 id
id


Beranda
Selamat datang di OY! Indonesia. Kami bertujuan untuk menjadi perusahaan money movement terdepan yang selalu menempatkan partner kami sebagai prioritas utama. Berbekal berbagai produk, seperti Terima Uang dan Kirim Uang, kami siap membantu pertumbuhan bisnis Anda melalui solusi pembayaran yang cepat dan aman.
Temukan Manfaat OY! Sesuai Bisnis Anda
Sesuaikan Produk dengan Kebutuhan Bisnis Anda
Kirim Uang - Multitransfer - API Kirim Uang - Transfer Internasional - Pembayaran Tagihan - Pengembalian Dana
Terima Uang - Link Pembayaran - Virtual Account Aggregator - E-Wallet Aggregator - Routing Pembayaran
Proses Pendaftaran
Proses pendaftaran dimulai dengan membuat akun secara gratis. Anda dapat mencoba produk dan fitur kami di mode demo, di mana Anda dapat melakukan transaksi dummy (tanpa menggunakan uang sungguhan).
Setelah berhasil membuat akun, jika Anda tertarik untuk melanjutkan menggunakan OY! untuk bisnis Anda, Anda diharuskan untuk memverifikasi bisnis Anda dengan mengirimkan pesyaratan dokumen yang diperlukan.
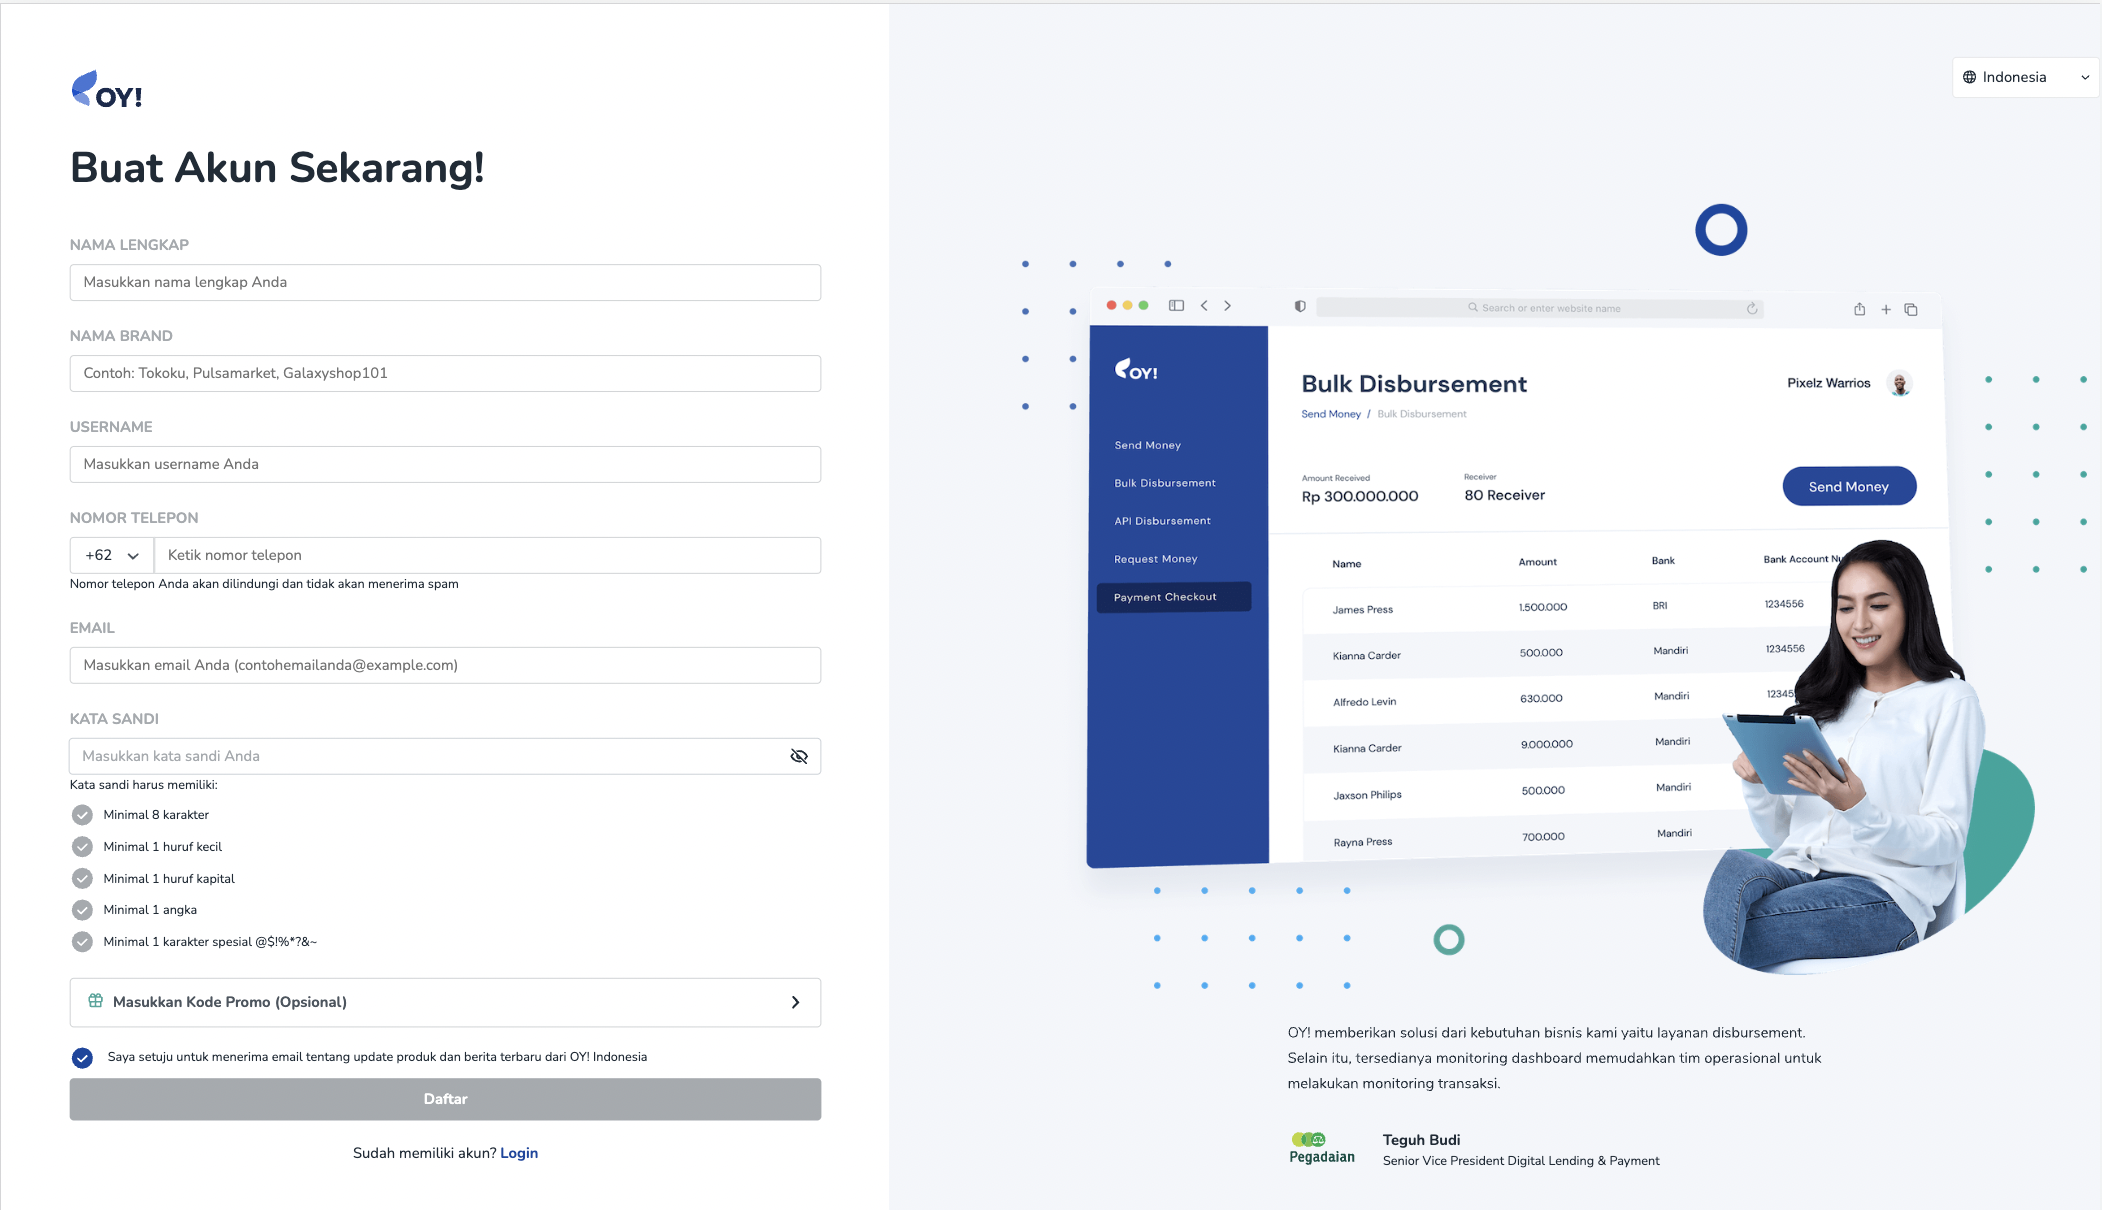
Cara Membuat Akun
Untuk membuat akun, ikuti langkah-langkah berikut:
- Daftar via website OY!: Untuk membuat akun, silakan daftar di sini, dan lengkapi formulir dengan semua informasi yang diperlukan.
Harap perhatikan bahwa username Anda tidak dapat diubah setelah formulir pendaftaran dikirimkan.
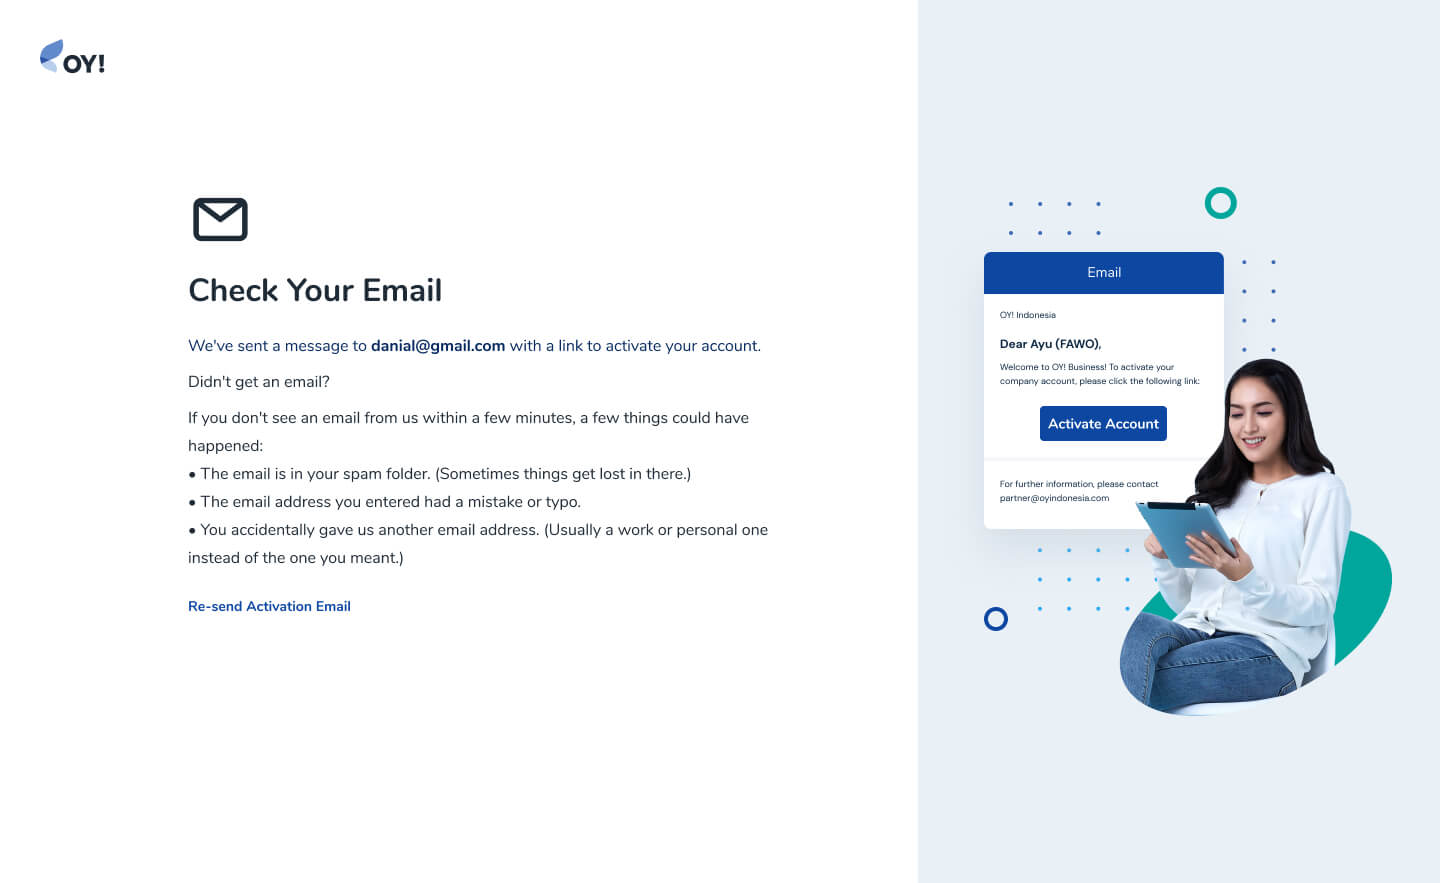
- Aktivasi akun Anda: Setelah formulir pendaftaran dikirimkan, sebuah link aktivasi akan dikirimkan ke email yang terdaftar. Setelah Anda berhasil masuk, Anda dapat mencoba produk kami di mode demo, di mana Anda dapat melakukan transaksi tanpa menggunakan uang sungguhan. Jika Anda ingin bertransaksi di mode production atau mengintegrasikan platform Anda dengan OY!, silakan baca langkah-langkah di bawah ini untuk memverifikasi akun Anda.
Setelah Anda berhasil masuk, Anda akan dapat mencoba produk kami di mode demo, di mana Anda dapat melakukan transaksi tanpa menggunakan uang sungguhan. Jika Anda siap melanjutkan, lihat bagian di bawah untuk informasi lebih lanjut tentang langkah-langkah untuk meng-upgrade akun Anda.
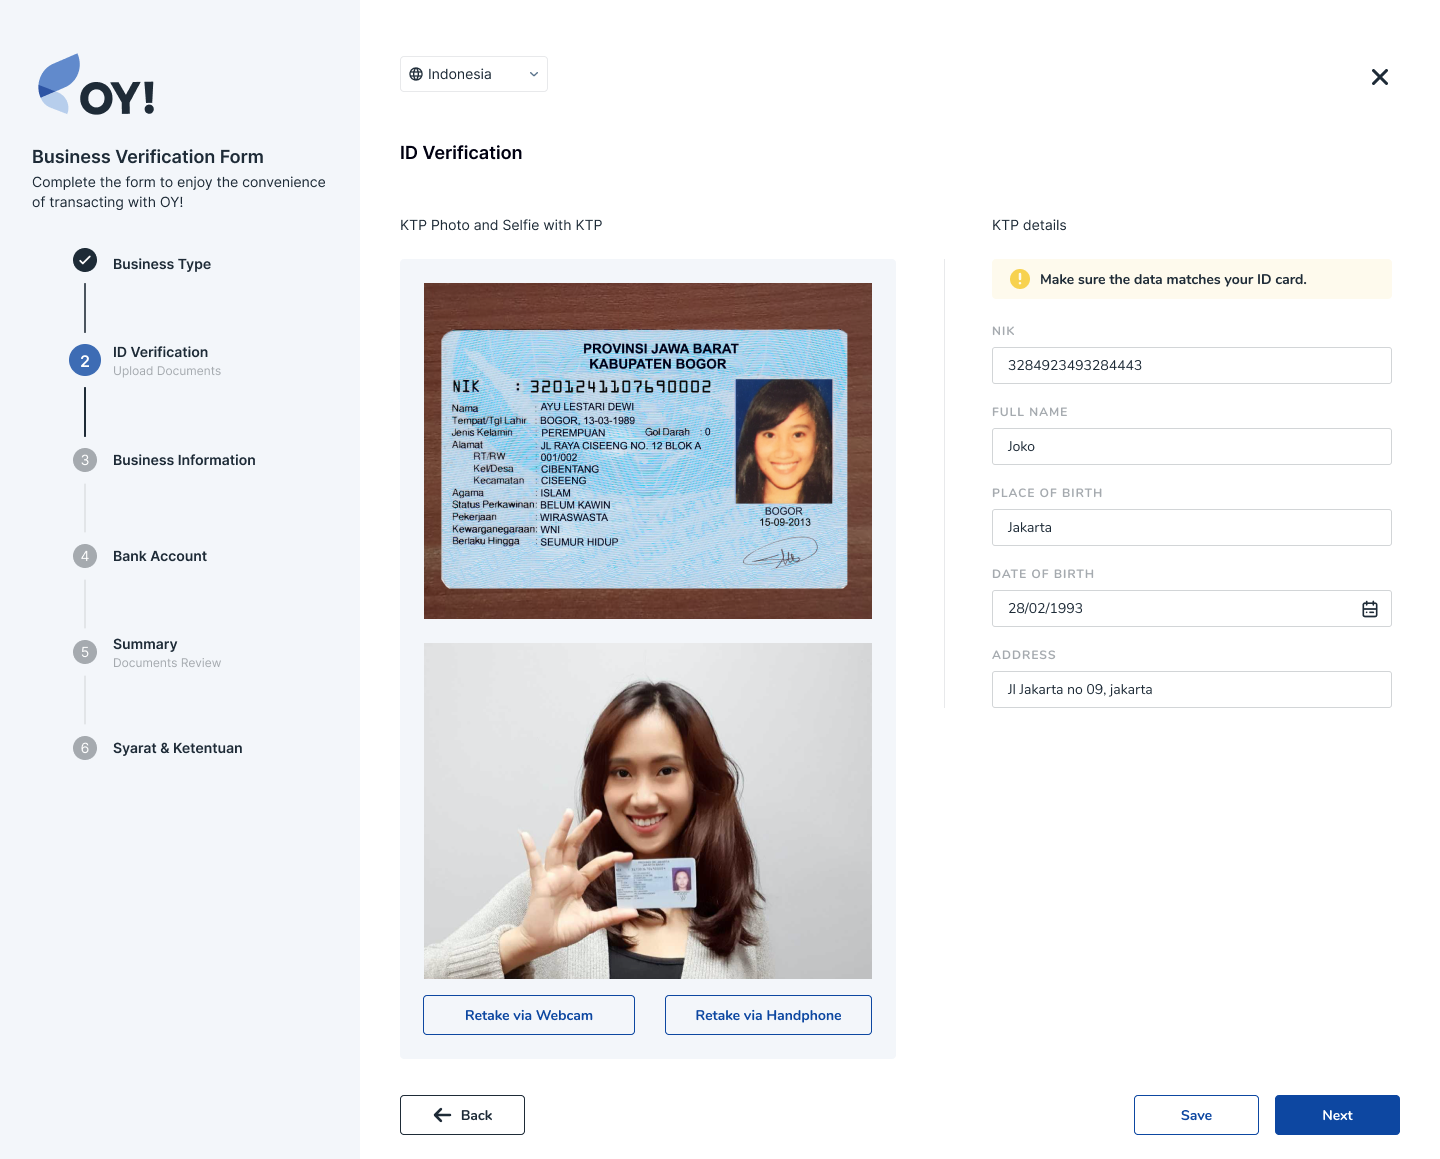
Verifikasi Bisnis Anda
Silakan ikuti langkah-langkah berikut untuk memverifikasi bisnis Anda:
- Lakukan permintaan verifikasi bisnis: Untuk mengakses semua produk OY!, silakan pilih "Verifikasi Bisnis" pada menu di sisi kiri dashboard OY! di mode Production dan lengkapi semua informasi yang diperlukan.
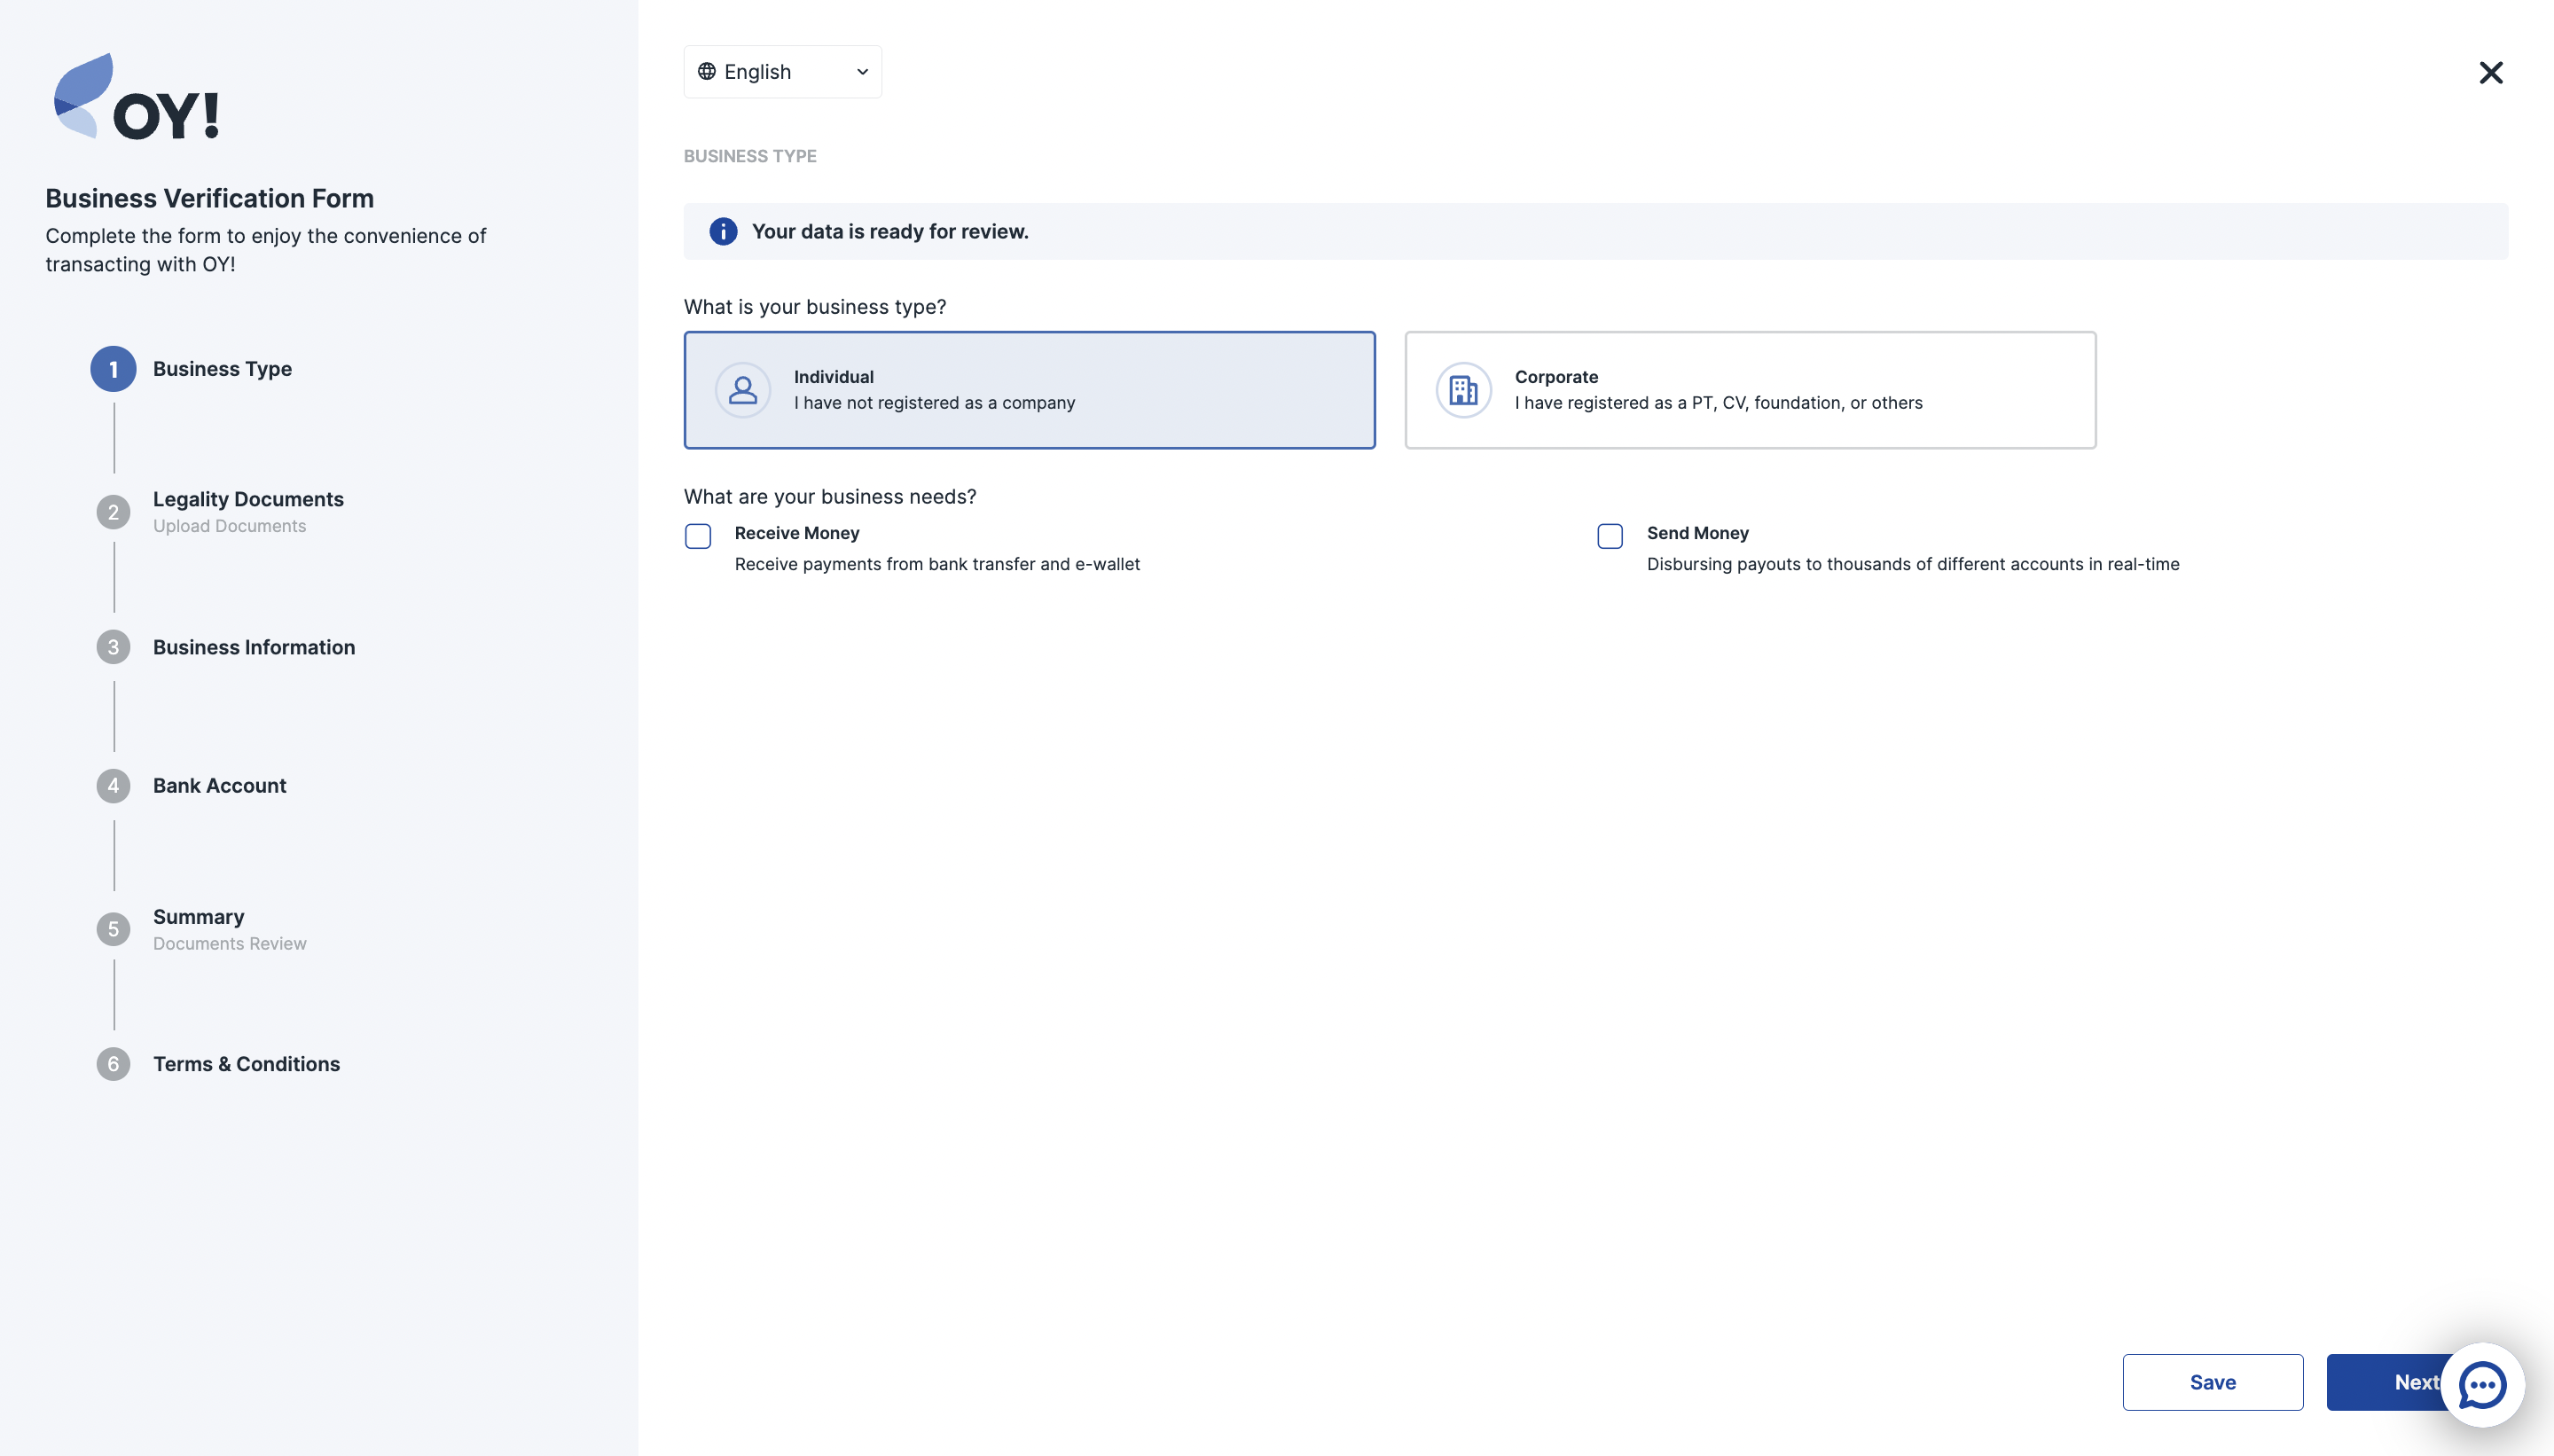
- Untuk tipe bisnis individual: Unggah KTP Anda untuk verifikasi identitas. Silakan ambil foto KTP dan foto selfie sambil memegang KTP. Sistem akan secara otomatis membaca informasi pada foto KTP Anda dan formulir otomatis terisi. Pastikan semua informasi yang tertera sesuai dengan KTP Anda.
Untuk tipe bisnis individual:
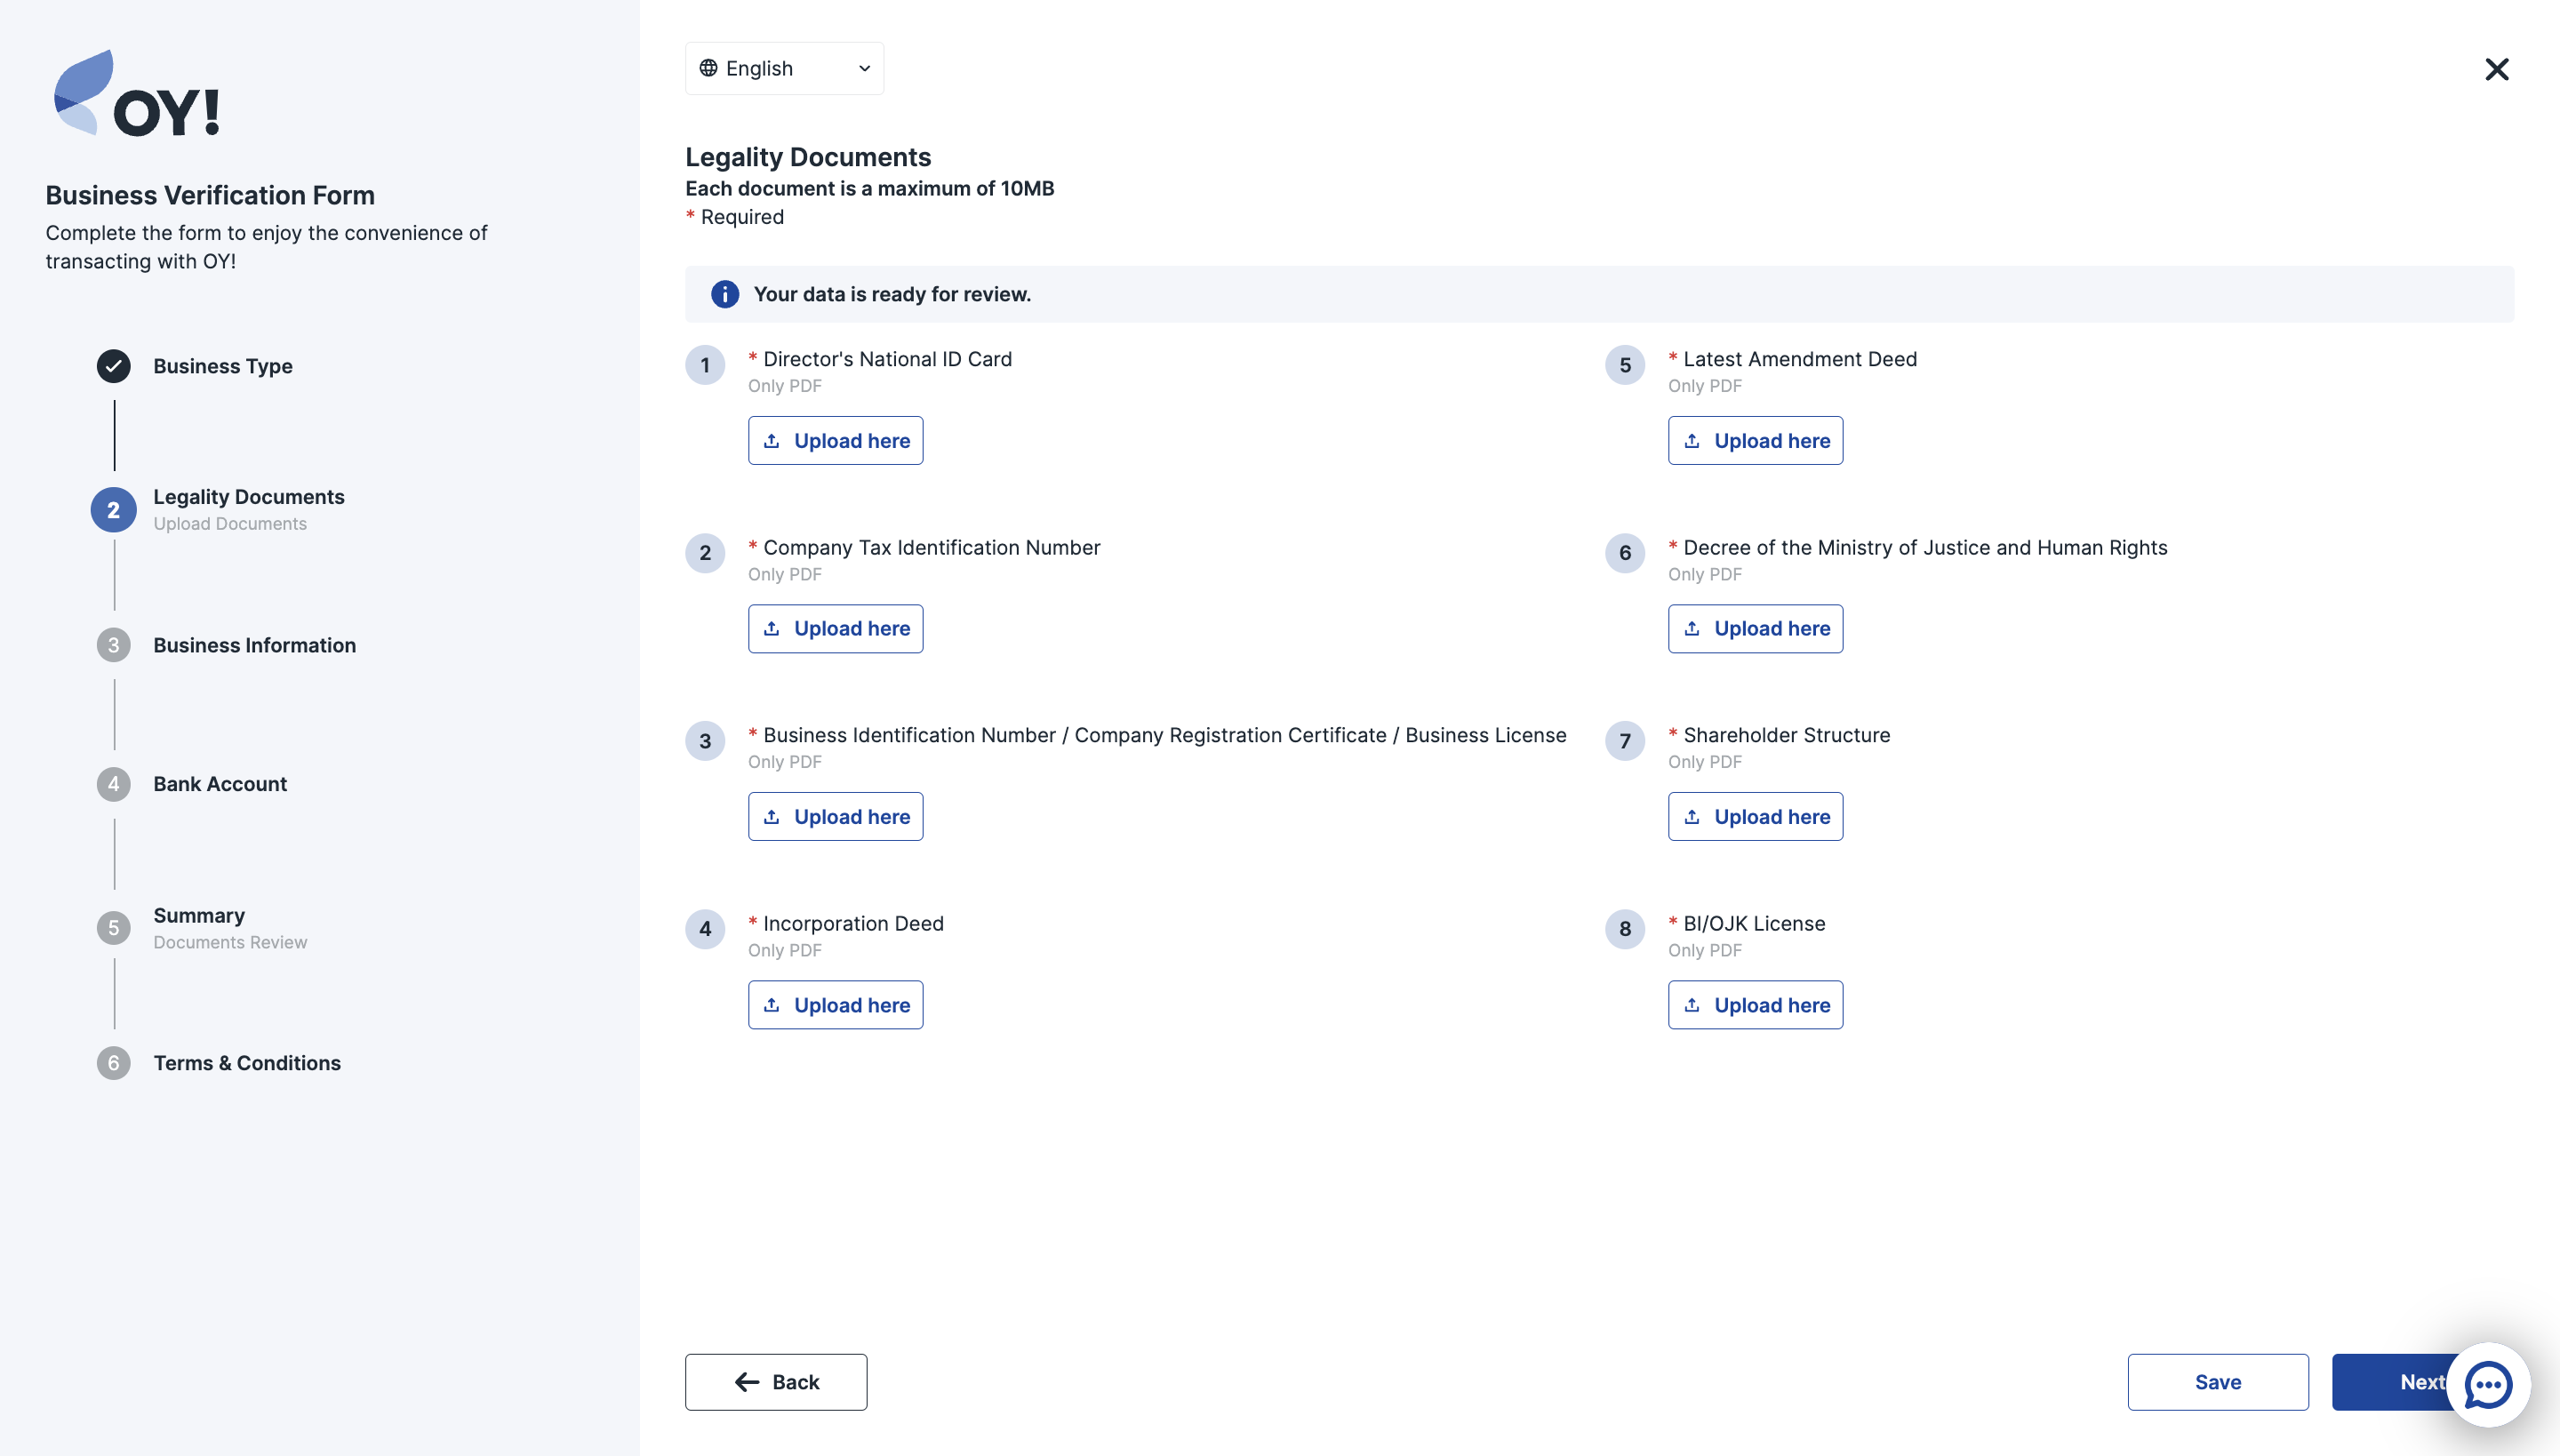
- Untuk tipe bisnis perusahaan: Unggah persyaratan dokumen. Kami akan meminta persyaratan dokumen yang berbeda untuk berbagai jenis entitas perusahaan. Setelah memilih jenis perusahaan Anda, kami akan memberitahu dokumen apa yang perlu Anda kirimkan.
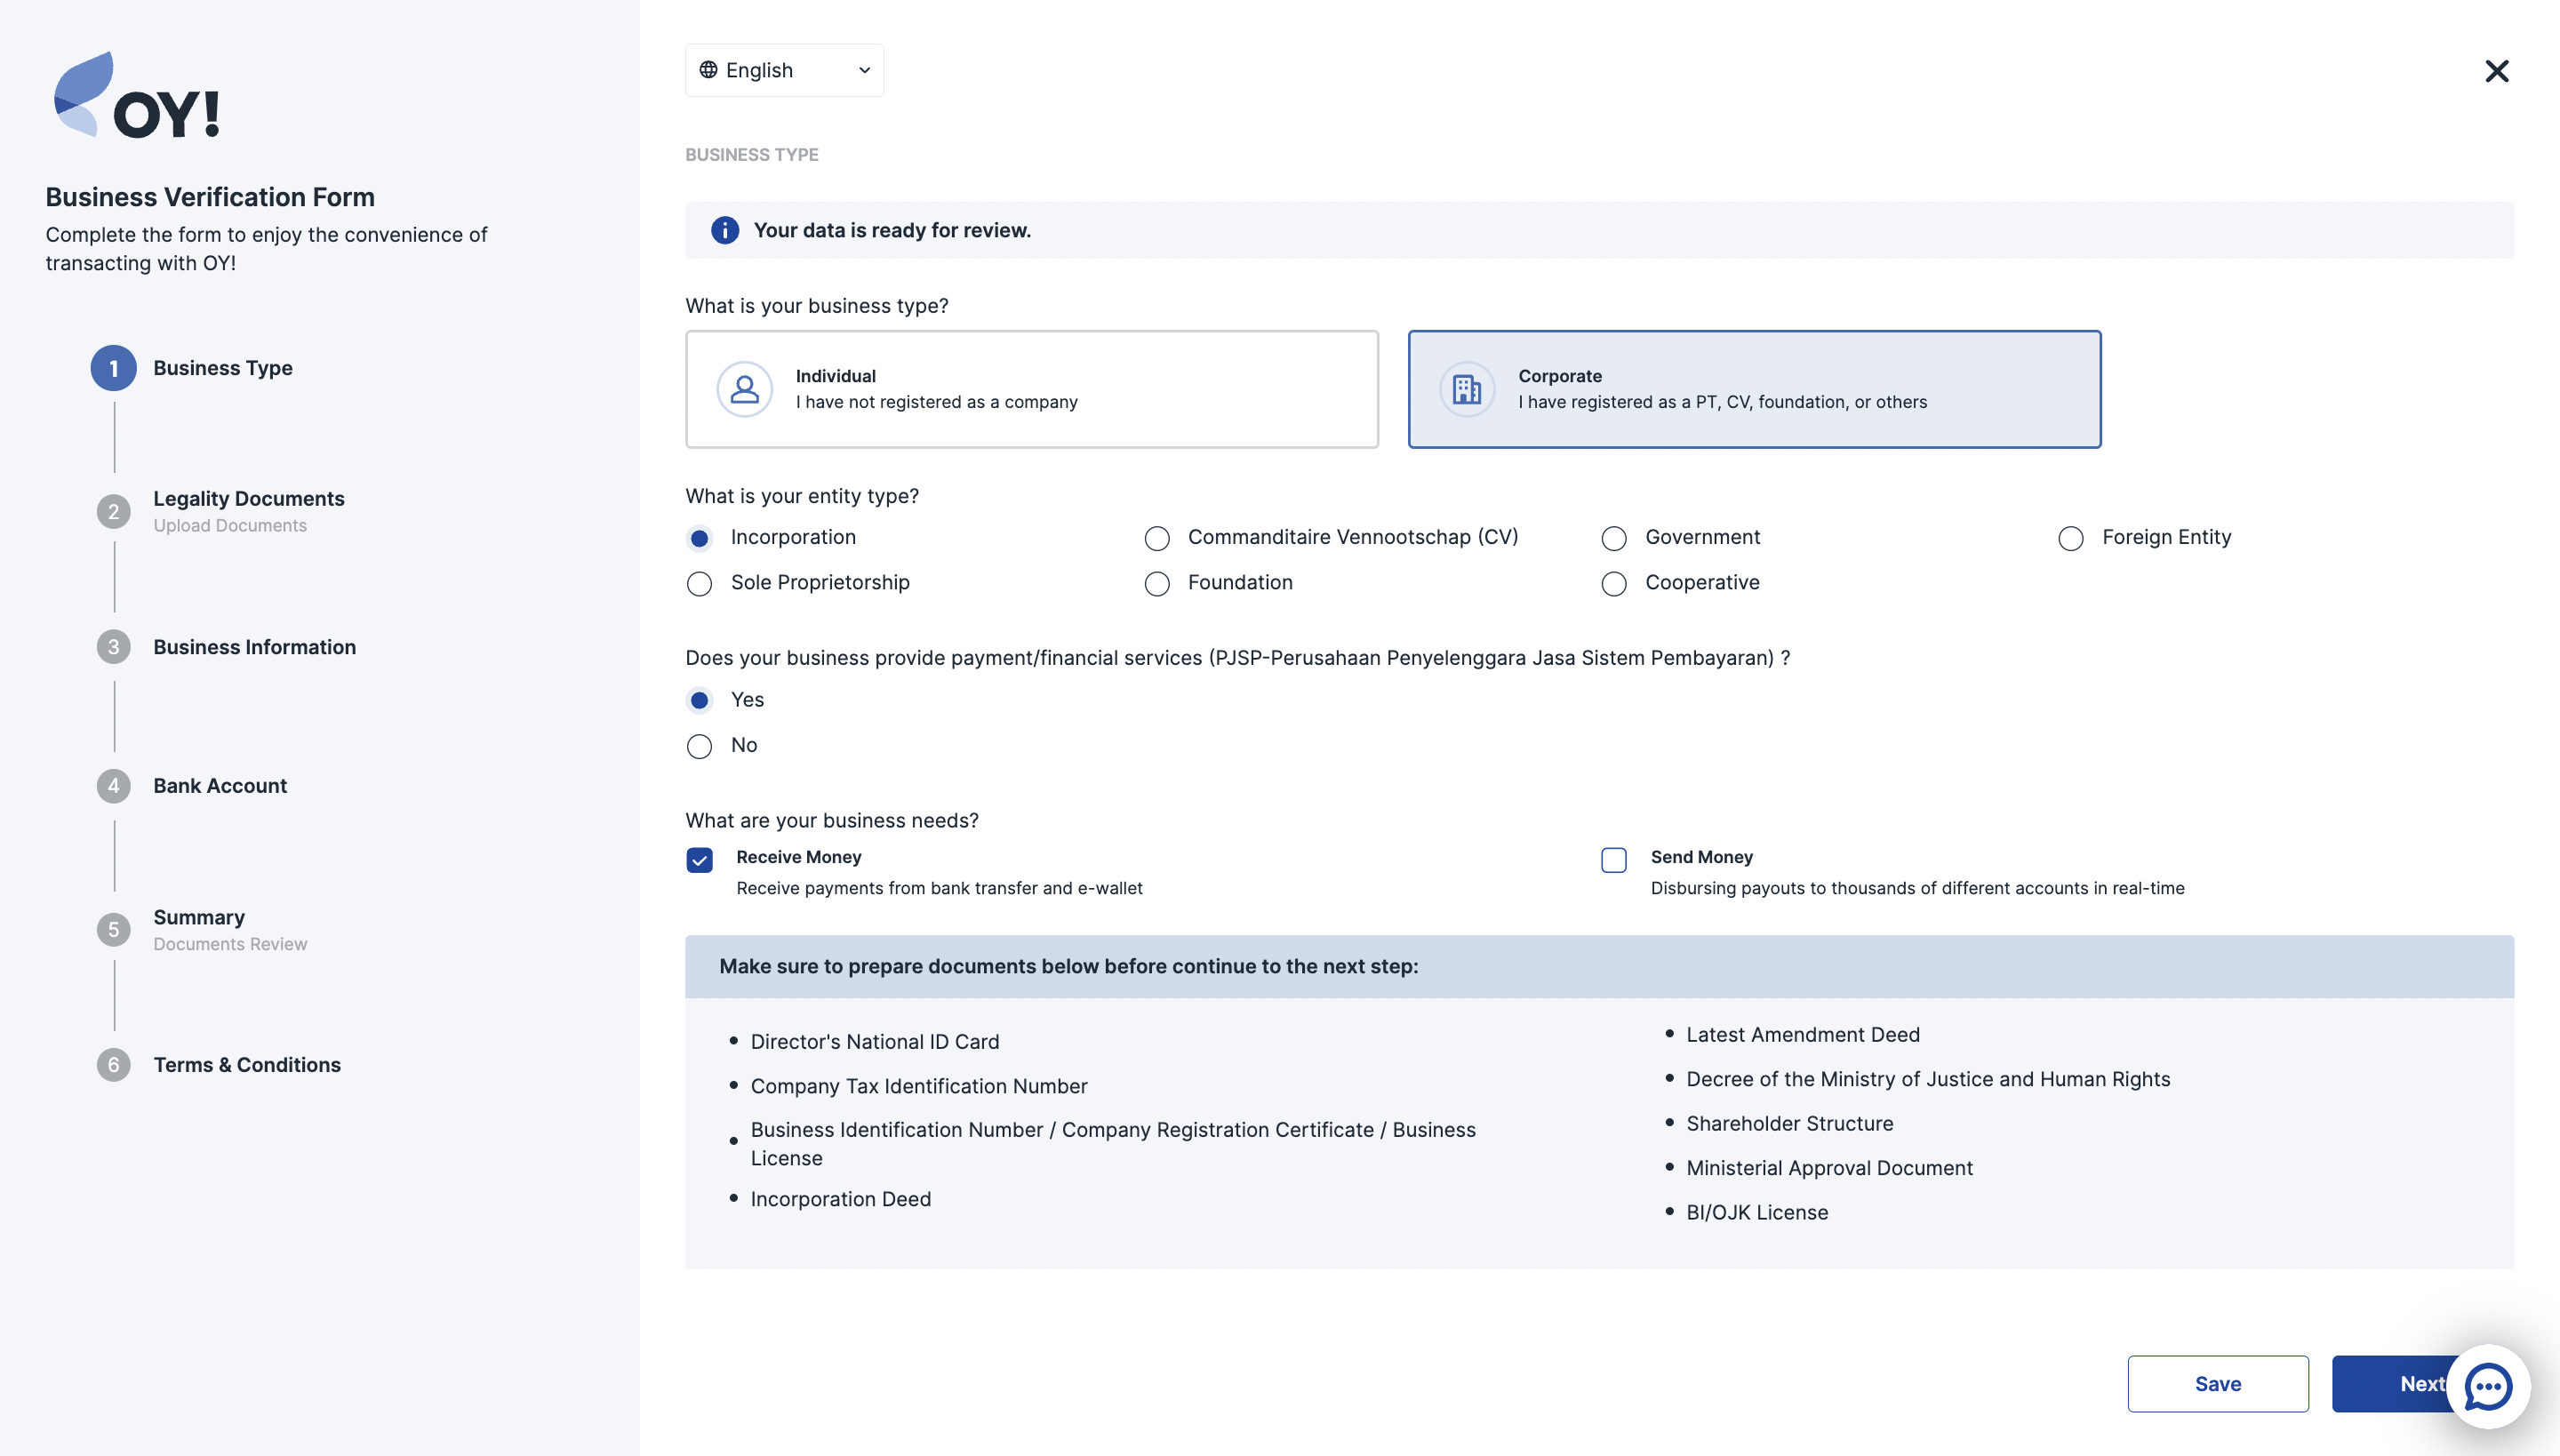
Silakan unggah dokumen yang diperlukan sesuai dengan tipe bisnis Anda. Dokumen yang diunggah harus dalam format PDF dan memiliki ukuran per dokumen kurang dari 10 MB.
Berikut adalah contoh dokumen yang harus diunggah perusahaan tipe bisnis penyelenggara jasa sistem pembayaran (PJSP)

Berikut adalah contoh dokumen yang harus diunggah perusahaan tipe bisnis non-PJSP

- Isi Formulir Informasi Bisnis: Berikan informasi lebih lanjut tentang bisnis Anda dengan mengisi formulir informasi. Harap perhatikan bahwa Anda tidak akan dapat mengubah informasi bisnis Anda ini dalam status Butuh Revisi.
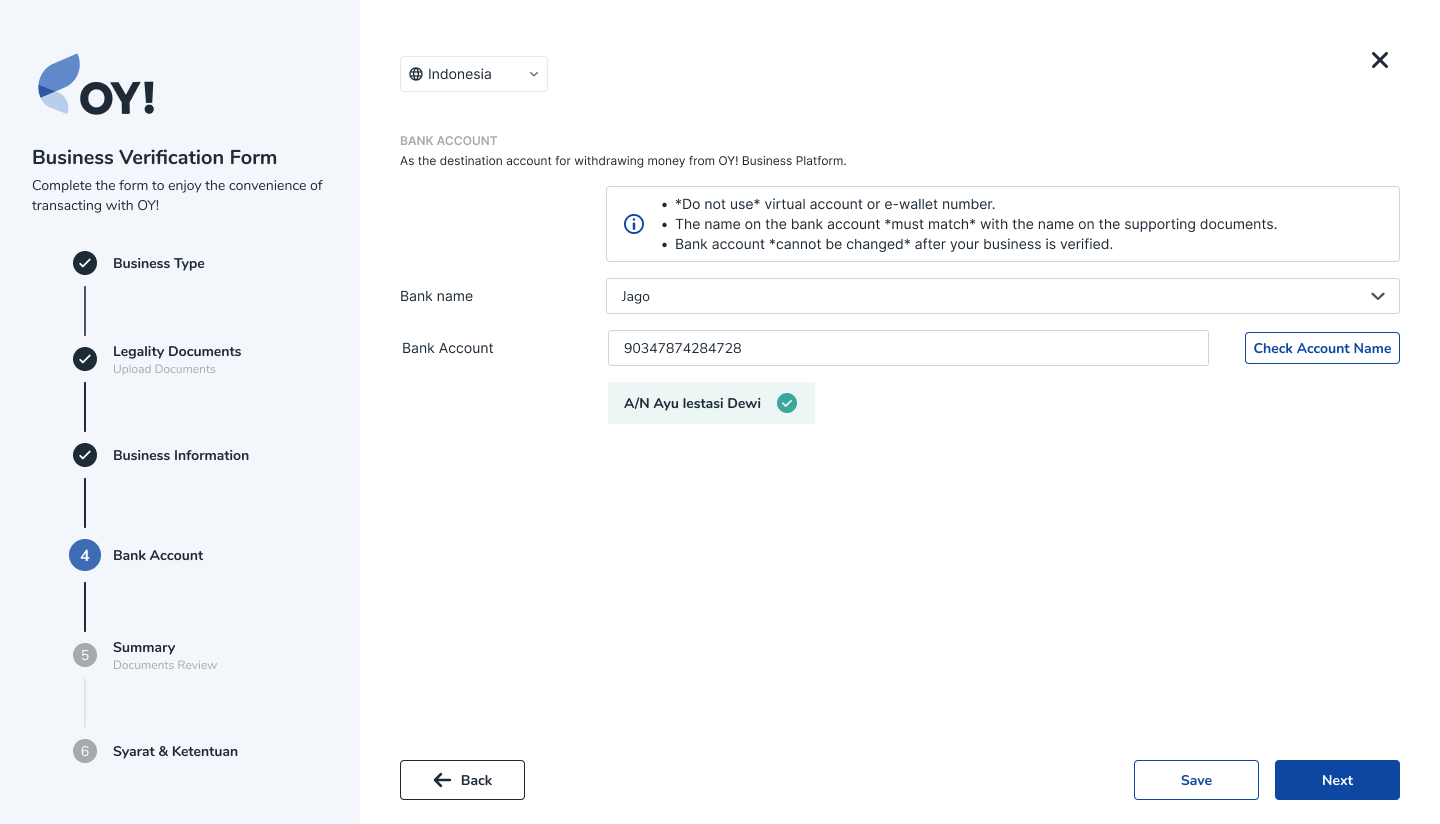
- Masukkan Nomor Rekening Bank Anda: Tambahkan Informasi Rekening Bank sebagai rekening tujuan untuk menarik uang dari Platform OY! Business.
Catatan: informasi rekening bank penerima tidak dapat diubah melalui dashboard OY! setelah permintaan verifikasi bisnis Anda disetujui karena alasan keamanan. Silakan hubungi kami di partner@oyindonesia.com untuk mengubah informasi rekening bank penerima.
- Kirimkan Permintaan Verifikasi Anda: Klik "Kirim", dan status "Menunggu Persetujuan" akan muncul di halaman utama, menandakan bahwa permintaan Anda telah diajukan.
Proses ini akan membutuhkan waktu sekitar 1-2 hari kerja. Jika status permintaan Anda adalah "Butuh Revisi" atau "Ditolak", silakan lanjutkan membaca. Jika tidak, Anda sudah siap untuk melanjutkan.
Status: Butuh Revisi
Setelah mengkaji permintaan verifikasi, tim kami mungkin meminta dokumen tambahan. Silakan ikuti langkah-langkah di bawah ini:
Baca laporan kami: Laporan hasil verifikasi akan dikirimkan ke email Anda mengenai informasi dan dokumen mana saja yang perlu direvisi atau ditambahkan.
Isi ulang formulir: Kami akan menunjukkan informasi dan dokumen mana yang perlu direvisi. Ketika mengajukan permintaan verifikasi bisnis lagi, harap kirimkan kembali semua pesyaratan dokumen Anda. Dokumen hanya diterima dalam format PDF dan harus berukuran kurang dari 10 MB.
Ajukan permintaan Anda: Klik "Kirim", dan status baru "Menunggu Persetujuan" akan muncul di halaman ini, menandakan bahwa permintaan Anda telah diajukan.
Harap perhatikan bahwa setelah 3 kali atau lebih proses revisi, Anda akan memerlukan waktu tunggu yang lebih lama untuk mengajukan permintaan verifikasi berikutnya. Kami akan memberi tahu Anda melalui email atau dashboard kapan Anda dapat melakukan pengajuan berikutnya.
Untuk pertanyaan lebih lanjut, silakan hubungi kami di partner@oyindonesia.com, tim kami akan menghubungi Anda.
Status: Ditolak
Untuk pertanyaan lebih lanjut mengenai status ini, silakan hubungi kami di partner@oyindonesia.com, tim kami akan menghubungi Anda.
Persyaratan Dokumen
Berikut adalah daftar persyaratan dokumen yang dibutuhkan untuk verifikasi bisnis berdasarkan tipe bisnis Anda:
Akun Individual
- Kartu Tanda Penduduk (KTP)
Akun Perusahaan Penyelenggara Jasa Sistem Pembayaran (PJSP)
- Nomor Pokok Wajib Pajak (NPWP) Perusahaan
- Surat Izin Usaha Perdagangan (SIUP)/ Tanda Daftar Perusahaan (TDP) / Nomor Induk Berusaha (NIB)
- SK Kemenhukam
- Akta Perubahan Terakhir Terlegalisir
- Akta Pendirian Perseroan Teregalisir
- KTP Direktur
- Struktur Pemegang Saham
- Lisensi BI/OJK
- Pengesahan Kementerian Terkait
Akun Perusahaan Non-PJSP
- Nomor Pokok Wajib Pajak (NPWP) Perusahaan
- Surat Izin Usaha Perdagangan (SIUP)/ Tanda Daftar Perusahaan (TDP) / Nomor Induk Berusaha (NIB)
- SK Kemenhukam
- Akta Perubahan Terakhir Terlegalisir
- Akta Pendirian Perseroan Teregalisir
- KTP Direktur
- Struktur Pemegang Saham
- Pengesahan Kementerian Terkait
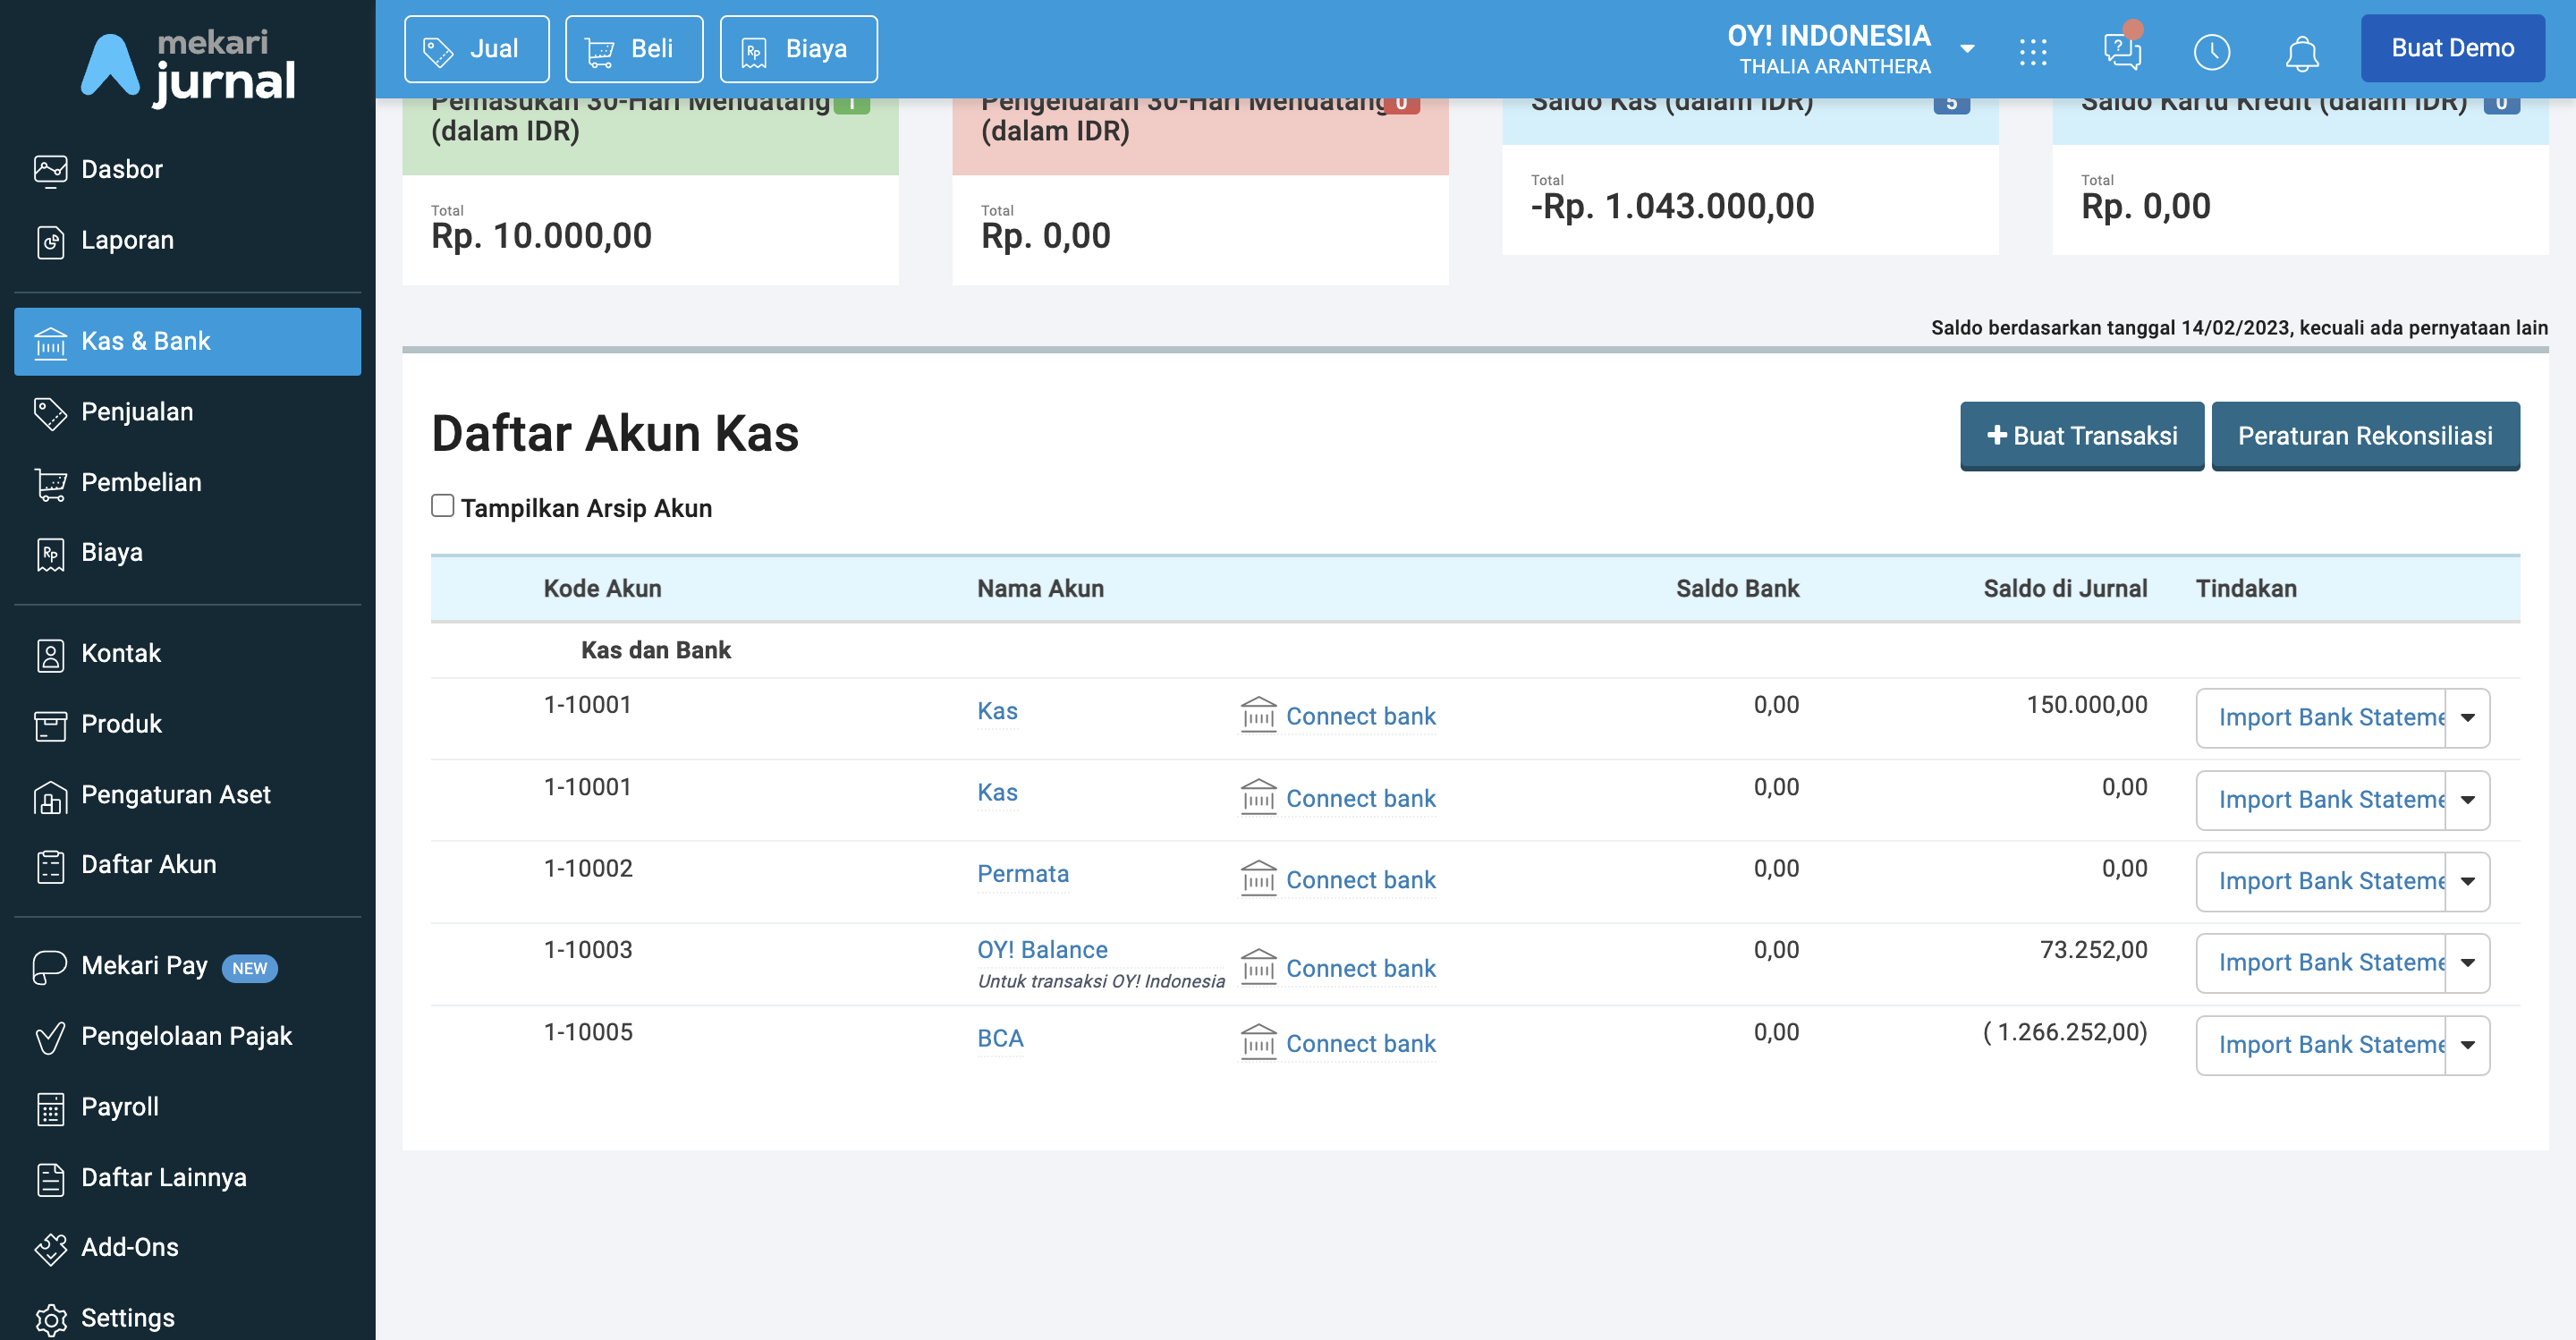
Mulai Bertransaksi
Sebelum bertransaksi atau melakukan integrasi menggunakan fitur OY!, pastikan Anda sudah melakukan hal-hal berikut:
- Buat akun OY! Indonesia
- Verifikasi bisnis Anda dengan mengunggah persyaratan dokumen
- Tunggu hingga akun Anda terverifikasi
- (Opsional) Jika Anda ingin menggunakan produk atau fitur API kami, silakan kirimkan IP dan URL callback (untuk production dan demo) ke perwakilan tim kami, atau ke partner@oyindonesia.com
- (Opsional) Jika Anda ingin menggunakan produk atau fitur API kami, Anda perlu meminta API Key untuk production dan demo ke perwakilan tim kami. Anda tidak diwajibkan untuk verifikasi bisnis jika ingin meminta API Key untuk demo, namun jika Anda ingin meminta API Key untuk production, Anda perlu memverifikasi bisnis Anda.
- (Opsional) Lakukan pengujian. Kami sarankan Anda untuk melakukan pengujian secara menyeluruh sebelum memulai bertransaksi. Kami telah menyediakan Mode demo di dashboard kami, di mana Anda dapat menguji transaksi untuk memahami bagaimana cara menggunakan produk kami tanpa menggunakan uang sungguhan. Jika Anda adalah seorang developer, Anda juga dapat menguji integrasi dengan platform Anda.
- (Opsional) Jika bisnis atau perusahaan Anda ingin menambah pengguna atau sub-akun, Anda dapat menggunakan fitur “Sub-Entity”
Selamat! Anda sudah dapat menikmati kemudahan bertransaksi menggunakan OY! Indonesia.
Tutorial Dashboard OY!
Masuk ke Dashboard
Untuk masuk ke dashboard OY!, lakukan langkah berikut:
- Akses halaman login di https://desktop-business.oyindonesia.com/login.
- Masukkan username dan password Anda.
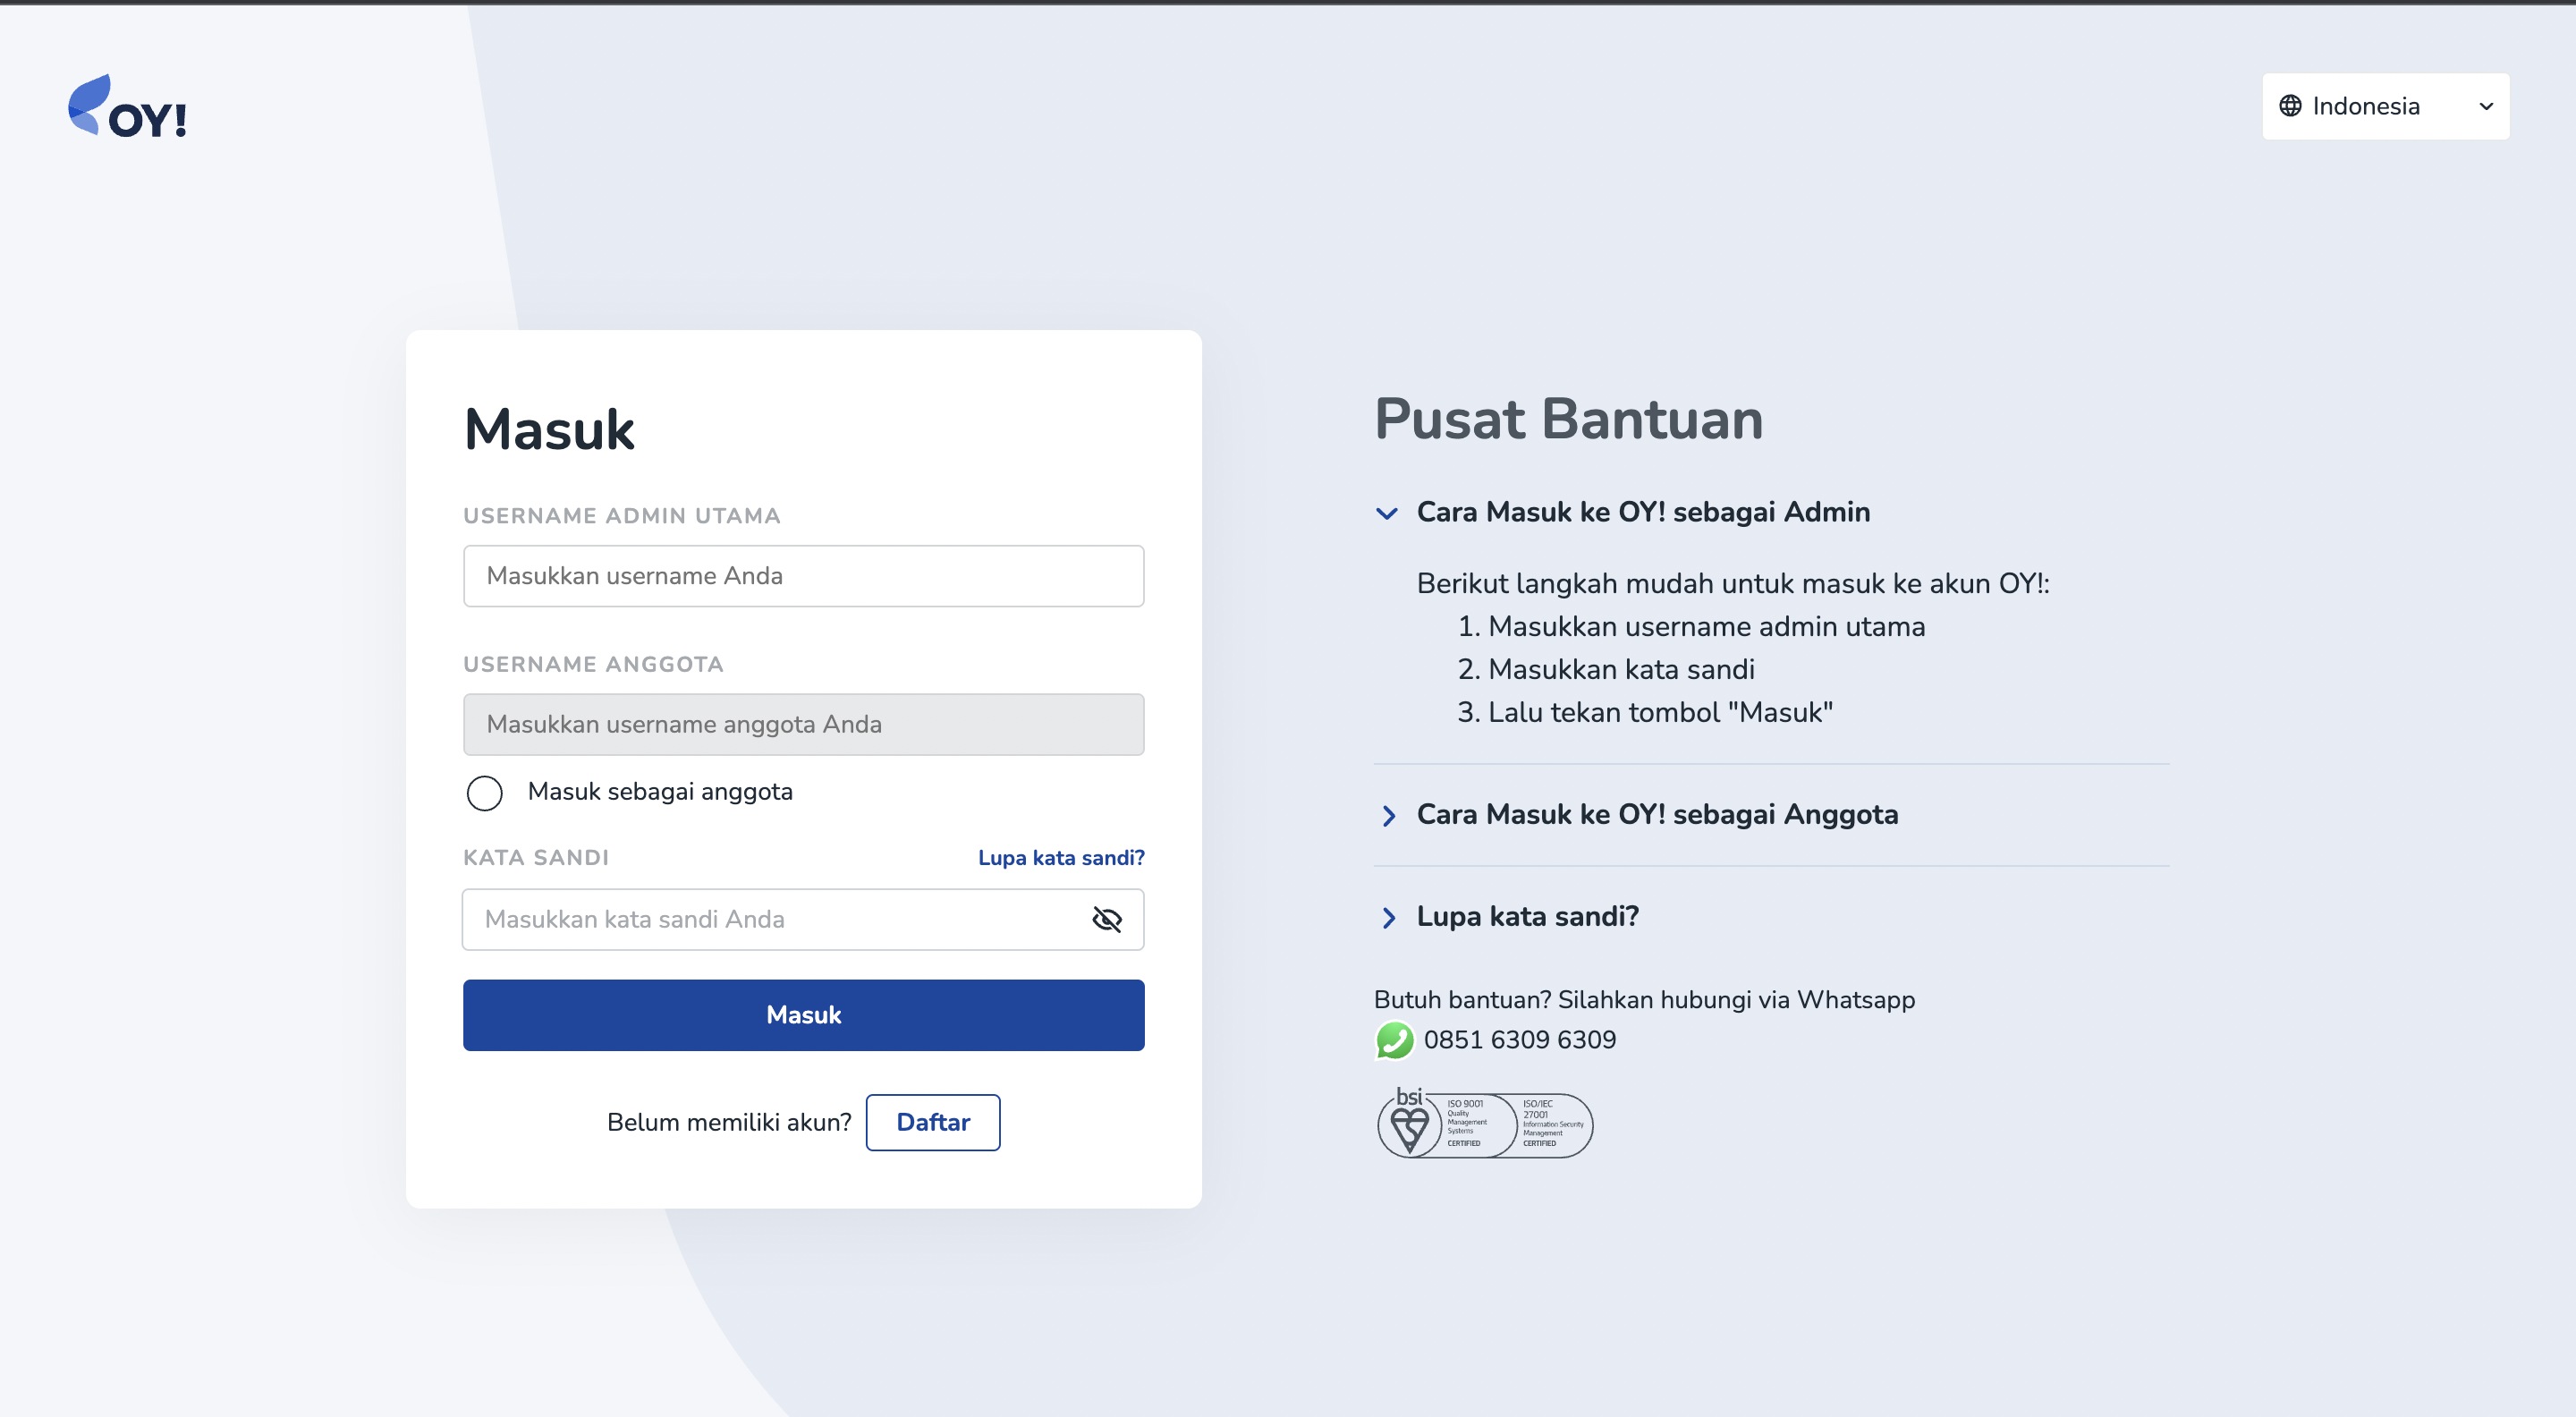
- Anda akan diarahkan untuk memasukkan kode OTP. Silakan cek inbox email yang terdaftar untuk mendapatkan kode OTP, lalu masukkan di kolom yang tersedia.
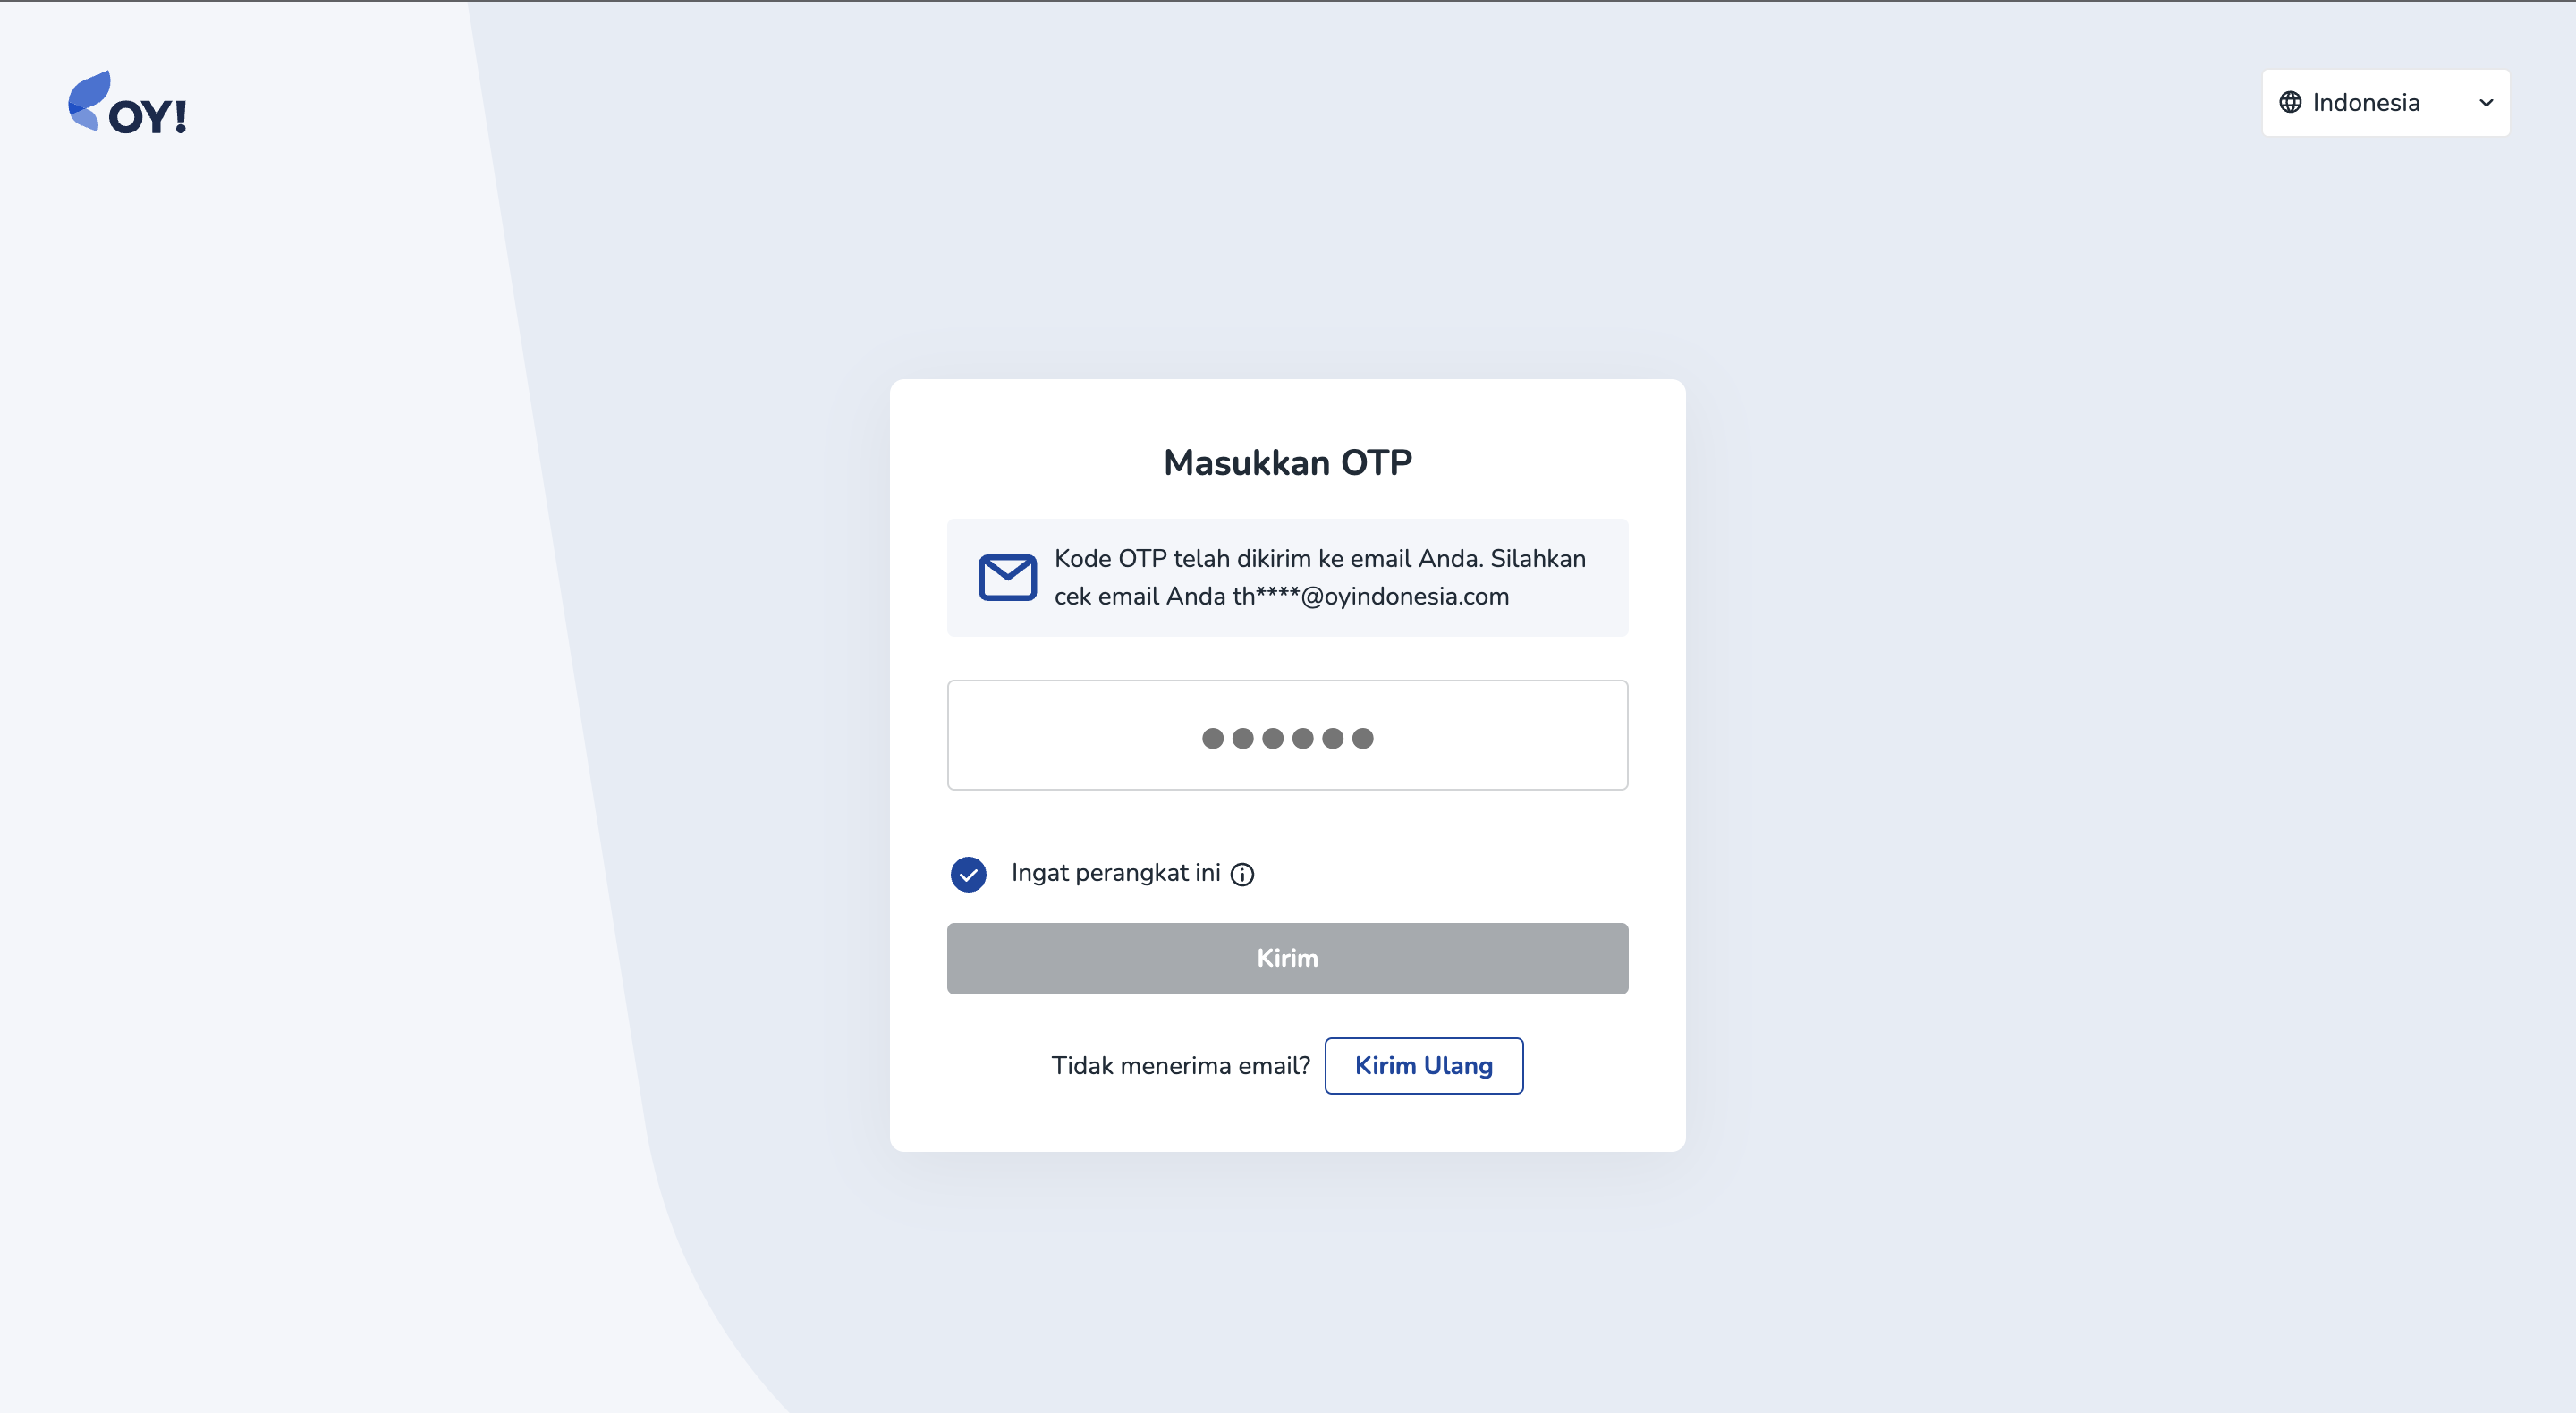

Jika Anda mencentang opsi “Ingat perangkat ini”, Anda tidak perlu memasukkan OTP saat Anda masuk kembali. Oleh karena itu, langkah ketiga hanya diperlukan saat Anda masuk untuk pertama kali setelah Anda membuat akun.
Analitik Transaksi
Fitur analitik pada dashboard OY! memberikan Anda informasi tentang transaksi pendapatan dan pengeluaran yang terjadi di OY!. Dengan fitur ini, Anda bisa tahu berapa banyak uang yang sudah Anda keluarkan dan berapa yang sudah Anda dapatkan dalam jangka waktu tertentu. Anda bisa melihat rincian transaksi Anda secara harian, mingguan, atau bulanan. Anda juga bebas memilih periode waktu yang Anda inginkan. Dari sini, Anda akan mendapatkan gambaran tentang bagaimana tren transaksi bisnis Anda bergerak. Dengan demikian, fitur ini dapat membantu Anda dalam mengambil keputusan bisnis baru guna mengembangkan bisnis Anda.
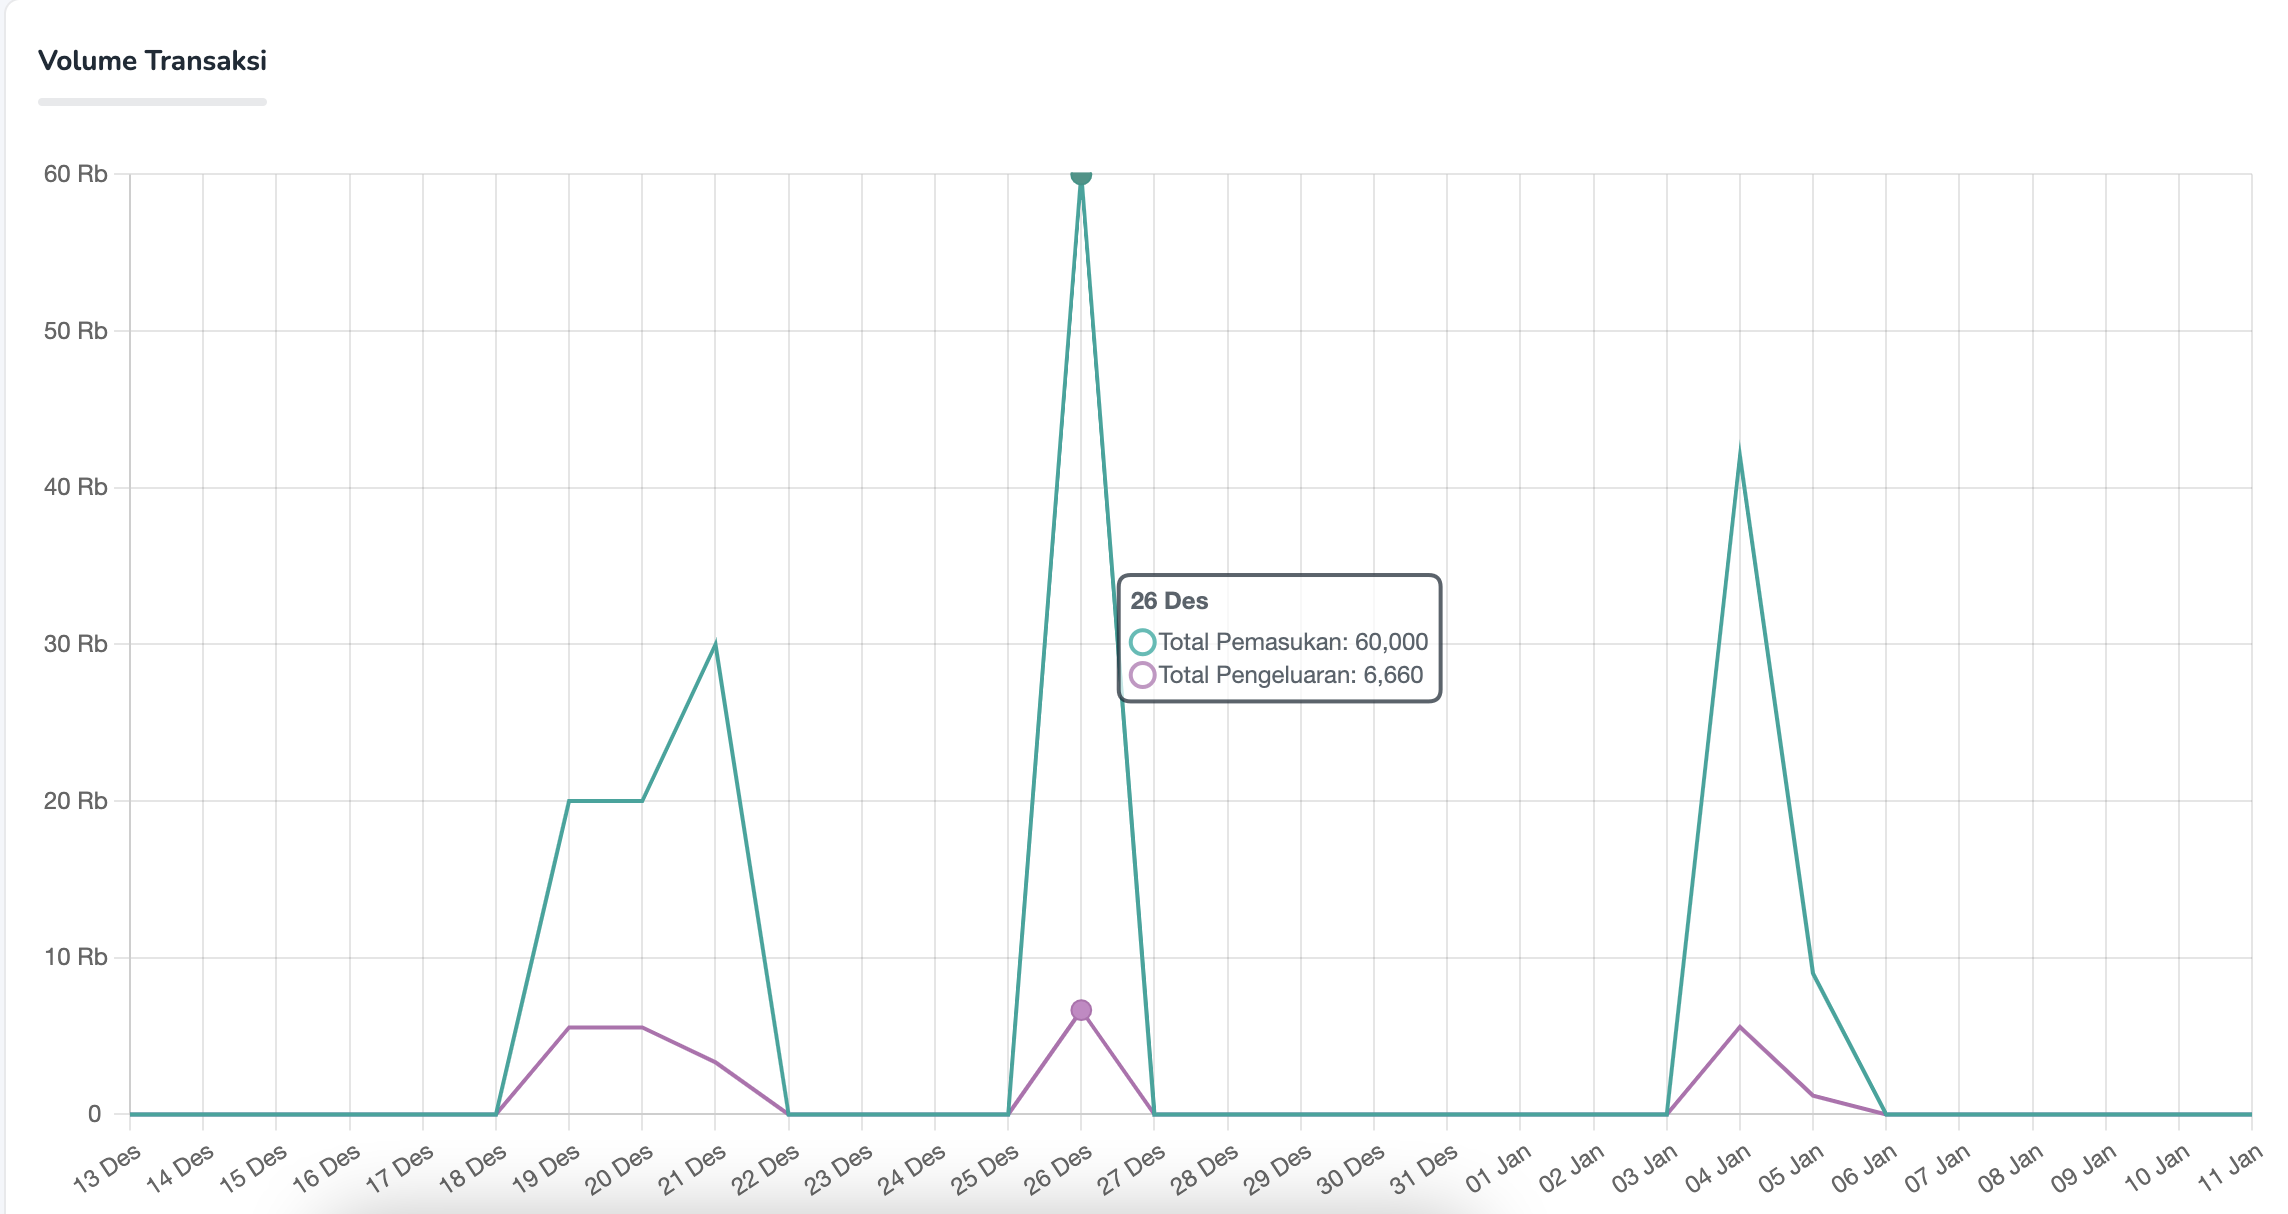
- Anda bisa pilih seberapa rinci dan dalam periode waktu berapa Anda ingin melihat informasi transaksi Anda.
- Indikator kenaikan dan penurunan akan membandingkan bagaimana transaksi Anda pada periode yang Anda pilih dengan periode sebelumnya.
- Jika Anda arahkan kursor ke suatu titik garis, jumlah volume transaksi akan muncul.
Bagi Anda yang menggunakan produk Virtual Account, Link Pembayaran, dan E-wallet, Anda bisa melihat perbandingan antar metode pembayaran yang digunakan oleh pelanggan Anda. Informasi ini bisa memberikan wawasan penting bagi Anda agar tahu metode pembayaran mana yang paling banyak digunakan oleh pelanggan Anda.

Manajemen Akun
Jika Anda memiliki peran Super Admin, Anda dapat menambahkan akun untuk anggota tim Anda dan menentukan peran untuk mereka.
Berikut adalah langkah-langkah berikut untuk menambahkan pengguna baru:
- Masuk ke dashboard OY!
- Klik menu Akun, kemudian klik “Manajemen Pengguna”
- Klik tombol “Tambah Pengguna” di sebelah kanan atas
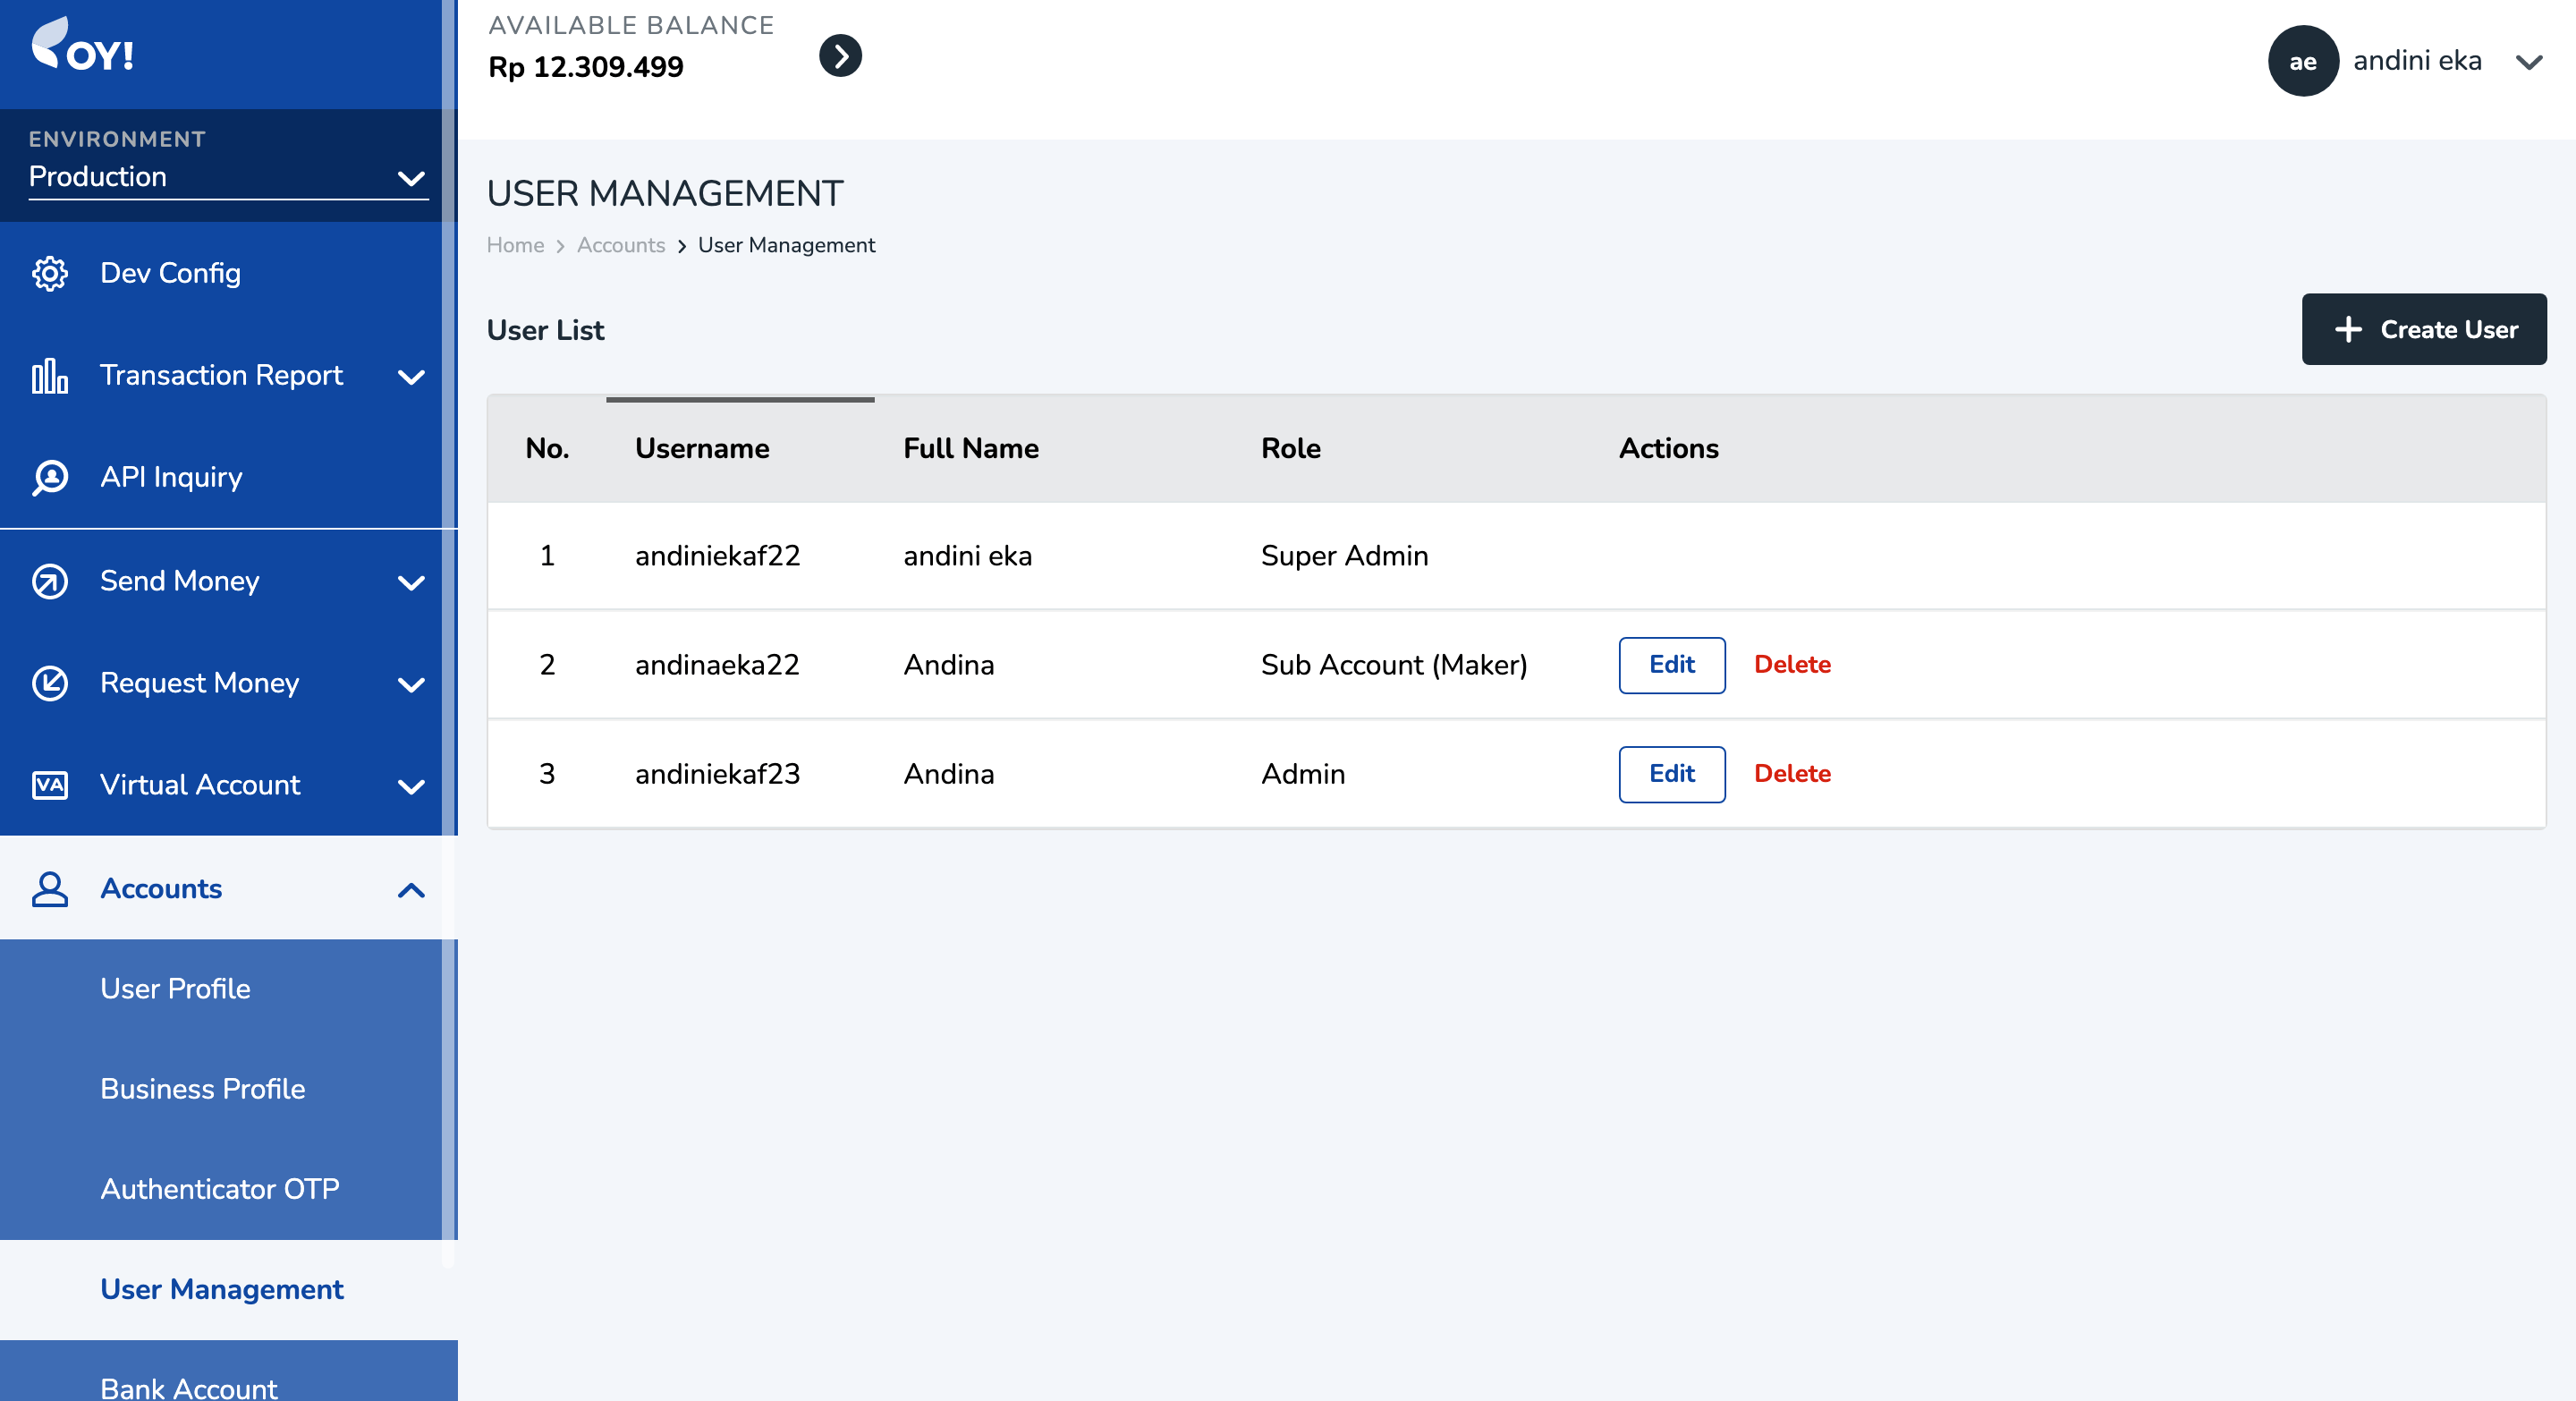
- Isi nama lengkap, username, email, nomor telepon (opsional), dan kata sandi
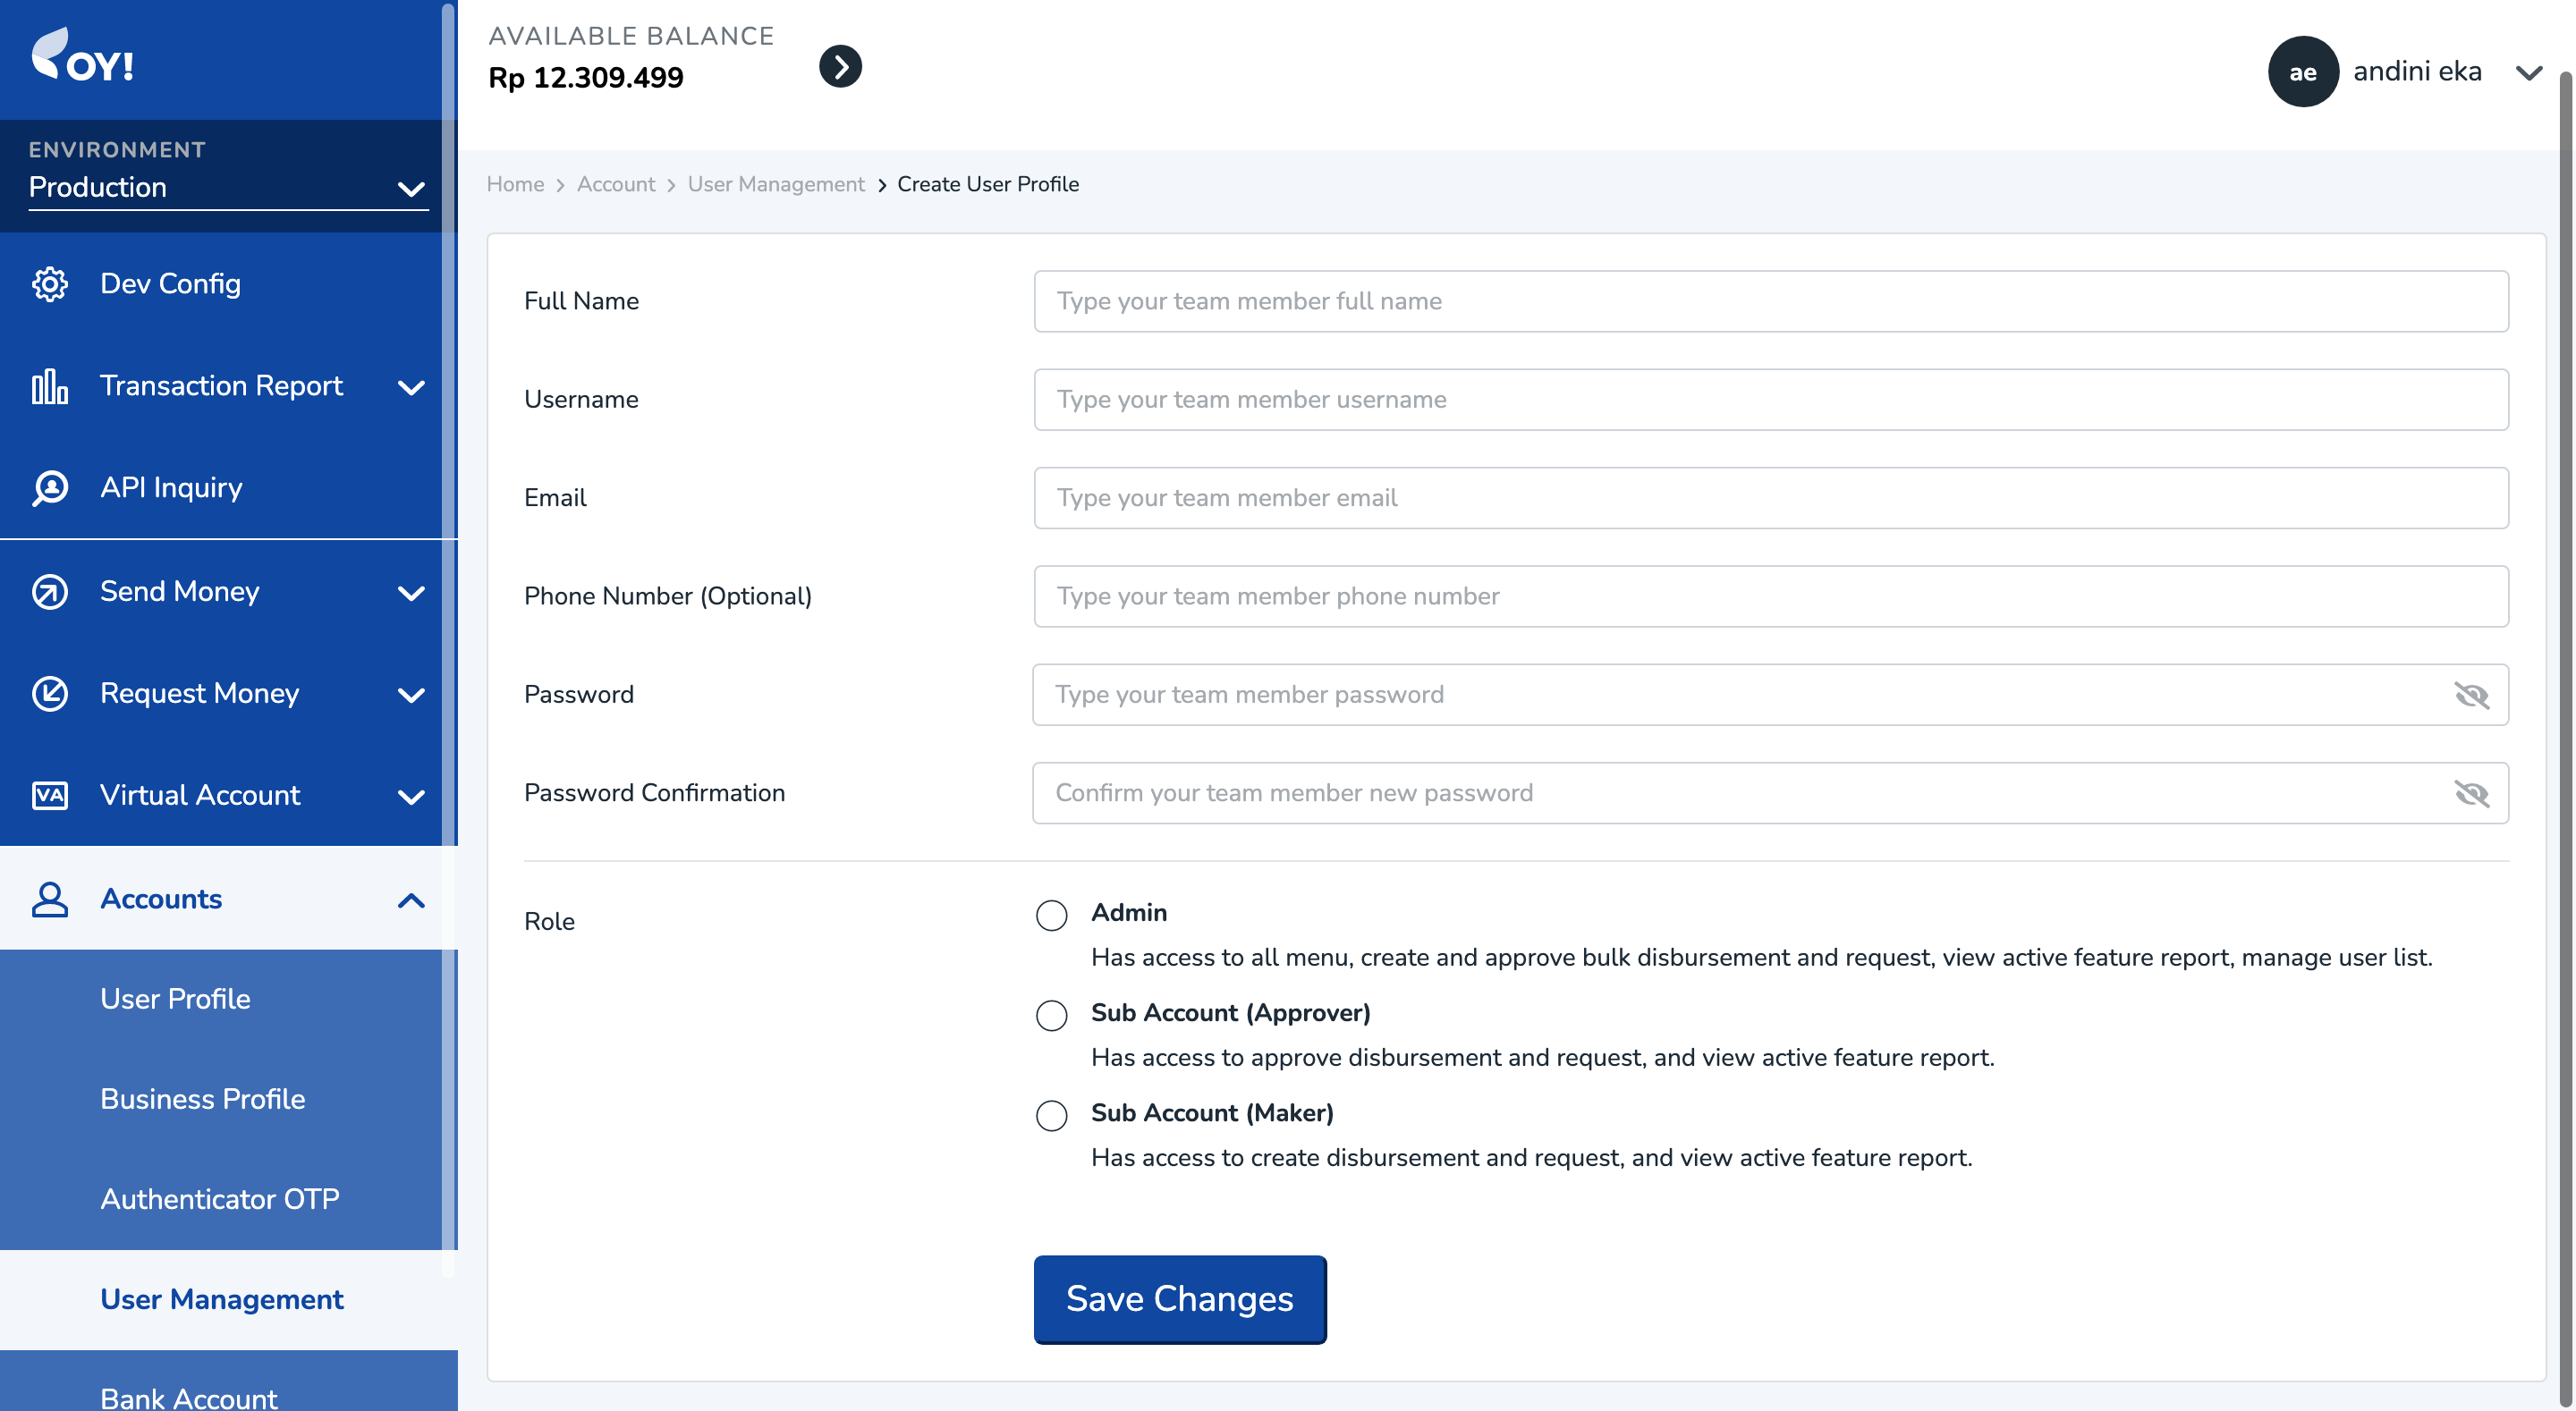
- Pilih peran yang ingin Anda berikan kepada anggota tim Anda. Anda dapat memilih antara Administrator, Approver, dan Maker
Selain menambahkan pengguna baru, Super Admin juga dapat mengubah informaasi dan menghapus pengguna yang sudah ada dengan mengklik tombol ubah/hapus pada tabel Daftar Pengguna.
Berikut adalah daftar kontrol akses di dashboard OY! berdasarkan peran:
| Akses | Superadmin | Admin | Approver | Maker |
|---|---|---|---|---|
| Verifikasi Akun | Bisa mengajukan | Bisa mengajukan | - | - |
| Analitik | Bisa melihat | Bisa melihat | Bisa melihat | Bisa melihat |
| Laporan Transaksi | Bisa melihat dan mengunduh | Bisa melihat dan mengunduh | Bisa melihat dan mengunduh | Bisa melihat dan mengunduh |
| Laporan Penyelesaian | Bisa melihat dan mengunduh | Bisa melihat dan mengunduh | Bisa melihat dan mengunduh | Bisa melihat dan mengunduh |
| Isi Saldo | Bisa mengisi saldo | Bisa mengisi saldo | Bisa mengisi saldo | Bisa mengisi saldo |
| Tarik Saldo | Bisa menarik saldo | Bisa menarik saldo | Bisa menarik saldo | Bisa menarik saldo |
| Tambah Pengguna | Bisa menambahkan | Bisa menambahkan | - | - |
| Profil Pengguna | Bisa melihat dan mengedit | Bisa melihat dan mengedit | Bisa melihat dan mengedit | Bisa melihat dan mengedit |
| Profil Bisnis | Bisa melihat dan mengedit | Bisa melihat dan mengedit | Bisa melihat dan mengedit | Bisa melihat dan mengedit |
| Authenticator OTP | Punya akses | Punya akses | Punya akses | Punya akses |
| Tambah Metode Pembayaran | Bisa menambahkan | Bisa menambahkan | - | - |
| Laporan Otomatis | Bisa mengatur | Bisa mengatur | - | - |
| Tarik Saldo Otomatis | Bisa mengatur | Bisa mengatur | - | - |
| Multi Approval | Bisa mengatur | Bisa mengatur | - | - |
| Pengaturan Notifikasi | Bisa mengatur | Bisa mengatur | - | - |
| Opsi Developer | Bisa mengatur | Bisa mengatur | - | - |
| Tambah Kategori Transaksi | Bisa menambahkan | Bisa menambahkan | - | - |
| Pengaturan Bukti Transaksi | Bisa mengatur | Bisa mengatur | Bisa mengatur | Bisa mengatur |
Multi Entity Managementy
| Akses | Superadmin | Admin | Approver | Maker |
|---|---|---|---|---|
| Membuat Sub-entit | Bisa membuat | Bisa membuat | - | - |
| Isi ulang saldo Sub-entity | Bisa mengisi saldo | Bisa mengisi saldo | - | - |
| Memutus Sub-entity | Bisa memutus | Bisa memutus | - | - |
Produk Multitransfer
| Akses | Superadmin | Admin | Approver | Maker |
|---|---|---|---|---|
| Buat transaksi | Bisa membuat | Bisa membuat | - | Bisa membuat |
| Menyetujui transaksi | Bisa menyetujui | Bisa menyetujui | Bisa menyetujui | - |
| Melihat dan mengunduh laporan transaksi | Bisa melihat dan mengunduh | Bisa melihat dan mengunduh | Bisa melihat dan mengunduh | Bisa melihat dan mengunduh |
Produk Pengembalian Dana
| Akses | Superadmin | Admin | Approver | Maker |
|---|---|---|---|---|
| Buat pengembalian dana | Bisa membuat | Bisa membuat | - | Bisa membuat |
| Menyetujui pengembalian dana | Bisa menyetujui | Bisa menyetujui | Bisa menyetujui | - |
| Melihat dan mengunduh laporan transaksi | Bisa melihat dan mengunduh | Bisa melihat dan mengunduh | Bisa melihat dan mengunduh | Bisa melihat dan mengunduh |
Produk Invoice Pembelian
| Akses | Superadmin | Admin | Approver | Maker |
|---|---|---|---|---|
| Buat invoice | Bisa membuat | Bisa membuat | - | Bisa membuat |
| Menyetujui invoice | Bisa menyetujui | Bisa menyetujui | Bisa menyetujui | - |
| Melihat dan mengunduh laporan invoice | Bisa melihat dan mengunduh | Bisa melihat dan mengunduh | Bisa melihat dan mengunduh | Bisa melihat dan mengunduh |
Produk Link Pembayaran
| Akses | Superadmin | Admin | Approver | Maker |
|---|---|---|---|---|
| Membuat Link Pembayaran | Bisa membuat | Bisa membuat | Bisa membuat | Bisa membuat |
| Melihat dan mengunduh laporan link pembayaran | Bisa melihat dan mengunduh | Bisa melihat dan mengunduh | Bisa melihat dan mengunduh | Bisa melihat dan mengunduh |
Produk Virtual Account
| Akses | Superadmin | Admin | Approver | Maker |
|---|---|---|---|---|
| Membuat VA via dashboard | Bisa membuat | Bisa membuat | Bisa membuat | Bisa membuat |
| Melihat dan mengunduh laporan VA | Bisa melihat dan mengunduh | Bisa melihat dan mengunduh | Bisa melihat dan mengunduh | Bisa melihat dan mengunduh |
E-Wallet Aggregator
| Akses | Superadmin | Admin | Approver | Maker |
|---|---|---|---|---|
| Melihat dan mengunduh laporan E-Wallet | Bisa melihat dan mengunduh | Bisa melihat dan mengunduh | Bisa melihat dan mengunduh | Bisa melihat dan mengunduh |
Produk Invoice Penjualan
| Akses | Superadmin | Admin | Approver | Maker |
|---|---|---|---|---|
| Buat invoice | Bisa membuat | Bisa membuat | Bisa membuat | Bisa membuat |
| Melihat dan mengunduh laporan invoice | Bisa melihat dan mengunduh | Bisa melihat dan mengunduh | Bisa melihat dan mengunduh | Bisa melihat dan mengunduh |
Inquiry API
| Akses | Superadmin | Admin | Approver | Maker |
|---|---|---|---|---|
| Melihat dan mengunduh laporan Inquiry API | Bisa melihat dan mengunduh | Bisa melihat dan mengunduh | Bisa melihat dan mengunduh | Bisa melihat dan mengunduh |
API Transaksi Data
| Akses | Superadmin | Admin | Approver | Maker |
|---|---|---|---|---|
| Melihat dan mengunduh laporan API Transaksi Data | Bisa melihat dan mengunduh | Bisa melihat dan mengunduh | Bisa melihat dan mengunduh | Bisa melihat dan mengunduh |
2-Factor Authentication
Untuk meningkatkan keamanan akun Anda, Anda bisa mengaktifkan 2-Factor Authentication. Saat ini, OY menyediakan metode keamanan ini melalui aplikasi authenticator. Berikut adalah langkah-langkahnya:
- Masuk ke dashboard OY!
- Pilih menu Akun -> Authenticator OTP
- Unduh aplikasi authenticator di handphone Anda (dari Play Store/App Store) atau PC (Anda bisa unduh ekstensi untuk brower Anda). Contoh aplikasi Authenticator: Google Authenticator, Microsoft Authenticator, Authy
- Scan QR code yang terlihat di dahsboard dengan aplikasi Authenticator Anda atau masukkan kunci pengaturan yang ada di sampingnya ke Aplikasi Authenticator Anda
- Ketik 6 digit kode yang muncul di aplikasi Authenticator Anda ke dalam kolom “Authenticator OTP”
Mengisi Saldo OY!
Berikut adalah langkah-langkah untuk mengisi ulang saldo OY! Anda melalui dashboard:
- Masuk ke dashboard OY!
- Pergi ke menu “Laporan Transaksi” lalu pilih “Laporan Transaksi Rekening”
- Klik tombol “Bagaimana Cara Isi Ulang”. Ada 2 cara untuk menambah saldo akun OY! Anda:
Isi Ulang via Virtual Account
Anda bisa melihat nomor VA di tab 'Virtual Account' setelah Anda mengklik tombol 'Bagaimana Cara Isi Ulang'. Jumlah saldo yang Anda isi akan otomatis masuk ke akun Anda secara real-time tanpa perlu mengirim konfirmasi manual ke OY.

Isi Ulang Manual via Transfer Bank
Selain menggunakan Virtual Account, Anda juga dapat mentransfer ke rekening giro OY. Jika Anda memilih untuk isi ulang saldo melalui metode ini, Anda perlu melakukan konfirmasi manual agar uang Anda dapat diteruskan ke akun Anda.
Setelah Anda menyelesaikan transfer dana ke OY! Indonesia, Anda perlu melakukan langkah-langkah berikut:
- Klik tab “Transfer Bank Manual” pada menu Isi Ulang Saldo
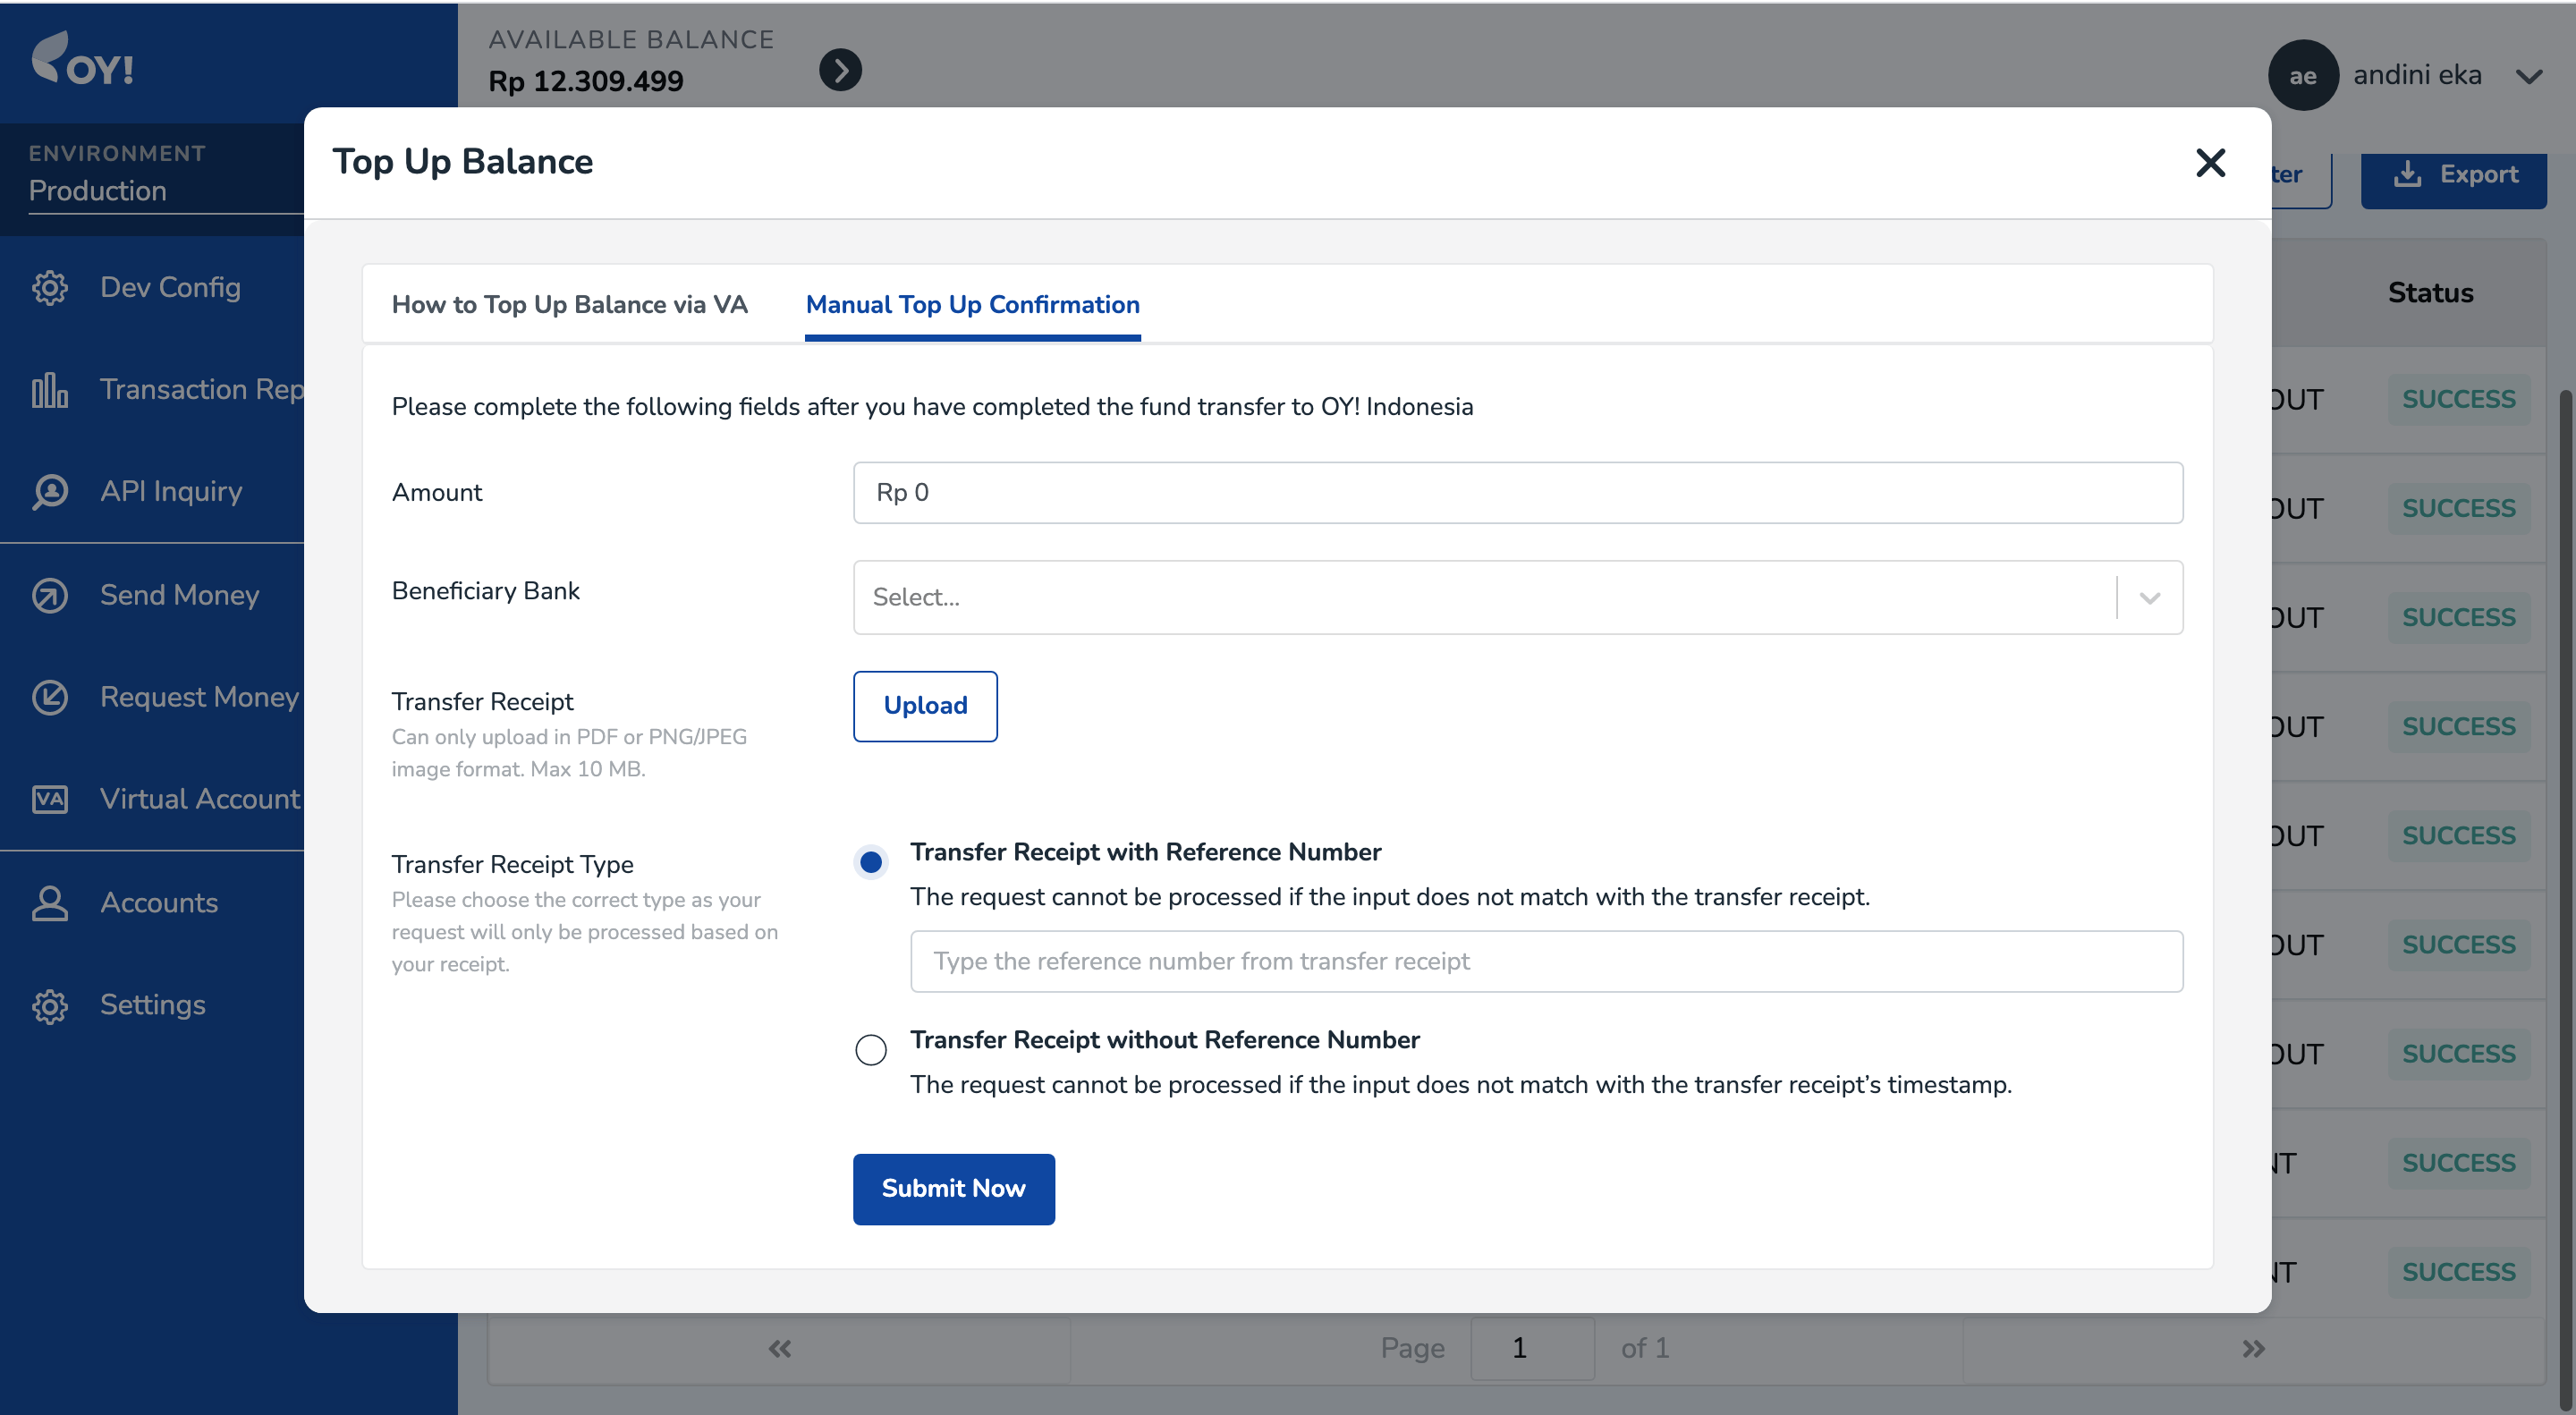
- Isi kolom informasi berikut:
| Field Name | Description |
|---|---|
| Amount | The amount that you have topped up (as per written in the Bukti Transfer) |
| Beneficiary Bank | A dropdown where you can choose to which bank you have transferred the top up amount to |
| Transfer Receipt | Click the upload button to upload the Bukti Transfer obtained after you have successfully performed the transfer. Can be in PDF, PNG, or JPEG format, with max. file size 10 MB |
| Transfer Receipt Type | Transfer Receipt with Reference Number --> If your uploaded transfer receipt displays the reference number, you need to choose this option. Transfer Receipt without Reference Number --> If your uploaded transfer receipt doesn't display the reference number, you need to choose this option and fill in the date & timestamp according to your Bukti Transfer. |
- Klik “Kirim Sekarang”
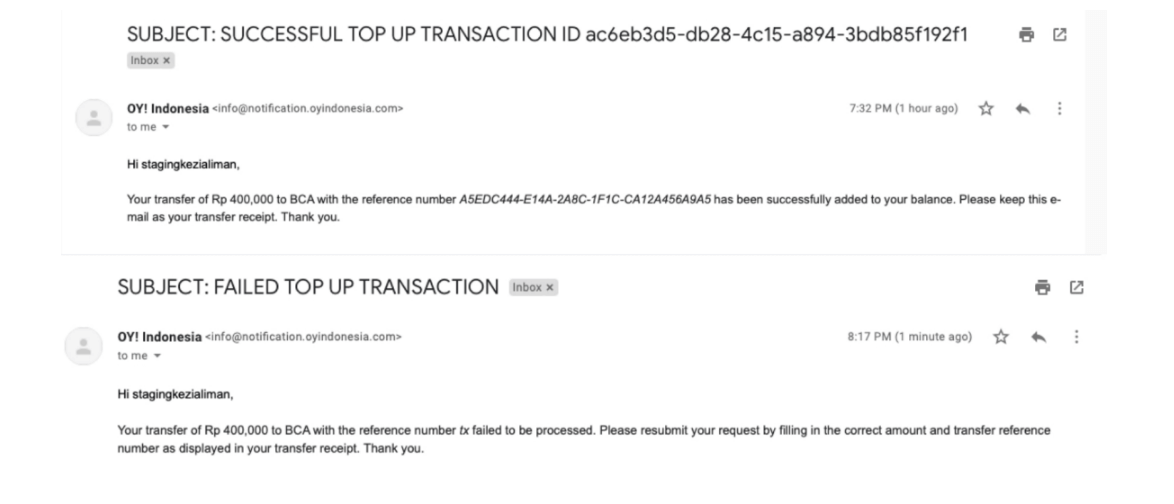
- Anda akan menerima email menyatakan bahwa isi ulang saldo Anda sedang diproses.
- Terakhir, Anda akan menerima email konfirmasi yang menyatakan bahwa isi ulang saldo Anda telah berhasil atau gagal.
Isi Ulang via Transfer Instan BCA
Sekarang, kami memberi kemudahan metode isi ulang untuk para nasabah BCA. Transfer instan BCA memungkinkan Anda untuk mengisi ulang saldo secara instan tanpa perlu mengonfirmasi bukti transfer secara manual. Sistem kami akan otomatis menambahkan saldo Anda saat Anda mengisi ulang.
Untuk melakukan isi ulang via transfer instan BCA, silakan ikuti langkah-langkah berikut:
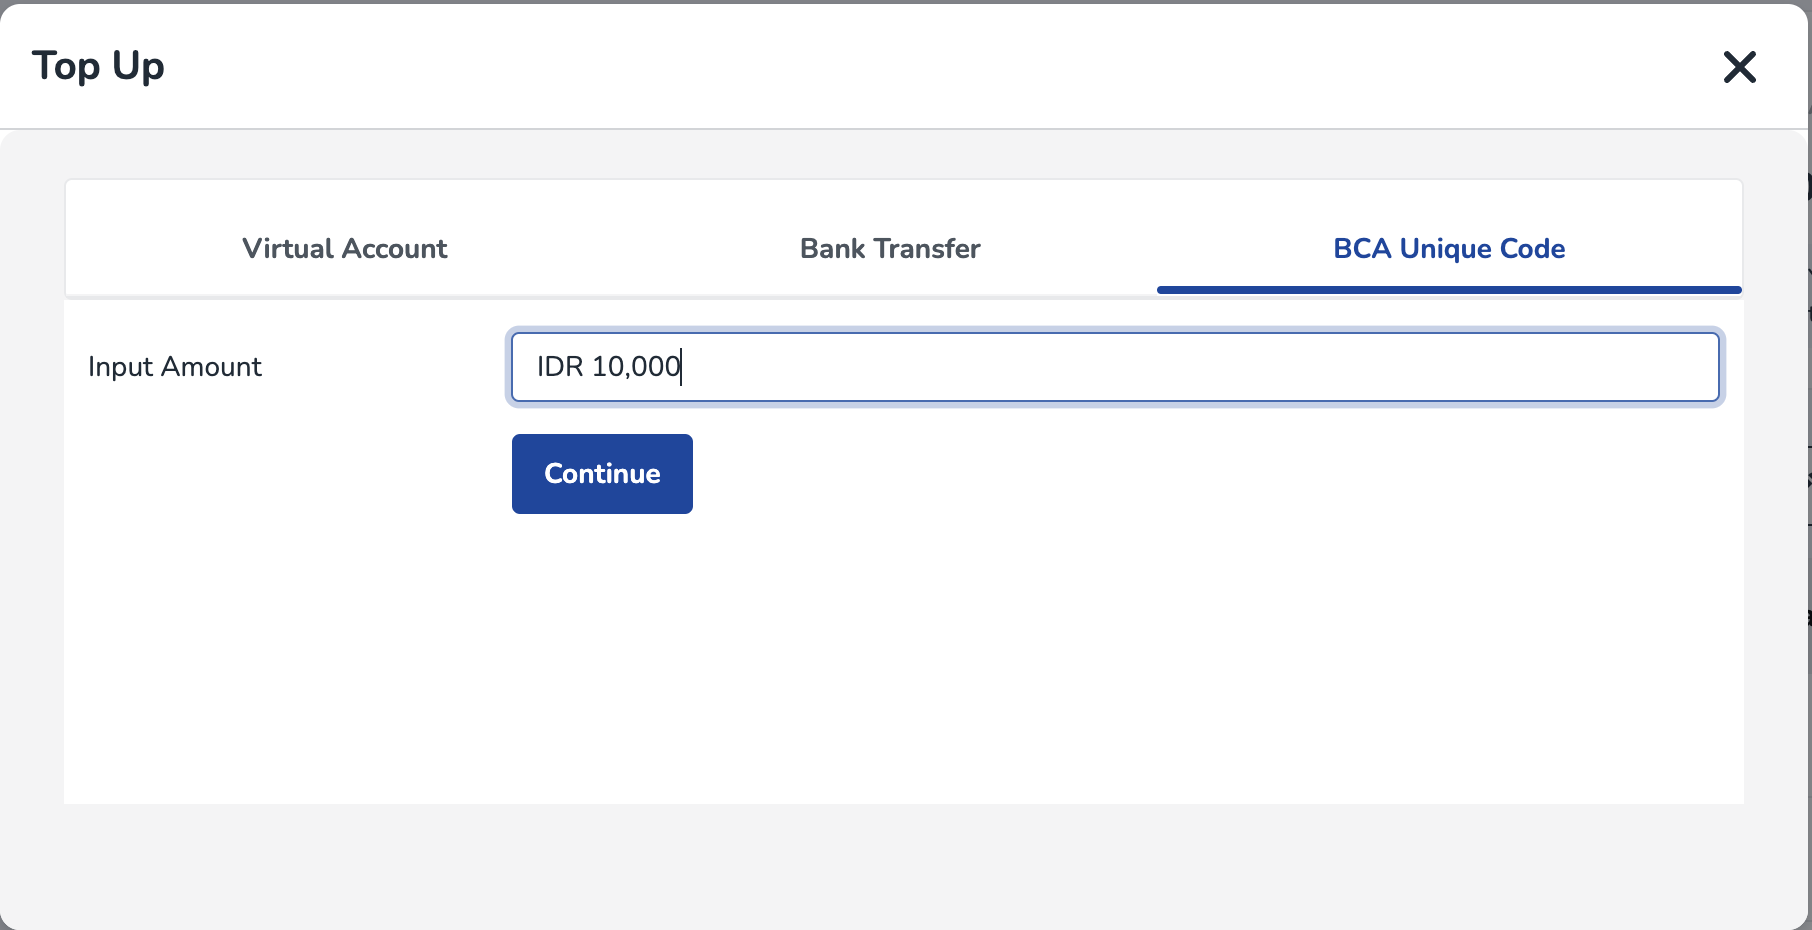
- Klik tab “Transfer Instan BCA” pada menu Isi Ulang Saldo.
- Masukkan nominal saldo yang ingin Anda isi, dengan pengisian minimal Rp10.000.
- OY! akan menampilkan jumlah yang harus Anda transfer, ditambah tiga digit kode unik di belakang nominal transfer. Pastikan Anda transfer sesuai dengan jumlah yang tertera.
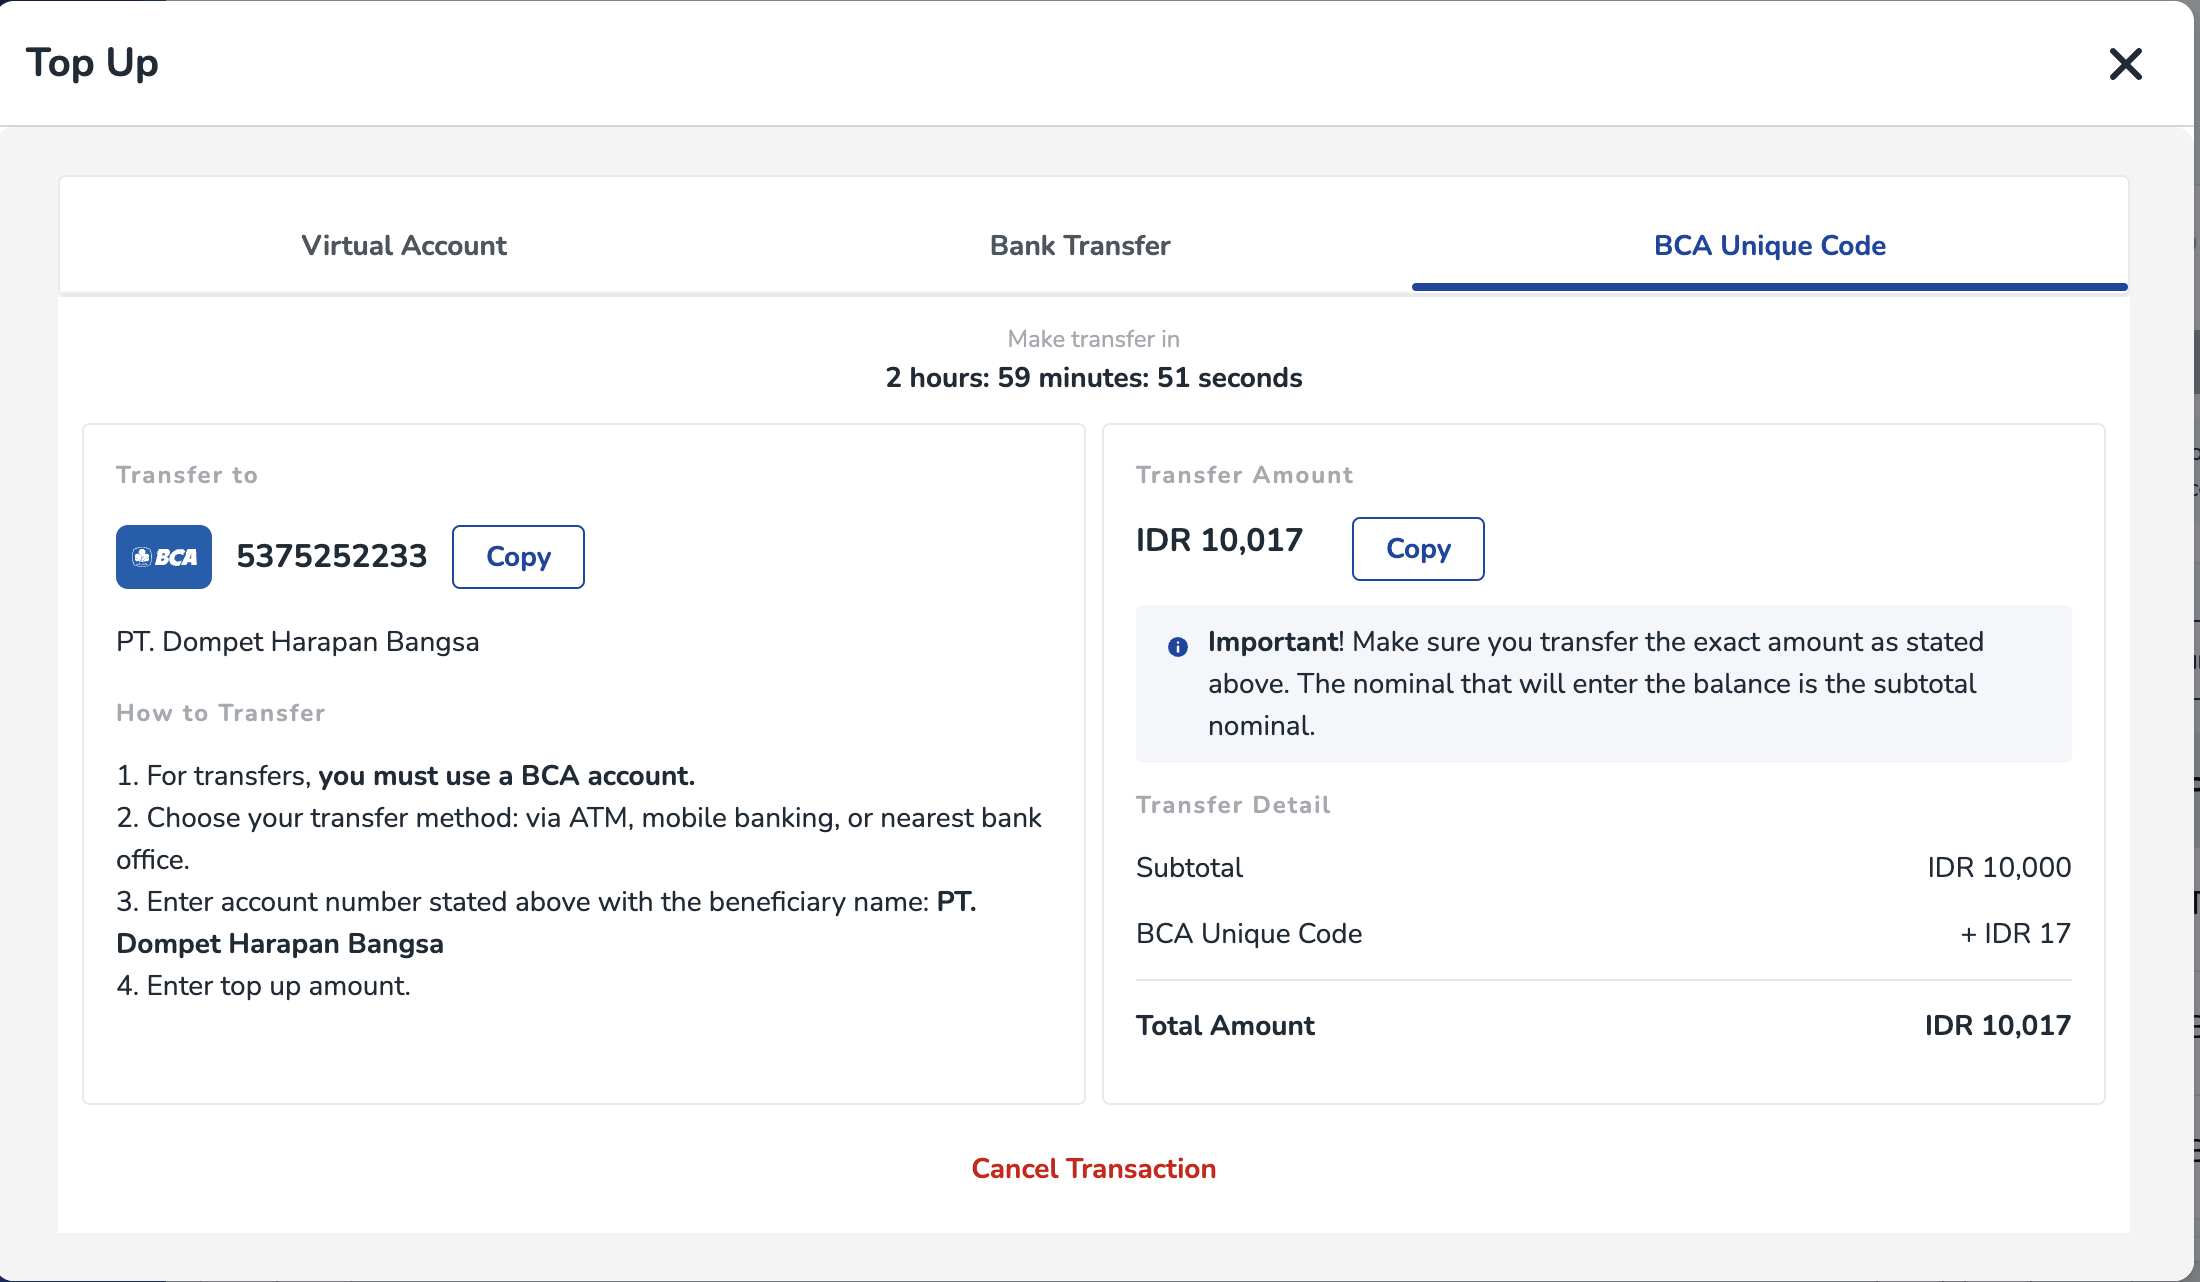
- Setelah transaksi berhasil, saldo yang tertera pada Subtotal akan masuk ke akun OY! Anda. Catatan: Jam operasional untuk metode ini adalah setiap hari, mulai dari pukul 03.01 pagi hingga pukul 08.00 malam. Di luar jam tersebut, Anda tidak bisa menggunakan metode ini.

Tarik Saldo ke Rekening
Anda dapat menarik saldo OY! ke rekening Anda dengan mengikuti langkah-langkah berikut:
- Masuk ke dashboard OY!
- Pergi ke menu “Laporan Transaksi” lalu pilih “Laporan Transaksi Rekening”
- Klik “Tarik Dana”
- Masukkan jumlah yang ingin Anda tarik
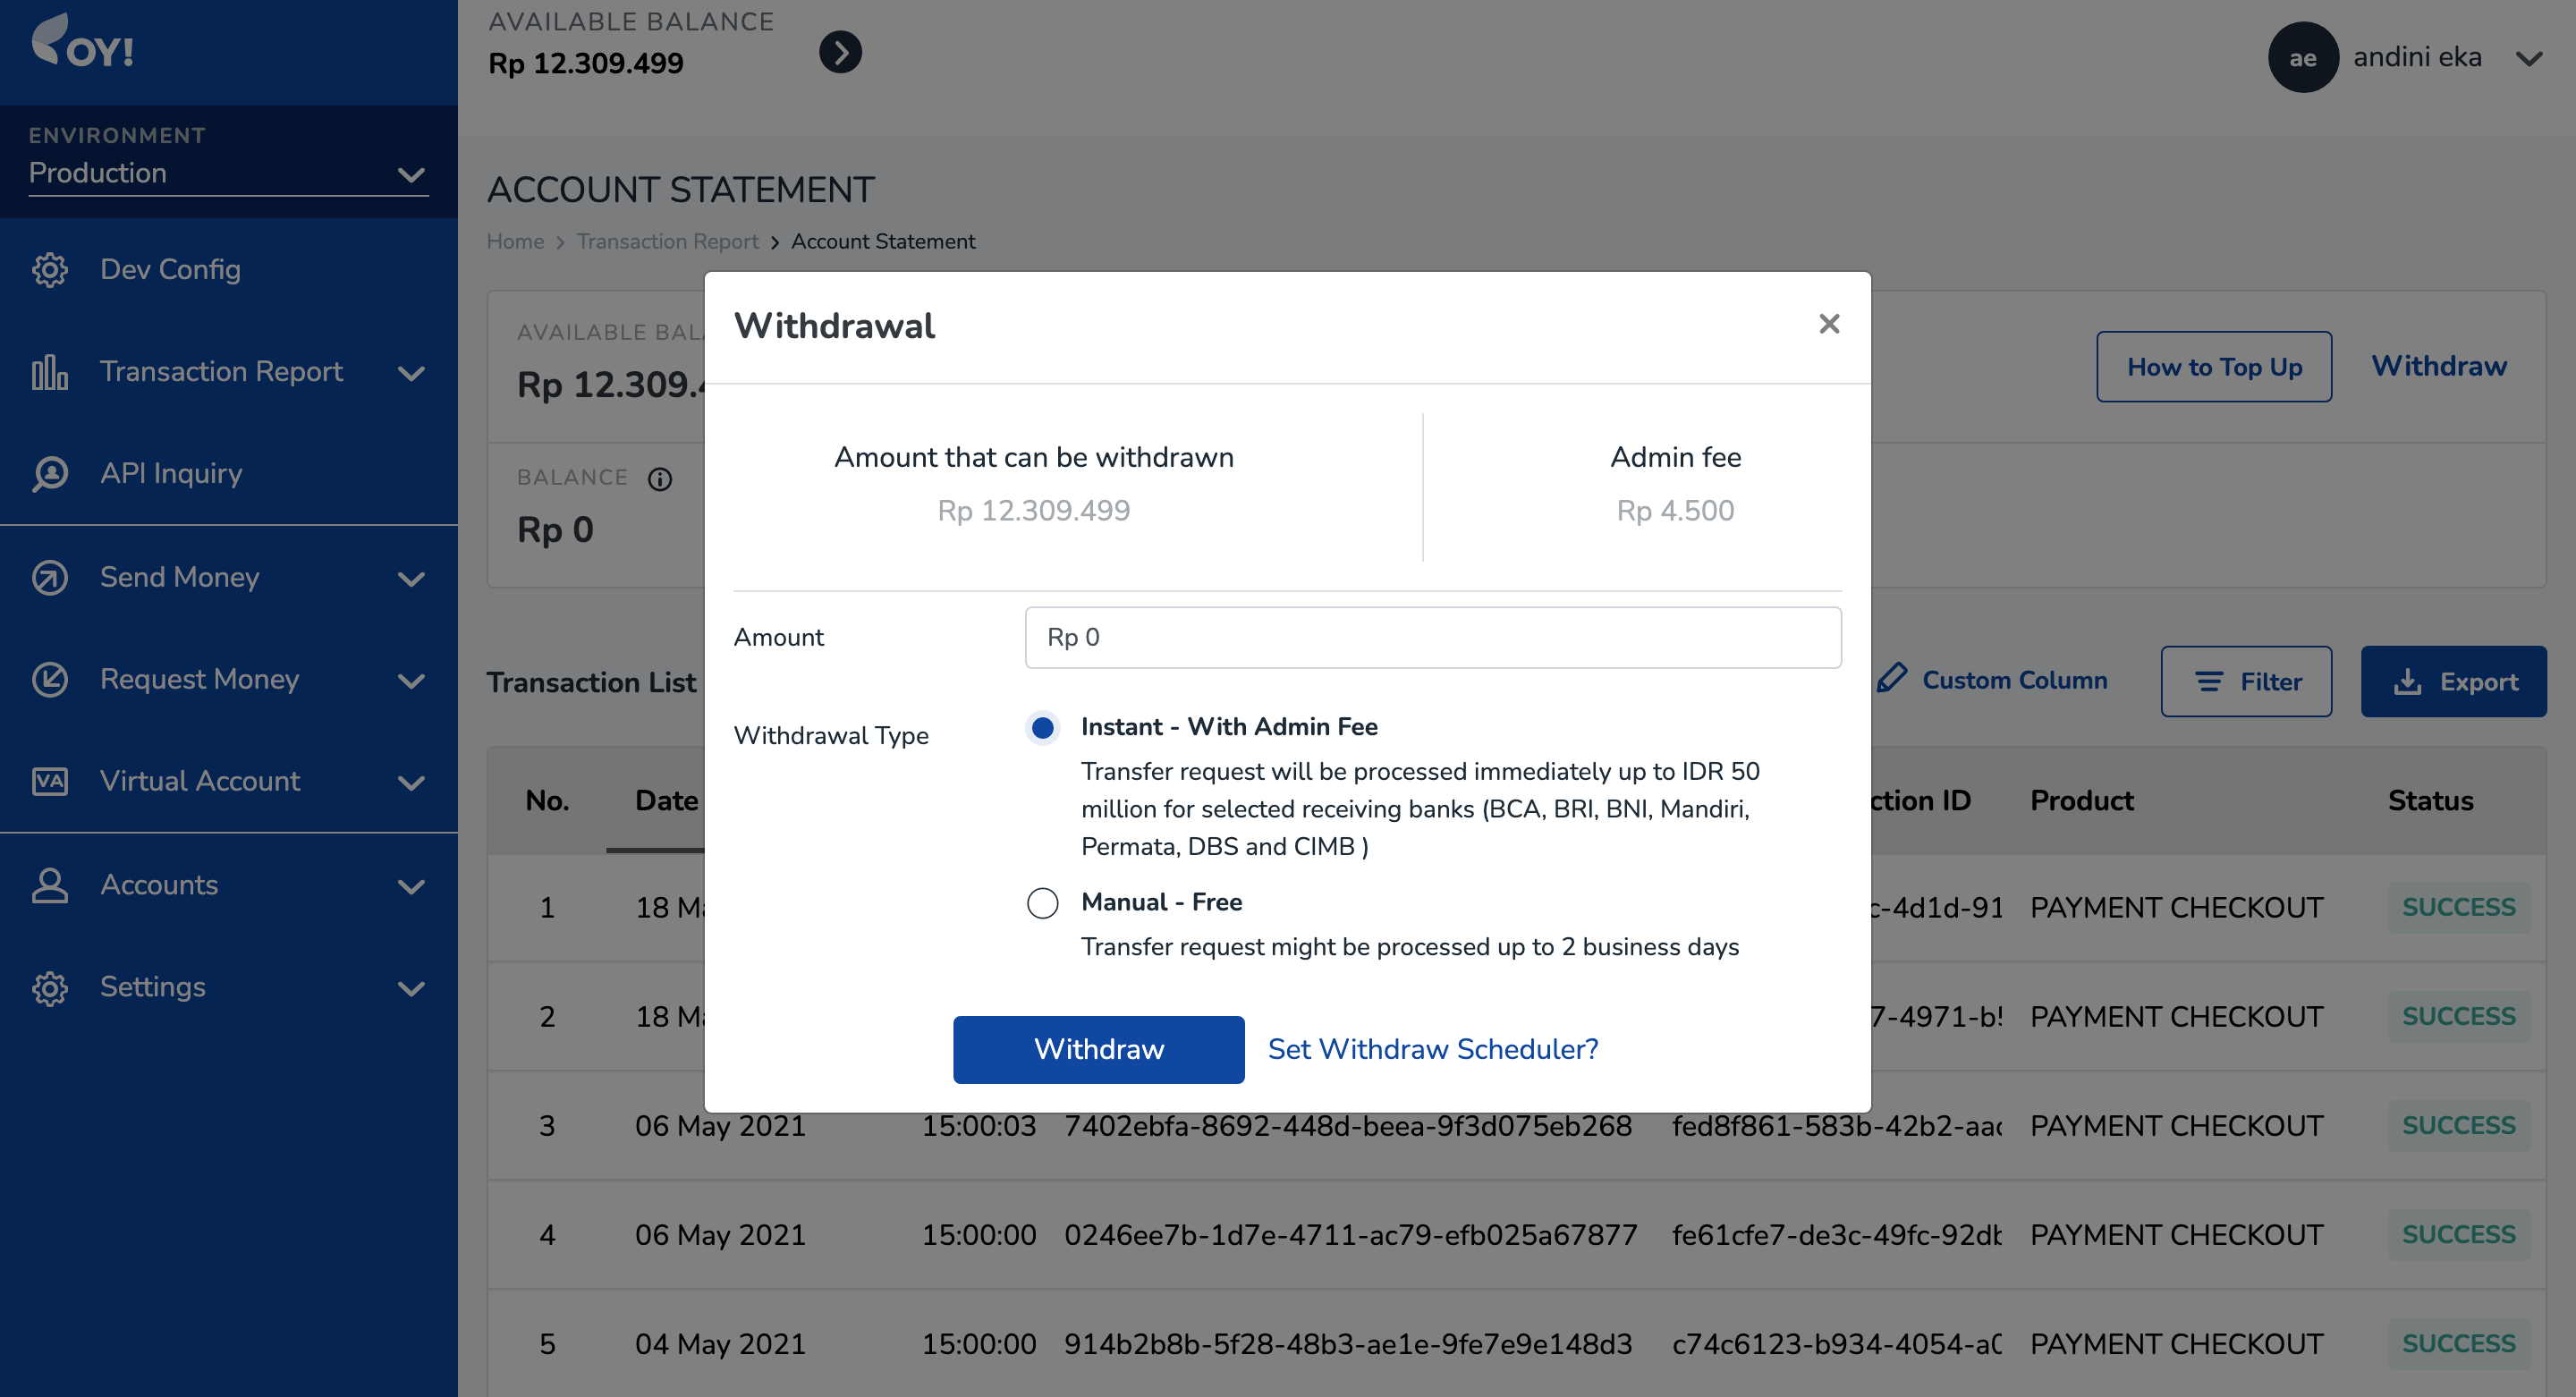
- Pilih jenis penarikan Anda. Anda dapat memilih salah satu dari opsi berikut:
- Instan dengan biaya admin -> Penarikan Anda akan diproses dan tiba di bank penerima Anda secara real-time, tetapi Anda akan dikenakan biaya admin. Jika jumlah yang akan ditarik <= Rp 50 juta dan bank penerima adalah BCA, BRI, BNI, Mandiri, Permata, DBS, dan CIMB Niaga.
- Manual -> Penarikan Anda akan diproses dalam waktu hingga 2 hari kerja. Jika jumlah yang akan ditarik > Rp 50 juta ATAU bank penerima bukanlah BCA, BRI, BNI, Mandiri, Permata, DBS, atau CIMB Niaga, Anda harus memilih opsi ini. Anda TIDAK akan dikenakan biaya admin jika Anda memilih opsi ini. |
Laporan Transaksi - Laporan Penyelesaian
Laporan Penyelesaian adalah daftar transaksi yang menggunakan metode pembayaran dengan waktu proses non real-time atau tidak langsung. Misalnya, untuk metode pembayaran "VA BCA" butuh waktu 2 hari kerja sejak transaksi dilakukan agar uangnya masuk. Maka setiap kali pelanggan Anda melakukan transaksi dengan VA BCA, transaksi tersebut akan tercatat dalam Laporan Penyelesaian.
Untuk mengakses laporan penyelesaian, ikuti langkah-langkah berikut: - Masuk ke dashboard OY! - Pilih menu Laporan Transaksi, lalu klik Laporan Penyelesaian
Laporan Penyelesaian berisi informasi sebagai berikut:
Total nominal untuk diselesaikan hari ini: Jumlah total yang dijadwalkan untuk diselesaikan ke saldo akun Anda hari ini.
Total nominal penyelesaian tertunda: Jumlah total yang belum diselesaikan ke saldo akun Anda. (status penyelesaian masih belum SUKSES)
Berikut adalah informasi di dalam tabel Daftar Transaksi Penyelesaian:
| Field Name | Description | Example |
|---|---|---|
| Transaction Date | The date on which your customer performs the transaction | 11 May 2021 |
| Transaction Time | The time at which your customer performs the transaction | 17:44:09 |
| Transaction ID | A unique transaction ID given by OY | d4b26687-34b9-43d3-9d08-af440bcbaca7 |
| Partner Transaction ID | A unique transaction ID that is assigned by you for a given transaction | TXID_001 |
| Product | The product associated with a given transaction. This will be filled with VIRTUAL_ACCOUNT if the transaction comes from Virtual Account Aggregator product, or PAYMENT_CHECKOUT if the transaction comes from Payment Link product | VIRTUAL_ACCOUNT |
| Payment Method | The payment method associated with a given transaction. Possible values: VA [Bank Name], CARDS, QRIS, EWALLET SHOPEEPAY | VA BCA |
| Transfer Amount | The transaction amount (before getting deducted with admin fee | +Rp 10.000 |
| Admin Fee | The admin fee associated with a given transaction | -Rp 1.000 |
| Total Amount | The transaction amount that has been deducted with admin fee | +9,000 |
| Settlement Date | The scheduled settlement date for a given transaction | 12 May 2021 |
| Settlement Time | The scheduled settlement timestamp for a given transaction | 15:00:00 |
| Settlement Status | The settlement status for a given transaction. Possible values: WAITING (if the amount is not yet settled to your account statement balance), SUCCESS (if the amount has been settled to your account statement balance). | SUCCESS |
Jika status penyelesaian suatu transaksi masih MENUNGGU, transaksi tersebut belum muncul di tabel laporan rekening Anda, dan jumlahnya juga belum akan ditambahkan dalam saldo Anda.
Jika status penyelesaian suatu transaksi sudah SUKSES, transaksi tersebut akan muncul di dalam tabel laporan rekening Anda, dan jumlahnya akan ditambahkan dalam saldo Anda.
Callback untuk Transaksi Tertunda
Jika Anda mempunyai transaksi dengan metode pembayaran yang diselesaikan H+>0, Anda akan menerima dua callback dengan rincian sebagai berikut:
Callback Pertama -> Akan dikirim setelah pelanggan Anda berhasil melakukan transaksi. Misalnya, jika pelanggan Anda melakukan transaksi pada 11 Mei 2021 pukul 14.00, saat itu juga kami akan mengirimkan callback pertama kepada Anda. Dalam callback pertama, status penyelesaian akan menjadi MENUNGGU (karena belum masuk ke saldo Anda).
Callback Kedua -> Akan dikirim setelah status penyelesaian berubah dari MENUNGGU menjadi SUKSES. Misalnya, jika status penyelesaian berubah menjadi SUKSES pada 12 Mei 2021 pukul 15.00, saat itu juga kami akan mengirimkan callback kedua kepada Anda. Dalam callback kedua, status penyelesaian akan menjadi SUKSES.
Unduh dan Filter Laporan Penyelesaian
Tombol Ekspor: Anda dapat mengunduh laporan penyelesaian dalam format CSV, PDF, dan XLSX.
Filter: Anda dapat mem-filter laporan penyelesaian berdasarkan rentang tanggal transaksi, produk, metode pembayaran, rentang tanggal penyelesaian, dan status penyelesaian.
Notifikasi
Anda dapat mengaktifkan atau menonaktifkan pengaturan notifikasi saat saldo Anda mencapai limit, notifikasi untuk produk kirim uang, dan notifikasi untuk produk terima uang jika Anda memiliki peran super admin atau admin, berikut caranya:
- Masuk ke dashboard melalui https://business.oyindonesia.com/
- Pergi ke menu Pengaturan -> Notifikasi
- Jika Anda ingin mendapatkan pemberitahuan melalui email jika saldo Anda mencapai limit, atur di tab "Saldo Rendah". Masukkan limit jumlah saldo dan alamat email yang ingin dikirimkan notifikasi.
- Pilih apakah Anda ingin mengaktifkan atau menonaktifkan pemberitahuan untuk Multitransfer atau API Kirim Uang. a. Aktifkan Pemberitahuan: Pemberitahuan melalui email akan dikirimkan untuk transaksi tertunda, gagal, dan berhasil. b. Nonaktifkan Pemberitahuan yang Berhasil: Pemberitahuan melalui email hanya akan dikirimkan untuk transaksi tertunda dan gagal.
- Pilih apakah Anda ingin mengaktifkan atau menonaktifkan pemberitahuan untuk Link Pembayaran atau VA:
a. Aktifkan Pemberitahuan: Pemberitahuan melalui email akan dikirimkan untuk transaksi yang sukses. b. Nonaktifkan Pemberitahuan Berhasil: Tidak akan ada pemberitahuan melalui email. - Kolom Email: Memungkinkan pengguna untuk menambahkan, menghapus, dan mengedit email penerima notifikasi dalam kolom ini, Anda dapat memasukkan hingga 3 alamat email
- Klik 'Simpan Perubahan'

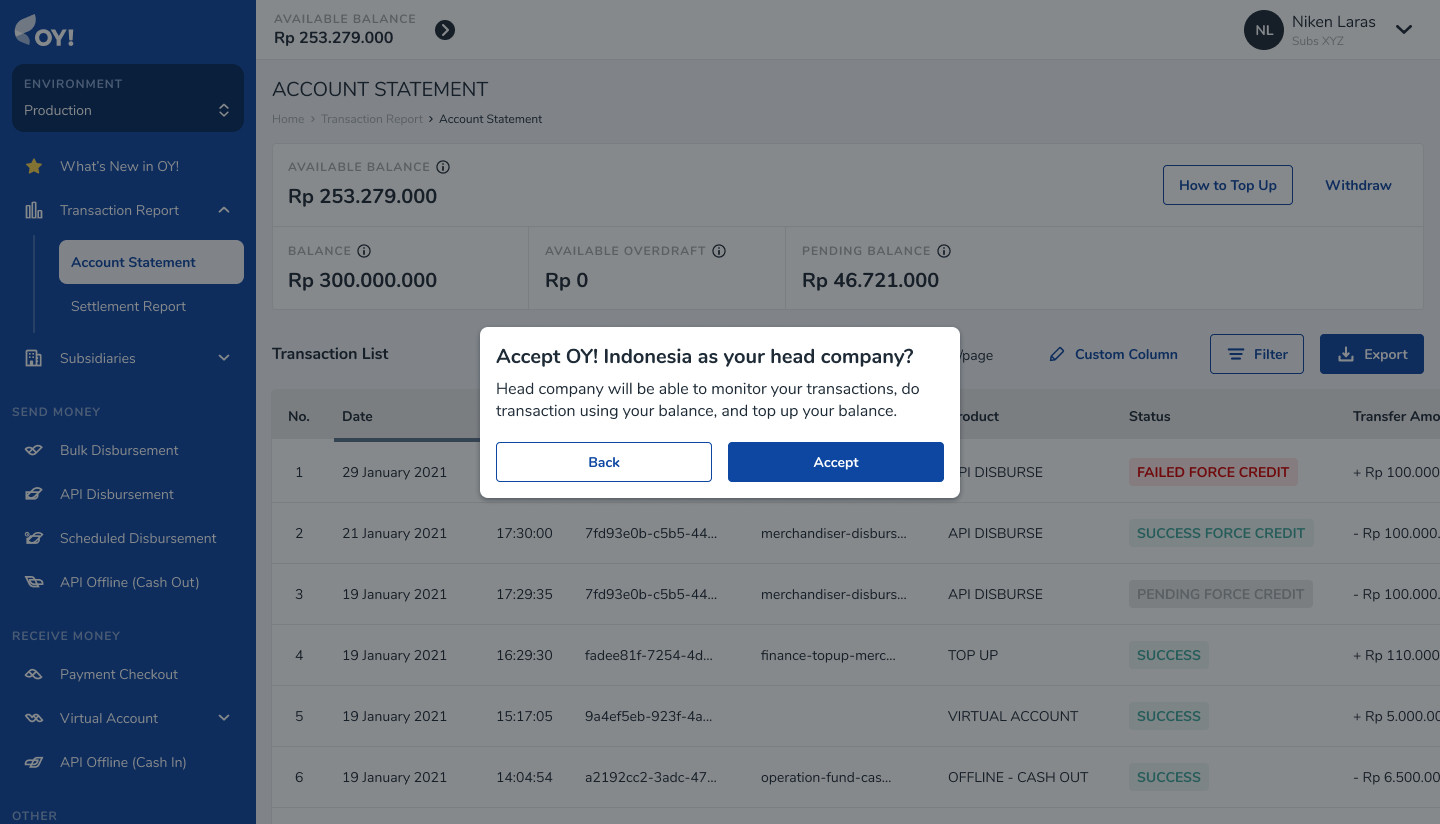
Multi Entity Management
Mengelola banyak akun rekening bisnis untuk perusahaan yang memiliki franchise, toko cabang, hingga anak perusahaan dapat membuat sebagian besar pengusaha dan pemilik bisnis kehabisan tenaga. Terkadang proses pembukuan menjadi lebih rumit karena banyak data transaksi dan arus kas yang harus dikelola.
Sebagai bentuk solusi, OY! Indonesia melalui OY! Business menghadirkan fitur Multi Entity yang memudahkan para pemilik bisnis untuk memantau arus kas bisnis, memeriksa transaksi, serta menerima dan mengirim uang.
Multi Entity dari OY! Business memungkinkan pemilik bisnis untuk memiliki lebih dari 1 akun sekunder OY! Business. Akun sekunder ini disebut sebagai Sub-entity Account yang berada di dalam 1 akun utama yang bernama Main Entity untuk dikelola dan dikendalikan.
Dengan fitur ini, Anda akan dapat:
- Memiliki laporan terperinci tentang transaksi yang dilakukan oleh semua Sub-entity.
- Mentransfer saldo antara akun Main-entity ke akun Sub-entity.
- Menggunakan saldo Sub-entity anak untuk mengirimkan dana.
- Menerima uang menggunakan Link Pembayaran atas nama Sub-entity.
- Tidak dikenakan biaya admin untuk mentransfer saldo antar entity.
Cara Mendaftar dan Mengaktifkan Fitur
- Buat Akun OY! Indonesia
- Aktifkan akun Anda melalui link aktivasi yang dikirim melalui email.
- Verifikasi bisnis Anda.
- Tunggu hingga bisnis Anda terverifikasi oleh tim kami.
- Hubungi perwakilan tim kami untuk mengaktifkan fitur Multi Entity
Cara menggunakan Fitur Multi Entity Management
Untuk menggunakan Multi Entity Management, Anda perlu menghubungkan beberapa akun. Setiap akun dapat digunakan secara independen, dan ada beberapa persyaratan yang harus Anda penuhi untuk menggunakan fitur ini. Silakan hubungi tim kami untuk informasi lebih lanjut.
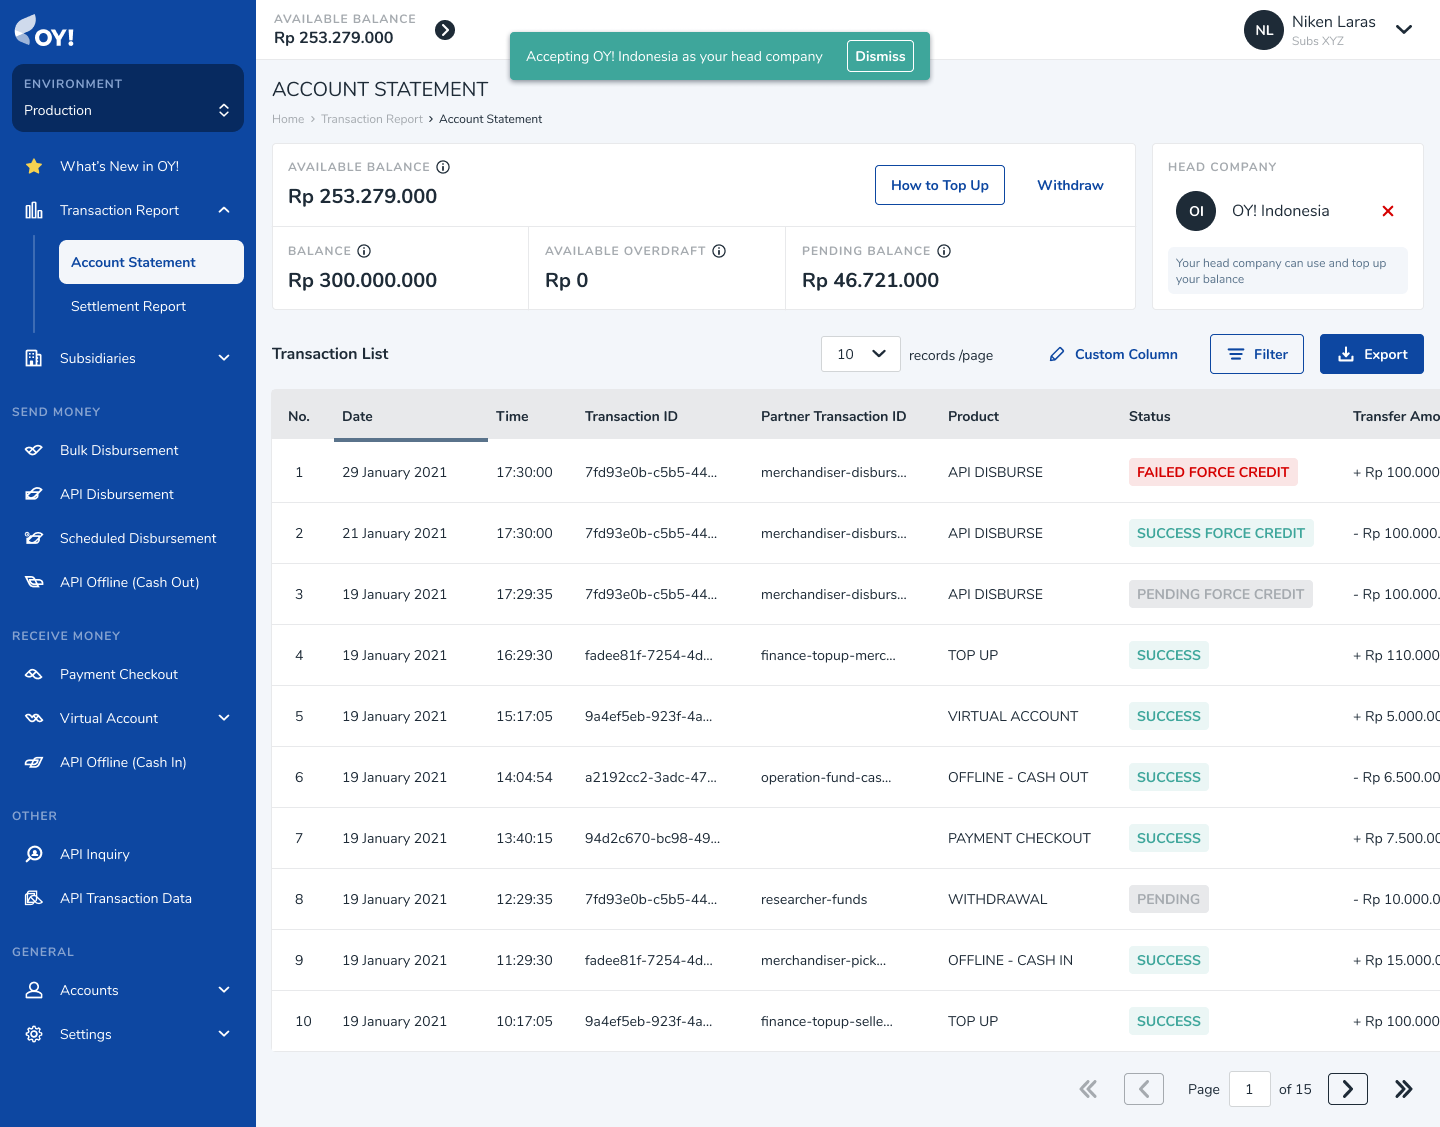
A. Menghubungkan Antar Akun
- Jika Anda adalah Main-Entity
Untuk menambahkan sub-entity, lakukan langkah berikut: 1. Masuk ke dashboard dengan akun utama 2. Pergi ke menu Multi Entity lalu klik tombol “Tambah Sub-Entity”
- Isi username sub-entity yang ingin Anda hubungkan. Anda dapat menemukan username Anda dari menu Akun → Profil Pengguna dalam bagian username.
- Klik Tombol “Tambah”, lalu jika akun ada di sistem, akan ada konfirmasi untuk menghubungkan.
Setelah mengonfirmasi, permintaan akan dikirimkan ke akun yang bersangkutan untuk diterima.
Jika Anda adalah Sub-Entity
Untuk menerima permintaan dari main entity, silakan masuk ke dashboard dengan akun sub-entity, kemudian buka menu “Laporan Transaksi” → “Laporan Transaksi Rekening”.
- Klik tombol "Cek Permintaan" yang dapat ditemukan di dekat sudut kanan atas halaman.
- Anda akan melihat permintaan yang masuk untuk dihubungkan menjadi main entity untuk akun Anda, kemudian Anda dapat memilih akun mana yang merupakan akun yang benar untuk main entity dengan mengklik “Terima” pada akun yang sesuai.

- Setelah berhasil menerima permintaan dari main entity untuk terhubung, Anda akan menemukan informasi main entity Anda di dekat sudut kanan atas halaman Anda, dan selamat, Anda sekarang sudah terhubung!
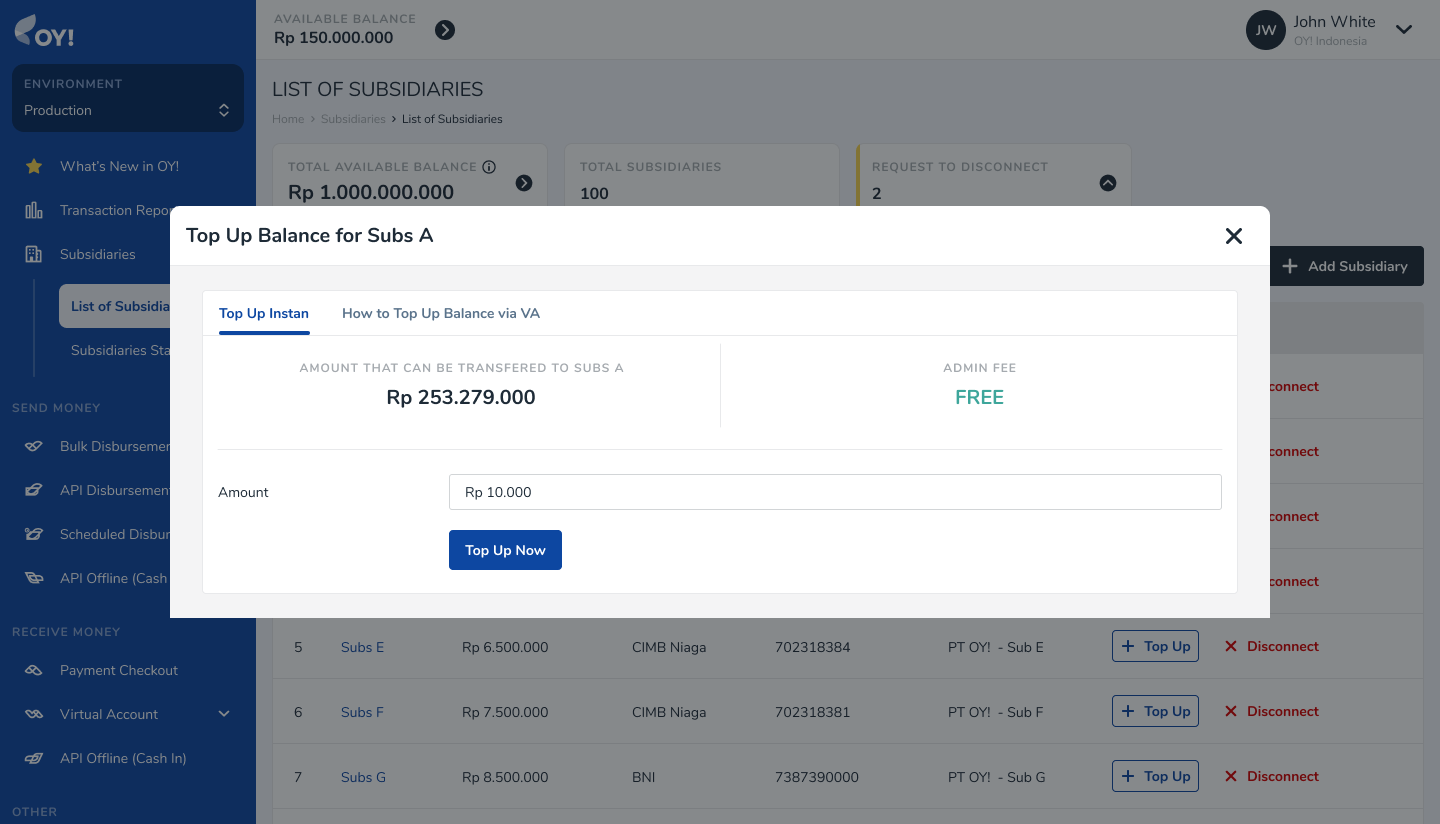
B. TMengisi Saldo ke akun Sub-Entity
Setelah terhubung dengan sub-entity Anda, Anda dapat mengisi ulang saldo akun sub-entity dengan mengakses menu Multi Entity → Daftar sub-entity, lalu ikuti langkah berikut: 1. Temukan akun yang ingin Anda isi saldonya 2. Klik tombol "Isi Ulang" 3. Isi jumlah yang ingin Anda isi 4. Klik tombol "Isi Ulang Sekarang" untuk melanjutkan 5. Anda juga dapat melakukan pengisian ulang dengan mentransfer ke salah satu Virtual Account yang disediakan (lihat "Cara Mengisi Saldo melalui VA")
C. Mengirim Uang Menggunakan Saldo Sub-Entity
Dengan menu Multi Entity, Anda dapat melakukan pengiriman uang menggunakan akun sub-entity atas nama mereka. Untuk melakukannya, Anda dapat mengikuti langkah-langkah berikut:
- Akses menu Multitransfer dan klik tombol "+ Buat Transaksi Baru"
- Pilih saldo sub-entity Anda sebagai sumber dana untuk melakukan pengiriman uang dengan memilih "Saldo Sub-entity Saya" dan pilih akun yang sesuai.
- Setelah memilih, Anda dapat melanjutkan untuk melakukan pengiriman uang seperti biasa.
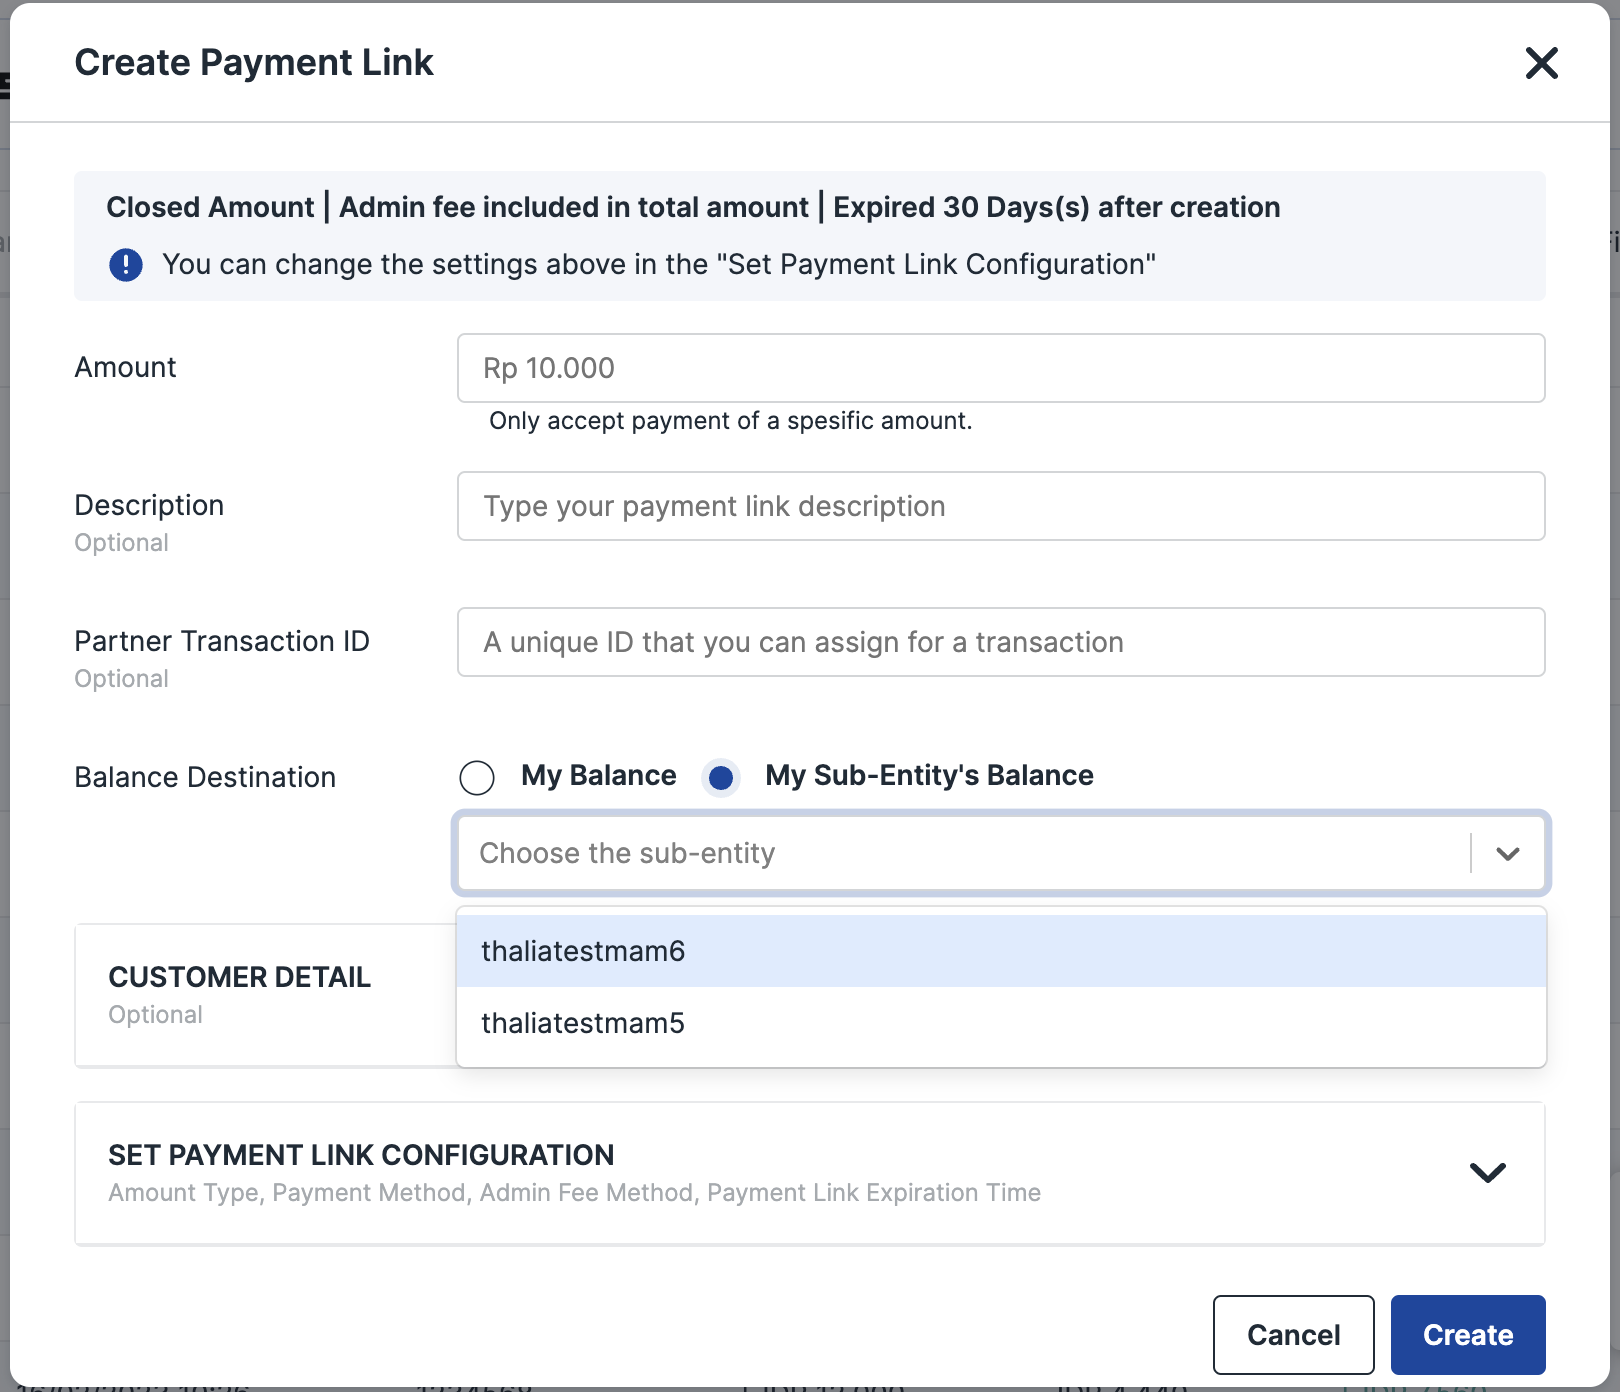
D. CMembuat Link Pembayaran Atas Nama Sub-Entity
Dengan fitur ini, Anda akan dapat menerima pembayaran dari pelanggan Anda melalui Link Pembayaran yang dibuat atas nama akun sub-entity Anda. Ketika pelanggan Anda berhasil membayar, transaksi tersebut akan dicatat dalam saldo Akun Sub-entity. Sebagai main entity, Anda mempunyai akses untuk melihat saldo dan daftar transaksi Akun Sub-entity kapan saja.
Silakan ikuti langkah-langkah berikut untuk membuat link pembayaran atas nama akun sub-entity:
Melalui API
Silakan hit API Link Pembayaran dan isi parameter "child_balance" dengan nama pengguna akun sub-entity yang akan Anda tetapkan sebagai tujuan saldo masuk. Ketika pelanggan Anda berhasil melakukan pembayaran, transaksi tersebut akan masuk ke dalam saldo Akun Sub-entity yang ditentukan.
Melalui Dashboard
- Klik Link Pembayaran -> Sekali Pakai (jika Anda ingin membuat link pembayaran sekali pakai) atau Klik Tautan Pembayaran -> Pakai Berulang (jika Anda ingin membuat link pembayaran yang dapat digunakan berulang kali.)
- Klik "Buat Link Pembayaran" (untuk tautan pembayaran satu kali) atau klik "Buat Link Pakai Berulang" (untuk link pembayaran yang dapat digunakan berulang kali). Anda akan melihat pop-up untuk melanjutkan proses pembuatan link pembayaran.
- Isi "Tujuan Saldo" dengan "Saldo Saya" (jika tujuan saldo transaksi adalah ke akun main entity) atau "Saldo Sub-entity" (jika tujuan saldo transaksi adalah sub-entity Anda). Jika Anda memilih "Saldo Sub-entity", Anda akan melihat dropdown untuk memilih username sub-entity. Anda hanya dapat memilih 1 akun sub-entity.
Integrasi dengan Xero
Integrasi OY! Bisnis dengan Xero bertujuan untuk memudahkan tim keuangan Anda untuk mendapatkan informasi keuangan yang mendalam. Dengan begitu, Anda dan tim jadi mengetahui kapan dan di mana Anda harus melakukan efisiensi terhadap biaya dan mendorong produktivitas.
Setiap transaksi yang terjadi di OY! akan otomatis tercatat dalam akun Xero Anda, baik transaksi pengeluaran maupun pendapatan.
Bagaimana Cara Kerjanya?
Setelah Anda berhasil menghubungkan akun Xero Anda di OY!, setiap transaksi yang terjadi di OY! akan otomatis tercatat di akun Xero Anda. Setelah koneksi berhasil, kami akan membuat rekening bank baru, yaitu rekening saldo OY!. Setiap transaksi yang terjadi di OY! akan dicatat dalam rekening bank tersebut, baik transaksi pengeluaran maupun pendapatan. Selanjutnya, Anda akan diminta untuk melakukan pemetaan chart of account Anda di Xero. Pemetaan chart of accounts Anda akan membantu kami untuk mengalokasikan transaksi Anda ke accounts yang tepat.
Menghubungkan Akun Xero Anda
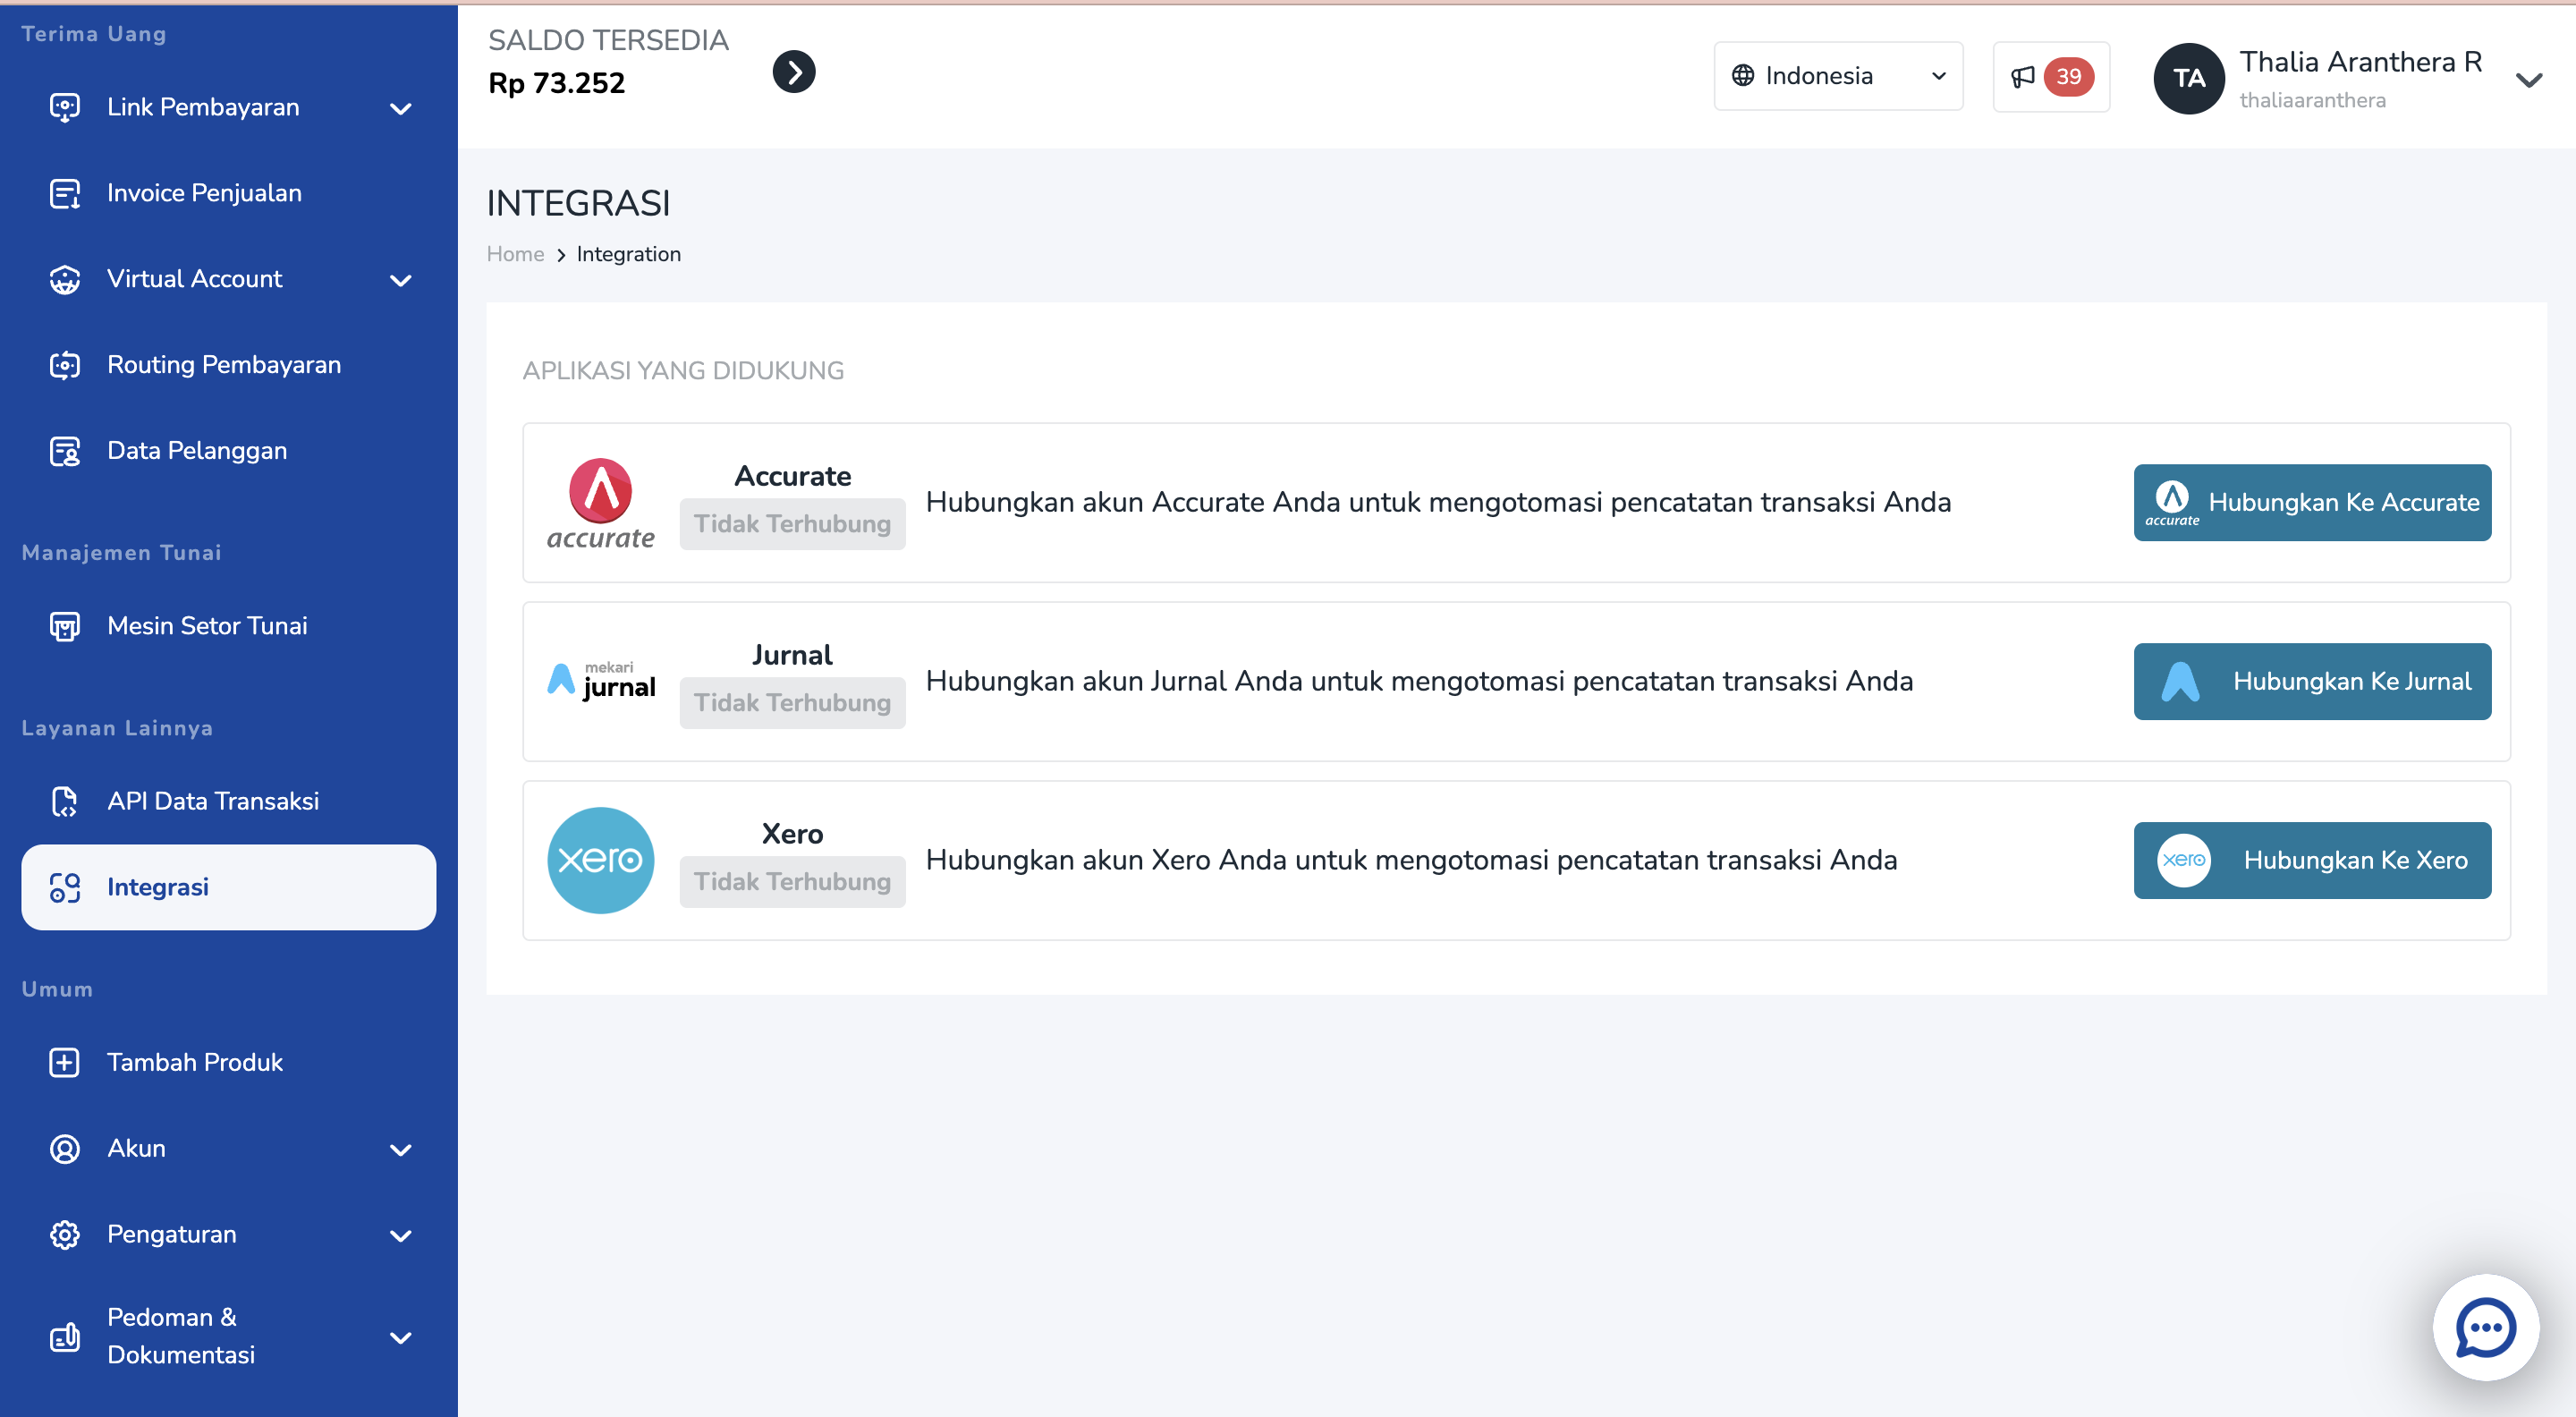
Masuk ke dashboard, lalu pilih menu Integrasi
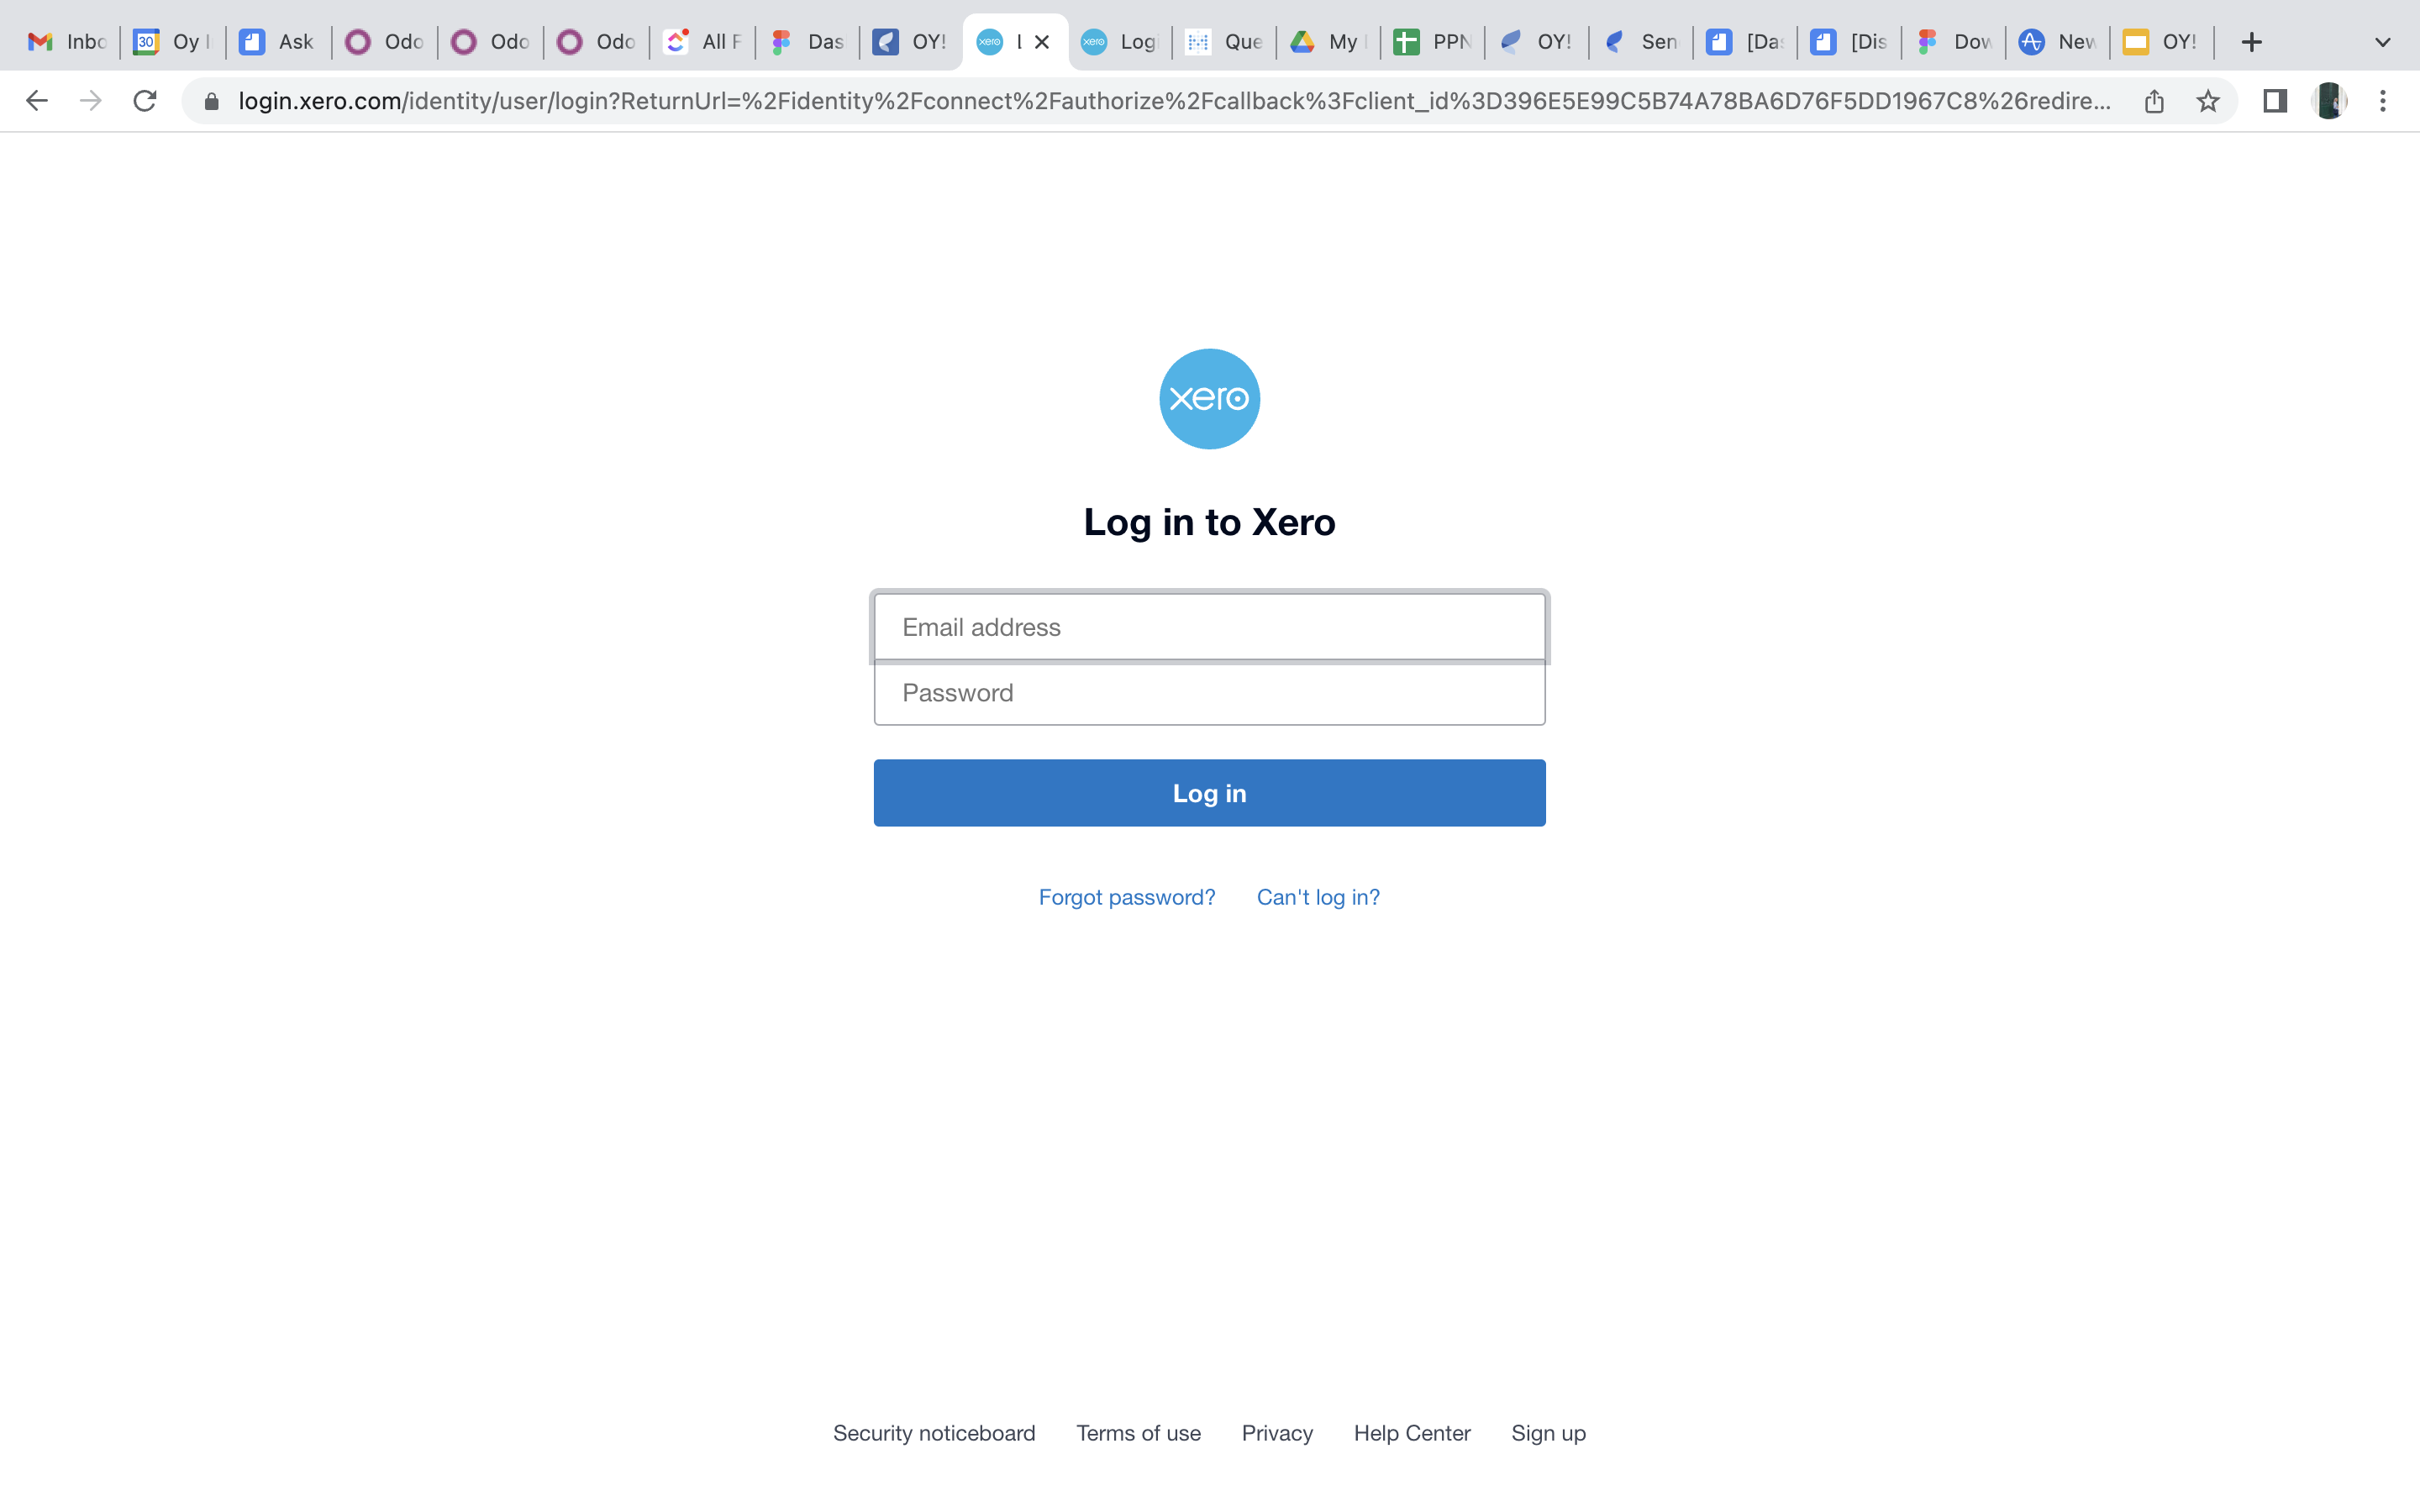
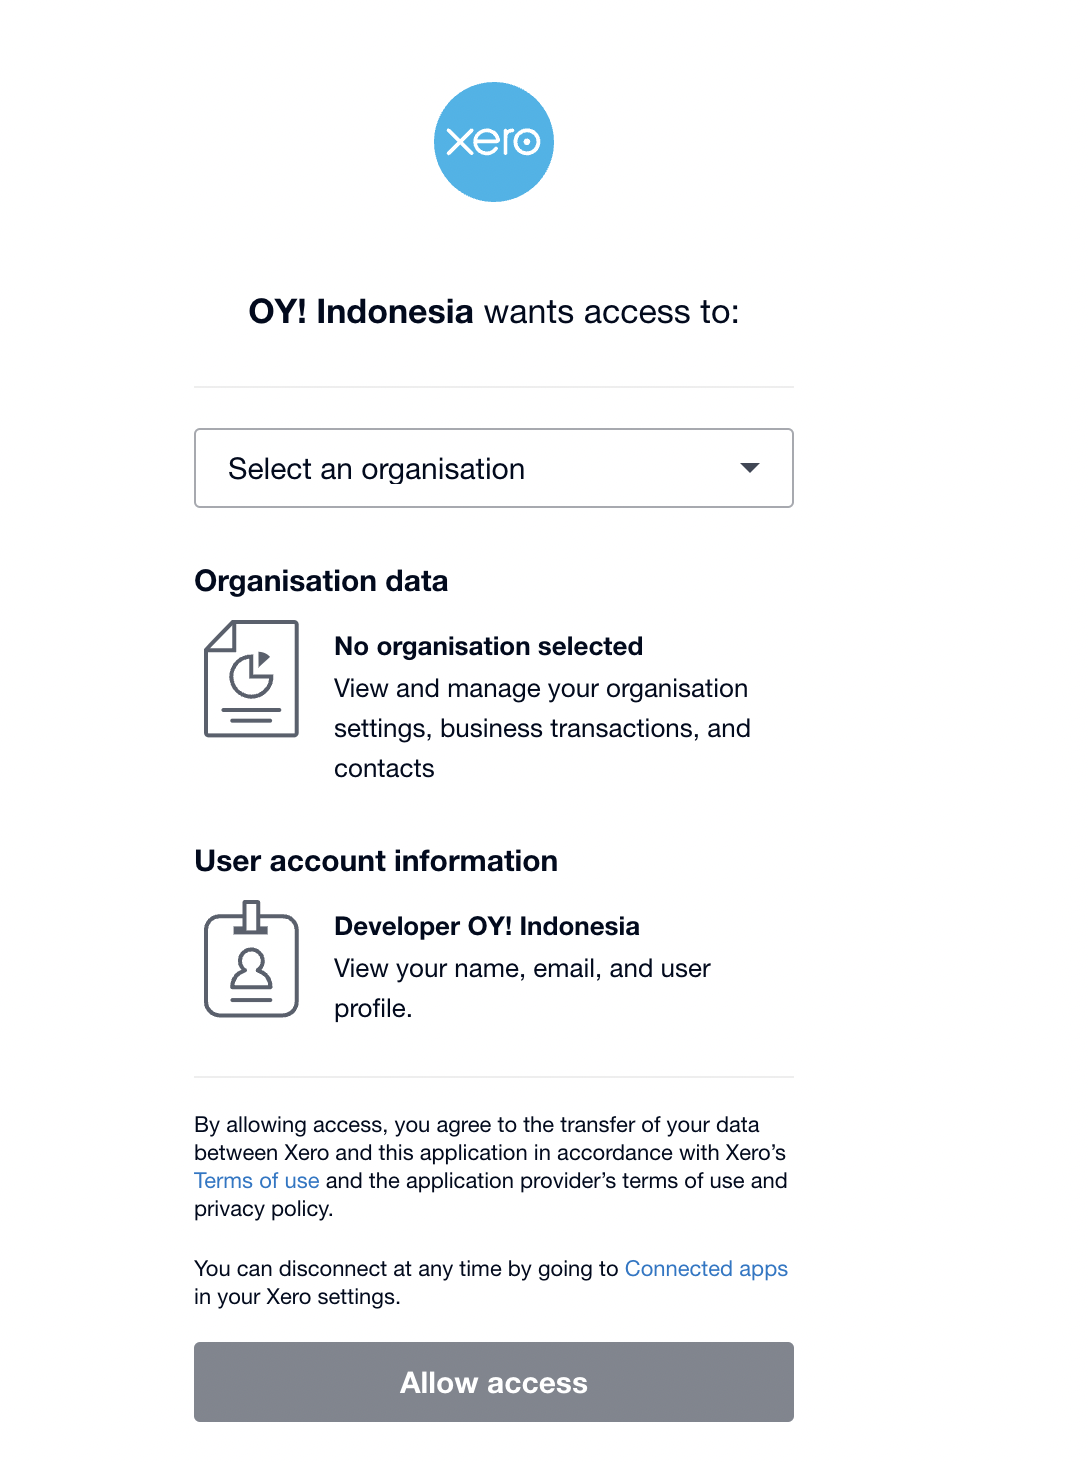
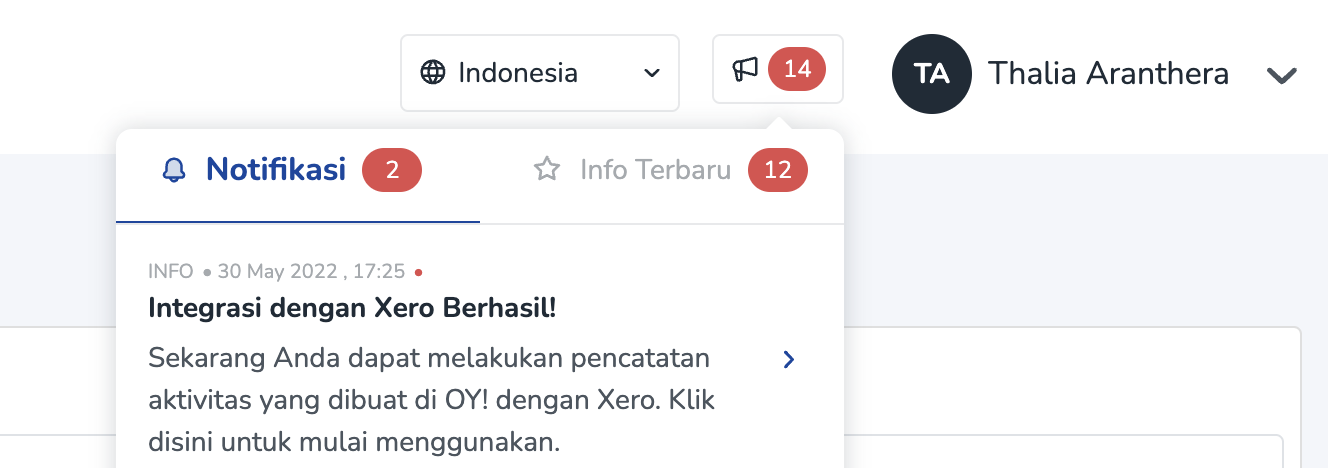
Anda akan melihat pilihan app Xero. Klik "Hubungkan" untuk menghubungkan akun Xero Anda ke OY!. Anda akan diarahkan ke halaman login Xero. Setelah Anda berhasil masuk ke Xero, akan muncul notifikasi.
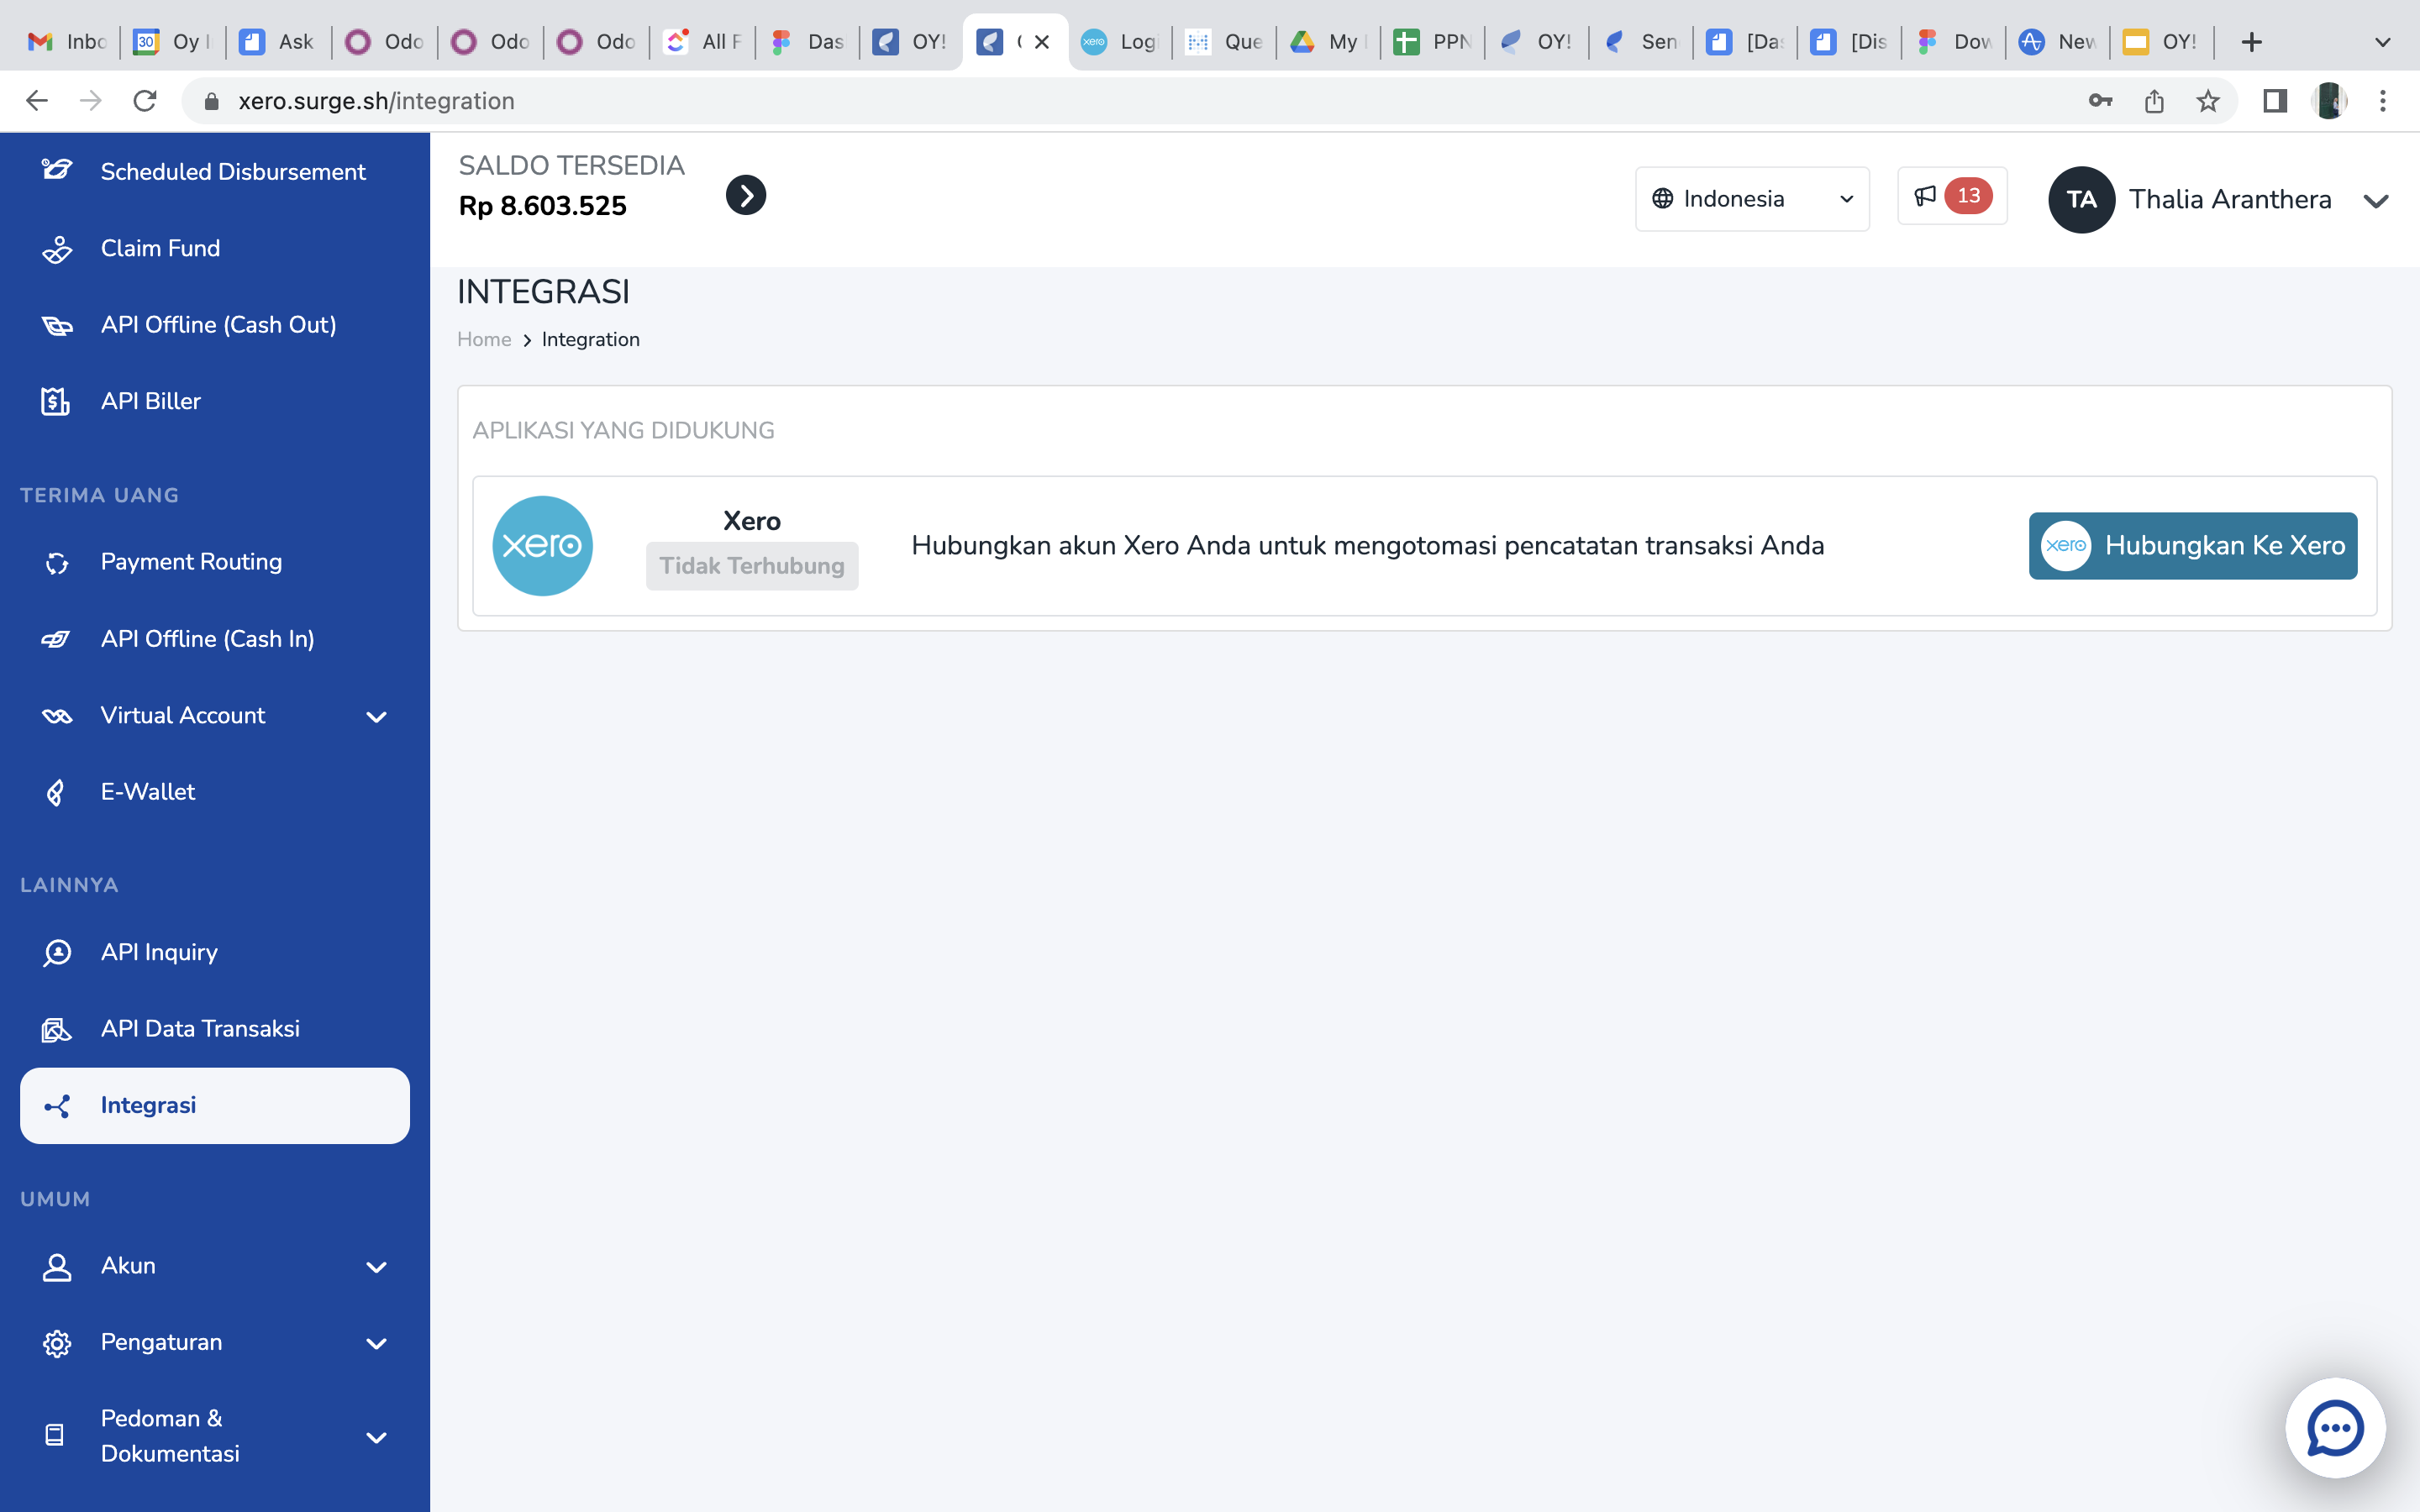
Pratinjau untuk halaman login Xero:
Pratinjau notifikasi OY!:
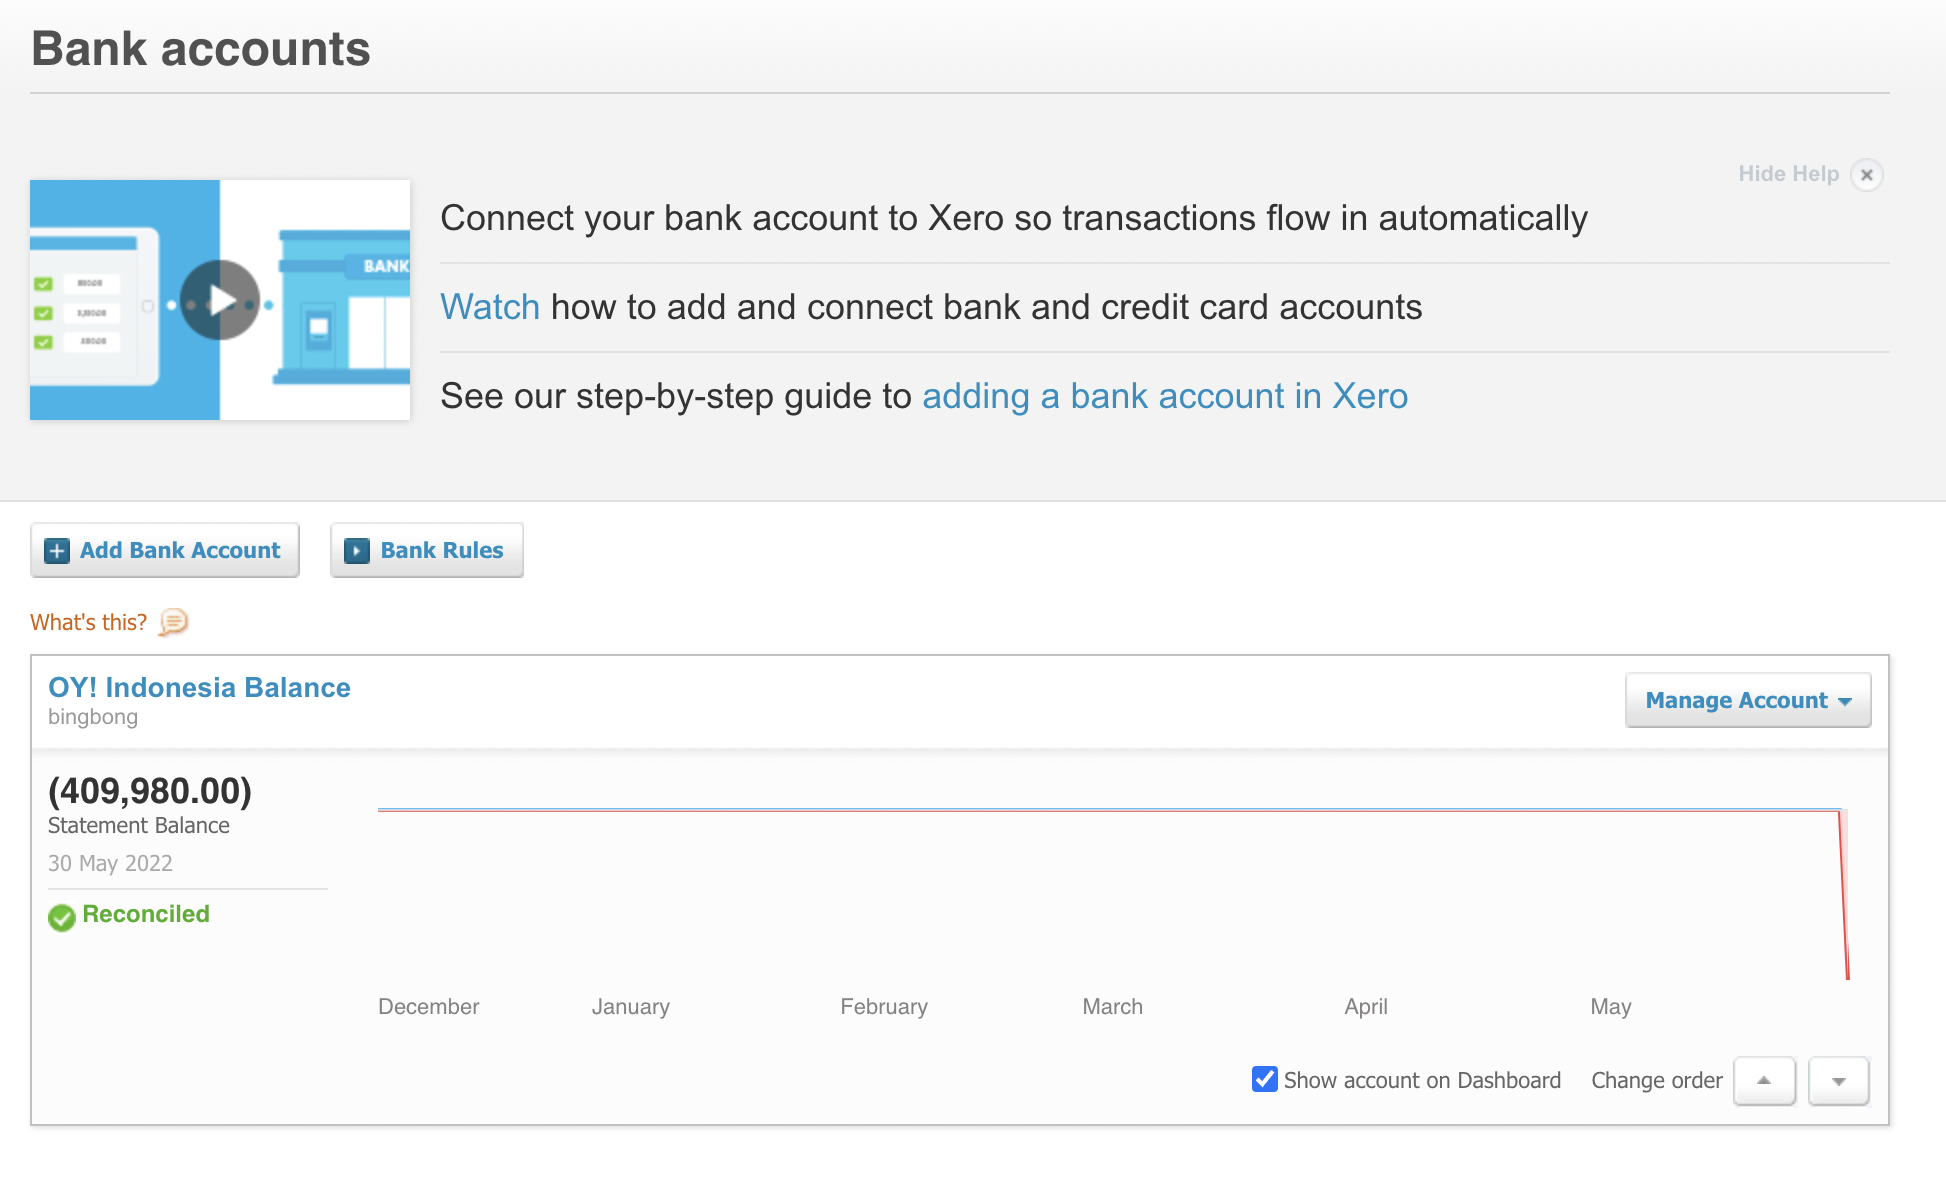
- Setelah berhasil terhubung ke Xero, kami akan membuat rekening bank baru dalam akun Xero Anda, dengan nama "OY! Indonesia Balance" di mana setiap transaksi yang terjadi di OY! akan dicatat di sana.
Memetakan Chart of Account Anda
Setelah Anda berhasil terhubung ke Xero, Anda akan diarahkan ke halaman untuk melakukan pemetaan chart of account Anda.
Kemudian, lakukan pemetaan setiap produk ke account yang sesuai. Setiap transaksi yang menggunakan setiap produk akan dimasukkan ke dalam chart of account yang Anda tentukan di halaman ini.
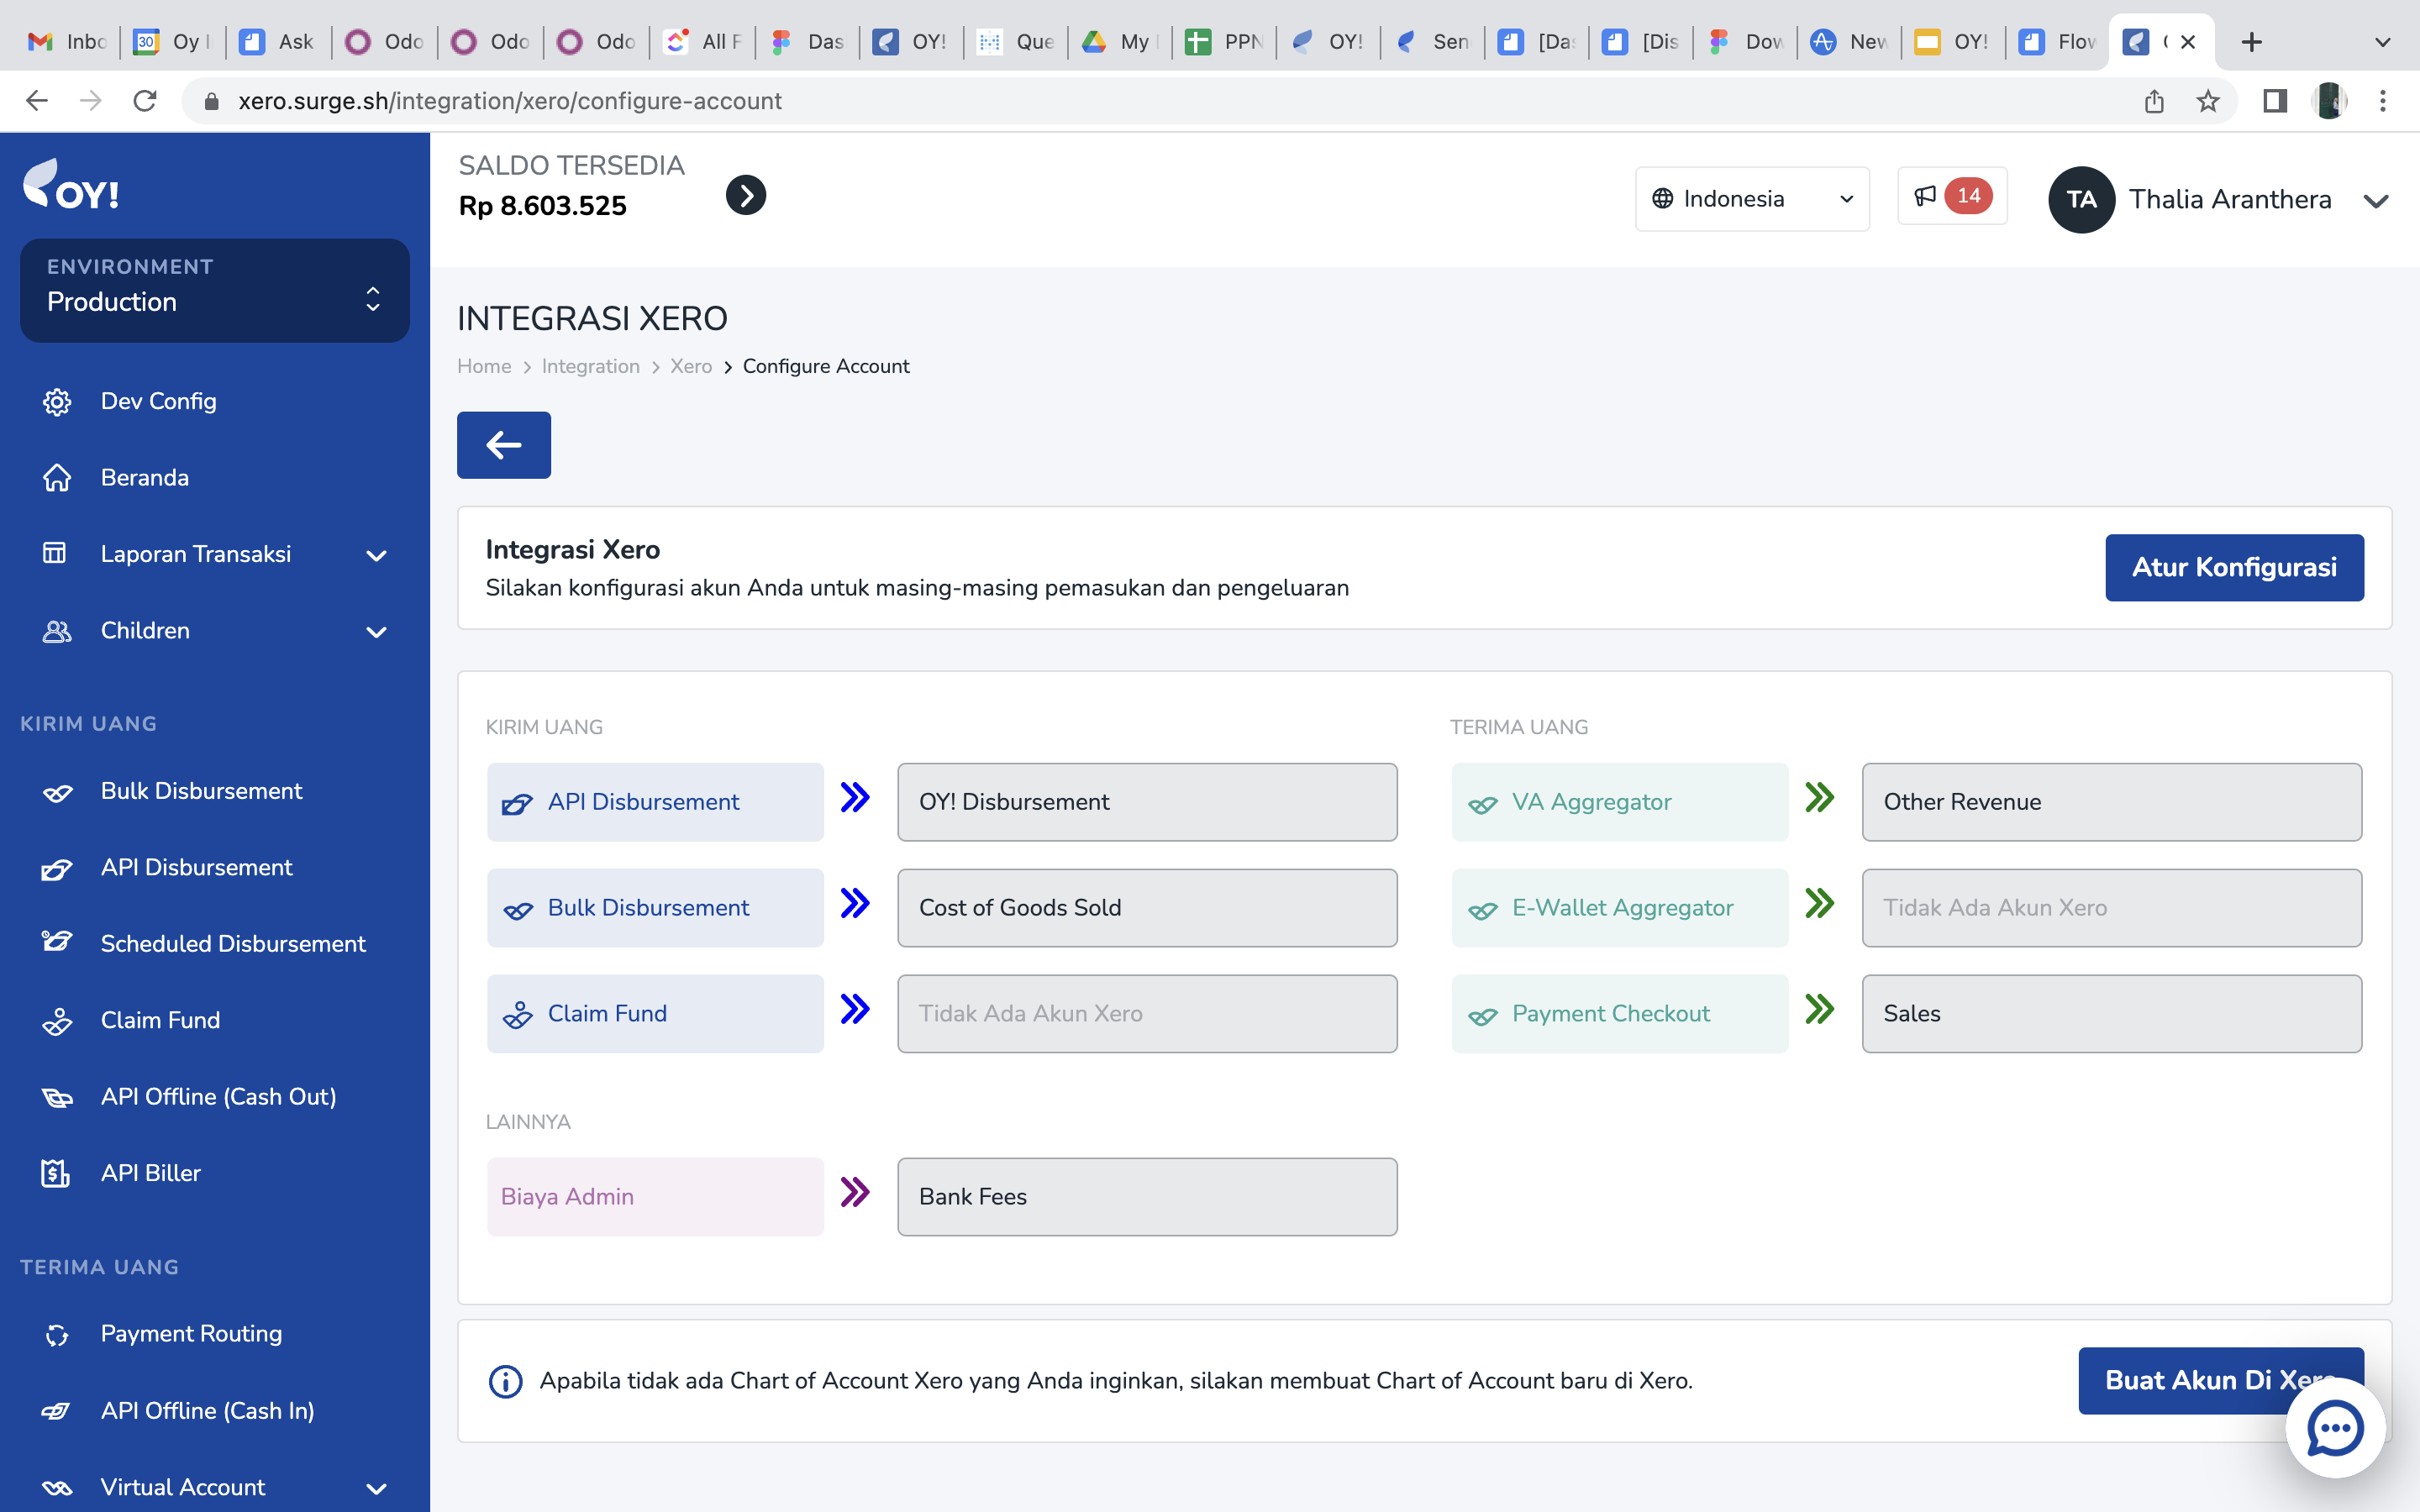
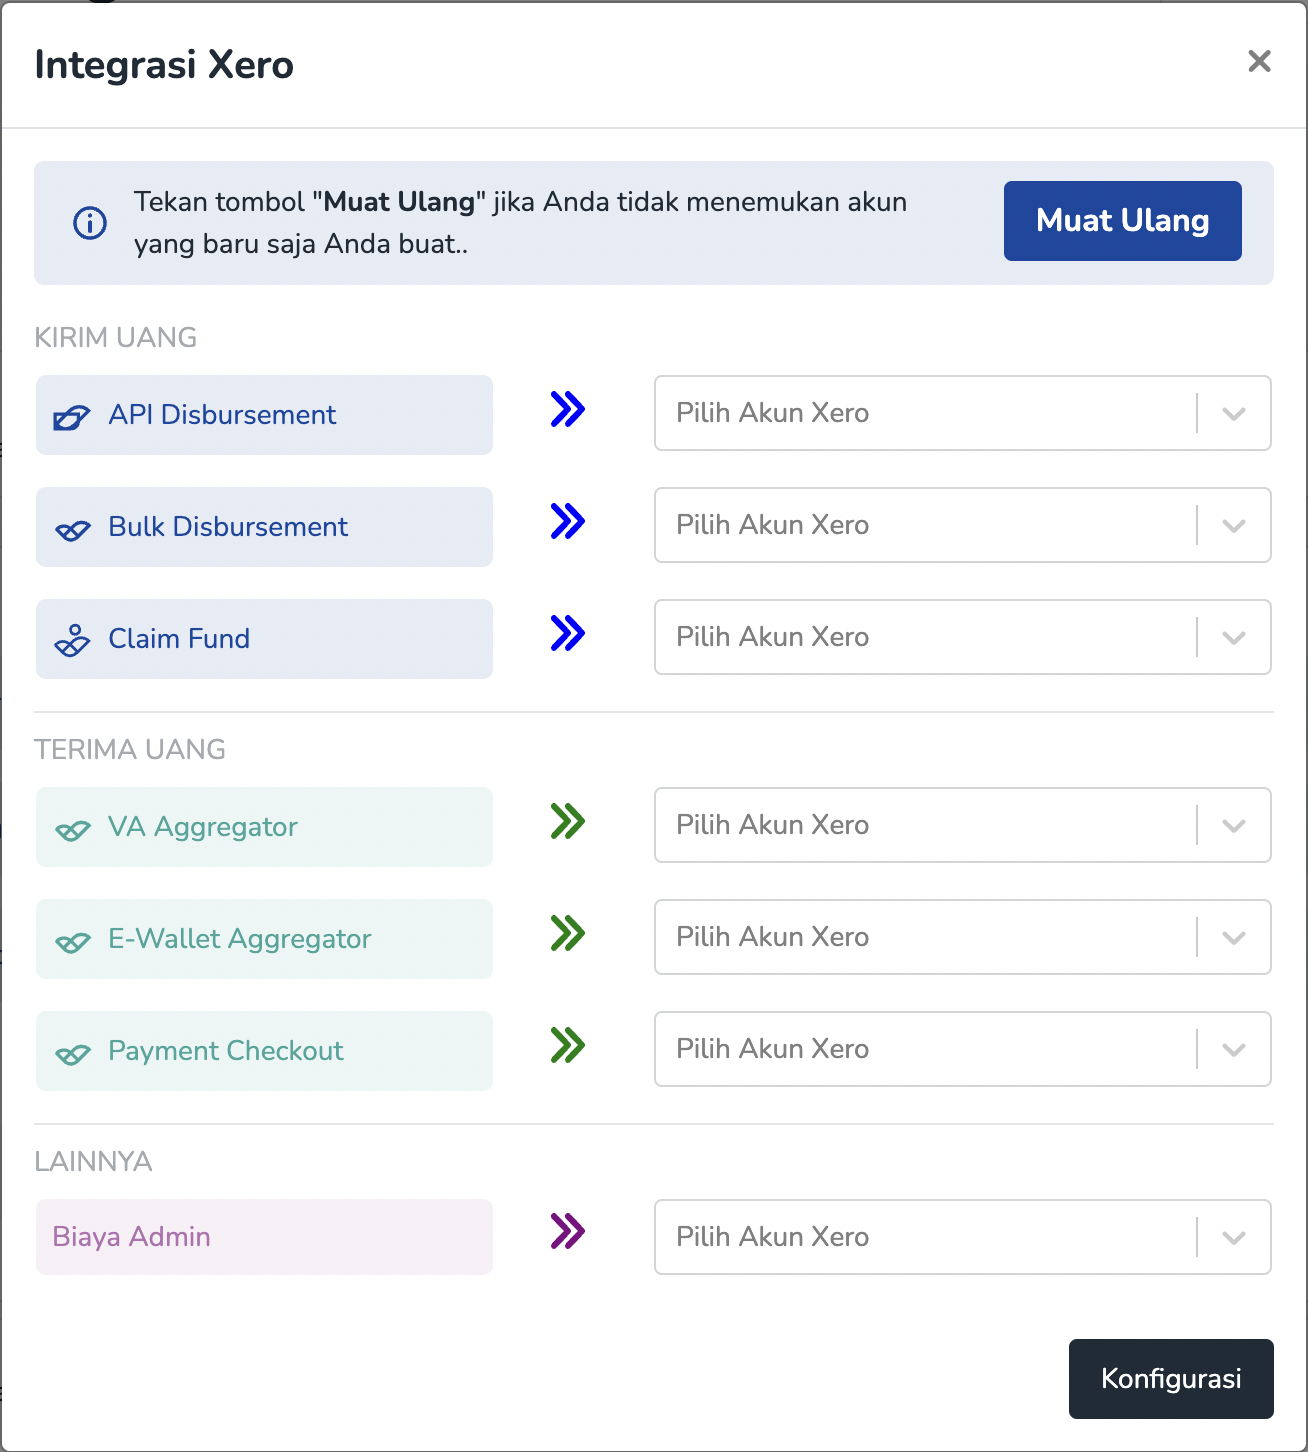
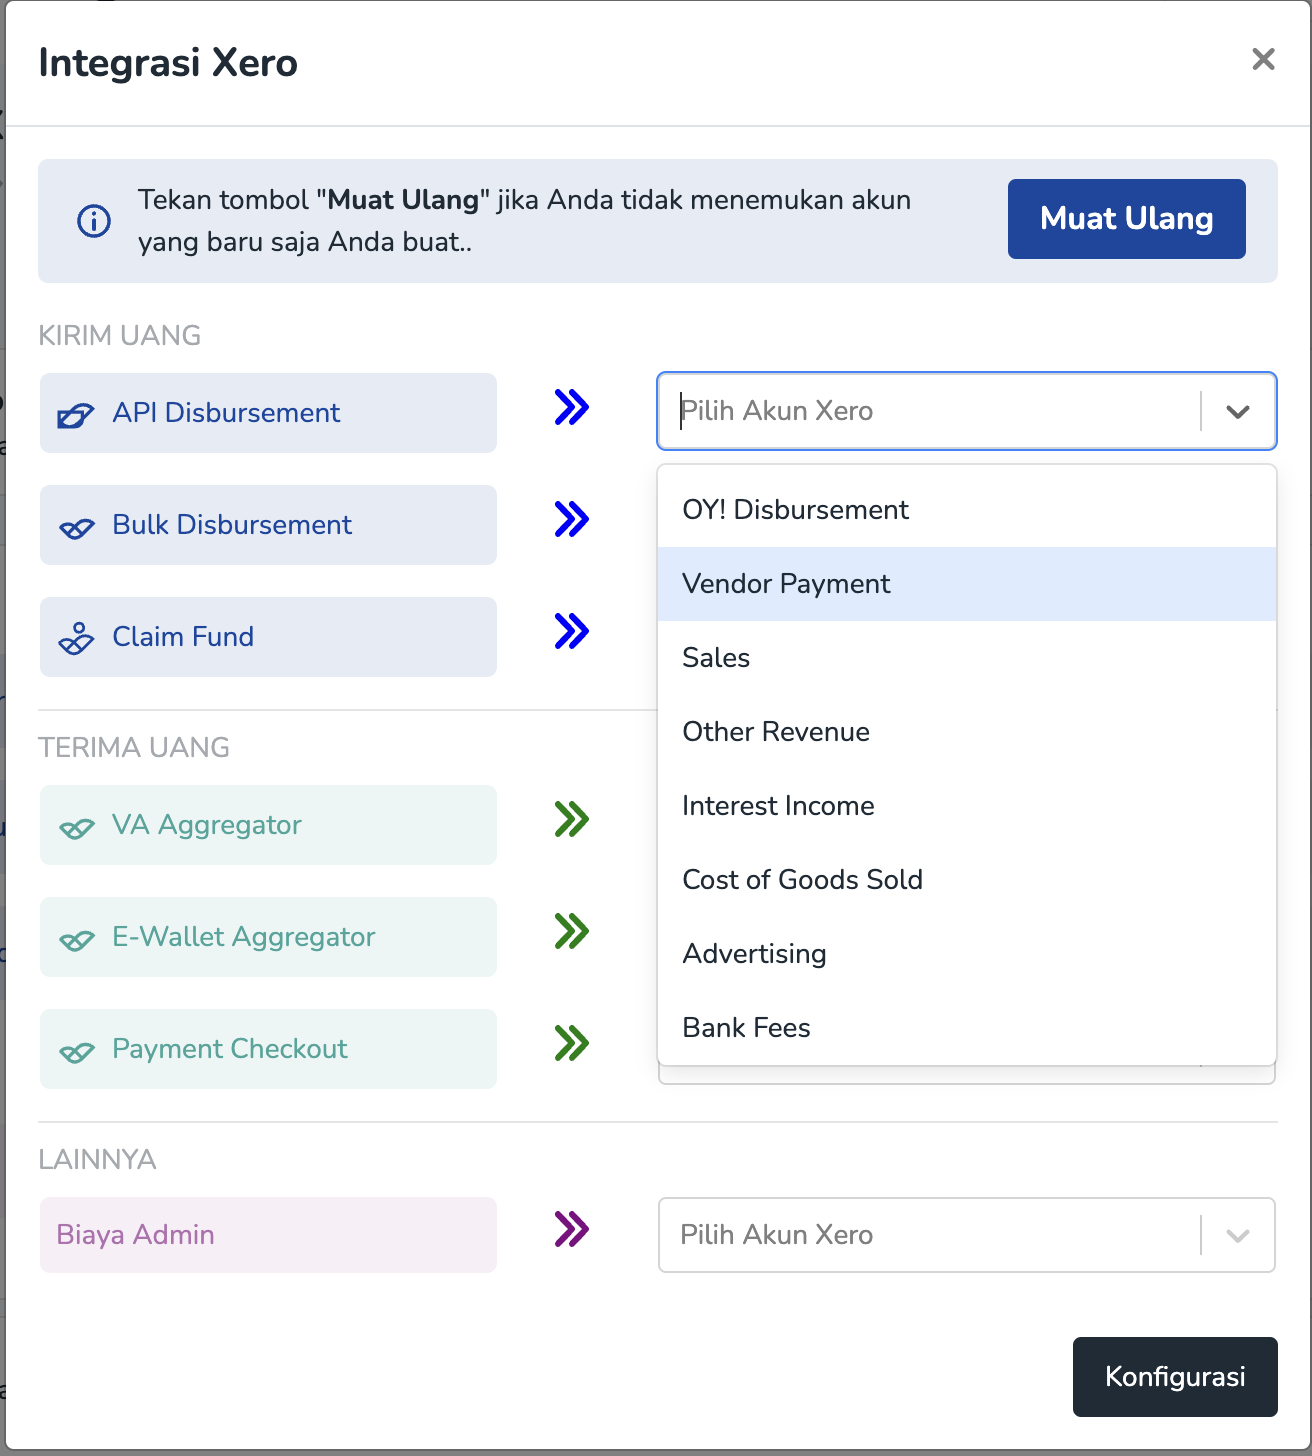
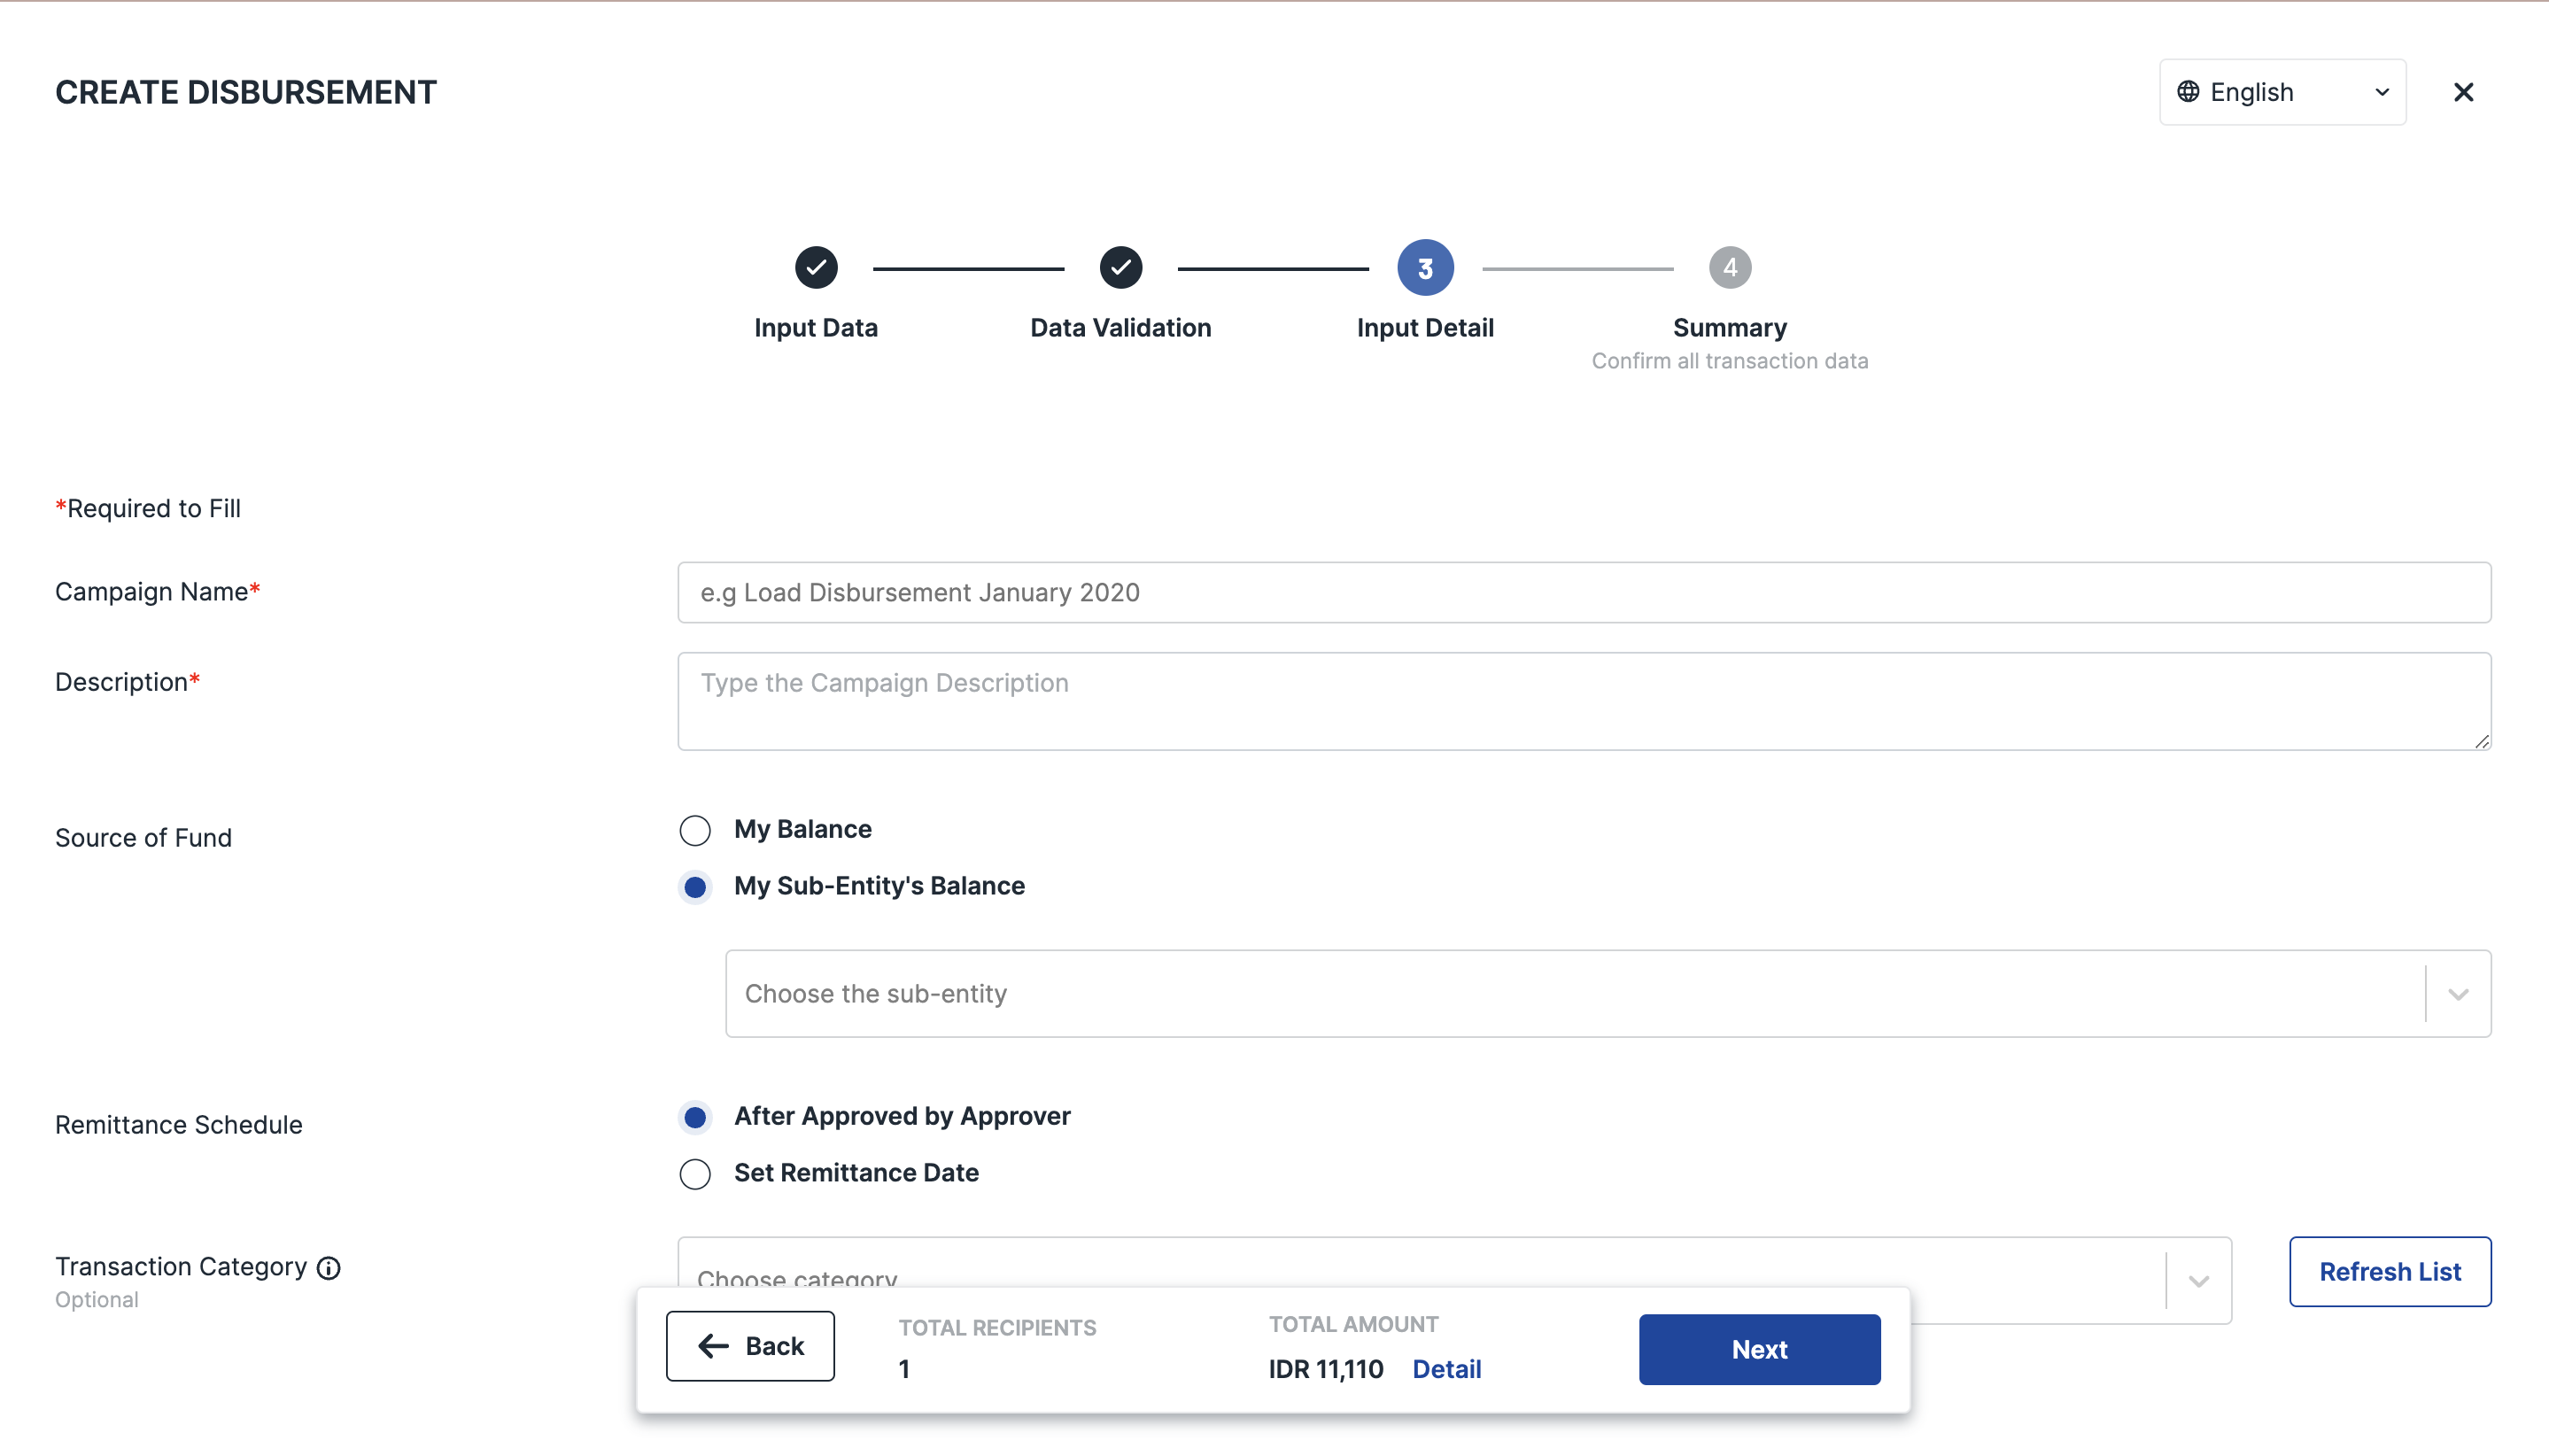
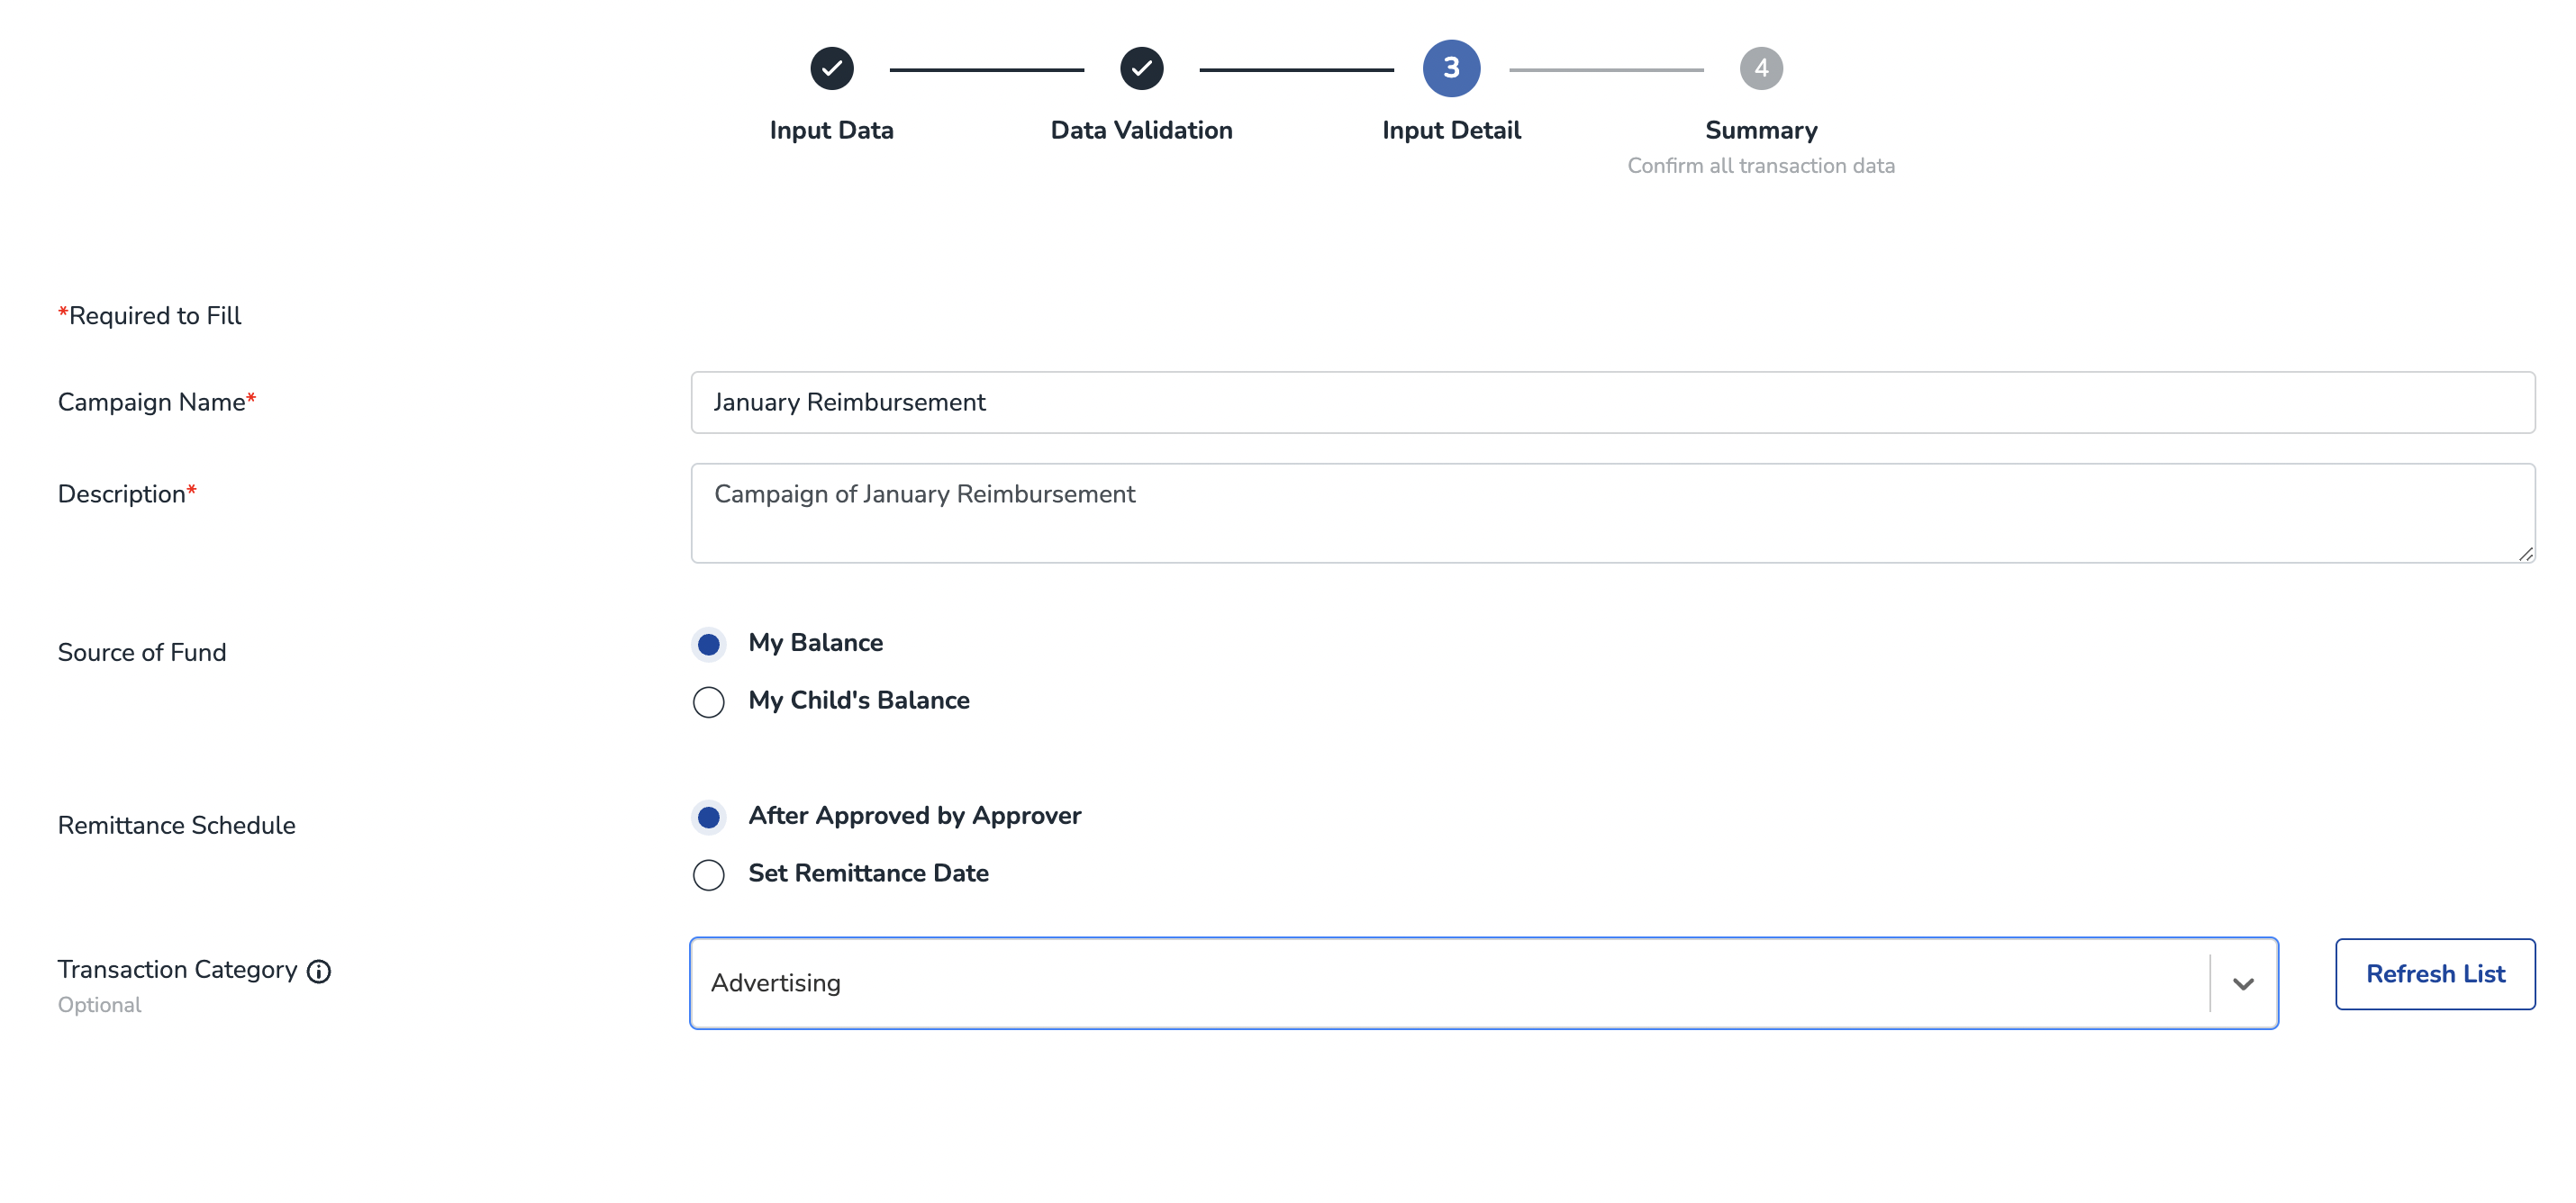
Catatan: Khusus untuk produk Multitransfer, Anda dapat menentukan chart of account nanti dalam proses pembuatan transaksi pada halaman "Masukkan Detail" di langkah ke-3, pada kolom kategori transaksi.
- Anda dapat mengubah pemetaanchart of account kapan saja sesuai kebutuhan, cukup pergi ke menu Integrasi > Xero > Konfigurasi.
Record Transaction to Xero
- Now, your OY! account has been connected to your Xero account and each products has been mapped to its corresponding Chart of Account.
- Any success transaction that happened in OY! will be recorded to Xero with the corresponding Account you defined in Mapping Account menu.
- Transaction in OY! will be treated as SPEND or RECEIVE money transaction in a bank account (OY! Balance).
- Each transaction will contains of two rows. Row 1 contains of amount of transaction where row 2 contains of admin fee.
- In this version, any tax will be excluded. Means that you will need to input manually the tax invoice you obtained from OY! team to your Xero.
Disconnected your Xero
- To disconnect your Xero account from OY!, open the Integration menu on the sidebar. Then select “Disconnect”.
- Then, you will be disconnected from Xero. Any transaction that you execute via OY! will not be recorded into Xero.
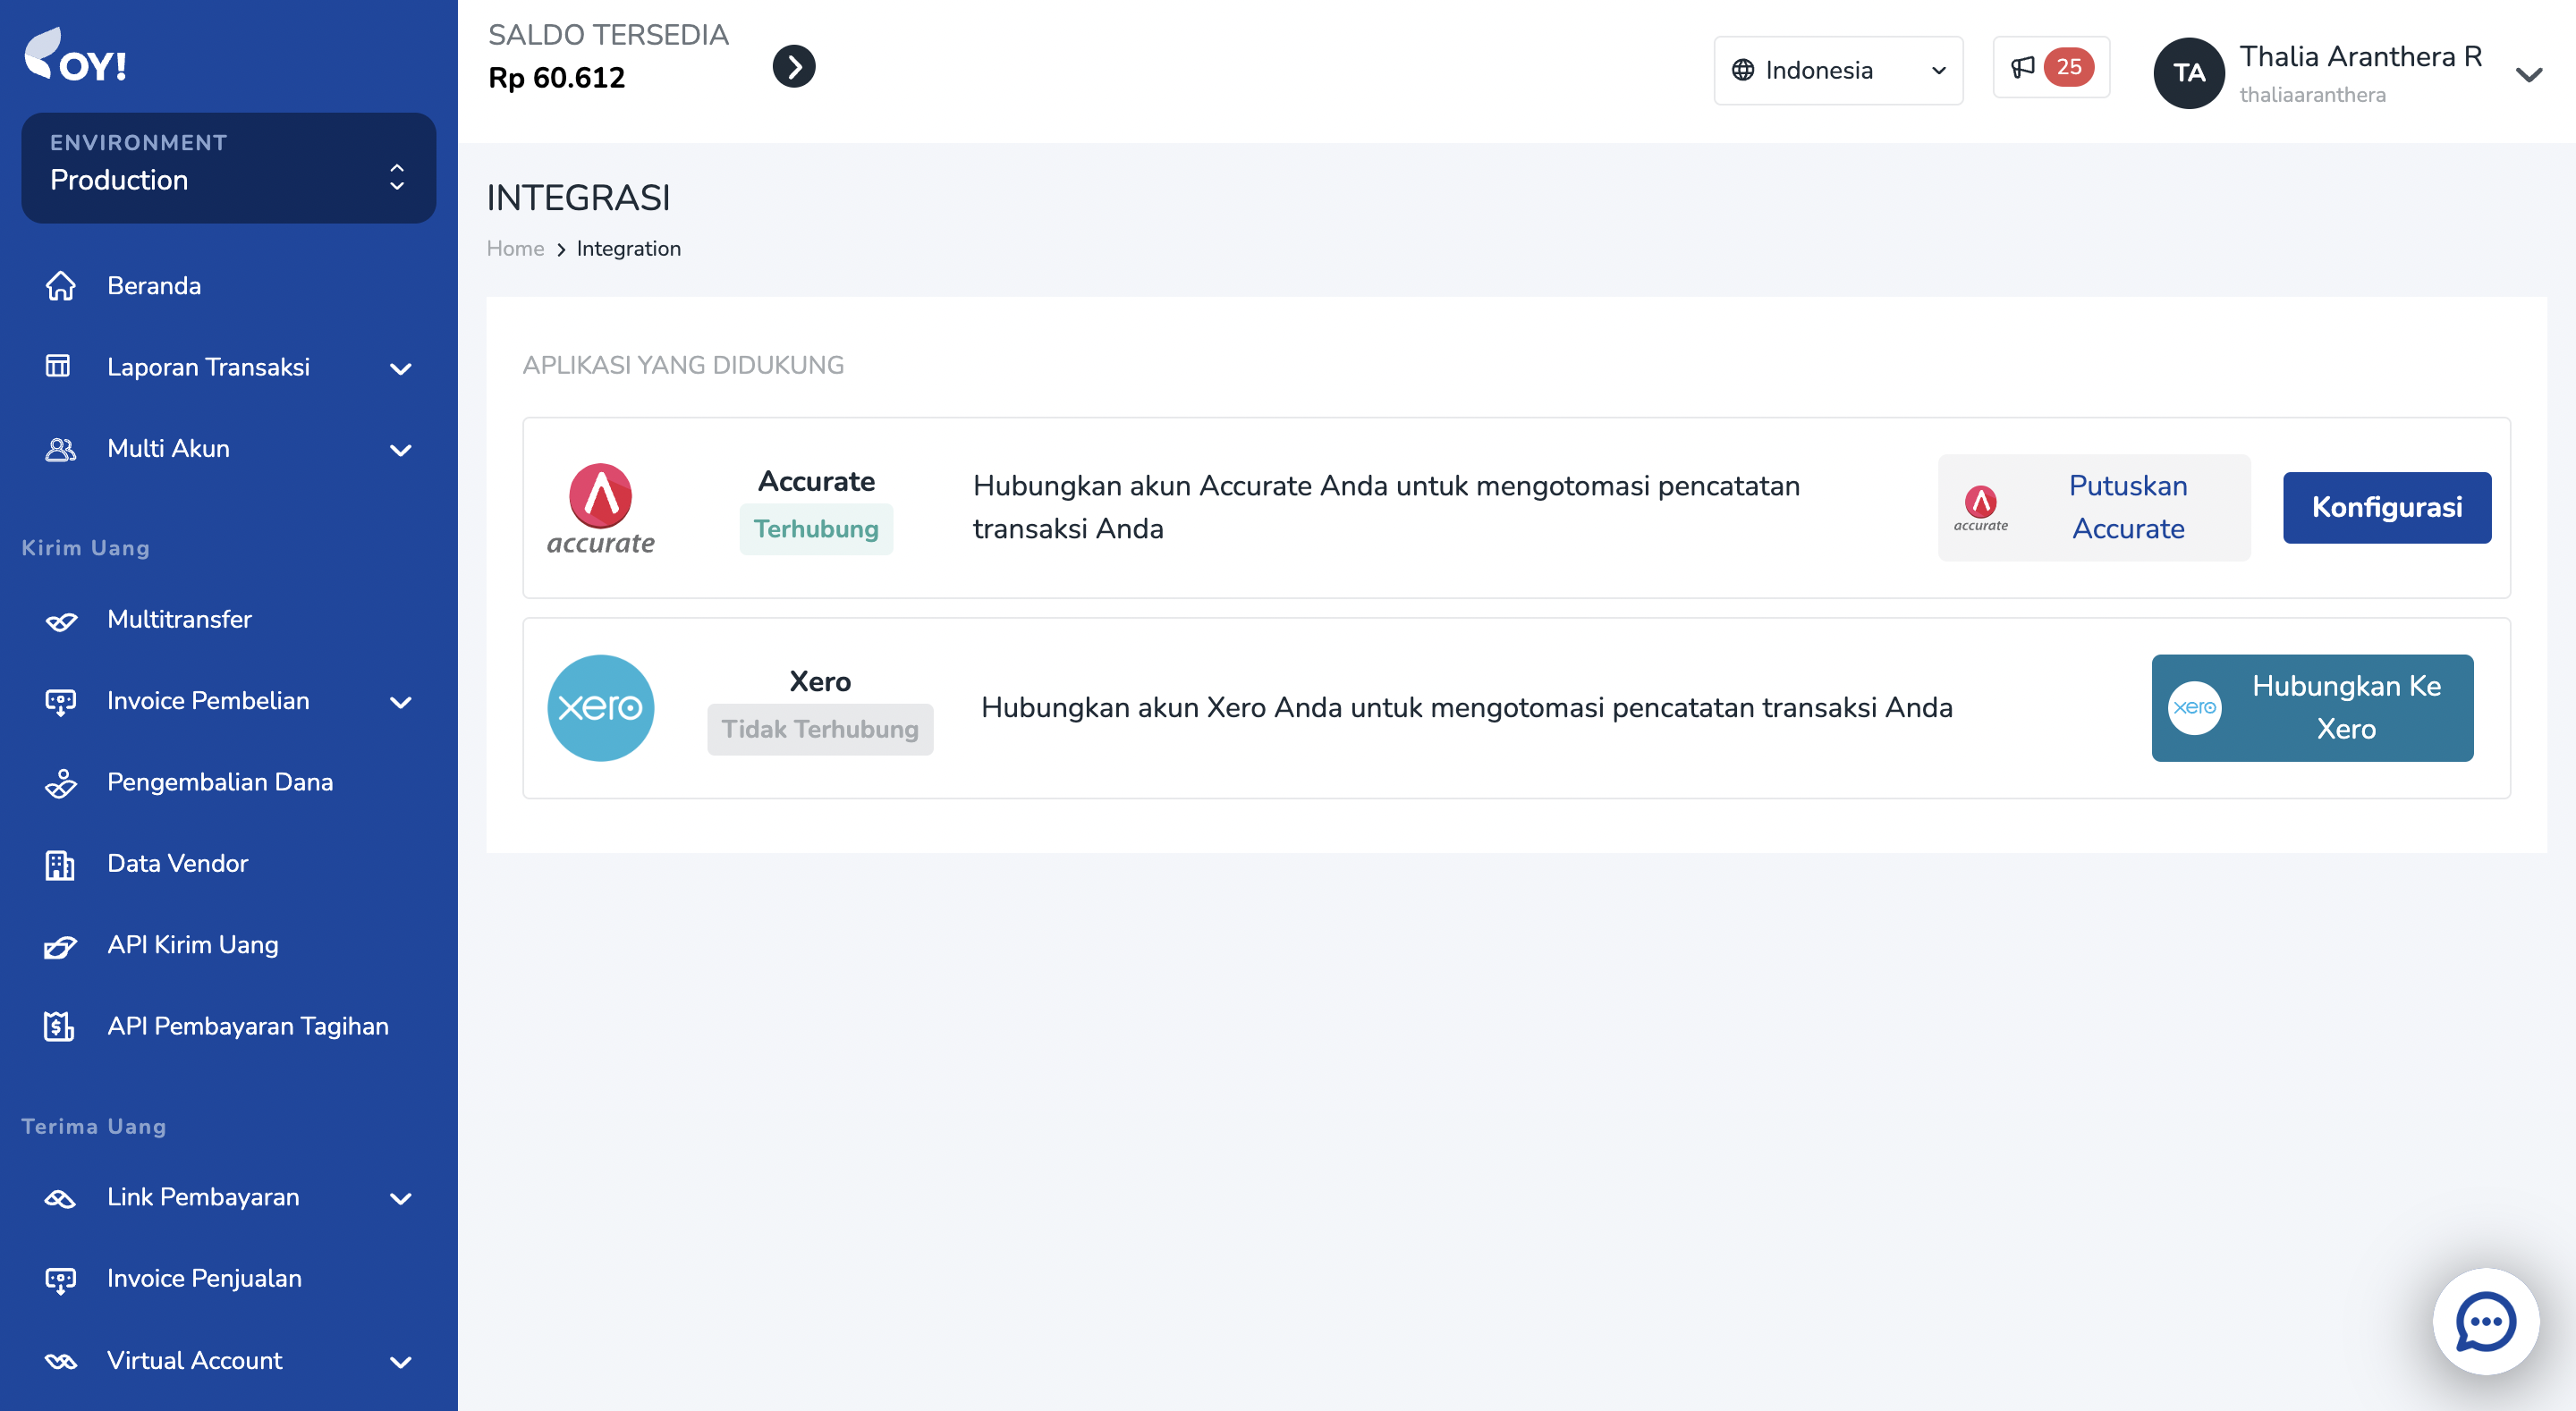
Accurate Integration
Accurate is a local accounting platform that is mainly used by companies in Indonesia. We have integrated our system to Accurate system in order to help you optimize your workflow. By connecting your OY! account to your Accurate account, you do not have to log in to your Accurate account. This means that you do not have to manually record your transaction that happened in OY! to Accurate. You will get a seamless experience of recording your transaction.
How does it works?
Once you have connected your Accurate account in OY!, any transaction that happened in OY! will be automatically recorded to your Accurate account. Upon successful connection, we will trigger the creation of a new Bank Account, which is OY! Balance Bank Account. Transactions that happened in OY! will be recorded in that bank account, to PEMASUKAN or PENGELUARAN module. Then, you will be required to map your Accurate’s Chart of Account (in Accurate, it is Akun Perkiraan). Mapping your Chart of Accounts will help us to put your transaction into the correct Account.
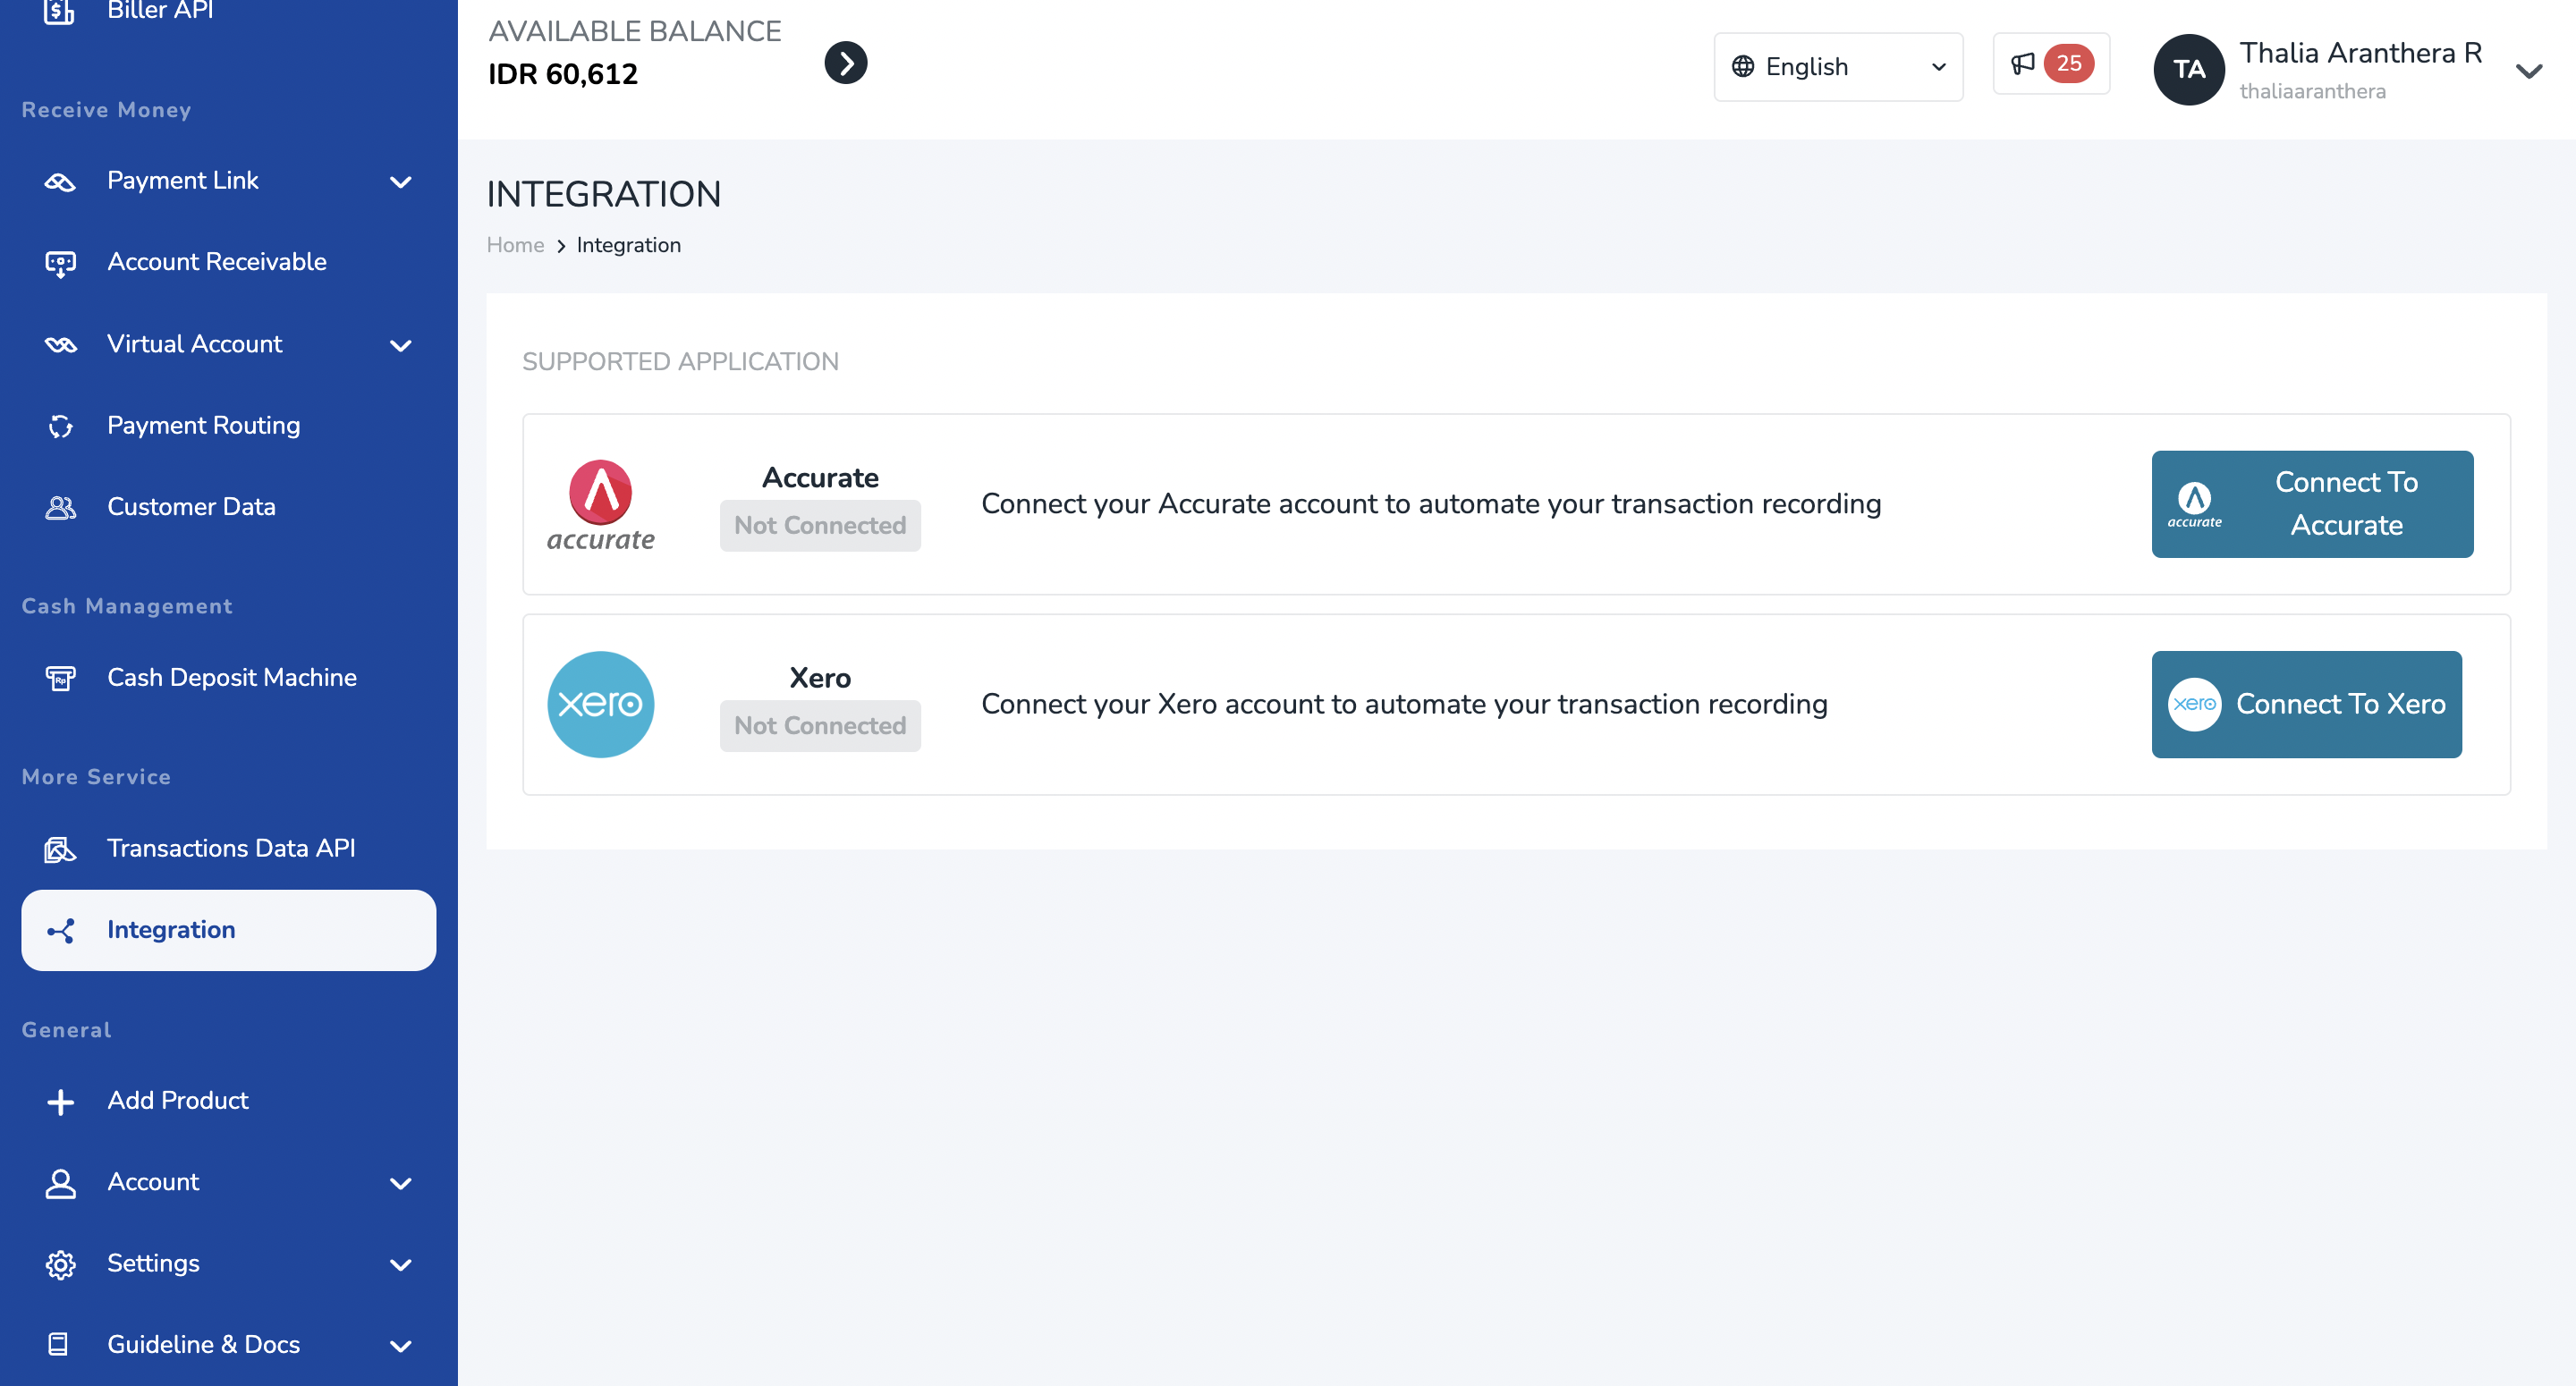
Connect your Accurate
- Login to your OY! dashboard. In the sidebar, select the Integration menu.
- You will see Accurate menu. Click “Connect” to connect your Accurate account to OY!. You will be redirected to Accurate’s login page.
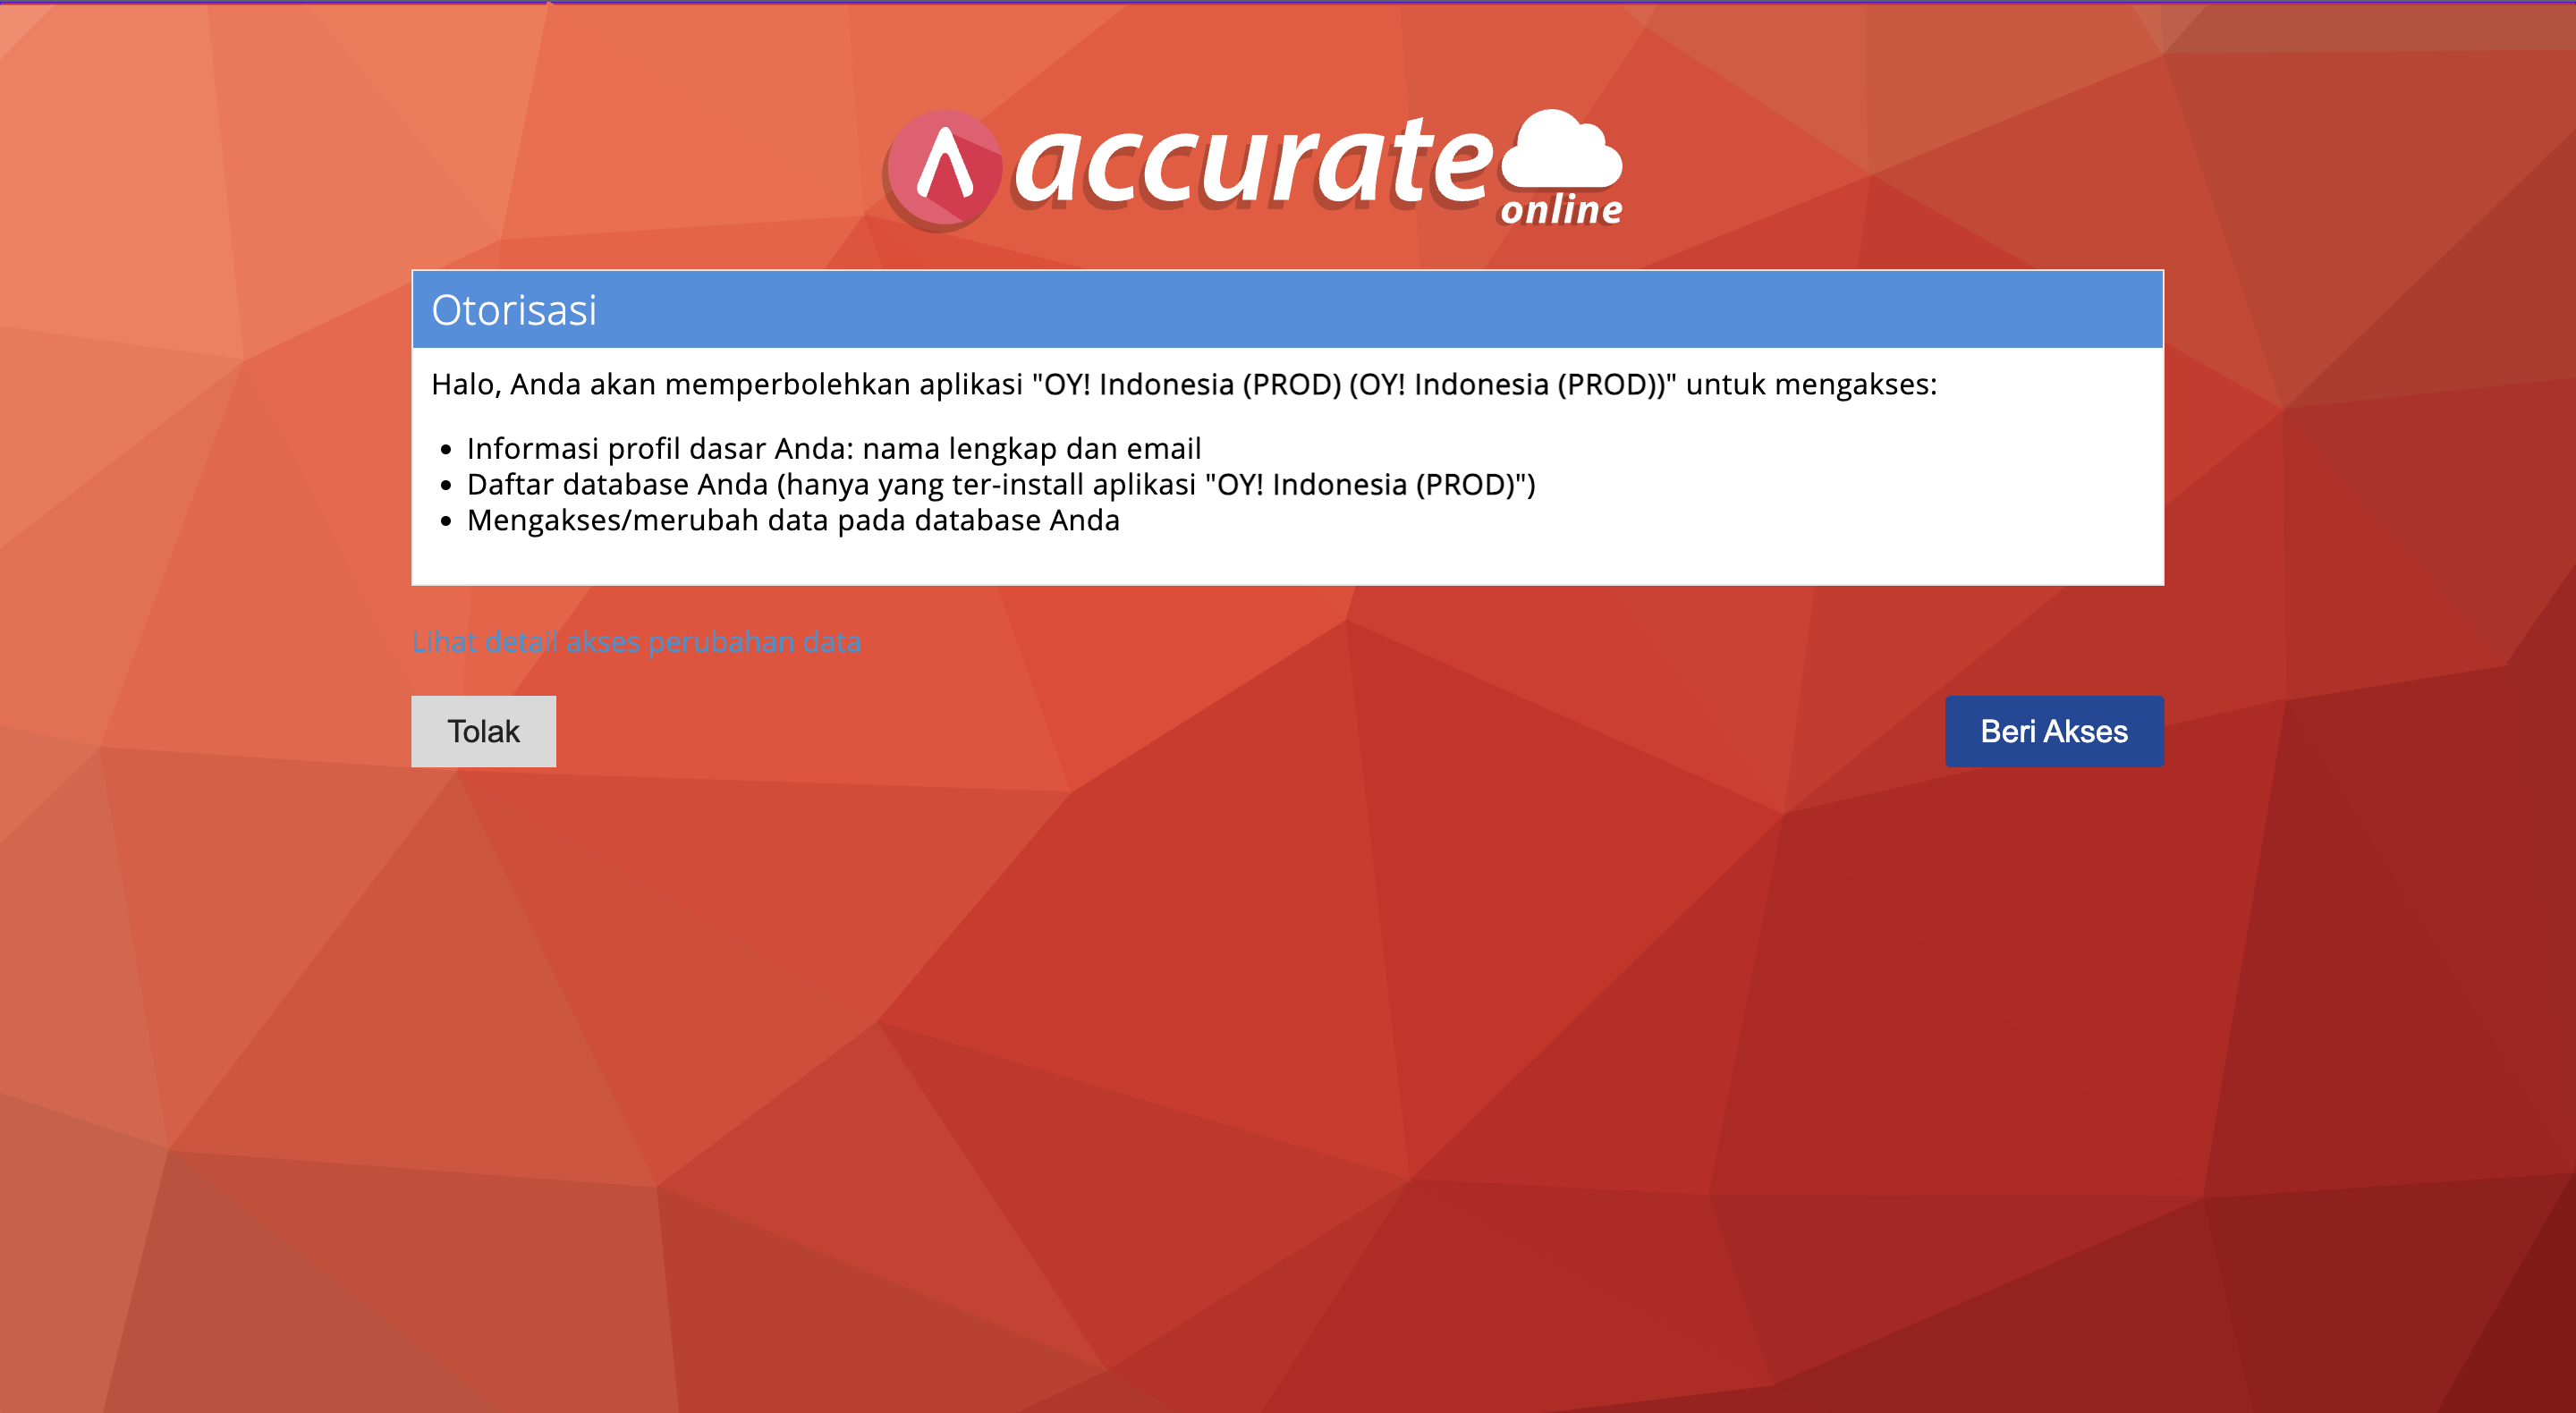
After login to your Accurate account, click Allow to allow conection between OY! and Accurate.
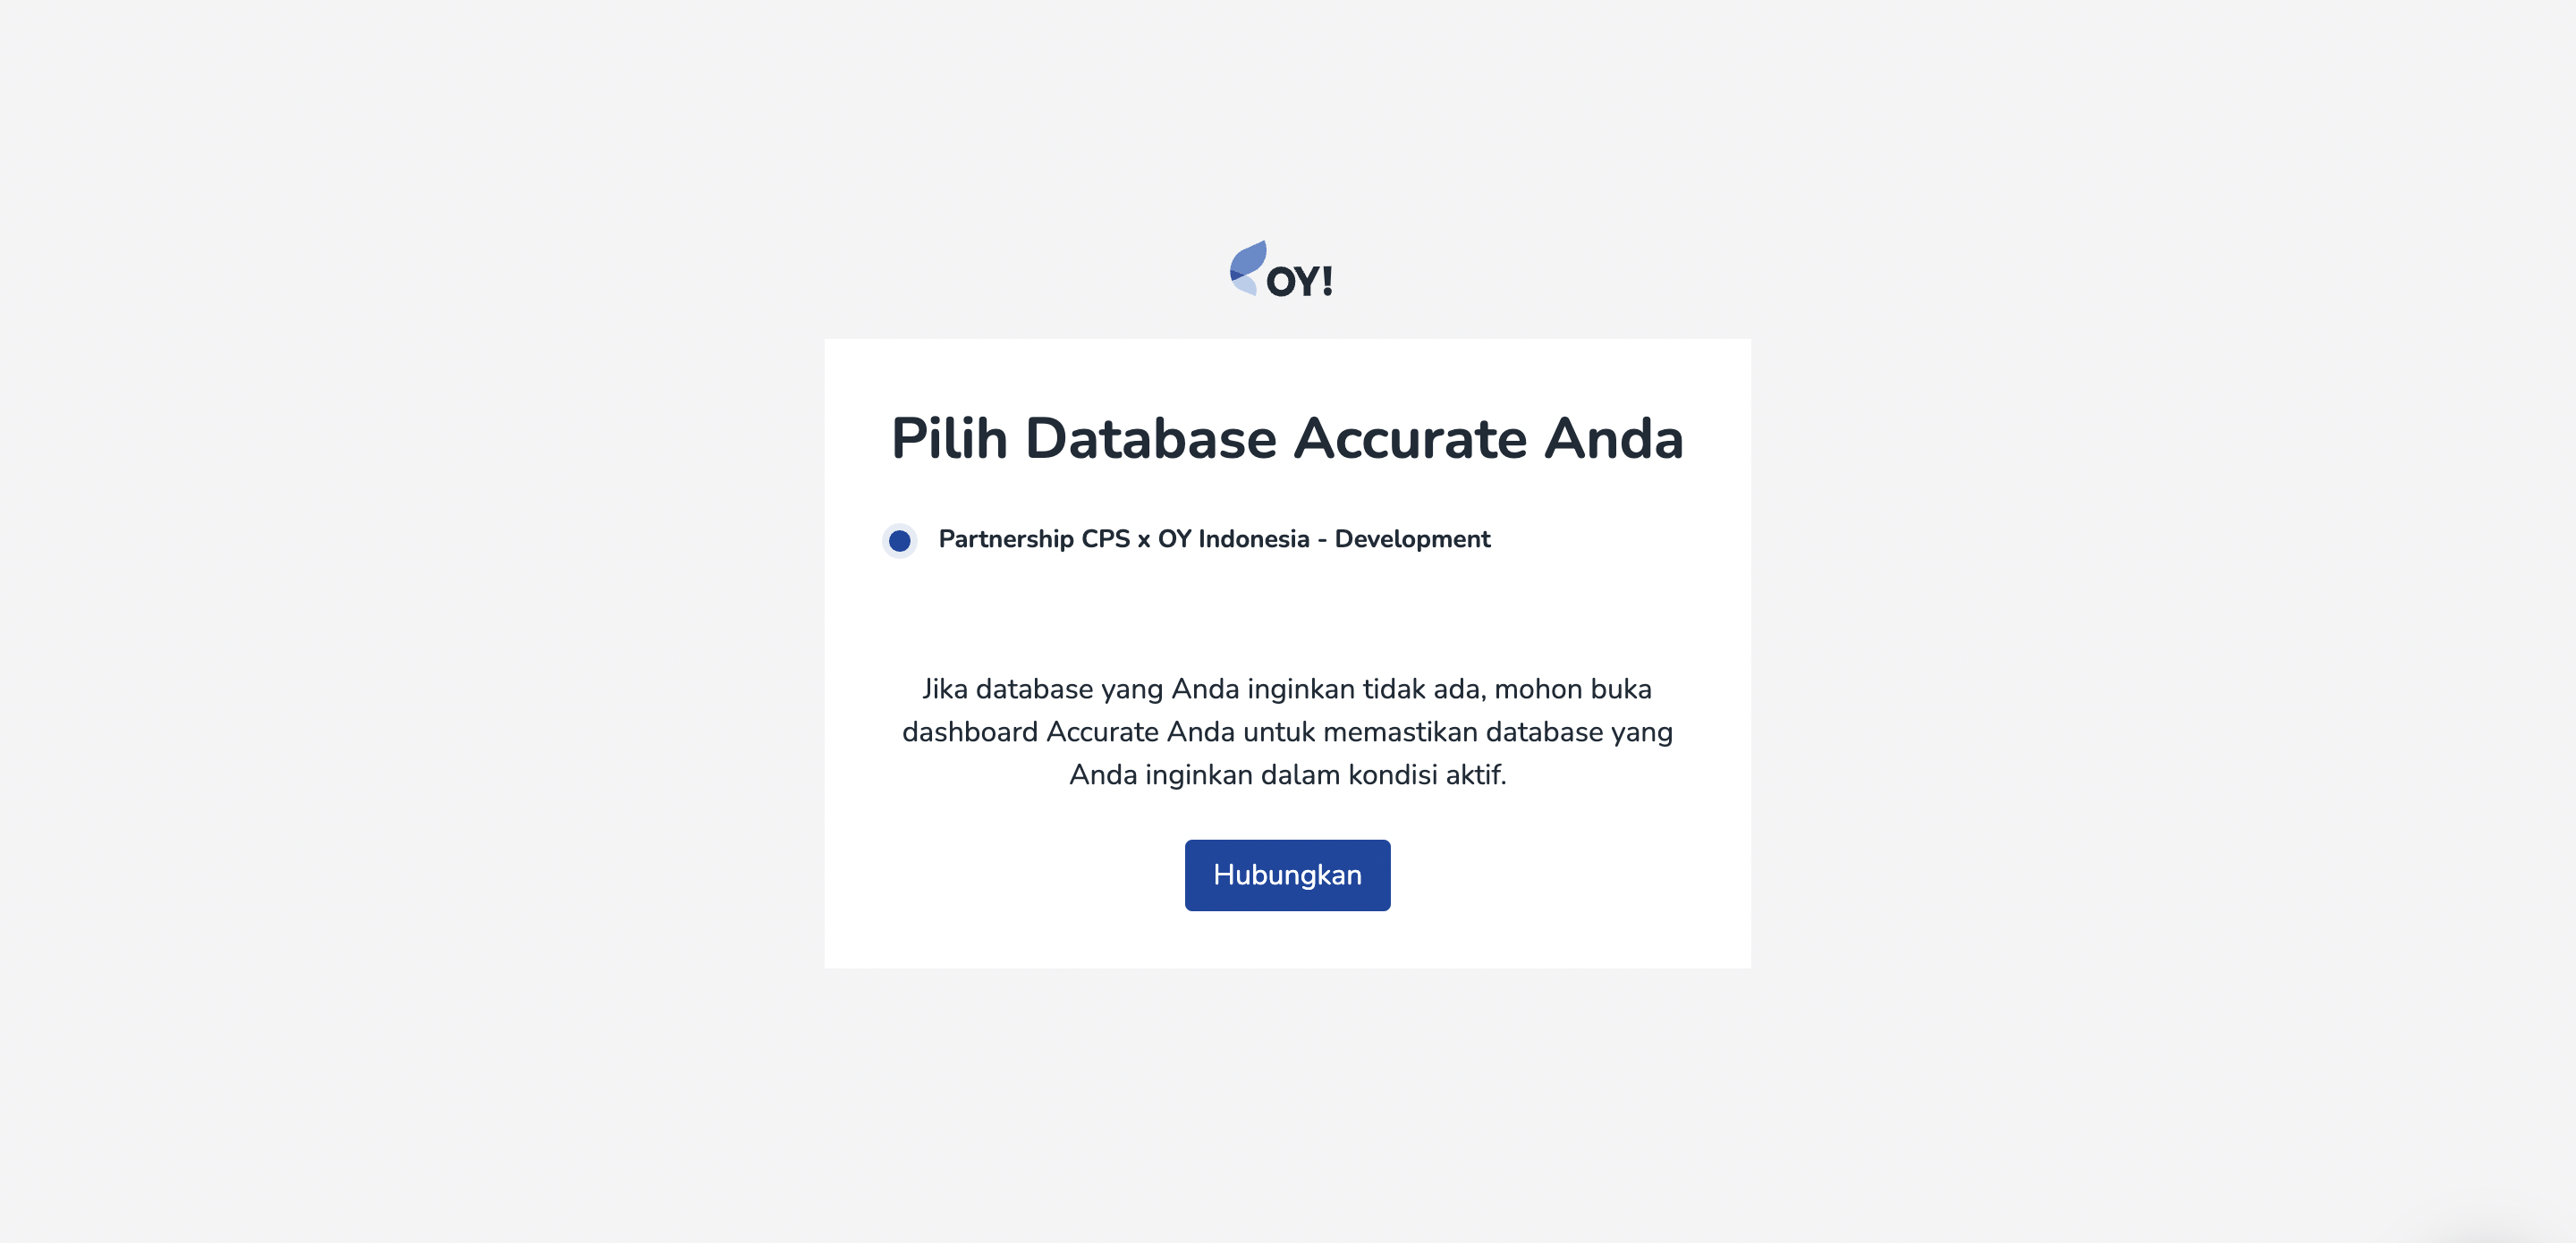
Next, please select an Accurate database that you want to connect with your OY! account.
Once you have successfully connected to Accurate, a notification in your OY! dashboard will appear and you can see your status is now "Connected/Terhubung".
Upon success connecting to Accurate, we will create a new Bank Account into your Accurate account, named “OY! balance” in which any transaction that happened in OY! will be recorded there. Your current OY! balance will also be mapped there.
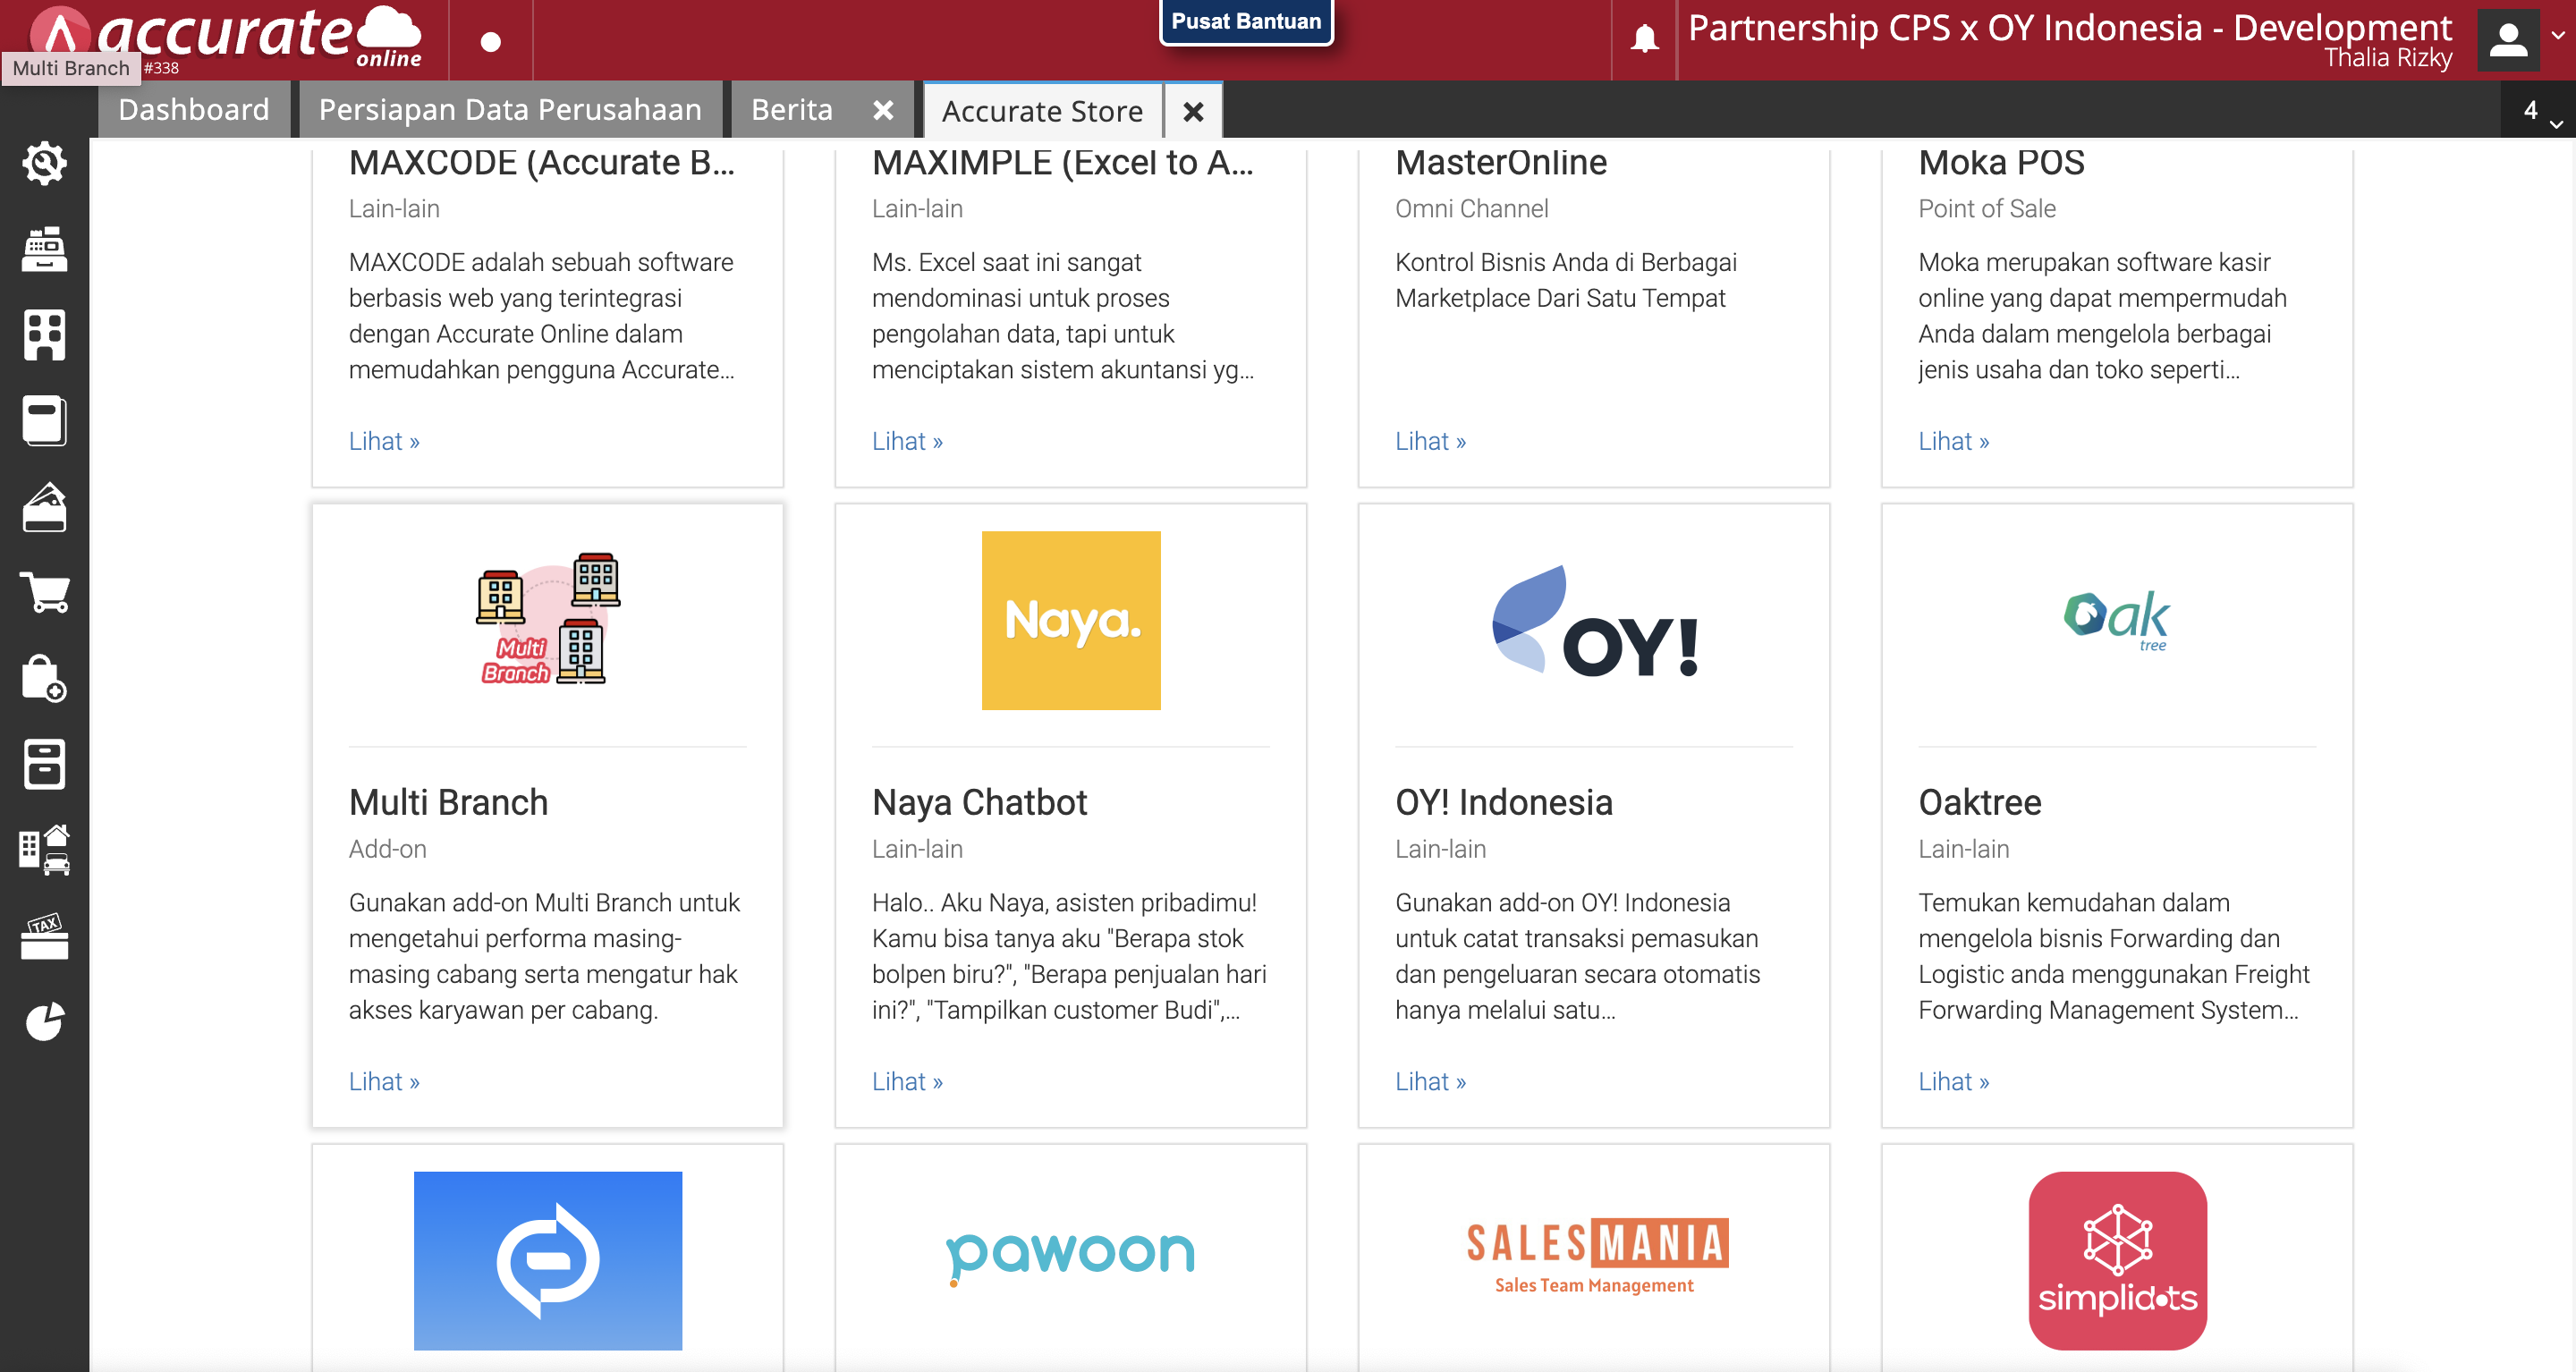
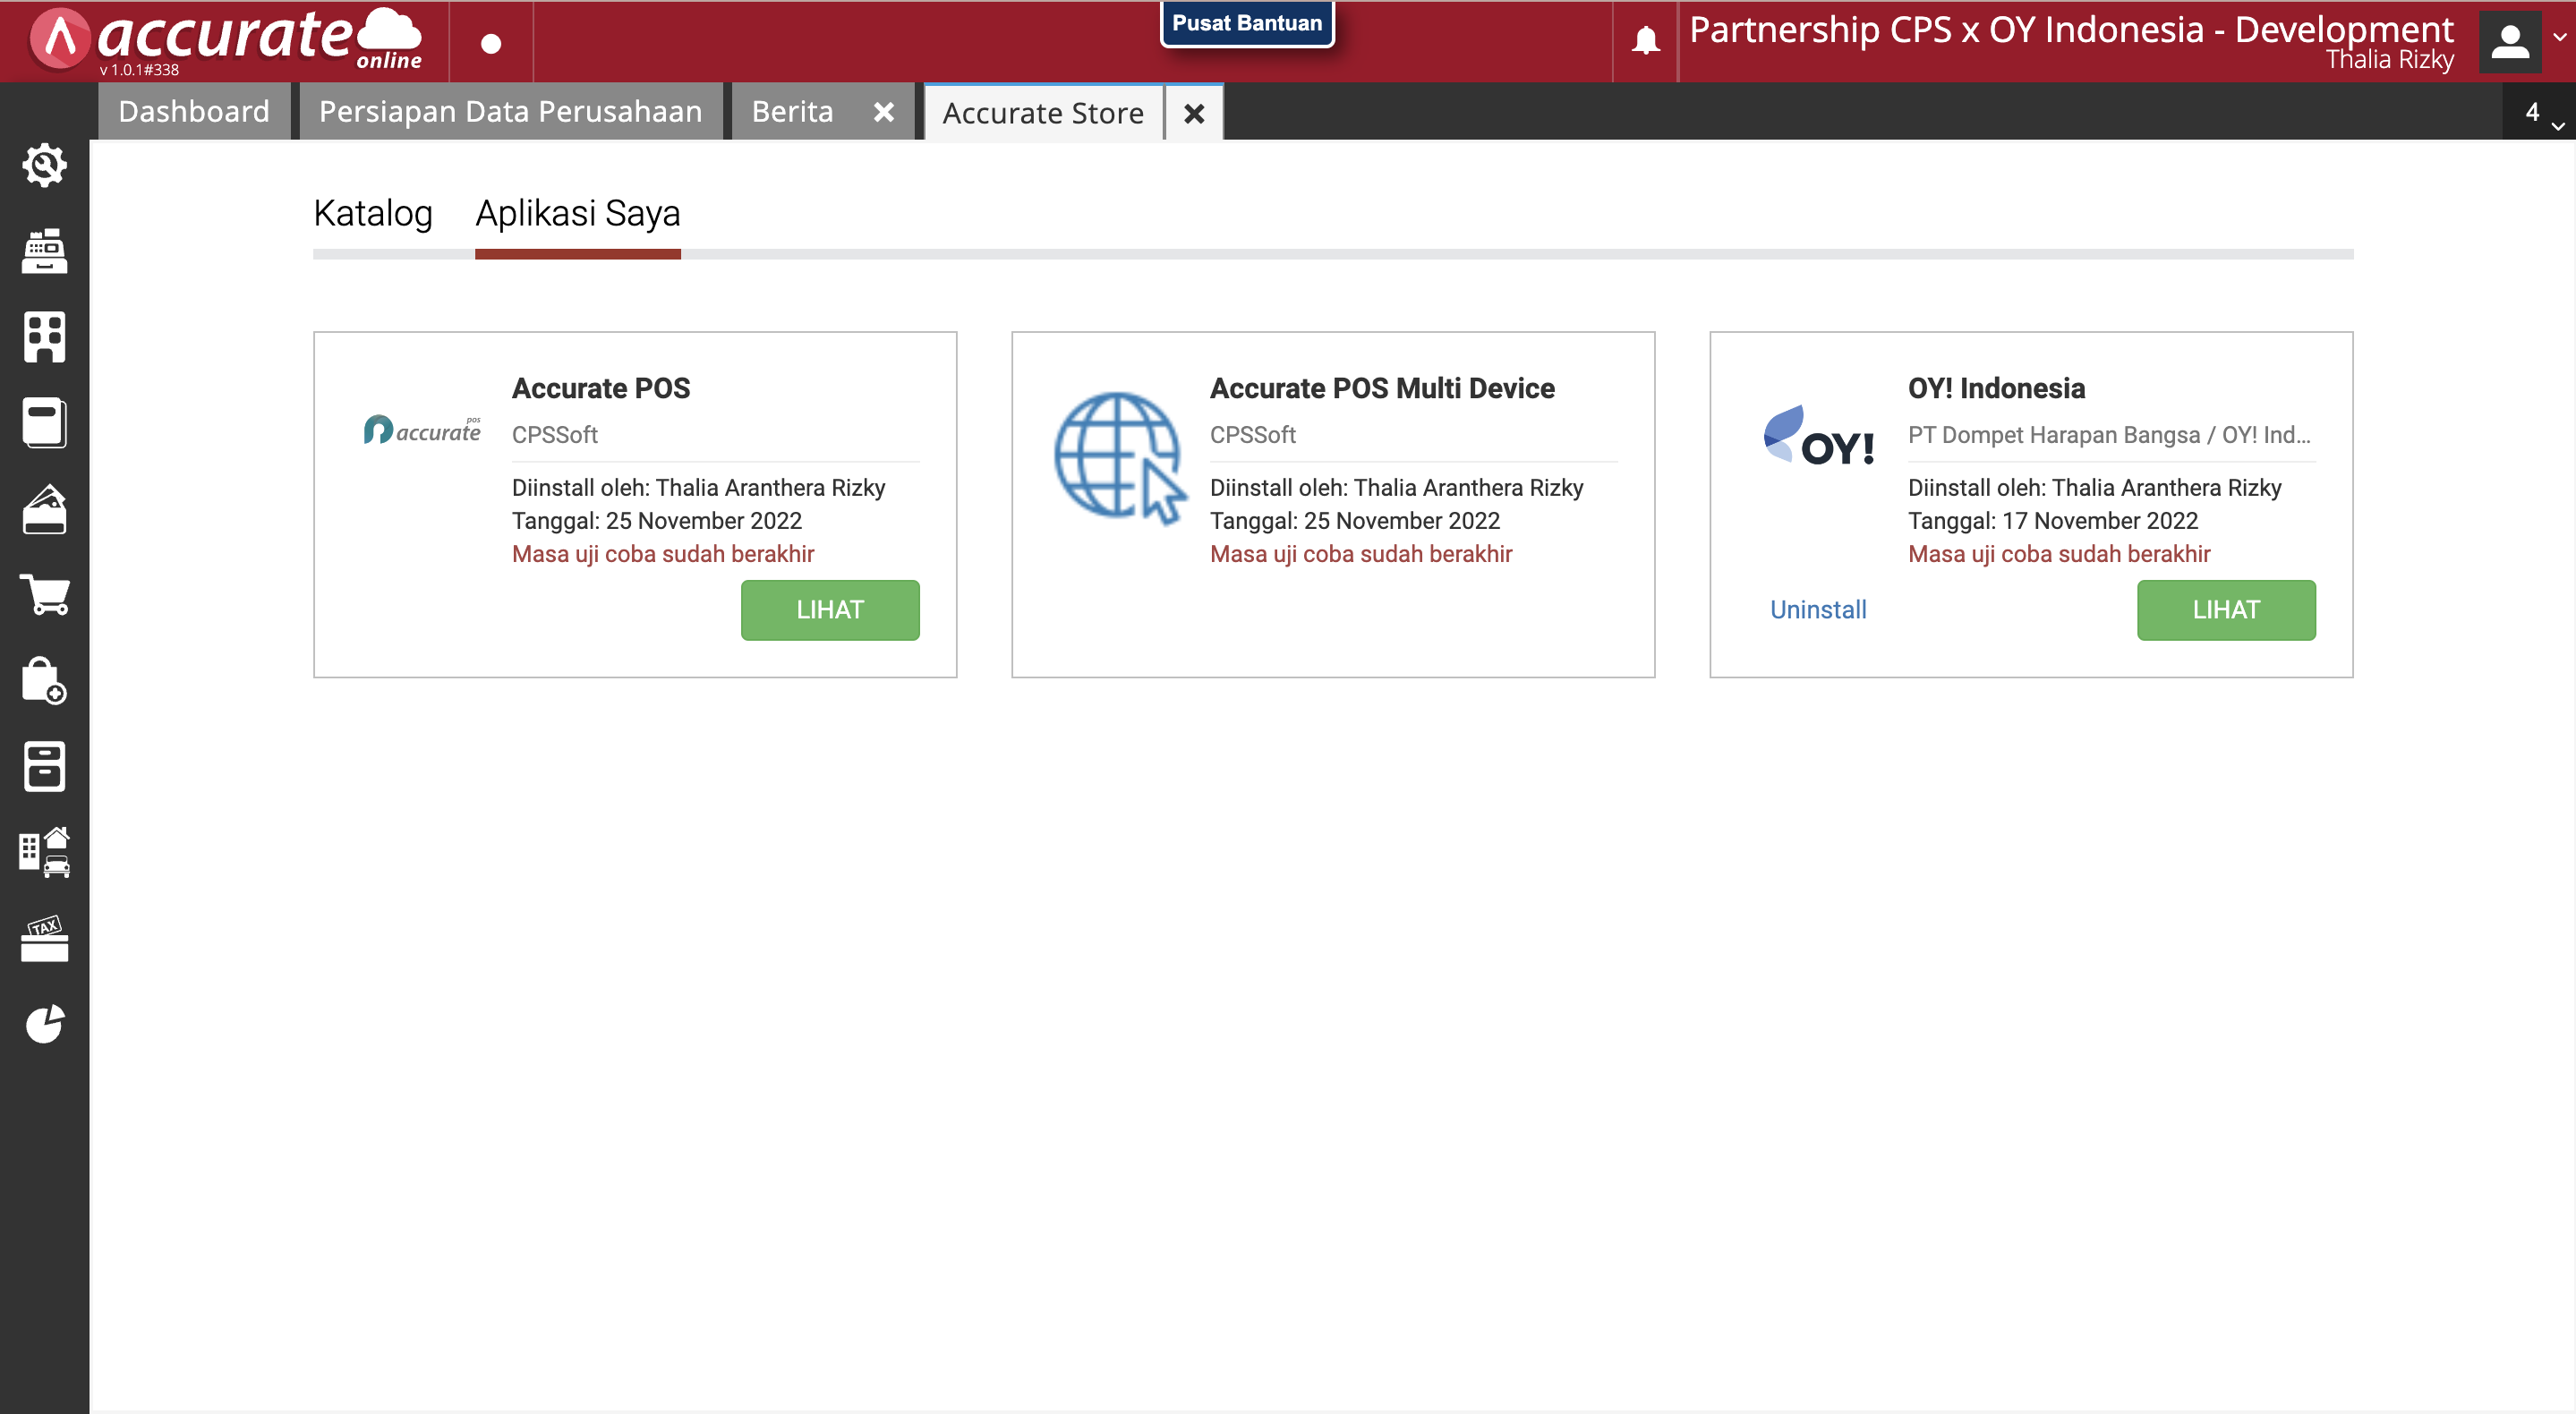
In your Accurate Dashboard, you can see that OY! Indonesia app will be listed in the Accurate Store >> Aplikasi Saya menu.
Note: A fee of IDR 20k/month will be added to your Accurate billing.
Map your Chart of Account (Akun Perkiraan)
- Click on "Configure" to map your Chart of Account (Akun Perkiraan).
- Then, map each product to the corresponding Account. Any transaction using each product will be put into the Chart of Accounts you defined on this page.
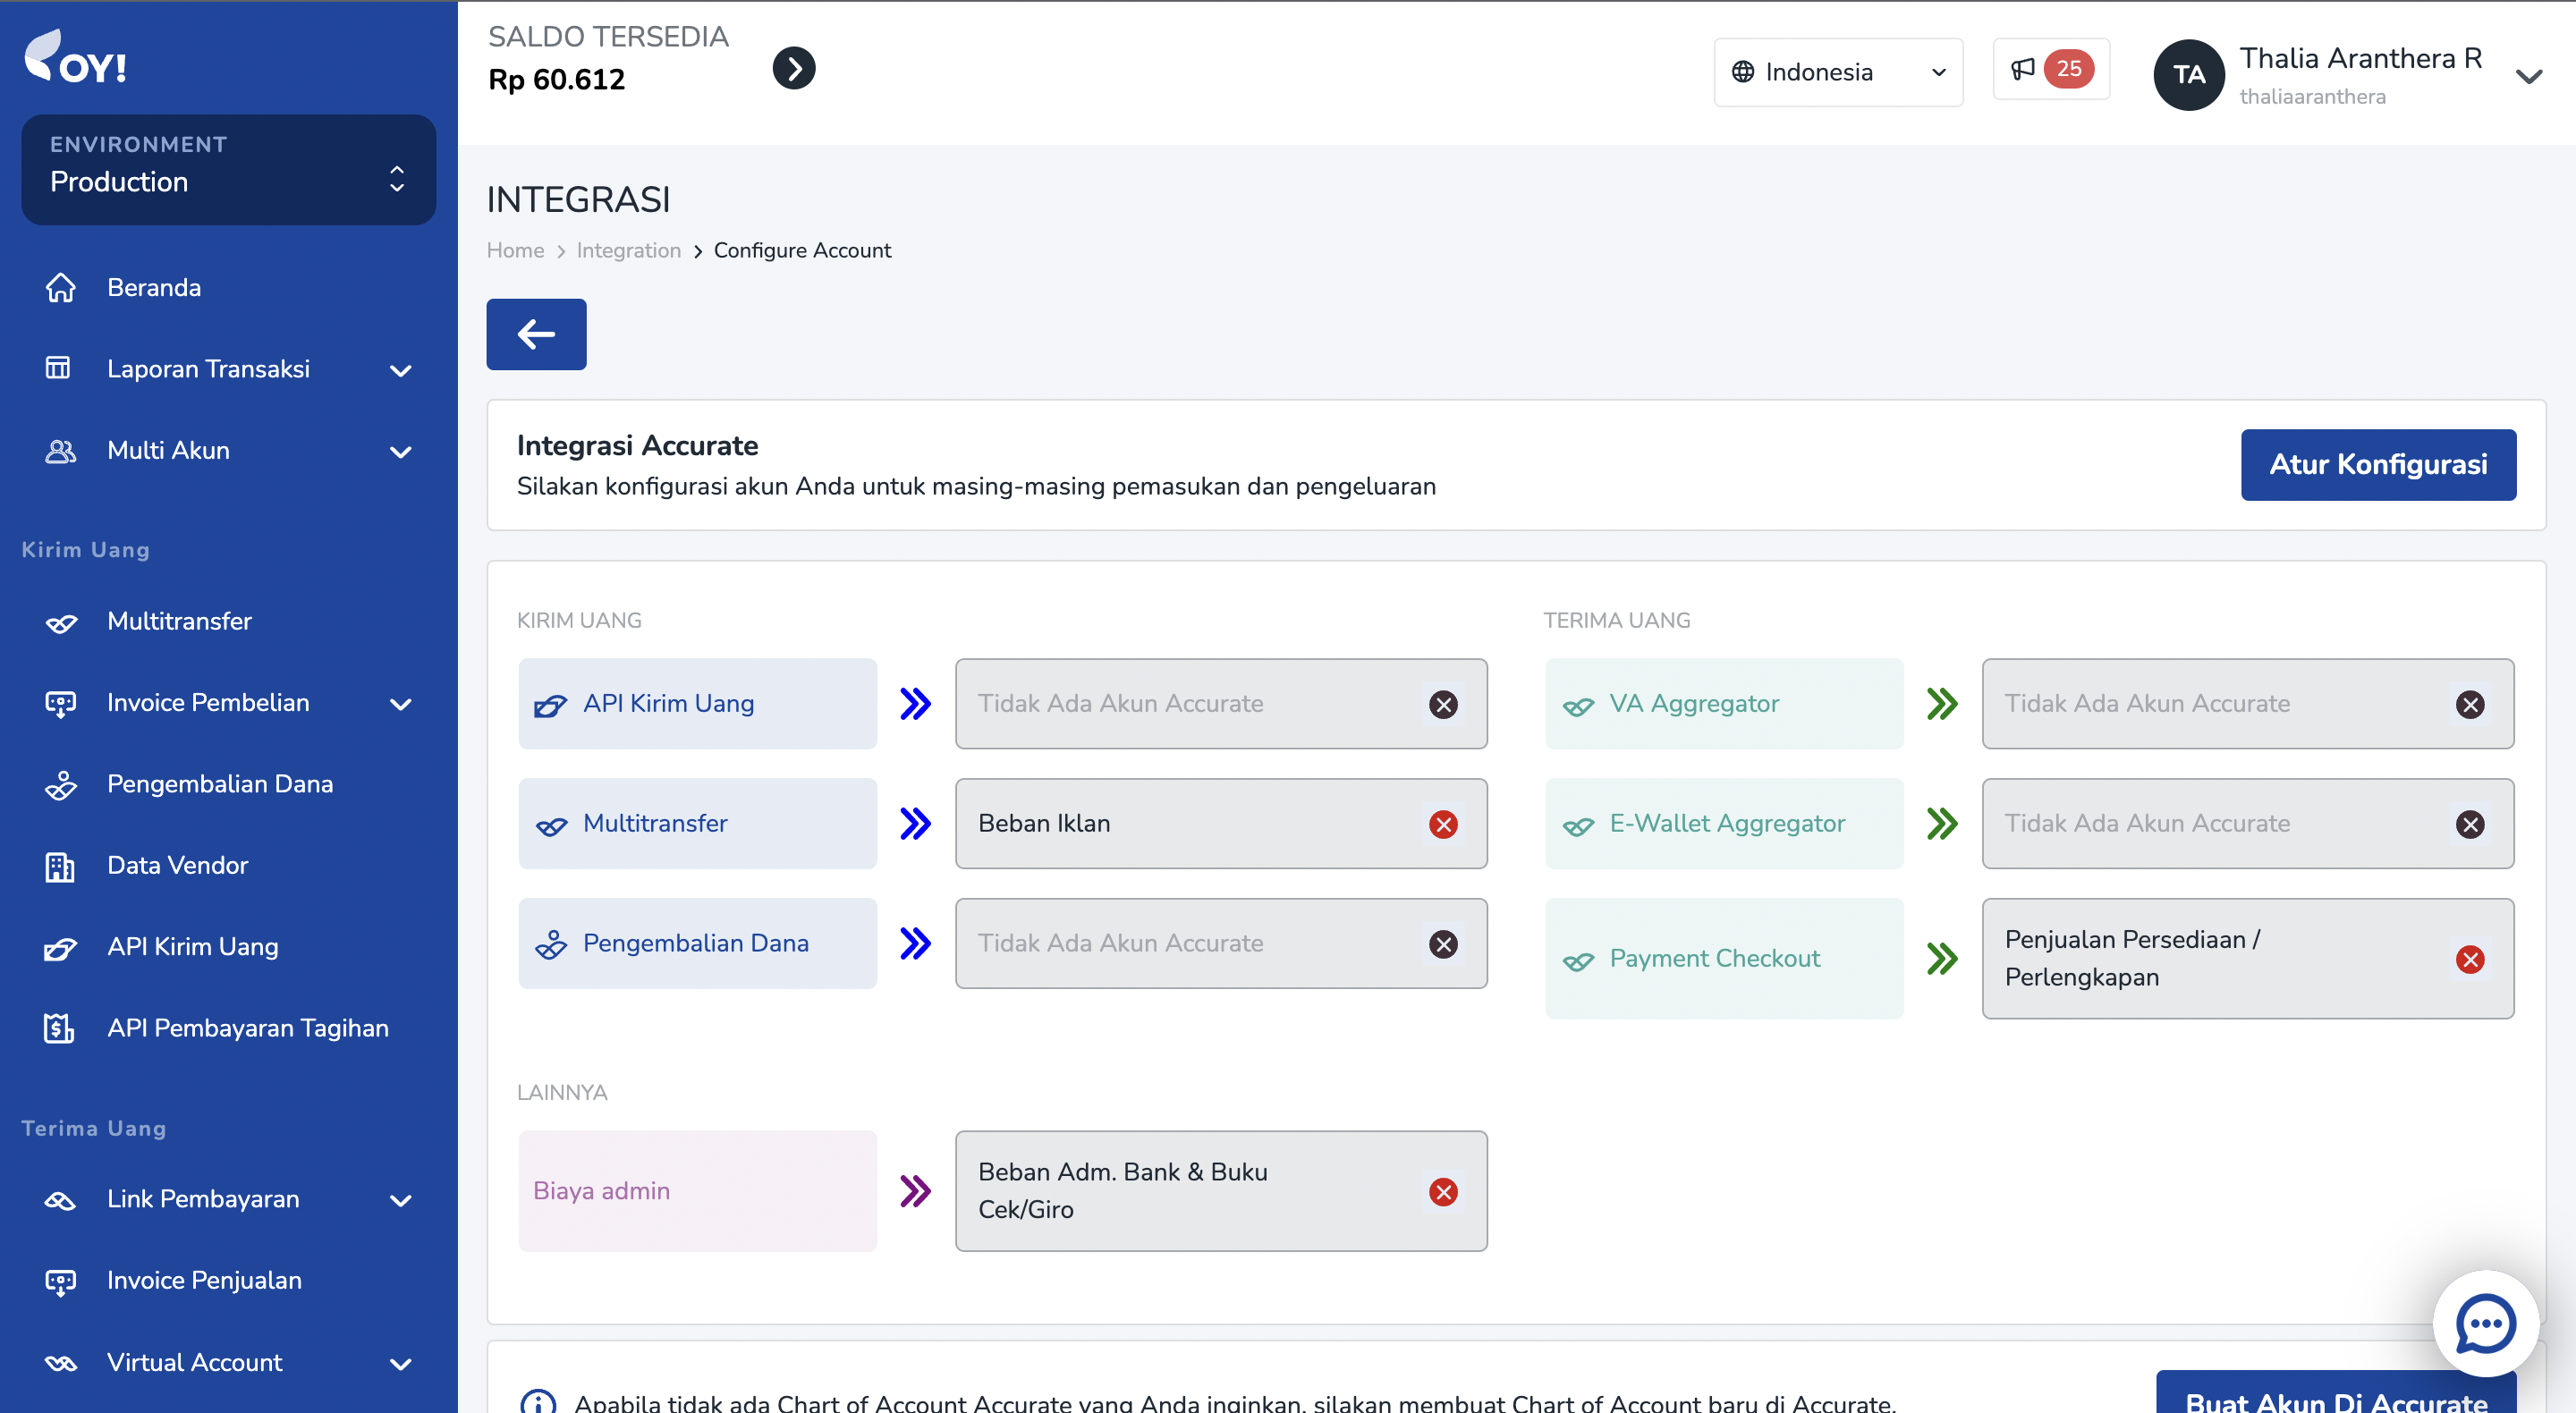
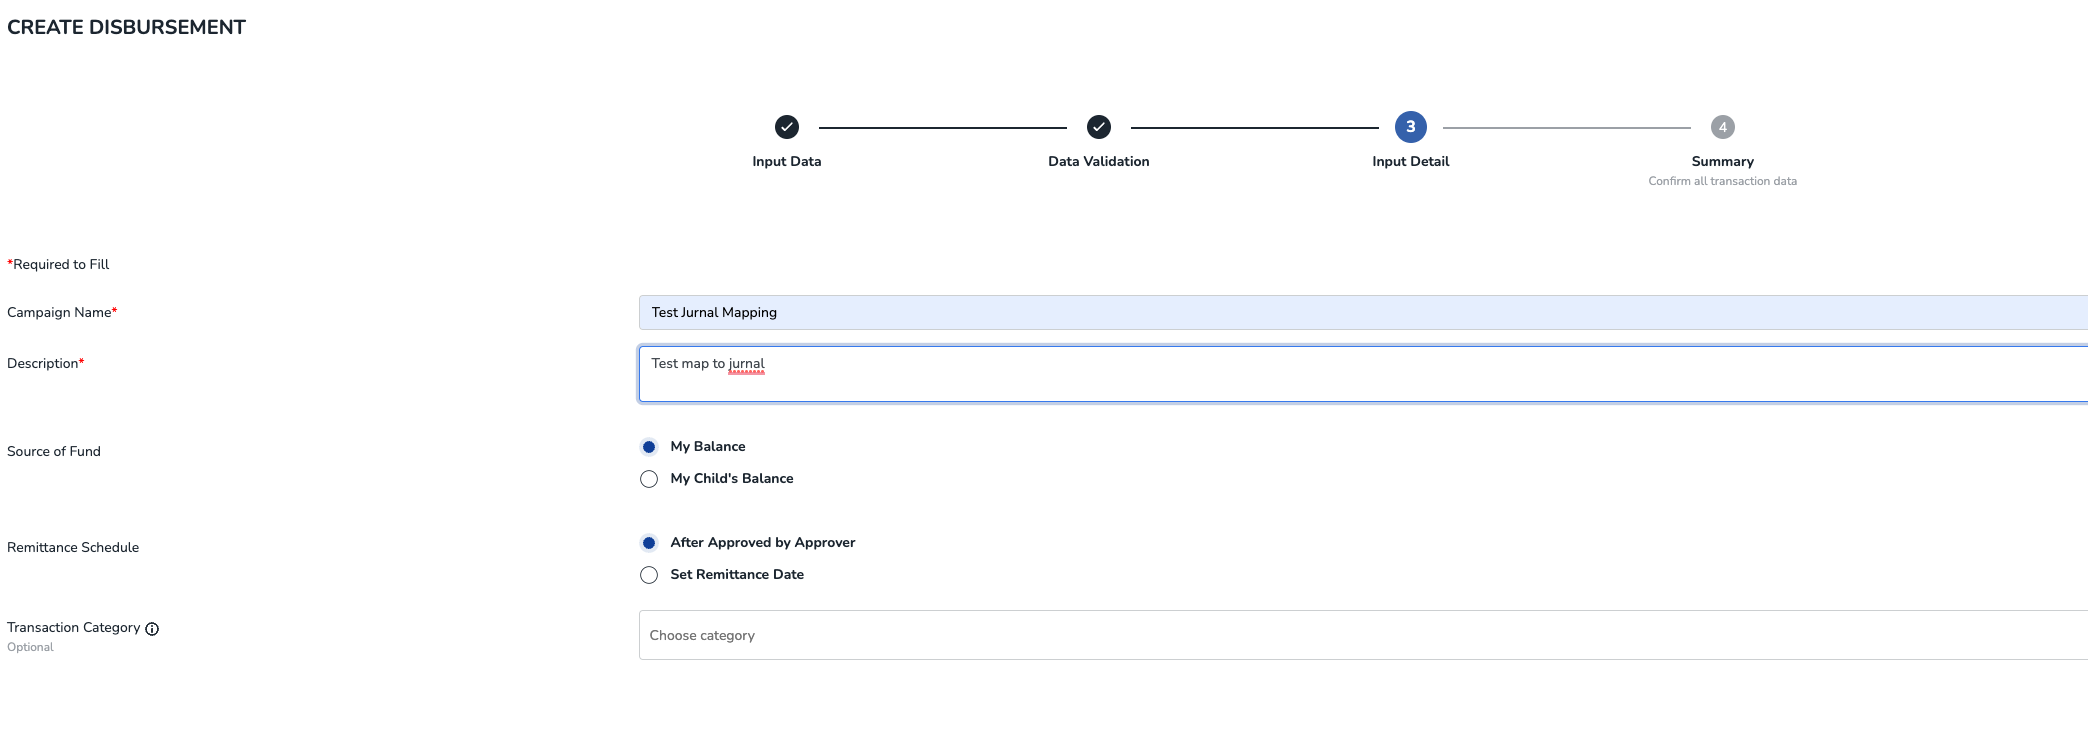
Note: Special for Bulk Disbursement product, you can define the Chart of Account later in the campaign creation process - Step 3 Input Detail page. In the Transaction Category field.
- You can change the CoA mapping anytime as needed, just go to Integration >> Accurate >> Configure.
Record Transaction to Accurate
- Now, your OY! account has been connected to your Accurate account and each product has been mapped to its corresponding Chart of Account.
- Any successful transaction that happened in OY! will be recorded to Accurate with the corresponding Account you defined in the Mapping Account menu.
- Transactions in OY! will be recorded in Pengeluaran or Pemasukan module, under OY! Balance bank account. It will also credited/debited your OY! Balance Bank Account.
- Note: For some reasons, we do not map Top up and Withdraw balance transactions to Jurnal. Therefore, you should adjust your bank’s Cash Bank account balance as well as OY! Indonesia Cash Bank account balance in your Accurate dashboard everytime you execute top up and withdraw transactions.
Disconnected your Accurate
- To disconnect your Accurate account from OY!, open the Integration menu on the sidebar. Then select “Disconnect”.
- Then, you will be disconnected from Accurate. Any transaction that you execute via OY! will not be recorded in Accurate.
- Note: To remove the bill, please make sure you also uninstall OY! app in your Accurate dashboard.
Jurnal Integration
Jurnal is a local accounting platform that is mainly used by companies in Indonesia. We have integrated our system to the Jurnal system in order to help you optimize your workflow. By connecting your OY! Account, you do not have to manually record your transaction that happened in OY! to Jurnal. You will get a seamless experience of recording your transaction.
How does it work?
Once you have connected your Jurnal account in OY!, any transaction that happened in OY! will be automatically recorded to your Jurnal account. Upon successful connection, we will trigger the creation of a new Bank Account, which is OY! Balance Bank Account. You will be required to map your Jurnal’s Chart of Account. Mapping your Chart of Accounts will help us to put your transaction into the correct Account. Transactions that happened in OY! will be recorded in that bank account, into the EXPENSES or SALES INVOICE modules.
Connect your Jurnal
- Before connecting your Jurnal account, you need to log in to your Jurnal account in your browser.
Login to your OY! dashboard. In the sidebar, select the "Integration" menu.
You will see the Jurnal menu. Click “Connect” to connect your Jurnal account to OY!.
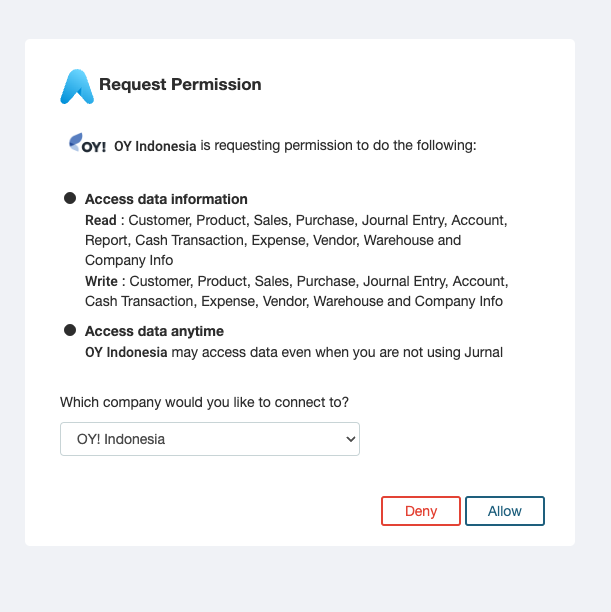
- There will be a page to ask for your consent regarding this connection process. Make sure to select OY! Indonesia. Click Allow to allow connection between OY! and Jurnal.
- Once you have successfully connected to Jurnal, a notification in your OY! dashboard will appear and you can see your status is now "Connected/ Terhubung".
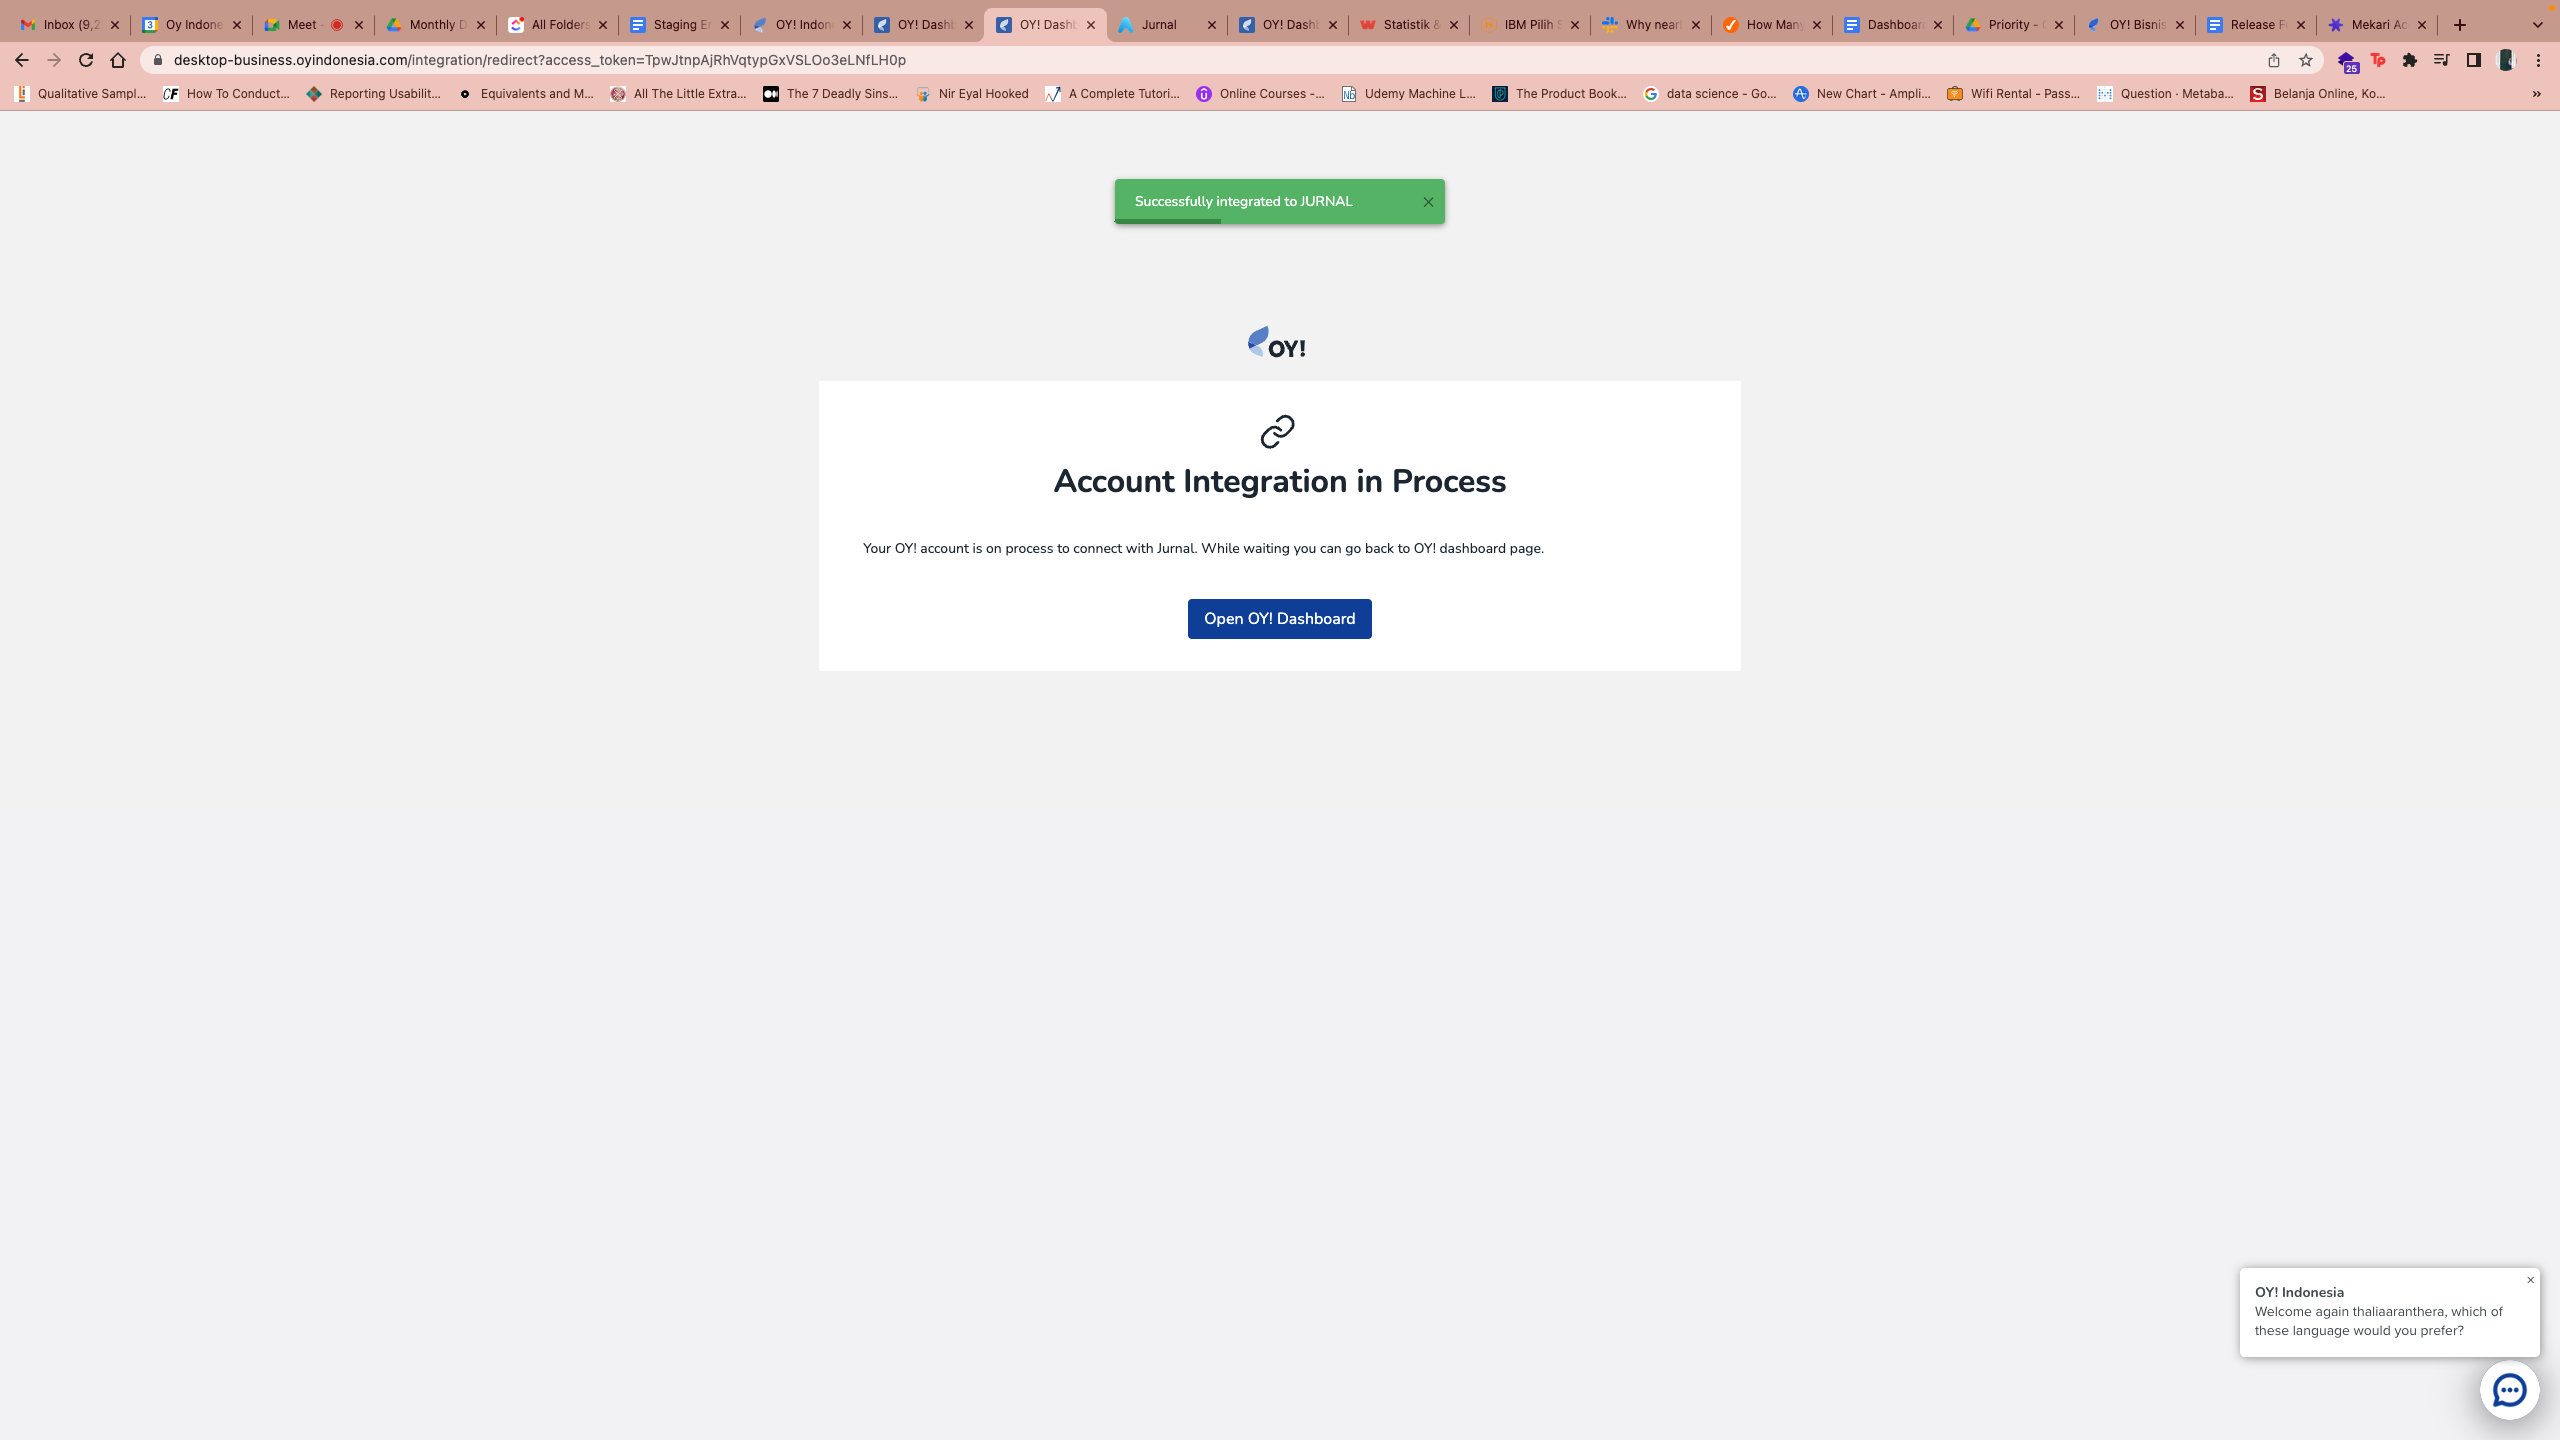

- Upon success connecting to Jurnal, we will create a new Bank Account into your Jurnal account, named “OY! Balance”. Any transaction that happened in OY! will be recorded under that bank account. Your current OY! balance will be mapped into your OY! Balance Cash Bank Account as a bank deposit transaction.
Map your Chart of Account
Click on "Configure" button in the "Integrasi" menu to map your Chart of Account.
Then, map each product to the corresponding Account. Any transaction using each product will be put into the Chart of Accounts you defined on this page.
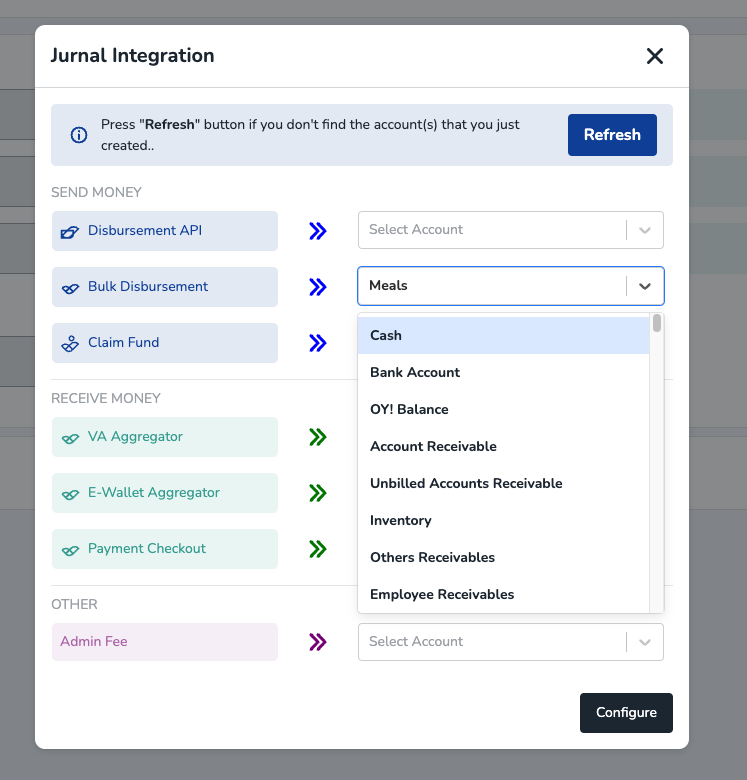
- Note: Special for Bulk Disbursement product, you can define the Chart of Account later in the campaign creation process - Step 3 Input Detail page. In the Transaction Category field.
You can change the CoA mapping anytime as needed, just go to Integration >> Jurnal >> Configure.
Note: currently, we do not include mapping and recording the PPN tax. The applied tax will be recorded to Admin Fee Chart of Account. We will update this document as soon as possible once we have included mapping PPN function.
Record Transaction to Jurnal
- Now, your OY! account has been connected to your Jurnal account and each product has been mapped to its corresponding Chart of Account.
Any successful transaction that happened in OY! will be recorded to Jurnal with the corresponding Account you defined in the Mapping Account menu. Transactions from OY! will be recorded in the Expenses or Sales Invoice module, under OY! Balance bank account and it will credited/debited your OY! balance bank account. Note: Admin Fee of Receive Money transactions will be recorded in the Expenses module.
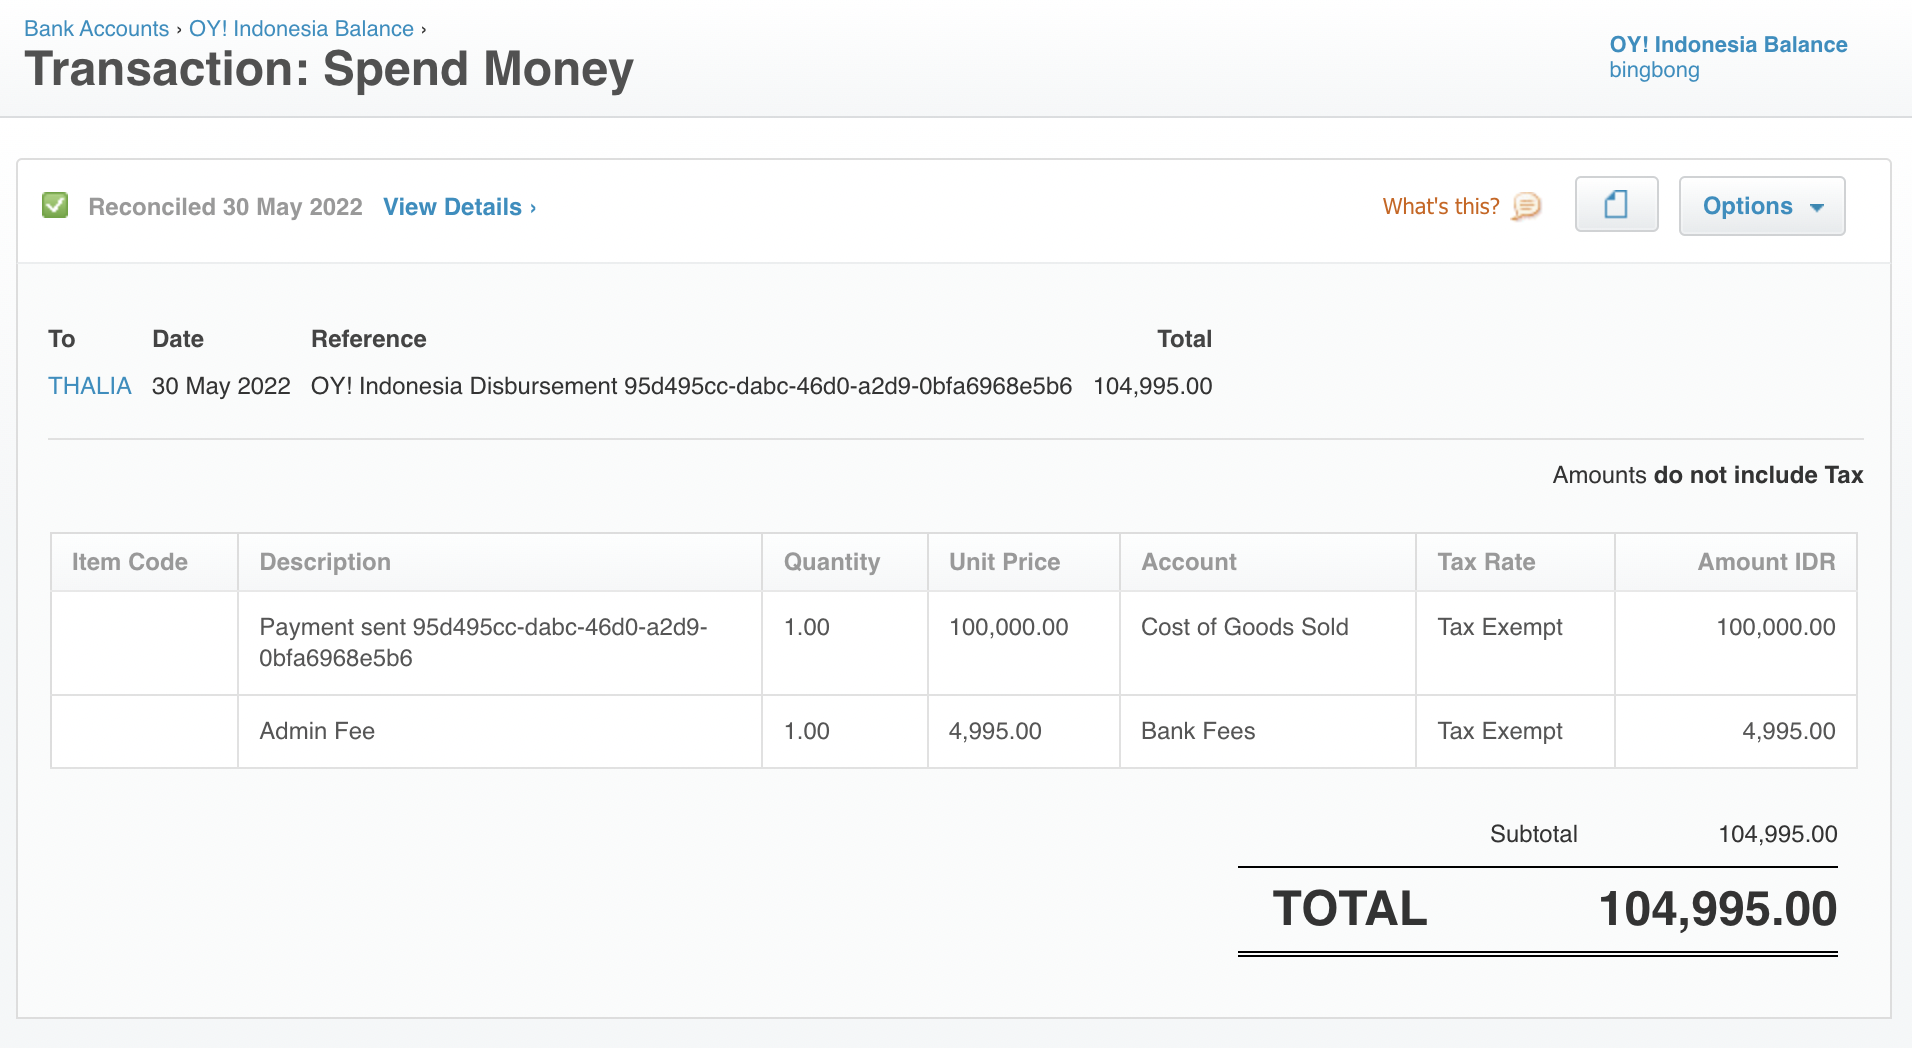
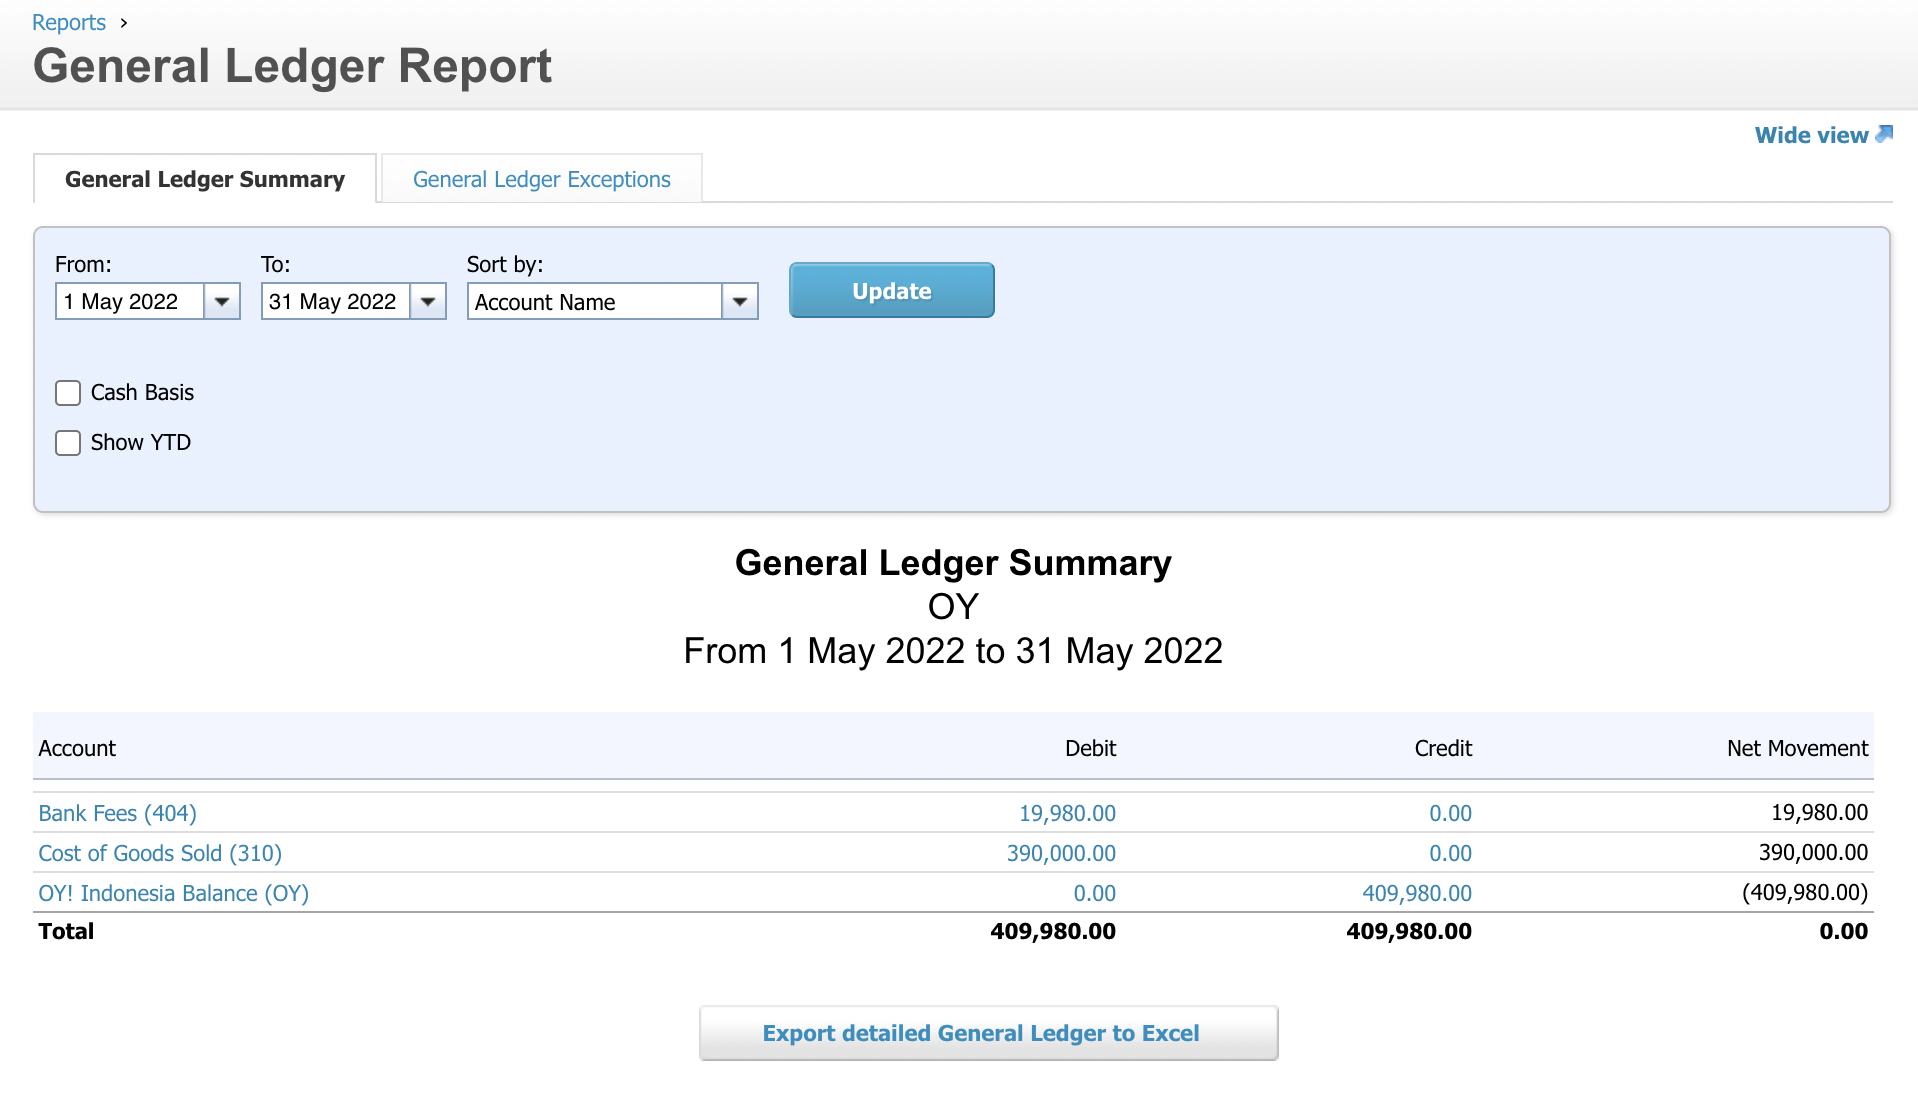
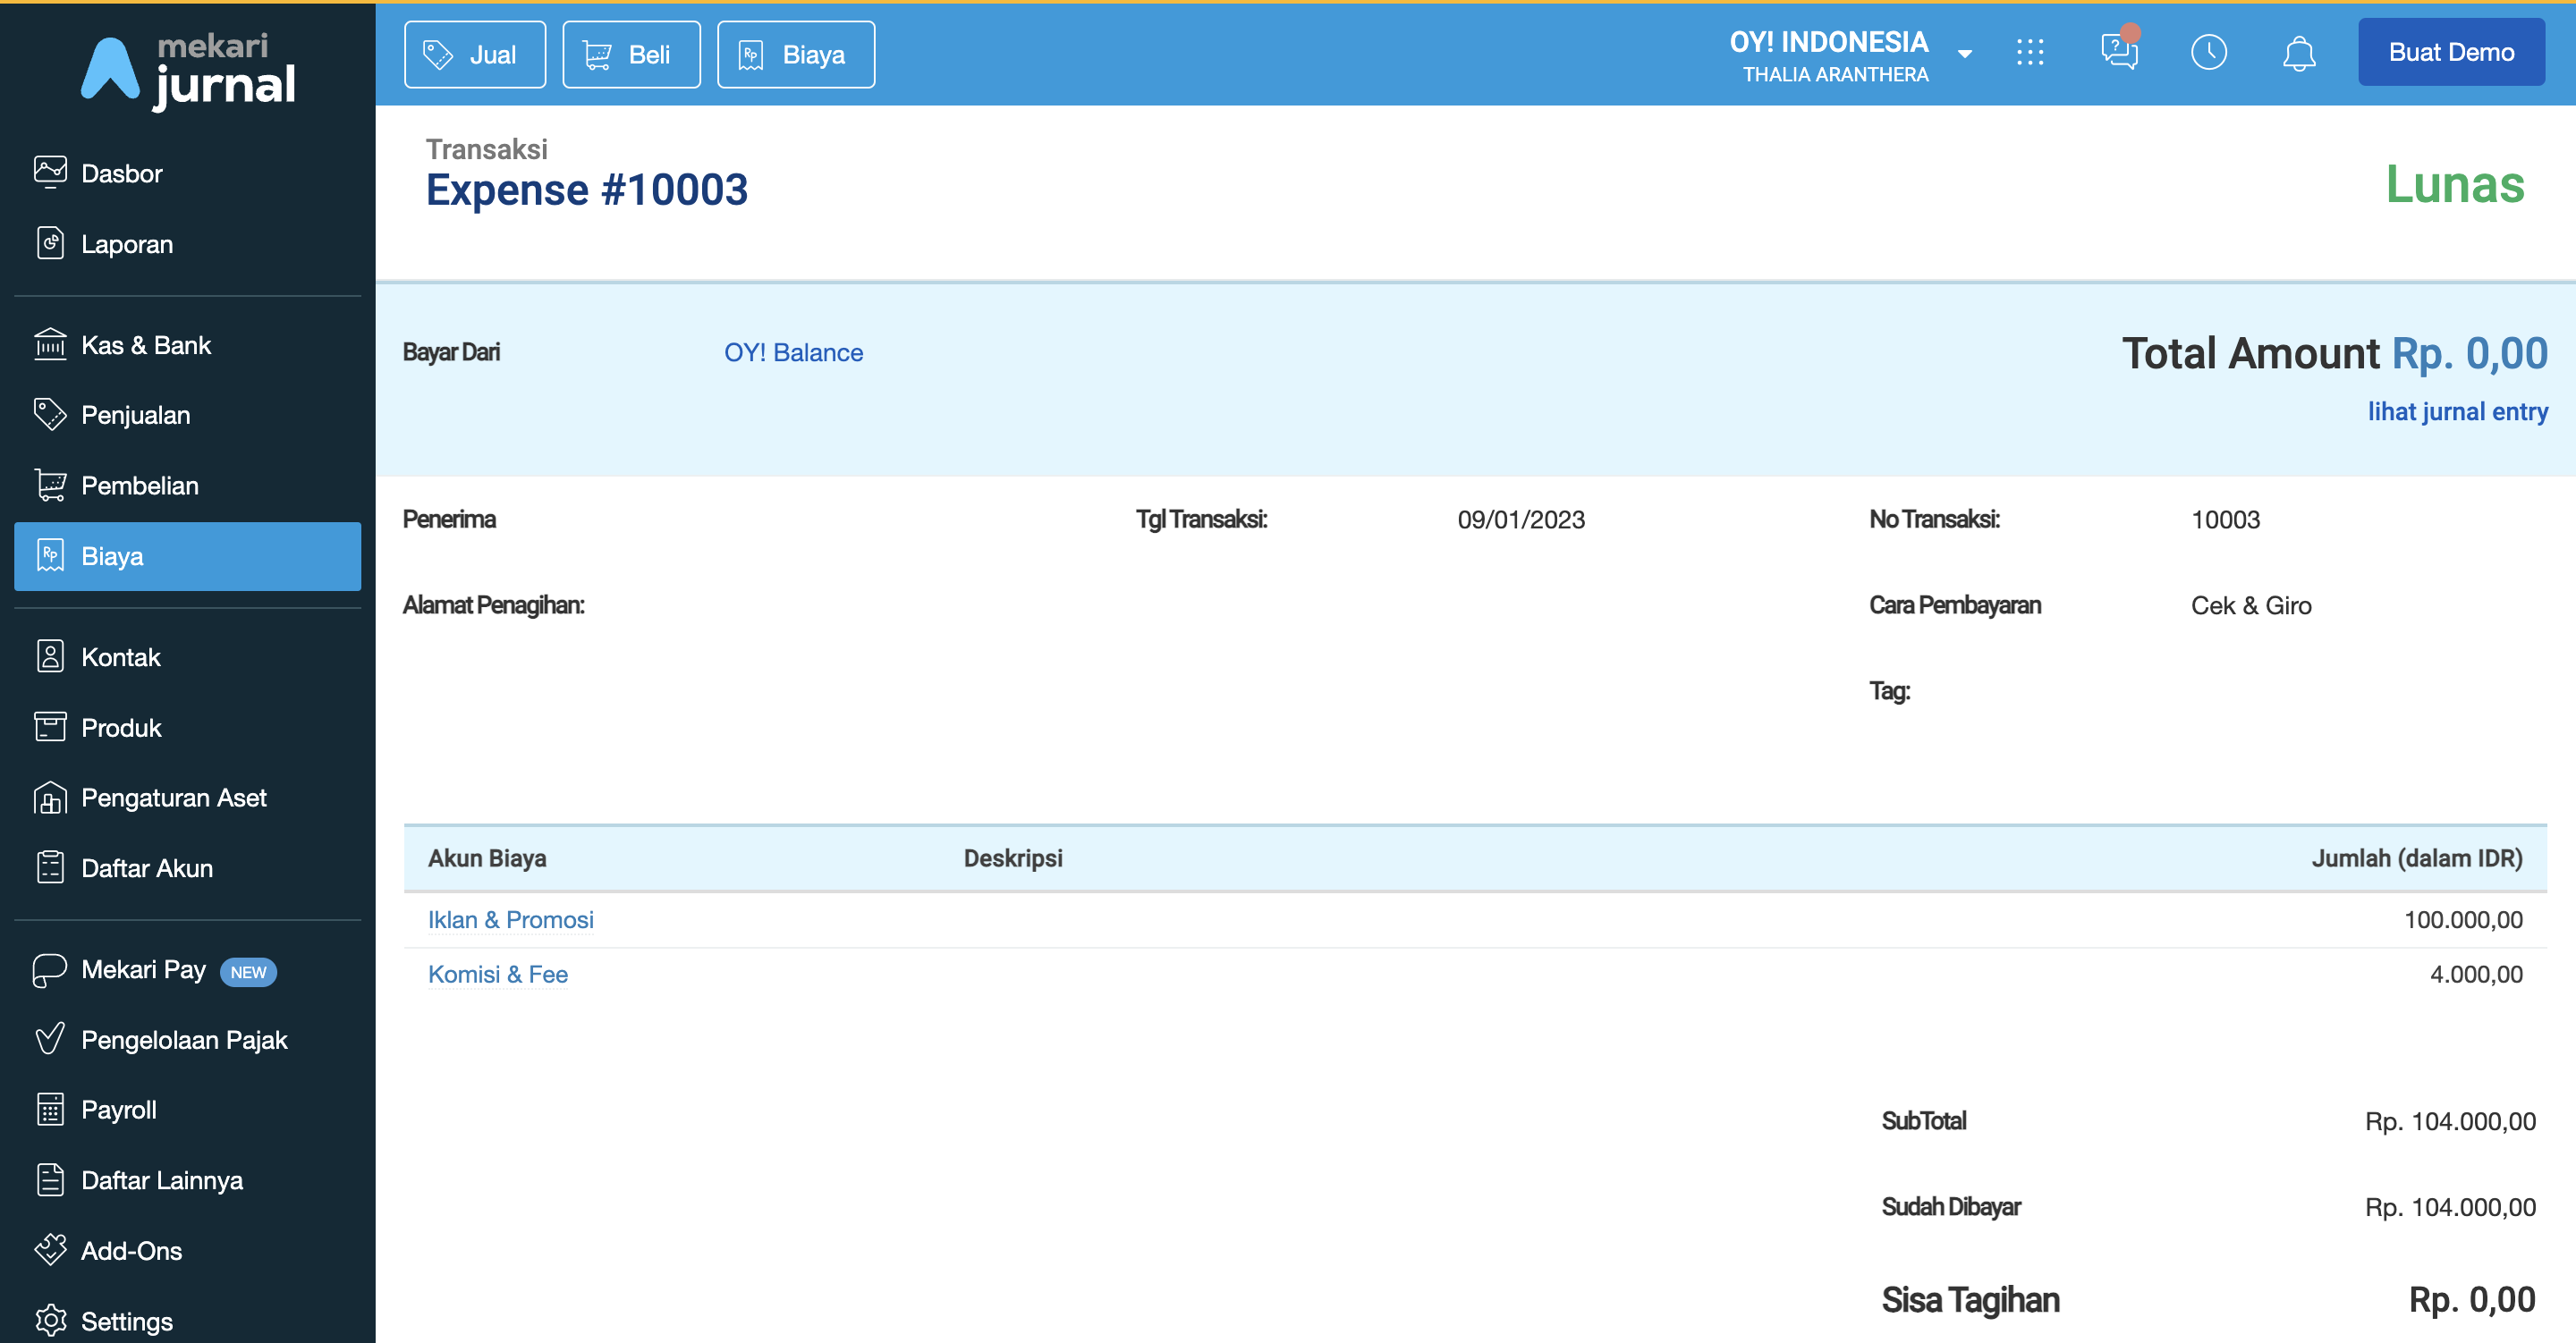
In this image, we show you a Disbursement Transaction with CoA "Iklan & Promosi" and admin fee with CoA "Komisi & Fee". It is recorded into the "Expenses" module in your Jurnal account with status LUNAS.
- Note: For some reasons, we do not map Top up and Withdraw balance transactions to Jurnal. Therefore, you should adjust your bank’s Cash Bank account balance as well as OY! Indonesia Cash Bank account balance in your Jurnal dashboard everytime you execute top up and withdraw transactions.
Disconnected your Jurnal
- To disconnect your Jurnal account from OY!, open the Integration menu on the sidebar. Then select “Disconnect”.
- Then, you will be disconnected from Jurnal. Any transaction that you execute via OY! will not be recorded in Jurnal.
Authorization Callback OY!
Ketika Anda berhasil melakukan transaksi dengan produk berbasis API, OY! Akan mengirimkan callback ke sistem klien. Untuk menjaga keamanan sistem Anda, kami telah menyediakan fitur yang memungkinkan Anda untuk mengontrol dan menyetujui pengiriman callback dari OY! sebelum callback tersebut diterima oleh sistem Anda.
Untuk saat ini, kami hanya mendukung pengaturan untuk protokol OAuth 2.0. Jika sistem Anda menggunakan protokol tersebut, Anda dapat mengatur agar callback dari OY! akan diarahkan ke proses otorisasi atau perizinan yang Anda tentukan sebelum callback tersebut diterima oleh sistem Anda. Untuk melakukan hal tersebut, Anda hanya perlu memasukkan URL otorisasi, client ID, dan client secret untuk OY! melalui dashboard Anda.
Cara Mengatur Authorization Callback
Anda dapat mengikuti langkah-langkah berikut untuk mengatur perizinan callback melalui dashboard:
- Masuk ke dashboard OY! sebagai superadmin atau admin, kemudian pilih menu Pengaturan, lalu pilih Opsi Developer.
- Pilih tab “Authorization Callback”. Selanjutnya, Anda perlu memasukkan kredensial otorisasi Anda (URL untuk Otorisasi, client ID, dan client secret) sehingga OY! dapat melalui proses otorisasi sebelum mengirimkan callback kepada Anda.
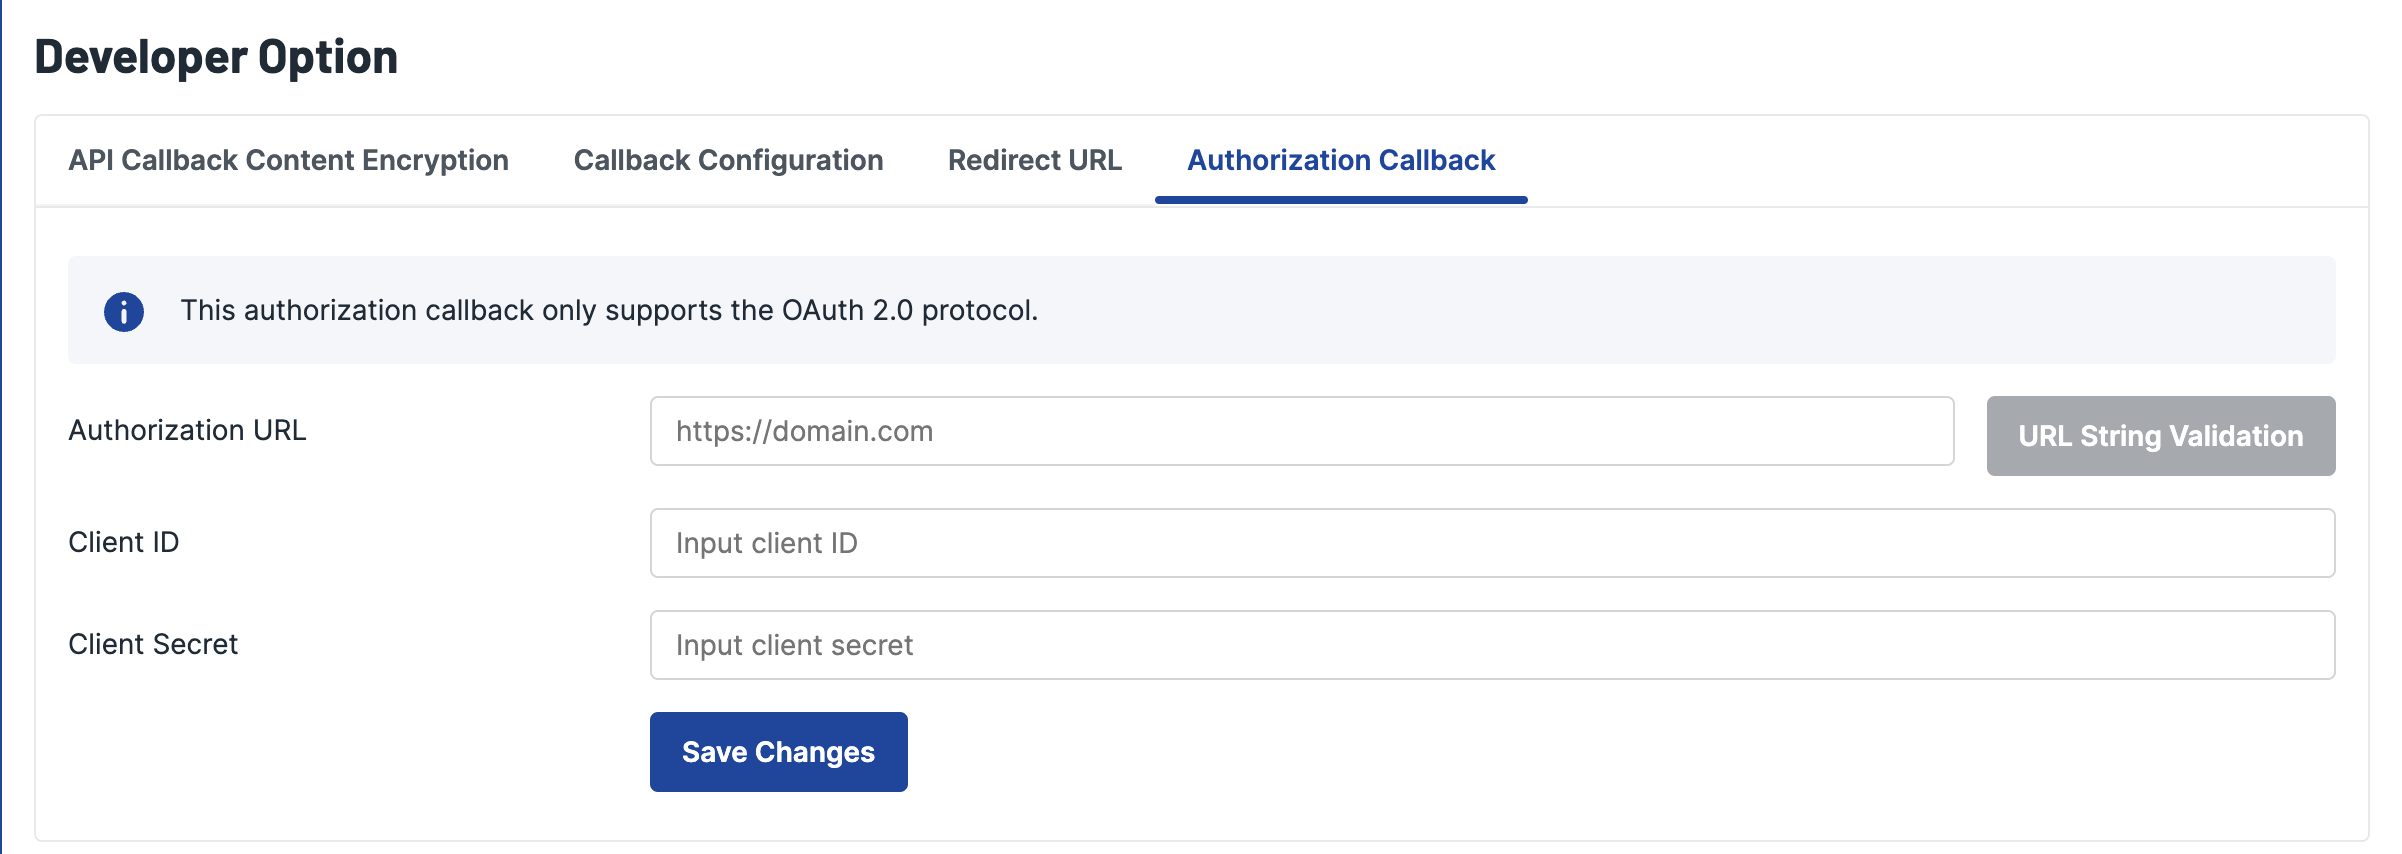
- Klik tombol “Simpan Perubahan”.
- Jika Anda sudah memasukkan kredensial OAuth, maka setiap callback yang dikirimkan oleh OY! akan melalui proses otorisasi atau perizinan sebelum callback dikirimkan kepada Anda. OY! akan mendapatkan token akses beserta tenggat waktu dari sistem Anda.
- Jika Anda tidak lagi ingin callback dari OY! melewati proses otorisasi, Anda dapat menghapus semua informasi atau kredensial OAuth yang telah Anda masukkan pada halaman ini, lalu klik “Simpan Perubahan”.
OY! Business App
OY! Business App
Great news for you who always in mobility mode but you need to access our dashboard! Now you can access your OY! dashboard from the tip of your finger. OY! Business offers you with easy access to OY! Dashboard, so you can do your financial activities everywhere you are, without opening your laptop or PC. In this app, you can see your balance, account statement, transaction status, send money and also receive money. Yes, doing transaction is now easier than before!
Register and KYB
- Open your OY! Business app in your Android phone.
- If it is your first time opening this application, you have to input your phone number.
- Then, app will shows list of accounts that are tied to the phone number you entered before.
- If you want to create a new account, tap “Buat Sekarang”. Then follow the instruction.
- Once you success registering your new account, you can also submit your KYB.
Login
- Open your OY! Business app in your Android phone.
- If it is your first time opening this application, you will need to input your phone number to verify your account.
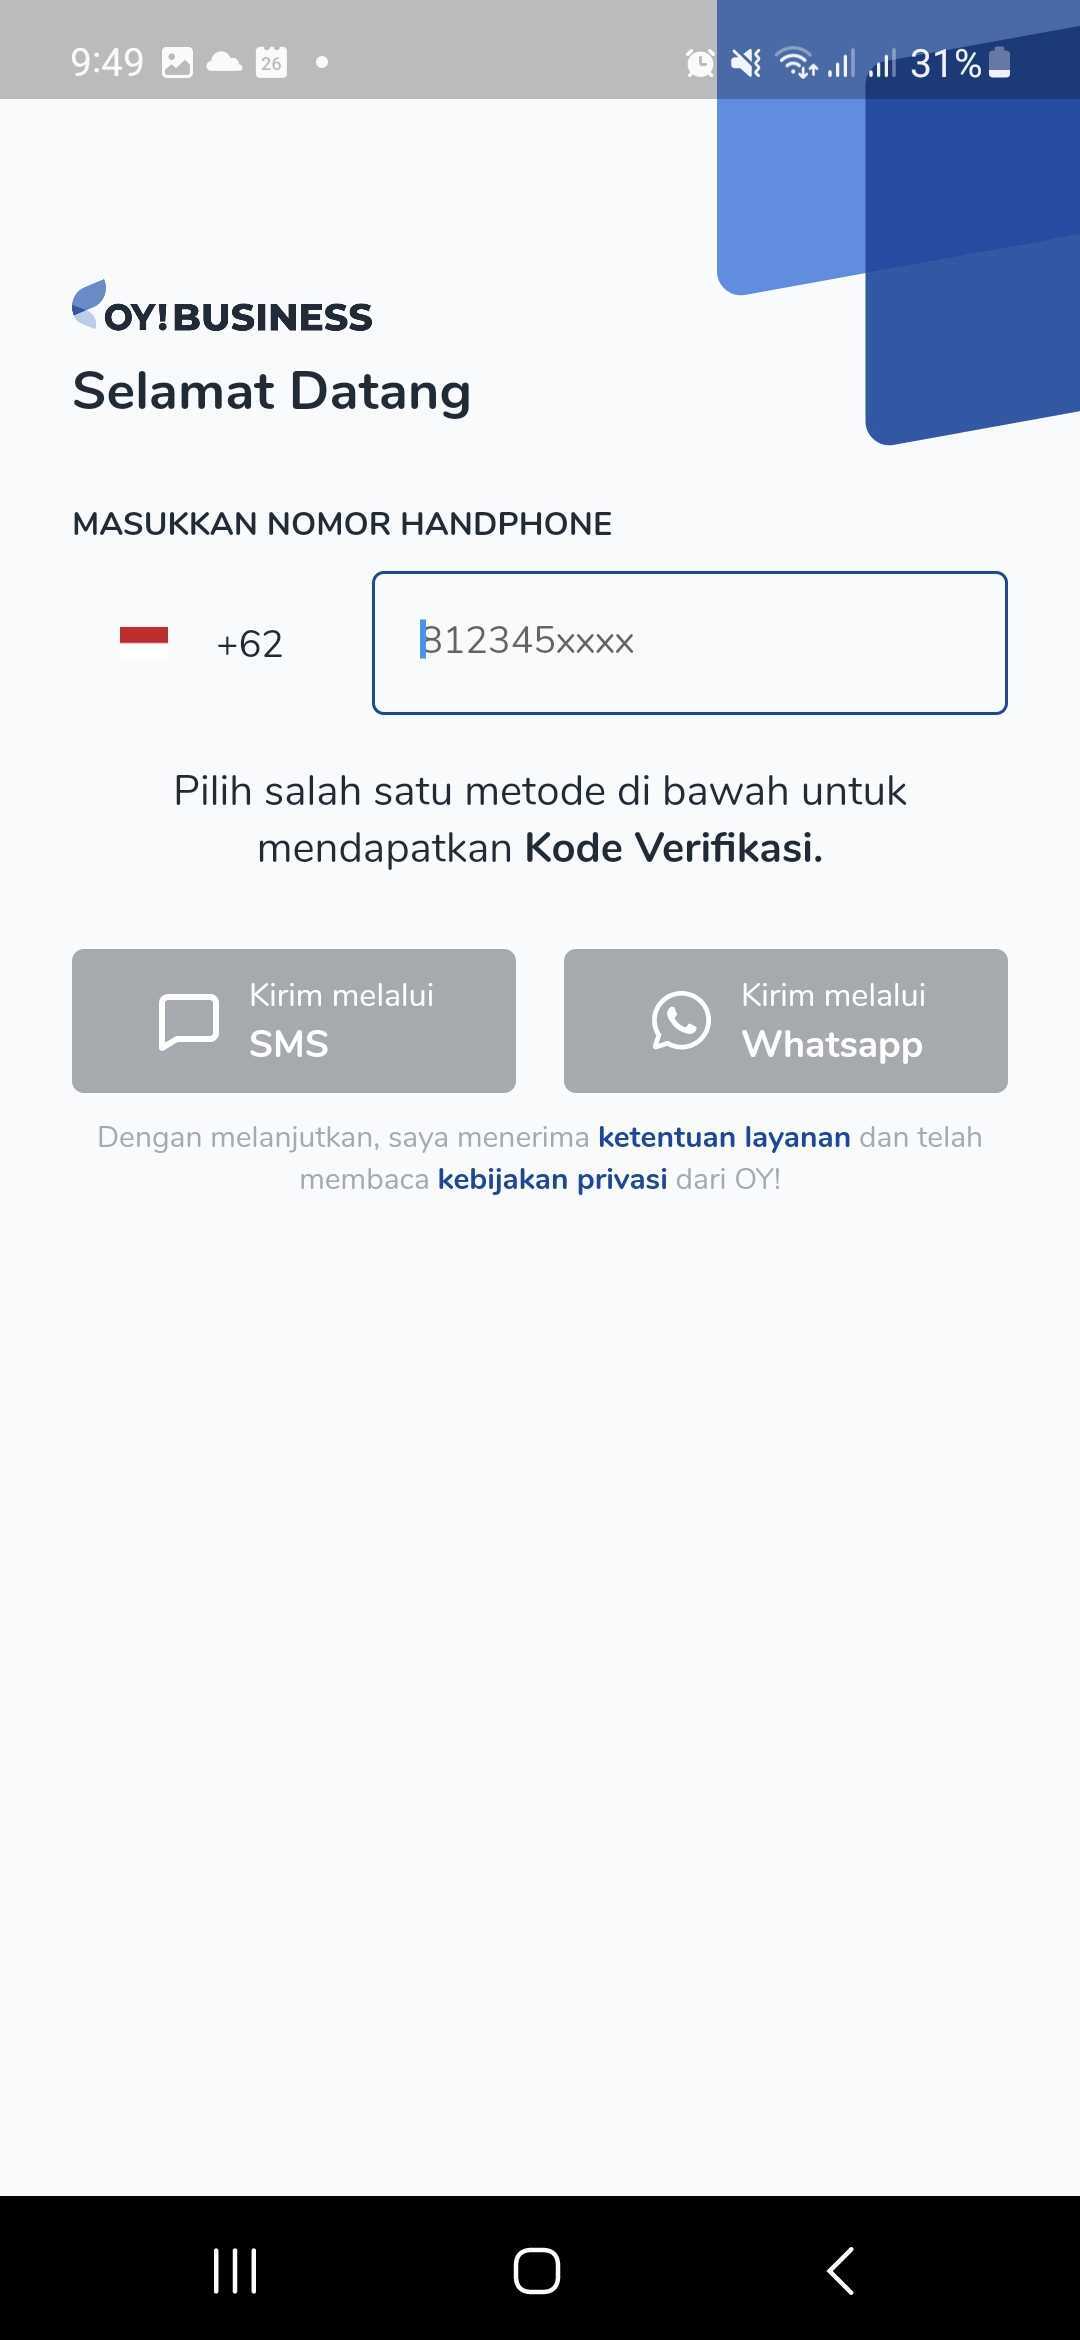
- Next, select which method for sending OTP. Make sure to input the right phone number. Then, please input the OTP number we just sent you.
- If the phone number is not yet registed in OY!, you will be required to create a new account.
- However, if your phone number have been registered to OY! before, the app will displays list of accounts that are tied to the phone number you entered before.
- Select an account you want to log in to.
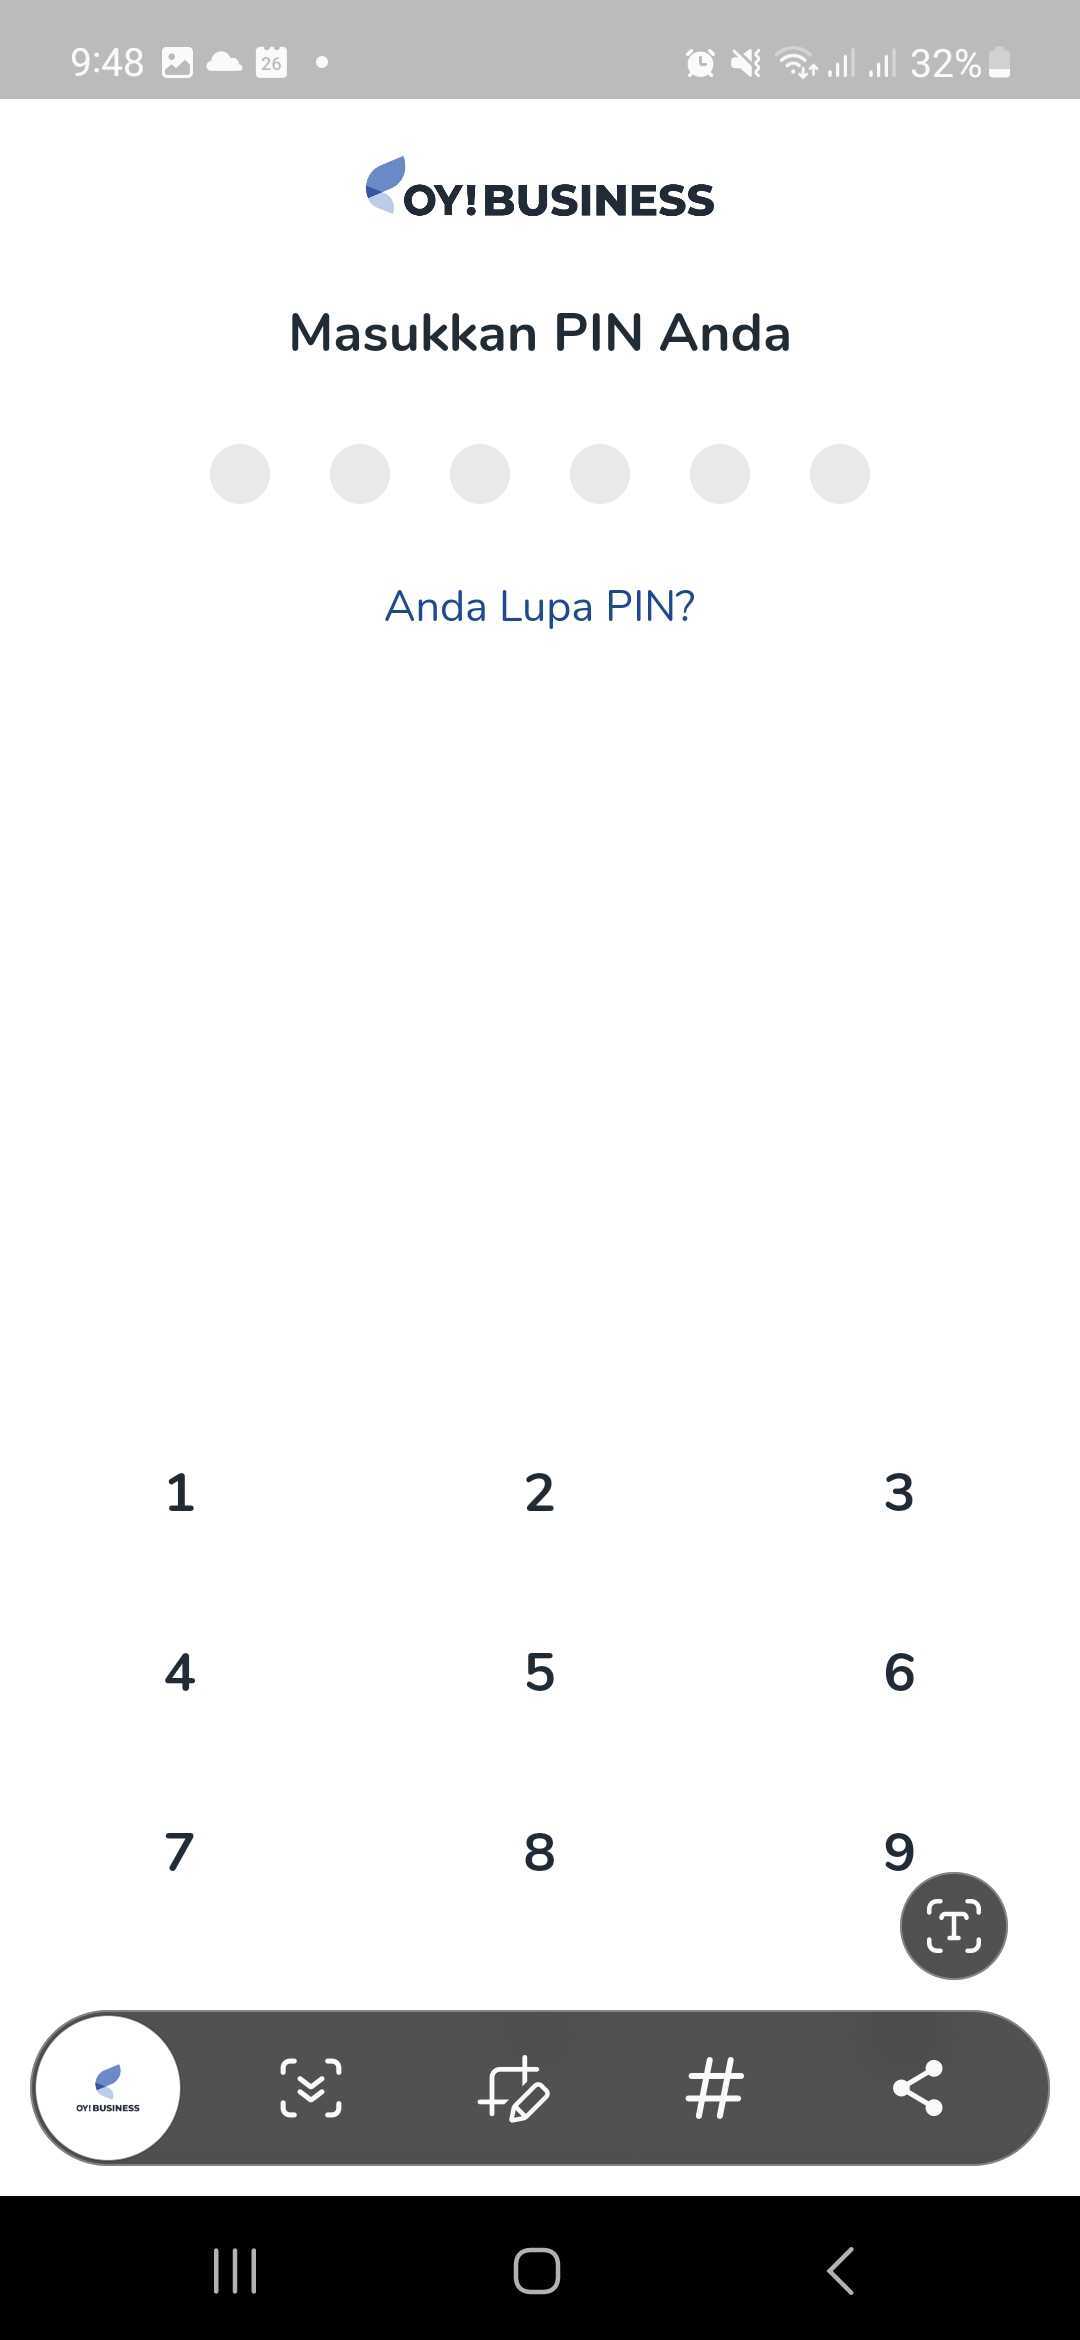
- First time logging in, you will be required to create a new PIN. This PIN will be used to log in to that account in the business app environment.
- Once you have successfully logged in, you will be directed to homepage. Here, you can see your balance and see your latest transaction.
Create Payment Link
- In the homepage tap “Transaksi Sekarang” button.
- Then, select “Tagih Uang”.
- You will see your history of payment links and its transaction history. Then, tap “Buat Link Pembayaran” button in the bottom right.
- Configure the payment link you want to create and fill all the required details. In this page, you can set the amount method (closed or open amount), admin fee method, payment link expiry date, and payment method(s) you want to provide to your customer(s). Them klik "Simpan".
- Define the amount (if you select closed amount in the configuration page), description, and the transaction ID. Then, tap “Buat Link Pembayaran” button.
- Payment Link has been created and now you can share the link to your customer to receive payment from them.
Send Money (Bulk Disbursement)
- In the homepage tap “Transaksi Sekarang” button.
- Then, select “Kirim Uang”.
- You will see your bulk disbursement campaign history. Then, tap “Buat Disbursement” button in the bottom right.
- Create your Bulk Disbursement campaign. First, fill out your campaign details.

- Next, fill the recipient data (bank, bank account number, amount, recipient email, phone number, note).
- Next, check on your recipient list. If you want to add more recipient, click on "Tambah Transaksi" button.
- Confirm your bulk disursement campaign. In this page you can ensure your campaign detail and your recipient data are correct before submitting the campaign.

- Your Bulk Disbursement campaign has been created and will be displayed on the Bulk Disbursement campaign history page. You may wait for your approver to approve the bulk disbursement so we can execute the transaction.
Kirim Uang
API Disbursement
API disbursement product provides the capability for you to disburse to 100+ banks in Indonesia via OY! at any time. The integration process to use the API disbursement product is straight forward and the details can be checked here.
Key Features
Overbooking OY! can use the funds directly from your Mandiri or CIMB bank accounts for your disbursement needs. You will only need to top up the admin fee needed to execute the disbursements instead of the full amount of your disbursement. Please contact our business representative for further details about this feature. Check Transaction Status and Callback
For all disbursements executed, you will receive notifications regarding your transaction whether it is successful, failed or pending. We also provide an API for you to check the transaction status manually. IP proxy is also available upon request to enhance the security and integrity of the callback you will receive.
Check Balance
You can check your available balance at anytime to ensure that you have sufficient balance to execute a disbursement.
Registration and Set Up
Prerequisites
Register an account on the OY! dashboard
Activate your account through the activation link sent via email
Upgrade your account
Upgrade request is approved
Provide IP to be whitelisted and callback link to our business team
Receive an API Key from us
Integrate with our API
Testing
Once you successfully create an OY! account, you can immediately simulate disbursement via API. Follow the below steps to test the flow:
- Create an account
- Login into the dashboard
- Change the environment to “staging”
- Once the environment changed to staging, there will be API key staging available on the bottom left corner of the page
- Before creating a disbursement transaction, check your available balance through API GET https://api-stg.oyindonesia.com/api/balance
- Create a disbursement by sending a ‘POST’ request to https://api-stg.oyindonesia.com/api/remit (https://api-stg.oyindonesia.com/api/remit) using your staging API key. Enter the required and optional fields, as referenced in the API reference docs (https://api-docs.oyindonesia.com/#disbursement-fund-disbursement)
- Fill in the amount, recipient bank, recipient account, and the partner transaction-id
- To get the status of a disbursement request, you can call the API https://api-stg.oyindonesia.com/api/remit-status, This API also offers the option for callback status under field send_callback
- If payment is successful or failed, we will send a callback to the registered staging callback URL destination. Callback URL can be registered via our business representative.
- The API disbursement transactions can be monitored through OY! dashboard from the “Send money - API disbursement” menu.
How to Use
In order to create disbursements, a sufficient available OY! balance is required in the account. More details and instructions about topping up to your OY! account coming soon.
Before you execute a disbursement, you can verify the beneficiary account information from our inquiry endpoint.
Below is an example of the request body for inquiry:
curl -X POST https://partner.oyindonesia.com/api/inquiry
-H 'content-type: application/json, accept: application/json, x-oy-username:myuser, x-api-key:987654'
-d '{
    "recipient_bank": "022",
    "recipient_account": "7823023345"
    }'
It will return an error message if the request is not valid. Otherwise, below is the sample response parameters that will be returned:
{
    "status":{
        "code":"000",
        "message":"Success"
    },
    "recipient_bank":"022",
    "recipient_account":"7823023345",
    "recipient_name":"Budi Budianto Budiman",
    "timestamp":"16-10-2021 09:55:31"
}
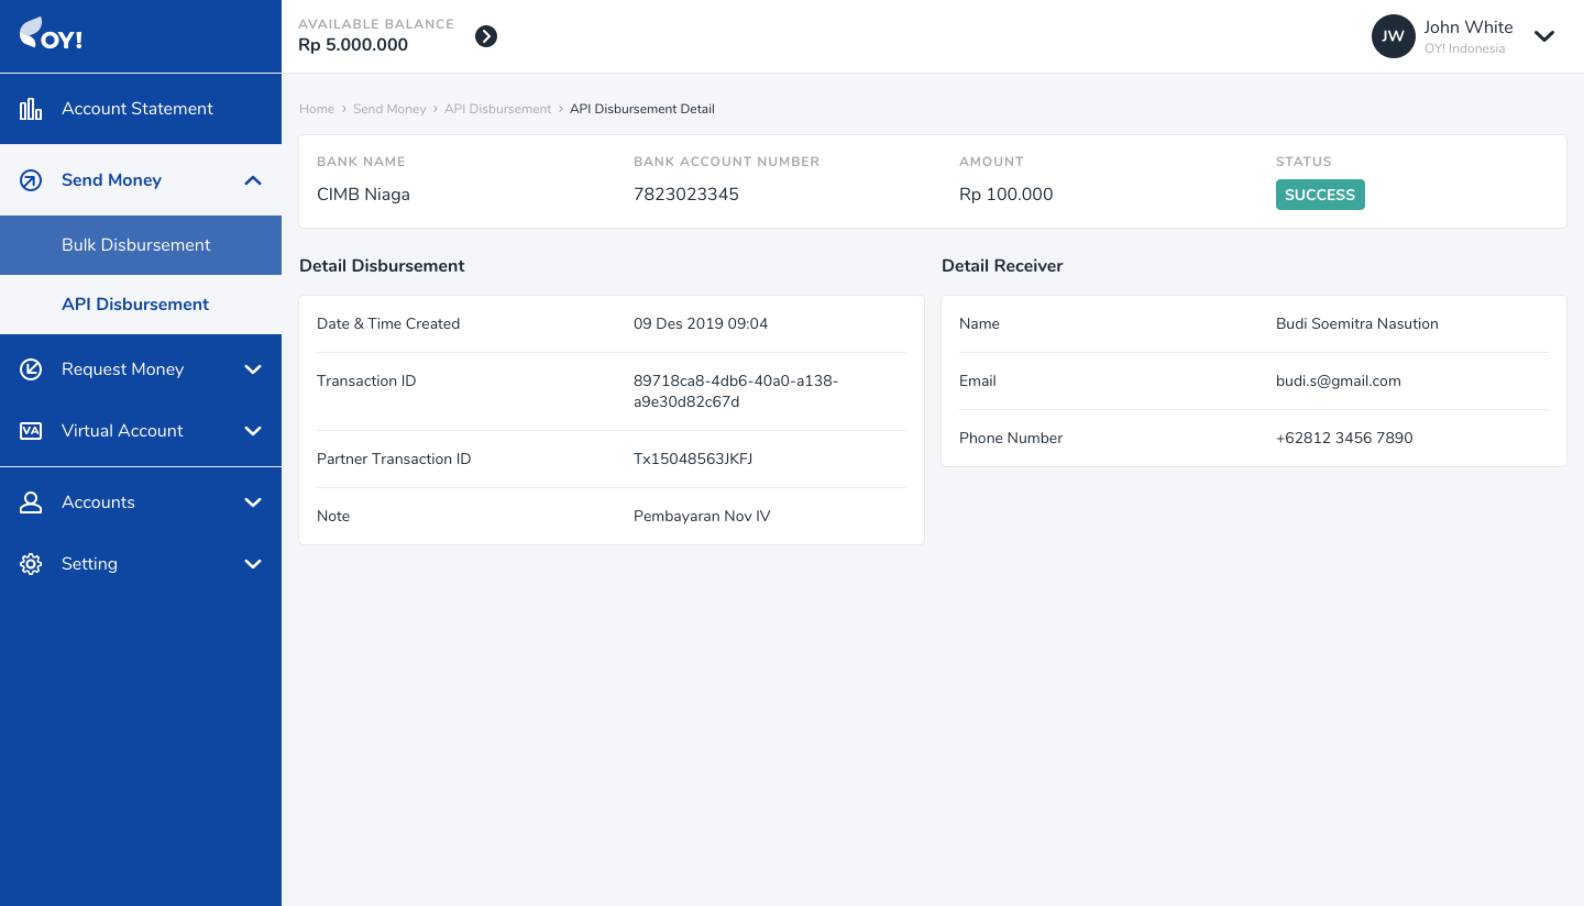
Next, send a request body to execute a disbursement request to be sent to our disbursement endpoint.
Below is an example of the request body for the remit:
curl -X POST https://partner.oyindonesia.com/api/remit
-H 'content-type: application/json, accept: application/json, x-oy-username:myuser, x-api-key:7654321'
-d '{
    "recipient_bank": "022",
    "recipient_account": "7823023345",
    "amount":100000, "note":"Pembayaran Nov IV",
    "partner_trx_id":"Tx15048563JKFJ",
    "email" :"budi.s@gmail.com"
    }'
Below is the sample response parameters that will be returned:
{
    "status":{
        "code":"101",
        "message":"Request is Processed"
    },
    "amount":100000,
    "recipient_bank":"022",
    "recipient_account":"7823023345",
    "trx_id":"89718ca8-4db6-40a0-a138-a9e30d82c67d",
    "partner_trx_id":"Tx15048563JKFJ",
    "timestamp":"16-10-2019 10:23:42"
}
An enpoint to check the transaction is also available and can be accessed at anytime.
Below is an example of the request body:
curl -X POST https://partner.oyindonesia.com/api/remit-status
-H 'content-type: application/json, accept: application/json, x-oy-username:myuser, x-api-key:7654321'
-d '{
    "partner_trx_id": "1234-asde",
    "send_callback": "true"
    }'
The above command returns a JSON structured similar like this:
{
  "status":{
    "code":"000",
    "message":"Success"
  },
  "amount":125000,
  "recipient_name":"John Doe",
  "recipient_bank":"008",
  "recipient_account":"1234567890",
  "trx_id":"ABC-456",
  "partner_trx_id":"1234-asde",
  "timestamp":"16-10-2020 10:34:23",
  "created_date": "24-01-2020 06:48:08",
  "last_updated_date": "24-01-2020 06:48:39"
}
A callback with the following information will be sent to the callback endpoint that you can register with us.
Below is an example of the request body:
curl -X POST https://partner.oyindonesia.com/api/remit-status
-H 'content-type: application/json, accept: application/json, x-oy-username:myuser, x-api-key:7654321'
-d '{
    "partner_trx_id": "Tx15048563JKFJ"
    }'
Below is the sample response parameters that will be returned:
{
    "status":{
        "code":"000",
        "message":"Success"
    },
    "amount":100000,
    "recipient_name":"Budi Soemitra Nasution",
    "recipient_bank":"022",
    "recipient_account":"7823023345",
    "trx_id":"89718ca8-4db6-40a0-a138-a9e30d82c67d",
    "partner_trx_id":"Tx15048563JKFJ",
    "timestamp":"16-10-2019 10:40:23",
    "created_date": "16-10-2019 10:23:42",
    "last_updated_date": "16-10-2019 10:34:23"
}
You can also check your balance anytime to ensure you have sufficient balance from our endpoint.
Below is an example of a request body to check the balance:
curl -X GET 'https://partner.oyindonesia.com/api/balance'
-H 'Content-Type: application/json'
-H 'Accept: application/json'
-H 'X-OY-Username: janedoe'
-H 'X-Api-Key: 7654321'
Below is the sample response parameters that will be returned:
{
    "status":{
        "code":"000",
        "message":"Success"
    },
    "balance":100000000.0000,
    "pendingBalance":2000000.0000,
    "availableBalance":98500000.0000,
    "overbookingBalance":98500000.0000,
    "timestamp":"10-12-2019 12:15:37"
}
Lastly, all transactions can be monitored from the OY! dashboard which includes all the transaction details.
For further details on the parameters definition and proper usage, please refer to our API Documentation.
Bulk Disbursement
Our Bulk disbursement product provides the capability to execute disbursements to multiple beneficiaries with a single xlsx or csv file upload ("Campaign") up to 25,000 transactions. Bulk disbursement is made through the OY! dashboard, where details regarding the disbursement campaign can be found. No technical integration is required to use this product.
Key Features
Overbooking OY! can use the funds directly from your Mandiri or CIMB bank accounts for your disbursement needs. You will only need to top up the admin fee needed to execute the disbursements instead of the full amount of your disbursement. Please contact our business representative for further details about this feature.
Account Management
When you first create an account, your account will be assigned as a Super Admin role. As a Super Admin, you have the ability to create new sub-accounts and assign different roles to your team such as Admin, Maker and Approver that are applicable for bulk disbursement. The Super Admin and Admin can also edit or delete created sub-accounts.
Note: it is not necessary to create new sub-accounts in order to use bulk disbursement. The Super Admin and Admin roles allows you to directly create and approve bulk disbursements.
Detailed step-by-step instructions on setting up user management and the different role types coming soon.
Multi-Layer Approval
Multi-layer Approval will improve your control over your bulk disburse transaction especially for big amount of money. You can setup up to 3 layers of approver before the transaction instruction is executed. By assigning proper approver and amount limitation, you can avoid a huge trouble on your business operational caused by incorrect transfer amount.
Overall Campaign Summary
Keep track of all the details of the entire campaign such as the total amount of disbursement, total number of transactions, and the maker and approver related information of a campaign.
Transaction Details
Itemized details of each individual transaction, including their respective statuses: success, pending, or failed.
Registration and Set Up
Prerequisites
Register an account on the OY! dashboard
Activate your account through the activation link sent via email
Upgrade your account
Upgrade request is approved
Testing
- Log on your OY! dashboard
- Choose "Staging" environment
- Click "Send Money" menu, and choose "Bulk disbursement"
- Click "Create Disbursement"
- Fill in the necessary details by following the steps explained in the “How to Use” section
How to Use
In order to create disbursement campaigns, a sufficient available OY! balance is required in the account. If there is an insufficient available balance in the account, campaigns can still be created but not approved.
1. Create Disbursement: On the OY! dashboard, navigate to Send Payments > Bulk Disburse on your left menu bar. Click “Create Disbursement” on the far righthand side of that page to create a new bulk disbursement campaign.
2. Create Campaign Details: Fill in the campaign details with 2 options:

a. upload an xlsx or csv file
Please upload an xlsx or csv file with each individual transaction’s details of your bulk disbursement campaign. An example template for both file types are available for download on the OY! dashboard. The following list of items are required in your CSV file.
| Column | Description | Example |
|---|---|---|
| Name | Recipient Name | Budy |
| Recipient Email (can contain up to 5 emails with a total maximum of 255 characters, incoming transaction notifications will be sent to these emails) | Budi@email.com | |
| Amount | Amount in IDR (only numbers) | 100000 |
| Bank Code | Destination Bank | 014 |
| Bank Account Number | Recipient Bank Account Number | 12341234 |
| Phone Number | Recipient Phone Number | 62812341234 |
| Notes (Optional) | Transaction Notes |
b. add disbursement detail manually. : choose ‘add disbursement detail manually’ and fill out a campaign name and campaign description in the provided spaces. These details are strictly used as your tracking information only and will not be shared to the transaction recipients.
c. [Staging only] You can replicate failed status on individual transaction within the campaign by fill in Bank Account Number value with 3000000. Another value will be processed normally.
3. Re-verify all the Information and Submit: Once your xlsx or csv file is uploaded or filled out manually, you can verify all of the information uploaded from the file from the table displayed. If there is any incorrect submission such as invalid entry due to special characters, a red box will appear to highlight the entry that should be corrected. Issues must be resolved before a campaign can be submitted

4. Validate Name Matching After all the issue has been resolved, user able to click submit and there will be popup shown to validate each recipient name *with their *Bank Account Name as shown below:

if you choose YES: if there is a name difference, a popup name validation with details of mismatched transactions will be displayed. if the information inputted is invalid, you could edit the information and choose the ‘ validate’ button to revalidate the data, or you could click the ‘ignore mismatch’ button to ignore the name matching validation and to process the disbursement.

If there is no issue with the details uploaded, a validate and submit button will be available at the bottom of the list of transactions, indicating that all information is valid. Click “Submit” to complete creating the bulk disbursement campaign.

5. Approve/Cancel Campaign*: Once the bulk disbursement campaign is created, a new status of waiting approval will appear. Approve the campaign by clicking the “Approve” button. If you want to cancel a campaign, click the “...” button and select “Cancel”.
Once the bulk disbursement campaign is approved, details regarding the campaign can no long er be changed. This includes changes made to individual transactions and their respective recipient information.
The balances will also immediately reflect changes. For more information about the different types of balances, click here. You will also receive an email with the campaign information summary (“Outgoing Transfer Alert”) when transactions are executed.
Note:
- Depend on the approval layer that you configured, this transaction should be approved by all layer before it can be executed by the system.
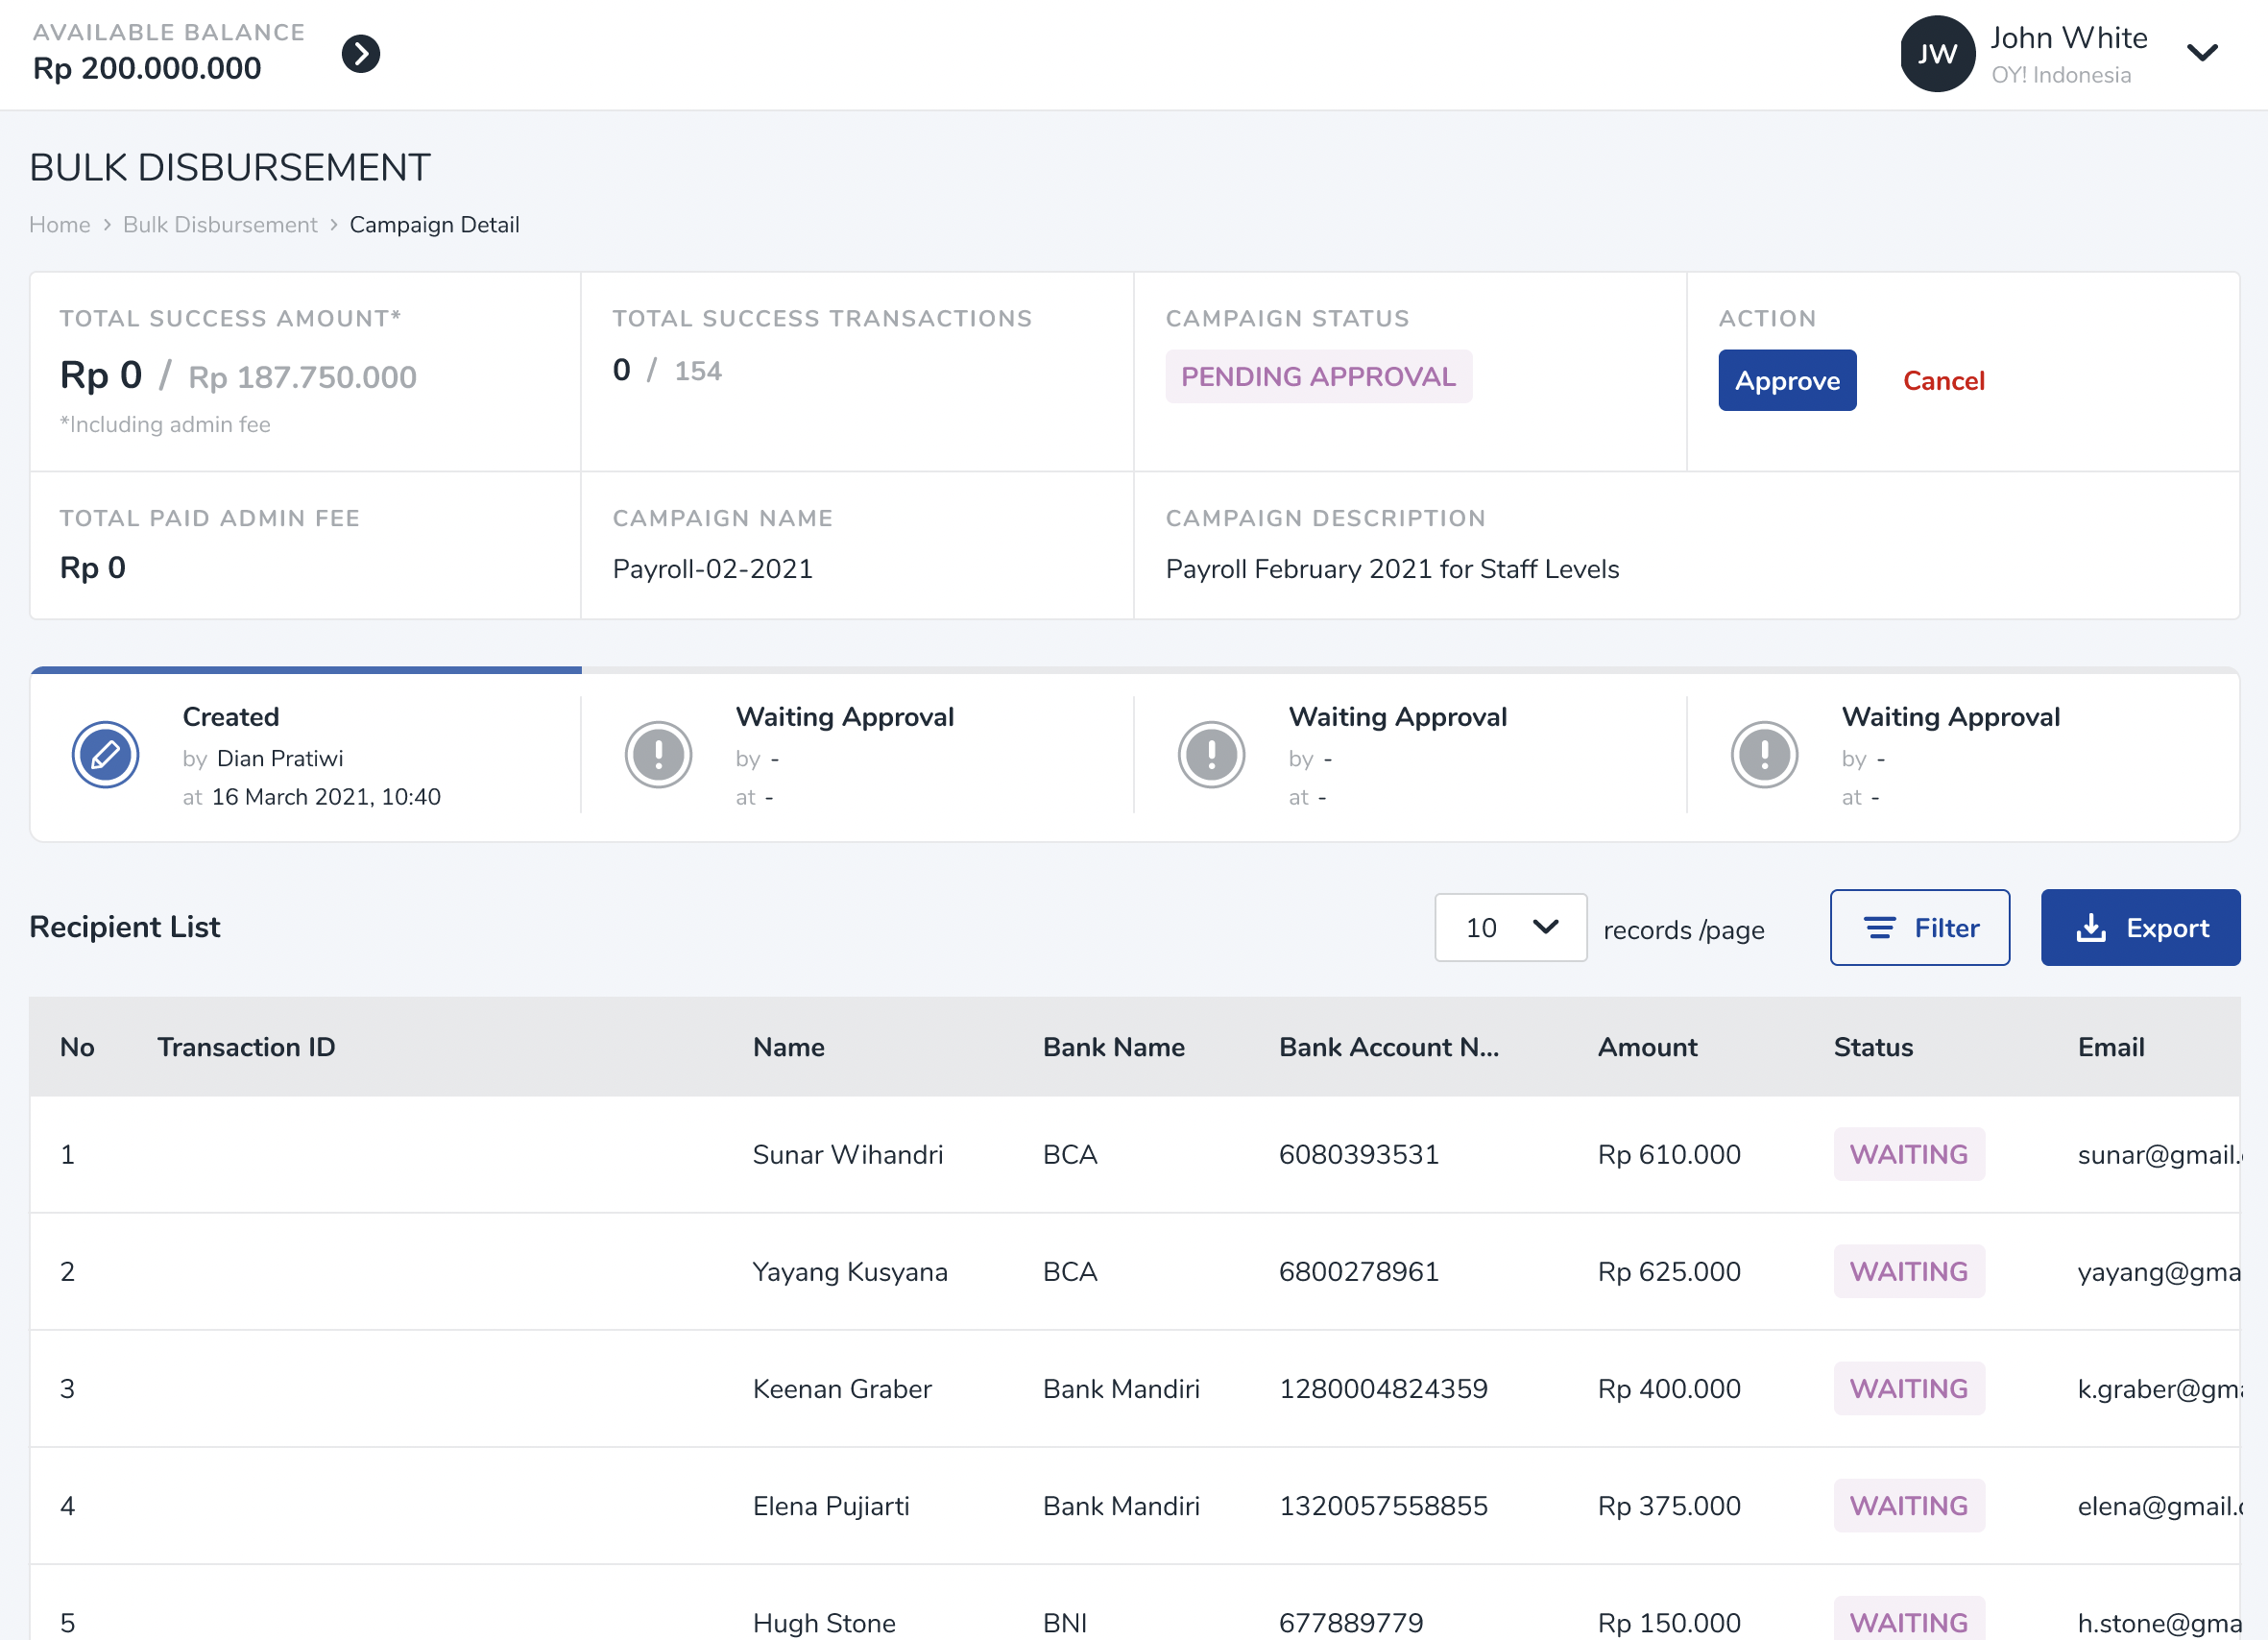
- Multiple campaigns can be approved at a time as long as there is sufficient available balance to complete campaigns that have already been approved but are still in queue to be processed.
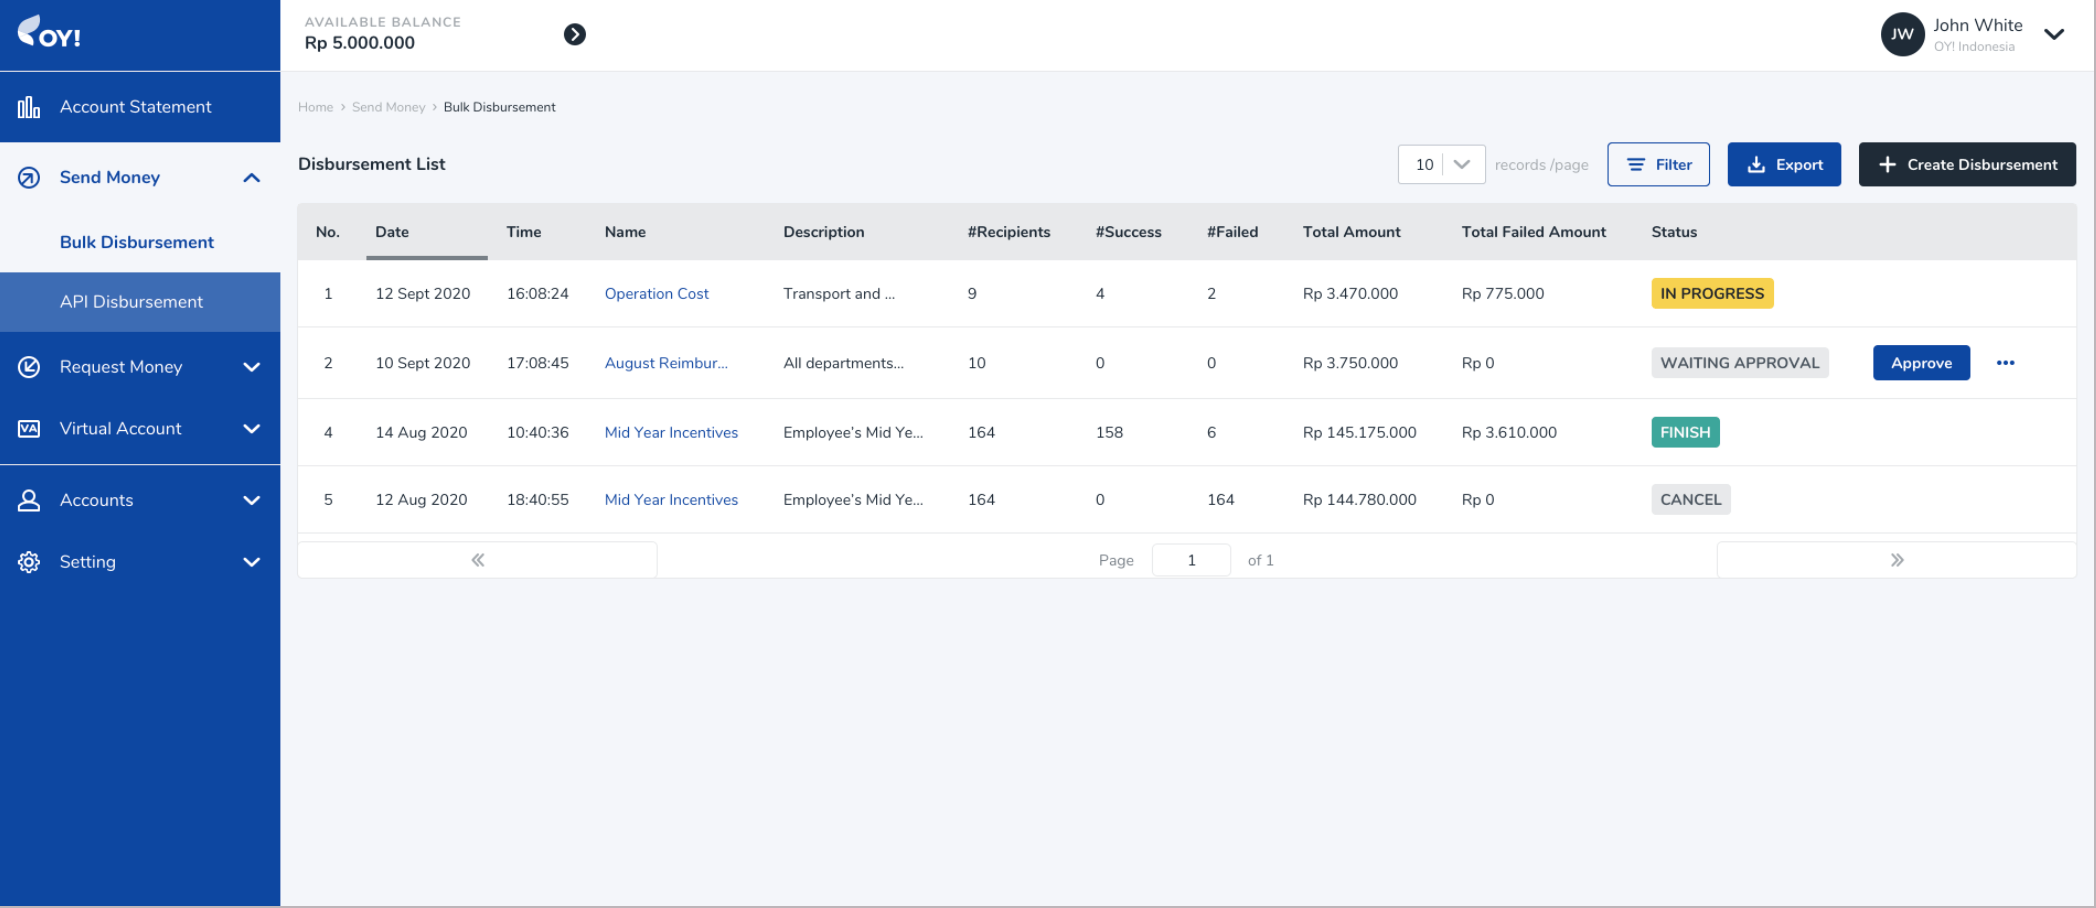
6. Keep Track of Campaign Details*: To check the details of the bulk disbursement campaign, click on the campaign name to find the campaign summary and its recipient list. Keep track of the both the overall campaign status and the status of individual transactions through the page.
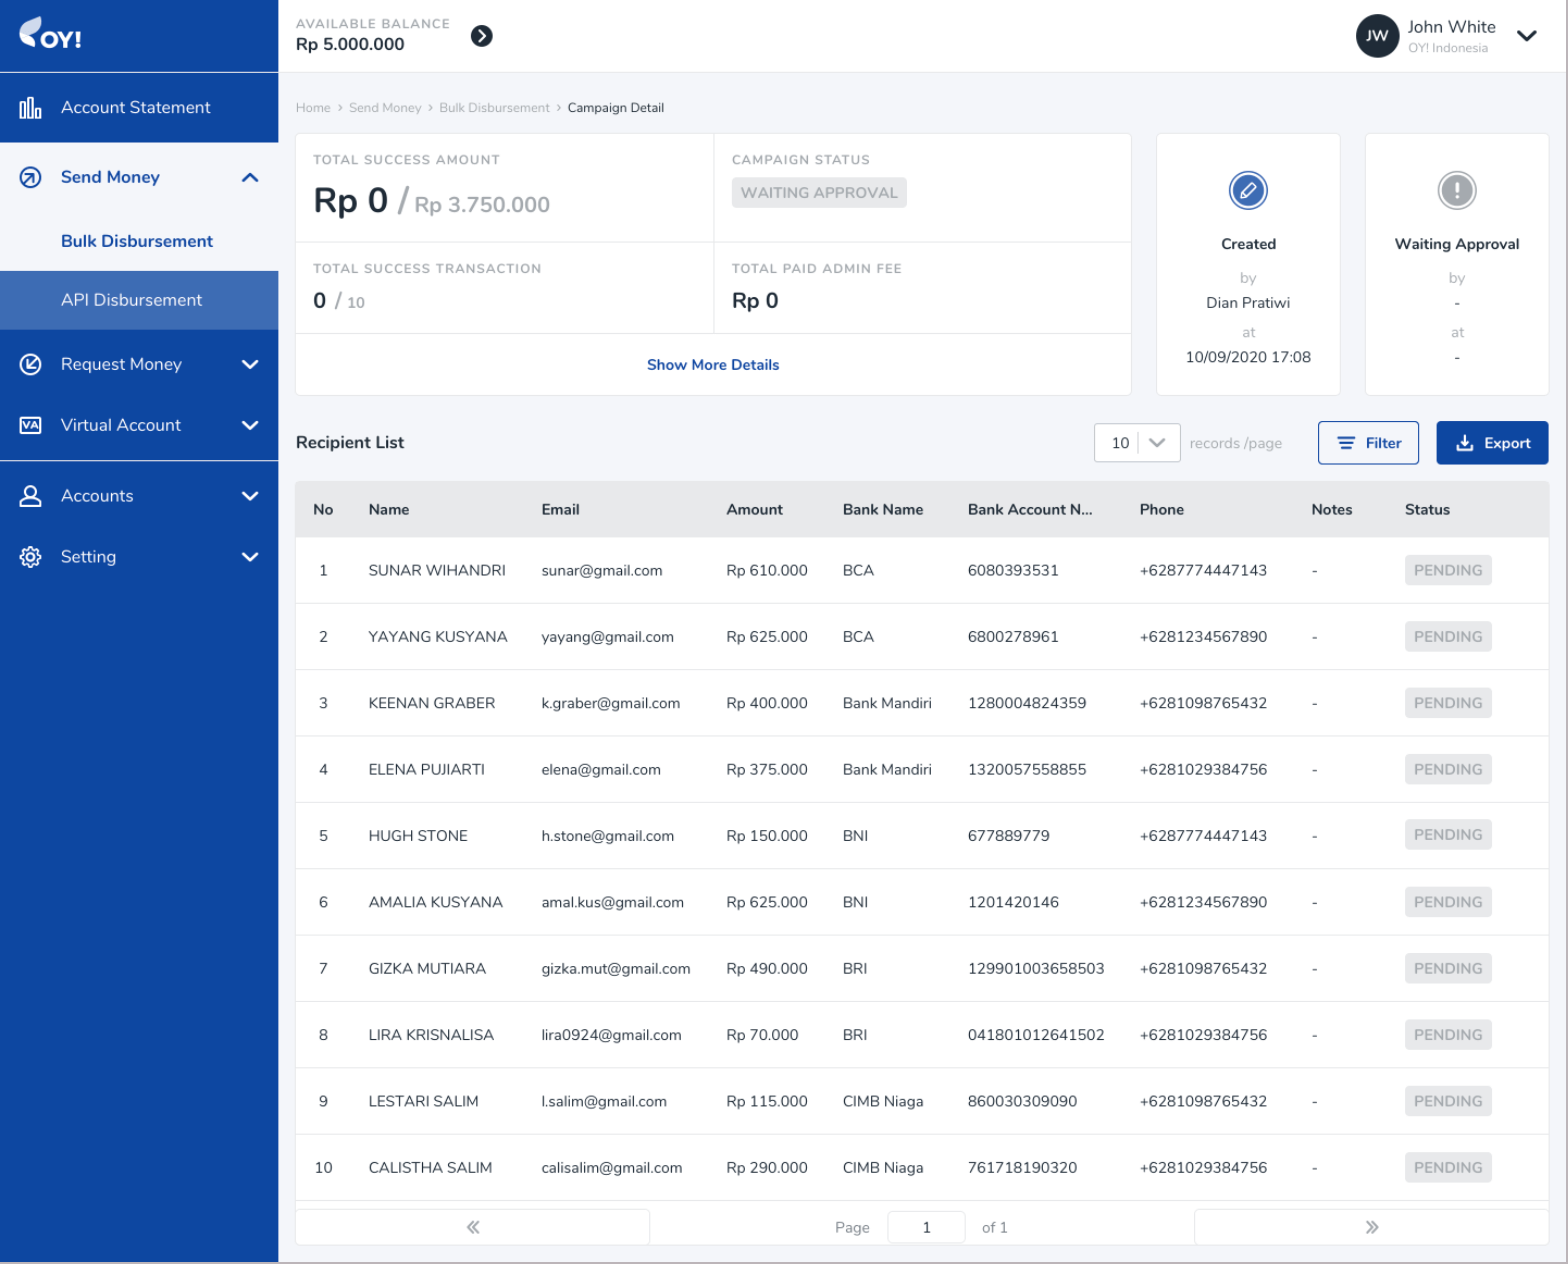
7. Status: In-Progress, Finish, and Cancel*: Congratulations! You just made your first bulk disbursement with OY! Below are a list of statuses you will find on the OY! dashboard.
In-Progress
As your individual disbursements are executed, the status of your bulk disbursement campaign will indicate an in-progress status.
Incomplete
The status of your bulk disbursement will change to incomplete once all of the listed transactions have been executed and the relevant final statuses of Failed or partially Failed have been assigned. The failed transactions will be shown the failed reason and can be retried.
Finish
Once all of the listed transactions have been completed and the final status of success for all transactions has been achieved, the status of your bulk disbursement campaign will change to Finish. The recipients should have all received an email detailing an “Incoming Transfer Alert.” You can also download a report of the campaign details directly through the OY! dashboard.
Cancel
If you choose not to approve your disbursement campaign, the status of your bulk disbursement campaign will indicate a cancelled status.
You can also double check each of your transactions by navigating to the account statement page on the OY! dashboard.
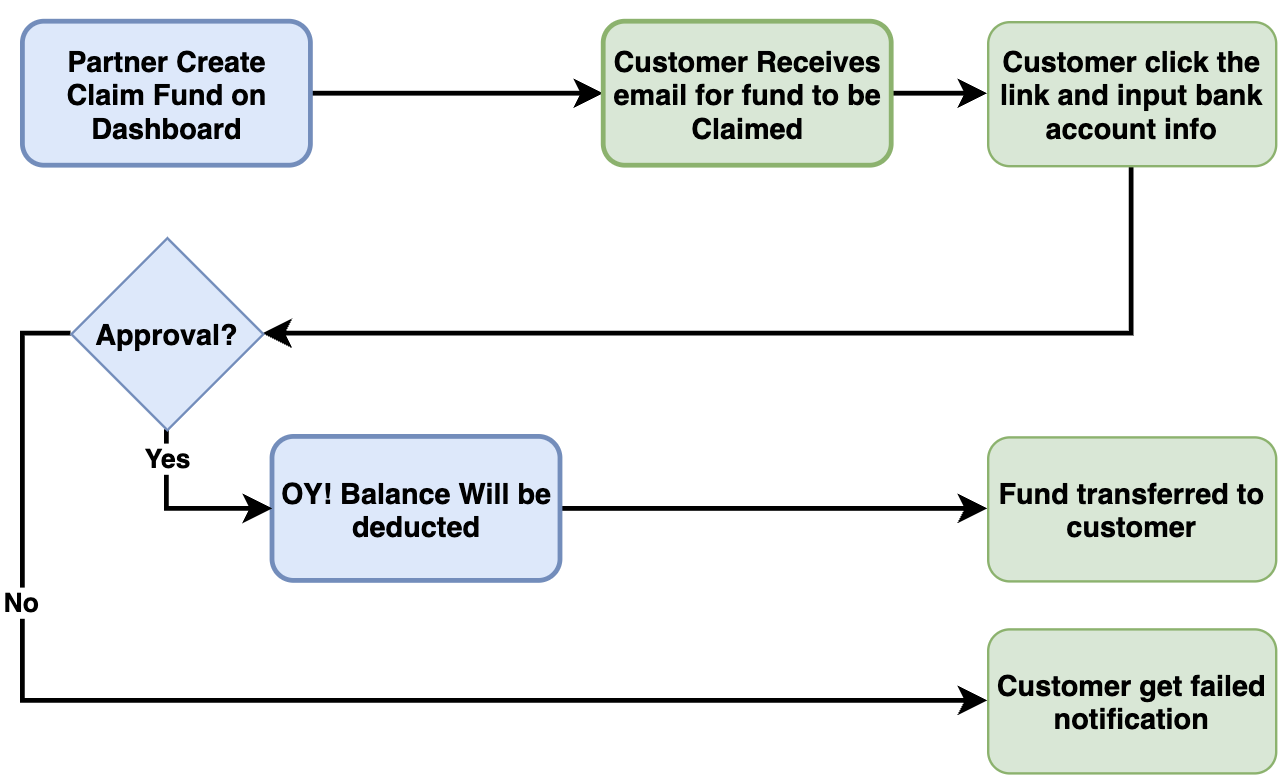
Claim Fund
Claim Fund product enable you to do disbursement without knowing your recipient bank account at first. You will simply create a link for them to fill-out bank account information and the payment will be processed by our system. This feature will remove you from the hassle of collecting your customer information manually then doing multiple bank transfer. Best use of this feature is : refunds, reimbursement claim, any disburse transaction in which the destination is not your regular partner.
At the moment, Claim Fund product is available only on OY! Business Dashboard.
Transaction Flow
Use Case
- Refund for purchase transaction
- Any money transfer transaction where you don't have recipient bank information
Registration and Set Up
Prerequisites
- Register an account on the OY! dashboard (https://business.oyindonesia.com/register?)
- Activate your account through the activation link sent via email
- Upgrade your account
- Upgrade request is approved
Testing
- Log on your OY! dashboard
- Choose "Staging" environment
- Click "Send Money" menu, and choose "Claim Fund"
- Click "Create Claim Fund"
- Fill in the necessary details by following the steps explained in the “How to Use” section
How to Use
In order to execute claim fund transaction successfully, a sufficient available OY! balance is required in the account. However, if there is an insufficient available balance, claim fund transaction can still be created but the approval will failed.
1. Business Dashboard - Create Claim Fund
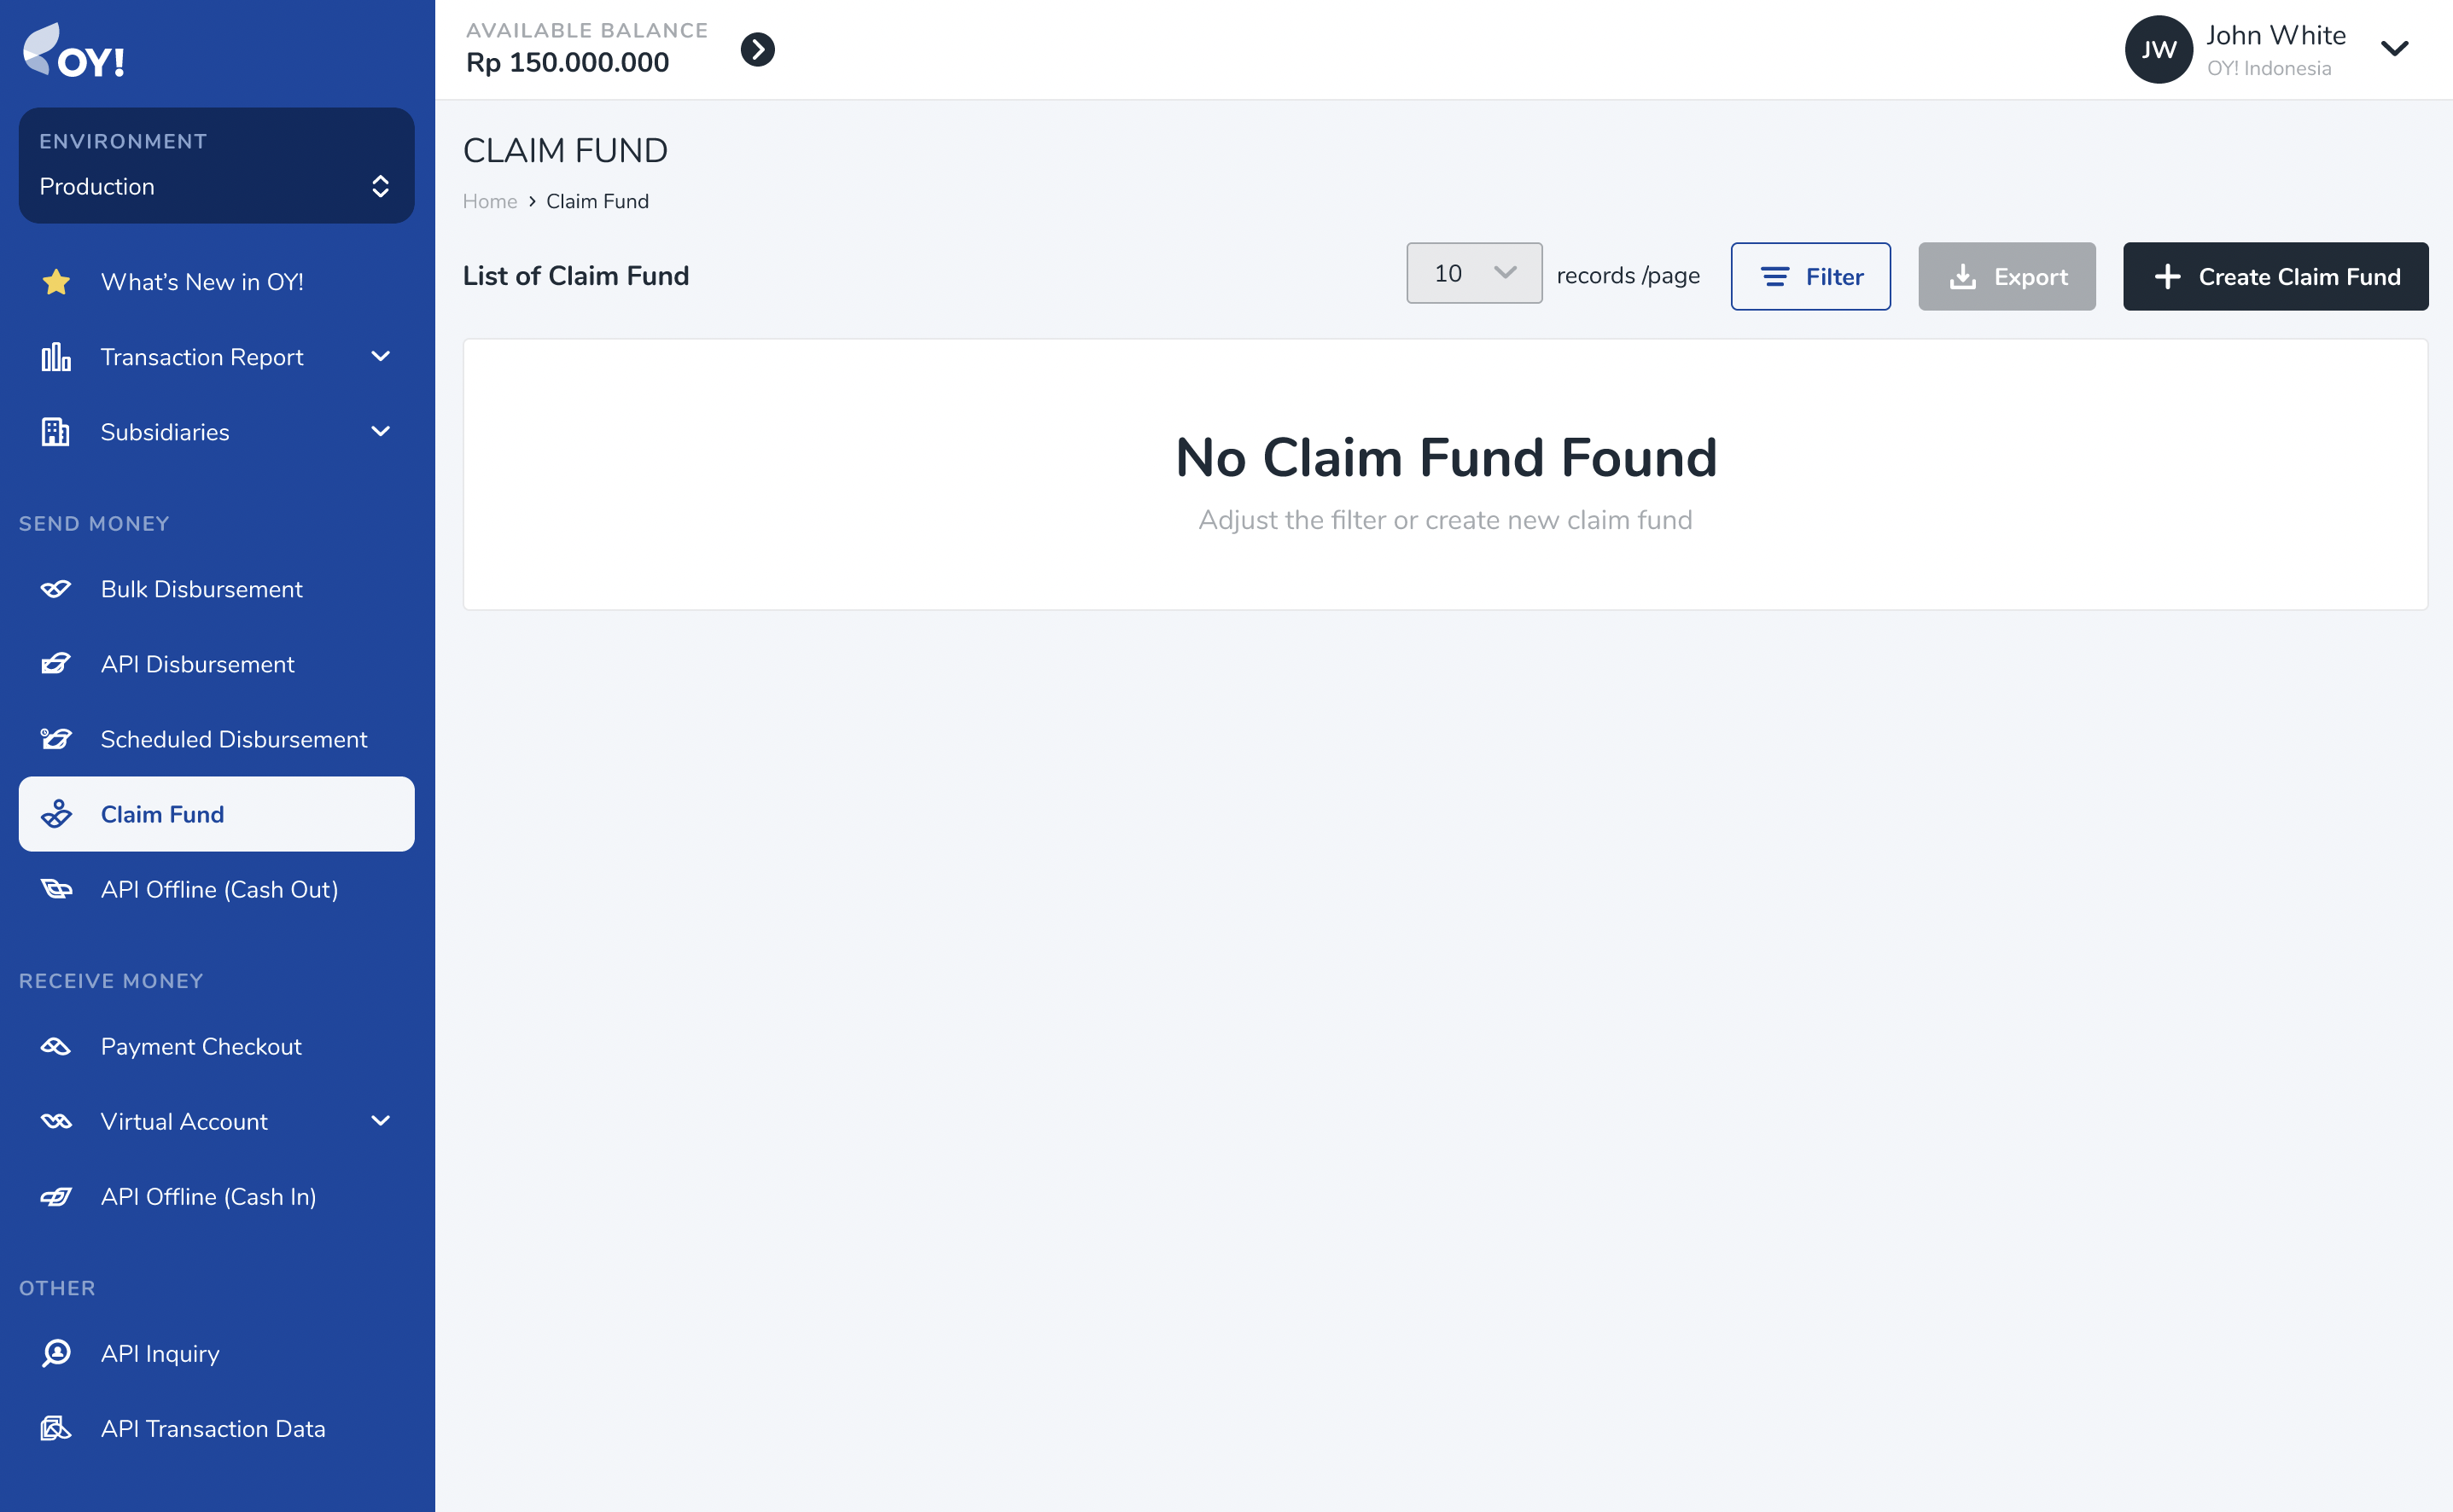
Create Claim Fund: On the OY! dashboard, navigate to Send Money > Claim Fund on your left menu bar. Click
Create Claim Fundbutton on the far righthand side of that page to create a new claim fund transaction.
Please fill-out the information accordingly. Below table is the description of each fields:
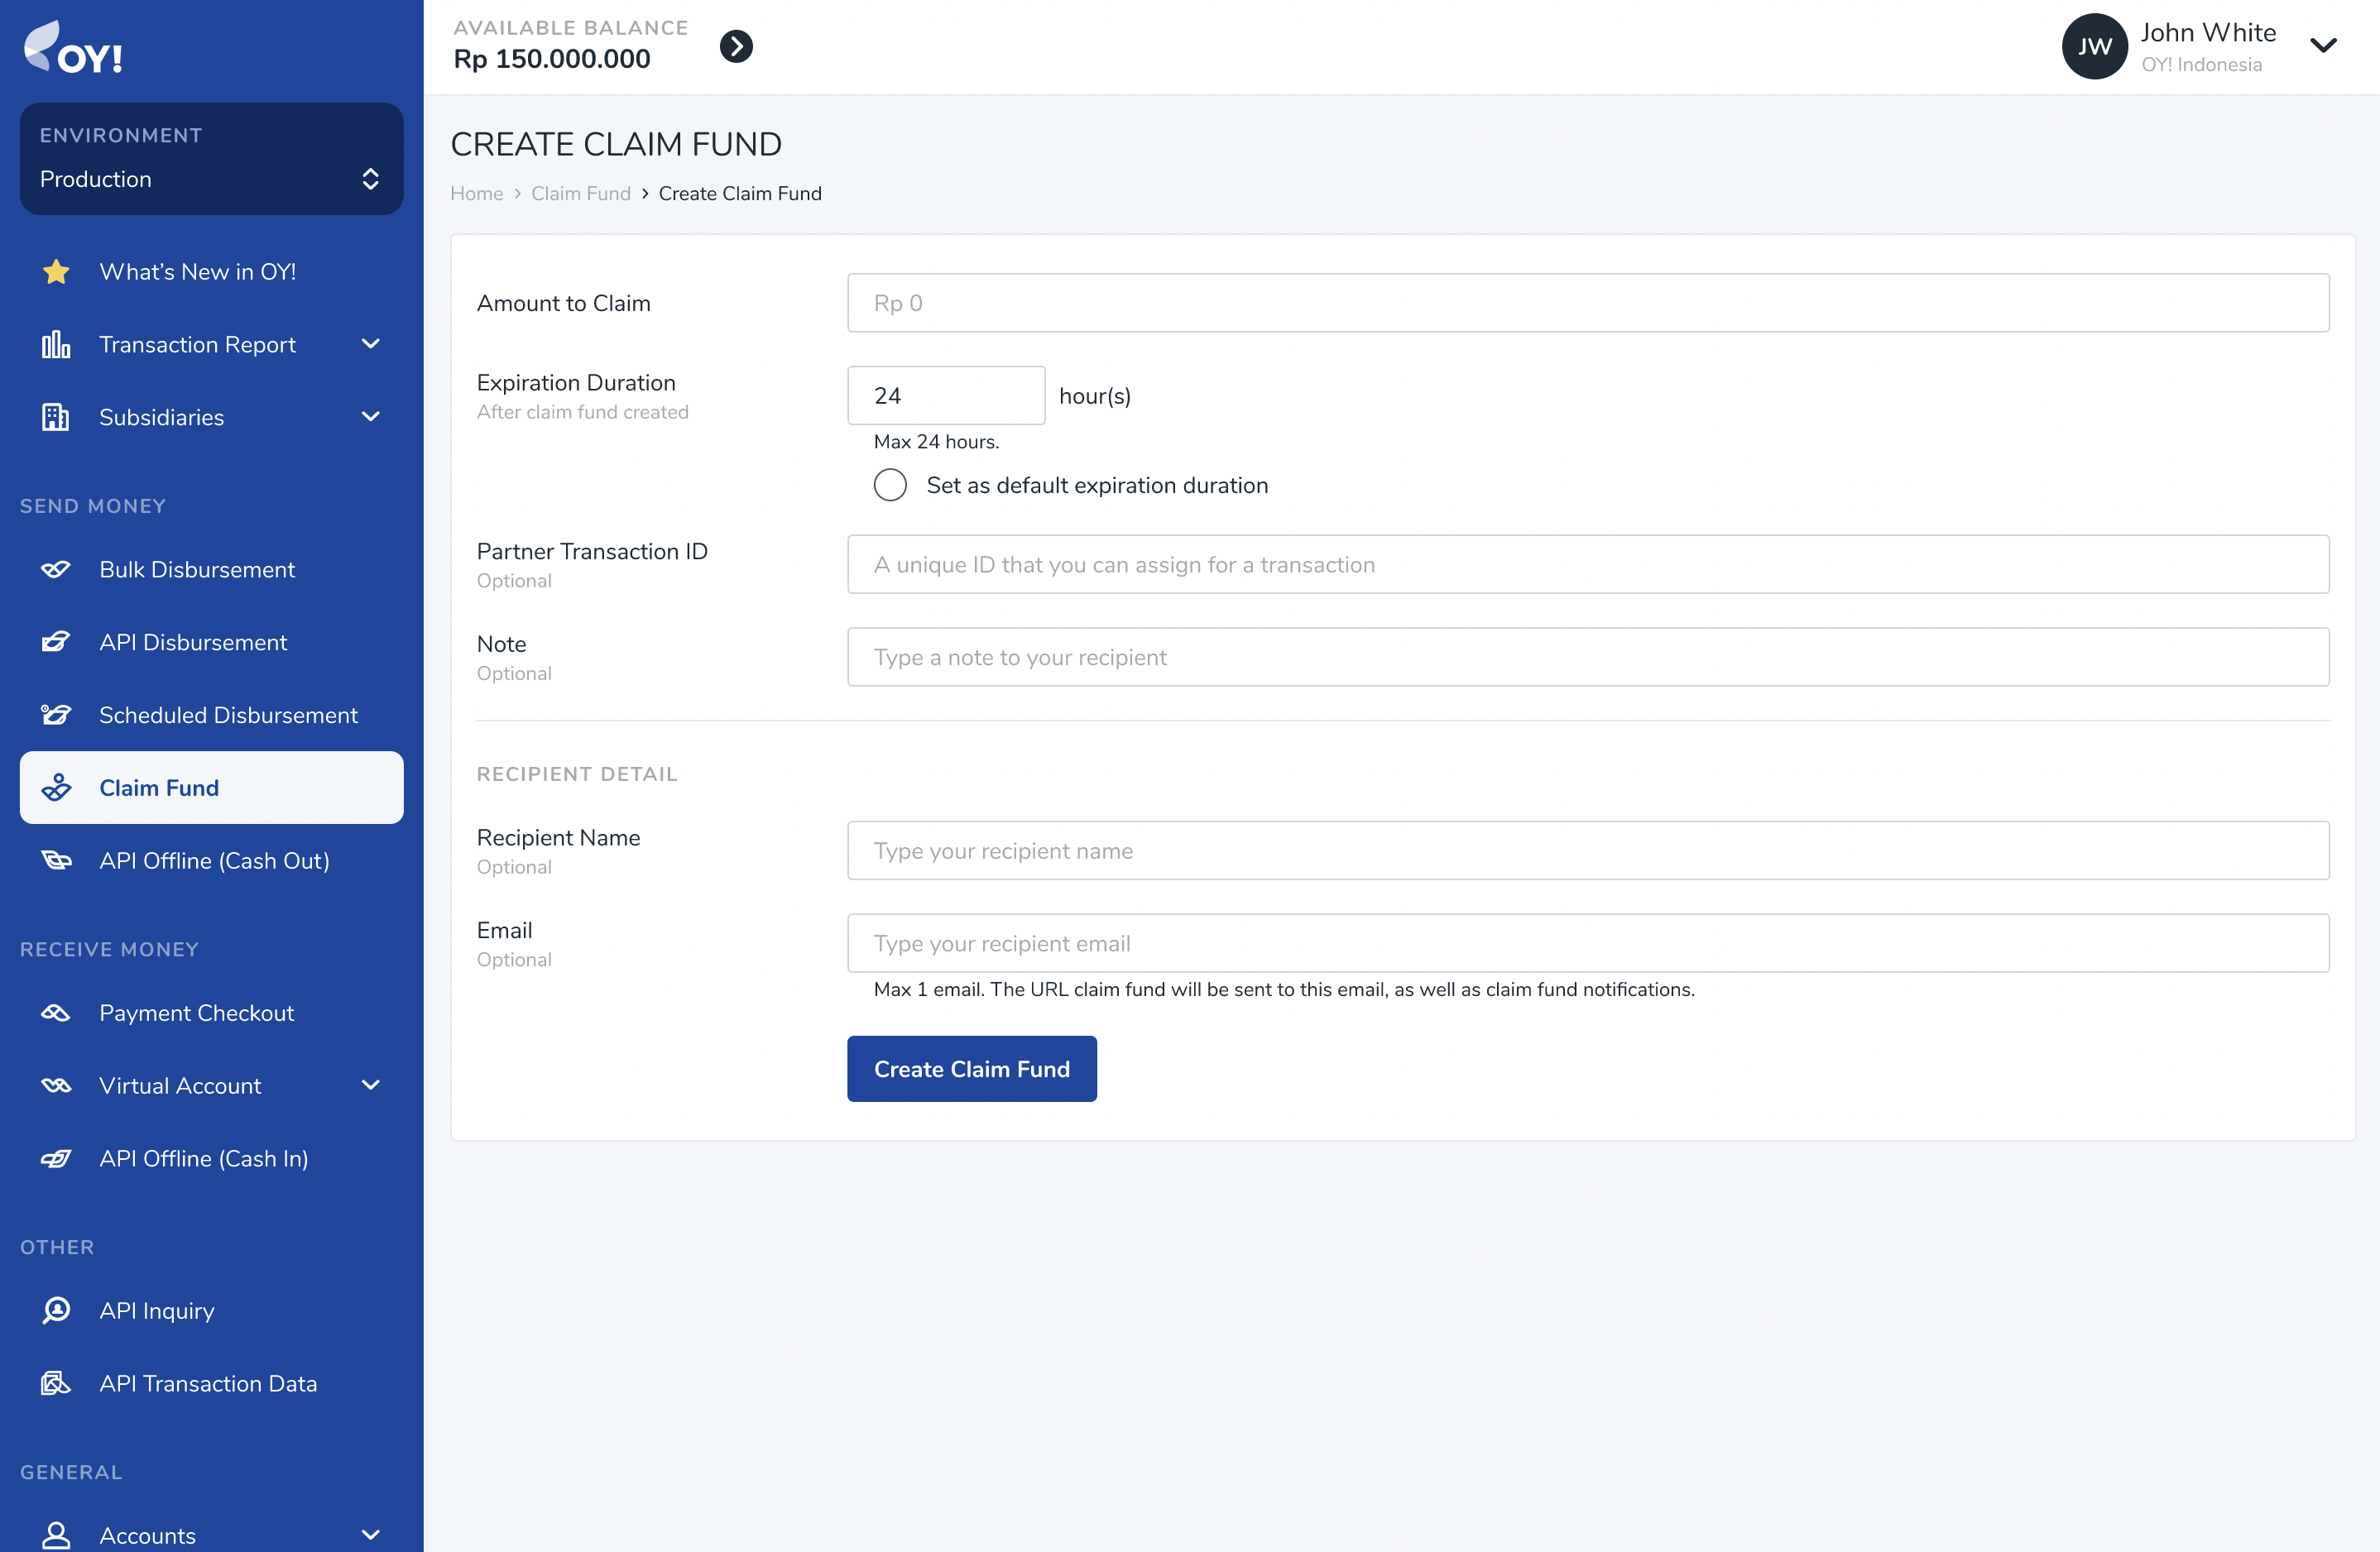
| Column | Description | Example |
|---|---|---|
| Amount to Claim | Amount of money to be sent | 1000000 |
| Expiration Duration | How long does this claim link be active. After expiration time, customer will not be able to submit their information then new claim fund link has to be created. | 12 Hours |
| Set as default expiration duration | Select this option to make it default expiration time for the next claim fund transaction. | - |
| Partner Transaction ID | Unique identifier for the recipient. | CF00001 |
| Note | additional remarks for recipient | Refund transaction |
| Recipient Name | Recipient Name | Dwiki Dermawan |
| Recipient Email | dwiki@gmail.com |
Click
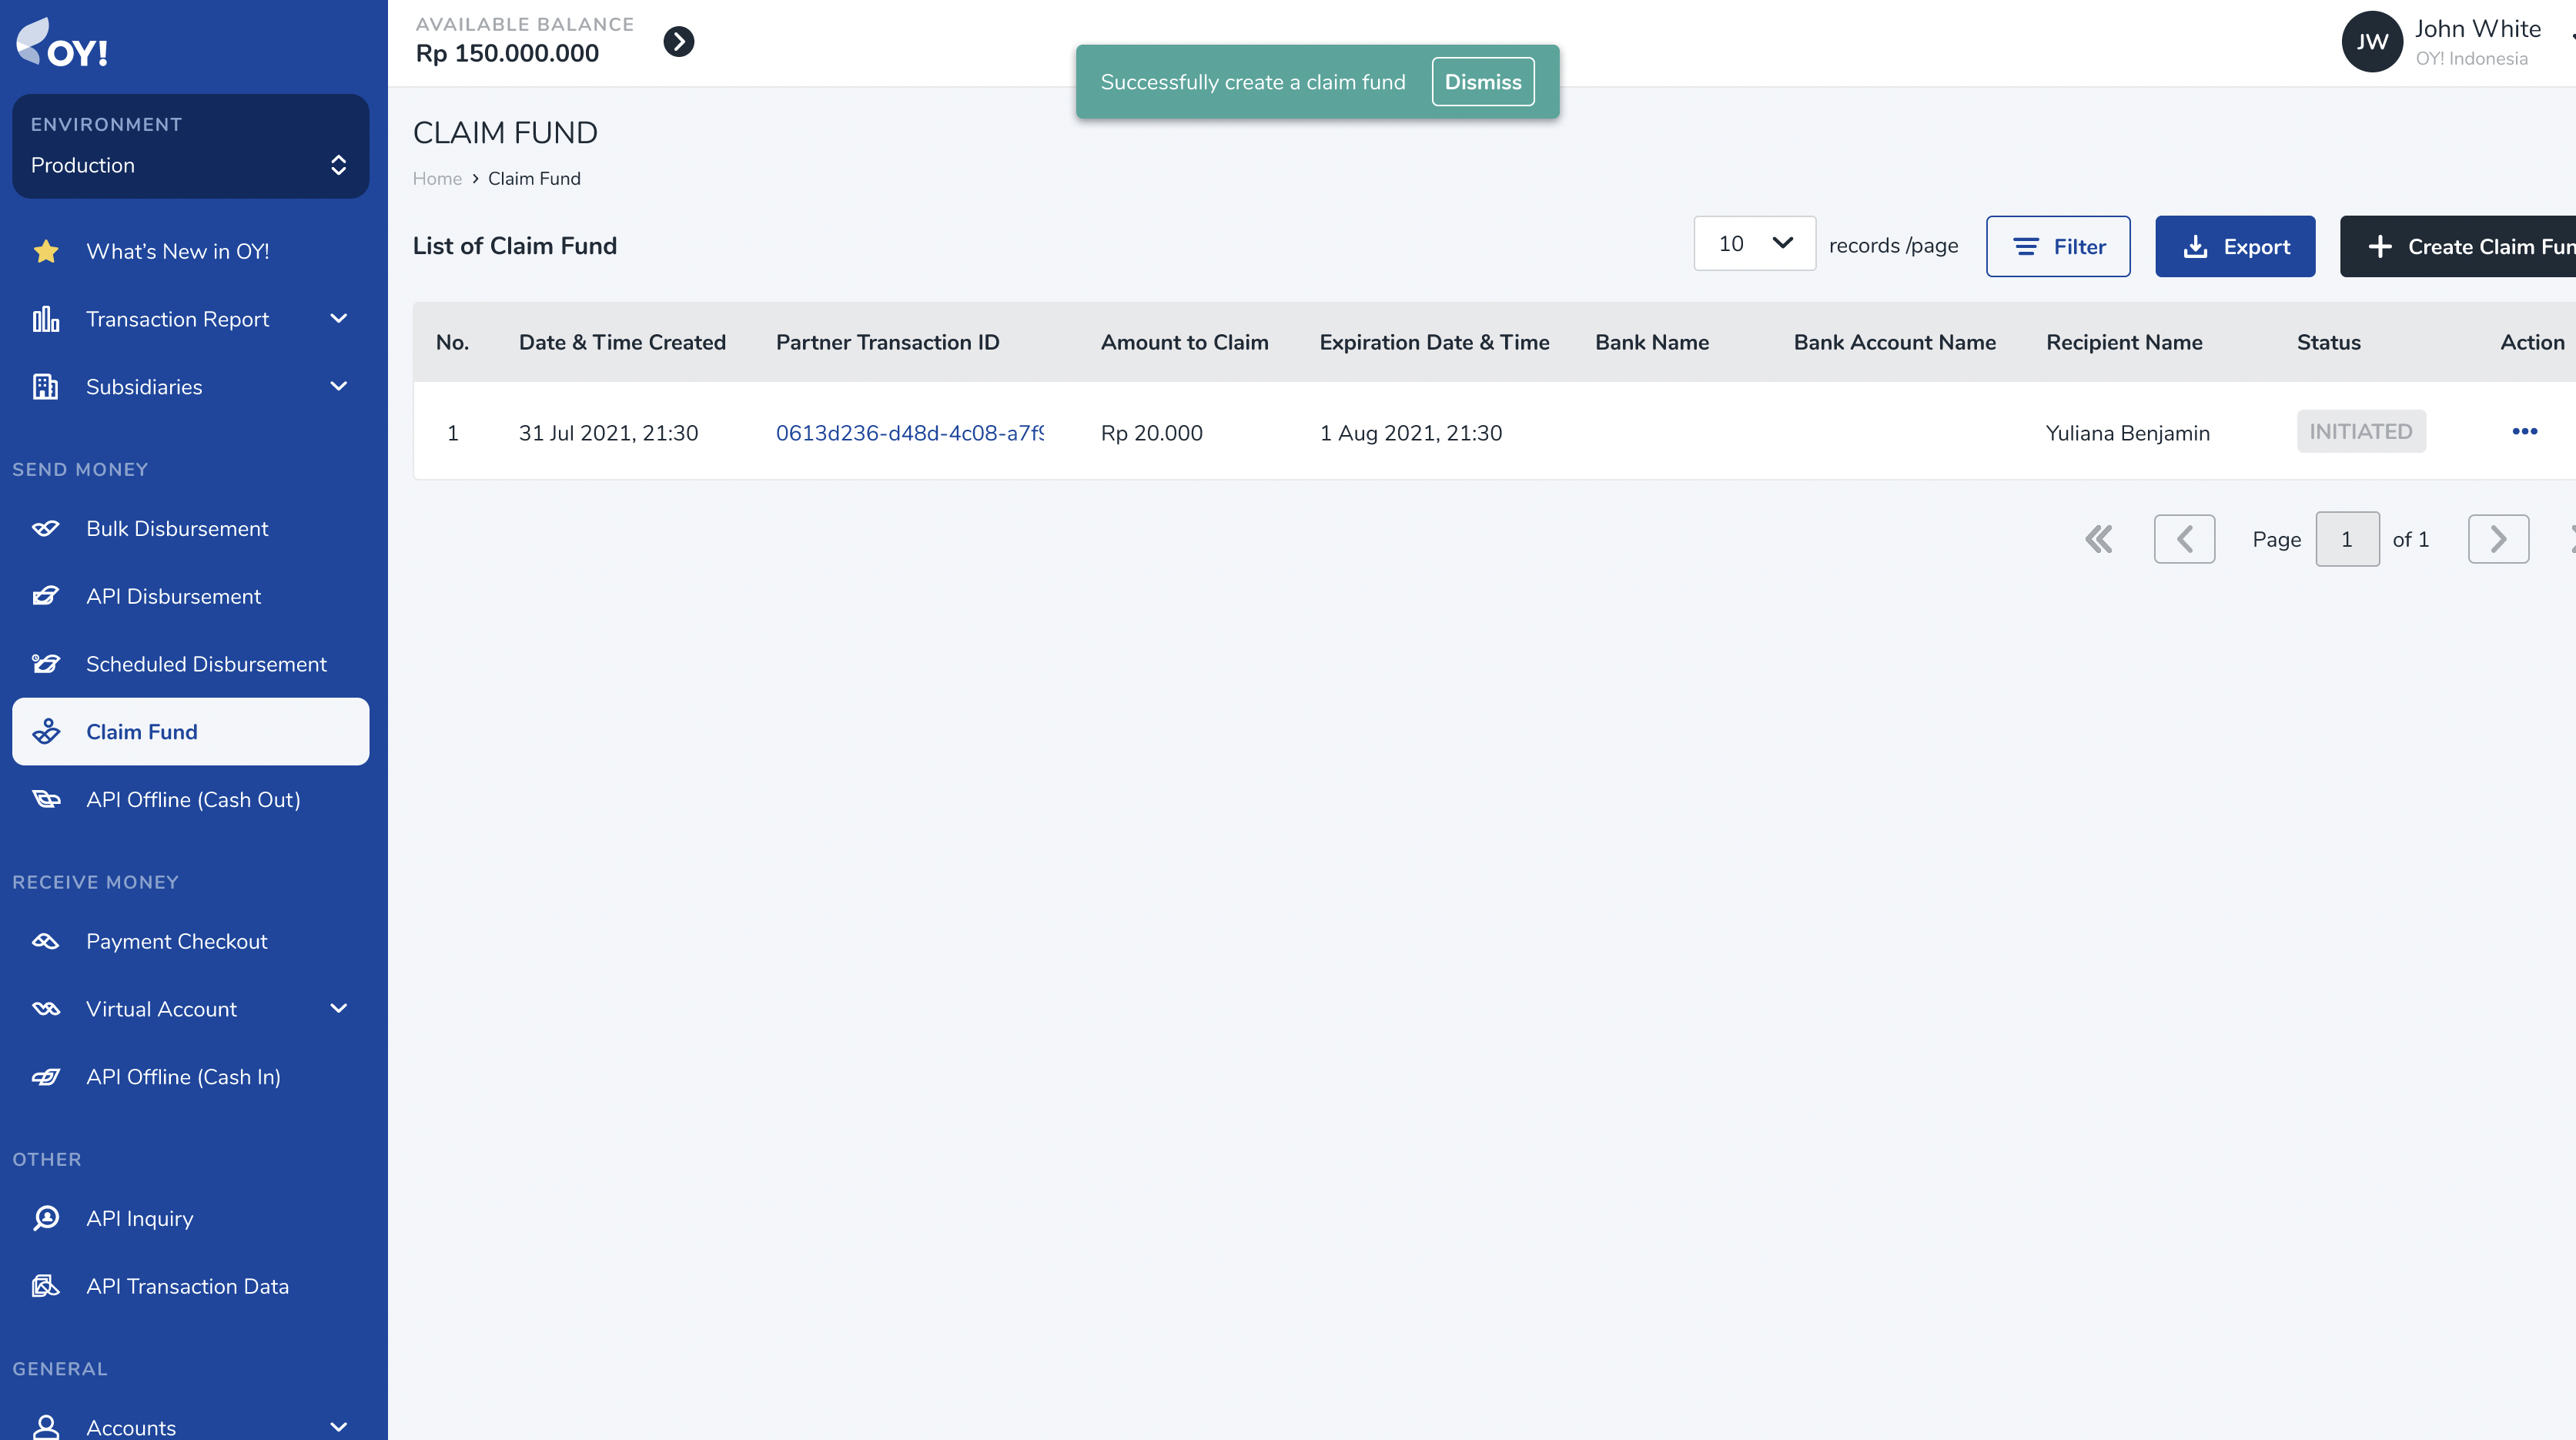
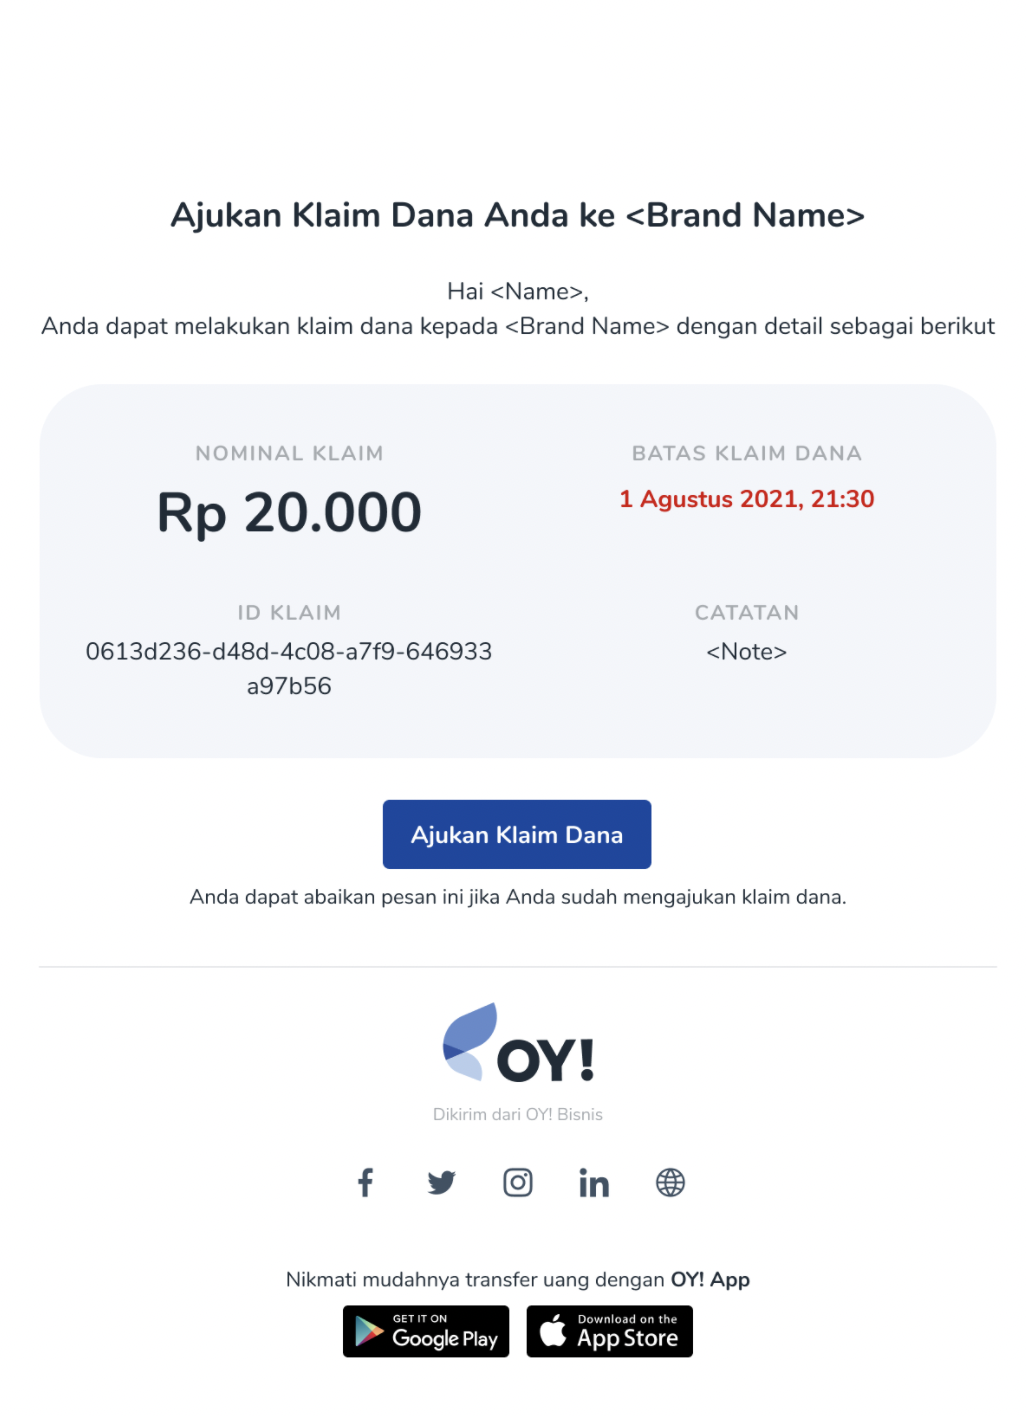
Create Claim Fundbutton to submit the transaction. Your recipient will get notified of this claim fund transaction through email. Transaction link will be attached on this email.Successful claim fund transaction will be listed on the claim fund transaction listing with INITIATED status.
Please be noted that this transaction still need account detail to be filled-out by the recipient.
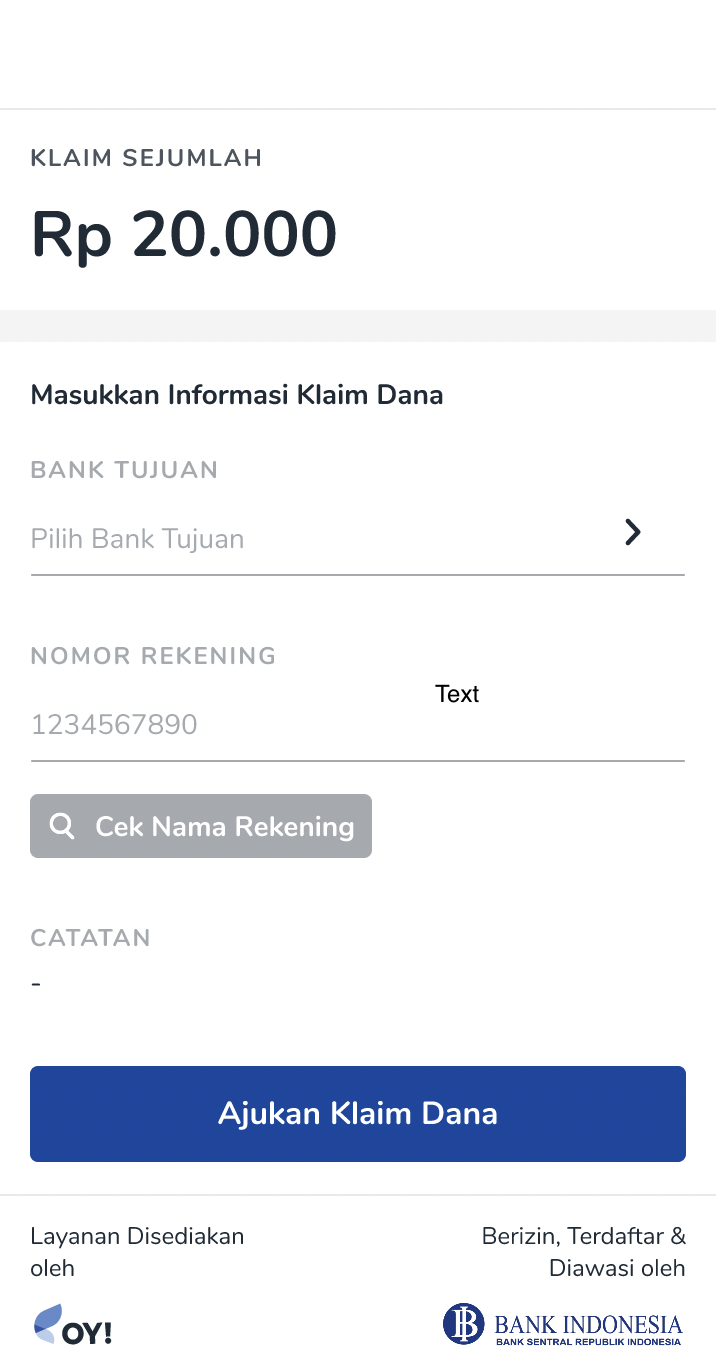
2. Fund Recipient - Input Account Information
On the notification email, user click the
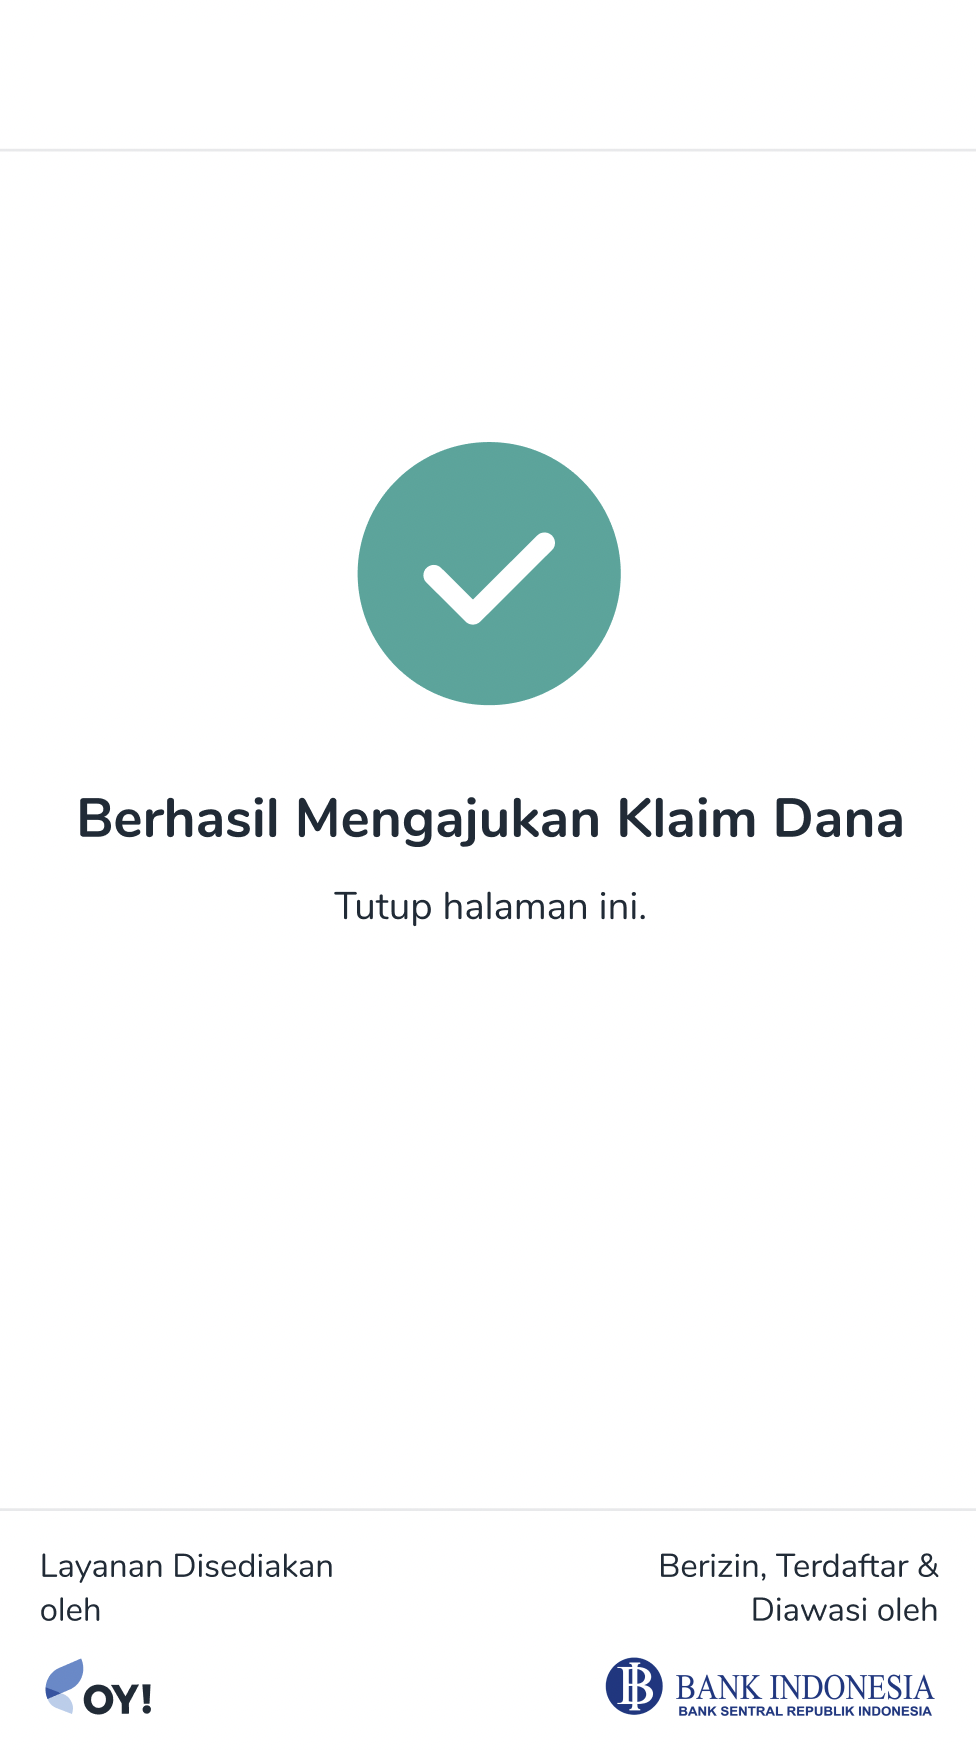
Ajukan Klaim Danalink to get into claim fund input page.User should fill-out the detail information so that OY! system can continue with the approval process.
3. Business Dashboard - Approve Transaction
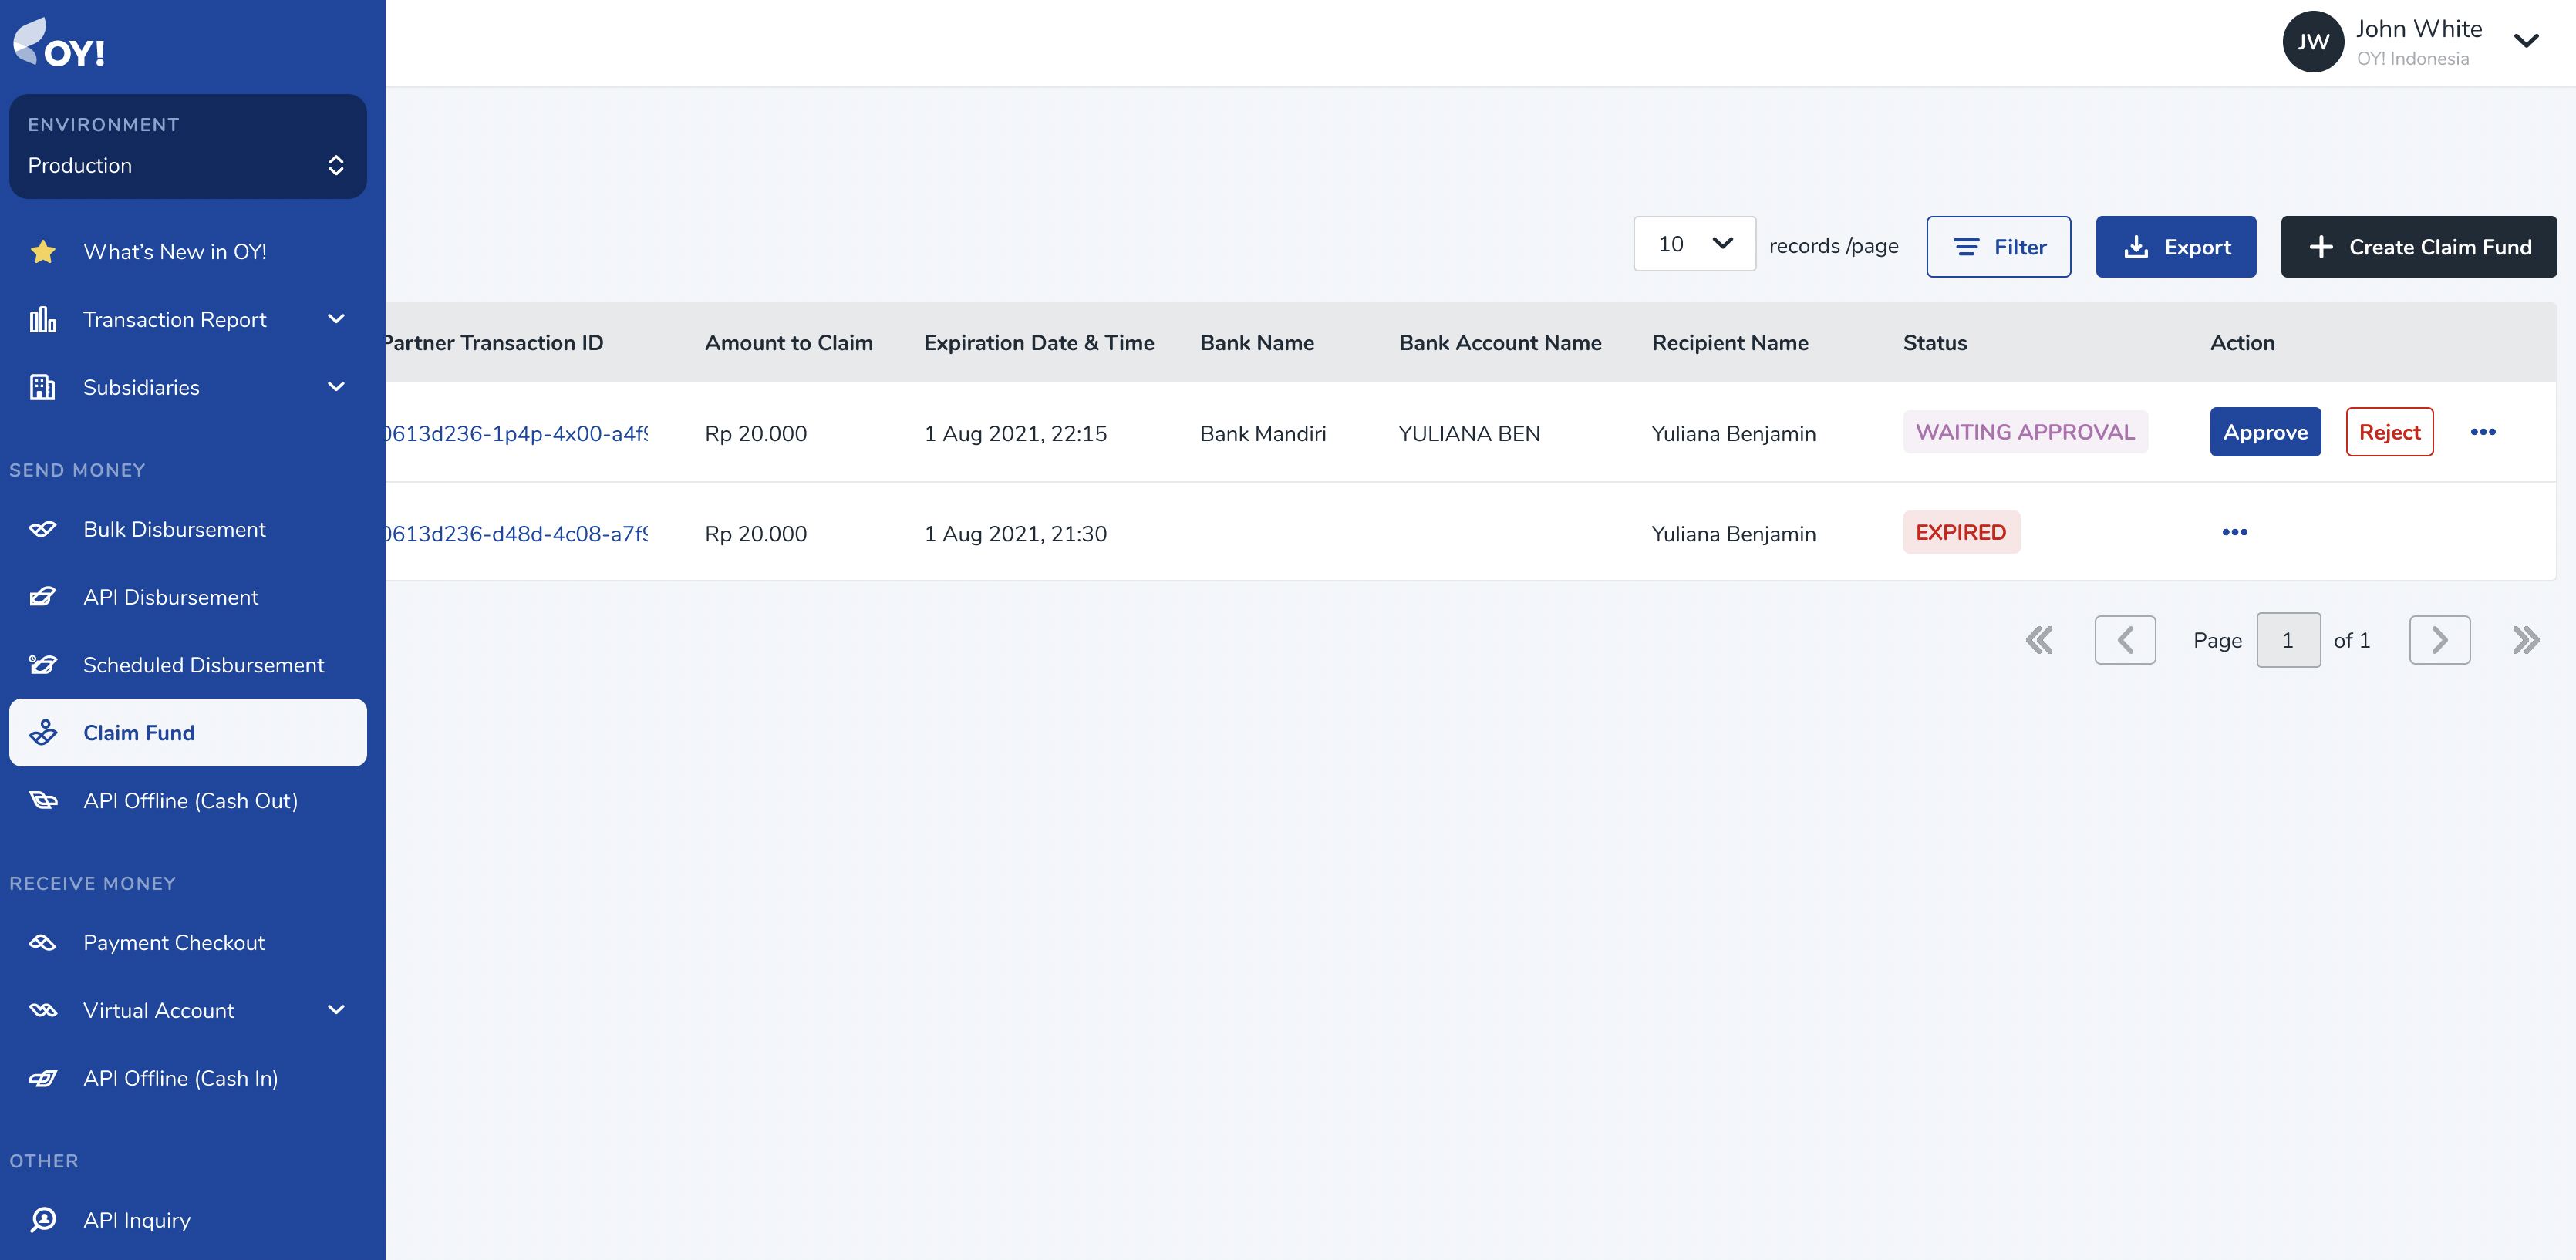
Transaction need to go through approval process to ensure that the money will be delivered to correct recipient and sufficient amount is available.
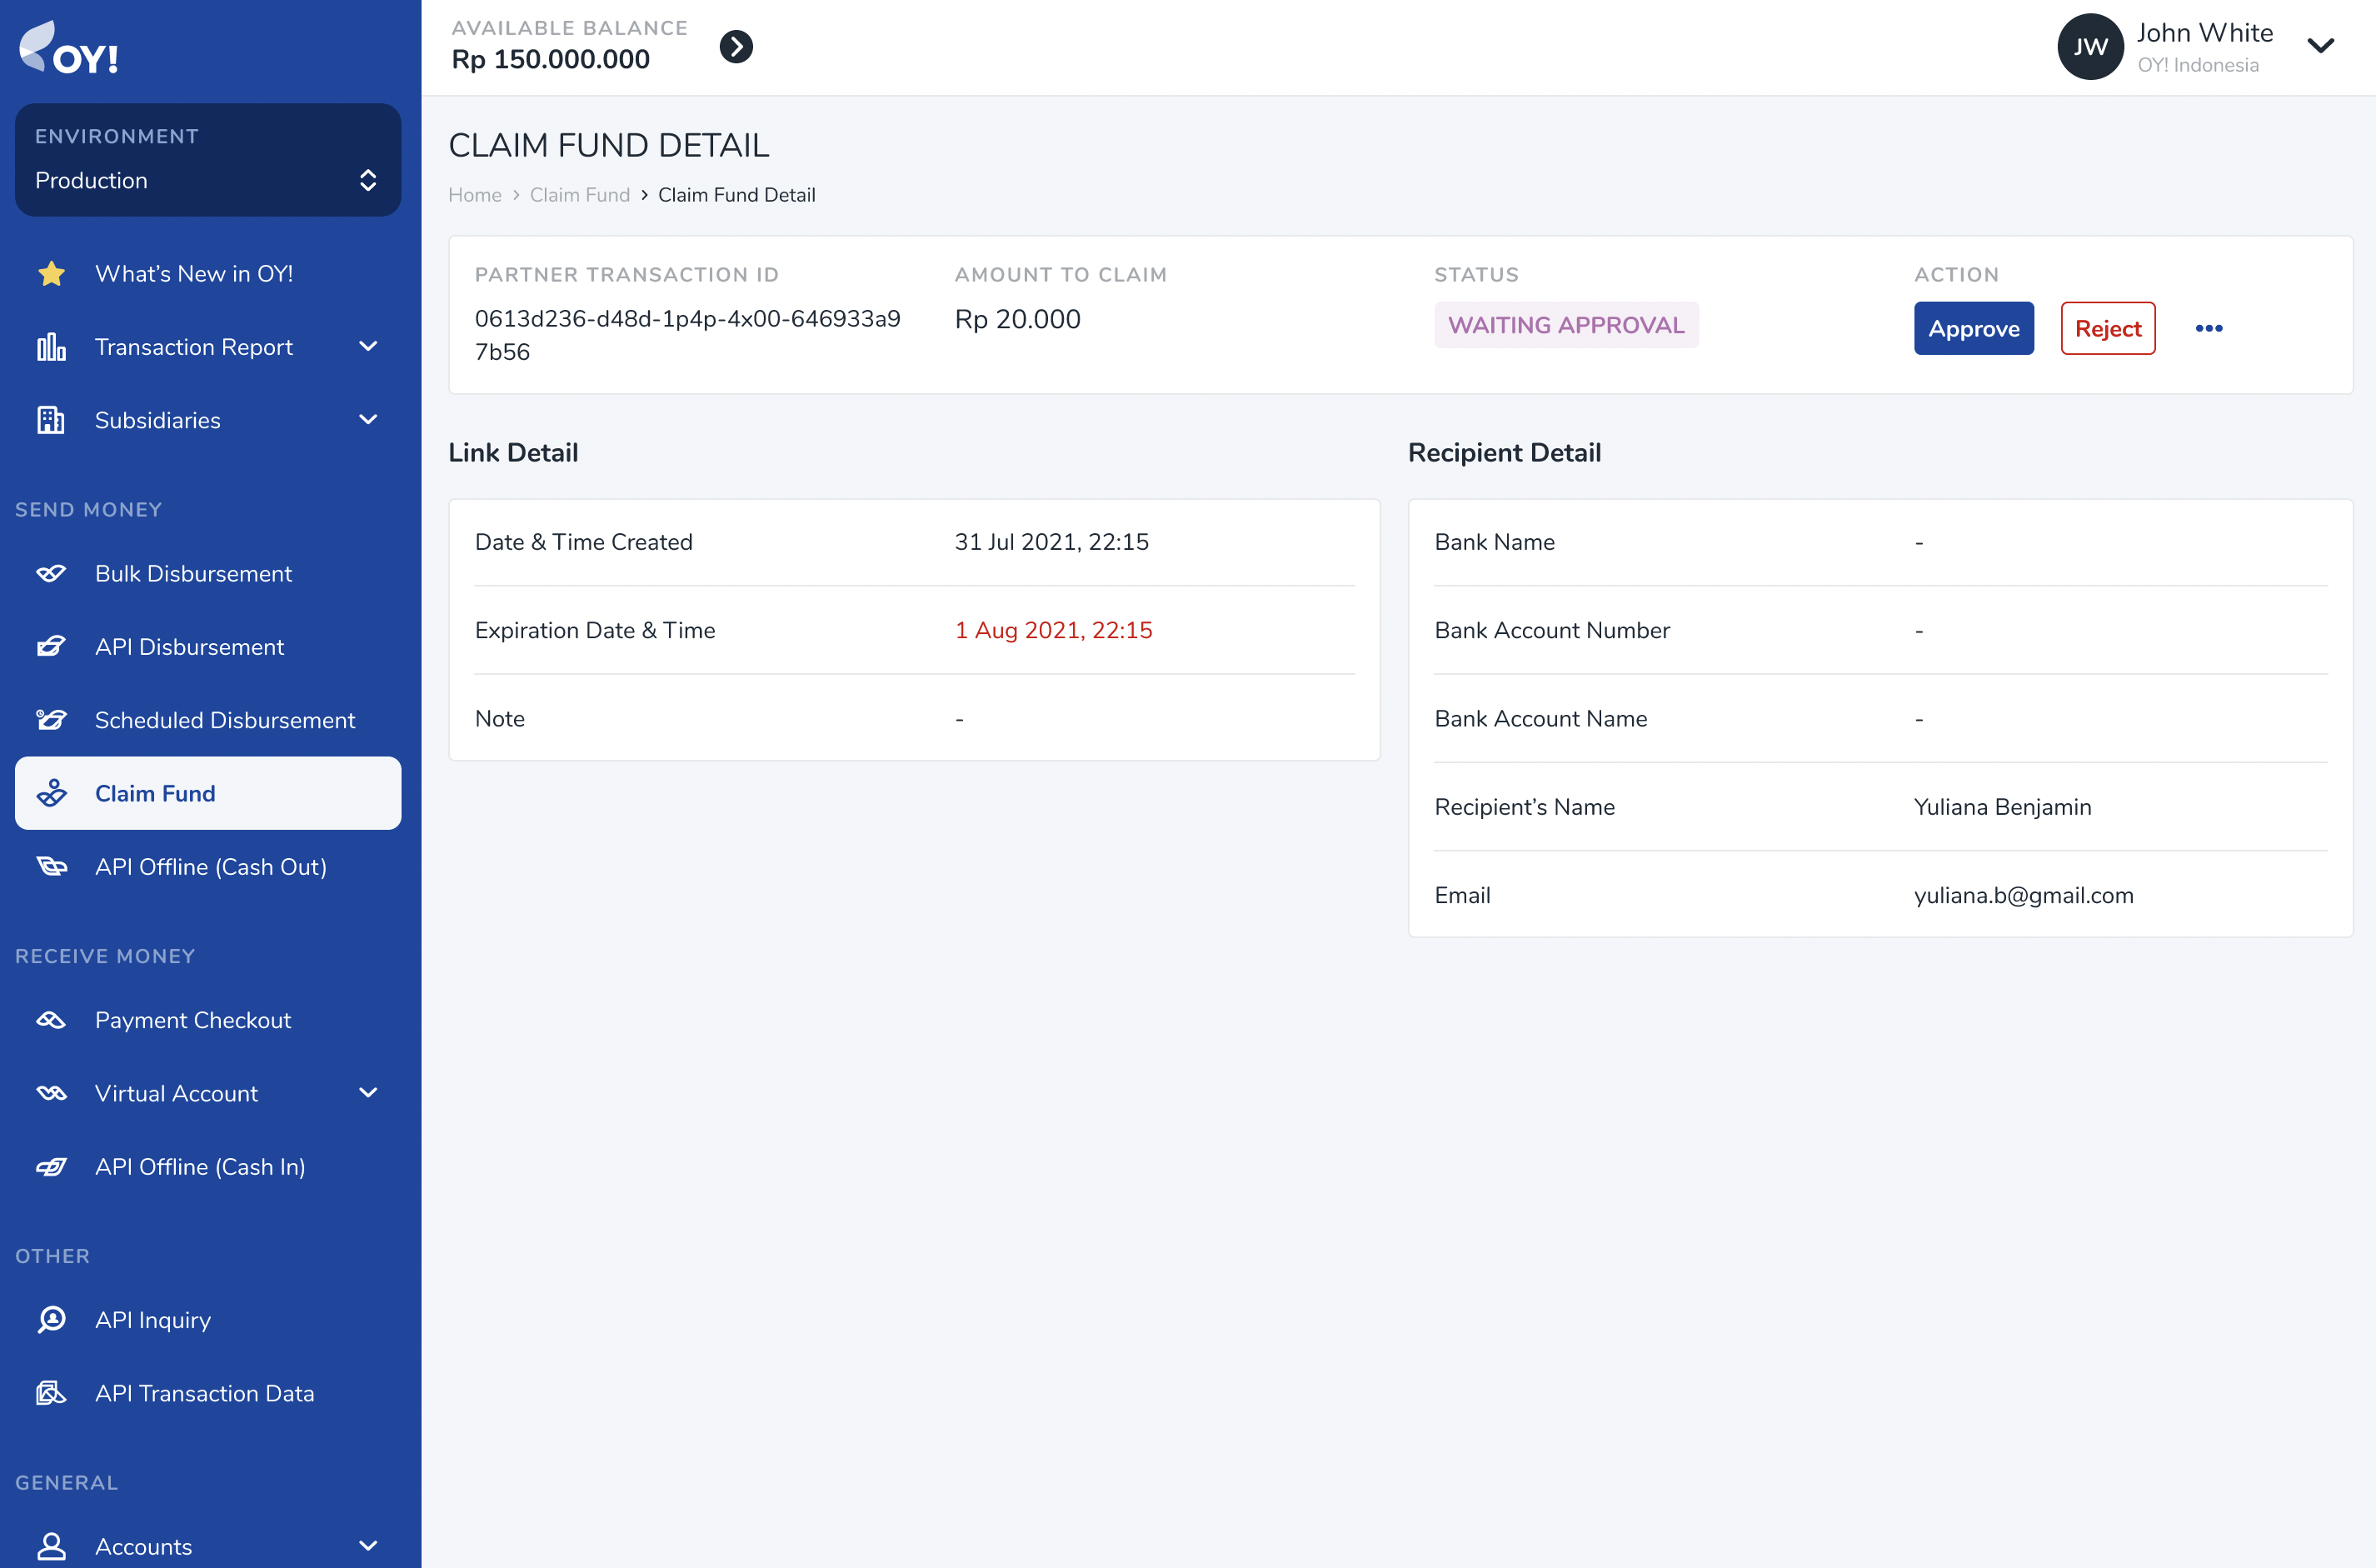
Approve claim fund transaction: On the OY! dashboard, navigate to Send Money > Claim Fund on your left menu bar. Transactions that already have user detail will be marked with
WAITING APPROVALstatus.You can approve the transaction directly from this screen by clicking Approve button, or go to detail transaction to see more information before approve.
Click approve button to release the transaction to user.
The transaction is now marked as
IN PROGRESSYour recipient should get the money delivered to their account immediately.
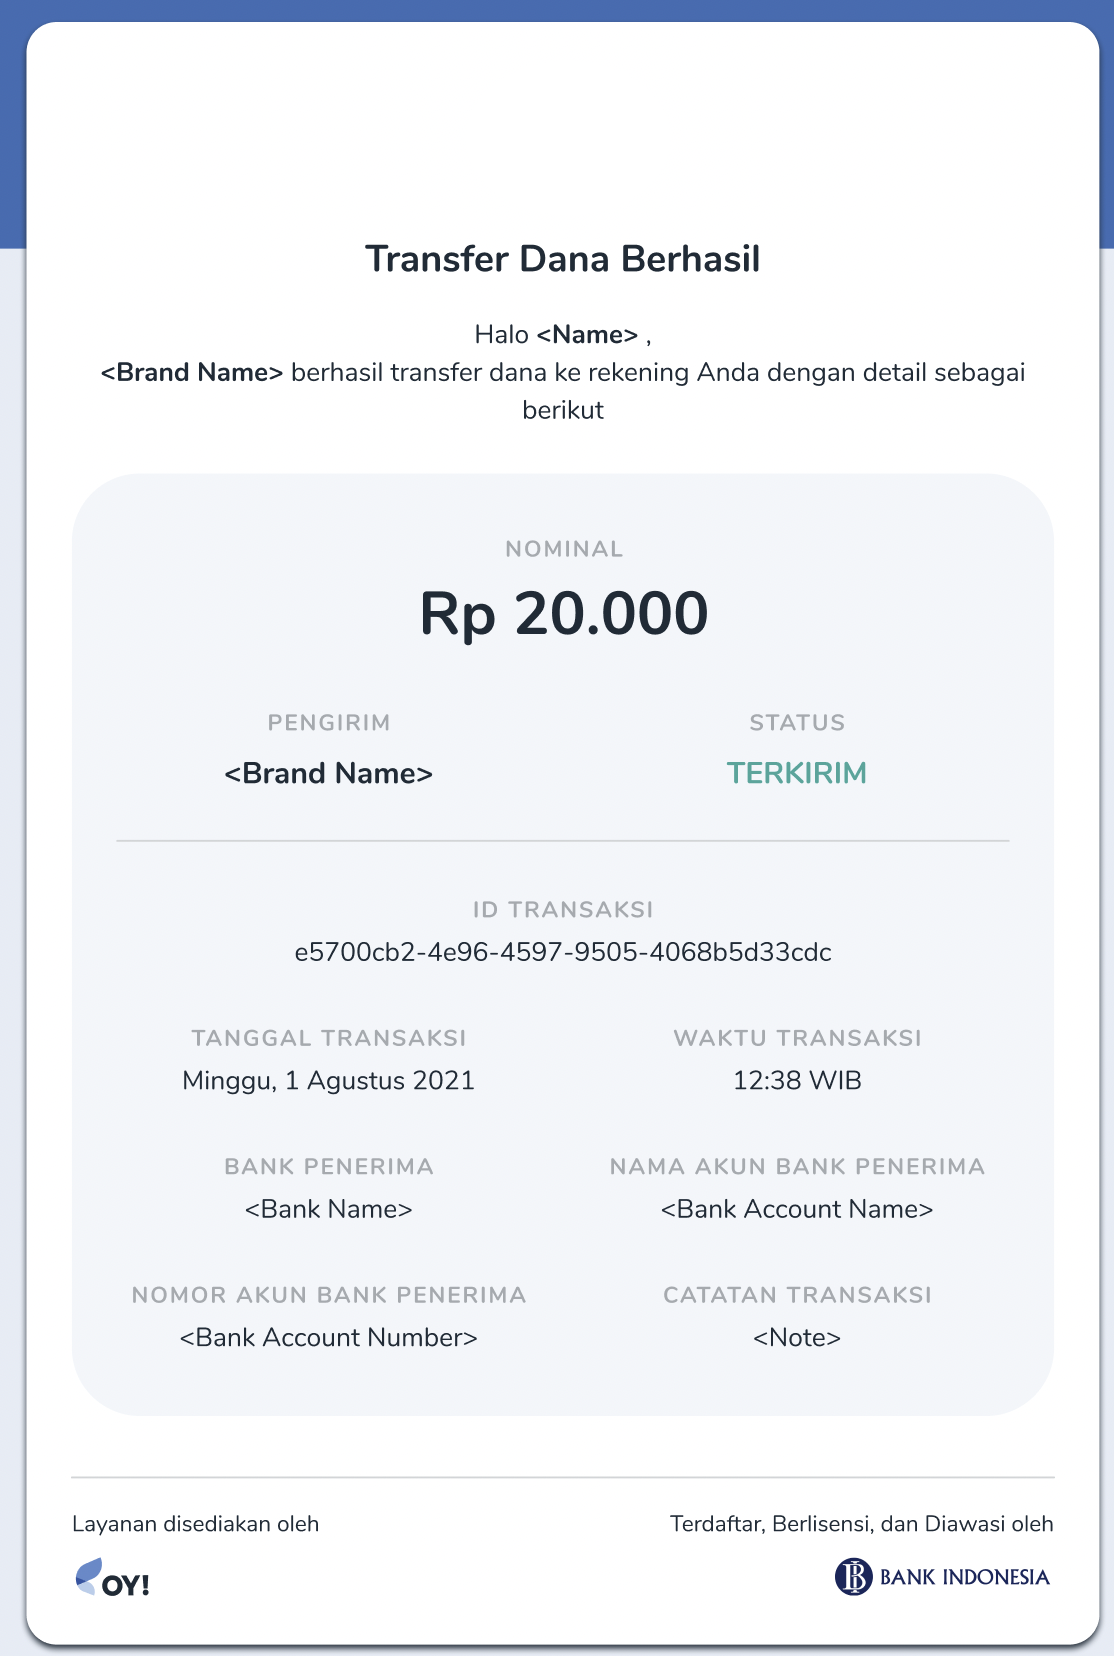
In parallel, your customer will also get email notification about successful claim fund transaction.
API Biller
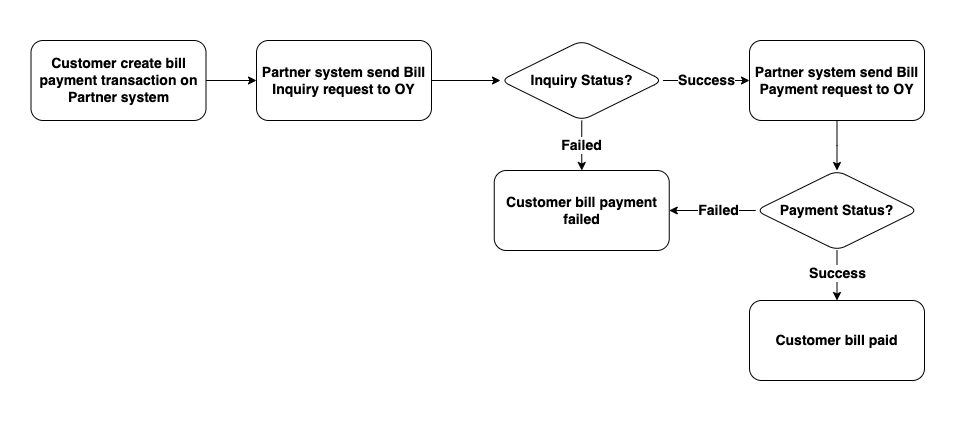
API biller product provides the capability for you to pay the bill products. With 130+ types of billing products, you can provide numerous bill payment options with ease and in real-time. The integration process to use the API biller product is straight forward and the details can be checked here.
Transaction Flow
Key Features
Overbooking OY! can use the funds directly from your Mandiri or CIMB bank accounts for your bill payment needs. Please contact our business representative for further details about this feature.
Check Transaction Status and Callback
For all bill inquiry & bill payment executed, you will receive notifications regarding your transaction whether it is successful, failed or pending. We also provide an API for you to check the transaction status manually. IP proxy is also available upon request to enhance the security and integrity of the callback you will receive.
Check Balance
You can check your available balance at anytime to ensure that you have sufficient balance to execute a bill payment.
Registration and Set Up
Prerequisites
Register an account on the OY! dashboard
Activate your account through the activation link sent via email
Upgrade your account
Upgrade request is approved
Provide IP to be whitelisted and callback link to our business team
Receive an API Key from us
Integrate with our API
Testing
Once you successfully create an OY! account, you can immediately simulate bill payment via API. Follow the below steps to test the flow:
- Create an account
- Login into the dashboard
- Change the environment to “demo”
- Once the environment changed to demo, there will be API key demo available on the bottom left corner of the page
- Before creating a bill payment transaction, check your available balance through API GET https://api-stg.oyindonesia.com/api/balance
- Request inquiry for the bill you want to pay by sending a ‘POST’ request to https://api-stg.oyindonesia.com/api/v2/bill using your staging API key. Enter the required and optional fields, as referenced in the API reference docs (https://api-docs.oyindonesia.com/#bill-inquiry-biller-api)
- Fill in the customer-id, product-id, and the partner transaction-id. You will get the detail information about the bill that you want to pay.
- After successful inquiry, you should do the payment process by sending a ‘POST’ request to https://api-stg.oyindonesia.com/api/v2/bill/payment. Enter the required and optional fields, as referenced in the API reference docs (https://api-docs.oyindonesia.com/#pay-bill-biller-api)
- To get the status of a bill payment request, you can call the API https://api-stg.oyindonesia.com/api/v2/bill/status
- If payment is successful or failed, we will send a callback to the registered staging callback URL destination. Callback URL can be registered via our business representative.
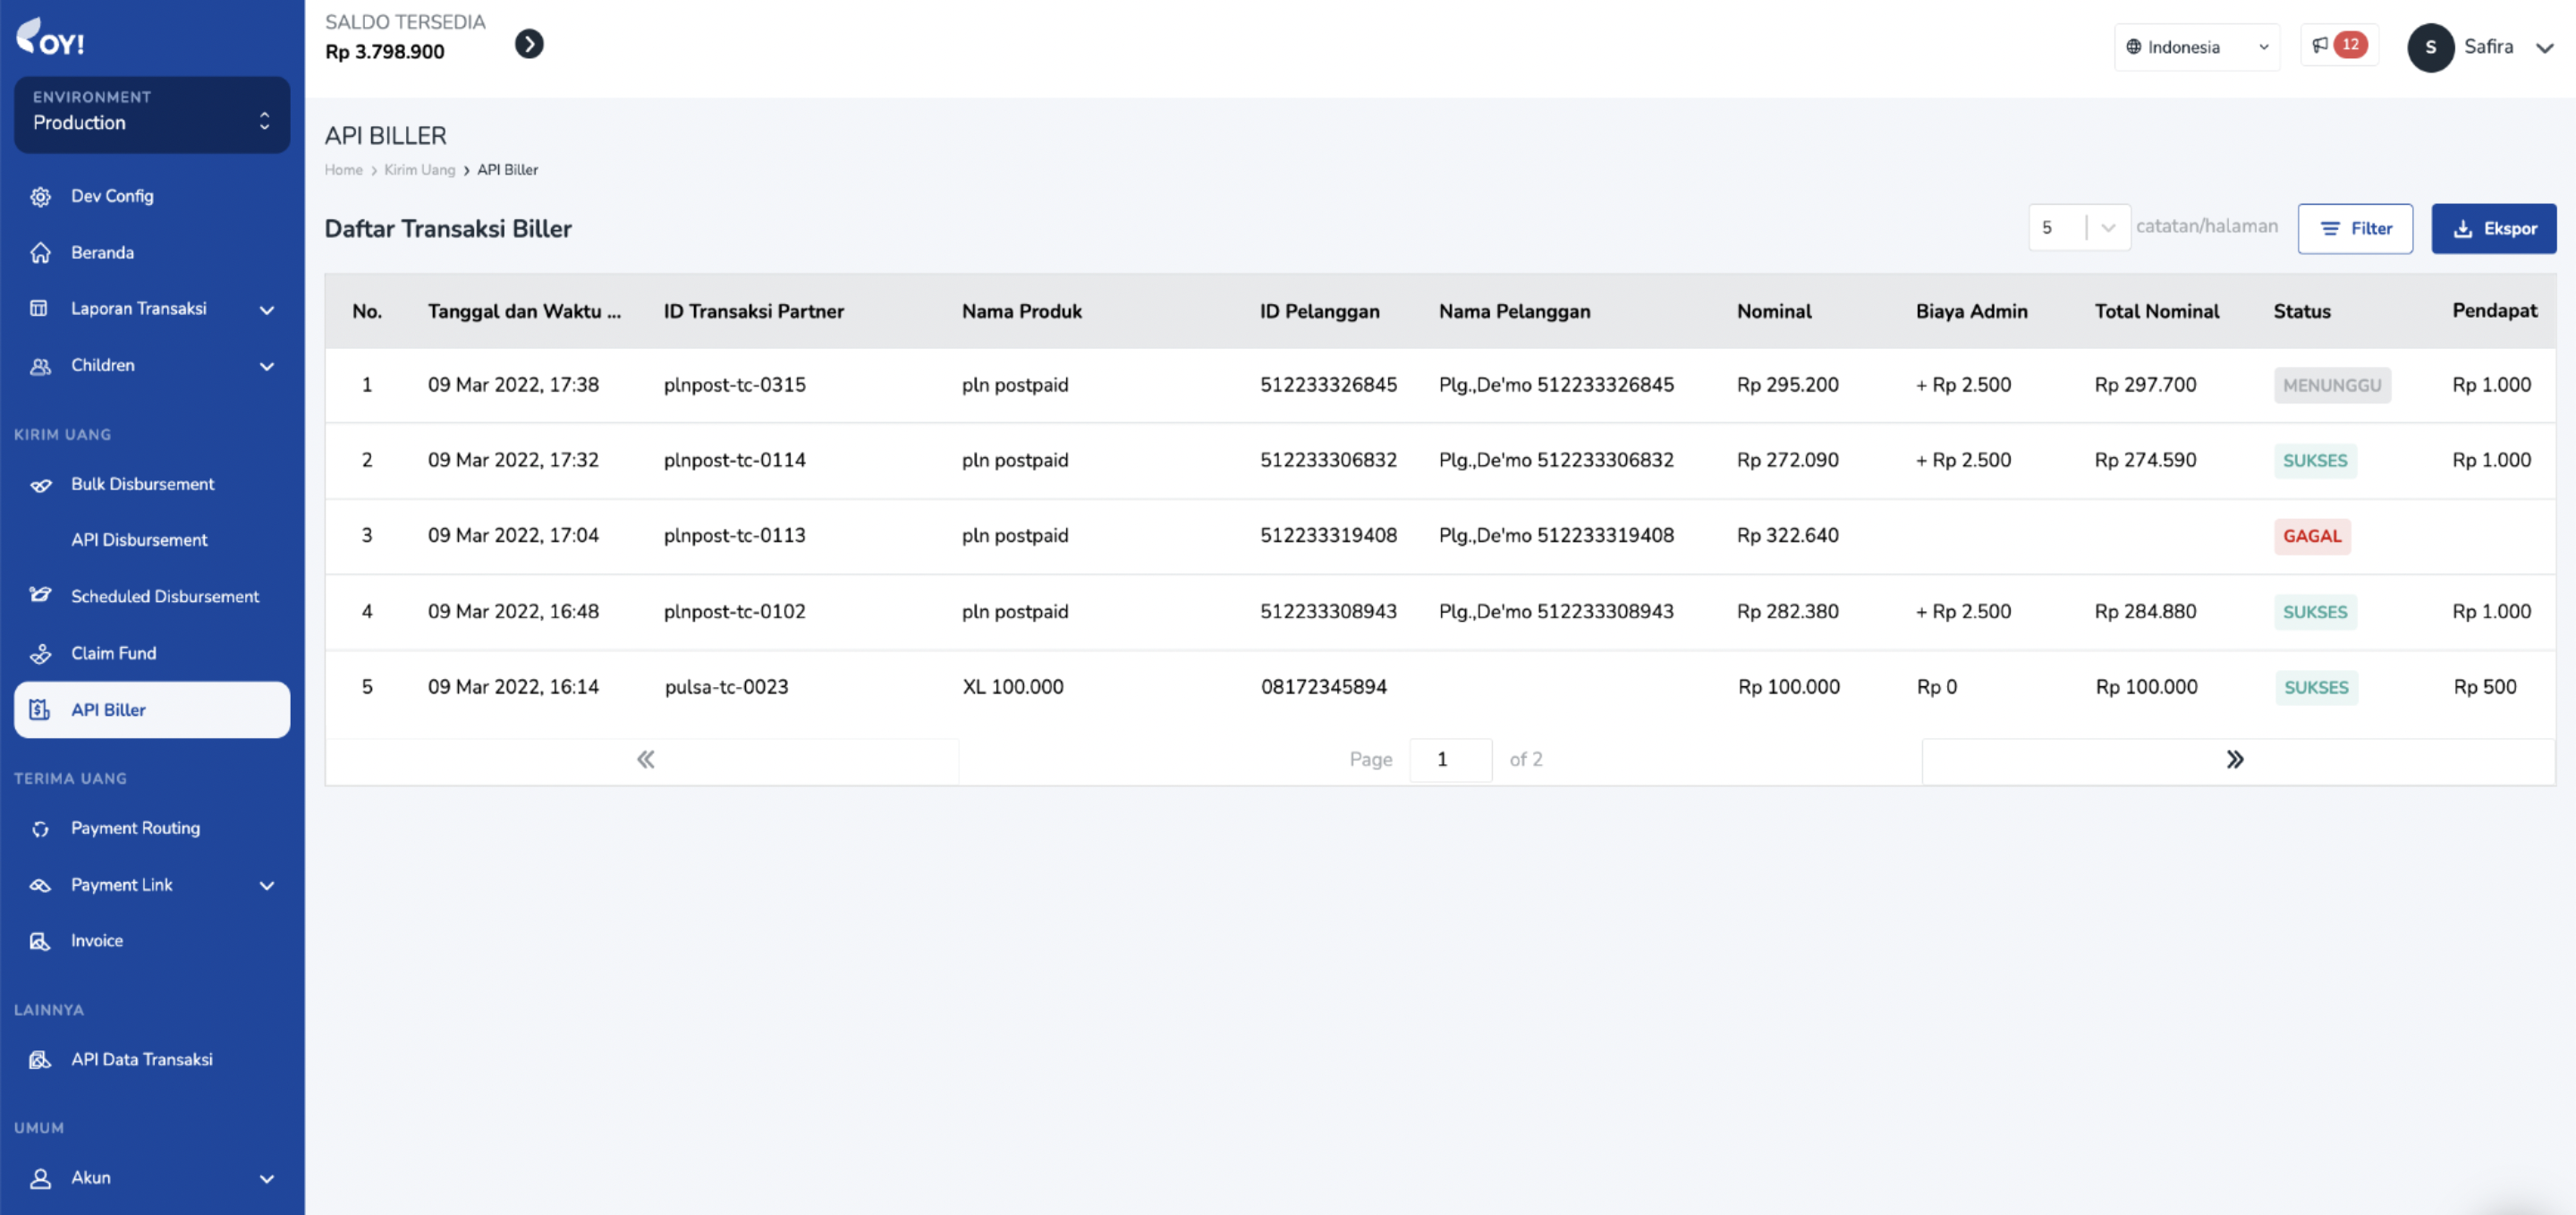
- The API biller transactions can be monitored through OY! dashboard from the “Send money - API biller" menu.
How to Use
In order to create API biller transaction, a sufficient available OY! balance is required in the account. More details and instructions about topping up to your OY! account can you see here https://docs.oyindonesia.com/#top-up-oy-dashboard-tutorial.
Before you execute the bill payment, you have to verify the bill information from our bill inquiry endpoint.
Below is an example of the request body for inquiry:
curl -X POST https://partner.oyindonesia.com/api/v2/bill
-H 'content-type: application/json, accept: application/json, x-oy-username:myuser, x-api-key:987654'
-d '{
    "customer_id": "512233308943",
    "product_id": "plnpost",
    "partner_tx_id": "Tx15048563JKFJ"
    }'
It will return an error message if the request is not valid. Otherwise, below is the sample response parameters that will be returned:
{
    "status":{
        "code":"000",
        "message":"Success"
    },
    "data": {
        "tx_id": "a3d87877-e579-4378-844b-c06294fc9564",
        "partner_tx_id": "Tx15048563JKFJ",
        "product_id": "plnpost",
        "customer_id": "512233308943",
        "customer_name": "Plg.,De'mo 512233308943",
        "amount": 282380,
        "additional_data": "{\"customer_id\":\"512233308943\",\"customer_name\":\"Plg.,De'mo 512233308943\",\"admin_fee\":\"2.500\"}"
    }
}
Next, send a request body to execute a bill payment request to be sent to our bill payment endpoint.
Below is an example of the request body for the bill payment:
curl -X POST https://partner.oyindonesia.com/api/v2/bill/payment
-H 'content-type: application/json, accept: application/json, x-oy-username:myuser, x-api-key:7654321'
-d '{
    "partner_trx_id":"Tx15048563JKFJ",
    "note" :"biller transaction test"
    }'
Below is the sample response parameters that will be returned:
{
    "status":{
        "code": "102",
        "message": "Request is In progress"
    },
    "data": {
        "tx_id": "a3d87877-e579-4378-844b-c06294fc9564",
        "partner_tx_id": "Tx15048563JKFJ",
        "product_id": "plnpost",
        "customer_id": "512233308943",
        "customer_name": "Plg.,De'mo 512233308943",
        "amount": 282380,
        "note": "biller transaction test"
    },
}
An endpoint to check the transaction is also available and can be accessed at anytime.
Below is an example of the request body:
curl -X POST https://partner.oyindonesia.com/api/b2/bill/status
-H 'content-type: application/json, accept: application/json, x-oy-username:myuser, x-api-key:7654321'
-d '{
    "partner_trx_id": "Tx15048563JKFJ"
    }'
The above command returns a JSON structured similar like this:
{
    "status":{
        "code": "000",
        "message": "Success"
    },
    "data": {
        "tx_id": "a3d87877-e579-4378-844b-c06294fc9564",
        "partner_tx_id": "Tx15048563JKFJ",
        "product_id": "plnpost",
        "customer_id": "512233308943",
        "customer_name": "Plg.,De'mo 512233308943",
        "amount": 282380,
        "additional_data": "\"{\\\"bill_period\\\":\\\"FEB2022\\\",\\\"total_amount\\\":\\\"282.380\\\",\\\"customer_id\\\":\\\"512233308943\\\",\\\"customer_name\\\":\\\"Plg.,De'mo 512233308943\\\",\\\"admin_fee\\\":\\\"2.500\\\",\\\"settlement_date\\\":\\\"09/03/2022 16:49\\\"}\"",
        "status": "SUCCESS"
    },
}
A callback with the following information will be sent to the callback endpoint that you can register with us.
You can also check your balance anytime to ensure you have sufficient balance from our endpoint.
Below is an example of a request body to check the balance:
curl -X GET 'https://partner.oyindonesia.com/api/balance'
-H 'Content-Type: application/json'
-H 'Accept: application/json'
-H 'X-OY-Username: janedoe'
-H 'X-Api-Key: 7654321'
Below is the sample response parameters that will be returned:
{
    "status":{
        "code":"000",
        "message":"Success"
    },
    "balance":100000000.0000,
    "pendingBalance":2000000.0000,
    "availableBalance":98500000.0000,
    "overbookingBalance":98500000.0000,
    "timestamp":"10-12-2019 12:15:37"
}
Lastly, all transactions can be monitored from the OY! dashboard which includes all the transaction details.
For further details on the parameters definition and proper usage, please refer to our API Documentation.
Feature: Resend Callback
Key Features
Retry Callback allows you to resend a callback of your transaction to your system. Initially, OY! will send a callback to your system after your transaction status has been updated. If your system failed to receive the callback, this feature can help you to retry the callback process. The process can be done in two ways
Automated retry callback If the callback is not successfully received on the first try, the system will automatically retry the callback delivery. If that callback is still not received by the client's system, the system will automatically retry until 5 occurrences. The interval of the sending process will be detailed in the Callback Interval section. If all automated Retry Callbacks have been sent but still returned failed, the system will send an email notification to the email address set in the configuration.
Manual retry callback Besides the automated process, you can manually request a callback via the dashboard.
Registration and Set Up
Follow the instruction below to activate retry callback
- Login to your account in OY! Dashboard
- Open “Settings” and choose “Developer Option”. Choose “Callback Configuration”
- Fill your callback URL in the related product that you want to activate. Make sure the format is right. You can click URL String Validation button to validate the URL format.
- If you want to activate automated retry callback, check the Enable Automatic Retry Callback and fill in the email. The email will be used to receive a notification if all the automatic callback attempts have been made but still fail
- Click "Save Changes". The configuration will not able to be saved if the callback URL or/and email format are not valid.
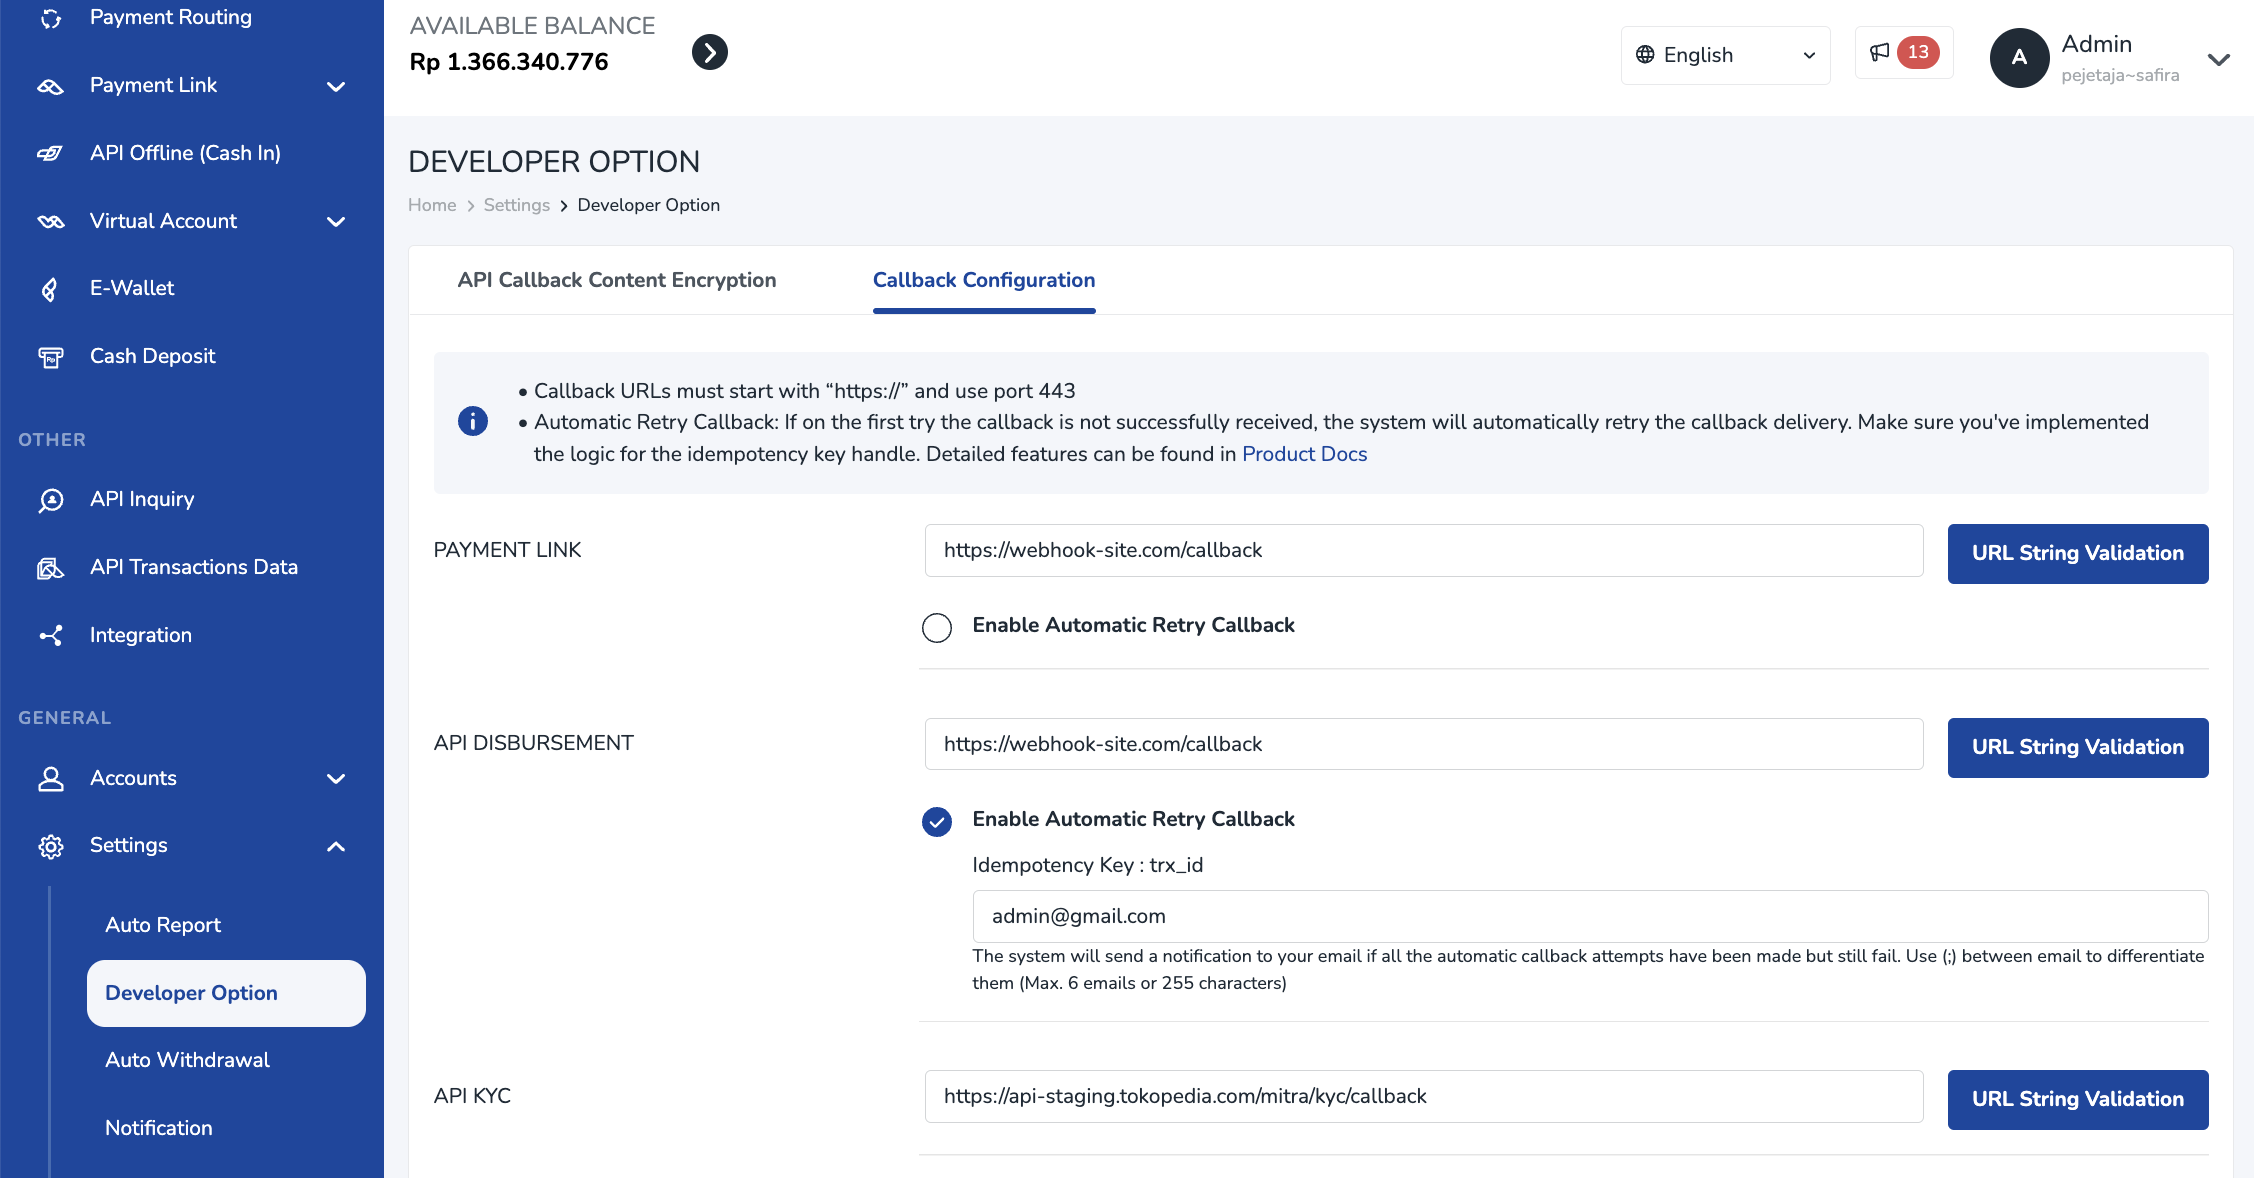
Don't forget to whitelist these IPs in order to be able to receive callback from OY: 54.151.191.85 and 54.179.86.72
If you want to manually resend a callback, you can follow the instruction below
- Login to your account in OY! Dashboard
- Open the API Disbursement menu
- Click the "Resend Callback" button in the related transaction
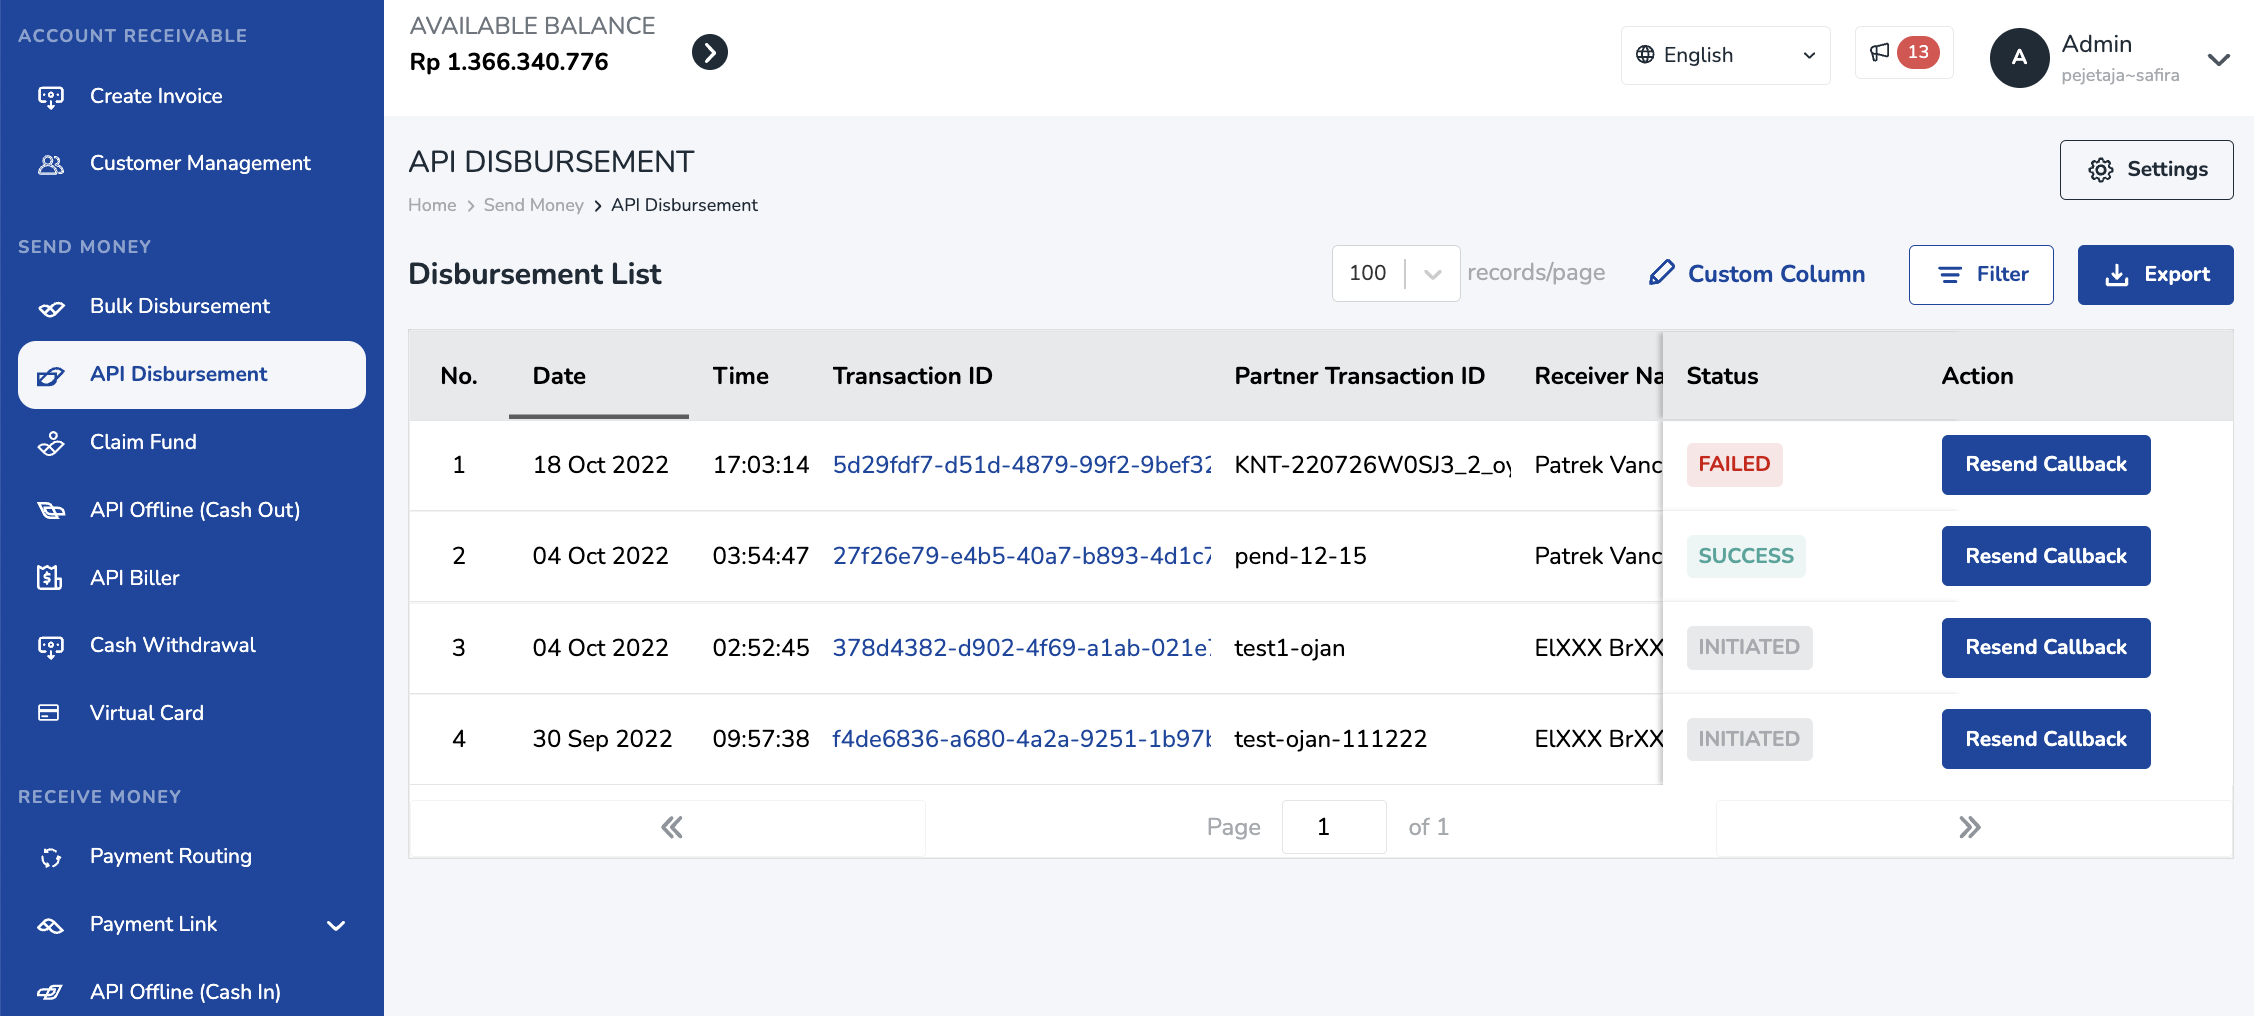
Callback Interval
1st retry: realtime (after the first failed log received) 2nd retry: 1 min (after callback failed log for the 1st retry is received) 3rd retry: 2 mins (after callback failed log for the 2nd retry is received) 4th retry: 13 mins (after callback failed log for the 3rd retry is received) 5th retry: 47 mins (after callback failed log for the 4th retry is received)
If all automated Retry Callback (all the 5 attempts) has been sent but we still get a Failed response from your end, our system will send an automated email notification to the email address that has been set in the configuration earlier
Idempotency Key
To implement automated retry callback, you need to handle the idempotency logic in your system using the below key:
API Disburse: trx_id
Account Payable
OY! Account Payable product provides the capability to record, create approval levels, and scheduled payment for invoice payables without hassle. Account Payable is made through the OY! dashboard, so no technical integration is required to use this product.
How to Use Account Payable via Dashboard
You can create new invoice to be paid and set up payment by following this step:
- Log on to your OY! dashboard
- Choose "Production" environment
- Click "Pay Invoice" under Account Payable menu
- Click "Invoice List"
- Choose "Create New Invoice"
- Upload your invoice document to help you easier record the invoice by click "Browse to Upload" or Drag & drop to the invoice area
Fill in the necessary details
Parameter Description Purchase Type You can choose between purchase order, service fee, bill, subscription fee, and reimbursement Invoice Number The number of the invoice that you get from your vendor/supplier Invoice Date The date of the invoice Due Date Due date of a transaction as mentioned in the invoice. Your approver will be reminded to approve on D-7, D-3, and D-1 from the invoice due date PO/PR Number (optional) The reference PO/PR number from your company to track this invoice Note The note for this invoice Vendor The name of the vendor that this invoice belongs to. You can choose the name of the vendor from the dropdown menu. To create a new vendor, follow the instruction here Product Description The name and/or description of the product Quantity The quantity of the product Price Unit price of the product Total Total price of the product (Total = Quantity x Price) Subtotal The total price of all the products PPn PPn that should be paid to the vendor. PPn is calculated from subtotal amount. You can set up the tax during vendor addition or edit in 'Vendor Management' menu under Account Payable PPh PPh that should be deducted from the vendor. PPh is calculated from subtotal amount.You can set up the tax during vendor addition or edit in 'Vendor Management' menu under Account Payable Total Pay to Vendor Total amount that will be paid to vendor on scheduled date, post approval Reference Documents (Upload document) The supporting documents that you want to record related to this invoice. Accept PDF files only. Maximum 7 documents (maximum 2.5MB each) Note: Maximum 20 rows for line item detail
Image Account Payable
Continue to set up 'Invoice Payment Details'. You can set up the payment to one time payment by choosing 'Full Payment' or multiple times payment by choosing 'Partial Payment'.
Parameter Description Payment Amount Amount that will be automatically paid to vendor on scheduled date Due Date The due date of the payment. The due date cannot do back date or more than due date that set in the first page (record invoice). Notification will be send to approval D-7, D-3, and D-1 if the status is waiting aproval Status Status of the invoice payment. You can choose 'Paid' for record intention and this amount will not be paid by system. Choose 'Unpaid' for incoming transaction that needs to be paid Scheduled Payment Time of the payment. You can prepare the balance prior to scheduled payment time and make sure the payment date is based on your preference and will only be executed post approval Remaining Amount Total pay to vendor - subtotal. This amount should be 0 to continue the process Image Payment Page
Status: Waiting Payment, Partially Paid, Complete and Cancelled Congratulations! You have finished your first invoice payable set up. Below are the list of statuses you will find on 'Invoice List'
Parameter Description Partially Paid Multi times payment or partially paid that not finish yet. You can click invoice number to find the partial payment details in 'payment transaction' tab Waiting Payment Waiting for approval or balance not enough Cancelled Invoice has been cancelled Complete All payment of the invoice is complete List of the Invoice Payable


How to Create, Edit and Inactivate Vendor Data
Add New Vendor for Account Payable
- Click 'Add' in the 'Vendor' field in the 'Create Payable Invoice' page.
- Fill in the necessary details
- Click 'Add Vendor' after complete registration of new vendor
| Parameter | Description |
|---|---|
| Vendor ID (Optional) | Unique ID of the vendor from your company. This is not mandatory |
| Vendor Name | The company/vendor name. Make sure the vendor name matches the vendor NPWP (if any) to help your company tax record |
| Vendor Address (Optional) | Vendor address to be recorded. This is not mandatory |
| Bank Name | Recipient bank name. You can choose using drop down |
| Account Number | Recipient bank account number. You can check the inquiry by clicking 'Get Account Name' after filling the account number |
| PIC Name | The PIC name of this vendor |
| PIC Email | The PIC or recipient email. Payment/transfer receipt will be send automatically to this email after complete payment |
| PIC WhatsApp (optional) | The PIC WhatsApp number for your record |
| PPh (optional) | PPh type from this vendor. Default of the setting is Not Subject to PPh. |
| Vendor NPWP (optional) | The vendor NPWP number record that can be use for company reference to generate 'Faktur Pajak' |
| NPWP Document (optional) | Vendor NPWP document to be record. Accept PDF and JPG format. Maximum 10 MB |
| PPn (optional) | PPn type of this vendor. Default of the setting is Not Subject to PPn. |
| SKB Document (optional) | Vendor SKB Document to be record. Accept PDF and JPG format. Maximum 10 MB |
| Not subject of PPh | Tax will not be added upon the subtotal |
| Not subject of PPn | Tax will not be added upon the subtotal |
| PPN Exclusive | PPN of the subtotal will be added upon the subtotal of the invoice. For example is subtotal is 10,000, then the PPN is 11% of the 10,000 = 1,100 |
| PPN Inclusive | Tax will not be added upon the subtotal because the subtotal is assumed to be tax inclusive |
Each vendor only have 1 type of PPh setting and 1 type of PPn setting
There will be an PPh email sent on the 1st day of each month that contains all the PPh from your vendors in the previous month. This report can help company with tax payment & reporting, and 'Faktur Pajak' generation to your vendor.
Create New Vendor
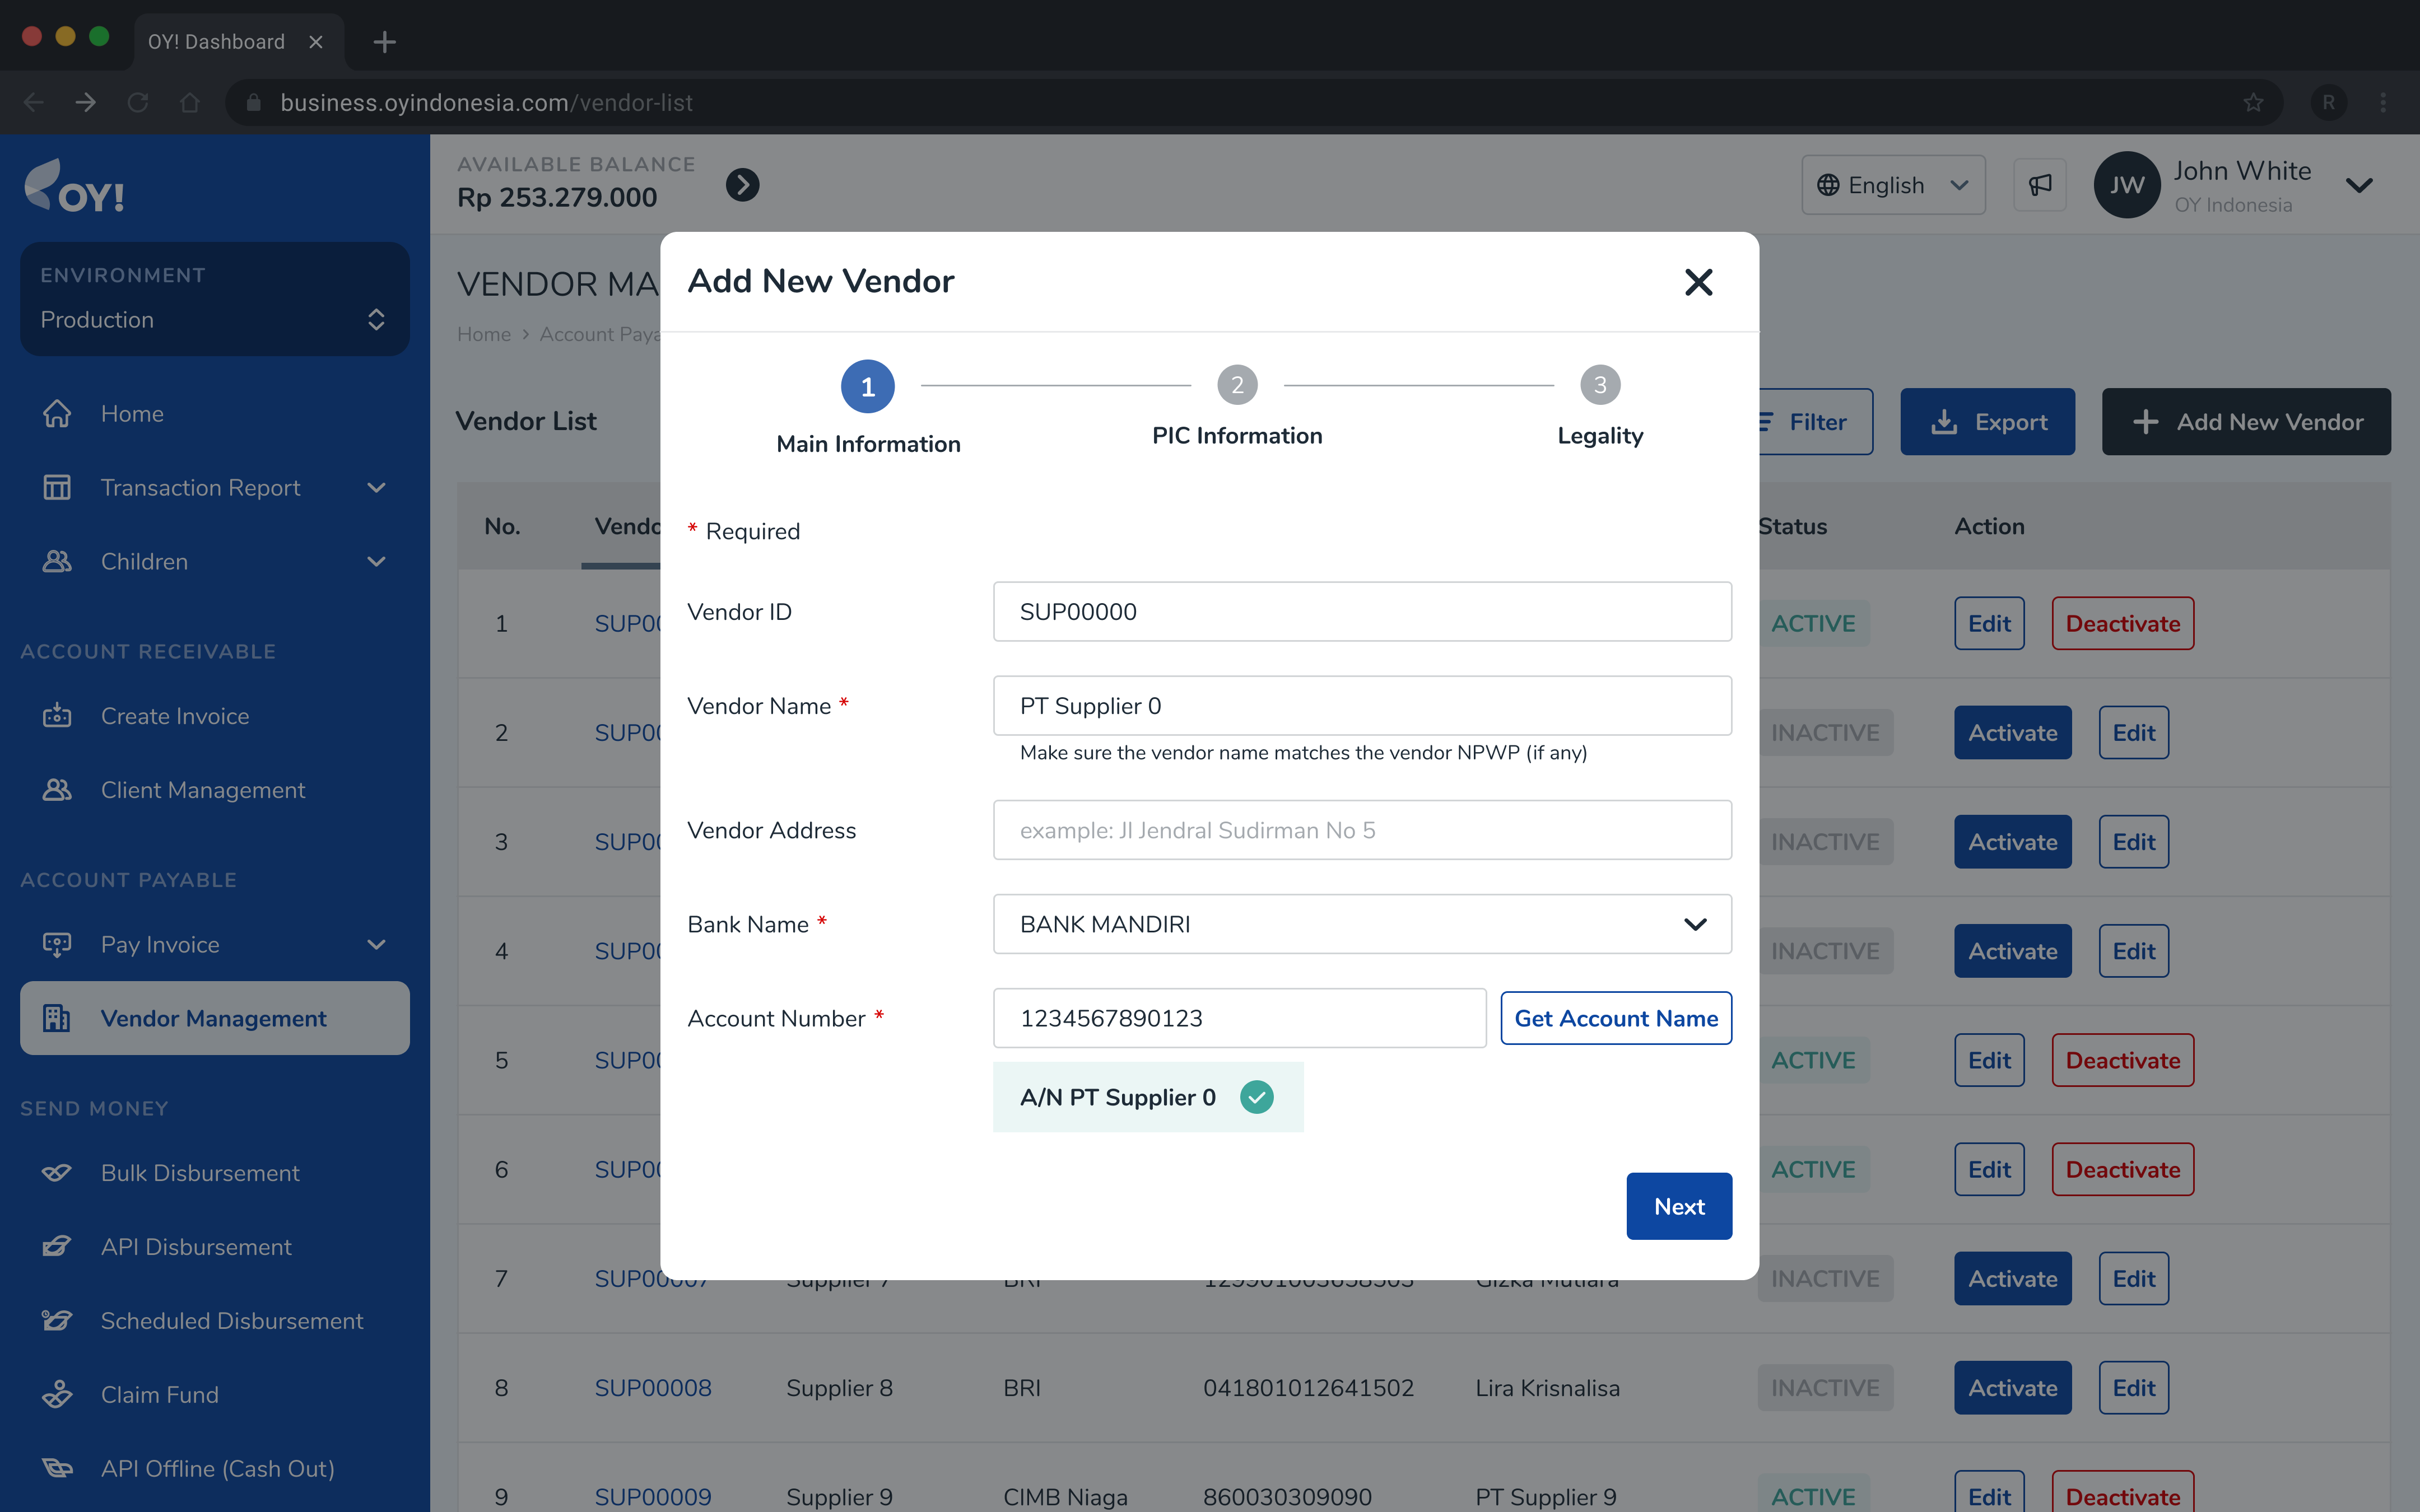
List Of Vendor
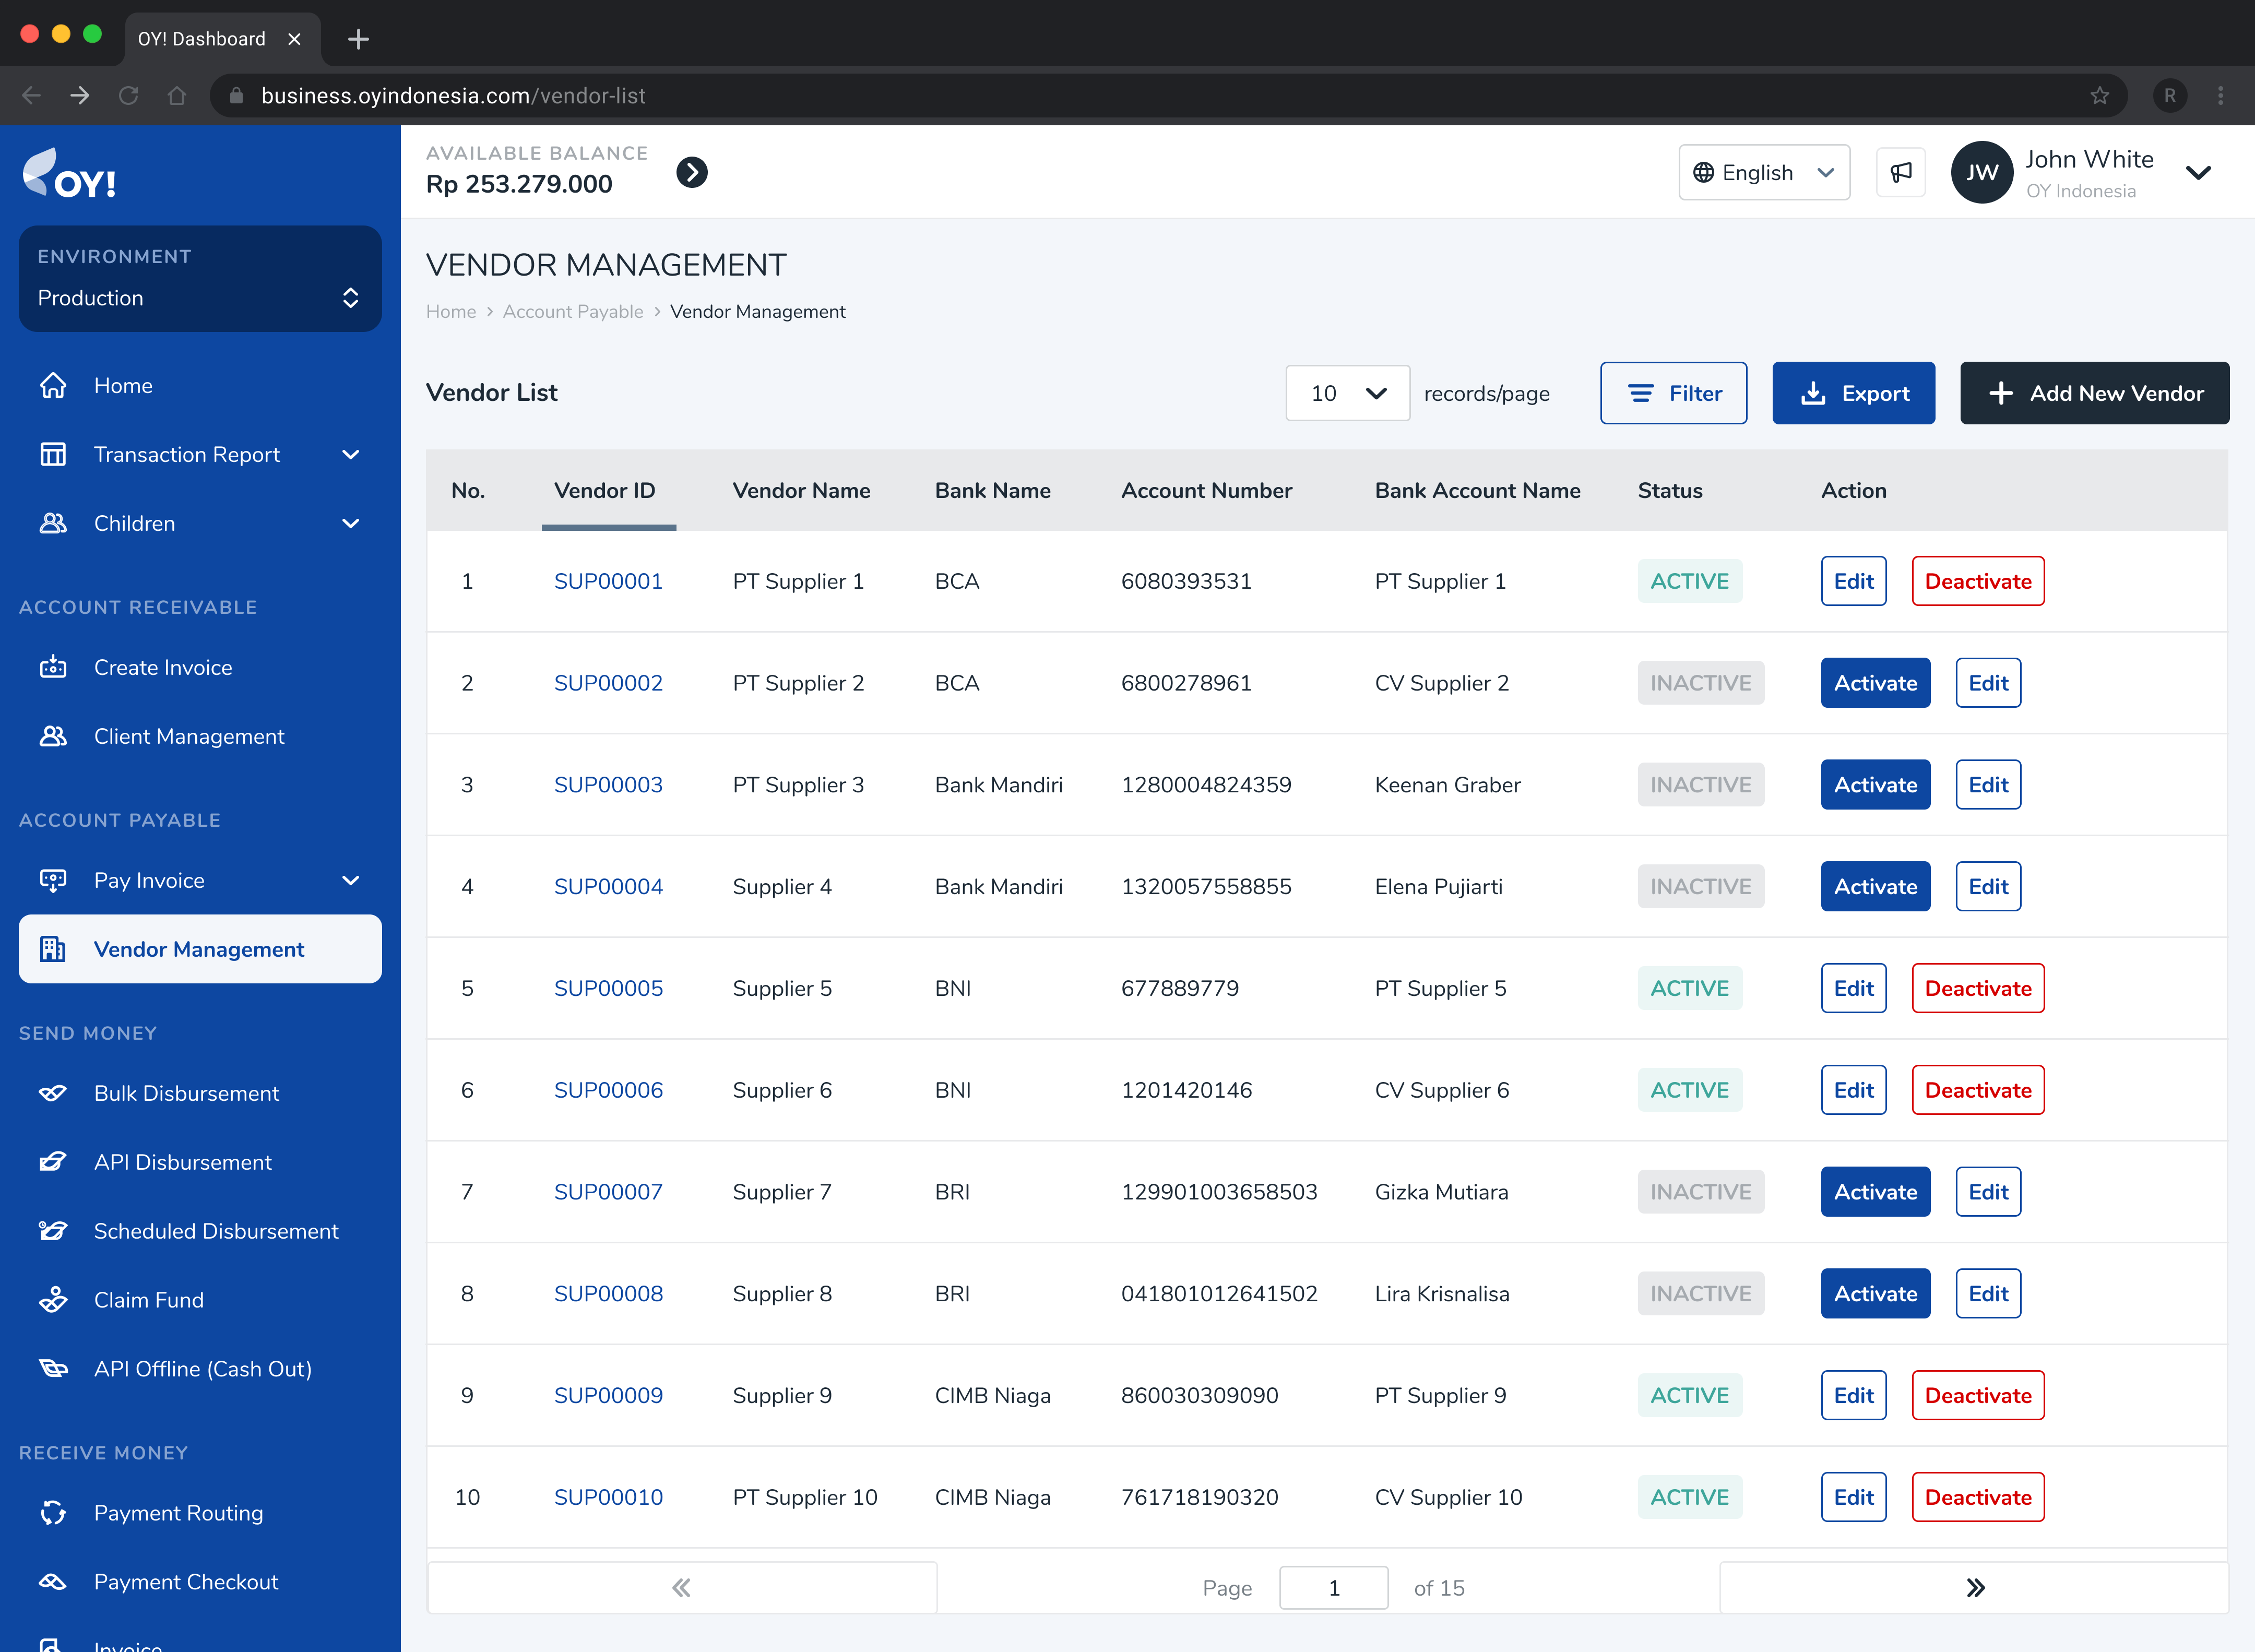
Vendor Detail
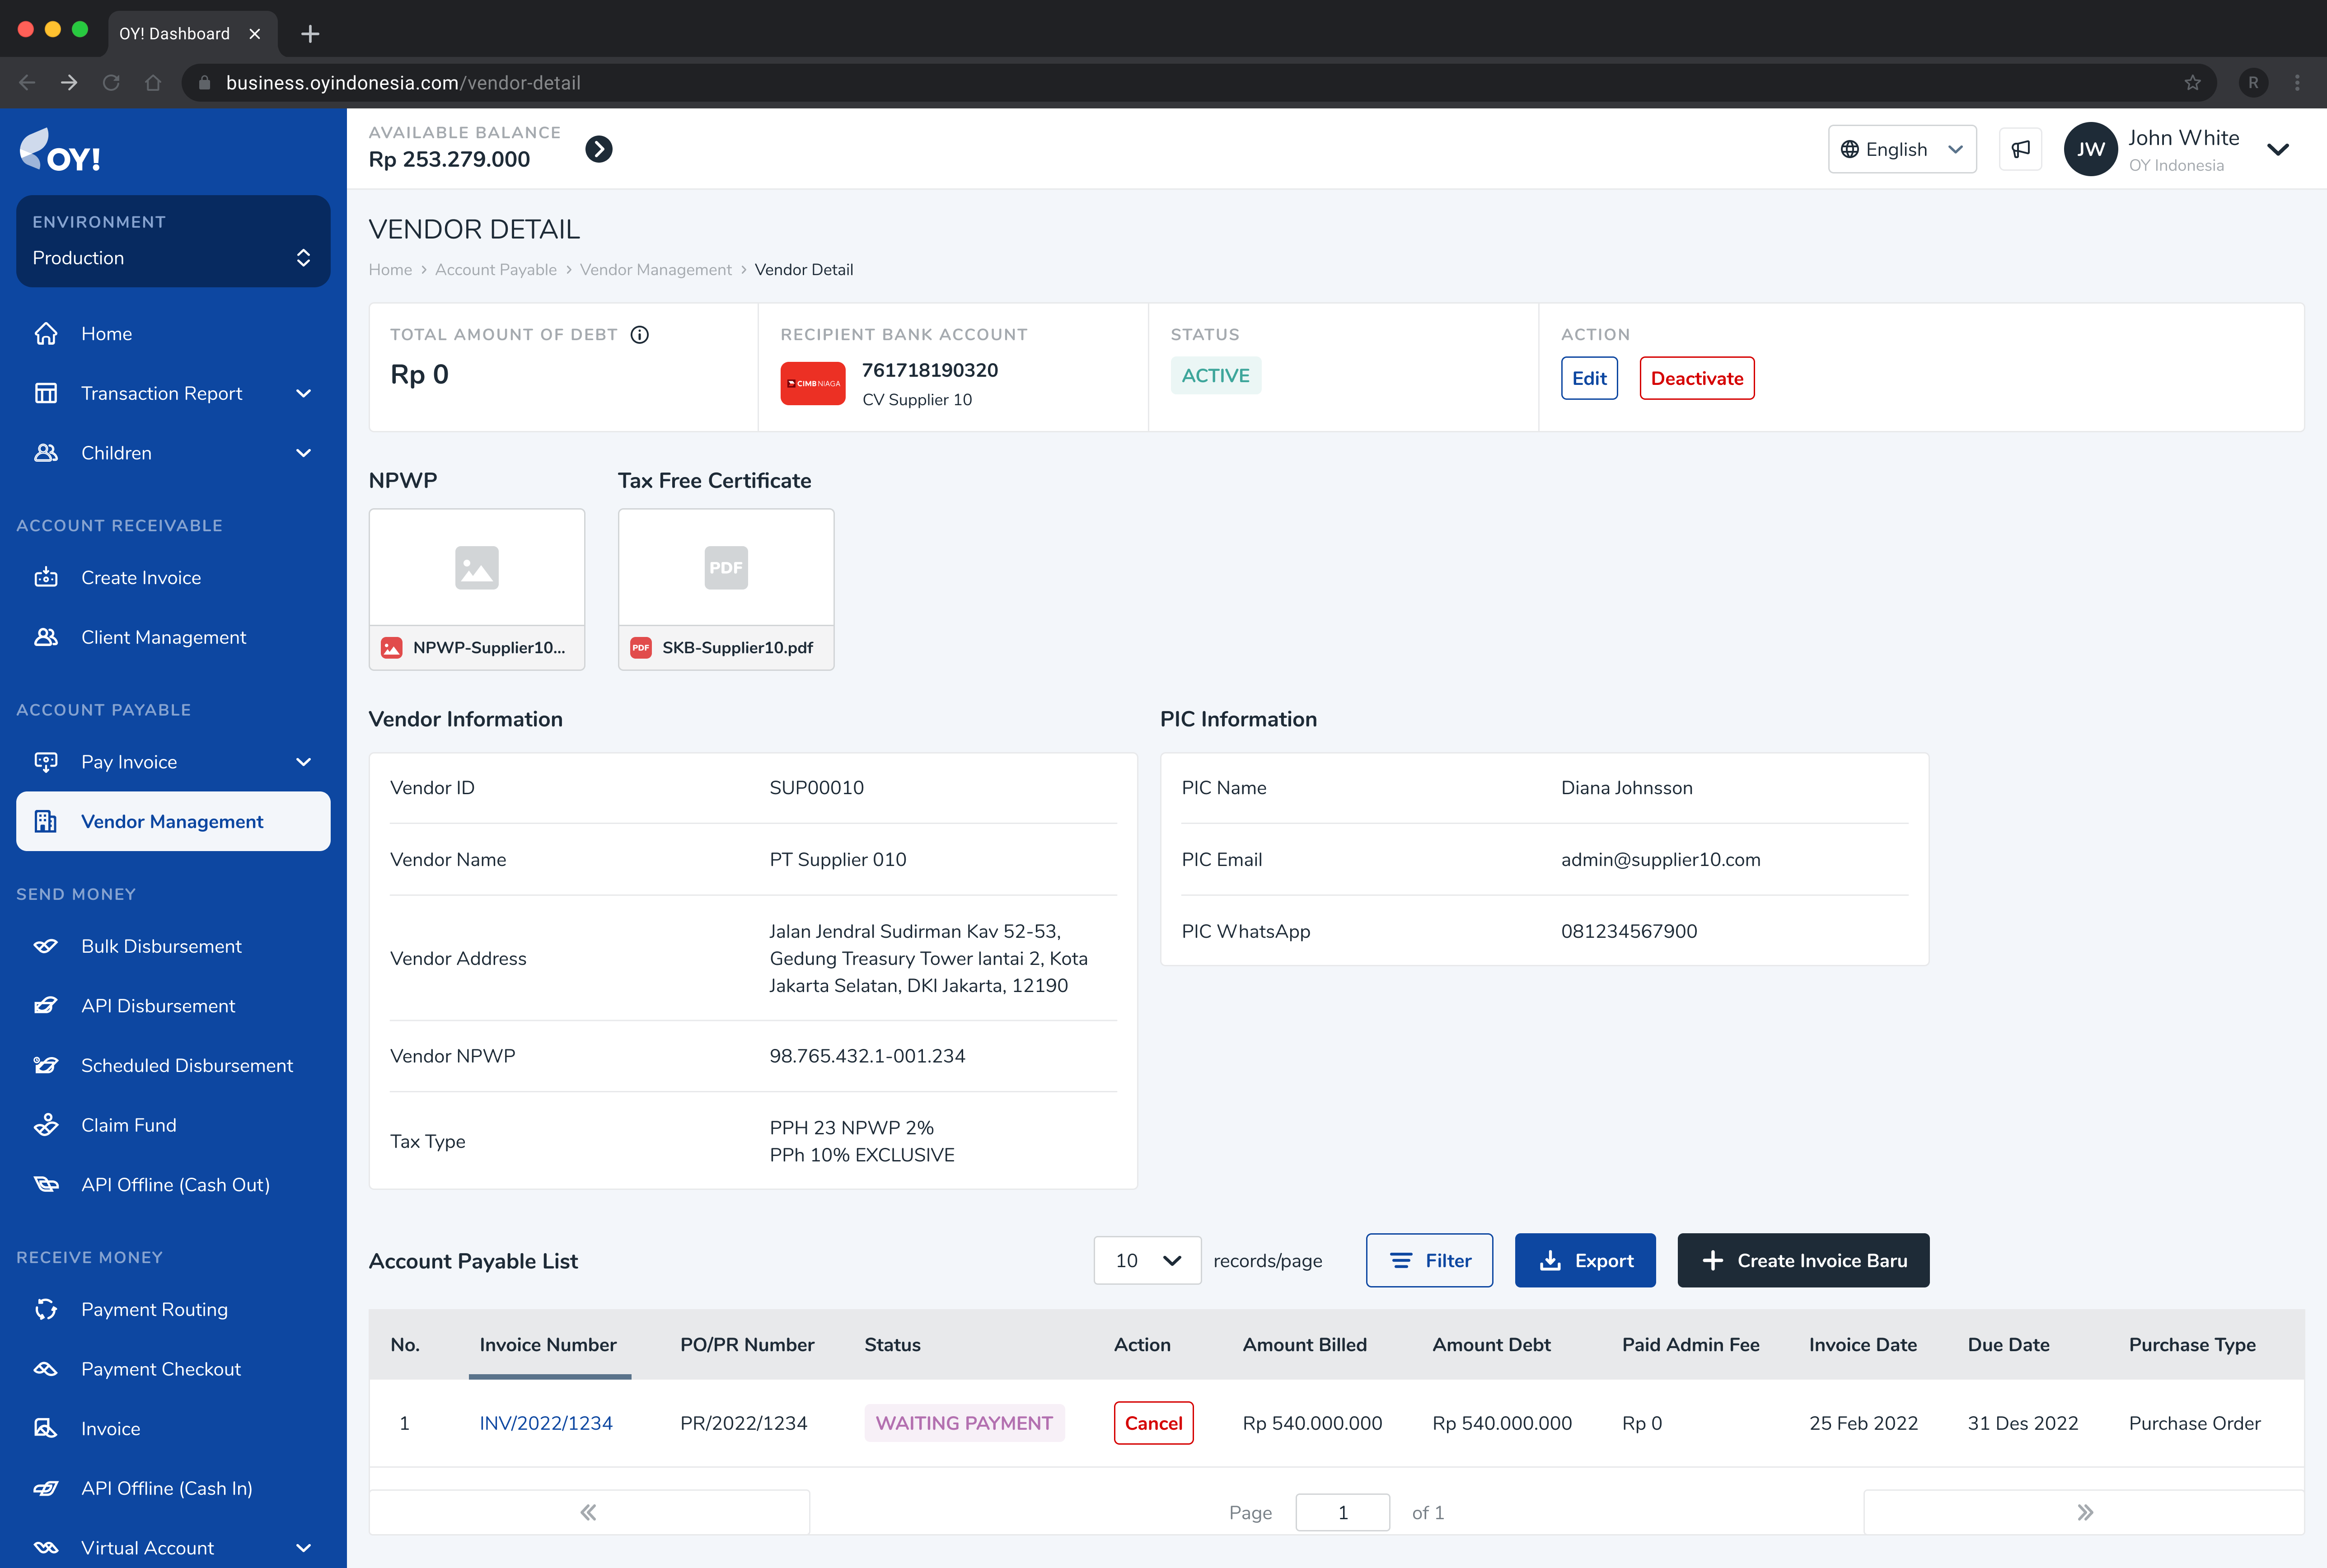
How to Set Up Invoice Payable Approval
You can set up multi level approval from OY's users. There will be 4 type of users: Super Admin, Admin, Approver, and Maker
Approval Layer Set Up
Approval Layer can be set up using 'User Management' under 'General' menu. When you first create an account, your account will be assigned as a Super Admin role. As a Super Admin, you have the ability to create new sub-accounts and assign different roles to your team such as Admin, Maker and Approver that are applicable for bulk disbursement. The Super Admin and Admin can also edit or delete created sub-accounts. Note: it is not necessary to create new sub-accounts in order to use Account Payable. The Super Admin and Admin roles allows you to directly create and approve Account Payable and also Bulk Disbursement. Detailed step-by-step instructions on setting up user management and the different role types coming soon.
Multi-Layer Approval
Multi-layer Approval will improve your control over your bulk disburse transaction especially for big amount of money. You can setup up to 3 layers of approver before the transaction instruction is executed. By assigning proper approver and amount limitation, you can avoid a huge trouble on your business operational caused by incorrect transfer amount.
Default approval: Super Admin, Admin, and Approval.
Corporate Card
OY! Corporate Card product provides the capability to create customized cards that can be used to manage online subscriptions without hassle. Corporate Card can be generated through the OY! dashboard, therefore no technical integration is required to use this product.
Key Features
| Condition | Description |
|---|---|
| Card creation | OY! can use the funds directly from your OY! balance for corporate card needs. It is essential to top-up your OY! balance based on your card limit. Please contact our business representative (https://docs.oyindonesia.com/partner@oyindonesia.com) for further details about this feature. |
| Card control | Create and control the card based on your requirements. You can set the limit amount (in Rupiah), validity period, card renewal frequency and even transaction limitations directly through OY dashboard. Moreover, you can block and deactivate corporate card real-time! Everything on your fingertips. |
| Real-time transaction | Transactions can be tracked easily through dashboard real-time. There is no need to wait until the end of month for full transaction statement |
How to Create Corporate Card
You can create new virtual card by following these steps:
- Log in to your OY! dashboard
- Choose “Production” environment
- Click “Corporate Card” under Expense Management menu
- Click “Add New Card”
- Choose “Card Type” for “Virtual” and usage frequency either single usage or multiple usage and click “Next”
- Fill in Cardholder details and Card details
- Once submitted, Corporate Card will be in “waiting for approval” state
- After the approval step, the card is ready to be used for transactions.
Notes: OY! balance would be put on pending once card is created.
- Corporate Card Dashboard

- Virtual Card Type


- Virtual Card Form


How to Transact with Card
Steps to use card for online transaction:
- Access your card information (including remaining balance & transaction) via email and enter OTP sent to the phone number registered.
- Once accessed, input all of you card information into merchant side under “Credit / Debit Card” Option
- Input 16 digit number, expiry date (MM/YY) and CVV
- Submit the information and proceed with the transaction and the transaction is successful.
- For record purposes, you can upload the invoice for each transaction inside OY! dashboard.
- Virtual Card Information

- Virtual Card


Card Status
| Status | Description |
|---|---|
| Pending Approval | Card has been requested but approval is not yet given. Request can only stay valid for 14 days. |
| Active | Card is ready to be used for transaction. |
| Active with Warning | Card is active with balance, but only <15% balance remaining. |
| Inactive | Card has been deactivated, but still contain limit. |
| Need top-up | New card has been created, but with 0 limit OR card limit is back to 0 and pass renewal time due to insufficient balance. |
| Expired | Card is expired or intentionally archived permanently. |
| Rejected | Card is rejected by Approver. |
Transaction Status
| Transaction Status | Description |
|---|---|
| Successful | Card has been used for transaction successfully |
| Failed | Transction was declined |
| Reversal | Temporary hold on card is returned to card prior settlement |
How to Set Approver
- During first time product activation, prompt to fill in Approver data will be triggered
- Fill in the approver details
- Tick T&C and confirm your Approver details
- Approver will receive confirmation email
- Add New Approver

- Approver Form

Notes: Approver data cannot be added or edited through dashboard for security purposes. Please contact our business representative for helps
| Parameter | Description |
|---|---|
| Name | Approver Name |
| Position | Approver Role |
| Phone Number | Approver Phone Number |
| Approver email for card approval purposes |
How to Manage Card
- Click “See All Cards”
- Click the card that needs to be managed

Card actions
| Card Actions | Description |
|---|---|
| Resend Card Info | To resend card info to cardholders, in case of missing email |
| Edit Information | To edit the card limit. Editing card limits will lead to card temporary blockage and require reapproval flow again. |
| Block | To temporarily lock the card, limit remains in the card |
| Archive | To permanently lock the card, limit will be 0 and returned to OY! balance |
| Renew Limit | To renew card limit with a desired amount using OY! balance |
| Resend Approval Notification | To remind Approver to approve the card request in case of closet email |
| Delete | Only applicable for "Waiting for Approval" card |
How to Set Up Card Config
- Click “Corporate Card Configuration”
- Select Department / Category / Approver
- You can choose to whether add new, edit existing or delete
- Click "Save Changes"
- Department page prior to “Edit Department” button

- Category page

- Approver Page

Failed Transaction Possible Reasons
- Card utilized more than
- requested frequency (multiple use vs single use)
- available limit
- Card is inactive
- Card is expired
- Invalid card number
- Invalid expiry date
- Invalid CVV
- Issuer network not supported
Notes
Transaction will be settled following bank’s instruction
Usage of card will directly reduce card limit and hold OY! balance
For refund, please kindly contact the merchant where you make the purchase at. OY! is not responsible to perform refund prior receiving the fund back from the merchant
- Refund duration will dependent on the merchant and the bank
- Once refund has been issued, the balance will be returned back to your OY! balance
It is the user’s responsibility to block card usage whenever fraudulent transactions found. OY! is not responsible for the transaction.
International Transfer
International Transfer product provides the capability for users to transfer across countries from Indonesia at any time. You may create a transaction within OY! dashboard without the need for any technical integration.
Key Features
Account Management When you first create an account, your account will be assigned as a Super Admin role. As a Super Admin, you have the ability to create new sub-accounts and assign different roles to your team such as Admin that is applicable for international transfers. Both Super Admin and Admin may edit or delete created sub-accounts.
Note: it is not necessary to create new sub-accounts in order to use international transfer. The Super Admin and Admin roles allows you to directly create and approve transactions.
Detailed step-by-step instructions on setting up user management and the different role types coming soon.
Roles & Accessibility Only Super Admin and Admin roles are available to create transactions. All other roles are only allowed to view transaction list, transaction details, filter, export and edit custom column in dashboard.
Available destinations Current list of countries supported: Singapore Current list of currencies supported: Singapore Dollars (SGD), US Dollars (USD)
More countries such as Australia, China, Hongkong, Malaysia, South Korea and United States will be available soon.
Sender / Recipient Contacts Suppose that you want to create an international transfer on behalf of another entity, you may create an individual / business sender or recipient and input all required information about the sender or recipient. All sender and recipient information will be saved in contacts and may be reused in the future.
Additional Documents We provide a placeholder for you to upload invoice and other supporting documents for the purpose of transfer and source of funds.
Transaction Details Once a transaction is successfully created, all transaction details and updates will be recorded in OY! dashboard
Registration and Set Up
Prerequisites
Register an account on the OY! dashboard
Activate your account through the activation link sent via email
Upgrade your account
Upgrade request is approved
Testing
- Log in to your OY! dashboard
- Choose "Staging" environment
- Click "Send Money" menu, and choose "International Transfer"
- Click "Create New Transaction"
- Fill in the necessary details by following the steps explained in the “How to Use” section
- Note: To reproduce a failed transaction in staging environment, you may fill the recipient account number as 1234567891. All other account numbers will result in a successful transaction.
How to Use
In order to create international transfers, you need to have sufficient available OY! balance is required in the account. If there is an insufficient available balance in the account, international transfers cannot be created 1. Create new transaction: On the OY! dashboard, navigate to Send Payments > International Transfer on your left menu bar. Click “Create New Transaction” on the far righthand side of that page to create a new transfer.
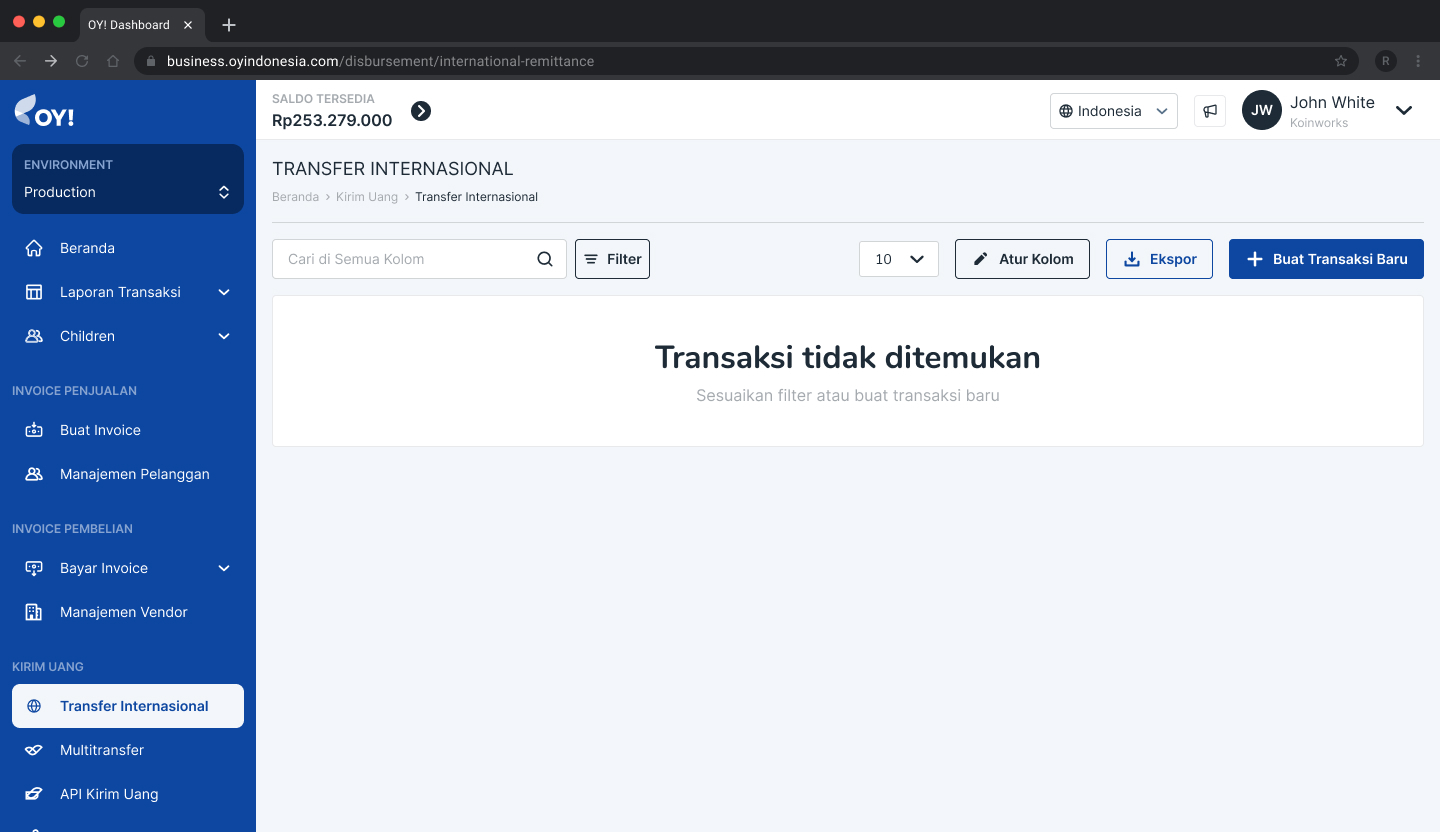
- Input transfer amount details: You may fill out the amount of transfer in two ways:
- Fill in the send amount (in Rupiah) you would like to transfer, along with the destination currency and country. Our system will automatically convert according to the foreign exchange rate at that time.
- Fill in the recipient amount (in SGD/USD) you would like to transfer, along with the destination currency and country. Our system will automatically convert according to the foreign exchange rate at that time.
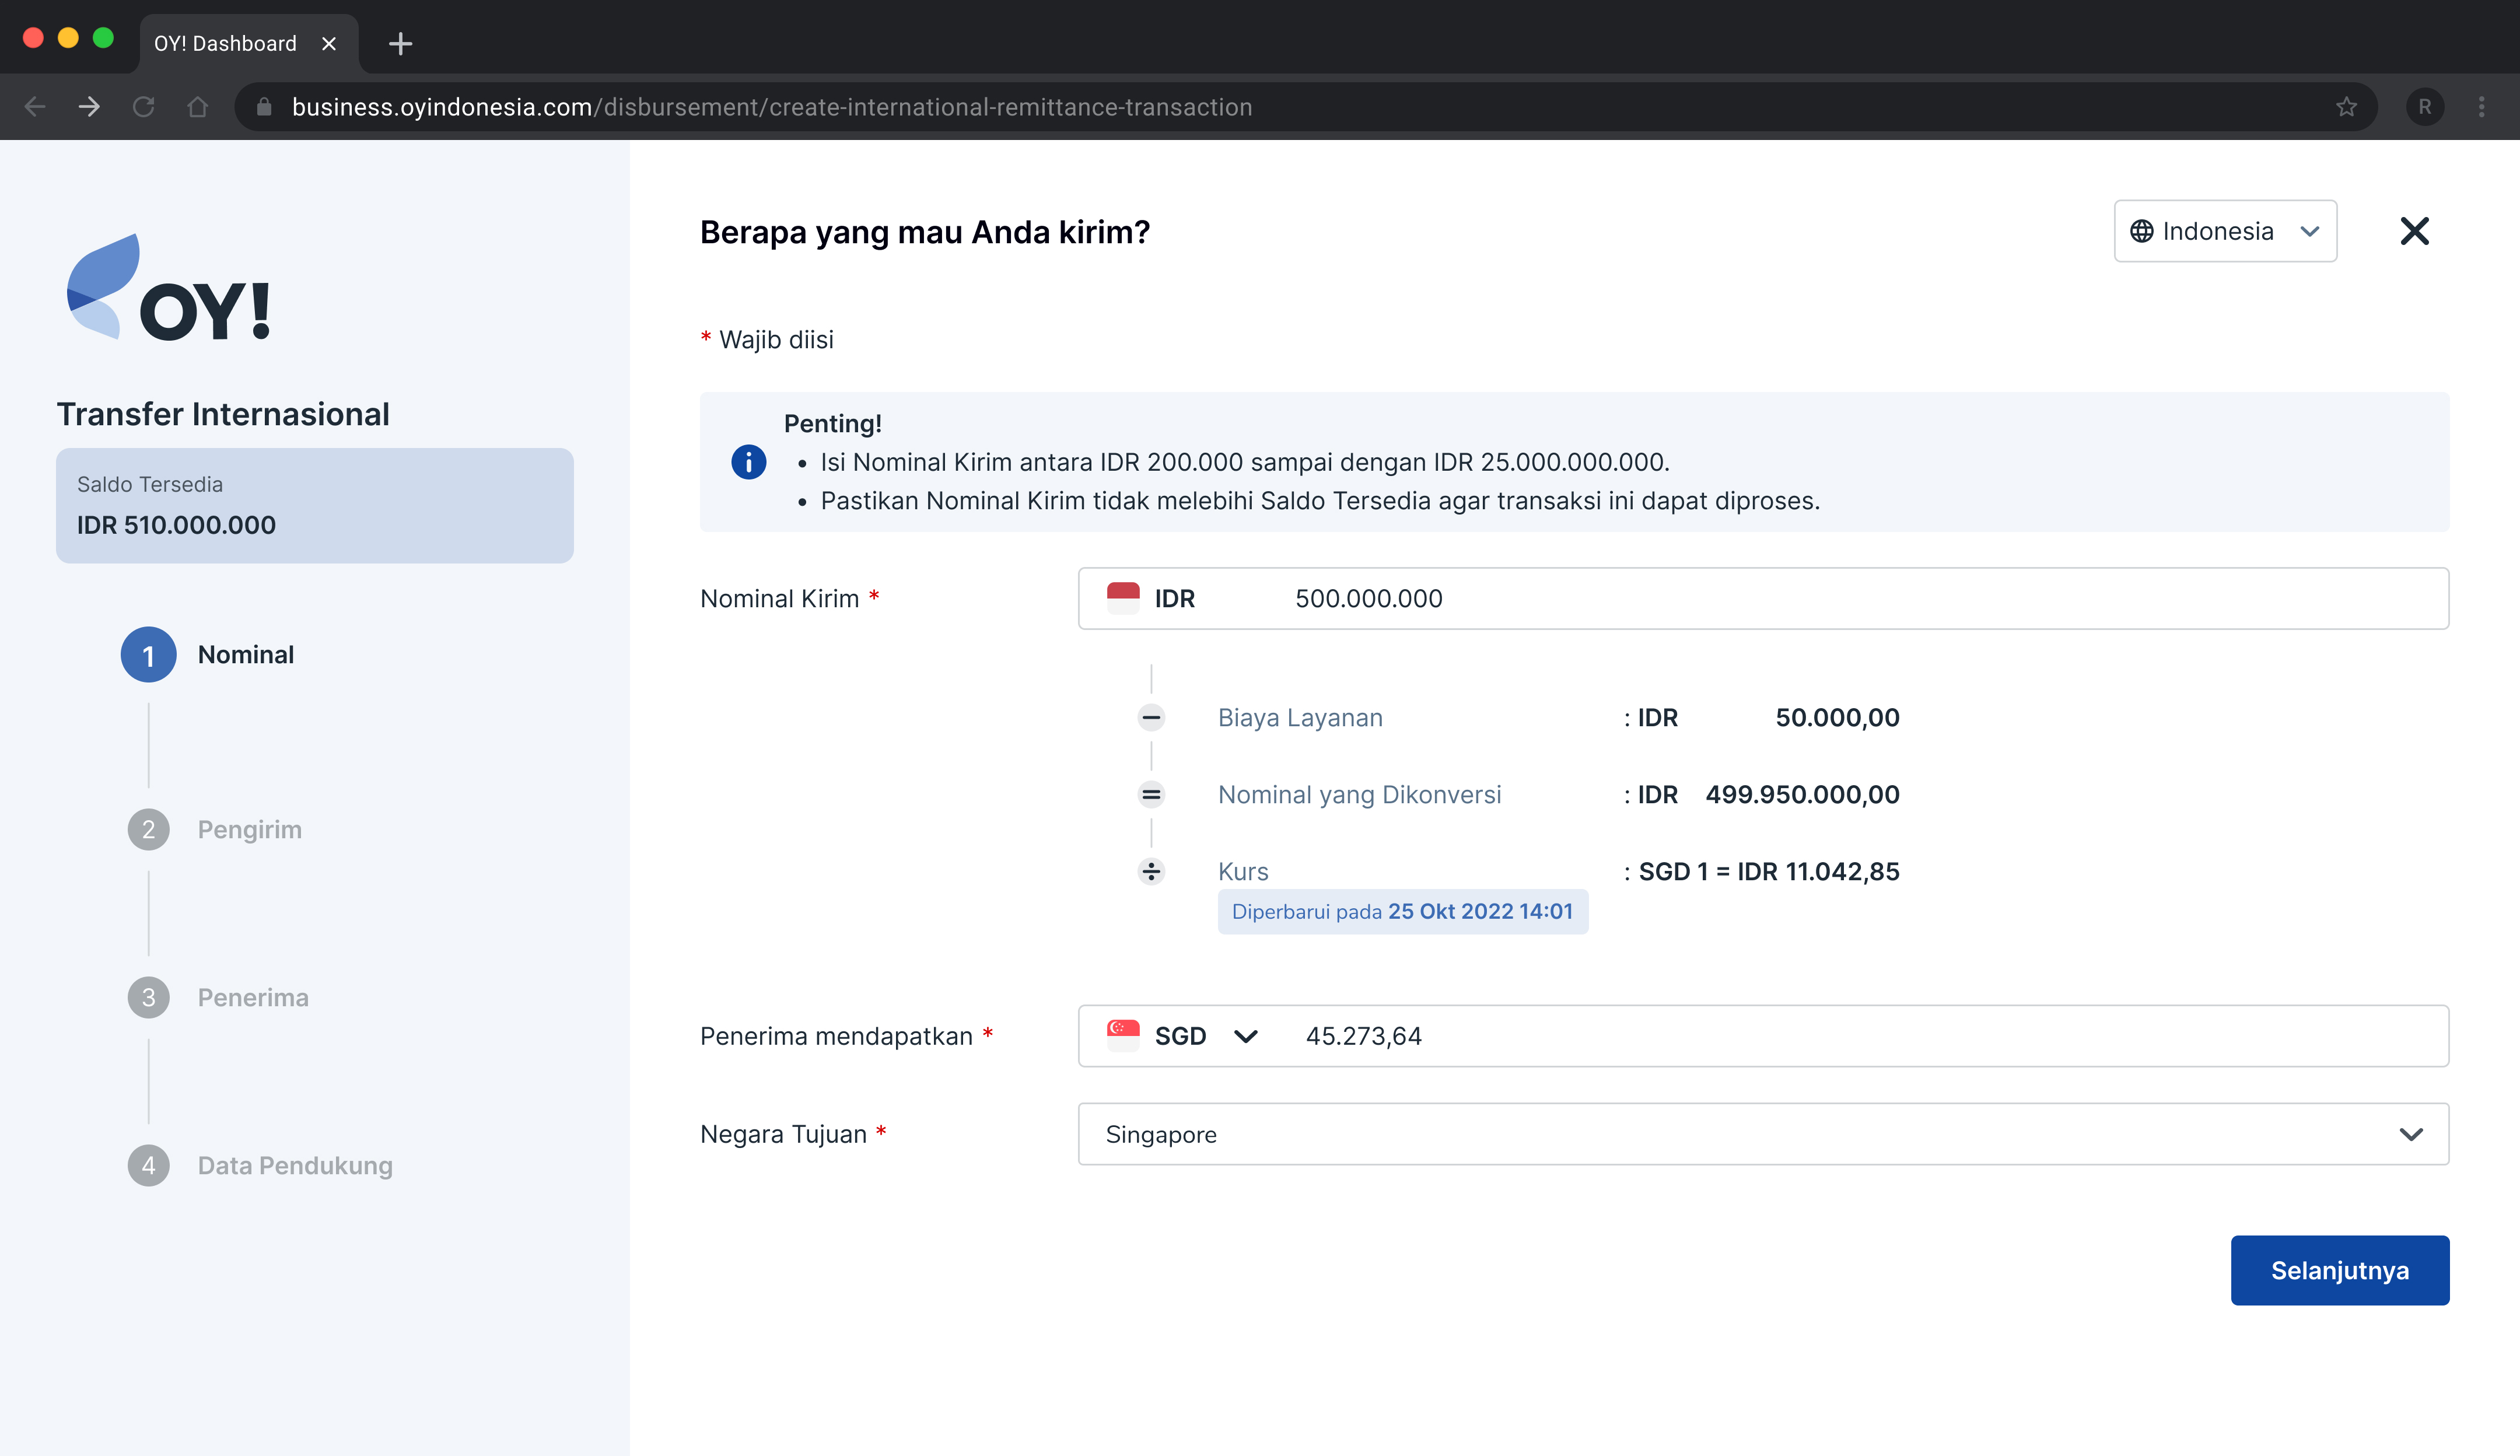
Note: If the nominal amount greater than the available balance, then our system will restrict users from proceeding
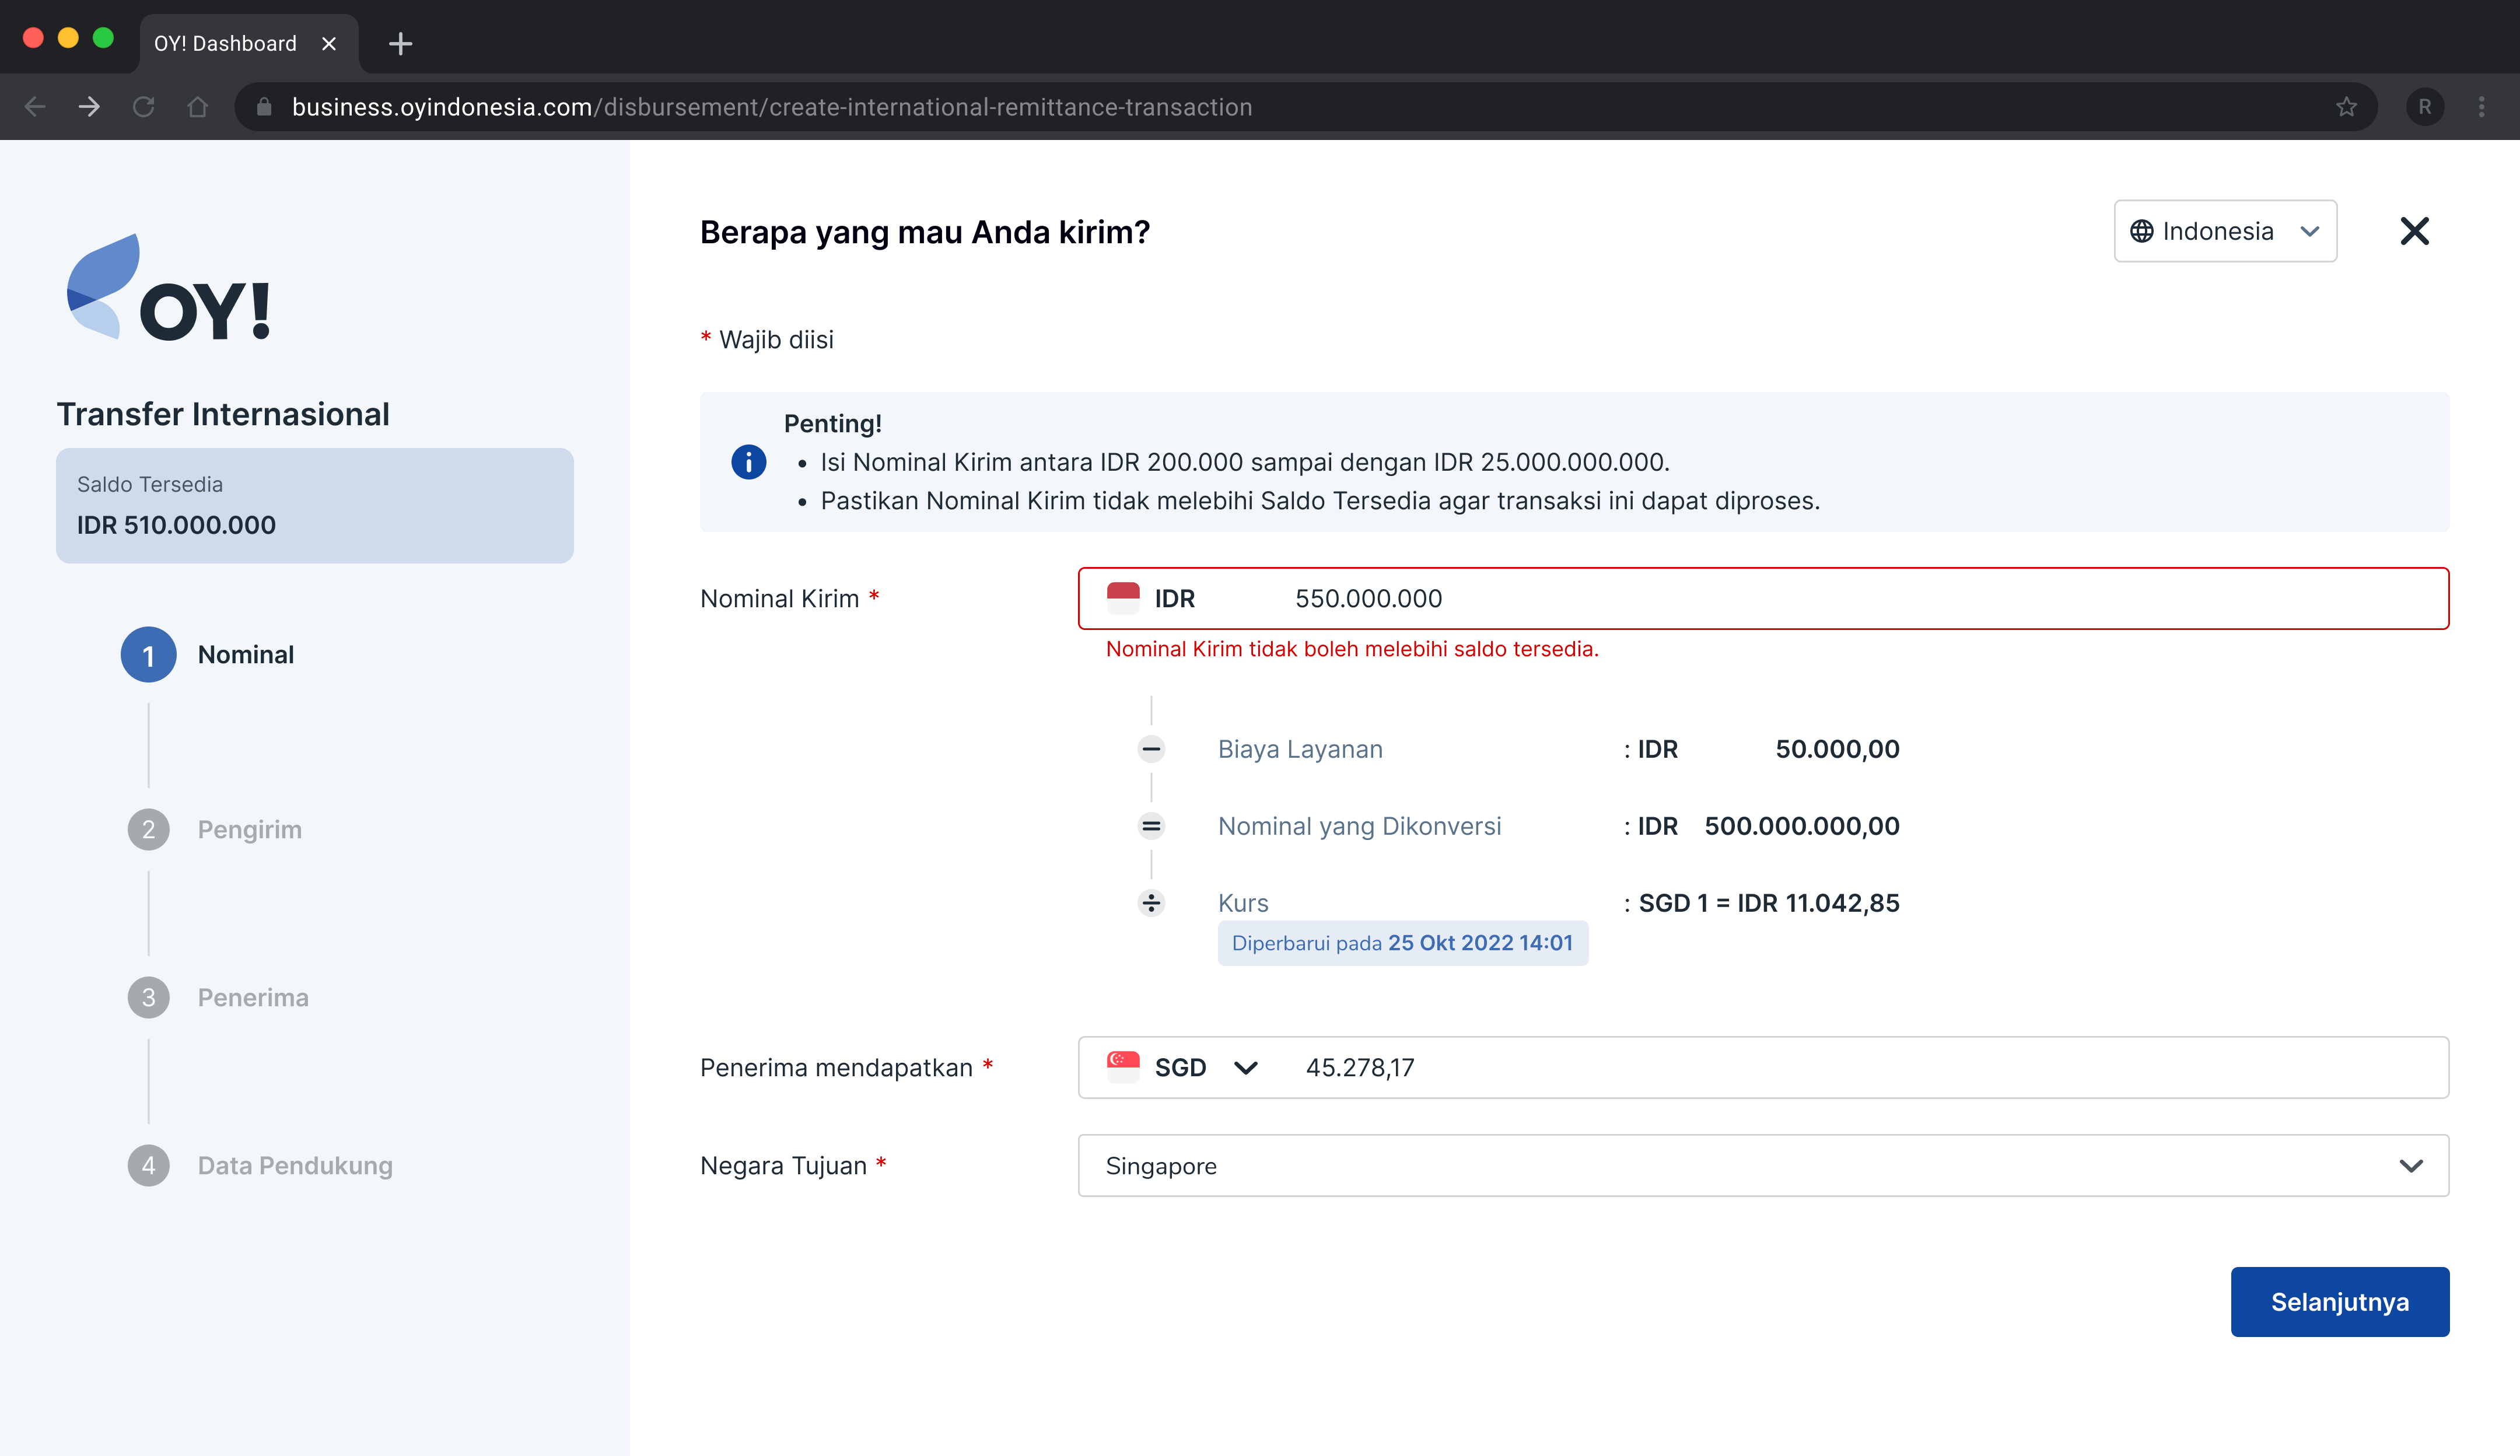
- Input sender details: Decide whether sender is an individual or business entity, and you will see the corresponding details to fill out for each. Previously saved sender contacts will be displayed at the bottom of this page.

Create a new individual sender by filling out this form
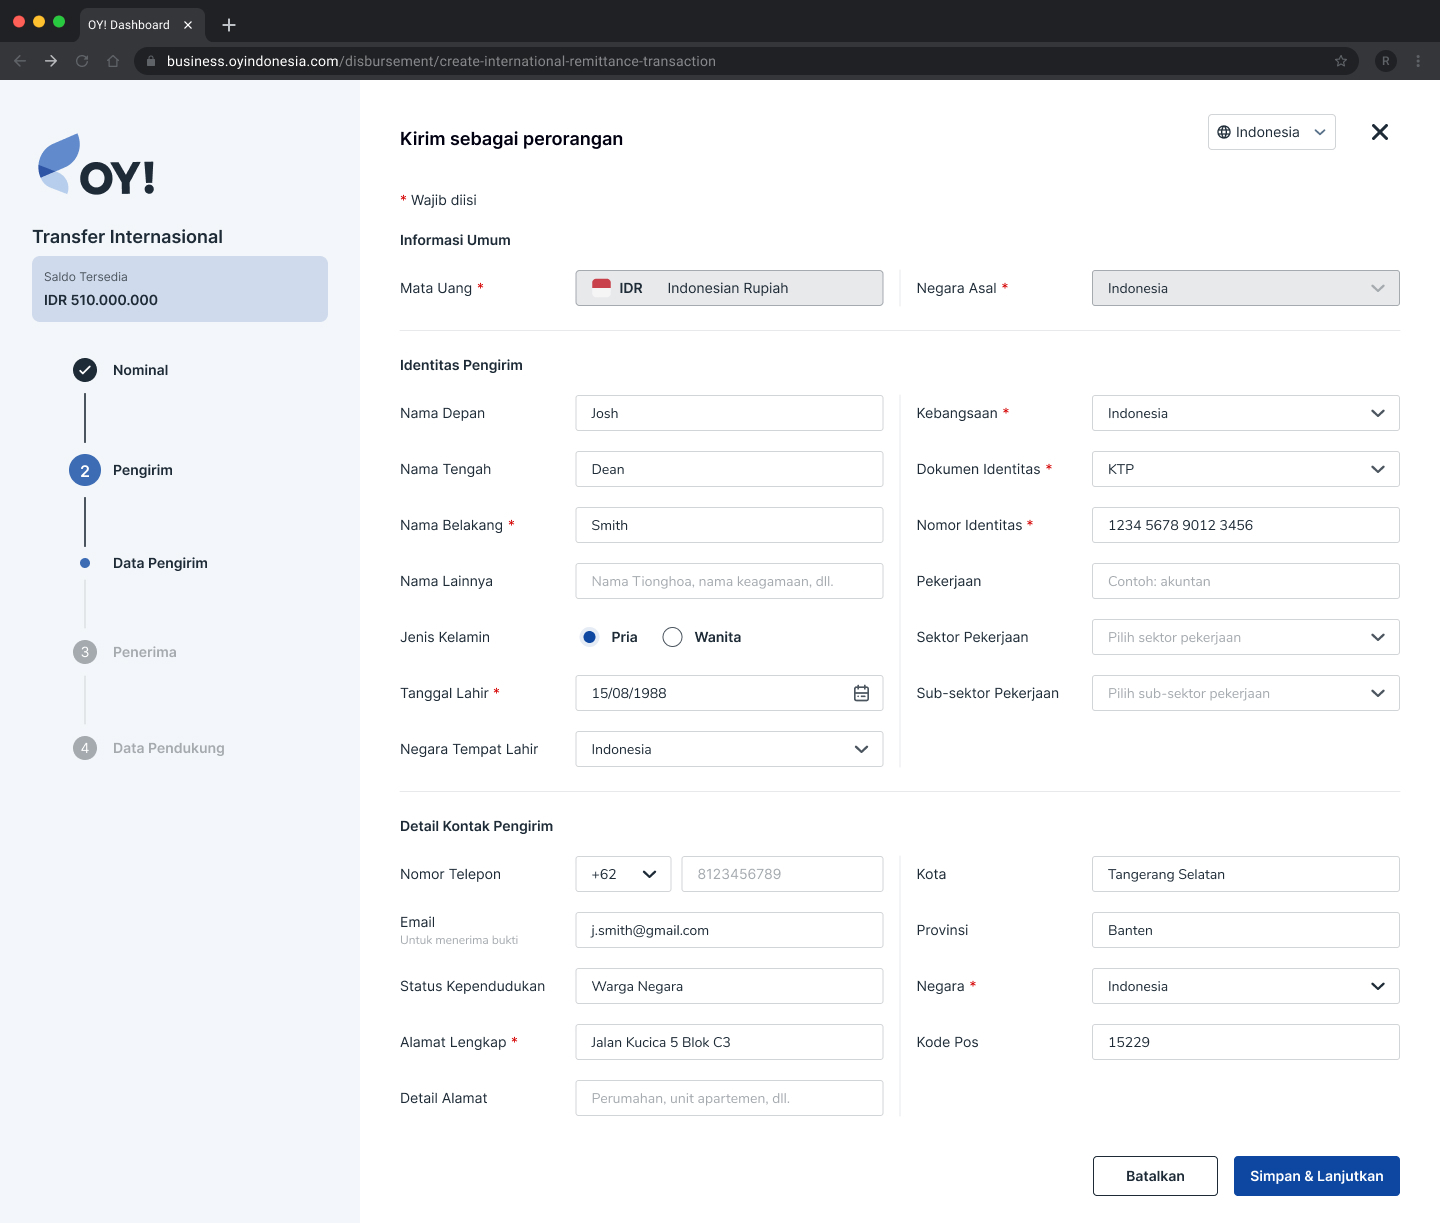
Create a new business sender by filling out this form
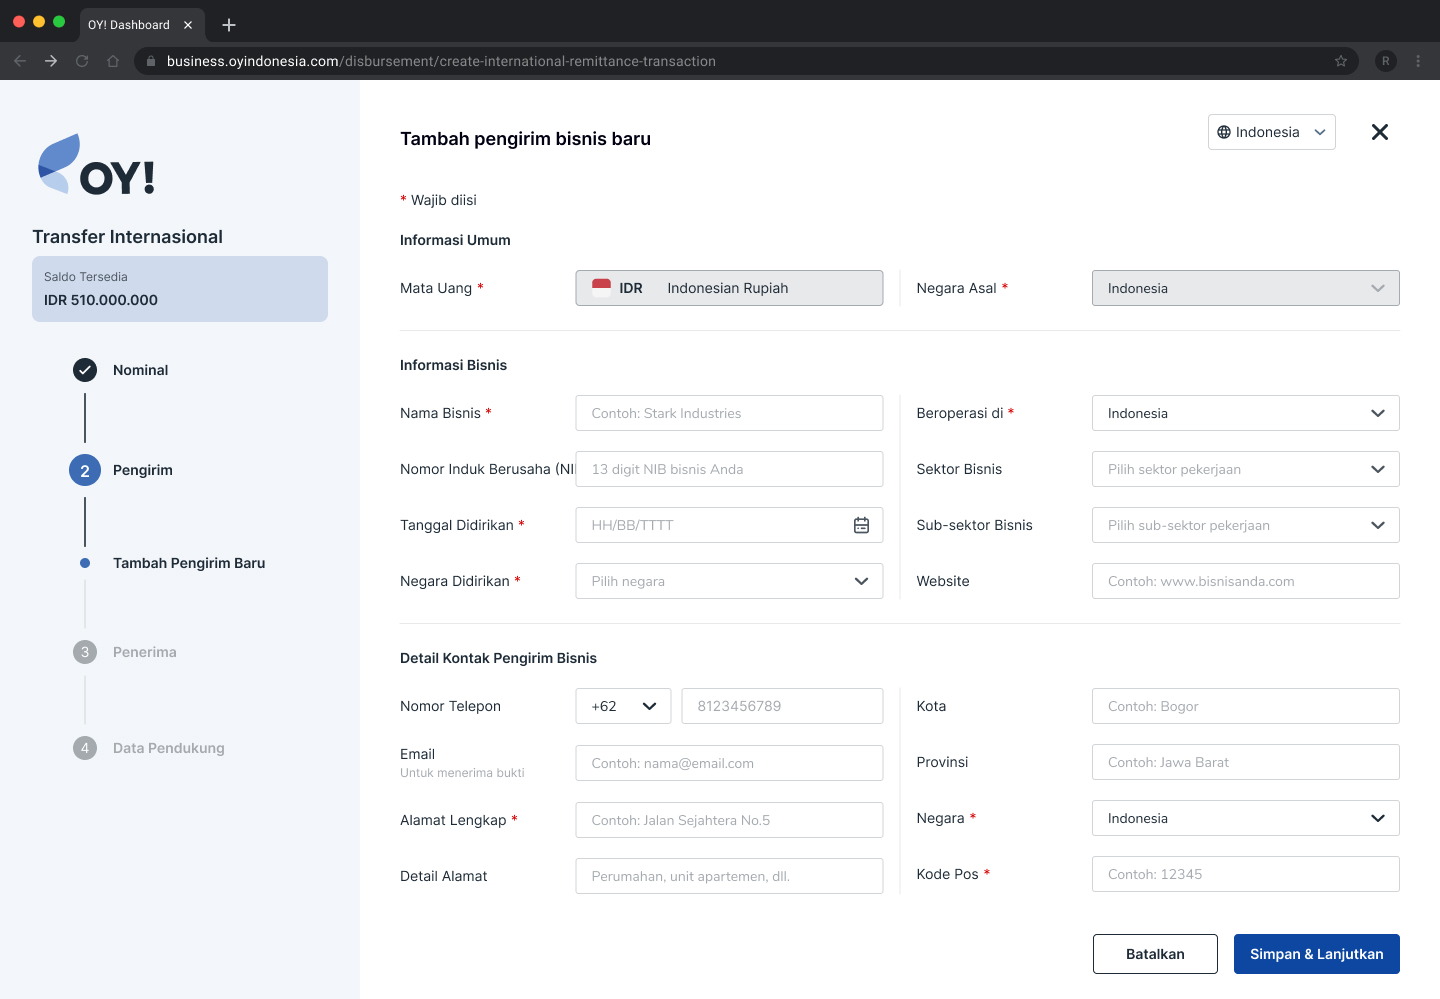
- Input recipient details: Decide whether recipient is an individual or business entity, and you will see the corresponding details to fill out for each. Previously saved recipient contacts will be displayed at the bottom of this page.
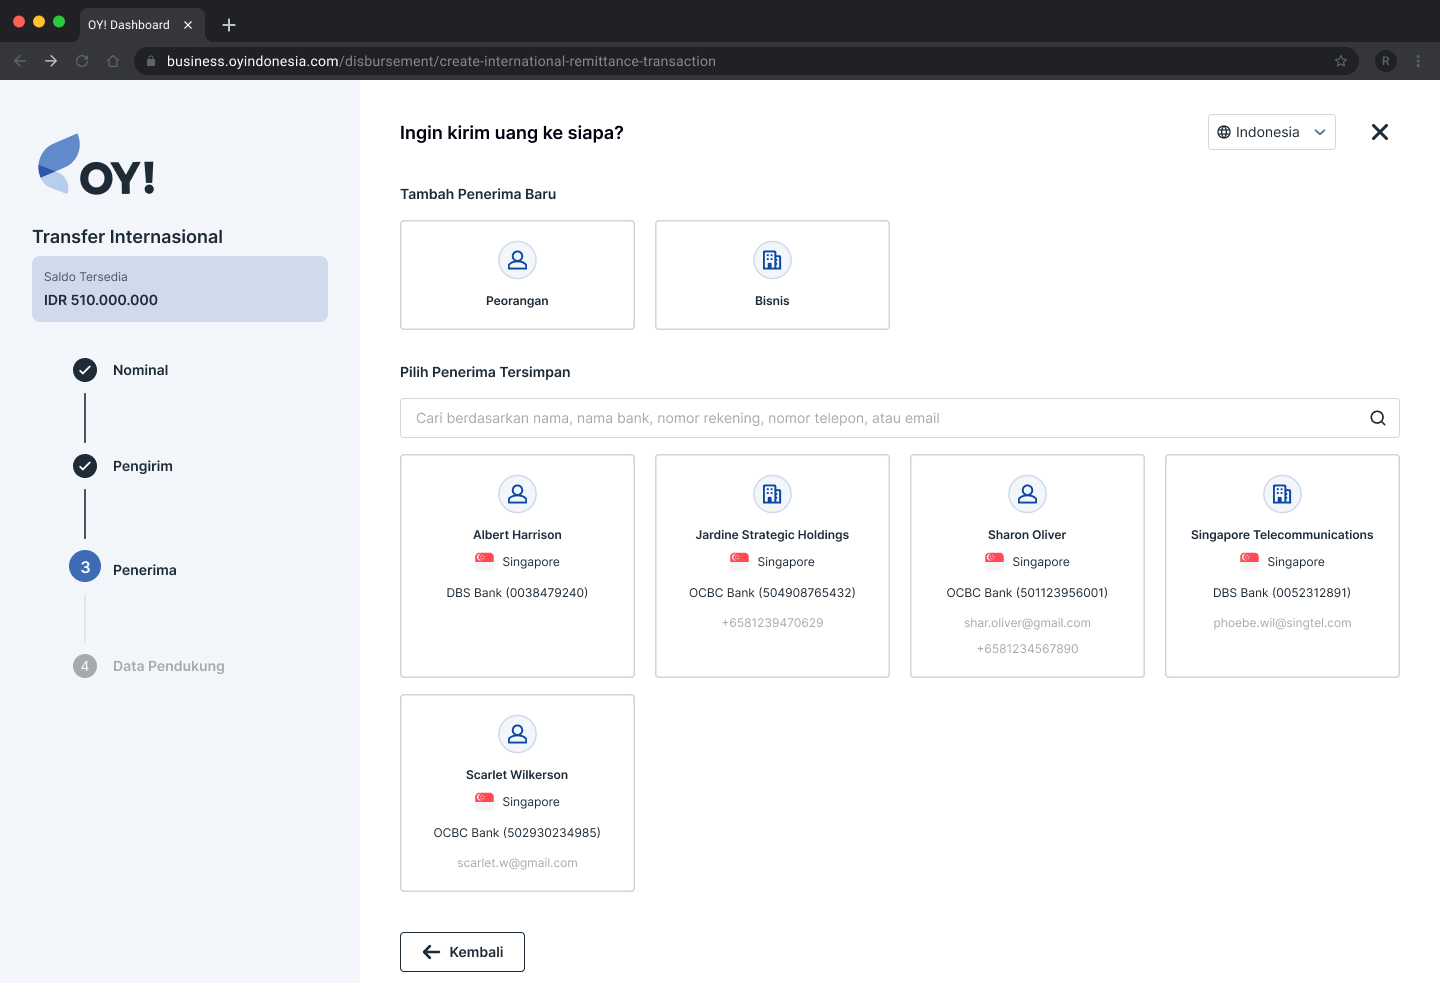
This will be the form you will need to fill out for individual recipient
Create a new individual recipient by filling out this form
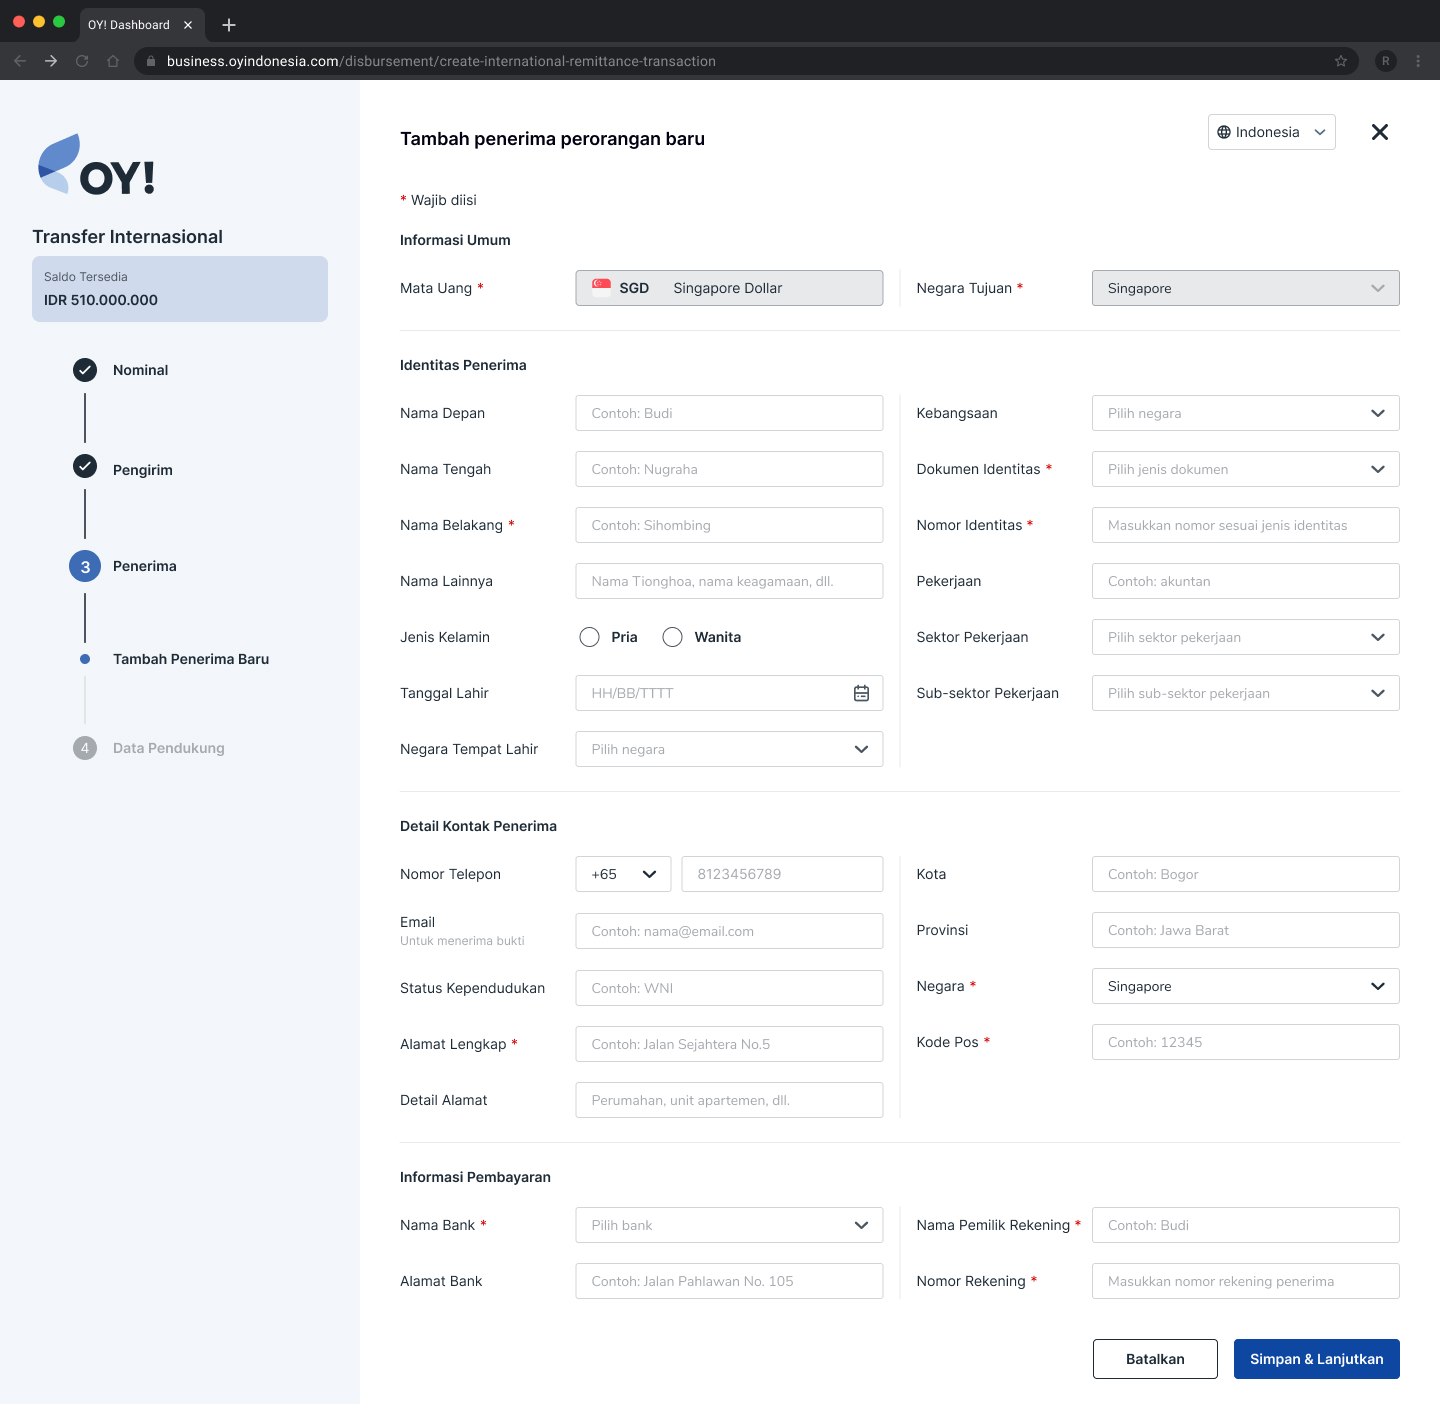
Create a new business contact by filling out this form
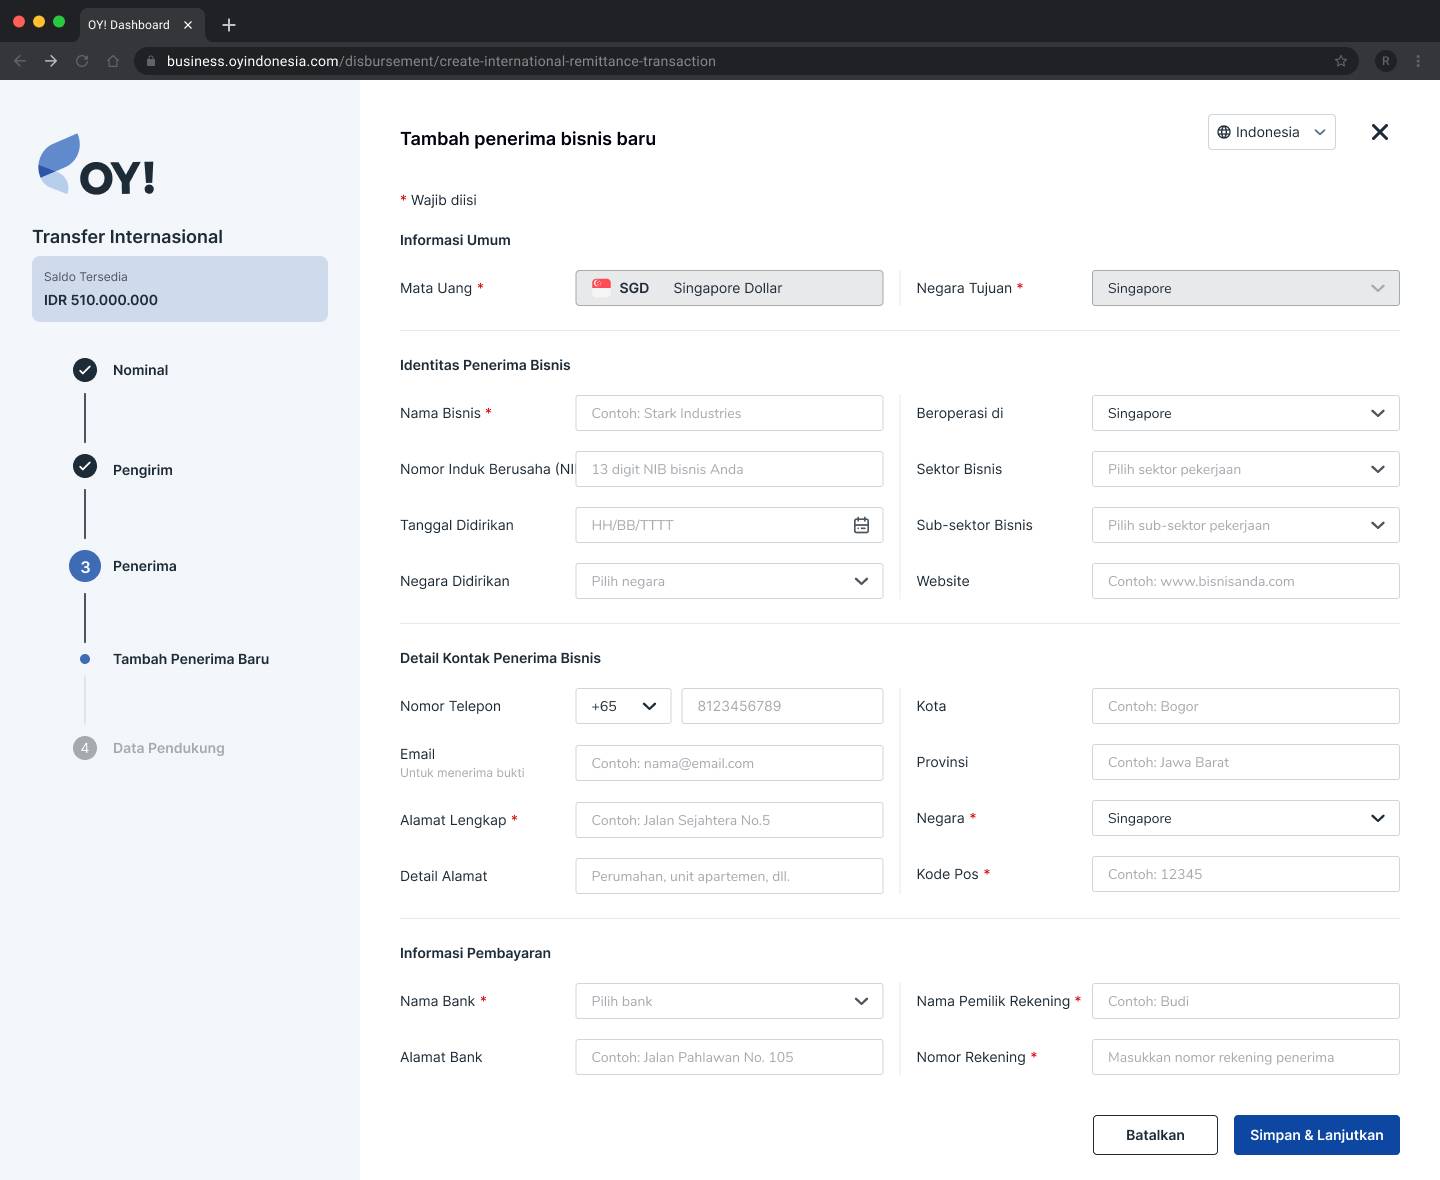
- Add supporting information: In this step, we need to record source of funds, purpose of transfer for the transaction. You may also attach supporting documents to aid the compliance requirements for your transaction.
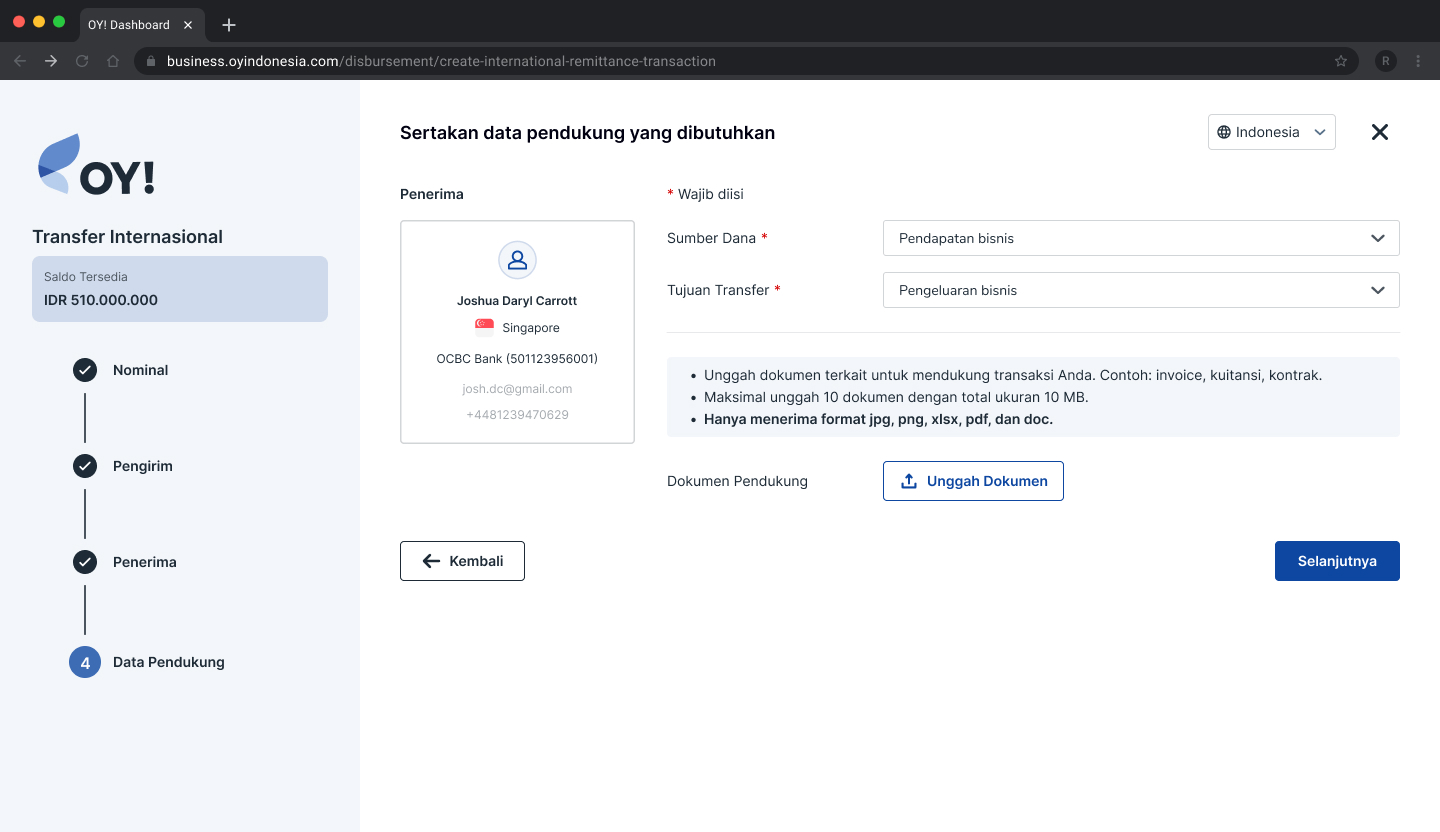
- Summary: The summary of your transaction will be shown. If all the information is correct, you may click the Submit button at the bottom right hand corner of the screen.
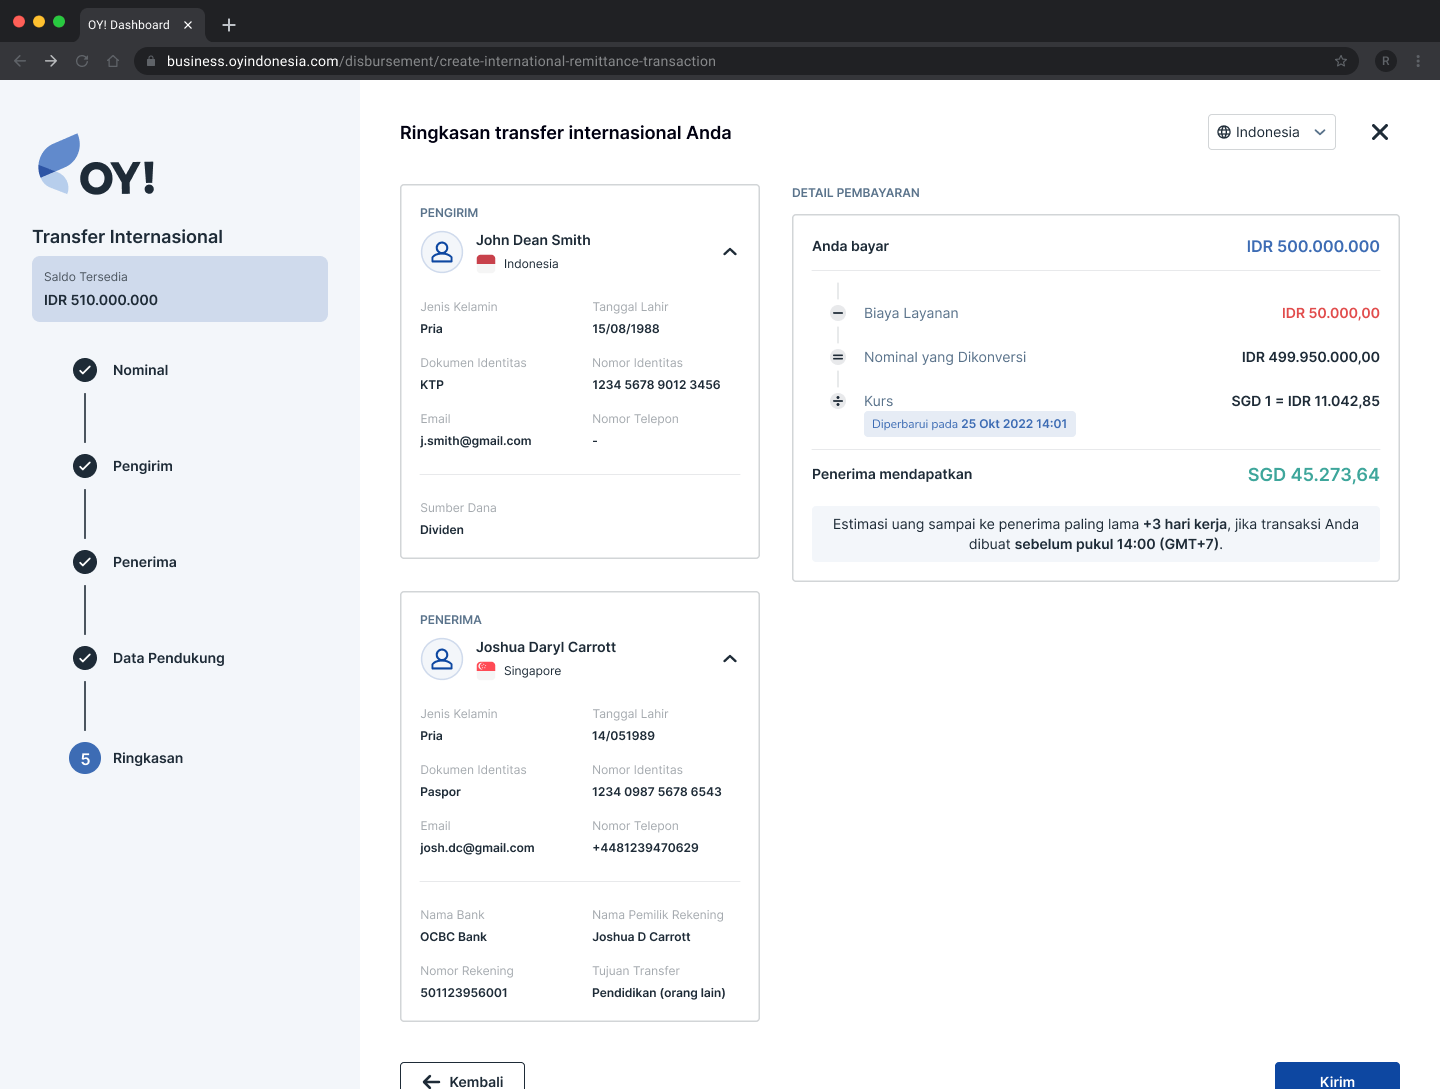
Note: A fixed quotation rate is created since Input sender details and will be refreshed every 30 minutes. In the case when the quotation expires, a pop up will show to fetch the latest exchange rate and a new quotation is created.
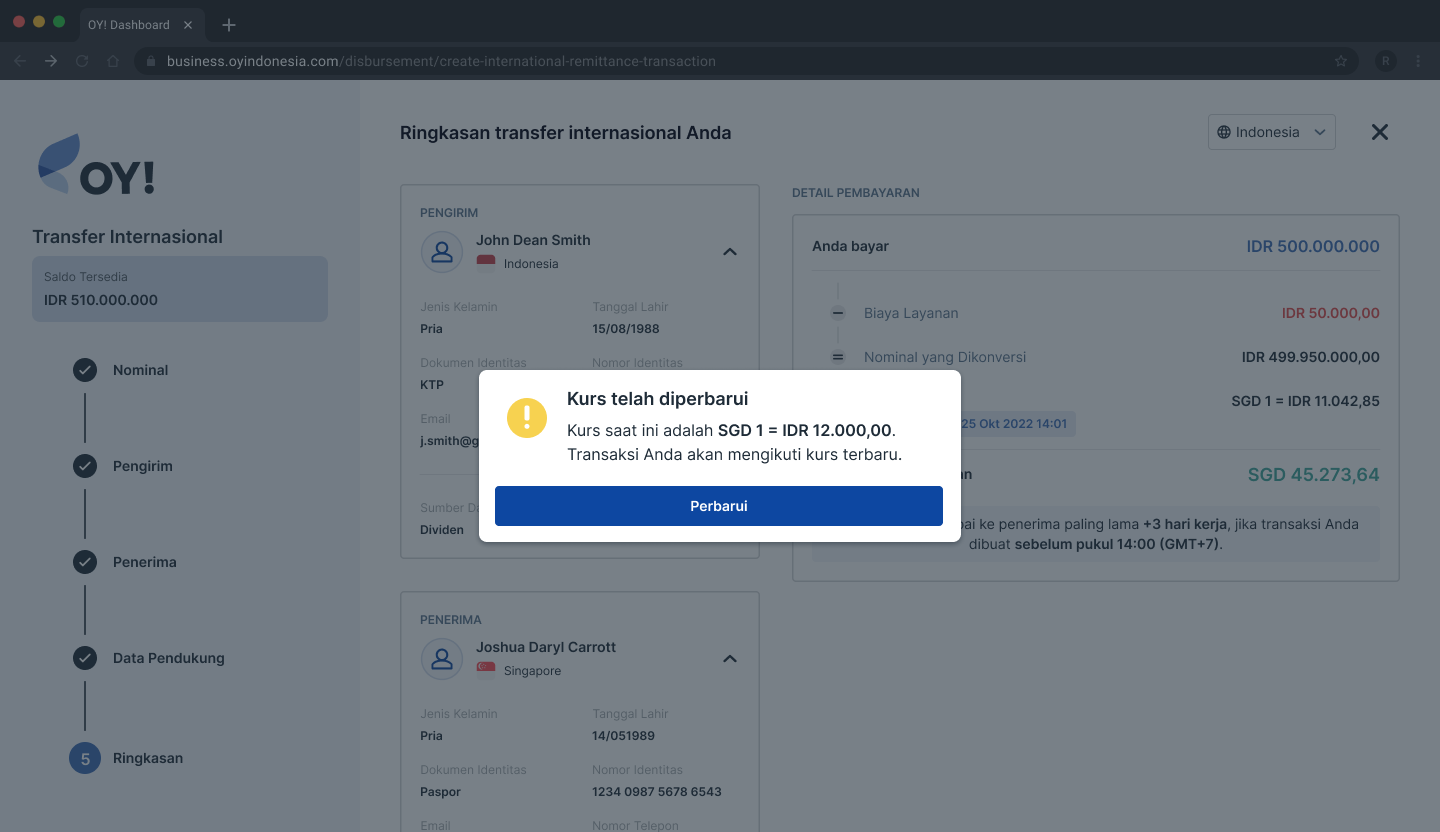
If the available balance is insufficient for the new quotation amount, then you will be prompted to change the transfer amount or top up balance.
- Input Password: For security reasons, OY! will prompt clients to input their password prior to every transaction.

Each client has 5 chances to input the correct password. If you failed to input the correct password 5 times, then the transaction will automatically be cancelled.
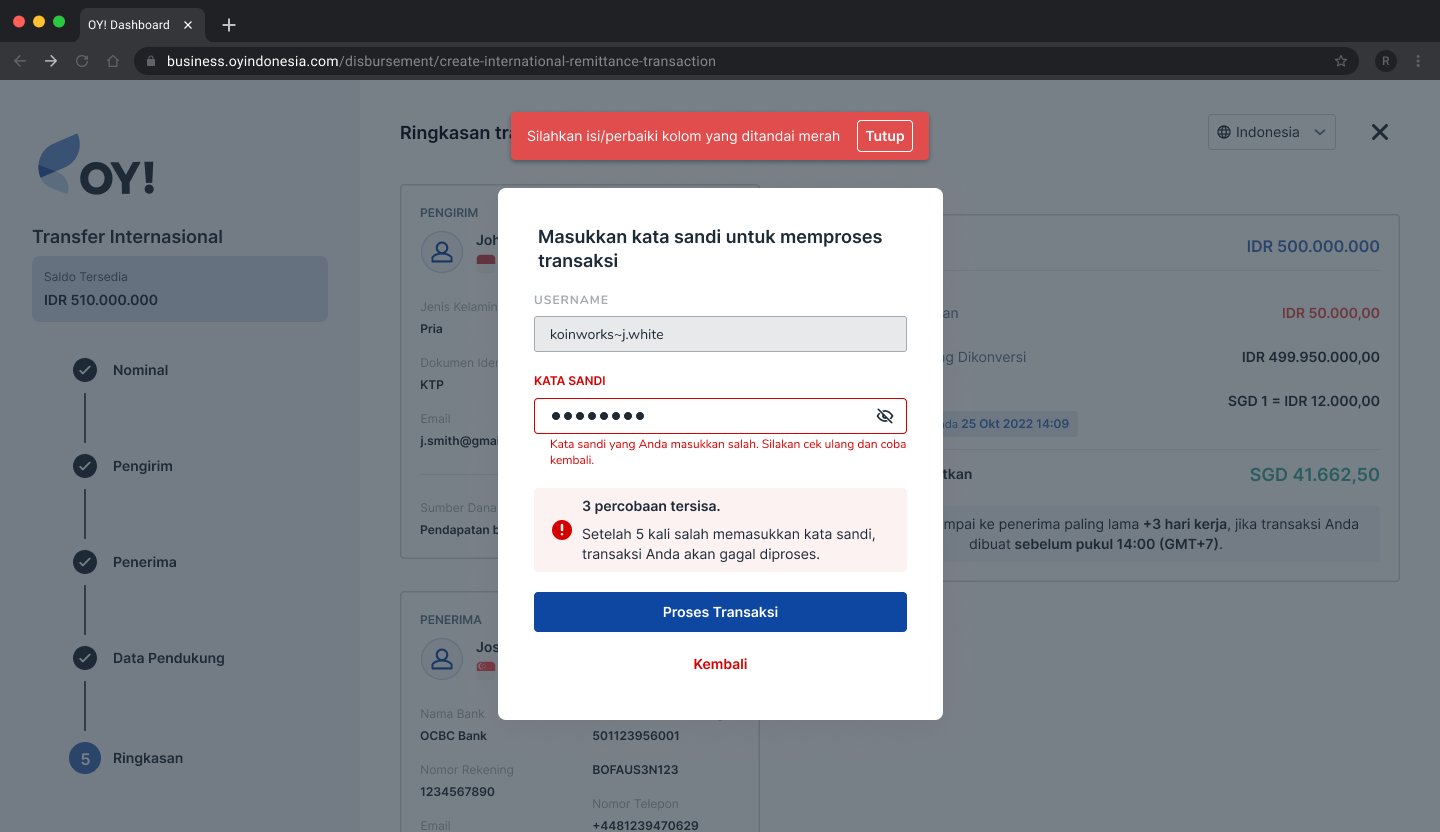
- Transaction Status: In Progress, Success, Failed.
In Progress
Once a transaction is successfully created, it will appear in your dashboard the status column will be set as In Progress.
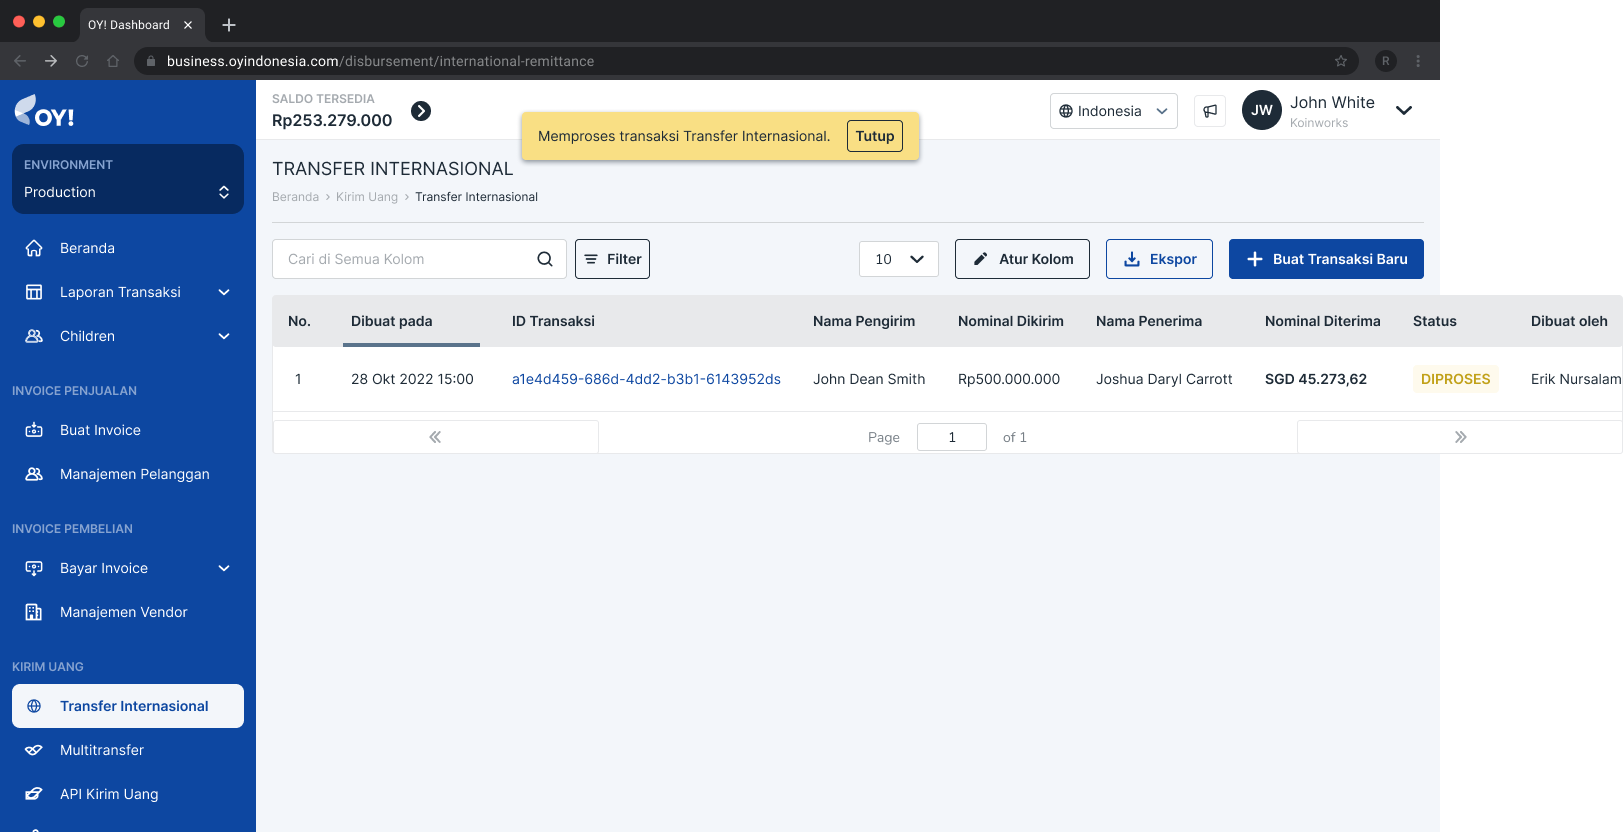
Success
Once your transaction is processed successfully, the status column will be updated as Success. Both sender and recipient should have received an email detailing a “Successful Transfer.”
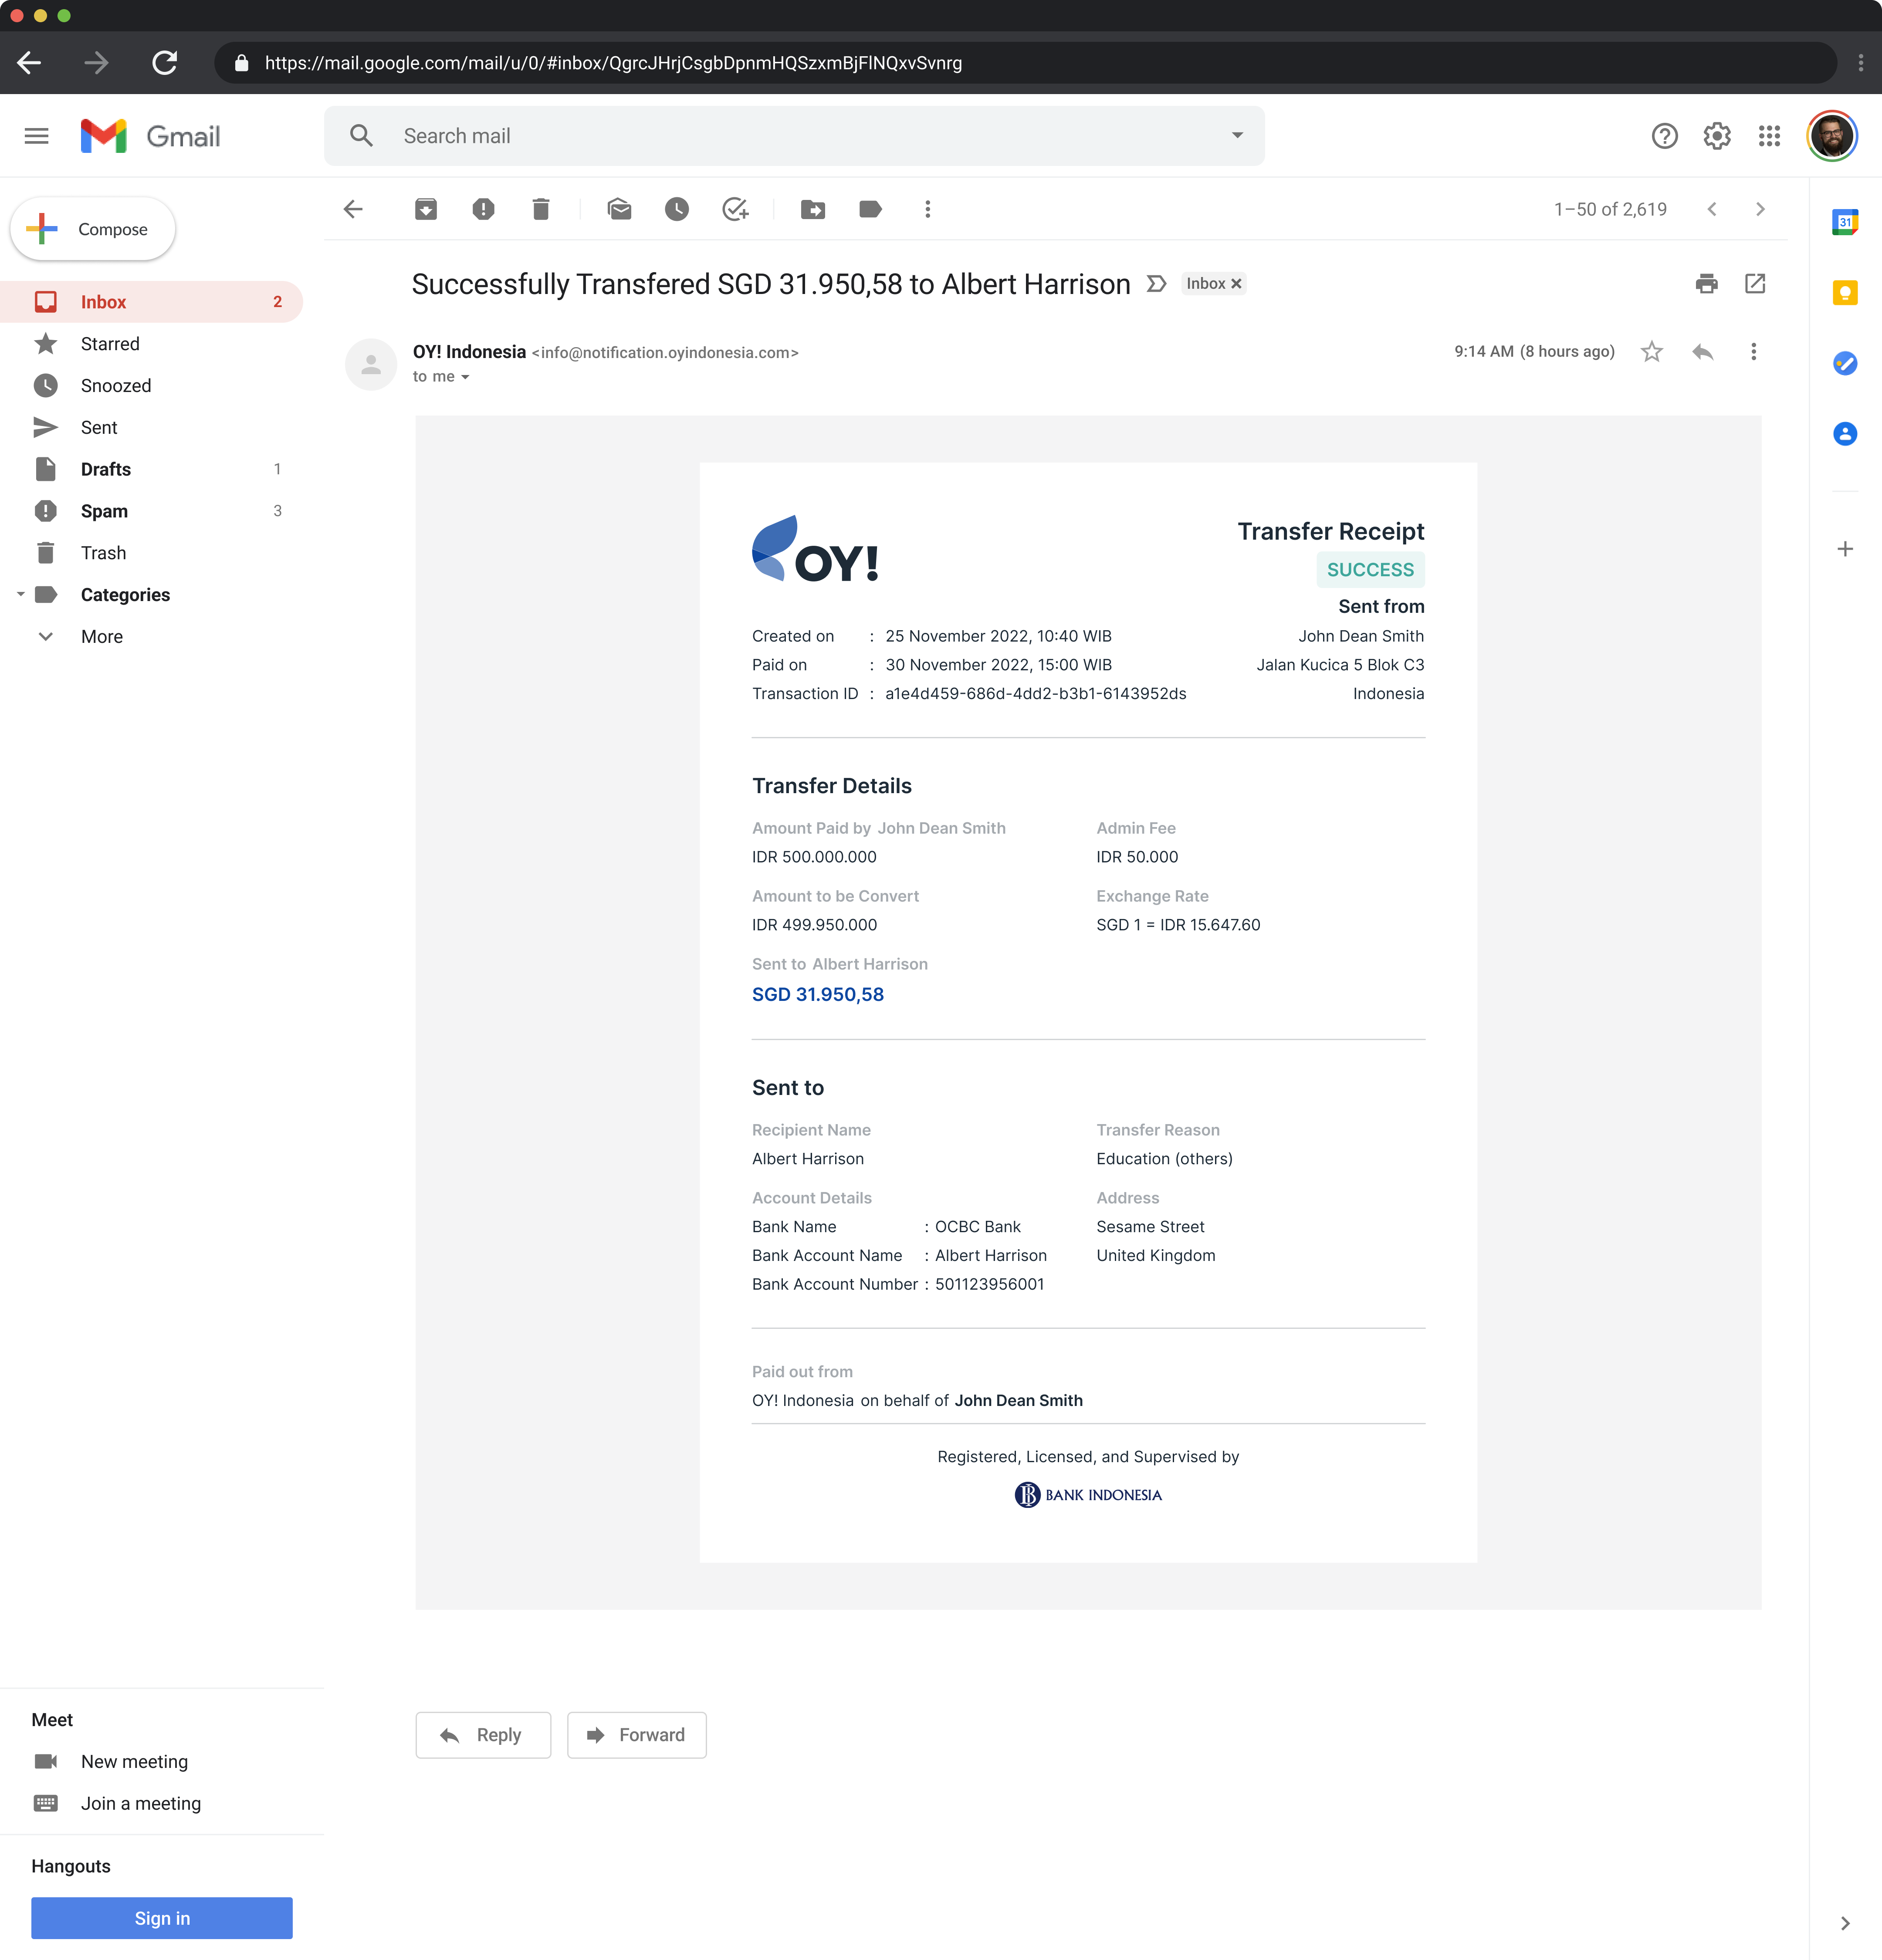
Failed
If your transaction has failed to process, the status column will be updated as Failed. Both sender and recipient should have received an email detailing a “Failed Transfer.”
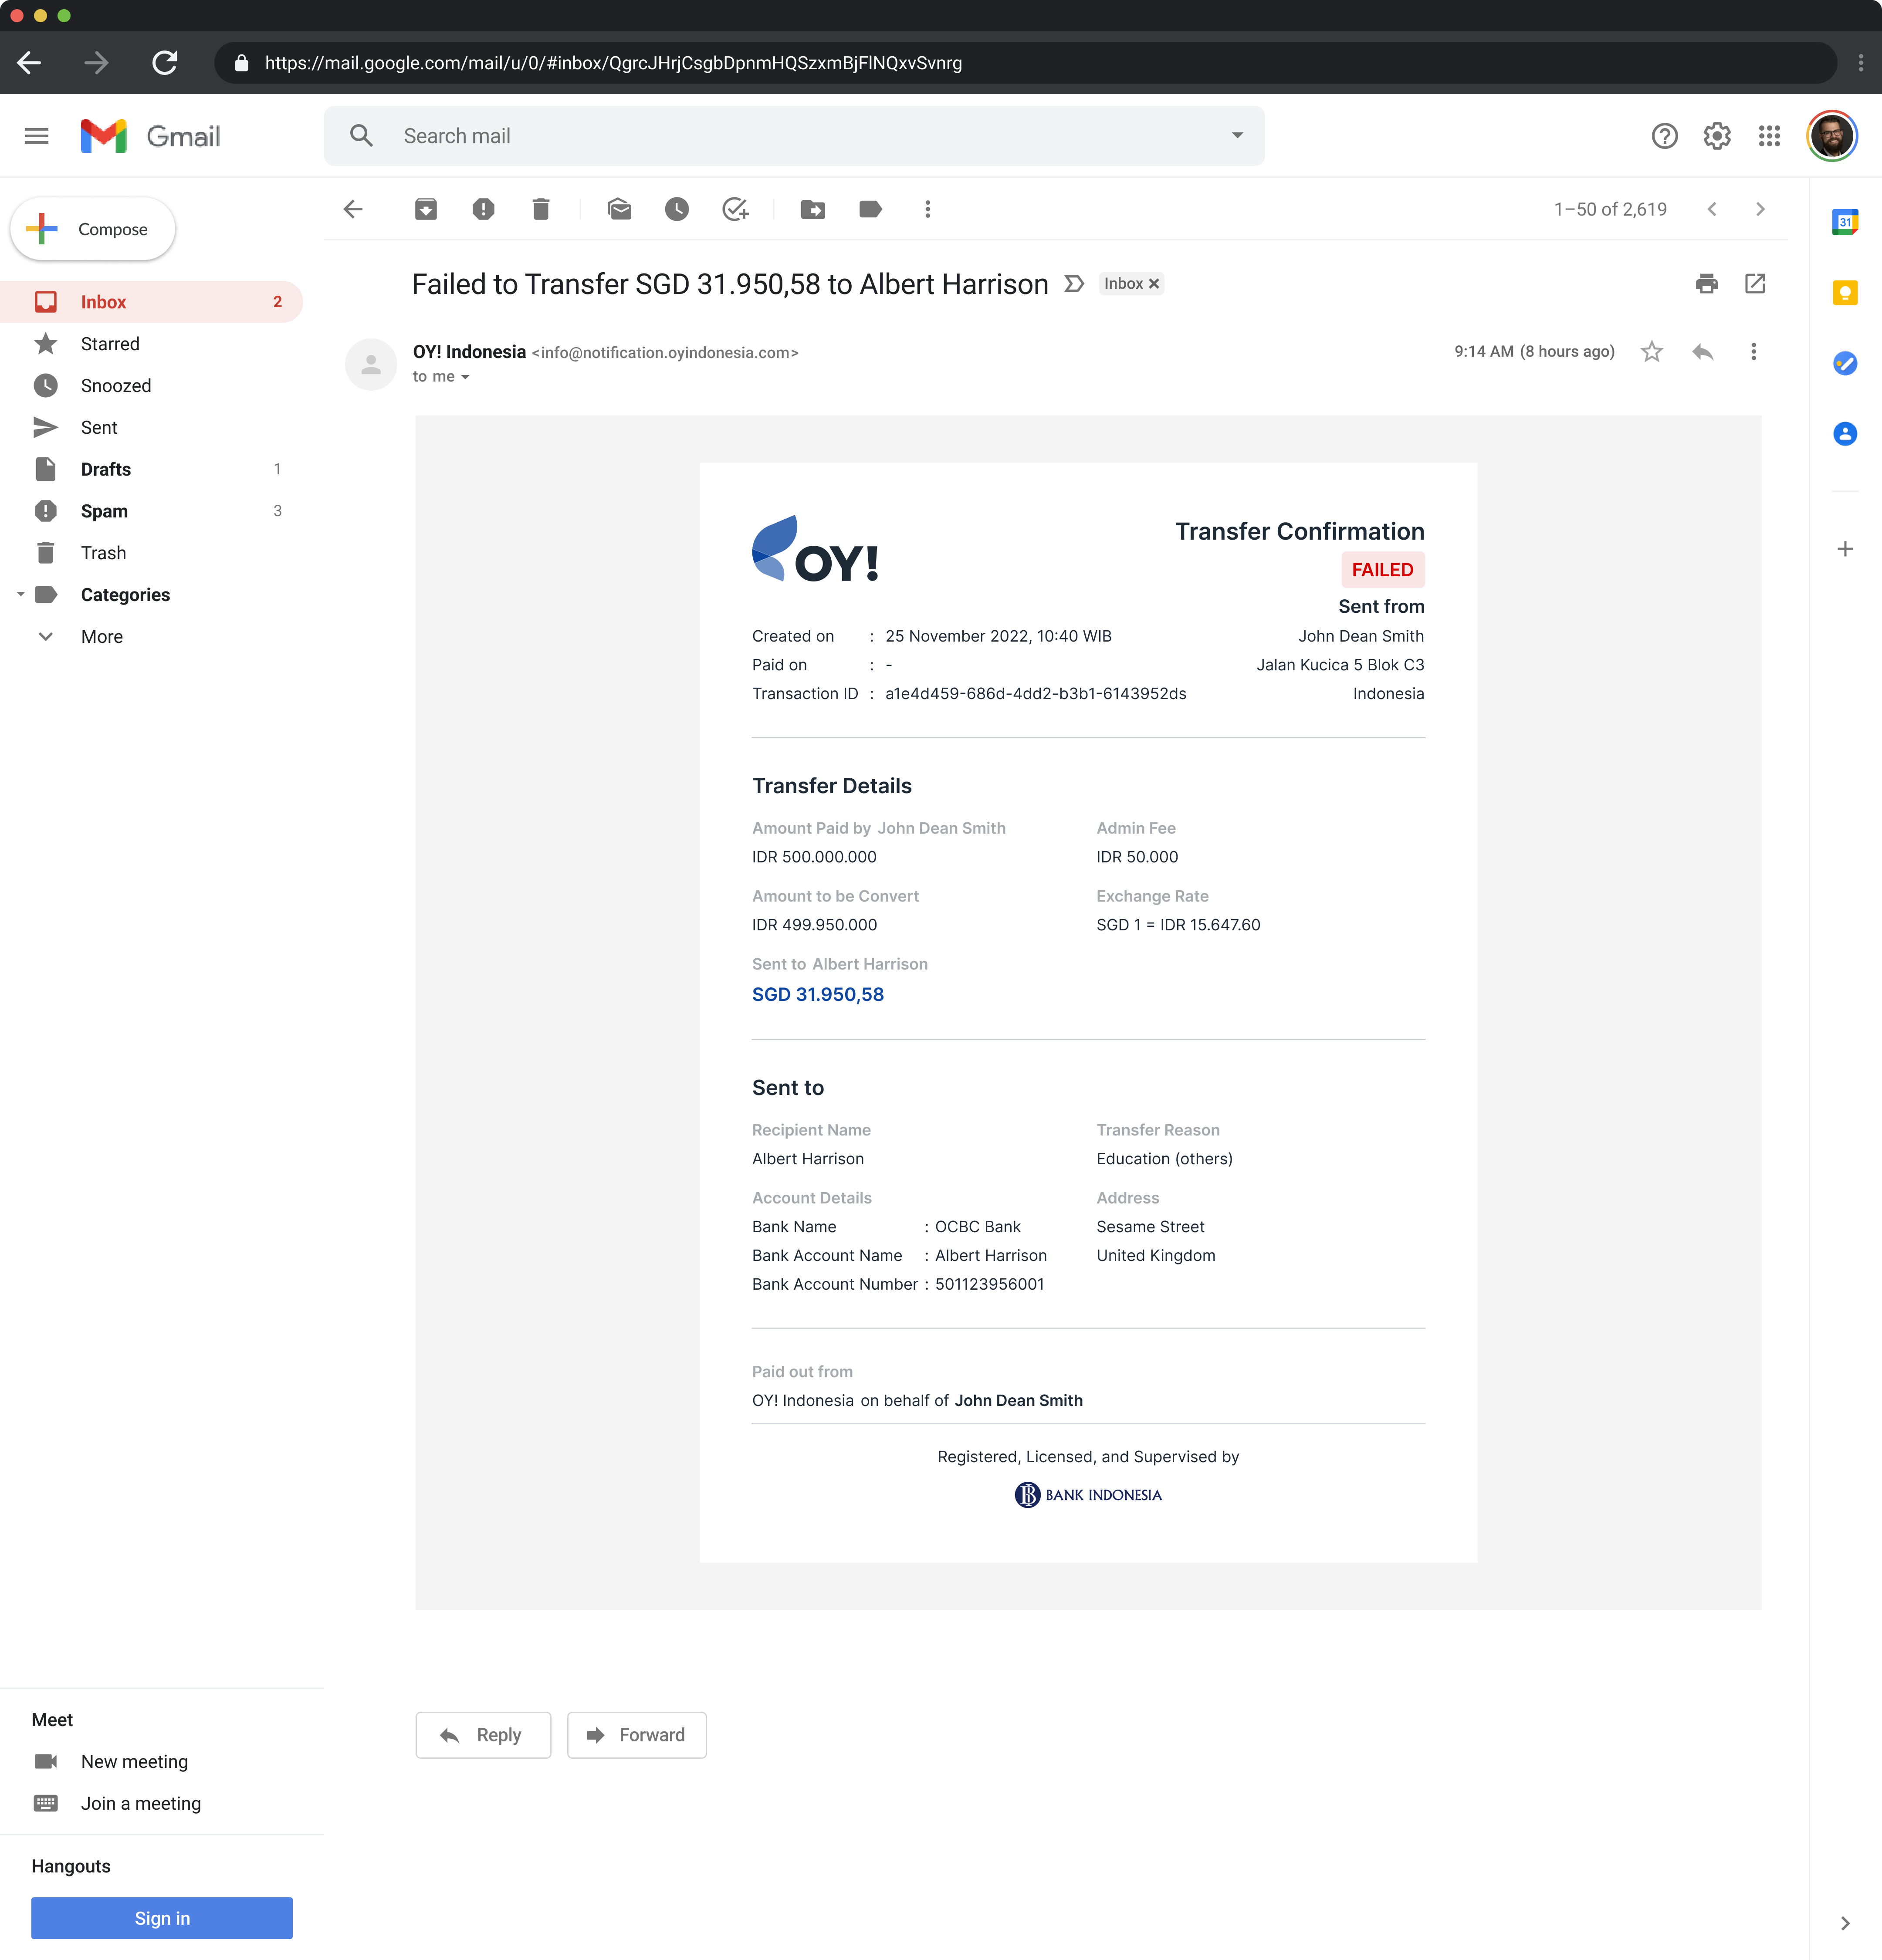
- Check transaction details: You may check transaction details by clicking on the transaction id on the list of transaction details on dashboard
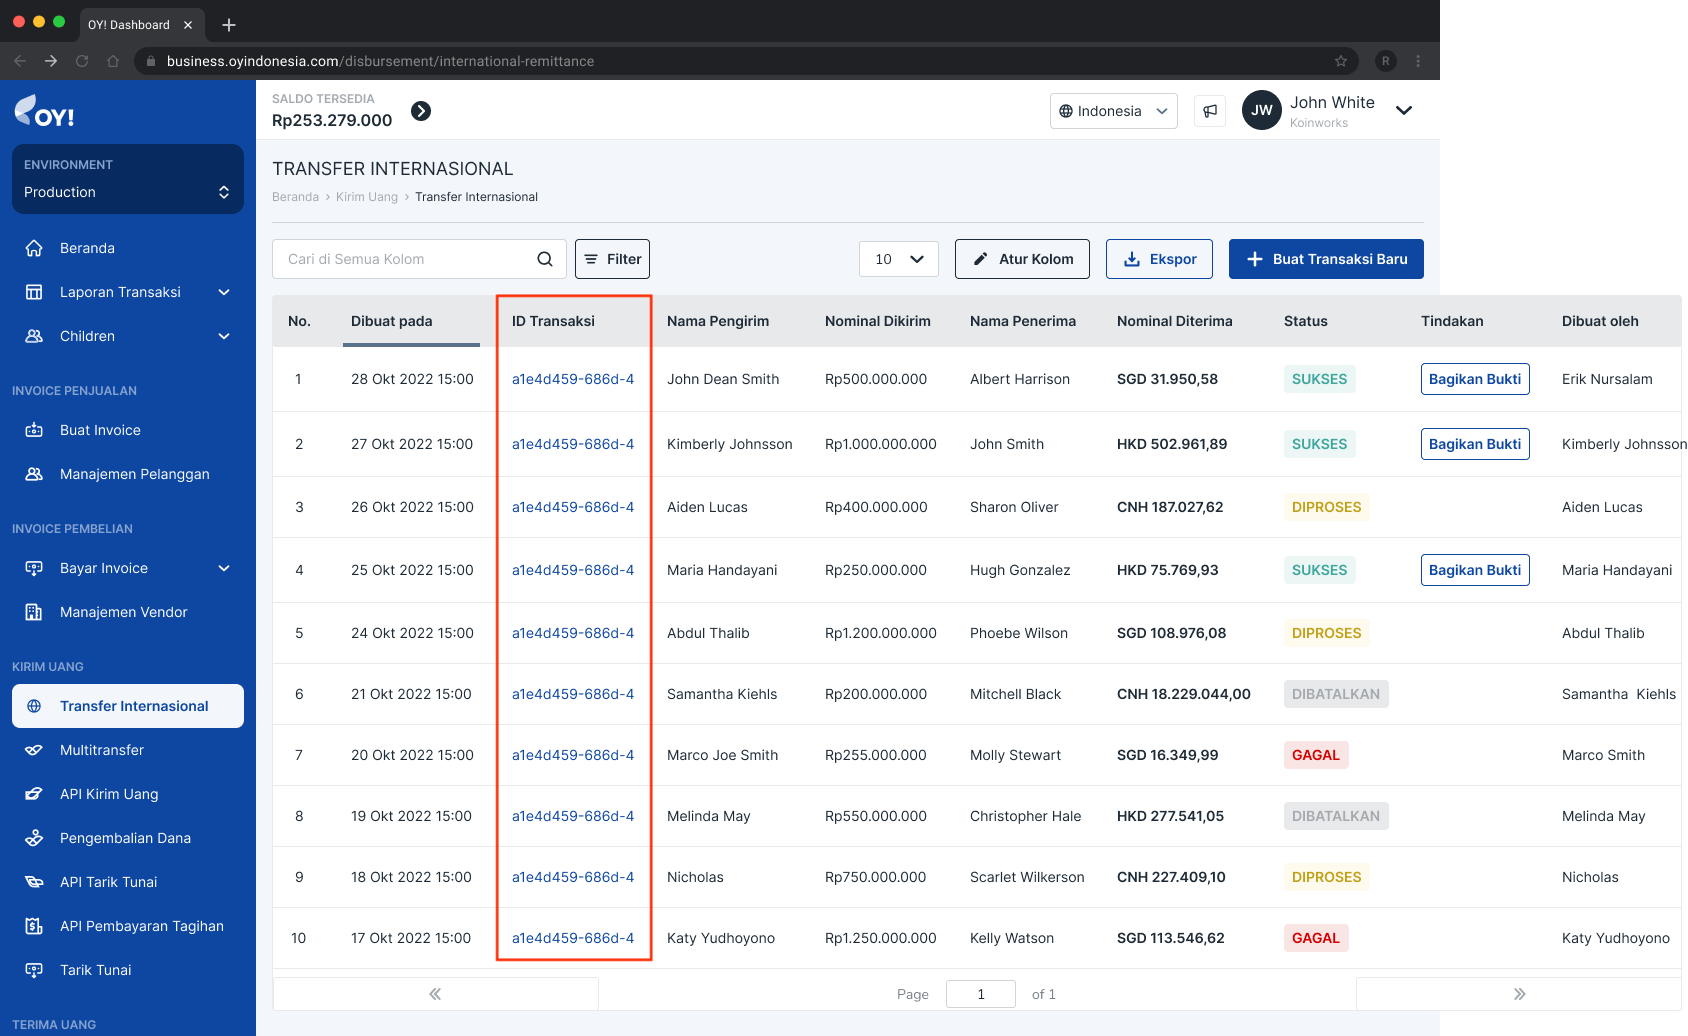
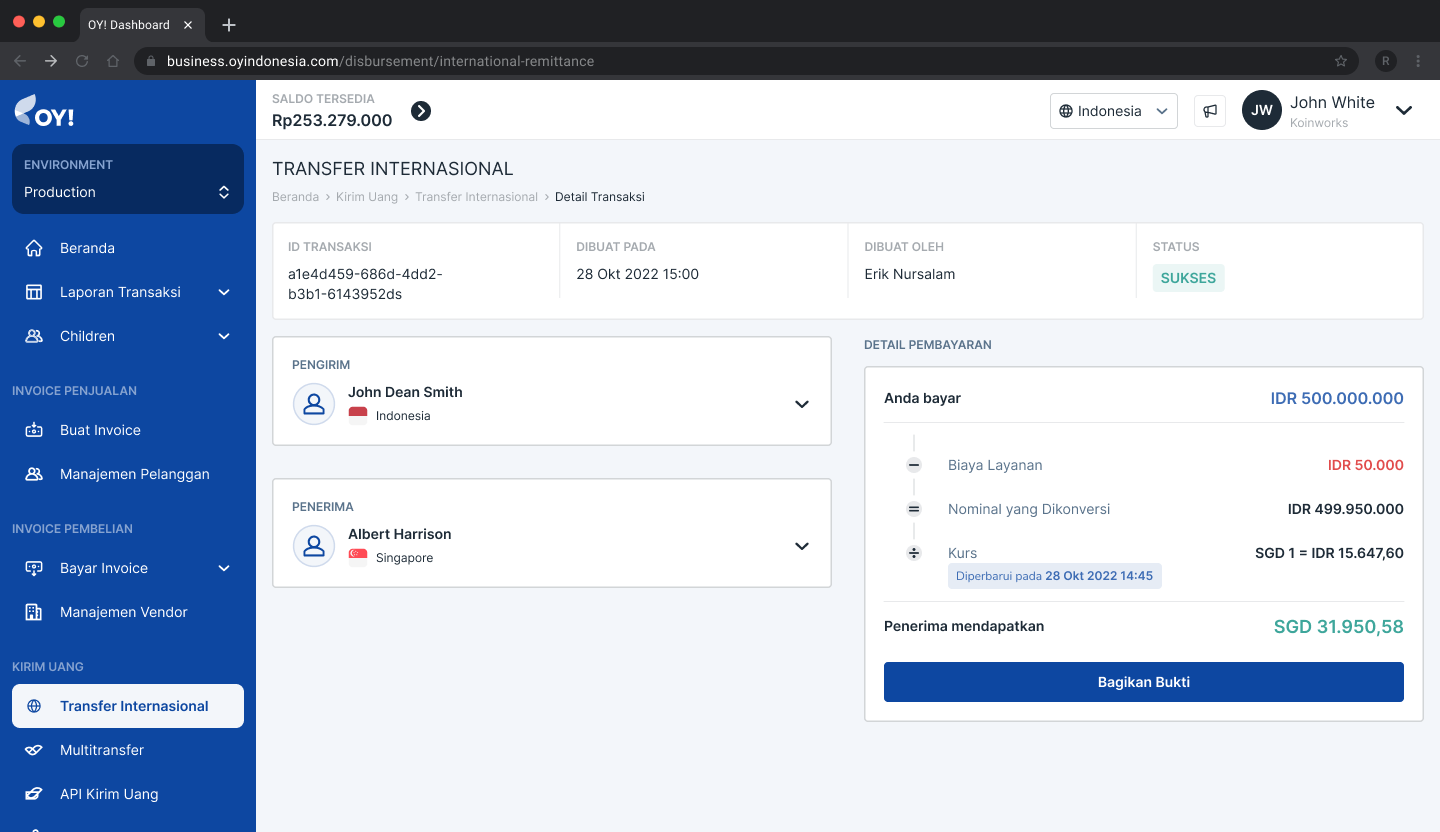
Reimbursement
OY! Reimbursement product provides the capability to handle employee reimbursement requests and fund disbursement on one platform. Reimbursement can be done easily without any employee signing up for an OY! Account. No technical integration is required to utilize the product.
Key Features
| Feature | Description |
|---|---|
| Approval Capability | To ensure no fraudulent requests are made, a double approval mechanism exists in the product and is mandatory for the reimbursement process. The first layer is for the reporting manager via email, and the second layer applies to the finance team via the dashboard. |
| Fund Disbursement | Not only does the product process disbursement requests, but you can also immediately schedule the disbursement time after approval from the reporting manager. Currently, the scheduled disbursement options are 1 day, 3 days, 7 days, and 14 days, allowing flexibility in managing cash flows. |
| Reimbursement Details | Every reimbursement request can be accessed through the OY! dashboard, including the uploaded file, to ensure it matches the requested amount. |
| Reimbursement Tracking | For employees, no more hassle in checking reimbursement progress with the HR or finance team. Your employee will receive a tracking email to check progress in real-time. |
How to Set Approver (Reporting Manager)
Setting up the approver will only occur once when the page is first opened.
- Log in to your OY! dashboard.
- Select the "Production" environment.
- Navigate to "Reimbursement" product under the Expense Management menu.
- Click on "Create Reimbursement Link."
- Choose "Register Approver."
- Fill in the approver's name, email address, and department.
- After registration, the approver will receive a notification via email.
- Approver registration page
Notes
Approver emails are mapped based on department names, and duplicate department names are not allowed.
After submission, addition, editing, or deletion of existing approvers can only be done via Customer Service.
Reporting managers will only receive notifications via email; no dashboard access is required.
The approver list view is accessible in the dashboard under reimbursement configuration.
How to Distribute Reimbursement Link
After Approver registration, you can start sharing the reimbursement link with employees through two methods:
Via Bulk Upload:
- Download the sample file and input a list of employee emails in CSV or XLSX format.
- Upload the file for email distribution.
Via Copy Link:
- Copy the link and distribute it using any convenient method.
Employees will find the form link in their email and can proceed to submit a request.
- Link distribution page
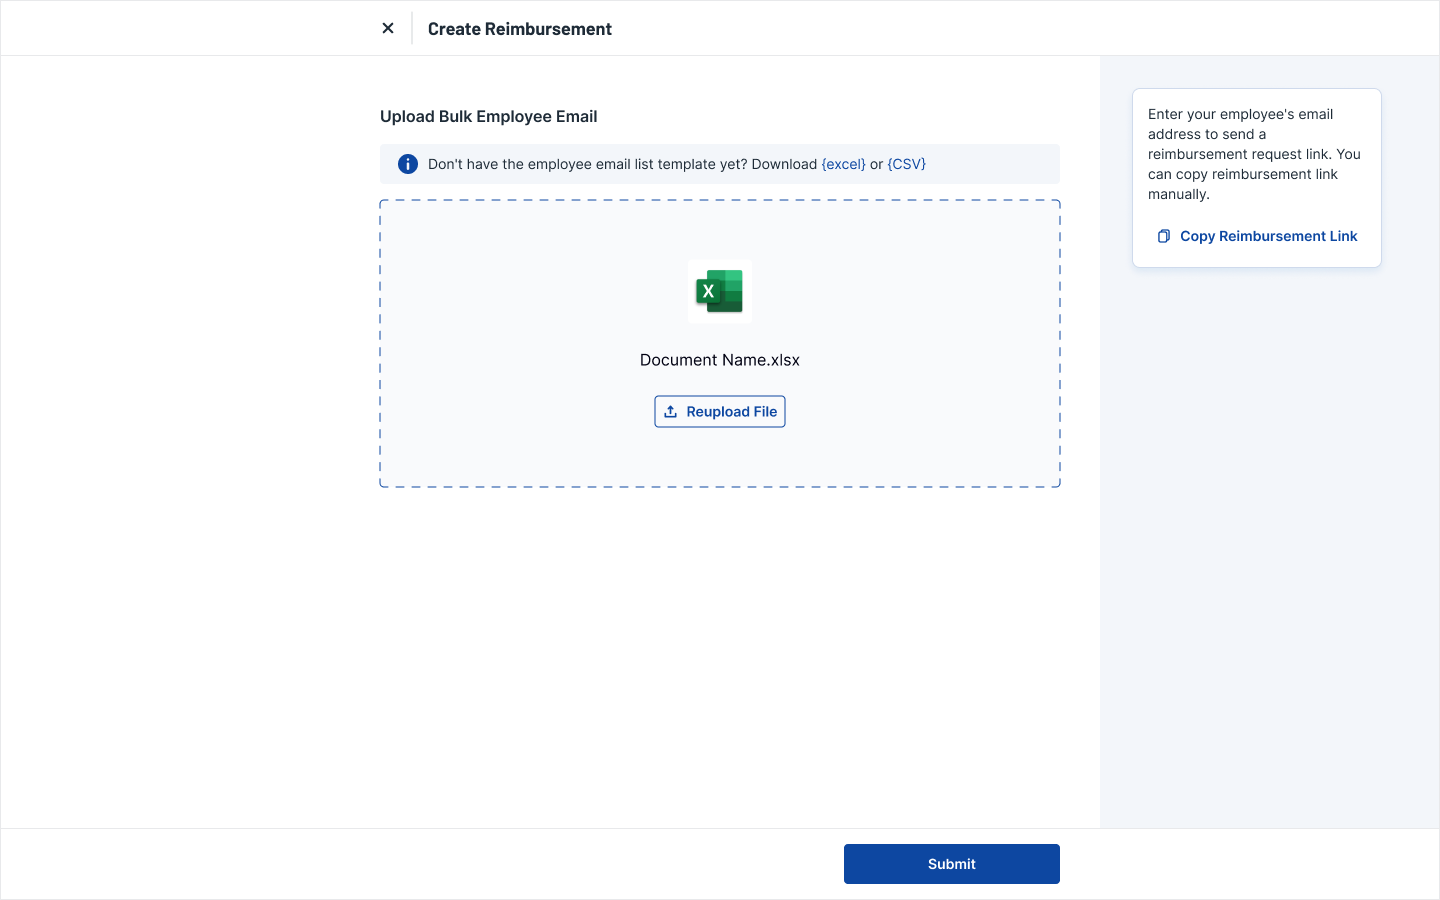
- Form page


Mandatory Parameters in the Form
| Parameter | Description |
|---|---|
| Employee Name | Employee identification purposes |
| Employee Email | This will be used to trigger tracking to employee post-submission |
| Department | Department will be mapped to approver's email directly |
| Bank Name | Disbursement bank name |
| Account Number | Disbursement bank account number. Bank account validity can be checked prior reimbursement submission |
| Item | Item name or description |
| Amount | Reimbursement total amount (in IDR). Minimum Rp 20.000 |
| Upload File | Placeholder to upload invoice document. Max 2 file with PDF, JPG, & PNG format (Each file max 5MB ). |
| Transaction Date | Date of transaction printed on the invoice |
Notes
- You can resend the link anytime in case employees lose the email.
- A single request is applicable for 1 item only.
How to Schedule Disbursement
Scheduled disbursement can only be done if the reporting manager has approved the request, and the dashboard admin agrees to schedule the disbursement.
- Open the OY! Dashboard and check the Reimbursement transaction list.
- Requests with "Need Approval" status will require action from the dashboard side.
- The admin can either reject with a reason or approve with a scheduled disbursement day.
- Request list in dashboard

- Request detail in dashboard
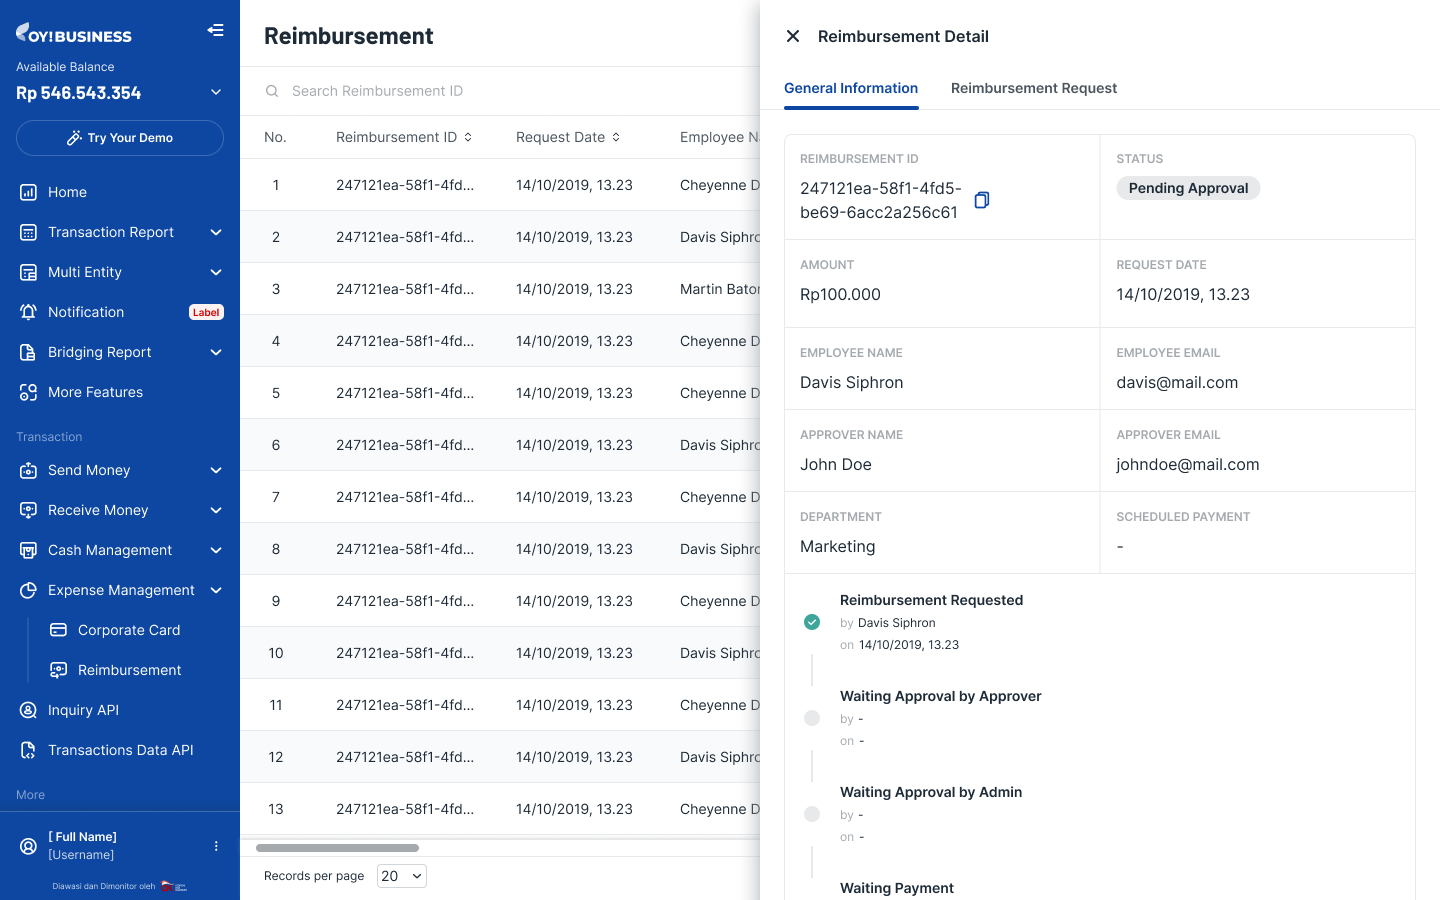
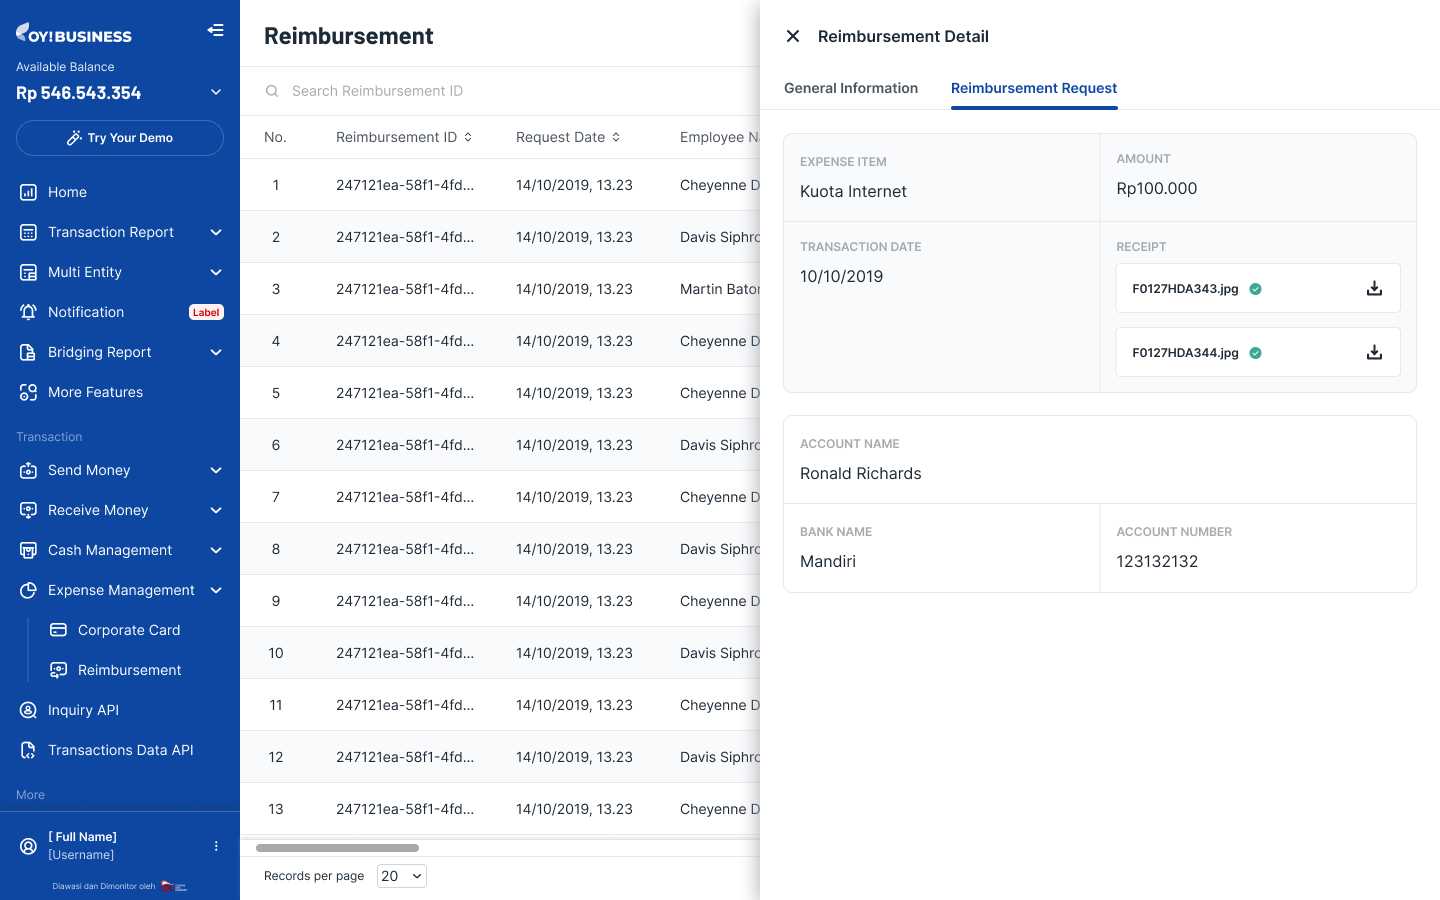
Note: If there is insufficient balance on the day of scheduled disbursement, you can retry manually when the balance is sufficient via the dashboard.
Dashboard Status
| Status | Description |
|---|---|
| Pending Approval | Submitted by employee but no action yet from approver |
| Need Approval | Approved by approver but no action yet from admin |
| Canceled | Cancelation can only be performed by employee. No further action needed |
| Completed | Money disbursed |
| Rejected | Rejected by admin or approver |
| Scheduled Payment | After admin has approved and set scheduled payment time |
| Failed | Disbursement failed due to timeout or vendor issue |
| Insufficient Balance | Fail to disburse due to insufficient balance (admin can retry payment manually from dashboard) |
How to Approve Transaction (Reporting Manager)
- When a new request is submitted by an employee, the respective approver will receive a notification and an approver portal link via email.
- Inside the link, the approver can find all reimbursement requests with certain statuses (rejected, approved, and need approval).
- The approver can choose to either reject the request with a reason or simply approve.
- Approving the request will trigger an update inside the OY! Dashboard and employee tracker page.
- Approver portal (unique per approver)
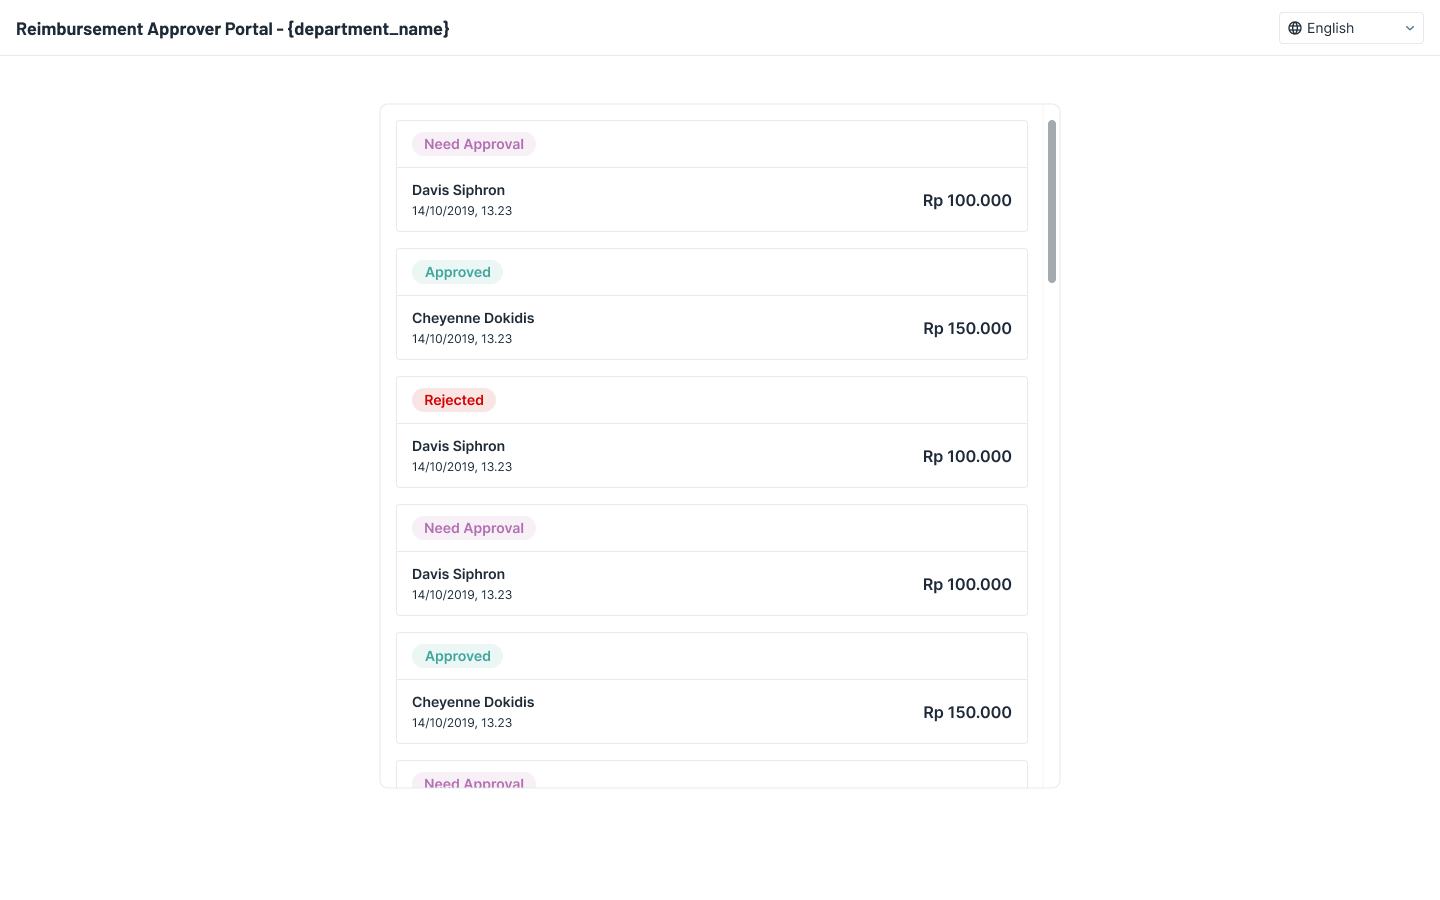
- Approver - request details with action buttons
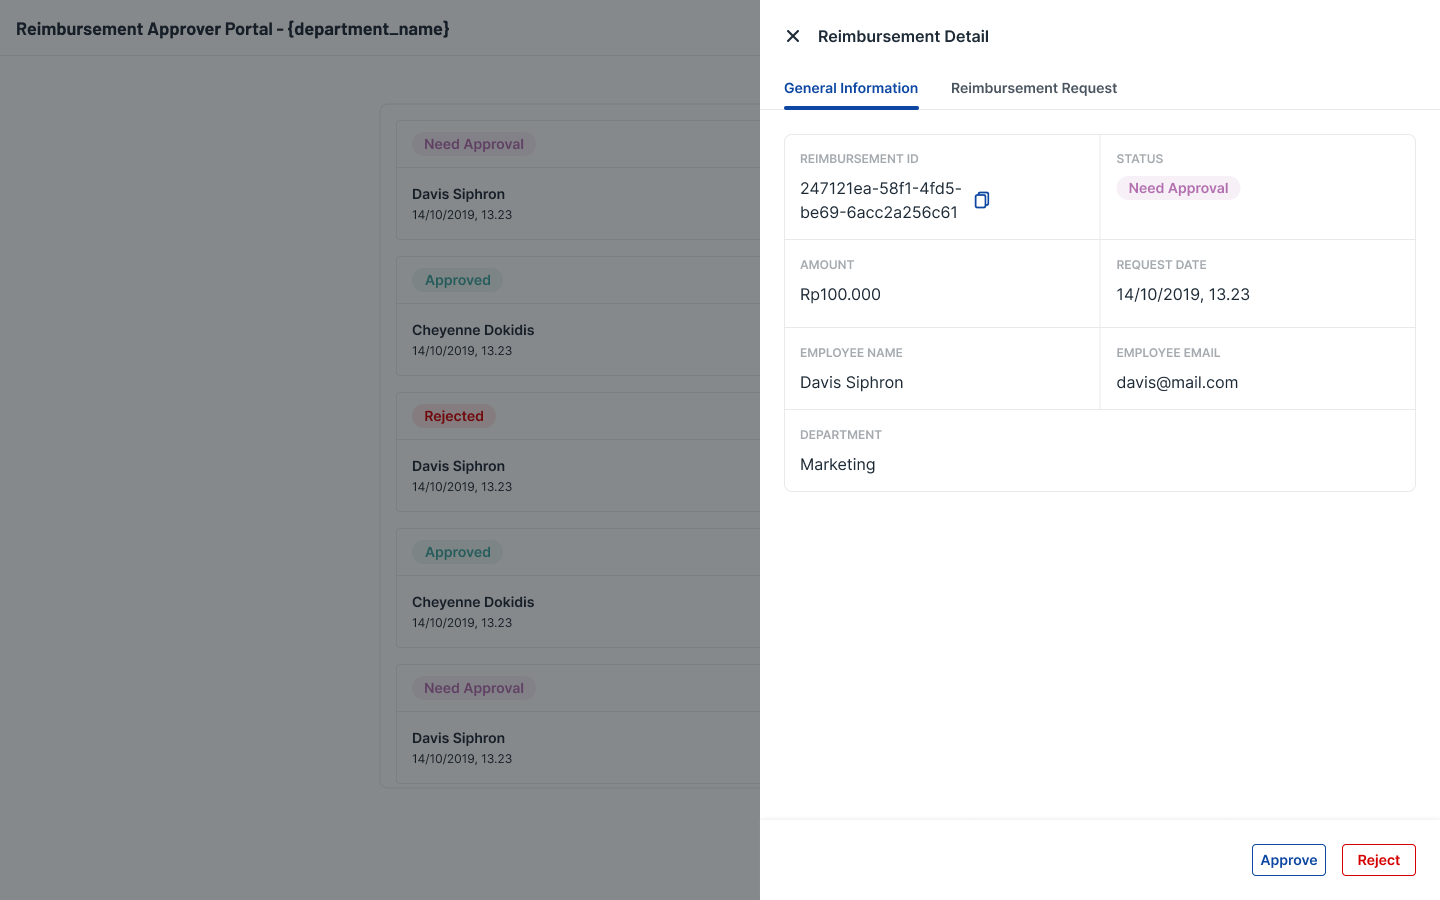
How to Check Reimbursement Progress (Employee)
- Employees can fill in the reimbursement request form portal via email.
- Once submitted, the employee will receive a tracking email.
- Inside the link, employees can find real-time reimbursement progress, from the submission timestamp until disbursement timestamp.
- Employees can still cancel the request if the approver has not yet approved.
- Employee Tracker page
![]()
- Employee Tracker page -- transaction detail
![]()
Tracker Status
| Status | Description |
|---|---|
| Pending Payment | Request approved but money not yet received |
| Scheduled Payment | After the admin has approved and set scheduled payment time |
| Rejected | Rejected by admin or approver |
| Canceled | Canceled by employee |
| Waiting Approval | Submitted but no action yet from approver or admin |
| Completed | Money has been disbursed successfully |
Note: The tracking email is applicable to each employee per reimbursement request.
Terima Uang
Metode Pembayaran
Transfer Bank - Virtual Account
Pendahuluan
Sebagai metode pembayaran digital, Anda bisa membuat virtual account (VA) untuk transaksi Anda. Pelanggan dapat langsung mentransfer pembayaran ke nomor VA yang dibuat oleh sistem. Anda akan menerima notifikasi (callback) dari OY! saat transaksi sudah selesai. Untuk saat ini, OY! mendukung VA dari 8 bank:
- Bank Central Asia (BCA)
- Bank Rakyat Indonesia (BRI)
- Bank Mandiri
- Bank Negara Indonesia (BNI)
- Bank CIMB & CIMB Syariah
- Bank SMBC
- Bank Syariah Indonesia (BSI)
- Bank Permata & Permata Syariah
Ketersediaan Fitur VA
| Fitur VA | Link Pembayaran | VA Aggregator | E-Wallet Aggregator | Routing Pembayaran |
|---|---|---|---|---|
| Open Amount | ❌ | ✅ | ❌ | ❌ |
| Closed Amount | ✅ | ✅ | ❌ | ✅ |
| VA Pakai Berulang | ❌ | ✅ | ❌ | ✅ |
| VA Sekali Pakai | ✅ | ✅ | ❌ | ✅ |
| Statis | ❌ | ✅ | ❌ | ✅ |
| Dinamis | ✅ (otomatis diset ke 24 jam) | ✅ | ❌ | ✅ |
| VA Nomor Custom | ❌ | ✅ | ❌ | ❌ |
Di samping parameter dari Link Pembayaran (seperti open amount, statis, dsb), pelanggan Anda harus memasukkan nominal yang harus dibayarkan sebelum memilih metode pembayaran dan membayar transaksi.
Karena itu, jika pelanggan Anda memilih untuk membayar melalui VA - Link Pembayaran, nomor VA yang dihasilkan hanya dapat menerima jumlah yang telah ditentukan (closed amount) dan hanya dapat digunakan untuk transaksi tersebut saja (single-use VA). Nomor VA yang dihasilkan melalui Link Pembayaran akan kedaluwarsa dalam 24 jam setelah pelanggan Anda mengonfirmasi metode pembayaran.
Pelanggan Anda juga bisa membuat nomor VA khusus. Anda bisa menyesuaikan suffix (nomor belakang) dari nomor VA berdasarkan nomor HP atau nomor tagihan pelanggan. Sebagai contoh, jika nomor HP pelanggan adalah 08123456789, maka ketika membuat VA, nomor VA nya akan menjadi 23088123456789.
Untuk membuat VA yang bisa disesuaikan, Anda perlu mengakses endpoint URL yang berbeda dari endpoint pembuatan VA yang biasa, yaitu API Create Customized VA. Endpoint API untuk memperbarui dan menonaktifkan VA khusus juga berbeda dari VA yang tidak disesuaikan. Secara umum, VA khusus dapat menerima pembayaran berulang dan tidak ada waktu kedaluwarsa. Saat ini, fitur ini hanya tersedia untuk bank BRI dan CIMB. Untuk mengaktifkan fitur ini, silakan hubungi tim kami.
Detail Nominal Transaksi
Nominal minimum per transaksi
| Tipe Produk | Nominal minimum per transaksi |
|---|---|
| Link Pembayaran (Selain CIMB, Mandiri, Permata, BNI, BRI) | Rp 10,000 |
| Link Pembayaran (VA CIMB, Mandiri, Permata, BNI, BRI) | Rp 15,000 |
| Routing Pembayaran | Rp 10,000 |
| VA Aggregator (Closed Amount) | Rp 10,000 |
| VA Aggregator (Open Amount) | Tidak ada minimum |
Nominal maksimum per transaksi
| Nama Bank | Nominal maksimum per transaksi |
|---|---|
| Bank Central Asia (BCA) | Rp 50,000,000 |
| Bank Negara Indonesia (BNI) | Rp 50,000,000 |
| Bank Rakyat Indonesia (BRI) | Rp 500,000,000 |
| Bank Mandiri | Rp 500,000,000 |
| Bank CIMB | Rp 500,000,000 |
| Bank SMBC | Rp 100,000,000 |
| Bank Syariah Indonesia (BSI) | Rp 50,000,000 |
| Bank Permata | Rp 500,000,000 |
Tersedia pada produk:
| Link Pembayaran | VA Aggregator | E-Wallet Aggregator | Routing Pembayaran |
|---|---|---|---|
| ✅ | ✅ | ❌ | ✅ |
Alur Pembayaran
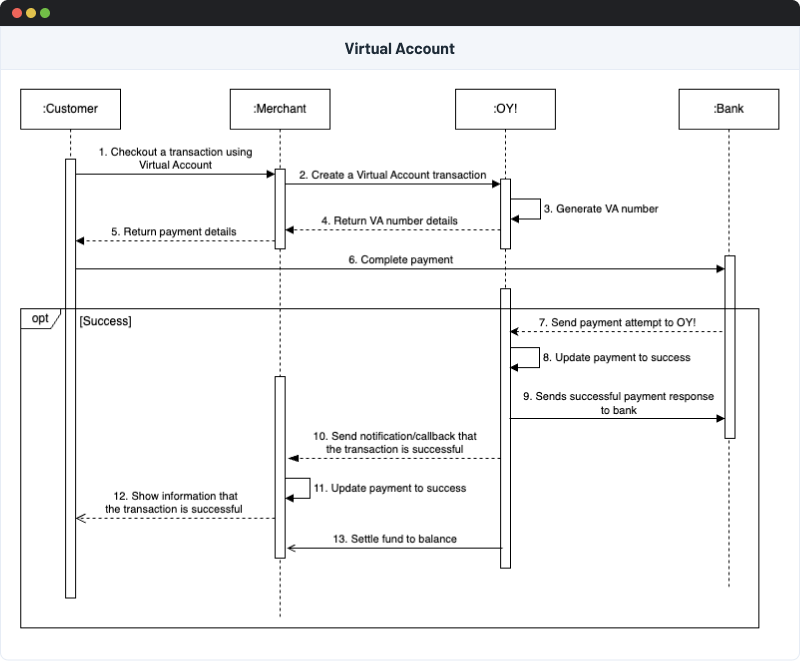
Cara Mengaktifkan
Bank selain BCA
Tidak ada proses onboarding tambahan untuk mengaktifkan metode pembayaran virtual account. Setelah produk Terima Uang aktif, Anda bisa menggunakan VA tanpa perlu dokumen tambahan. Anda cukup memberi tahu tim kami VA bank apa saja yang Anda perlukan.
BCA
Anda perlu mengajukan dokumen tambahan untuk mengaktifkan VA BCA(termasuk, namun tidak terbatas pada, Nomor Pokok Wajib Pajak (NPWP) dan KTP). Proses onboarding bank BCA membutuhkan waktu kurang lebih 14 sampai 30 hari kerja, tergantung pada penilaian bank dan kelengkapan dokumen.
Metode Pembayaran untuk Membayar VA
Pelanggan Anda dapat membayar tagihan VA melalui metode pembayaran berikut:
| Virtual Akun Bank | SKN | RTGS | ATMs | Mobile Banking antar bank | Internet Banking antar bank | Internet Banking (jaringan bank sama) | Mobile Banking (jaringan bank sama) |
|---|---|---|---|---|---|---|---|
| Bank Mandiri | ✅ | ✅ | ✅ | ✅ | ✅ | ✅ | ✅ |
| BRI | ✅ | ✅ | ✅ | ✅ | ✅ | ❌ | ✅ |
| BNI | ✅ | ✅ | ✅ | ✅ | ✅ | ❌ | ✅ |
| Permata | ✅ | ✅ | ✅ | ✅ | ✅ | ❌ | ✅ |
| CIMB Niaga / CIMB Niaga Syariah | ✅ | ✅ | ✅ | ✅ | ❌ | ❌ | ✅ |
| BCA | ❌ | ❌ | ✅ | ✅ | ✅ | ❌ | ❌ |
| SMBC | ✅ | ❌ | ✅ | ✅ | ❌ | ❌ | ✅ |
| BSI | ❌ | ❌ | ✅ | ✅ | ✅ | ✅ | ✅ |
Simulasi Callback:
- Sebelum melakukan simulasi callback, perlu diingat bahwa Anda perlu membuat transaksi pada produk Terima Uang terlebih dahulu untuk mendapatkan nomor VA di mode Demo.
- Untuk mensimulasikan pembayaran yang berhasil, pastikan Anda sudah berada pada mode Demo. Untuk masuk mode Demo, klik tombol “Coba di Demo” pada dashboard Anda.
- Klik menu “Pengaturan”, lalu pilih pengaturan untuk “Callback Transfer Bank”
- Pilih “Virtual Account” sebagai tipe transaksi
- Pilih nama bank berdasarkan nomor VA yang telah Anda buat
- Masukkan nomor VA dan nominal pembayaran. Untuk VA tipe closed, Anda perlu memasukkan nominal yang Anda tentukan saat membuat VA tersebut
- Masukkan waktu pembayaran. Pastikan waktu pembayaran melebihi waktu pembuatan serta kurang dari waktu kedaluwarsa
- Anda dapat menggunakan fitur ini untuk semua transaksi VA pada semua produk “Terima Uang” OY!, (Aggregator VA, Link Pembayaran, Routing Pembayaran)
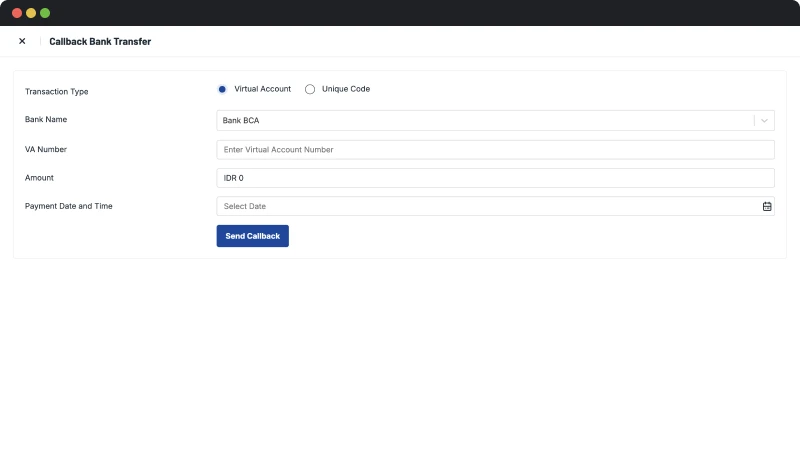
Transfer Bank - Kode Unik
Pendahuluan
Kode Unik adalah tipe pembayaran melalui transfer bank dengan menambahkan atau mengurangi nominal berdasarkan kode unik (sebesar Rp 1-999) pada total nominal pembayaran Anda. Tidak seperti virtual account, di mana tiap pelanggan mendapatkan nomor VA yang berbeda, kode unik selalu menggunakan nomor rekening yang sama setiap bertransaksi. Nomor rekening yang digunakan akan menggunakan nama perusahaan OY! (PT. Dompet Harapan Bangsa), dan Anda tidak dapat menyesuaikan dengan rekening Anda sendiri. Metode kode unik juga mempunyai jam operasional, yaitu pada jam 03.00 - 20.30 WIB.
Ada dua metode yang dapat Anda gunakan untuk transaksi kode unik: metode penambahan atau pendekatan pengurangan.
Metode Penambahan
Dengan menggunakan metode penambahan, nominal kode unik akan ditambahkan ke tagihan, sehingga pelanggan Anda akan membayar Rp 1-999 lebih banyak dari jumlah tagihan. Jumlah tambahan ini tidak akan masuk ke saldo Anda.
Metode Pengurangan
Dengan menggunakan metode pengurangan, jumlah tagihan akan dikurangi dengan nominal kode unik. Dalam hal ini, pelanggan Anda akan membayar Rp 1-999 lebih sedikit dari jumlah tagihan. Namun, jangan khawatir, jumlah yang masuk ke saldo Anda tidak akan terpengaruh oleh nominal kode unik ini.
Metode default pada kode unik adalah penambahan, tetapi Anda dapat meminta perubahan metode dengan menghubungi tim kami.
Sebagai contoh, jika Anda membuat transaksi kode unik dengan jumlah tagihan Rp 100.000, maka OY! akan membuat nominal kode unik untuk transaksi tersebut. Misalnya, nominal kode unik yang dihasilkan adalah Rp100.
Jika Anda menggunakan metode penambahan, pelanggan Anda akan membayar total Rp100.100.
Namun, jika Anda menggunakan metode pengurangan, pelanggan Anda akan membayar total Rp99.900.
Dengan kedua metode tersebut, jumlah yang akan masuk ke saldo Anda tetap Rp100.000.
Detail Pembayaran Kode Unik
| Bank | Kode Bank | Open Amount | Closed Amount | Waktu Pembayaran Maksimum | Jam Operasional |
|---|---|---|---|---|---|
| Bank Central Asia (BCA) | 014 | ❌ | ✅ | Max. 3 jam | 03.00 - 20.30 WIB. |
Fitur Pembayaran
| Bank | Fitur Refund |
|---|---|
| BCA | ❌ |
Ketersediaan Produk
| Bank | Link Pembayaran | Aggregator VA | Aggregator E-Wallet | Routing Pembayaran |
|---|---|---|---|---|
| BCA | ✅ | ❌ | ❌ | ✅ |
Detail Nominal Transaksi
| Metode Kode Unik | Min. Nominal Transaksi | Max. Nominal Transaksi |
|---|---|---|
| Pengurangan | Rp 11,000 | Rp 500,000,000 |
| Penambahan | Rp 10,000 | Rp 499,999,000 |
Alur Transaksi Pembayaran
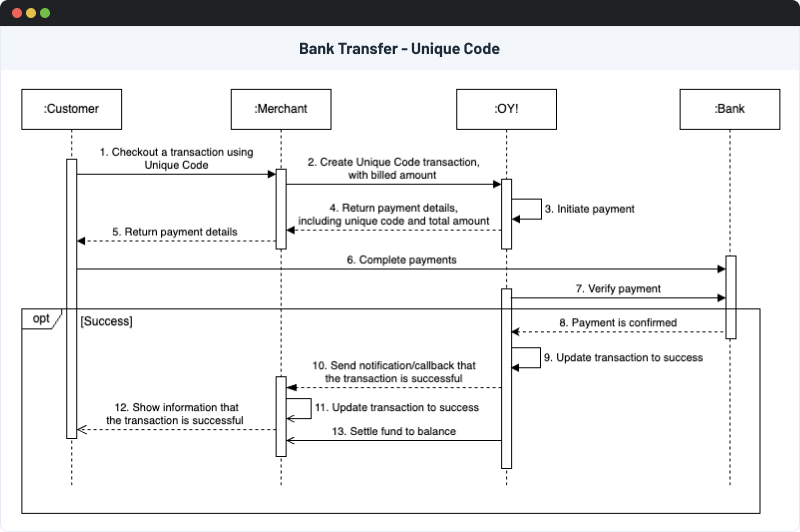
Aktivasi
Anda hanya dapat menggunakan satu jenis transfer bank (virtual account / kode unik) per bank. Secara default, semua bank menggunakan virtual account. Untuk menerima pembayaran menggunakan kode unik, Anda perlu mengajukan permintaan ke OY! melalui perwakilan bisnis Anda atau tim support kami.
Payment
Klik di sini untuk melihat tutorial pembayaran
Simulasi Pembayaran
Untuk memahami lebih lanjut tentang transaksi menggunakan kode unik, Anda dapat mensimulasikan transaksi kode unik yang dibuat di mode Demo. Berikut adalah langkah-langkah untuk mensimulasikan pembayaran kode unik melalui dashboard OY!:
- Buka dashboard OY! dan masuk ke mode Demo.
- Buka menu “Pengaturan” dan klik Callback Transfer Bank.
- Masukkan detail pembayaran untuk transaksi yang ingin Anda simulasikan:
- Jenis Transaksi: Pilih Kode Unik.
- Bank: Pilih bank tujuan.
- Nomor Rekening: Masukkan nomor rekening bank OY! Indonesia yang Anda terima saat pembuatan transaksi.
- Jumlah: Masukkan jumlah tagihan beserta nominal kode unik yang Anda terima saat pembuatan transaksi.
- Tanggal dan Waktu Pembayaran: Pilih tanggal dan waktu yang diinginkan untuk pembayaran.
- Setelah semua kolom diisi, Anda dapat mensimulasikan pembayaran dengan mengklik “Kirim Callback”. Jika pembayaran berhasil, notifikasi sukses akan ditampilkan di dalam dashboard. OY! juga akan mengirimkan callback ke URL callback yang telah Anda tentukan. Jika karena alasan tertentu Anda tidak menerima callback, silakan hubungi layanan pelanggan kami untuk membantu menyelesaikan masalah tersebut.
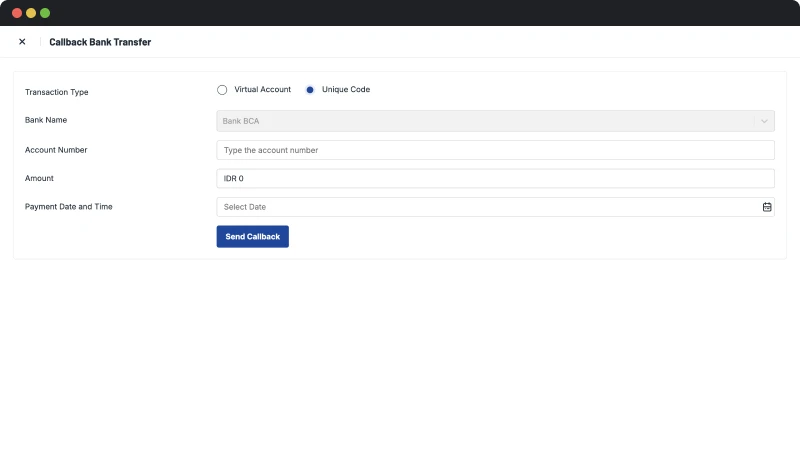
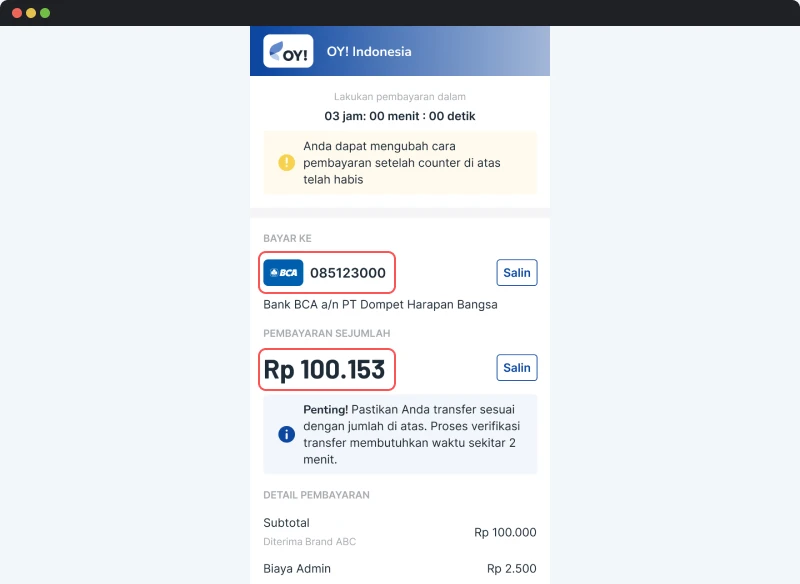
Kode QR (QRIS)
Pendahuluan
Quick Response Code Indonesian Standard (QRIS) adalah standar pembayaran QR di Indonesia yang dikembangkan oleh Bank Indonesia. Pembayaran dilakukan oleh pelanggan dengan memindai QR melalui aplikasi m-banking atau E-wallet mereka. Pembayaran QR sangat cocok untuk transaksi bernilai kecil karena menawarkan biaya yang terjangkau (0,7% per transaksi).
Fitur Pembayaran
| Provider QRIS | Fitur Refund |
|---|---|
| QRIS | ❌ |
Ketersediaan Produk
| Provider QRIS | Link Pembayaran | Aggregator VA | Aggregator E-Wallet | Routing Pembayaran |
|---|---|---|---|---|
| QRIS | ✅ | ❌ | ❌ | ✅ |
Detail Nominal Transaksi
Jumlah maksimum per transaksi untuk QRIS adalah Rp10.000.000, sedangkan jumlah minimum per transaksi adalah Rp10.000, baik melalui Link Pembayaran maupun Routing Pembayaran. Jika Anda ingin menerima pembayaran di bawah Rp10.000, silakan hubungi perwakilan bisnis kami.
Alur Pembayaran

Aktivasi
Untuk menerima pembayaran menggunakan QRIS, Anda perlu mendaftarkan merchant Anda terlebih dahulu ke provider QRIS. Pendaftaran dapat dilakukan melalui dashboard OY! dengan membuka halaman “Layanan Kami” dan mengklik tab “Metode Pembayaran”.
Berikut adalah persyaratan yang harus dipenuhi untuk mengajukan pendaftaran:
|
Persyaratan |
QRIS | |
|---|---|---|
| Kepemilikan Bisnis | ✅ | |
| KTP Direktur atau Pemilik Bisnis | NIK | ✅ |
| Nama Lengkap | ✅ | |
| Tanggal Lahir | ✅ | |
| Pekerjaan | ✅ | |
| Jenis Kelamin | ✅ | |
| Provinsi | ✅ | |
| Kota | ✅ | |
| Kecamatan | ✅ | |
| Kel/Desa | ✅ | |
| Kode Pos | ✅ | |
| Alamat Lengkap | ✅ | |
| Email Direktur | ✅ | |
| Nomor HP Direktur | ✅ | |
| NPWP | Nomor NPWP | ✅ |
| Lampiran Dokumen | ✅ | |
| Person in Charge (PIC) - Direktur | Nama Lengkap | ✅ |
|
Jabatan |
✅ | |
| Person in Charge (PIC) - Non Direktur | Nama Lengkap | ✅ |
|
Jabatan |
✅ | |
| Alamat Email | ✅ | |
| Nomor HP | ✅ | |
| Alur Pembayaran Bisnis | ✅ | |
| Logo Bisnis (dalam format URL Gdrive)) | ✅ | |
| Link Website | ✅ | |
| Nomor Induk Berusaha (sesuai dengan dokumen legalitas) | ✅ | |
| Tanggal Pendirian Usaha (sesuai dengan dokumen legalitas) | ✅ | |
| Tempat Pendirian Usaha (sesuai dengan dokumen legalitas) | ✅ | |
| Perkiraan omzet per bulan menggunakan QRIS | ✅ | |
| Perkiraan jumlah transaksi per bulan menggunakan QRIS | ✅ | |
Pembayaran
Klik di sini untuk melihat tutorial pembayaran
Simulasi Pembayaran
Saat ini, demo simulasi pembayaran QRIS untuk transaksi belum tersedia.
E-Wallet
Pendahuluan
E-wallet adalah metode pembayaran elektronik yang memungkinkan Anda membayar barang dan jasa tanpa memerlukan rekening bank atau uang tunai. E-wallet memiliki peran penting dalam pertumbuhan e-commerce, karena memungkinkan pengguna melakukan pembayaran dengan mudah tanpa harus berinteraksi dengan bank atau pihak ketiga lainnya. Saat ini, OY! mendukung pembayaran dari beberapa E-wallet di Indonesia, yaitu OVO, DANA, ShopeePay, dan LinkAja.
Detail Pembayaran E-Wallet
| Provider E-Wallet | Kode E-Wallet | Waktu Berlaku | Tipe Alur | Bayar via Desktop | Bayar via Browser HP | Bayar via Aplikasi Provider |
|---|---|---|---|---|---|---|
| ShopeePay | shopeepay_ewallet | 1 - 60 menit | Dialihkan ke app (JumpApp) | ❌ | ❌ | ✅ |
| OVO | ovo_ewallet | 55 detik | Notifkasi | ❌ | ❌ | ✅ |
| DANA | dana_ewallet | 1 - 60 menit | Dialihkan ke app (JumpApp) | ✅ | ✅ | ✅ |
| LinkAja | linkaja_ewallet | 5 menit | Dialihkan ke app (JumpApp) | ❌ | ❌ | ✅ |
Jumlah maksimum per transaksi untuk semua provider E-wallet adalah Rp10.000.000 untuk pelanggan yang telah melakukan KYC di aplikasi provider, dan Rp2.000.000 untuk pelanggan yang belum melakukan KYC.
Fitur Pembayaran
| Provider E-Wallet | Fitur Refund | Fitur Account Linking | Waktu Kedaluwarsa Link | Perpanjangan Link |
|---|---|---|---|---|
| ShopeePay | Refund Penuh | ✅ | 5 tahun | Setelah kedaluwarsa |
| OVO | Belum Didukung | ❌ | - | - |
| DANA | Refund Sebagian | ✅ | 10 tahun | Setelah kedaluwarsa |
| LinkAja | Refund Penuh | ❌ | - | - |
Ketersediaan Produk
| Provider E-Wallet | Link Pembayaran | Aggregator VA | Aggregator E-Wallet | Routing Pembayaran | |
|---|---|---|---|---|---|
| Single Payment | - | Single Payment | Single Payment | Direct Payment | |
| ShopeePay | ✅ | ❌ | ✅ | ✅ | ✅ |
| OVO | ✅ | ❌ | ✅ | ❌ | ❌ |
| DANA | ✅ | ❌ | ✅ | ✅ | ❌ |
| LinkAja | ✅ | ❌ | ✅ | ✅ | ❌ |
Tipe Pembayaran Beserta Alurnya
Single Payment
Single Payment adalah tipe pembayaran untuk pelanggan Anda membayar transaksi langsung di aplikasi E-wallet mereka. Single Payment memiliki 2 alur pembayaran, yaitu dialihkan ke app (JumpApp) dan notifikasi. Untuk mengerti alurnya, Anda dapat melihat bagan berikut:
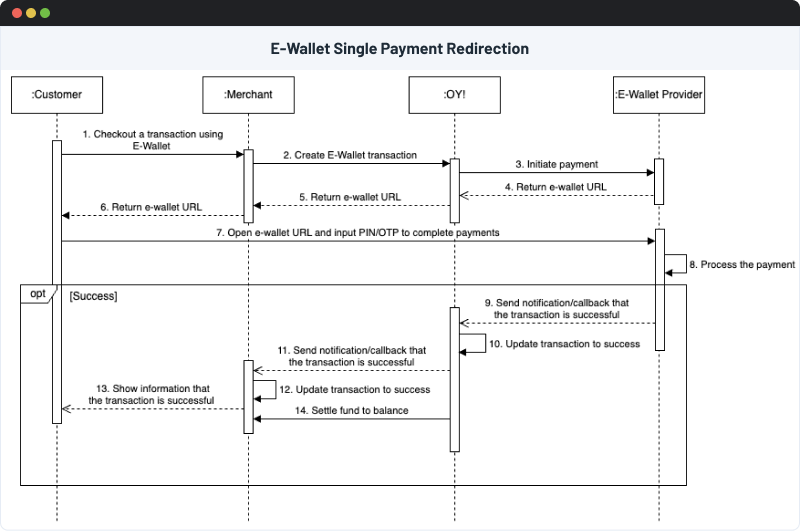
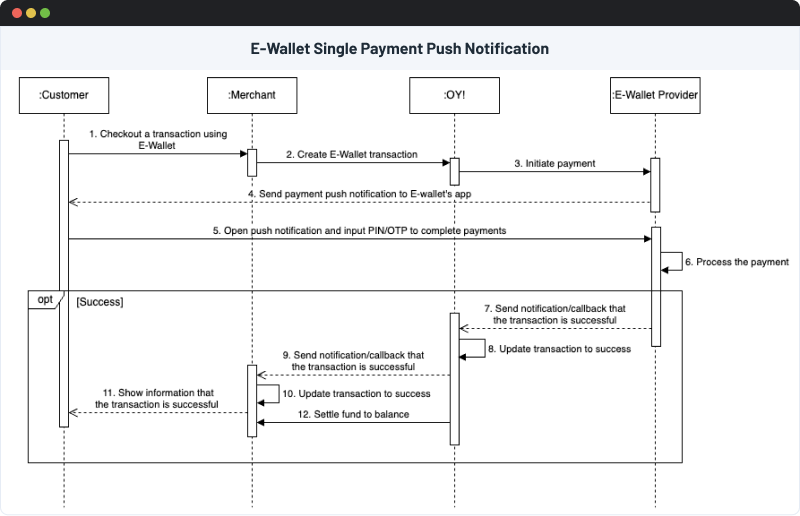
Direct Payment
Tipe pembayaran Direct Payment membutuhkan pelanggan Anda untuk melakukan account linking. Account linking mengharuskan pelanggan Anda untuk menghubungkan akun E-walletnya ke sistem Anda sebelum melakukan pembayaran. Direct Payment memberikan kemudahan kepada pelanggan, karena pelanggan tidak perlu diarahkan ke aplikasi provider E-wallet untuk melakukan pembayaran.
Dengan Direct Payment, pelanggan dapat melakukan transaksi dengan atau tanpa otorisasi (auto-debit). Transaksi dengan otorisasi memerlukan PIN atau OTP, sedangkan transaksi tanpa otorisasi memungkinkan sistem memotong saldo secara otomatis tanpa PIN atau OTP, cocok untuk kebutuhan seperti langganan (subscription).
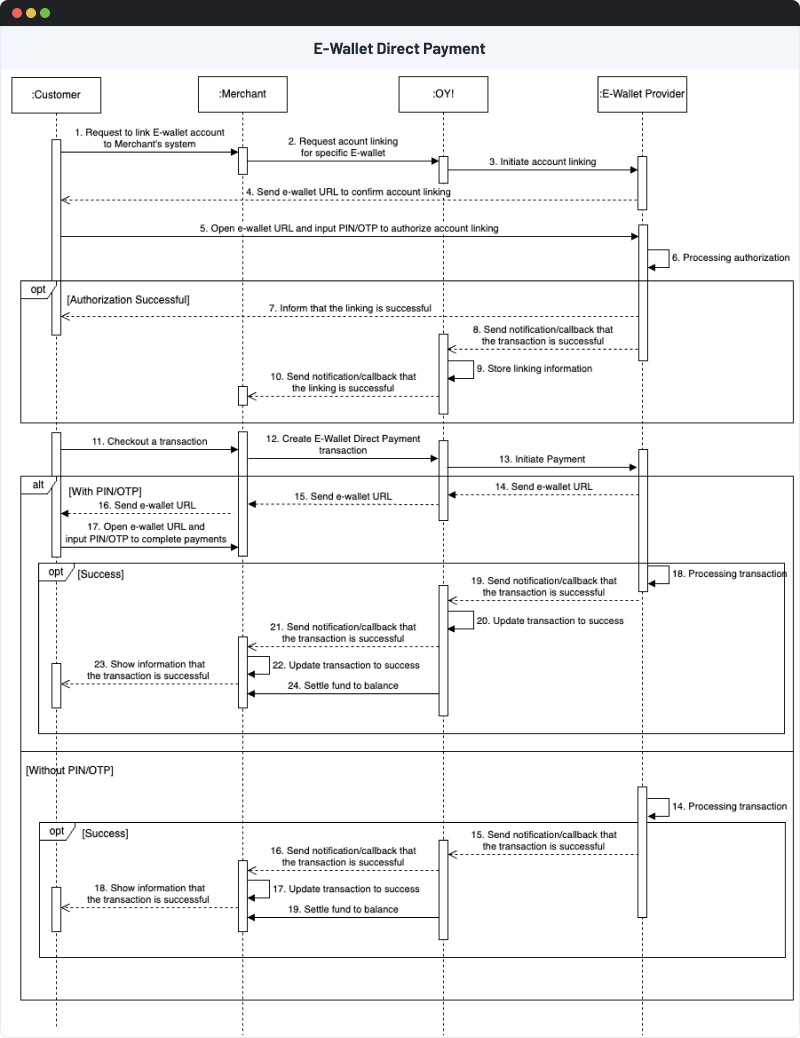
Aktivasi
Untuk menerima pembayaran menggunakan E-wallet, Anda perlu mendaftarkan merchant Anda terlebih dahulu ke provider E-wallet. Pendaftaran dapat dilakukan melalui dashboard OY! dengan membuka halaman “Layanan Kami” dan mengklik tab “Metode Pembayaran”. OY! menyediakan pendaftaran secara real-time, sehingga Anda dapat langsung menerima pembayaran setelah selesai mengajukan pendaftaran. Berikut adalah persyaratan yang harus dipenuhi untuk mengajukan pendaftaran:
|
Persyaratan |
Provider E-Wallet | ||||
|---|---|---|---|---|---|
| ShopeePay | LinkAja | DANA | OVO | ||
| Kepemilikan Bisnis | ✅ | ✅ | ✅ | ✅ | |
| KTP Direktur atau Pemilik Bisnis | KTP | ✅ | ✅ | ✅ | ✅ |
| Nama Lengkap | ✅ | ✅ | ✅ | ✅ | |
| Tanggal Lahir | ✅ | ✅ | ✅ | ✅ | |
| Pekerjaan | ✅ | ✅ | ✅ | ✅ | |
| Jenis Kelamin | ✅ | ✅ | ✅ | ✅ | |
| Provinsi | ✅ | ✅ | ✅ | ✅ | |
| Kota | ✅ | ✅ | ✅ | ✅ | |
| Kecamatan | ✅ | ✅ | ✅ | ✅ | |
| Kel/Desa | ✅ | ✅ | ✅ | ✅ | |
| Kode Pos | ✅ | ✅ | ✅ | ✅ | |
| Alamat Lengkap | ✅ | ✅ | ✅ | ✅ | |
| Email Direktur | ✅ | ✅ | ✅ | ✅ | |
| Nomor HP Direktur | ✅ | ✅ | ✅ | ✅ | |
| NPWP | Tipe NPWP | ❌ | ❌ | ✅ | ❌ |
| Nomor NPWP | ✅ | ✅ | ✅ | ✅ | |
| Lampiran Dokumen | ✅ | ✅ | ✅ | ✅ | |
| Provinsi | ❌ | ❌ | ✅ | ❌ | |
| Kota | ❌ | ❌ | ✅ | ❌ | |
| Kecamatan | ❌ | ❌ | ✅ | ❌ | |
| Kel/Desa | ❌ | ❌ | ✅ | ❌ | |
| Kode Pos | ❌ | ❌ | ✅ | ❌ | |
| Alamat Lengkap | ❌ | ❌ | ✅ | ❌ | |
| Person in Charge (PIC) - Non Direktur | Nama Lengkap | ✅ | ✅ | ✅ | ✅ |
|
Jabatan |
✅ | ✅ | ✅ | ✅ | |
| Alamat Email | ✅ | ✅ | ✅ | ✅ | |
| Nomor HP | ✅ | ✅ | ✅ | ✅ | |
| Apakah Izin Usaha Anda Mempunyai Masa Berlaku? | ❌ | ✅ | ❌ | ✅ | |
| Alur Pembayaran Bisnis | ✅ | ✅ | ✅ | ✅ | |
| Logo Bisnis (dalam format URL Gdrive) | ✅ | ✅ | ✅ | ✅ | |
| Link Website | ✅ | ✅ | ✅ | ✅ | |
| Nomor Induk Berusaha (sesuai dengan dokumen legalitas) | ✅ | ✅ | ✅ | ✅ | |
| Nomor Induk Berusaha / Sertifikat Pendaftaran Perusahaan | ❌ | ❌ | ✅ | ✅ | |
| Tanggal Pendirian Usaha (sesuai dengan dokumen legalitas) | ✅ | ✅ | ✅ | ✅ | |
| Tempat Pendirian Usaha (sesuai dengan dokumen legalitas) | ✅ | ✅ | ✅ | ✅ | |
| Perkiraan omzet per bulan menggunakan E-Wallet | ✅ | ✅ | ✅ | ✅ | |
| Perkiraan jumlah transaksi per bulan menggunakan E-Wallet | ✅ | ✅ | ✅ | ✅ | |
Pembayaran
ShopeePay (Single Payment)
Klik di sini untuk melihat tutorial pembayaran
DANA
Klik di sini untuk melihat tutorial pembayaran
LinkAja
Klik di sini untuk melihat tutorial pembayaran
OVO
Klik di sini untuk melihat tutorial pembayaran
Simulasi Pembayaran
Untuk memahami lebih lanjut tentang transaksi menggunakan E-wallet, Anda dapat mensimulasikan transaksi E-wallet yang dibuat di mode Demo. Berikut adalah langkah-langkah untuk mensimulasikan pembayaran E-wallet melalui dashboard OY!:
- Buka dashboard OY! dan masuk ke mode Demo.
- Buka menu “Pengaturan” dan klik Callback E-wallet.
- Masukkan detail pembayaran untuk transaksi yang ingin Anda simulasikan:
- Pilih provider E-wallet: ShopeePay, DANA, OVO, atau LinkAja
- Masukkan nomor referensi transaksi. Untuk transaksi E-wallet yang dibuat via API E-wallet, Anda bisa menemukan nomor referensi pada “Menu API E-wallet”. Untuk lebih jelasnya, silakan lihat gambar di bawah.
- Masukkan nominal transaksi yang ingin dibayar
- Setelah semua kolom diisi, Anda dapat mensimulasikan pembayaran dengan mengklik “Kirim Callback”. Jika pembayaran berhasil, notifikasi sukses akan ditampilkan di dalam dashboard. OY! juga akan mengirimkan callback ke URL callback yang telah Anda tentukan. Jika karena alasan tertentu Anda tidak menerima callback, silakan hubungi layanan pelanggan kami untuk membantu menyelesaikan masalah tersebut.
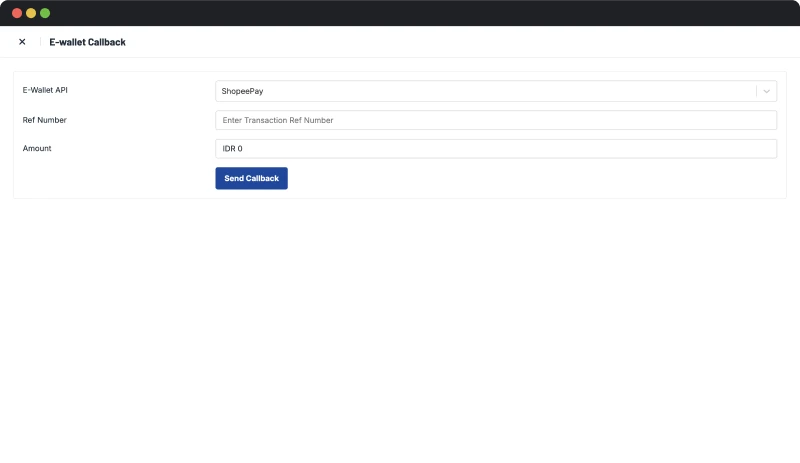
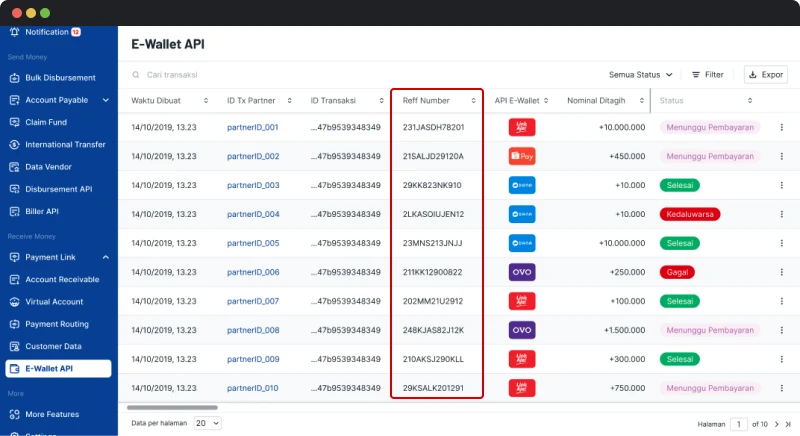
Khusus untuk transaksi Link Pembayaran, Anda dapat mensimulasikan pembayaran dengan klik tombol “Bayar Tagihan” pada Link Pembayaran yang telah Anda buat.
Kartu Debit dan Kredit
Pendahuluan
OY! menyediakan metode pembayaran melalui kartu debit dan kredit untuk pelanggan Anda. Untuk saat ini, OY! mendukung kartu VISA dan Mastercard.
Detail Fitur
- Transaksi aman dengan perlindungan 3DSecure – memberikan keamanan bagi Anda dan pelanggan Anda dari risiko penipuan.
- Mendukung berbagai jaringan global (Visa dan Mastercard) – mempermudah pemrosesan transaksi lokal dan internasional.
Untuk memastikan transaksi berjalan dengan lancar, pastikan pelanggan Anda telah: 1. Menyalakan 3DS sebagai metode otentikasi untuk setiap transaksi yang dilakukan dari kartu mereka 2. Memiliki saldo atau limit kredit yang cukup untuk tiap transaksi 3. Khusus untuk transaksi internasional, pastikan bank atau perusahaan penyedia kartu telah diizinkan untuk melakukan transaksi internasional
Nominal minimum untuk pembayaran kartu adalah Rp15.000 dan tidak ada nominal maximum untuk tiap transaksi. Sementara, limit kartu akan ditentukan oleh saldo atau limit kredit yang dimiliki tiap kartu.
Penjelasan untuk Transaksi Internasional
Pelanggan Anda dapat menggunakan kartu debit atau kredit yang diterbitkan di dalam atau pun luar negeri. Jika Anda berencana melakukan transaksi internasional, perlu diingat bahwa OY! hanya bisa melakukan transaksi dalam Rupiah. Artinya, pelanggan Anda tetap dapat menggunakan kartu internasional mereka untuk pembayaran, namun kartu tersebut akan tetap dikenakan biaya dalam Rupiah, dan penyelesaian dana ke saldo OY! akan dilakukan dalam Rupiah. Sementara, pada laporan tagihan penyedia kartu akan ditampilkan mata uang lokal mereka, beserta rate kurs dan biaya tambahan (jika ada) yang dikenakan oleh penyedia kartu.
Beberapa penyedia kartu mungkin tidak mengizinkan untuk melakukan transaksi internasional. Karena itu, penting untuk pelanggan Anda untuk mengecek apakah ada limitasi untuk meminimalisir transaksi ditolak oleh penyedia kartu.
Transactions Declined by Issuer
Ketika transaksi diajukan ke penyedia kartu pelanggan Anda, biasanya mereka memiliki sistem otomatis dan parameter yang membantu mereka dalam memutuskan apakah akan mengotorisasi transaksi tersebut atau tidak. Parameter ini dapat mencakup, namun tidak terbatas pada, aktivitas dari transaksi-transaksi sebelumnya, detail kartu; seperti tanggal kedaluwarsa dan CVV, serta ketersediaan saldo.
Meskipun semua detail kartu sudah benar, saldo kartu tersedia, dan 3DS sudah diaktifkan, masih ada kemungkinan transaksi ditolak oleh penyedia kartu. Terkadang, alasan penolakan yang diberikan terlalu “umum”. Jika itu terjadi, Anda dapat meminta pelanggan Anda untuk menggunakan kartu lain atau metode pembayaran yang lain. Selain itu, pelanggan dapat menghubungi penyedia kartu langsung untuk informasi lebih lanjut mengenai alasan yang lebih spesifik. Penyedia kartu kemungkinan besar tidak akan memberikan penjelasan penolakan melalui OY!.
Alur Transaksi Pembayaran
Alur via Link Pembayaran
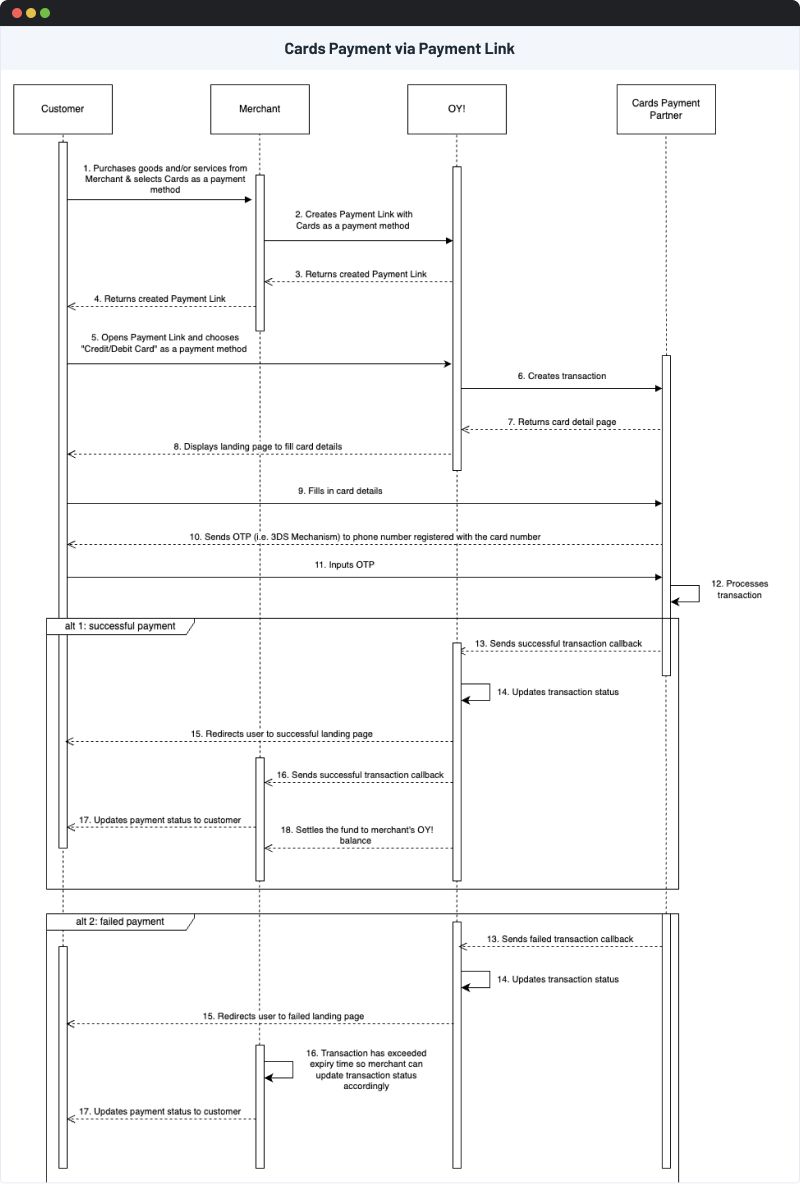
Alur via Routing Pembayaran

Aktivasi
Untuk menerima pembayaran menggunakan kartu debit atau kredit, Anda perlu menghubungi perwakilan bisnis kami untuk informasi lebih lanjut mengenai proses aktivasi.
| Persyaratan | Kartu Debit atau Kredit |
|---|---|
| Formulir Kelayakan Partner | ✅ |
| Formulir Permintaan Partner ke Bank | ✅ |
| Perjanjian Kerja Sama dengan OY! | ✅ |
| Profil Perusahaan | ✅ |
| Izin Operasional (jika berlaku) | ✅ |
| Alur KYC | ✅ |
| Daftar User | ✅ |
Simulasi Pembayaran
- Buka dashboard OY! dan masuk ke mode Demo
- Buat transaksi Link Pembayaran. Pastikan Anda memilih “Kartu Debit/Kredit” sebagai opsi metode pembayaran
- Buka link pembayaran melalui browser
- Pilih “Kartu Debit/Kredit” sebagai metode pembayaran Anda. Selanjutnya, Anda akan diarahkan ke halaman untuk mengisi detail kartu. Jika tidak diarahkan secara otomatis, silakan klik tombol “Pembayaran dengan Kartu”
- Isi detail kartu dengan informasi sebagai berikut:
- Nomor Kartu: 2223000000000007
- Masa Aktif Kartu: 01/39
- CVV Kartu: 100
- Nama Pemegang Kartu: Testing
- Isi email dan nomor HP
- Klik Bayar
- Anda akan diarahkan ke halaman untuk simulasi otentikasi 3DS. (pada pembayaran sebenarnya, Anda akan menerima OTP yang dikirimkan ke nomor HP Anda oleh bank). Pilih dari menu dropdown untuk transaksi yang berhasil diautentikasi (catatan: Anda juga dapat mensimulasikan transaksi yang ditolak dengan memilih opsi otentikasi gagal dari menu dropdown).
- Transaksi sukses
Link Pembayaran
Link Pembayaran adalah halaman pembayaran yang membantu bisnis Anda untuk menerima pembayaran online dengan mudah dan aman. Anda dapat membagikan link ke pelanggan dan mereka akan memilih beberapa metode pembayaran yang didukung oleh OY! dalam halaman Link Pembayaran. OY! mendukung lebih dari 17 metode pembayaran, seperti transfer bank, E-wallet, QRIS, serta kartu debit dan kredit. Link Pembayaran dapat dibuat tanpa integrasi. Tetapi, jika Anda ingin membuat Link Pembayaran dari website atau aplikasi Anda, OY! juga menyediakan API Link Pembayaran.
Terdapat 2 tipe Link Pembayaran, yaitu:
| Tipe Link Pembayaran | Penjelasan | Contoh Penggunaan |
|---|---|---|
| Sekali Pakai | Satu link untuk menerima satu kali pembayaran. | Transaksi sekali bayar |
| Pakai Berulang | Satu link untuk menerima pembayaran berulang, bisa diatur tanpa waktu kedaluwarsa. | Top up, Donasi |
Alur Link Pembayaran
Fitur Link Pembayaran
Penyesuaian Konfigurasi Link Pembayaran
Anda dapat mengatur konfigurasi Link Pembayaran Anda tergantung dari penggunaan transaksi bisnis Anda. Berikut adalah beberapa hal yang dapat Anda sesuaikan:
Daftar Metode Pembayaran
Atur metode pembayaran yang Anda sediakan untuk pelanggan. Metode pembayaran yang tersedia adalah transfer bank (via virtual account dan kode unik), kartu debit dan kredit, E-wallet, dan QRIS
Tipe Nominal
- Open Amount: Dapat menerima pembayaran dengan maksimal nominal yang telah Anda tentukan saat membuat Link Pembayaran.
- Closed Amount: Hanya menerima pembayaran dengan nominal yang telah Anda tentukan saat membuat Link Pembayaran.
Tipe Biaya Admin
- Termasuk dalam nominal: Biaya admin akan terpotong saat saldo sudah masuk ke rekening Anda. Dengan kata lain, biaya admin tersebut ditanggung oleh Anda (merchant).
- Tidak termasuk dalam nominal: Biaya admin akan ditambahkan ke dalam nominal yang akan dibayar (biaya admin ditanggung) oleh pelanggan Anda. Jadi, nominal yang ditagih ke pelanggan Anda adalah: Nominal pembayaran + biaya admin.
Masa Kedaluwarsa
- Secara default, masa kedaluwarsa link pembayaran adalah 24 jam. Tetapi, Anda dapat menyesuaikan masa kedaluwarsa tersebut berdasarkan hari dan jam, dengan maksimum waktu pembayaran adalah 31 hari + 23 jam.
- Khusus untuk Link Pembayaran berulang, Anda dapat mengatur waktu kedaluwarsa menjadi tanpa kedaluwarsa, yang artinya link tersebut tidak dapat kedaluwarsa, kecuali Anda menonaktifkannya secara manual.
Anda dapat mengatur konfigurasi default Anda agar tidak perlu mengisi kolom-kolom ini lagi saat membuat Link Pembayaran berikutnya. Simpan konfigurasi default Anda dengan mencentang opsi "Gunakan konfigurasi ini untuk transaksi selanjutnya" saat membuat Link Pembayaran.
Memantau Transaksi via Dashboard
Semua transaksi Link Pembayaran yang Anda buat akan ditampilkan di Dashboard OY!. Akses menu "Link Pembayaran" → "Sekali Pakai"/"Pakai Berulang" untuk melihat daftar transaksi yang telah dibuat. Di dalam dashboard, Anda dapat melihat detail transaksi, termasuk informasi yang dimasukkan saat pembuatan, status transaksi, dan nomor referensi pembayaran*. Dashboard juga dilengkapi fitur pencarian, penyaringan, dan ekspor daftar transaksi ke berbagai format: Excel (.xlsx), PDF (.pdf), dan CSV (.csv).
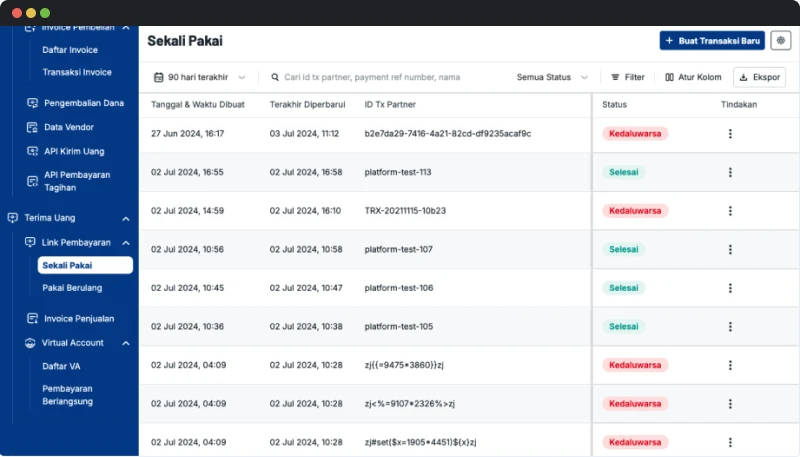
*Nomor Referensi Pembayaran adalah nomor identitas pembayaran ketika pelanggan berhasil menyelesaikan pembayaran QRIS. Nomor referensi ini juga tercantum pada struk/bukti transaksi pelanggan. Fitur ini hanya tersedia untuk transaksi QRIS.
Sesuaikan Tampilan
Secara default, Link Pembayaran menggunakan tema bawaan OY!. Namun, tema bawaan ini mungkin tidak sesuai dengan branding perusahaan Anda. Untuk menjaga konsistensi brand bagi pelanggan Anda, Anda dapat menyesuaikan tampilan Link Pembayaran dengan melakukan hal-hal berikut:
- Unggah logo perusahaan atau bisnis Anda sendiri
- Memilih warna tema
- Memilih warna tombol
Jika Anda menggunakan produk invoice OY!, penyesuaian tema Link Pembayaran juga akan diterapkan pada invoice, begitu pula sebaliknya.
Anda dapat menyesuaikan tema untuk Link Pembayaran melalui Dashboard OY!. Berikut langkah-langkahnya:
- Masuk ke dashboard OY! melaui https://www.desktop-business.oyindonesia.com. Saat ini, menu penyesuaian hanya tersedia di versi web desktop (belum tersedia di web seluler dan aplikasi OY! Business).
- Masuk ke menu “Pengaturan dan klik opsi “Tampilan Link Pembayaran”.
- Untuk mengunggah logo perusahaan, Anda harus mengunggah dengan format (contoh: https://example.com/image.jpg).
- Jika Anda tidak memiliki URL logo, gunakan tools online seperti snipboard.io atau imgbb untuk mengonversi logo Anda ke URL.
- Berikut adalah contoh URL yang benar:
- Snipboard.io: https://i.snipboard.io/image.jpg
- Imgbb: https://i.ibb.co/abcdef/image.jpg
- Untuk mengunggah warna header, pilih warna menggunakan Color Picker atau ketik kode warna HEX di kolom “Warna Header” (contoh: #FFFFFF).
- Anda dapat memilih warna yang berbeda untuk tombol di dalam Link Pembayaran. Pilih warna dari Color Picker atau ketik kode warna HEX di “Warna Tombol & Link”.
- Terakhir, simpan perubahan. Perubahan akan diterapkan secara real-time pada semua Link Pembayaran yang dibuat. Anda juga dapat melihat waktu terakhir Link Pembayaran diperbarui.
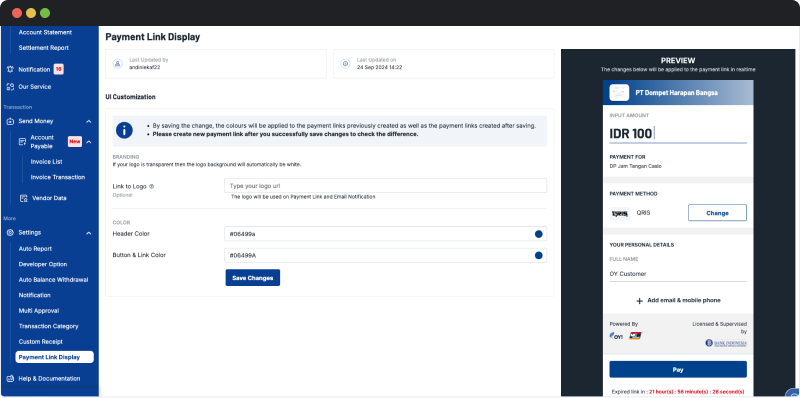
Berikut adalah contoh Payment Link sebelum dan sesudah disesuaikan. Warna header dan tombol telah disesuaikan menjadi warna merah.
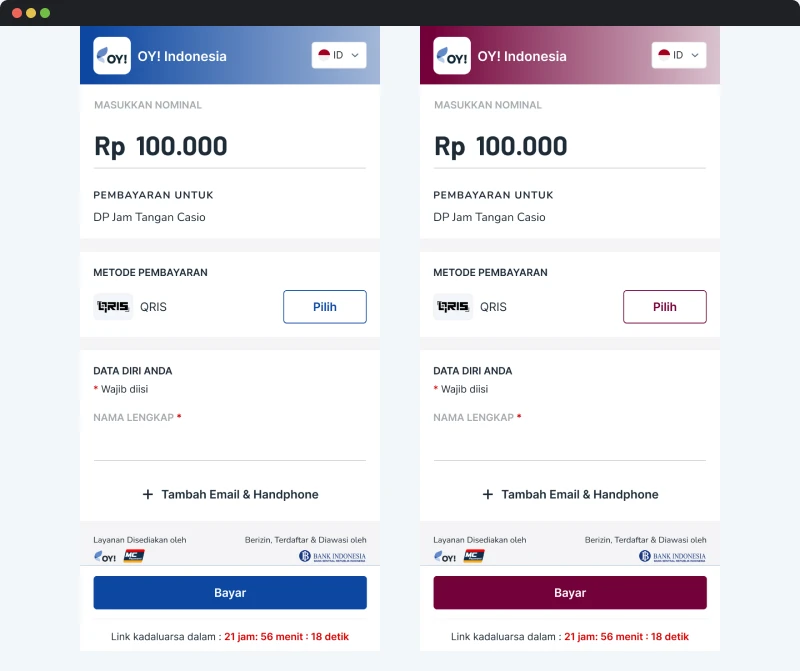
Bagikan Payment Link Melalui Berbagai Metode
Anda dapat membagikan Payment Link yang telah dibuat langsung kepada pelanggan Anda melalui berbagai metode, termasuk email, pesan WhatsApp, dan salin tautan.
Email
Kirim Payment Link yang telah dibuat hingga ke 6 penerima email per Payment Link. Fitur ini tersedia untuk pembuatan melalui Dashboard dan API. Mengirimkan Payment Link melalui email tidak dikenakan biaya.
Anda dapat mengisi daftar penerima email di kolom “Email” pada bagian “Detail Pelanggan” saat membuat Payment Link melalui Dashboard OY!. Pisahkan beberapa alamat email dengan tanda titik koma (;).
Contoh: email1@company.com;email2@company.com;email3@company.com
Jika Anda menggunakan API Link Pembayaran, Anda dapat memasukkan penerima email di bawah parameter “customer_email” saat membuat Payment Link. Untuk informasi lebih lanjut, silakan merujuk ke bagian Pembuatan Payment Link di API Docs.
WhatsApp
Kirim Payment Link ke akun WhatsApp tanpa batas per Payment Link. Fitur ini hanya tersedia untuk pembuatan melalui API dan tidak didukung untuk pembuatan melalui Dashboard. Secara default, fitur ini tidak diaktifkan secara otomatis setelah pendaftaran. Anda dapat menghubungi perwakilan bisnis Anda untuk mengaktifkan fitur ini.
Setelah berhasil membuat Payment Link, gunakan API Kirim WhatsApp untuk mengirim Payment Link yang telah dibuat ke pelanggan Anda. Untuk informasi lebih lanjut, silakan merujuk ke bagian API Kirim WhatsApp.
Pelanggan Anda akan menerima pesan WhatsApp dari akun WhatsApp OY! dengan format berikut:
Hi {{Nama Pelanggan}},
Anda memiliki transaksi di {{Nama Brand Anda}} yang sedang menunggu pembayaran. Lakukan pembayaran sebelum {{Waktu Kedaluwarsa Payment Link}}.
Silakan klik link berikut untuk membayar: {{URL Payment Link}}
Mohon untuk tidak membalas pesan ini.
Contoh:
Hi John Doe,
Anda memiliki transaksi di Jane’s Store yang sedang menunggu pembayaran. Lakukan pembayaran sebelum 1-Feb-2022, 13.28.
Silakan klik link berikut untuk membayar: https://pay.oyindonesia.com/123
Mohon untuk tidak membalas pesan ini.
Salin Link
Setelah Anda membuat Link Pembayaran, Anda akan mendapatkan link URL yang dapat Anda salin dan bagikan kepada pelanggan Anda.
Jika Anda membuat Link Pembayaran melalui aplikasi OY! Business, Anda bisa menggunakan fitur “Bagikan” yang ada pada app dari perangkat mobile Anda ketika akan membagikan link.
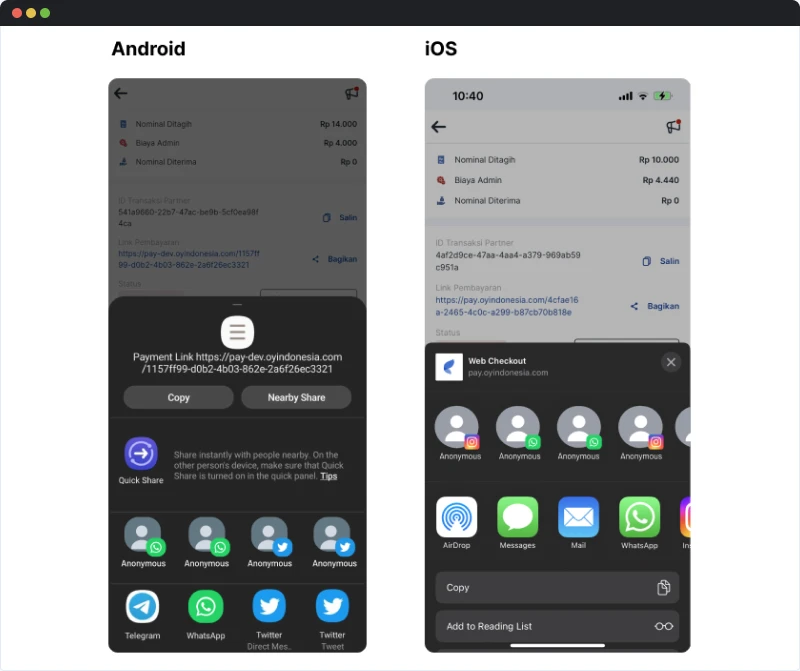
Bukti Pembayaran
Pelanggan dapat langsung melihat bukti pembayaran di dalam Link Pembayaran setelah pembayaran berhasil. Selain itu, pelanggan juga dapat menerima bukti pembayaran melalui email yang Anda masukkan saat membuat Link Pembayaran. Anda dapat mengatur pengiriman bukti pembayaran melalui email kepada pelanggan Anda dengan mengikuti langkah-langkah berikut:
- Masuk ke dashboard OY!
- Buka menu “Pengaturan” → “Notifikasi”
- Klik Tab “Terima Uang (ke Penerima)”
- Pilih “Aktifkan Notifikasi Transaksi yang Berhasil”
- Pilih logo yang akan tertera di email dalam format URL. Contoh: (https://example.com/image.jpg)
- Jika Anda tidak memiliki URL logo, gunakan tools online seperti snipboard.io atau imgbb untuk mengonversi logo Anda ke URL.
- Berikut adalah contoh URL yang benar:
- Snipboard.io: https://i.snipboard.io/image.jpg
- Imgbb: https://i.ibb.co/abcdef/image.jpg
- Simpan perubahan dengan mengklik "Simpan Perubahan"
- Buat transaksi Link Pembayaran dan masukkan alamat email pelanggan pada kolom "Email" di bagian "Detail Pelanggan” saat membuat Link Pembayaran melalui Dashboard. Pisahkan beberapa email dengan menggunakan tanda titik koma (;). Contoh: email1@company.com;email2@company.com;email3@company.com
- Pelanggan Anda akan menerima bukti pembayaran yang berhasil ke email yang terdaftar setelah pembayaran dilakukan.
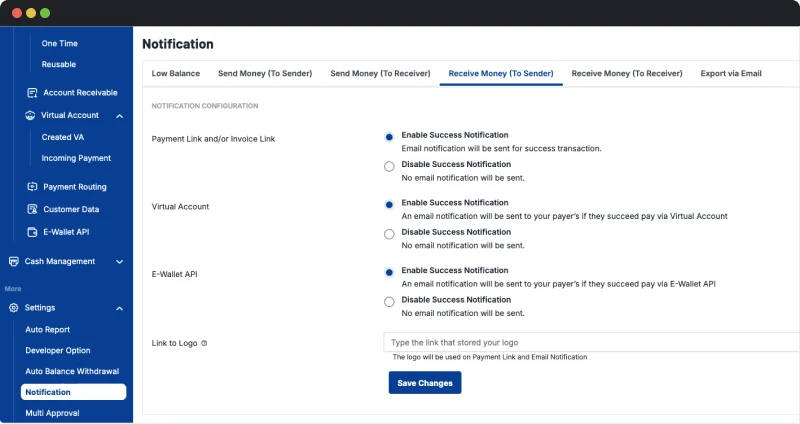
Anda juga dapat menerima bukti pembayaran ke email Anda setelah pelanggan melakukan pembayaran. Untuk mengaturnya, silakan ikuti langkah-langkah berikut:
- Masuk ke dashboard OY!
- Buka menu “Pengaturan” -> “Notifikasi”
- Klik Tab “Terima Uang (ke Pengirim)”
- Pilih “Aktifkan Notifikasi Transaksi yang Berhasil”
- Masukkan link logo yang akan ditampilkan pada bukti pembayaran.
- Simpan perubahan dengan mengklik "Simpan Perubahan"
- Anda akan menerima email untuk setiap pembayaran Link Pembayaran yang berhasil dilakukan oleh pelanggan Anda.
Catatan: Jika Anda tidak memasukkan alamat email pelanggan saat membuat Link Pembayaran, OY! tidak akan mengirimkan bukti melalui email meskipun konfigurasi notifikasi sudah diaktifkan.
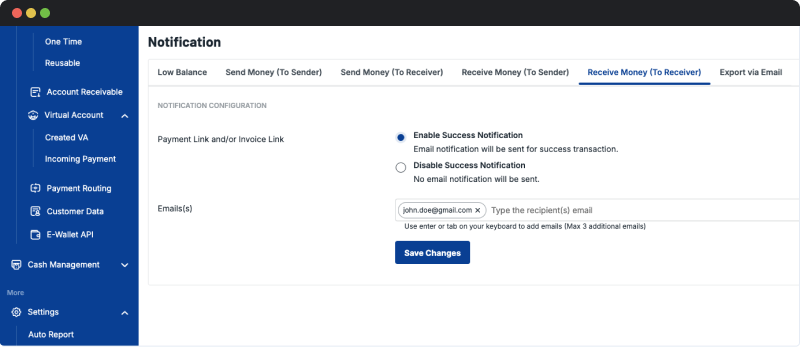
Menyematkan Payment Link ke Website atau Aplikasi Anda
Anda dapat menyematkan Link Pembayaran langsung di website atau aplikasi Anda, sehingga pelanggan dapat menyelesaikan pembayaran tanpa dialihkan ke halaman lain.
Ada beberapa cara untuk menampilkan Link Pembayaran di halaman Anda, berikut beberapa saran yang bisa digunakan: Pop-up (Tengah), Pop-up (Kanan), Pop-up (Kiri), Slide (Kanan). Anda dapat membaca API Docs untuk panduan implementasi lebih lanjut.
Refund Pembayaran ke Pelanggan
Jika pelanggan menerima produk yang tidak sesuai, seperti rusak, atau pesanan tidak terkirim, mereka dapat meminta pengembalian dana (refund). Anda dapat langsung mengembalikan pembayaran ke akun pelanggan melalui dashboard OY!. Refund dapat bersifat penuh atau sebagian. Refund penuh mengembalikan seluruh jumlah pembayaran (100%). Refund sebagian mengembalikan jumlah tertentu sesuai permintaan.
Fitur ini tidak dipungut biaya apa pun. Namun, biaya admin dari pembayaran awal tidak akan dikembalikan oleh OY! ke saldo Anda.
Terdapat beberapa syarat yang harus dipenuhi untuk melakukan refund:
- Refund hanya dapat dilakukan hingga 7 hari kalender setelah transaksi dinyatakan berhasil.
- Saldo Anda harus mencukupi agar kami dapat memotong jumlah transaksi yang akan dikembalikan.
- Refund hanya dapat dilakukan sekali untuk setiap transaksi yang berhasil, baik itu refund penuh maupun sebagian.
- Refund harus dilakukan pada jam operasional, sesuai dengan metode pembayaran yang digunakan. Lihat tabel di bawah untuk detailnya.
Saat ini, refund hanya tersedia untuk pembayaran melalui E-wallet sebagai berikut:
| Metode Pembayaran | Fitur Refund | Jam Operasional |
|---|---|---|
DANA |
Full, sebagian | 00.00 - 23.59 GMT+7 |
| ShopeePay | Full | 05.00 - 23.59 GMT+7 |
| LinkAja | Full | 00.00 - 23.59 GMT+7 |
| OVO | Tidak didukung | - |
Berikut adalah langkah-langkah untuk melakukan refund transaksi Link Pembayaran:
- Masuk ke dashboard OY! dengan username dan password yang telah Anda daftarkan.
- Buka menu “Link Pembayaran”, lalu pilih “Sekali Pakai” atau “Pakai Berulang”, sesuai dengan jenis transaksi Anda.
- Cari transaksi yang ingin direfund. Pada kolom “Tindakan”, klik tombol tiga titik, lalu pilih “Refund E-Wallet” untuk memproses refund.
- Jika refund tidak memenuhi syarat yang disebutkan sebelumnya, akan muncul pesan error, dan Anda tidak dapat melanjutkan proses refund.
- Jika transaksi memenuhi syarat refund, akan muncul pop-up untuk melanjutkan proses refund.
- Untuk refund sebagian, isi jumlah yang ingin dikembalikan.
- Pastikan saldo Anda mencukupi untuk melakukan refund. Jika saldo tidak mencukupi, akan muncul pesan error, dan Anda perlu mengisi saldo terlebih dahulu.
- Setelah refund berhasil, status transaksi akan berubah menjadi “Direfund”.
- Anda dapat melihat transaksi refund di halaman “Laporan Transaksi Rekening” dengan memilih “Laporan Transaksi” → “Laporan Transaksi Rekening”.
Retry Notifikasi/Callback untuk Pembayaran Berhasil
Jika Anda menggunakan API Link Pembayaran, OY! akan mengirimkan notifikasi/callback ke sistem Anda setelah transaksi dinyatakan berhasil. Dengan demikian, Anda akan mendapatkan pemberitahuan saat pelanggan Anda telah menyelesaikan pembayaran. Namun, ada kemungkinan sistem Anda tidak menerima notifikasi.
Dengan mengaktifkan Retry Callback, OY! akan mencoba mengirimkan ulang callback jika sistem Anda tidak menerimanya. Anda dapat meminta pengiriman ulang callback melalui Retry Callback Manual atau Retry Callback Otomatis.
Cara Mengaktifkan Retry Callback Manual
Jika Anda mengaktifkan fitur Retry Callback, sistem akan secara otomatis mengirim ulang callback yang gagal. Namun, Anda juga tetap bisa mengirim ulang callback secara manual melalui dashboard apabila diperlukan. Berikut langkah-langkahnya:
- Masuk ke akun Anda
- Buka menu “Link Pembayaran”, lalu pilih “Sekali Pakai” atau “Pakai Berulang”, sesuai dengan jenis transaksi Anda.
- Cari transaksi yang ingin dikirim ulang callback-nya, lalu klik tombol tiga titik pada kolom “Tindakan”.
- Pastikan Anda telah mengatur Callback URL melalui “Pengaturan” → “Opsi Developer” → “Konfigurasi Callback”.
- Masukkan URL callback untuk produk yang ingin Anda aktifkan. Pastikan format URL benar, lalu validasi dengan mengklik “Validasi String URL”.
- Pastikan Anda telah whitelist IP OY! agar sistem Anda dapat menerima callback:
- 54.151.191.85
- 54.179.86.72
- Klik “Kirim Ulang Callback” untuk mengirim ulang callback, dan ulangi proses ini sesuai kebutuhan.
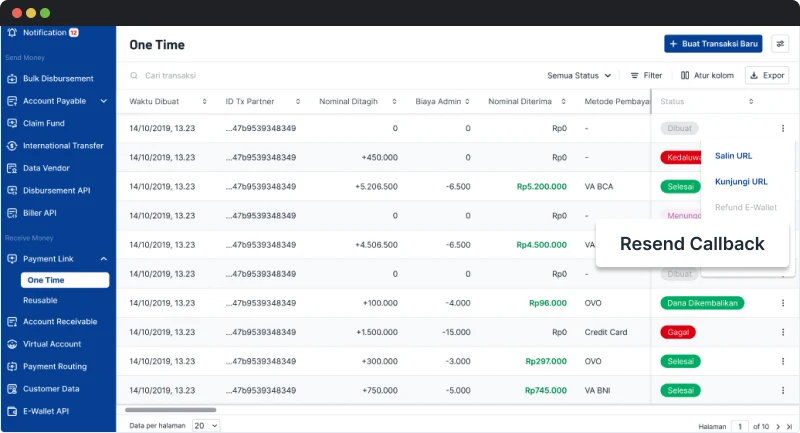
Retry Callback Otomatis
Retry Callback Otomatis dapat membantu Anda untuk menerima callback ulang dalam interval tertentu jika callback sebelumnya tidak berhasil diterima oleh sistem Anda. OY! akan mencoba mengirim ulang hingga 5 kali. Jika setelah 5 kali percobaan callback masih gagal diterima, OY! akan mengirim notifikasi melalui email. Anda dapat mendaftarkan hingga 6 penerima email, yang dapat dikonfigurasi melalui dashboard.
Interval Callback:
Realtime → 1 menit (setelah percobaan awal) → 2 menit (setelah percobaan pertama) → 13 menit (setelah percobaan kedua) → 47 menit (setelah percobaan ketiga)
OY! mengirimkan callback pertama setelah transaksi berhasil. Jika sistem Anda gagal menerimanya, OY! akan langsung mengirimkan callback ulang pertama. Jika callback masih gagal, OY! akan mengirimkan callback ulang kedua 1 menit setelah timeout atau menerima respons gagal dari sistem Anda. Proses ini akan berlanjut hingga callback berhasil diterima atau semua percobaan callback telah dilakukan.
Retry Callback Otomatis tidak aktif secara default. Berikut cara mengaktifkannya:
- Masuk ke akun Anda
- Buka menu “Pengaturan”, lalu pilih “Opsi Developer”.
- Pilih tab “Konfigurasi Callback”.
- Masukkan URL callback untuk produk yang ingin Anda aktifkan. Pastikan format URL benar, lalu validasi dengan mengklik “Validasi String URL”.
- Untuk mengaktifkan Retry Callback Otomatis, centang “Aktifkan Retry Callback Otomatis” untuk produk terkait. Masukkan email penerima yang akan menerima notifikasi jika callback gagal setelah semua percobaan dilakukan.
- Pastikan Anda telah whitelist IP OY! agar sistem dapat menerima callback:
- 54.151.191.85
- 54.179.86.72
- Pastikan sistem Anda menerapkan idempotency logic dengan menggunakan parameter “tx_ref_number” sebagai idempotency key untuk mencegah callback yang sama diproses sebagai pembayaran yang berbeda.
- Simpan perubahan
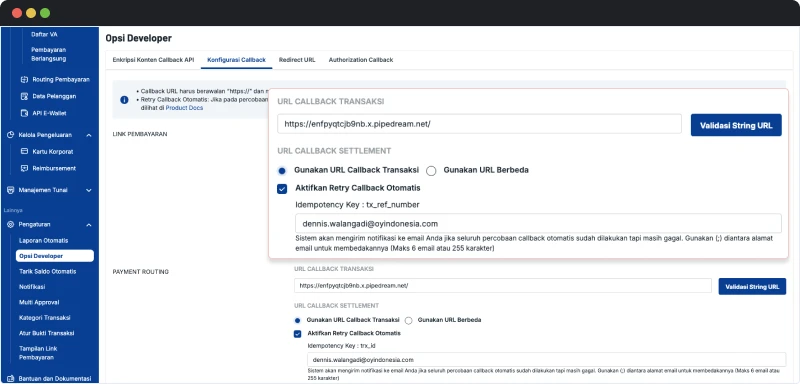
Multi Entity Management
Multi Entity Management adalah fitur yang dapat membantu Anda mengelola beberapa akun OY! dalam satu entitas. Akun yang berperan sebagai admin disebut Main Entity, sedangkan akun yang dapat dikendalikan oleh admin disebut Sub Entity.
Dengan fitur ini, Anda dapat menerima pembayaran dari pelanggan melalui Link Pembayaran yang dibuat atas nama Sub Entity. Ketika pengguna melakukan transaksi yang berhasil, transaksi tersebut akan dicatat dalam saldo Sub Entity. Sebagai Main Entity, Anda dapat melihat saldo dan daftar transaksi Sub Entity kapan saja melalui menu Multi Entity → Laporan Penyelesaian Sub Entity.
Silakan lihat bagian Multi Entity Management untuk informasi lebih lanjut.
Cara Mengaktifkan Fitur Link Pembayaran
Berikut adalah panduan untuk mengaktifkan fitur Link Pembayaran:
- Buat akun di OY!
- Lakukan verifikasi akun dengan mengisi formulir verifikasi. Pastikan Anda mencentang produk “Terima Uang”, karena Link Pembayaran termasuk dalam kategori produk ini.
- Tim OY! akan meninjau dan memverifikasi formulir serta dokumen yang telah Anda kirimkan.
- Setelah verifikasi disetujui, atur informasi rekening bank penerima untuk menerima saldo dari OY!.
Catatan Penting: Pastikan informasi rekening bank penerima benar, karena Anda hanya dapat mengaturnya sekali saja melalui dashboard demi alasan keamanan. - Secara default, Anda akan mendapatkan beberapa metode pembayaran, termasuk semua transfer bank (kecuali BCA).
- Metode pembayaran lain seperti QRIS, E-Wallet, dan BCA memerlukan proses onboarding tambahan agar dapat digunakan. Silakan lihat panduan lebih lanjut di:
Jika Anda ingin menggunakan API Link Pembayaran, Anda perlu melakukan langkah tambahan berikut:
- Kirimkan alamat IP dan URL Callback ke perwakilan bisnis Anda atau melalui email ke business.support@oyindonesia.com.
- OY! akan mengirimkan Production API Key sebagai otorisasi API melalui perwakilan bisnis Anda.
Catatan: Key Staging/Demo API dapat diakses melalui dashboard dengan masuk ke mode “Demo”, lalu temukan API key di menu kiri bawah. - Integrasikan API ke sistem Anda dengan mengikuti panduan di API Docs Link Pembayaran
Setelah semua langkah di atas selesai, Anda siap untuk membuat Link Pembayaran.
Cara Membuat Link Pembayaran
Anda dapat membuat Link Pembayaran melalui dashboard. Selain itu, Anda juga bisa membuat melalui API, tetapi hanya bisa untuk link sekali pakai. Berikut adalah panduan untuk membuat Link Pembayaran melalui dashboard:
- Masuk ke akun dashboard OY!
- Pilih mode yang sesuai. Jika Anda ingin membuat untuk transaksi sebenarnya, pilih "Production" pada sidebar. Jika Anda ingin membuat untuk pengujian/demo, pilih "Coba di Demo".
- Buka menu "Terima Uang", lalu pilih "Link Pembayaran". Pilih "Sekali Pakai" atau "Pakai Berulang" sesuai dengan jenis yang ingin dibuat.
- Klik "Buat Link Pembayaran".
- Akan muncul pop-up untuk mengisi detail link. Silakan lihat tabel di bawah untuk penjelasan setiap kolom.
- Klik "Simpan".
- Setelah Link Pembayaran berhasil dibuat, Anda dapat meninjau dan membagikannya ke pelanggan.
| Kolom | Deskripsi |
|---|---|
| Nominal | Jumlah pembayaran yang akan ditampilkan di laman pembayaran. |
| Deskripsi (opsional) | Anda dapat menjelaskan konteks pembayaran kepada pelanggan Anda melalui kolom deskripsi. |
| ID Transaksi Partner | ID unik yang dapat Anda berikan untuk mengidentifikasi suatu transaksi. |
| Tujuan Dana Masuk | Hanya tersedia jika Anda menggunakan Multi Entity Management. Anda dapat memilih antara "Saldo Saya" atau "Saldo Sub Entity": Saldo Saya: Setelah transaksi berhasil, dana akan masuk ke akun saldo Anda. Saldo Sub Entity: Setelah transaksi berhasil, dana akan masuk ke saldo Sub Entity yang Anda pilih. |
| Detail Pelanggan | Detail pelanggan yang dapat Anda isi, berupa: Nama Pelanggan, Nomor Telepon, Email, dan Catatan. Jika alamat email diisi, kami akan mengirimkan Link Pembayaran ke email tersebut. |
| Tipe Nominal | Anda dapat memilih tipe nominal open amount atau closed amount. Open amount: Anda dapat menerima pembayaran sampai maksimal sebesar nominal yang Anda tentukan. Closed Amount: Anda hanya dapat menerima pembayaran sejumlah nominal yang ditentukan. |
| Metode Pembayaran | Metode pembayaran yang dapat Anda pilih untuk diaktifkan. Metode pembayaran yang tersedia meliputi transfer bank, E-wallet, gerai ritel, kartu debit/kedit, dan QRIS. |
| Jenis Biaya Admin | Jika biaya admin termasuk dalam nominal, maka akan dipotong dari pembayaran pelanggan. Jika tidak termasuk, biaya admin akan ditambahkan ke total yang dibayar pelanggan. |
| Tanggal Kedaluwarsa | Setelah kedaluwarsa, pelanggan tidak dapat membuka link lagi. Secara default, waktu kedaluwarsa adalah 24 jam. Anda dapat menyesuaikan waktu kedaluwarsa berdasarkan hari dan/atau jam. Khusus untuk Link Pembayaran Pakai Berulang, Anda dapat menetapkan waktu kedaluwarsa sebagai "Lifetime", yang berarti link tidak memiliki batas waktu dan dapat menerima pembayaran kapan saja, kecuali dinonaktifkan secara manual. |
Menyelesaikan Pembayaran
Setelah berhasil membuat link, Anda dapat membagikan link tersebut kepada pelanggan Anda. Pelanggan Anda dapat membuka link melalui browser di desktop atau mobile. Berikut langkah-langkah bagi pelanggan untuk menyelesaikan pembayaran melalui Link Pembayaran:
- Pelanggan akan mengisi atau mengubah nominal transaksi (hanya tersedia untuk transaksi open amount).
- Memilih metode pembayaran yang diinginkan.
- Mengisi detail pelanggan, termasuk Nama Pelanggan, Email, Nomor Telepon, dan Catatan. Semua kolom bersifat opsional kecuali Nama Pelanggan.
- Mengonfirmasi metode pembayaran dengan mengklik “Bayar”.
- OY! akan menampilkan informasi pembayaran sesuai metode yang dipilih:
- Transfer Bank: Menampilkan Nomor Rekening dan Jumlah Transfer.
- QRIS: Menampilkan kode QR yang dapat diunduh atau langsung dipindai.
- E-wallet: Pelanggan akan diarahkan ke aplikasi E-wallet (DANA, LinkAja, ShopeePay) atau menerima notifikasi dari aplikasi E-wallet (OVO).
- Kartu Kredit & Debit: Pelanggan akan diarahkan untuk mengisi nomor kartu, tanggal kedaluwarsa, dan CVV.
- Perlu diperhatikan bahwa setiap metode pembayaran memiliki batas waktu pembayaran yang berbeda. Silakan merujuk ke tabel berikut untuk informasi lebih lanjut.
- Untuk melakukan simulasi transaksi demo, silakan merujuk ke bagian berikut:
- Simulasi pembayaran Virtual Account
- Simulasi pembayaran Kode Unik
- Simulasi pembayaran E-wallet
- Simulasi pembayaran Kartu
- Catatan: Simulasi transaksi QRIS saat ini belum tersedia.
- Status pada Link Pembayaran akan berubah menjadi berhasil setelah pembayaran dilakukan. Jika status transaksi tidak otomatis diperbarui, pelanggan dapat memeriksa statusnya langsung di halaman Link Pembayaran.
| Metode Pembayaran | Batas Waktu Bayar | |
|---|---|---|
| Transfer Bank | Virtual Account | hingga 24 jam |
| Kode Unik | hingga 3 jam | |
| E-Wallet | ShopeePay | hingga 60 menit |
| LinkAja | 5 menit | |
| DANA | hingga 60 menit | |
| OVO | hingga 55 detik | |
| QRIS | hingga 30 menit | |
| Kartu Debit & Kredit | 60 menit | |
Batas waktu metode pembayaran berbeda dengan batas waktu kedaluwarsa Link Pembayaran. Batas waktu metode pembayaran dihitung sejak pelanggan mengkonfirmasi metode pembayaran yang dipilih. Sementara itu, batas waktu kedaluwarsa Link Pembayaran dihitung sejak link dibuat. Anda hanya dapat menyesuaikan batas waktu kedaluwarsa Link Pembayaran.
Contoh: Anda membuat Link Pembayaran yang menerima pembayaran melalui Virtual Account (VA) dan QRIS dengan batas waktu kedaluwarsa 2 jam.
Pelanggan membuka link dan memilih QRIS sebagai metode pembayaran. OY! akan menghasilkan kode QR, yang dapat dibayar dalam 30 menit sebelum kedaluwarsa. Jika pelanggan tidak menyelesaikan pembayaran dalam 30 menit, kode QR akan kedaluwarsa, dan mereka harus memilih metode pembayaran lain.
Kali ini, pelanggan memilih VA sebagai metode pembayaran. OY! akan menghasilkan nomor VA, yang berlaku selama 1 jam 30 menit karena sisa waktu kedaluwarsa Link Pembayaran adalah 1 jam 30 menit. Setelah 2 jam, Link Pembayaran akan kedaluwarsa, dan pelanggan tidak dapat mengaksesnya lagi.
Mengecek Status Transaksi
Semua transaksi Link Pembayaran yang dibuat akan ditampilkan di dashboard. Untuk melihat daftar transaksi yang telah dibuat, Anda bisa pergi ke ke “Link Pembayaran” → “Sekali Pakai” atau “Pakai Berulang”.
Di dalam dashboard, Anda dapat melihat detail transaksi, termasuk informasi yang diinput saat pembuatan, status transaksi, dan nomor referensi pembayaran. Dashboard juga menyediakan fitur untuk mencari, memfilter, dan mengekspor daftar transaksi dalam berbagai format, seperti Excel (.xlsx), PDF (.pdf), dan CSV (.csv).
Terkadang, pelanggan Anda mungkin telah menyelesaikan pembayaran, tetapi status transaksi belum diperbarui menjadi sukses. Jika hal ini terjadi, Anda dapat melakukan beberapa langkah berikut untuk memeriksa status transaksi:
- Pelanggan dapat langsung memeriksa status transaksi dengan memilih tombol “Cek Status” pada halaman Link Pembayaran.
- Anda dapat mengecek status transaksi menggunakan API dengan memanggil API Check Status. Silakan merujuk ke dokumen berikut: Check Status Payment Link - API Docs.
Menerima Dana ke Saldo
Setelah pelanggan Anda melakukan pembayaran, OY! akan memperbarui status transaksi dan mengirim notifikasi ke sistem Anda sebagai konfirmasi bahwa transaksi telah dibayar. Dana dari transaksi tersebut akan diselesaikan (settled) ke saldo Anda.
Waktu penyelesaian (settlement time) berbeda untuk setiap metode pembayaran, mulai dari real-time hingga H+2 Hari Kerja tergantung pada metode yang digunakan.
VA Aggregator
Bisnis sering menghadapi tantangan dalam mengelola ratusan hingga ribuan rekening bank fisik untuk berbagai keperluan. Hal ini menyebabkan biaya operasional yang tinggi, baik dari segi pemeliharaan rekening maupun waktu yang dihabiskan untuk pelaporan dan rekonsiliasi.
Virtual Account (VA) adalah akun dummy yang terhubung dengan rekening bank fisik dan memiliki karakteristik serupa dengan rekening fisik. VA memungkinkan proses pelaporan dan rekonsiliasi yang lebih mudah dengan memusatkan aliran dana ke dalam satu rekening fisik. Dengan menggunakan VA, Anda dapat mengatur setiap VA untuk pelanggan atau tujuan tertentu.
Virtual Account (VA) Aggregator adalah fitur yang dirancang khusus untuk membuat Virtual Account, memungkinkan Anda menerima pembayaran melalui transfer bank dari pelanggan.Jika Anda ingin menerima pembayaran menggunakan berbagai metode pembayaran untuk satu transaksi, sebaiknya gunakan Link Pembayaran atau Routing Pembayaran sebagai alternatif.
Secara umum, pembuatan nomor VA untuk pelanggan dapat dilakukan melalui API VA Aggregator. Namun, jika Anda ingin membuat VA tanpa integrasi API, Anda dapat melakukannya melalui Dashboard dengan mengakses menu "Virtual Account" di bagian "Terima Uang".
Alur VA Aggregator
Fitur VA Aggregator
Pembuatan Fleksibel – via Dashboard atau API
Anda dapat membuat nomor VA melalui Dashboard atau API. Jika tidak memiliki sumber daya untuk mengintegrasikan API, Anda tetap bisa membuat nomor VA dan menerima pembayaran langsung melalui dashboard.
Dukungan Pembayaran VA dari Berbagai Bank
Saat ini, OY! mendukung pembayaran VA dari 8 bank, yaitu:
- Bank Central Asia (BCA)
- Bank Rakyat Indonesia (BRI)
- Bank Mandiri
- Bank Negara Indonesia (BNI)
- Bank CIMB & CIMB Syariah
- Bank SMBC
- Bank Syariah Indonesia (BSI)
- Bank Permata & Permata Syariah
Settlement Cepat untuk Mayoritas Bank
OY! memahami bahwa arus kas yang lancar sangat penting bagi bisnis Anda. Kami menawarkan settlement real-time ke saldo OY! untuk sebagian besar bank yang didukung, sehingga dana dapat langsung digunakan tanpa menunggu lama.
Menyesuaikan Jenis VA Sesuai Kebutuhan
Anda dapat mengkonfigurasi jenis VA sesuai kebutuhan bisnis Anda, memberikan fleksibilitas lebih dalam pengelolaan transaksi pembayaran dengan detail sebagai berikut:
| Kategori | Tipe | Deskripsi |
|---|---|---|
| Masa Berlaku | VA Statis (Tanpa Kedaluwarsa) | VA yang memiliki masa berlaku tidak terbatas. Akan selalu aktif sampai dinonaktifkan secara manual. |
| VA Dinamis | VA yang memiliki periode masa berlaku tertentu. Akan selalu aktif sampai masa berlakunya habis atau dinonaktifkan secara manual. | |
| Nominal Transaksi | VA Closed Amount | VA yang hanya menerima pembayaran dengan nominal yang ditentukan. |
| VA Open Amount | VA yang dapat menerima pembayaran dengan maksimal nominal yang telah Anda tentukan saat membuat VA. | |
| Jumlah Penggunaan | VA Sekali Pakai | VA yang hanya bisa menerima satu kali pembayaran. |
| VA Pemakaian Berulang | VA yang hanya kedaluwarsa ketika mencapai tanggal kedaluwarsa atau ketika dinonaktifkan secara manual. Anda juga dapat menyesuaikan batas maksimum pembayaran. VA Pemakaian Berulang dengan batas maksimum pembayaran yang disesuaikan akan kedaluwarsa setelah batas pembayaran terlampaui meskipun belum mencapai waktu kedaluwarsa. | |
| Nomor VA | Custom | Anda dapat mempersonalisasi nomor akhir VA dengan angka yang Anda inginkan (misalnya, nomor telepon atau nomor tagihan pengguna akhir Anda). Untuk mengaktifkan penyesuaian nomor VA, silakan hubungi perwakilan bisnis Anda. Anda dapat merujuk ke API Docs - Create Customized VA Number Khusus untuk fitur ini, saat ini kami hanya mendukung bank BRI dan CIMB. |
| Predetermined | OY! akan membuat nomor VA secara random atas nama Anda. Anda dapat merujuk ke API Docs - Create VA Number. |
Kemampuan untuk Memperbarui VA
Setelah nomor VA dibuat, Anda masih bisa mengubah beberapa parameter berikut:
- Nominal VA (nominal) → Mengubah jumlah nominal pembayaran.
- Jenis Penggunaan (is_single_use) → Mengubah VA dari Sekali Pakai ke Pakai Berulang atau sebaliknya.
- Email (email) → Memperbarui alamat email
- Batas Transaksi (trx_counter) → Menentukan jumlah pembayaran yang dapat diterima oleh nomor VA. Parameter ini hanya bisa digunakan oleh VA Pemakaian Berulang.
- Waktu Kedaluwarsa Transaksi (trx_expired_time) → Mengatur batas waktu transaksi VA.
- Waktu Kedaluwarsa VA (expired_time) → Menetapkan kapan VA tidak lagi berlaku. Waktu ini harus sama atau lebih lama dari trx_expired_time.
- Nama yang Ditampilkan (username_display) → Nama VA yang akan muncul saat pelanggan memasukkan nomor VA di aplikasi perbankan mereka.
Catatan: Setelah VA diperbarui, konfigurasi baru akan langsung diterapkan, dan pengaturan sebelumnya tidak lagi berlaku.
Callback Otomatis & Retry *Callback*
Anda akan menerima callback untuk setiap pembayaran VA yang sukses melalui API. Jika callback gagal diterima, Anda bisa mengaktifkan Automatic Retry Callback melalui:
Dashboard → Pengaturan → Opsi Developer → Konfigurasi Callback.
Jika callback pertama gagal, sistem OY! akan mencoba kembali hingga 5 kali. Jika semua percobaan gagal, OY! akan mengirimkan notifikasi ke email yang telah Anda atur. Anda juga akan menerima callback untuk setiap transaksi yang berhasil diselesaikan ke saldo Anda.
Nominal Minimum dan Maksimum Transaksi VA
- Nominal minimum transaksi VA: Rp10.000 (untuk closed amount).
- nominal maksimum transaksi VA: Tergantung pada kebijakan masing-masing bank. Dengan detail sebagai berikut:
| Nama Bank | Nominal maksimum per transaksi |
|---|---|
| Bank Central Asia (BCA) | Rp 50,000,000 |
| Bank Negara Indonesia (BNI) | Rp 50,000,000 |
| Bank Rakyat Indonesia (BRI) | Rp 500,000,000 |
| Bank Mandiri | Rp 500,000,000 |
| Bank CIMB | Rp 500,000,000 |
| Bank SMBC | Rp 100,000,000 |
| Bank Syariah Indonesia (BSI) | Rp 50,000,000 |
| Bank Permata | Rp 500,000,000 |
Use Cases
Cara Mengaktifkan
Berikut adalah langkah-langkah aktivasi fitur VA Aggregator:
- Buat akun OY!
- Lakukan verifikasi akun dengan mengisi formulir verifikasi. Pastikan untuk mencentang produk "Terima Uang", karena VA Aggregator merupakan bagian dari produk tersebut.
- Tim OY! akan meninjau dan memverifikasi formulir serta dokumen yang dikirimkan.
- Setelah verifikasi disetujui, atur informasi rekening penerima sebagai rekening tujuan penarikan saldo. Pastikan informasi rekening penerima sudah benar, karena pengaturan ini hanya dapat dilakukan sekali melalui dashboard untuk alasan keamanan.
- Untuk penggunaan VA BCA, Anda mungkin perlu mengirimkan dokumen tambahan, seperti Nomor Pokok Wajib Pajak (NPWP) dan Kartu Tanda Penduduk (KTP)
- Jika memiliki pertanyaan atau kendala, silakan hubungi perwakilan bisnis OY! atau email ke business.support@oyindonesia.com
Jika Anda ingin menggunakan VA Aggregator via API, terdapat langkah tambahan:
- Kirimkan alamat IP dan URL callback Anda ke perwakilan bisnis OY! atau melalui email ke business.support@oyindonesia.com. Maksimal 5 alamat IP yang dapat didaftarkan.
- OY! akan mengirimkan Production API Key sebagai otorisasi API melalui perwakilan bisnis Anda.
Catatan: Staging/Demo API Key dapat diakses melalui dashboard di mode "Demo" pada menu bagian kiri bawah. - Integrasikan API VA Aggregator ke sistem Anda dengan mengikuti panduan pada API Docs - VA Aggregator untuk memastikan implementasi berjalan dengan baik.
Simulasi Pembuatan Virtual Account
Membuat Nomor VA melalui API
- Masuk ke mode Demo di dashboard dengan klik tomboll “Coba di Demo” untuk masuk ke mode uji coba (staging).
- Salin API Staging Key dari menu navigasi kiri bawah.
- Buat nomor VA dengan mengirimkan permintaan POST ke https://api-stg.oyindonesia.com/api/generate-static-va. Masukkan parameter yang diperlukan sesuai dengan API Docs.
- OY! akan merespons dengan nomor VA yang berhasil dibuat.
Membuat Nomor VA melalui Dashboard
- Masuk ke mode Demo di dashboard dengan klik tomboll “Coba di Demo” untuk masuk ke mode uji coba (staging).
- Pergi ke “Terima Uang” → Virtual Account → Daftar VA.
- Klik tombol “Buat Virtual Account” di kanan atas.
- Pilih metode pembuatan nomor VA dengan mengunggah file Excel (sesuai format template) atau input manual dengan klik “Tambahkan Detail Virtual Account Secara Manual”.
- Klik “Validasi” setelah mengisi semua kolom.
- Klik “Buat” untuk mengirim permintaan.
- Setelah berhasil, Anda akan diarahkan ke halaman Daftar VA untuk melihat nomor VA yang sudah dibuat.
- VA Anda siap untuk digunakan
Simulasi Callback Berhasil
- Masuk ke mode Demo di dashboard dengan klik tomboll “Coba di Demo” untuk masuk ke mode uji coba (staging).
- Pergi ke “Pengaturan” → Callback Transfer Bank.
- Pilih “Virtual Account” sebagai Jenis Transaksi.
- Pilih nama bank dari VA yang sudah dibuat sebelumnya.
- Masukkan nomor VA dan jumlah transaksi. Untuk VA closed amount, jumlah yang dimasukkan harus sesuai dengan yang telah dibuat.
- Masukkan tanggal dan waktu pembayaran. Pastikan Tanggal & Waktu Pembuatan VA < Tanggal & Waktu Pembayaran < Tanggal & Waktu Kedaluwarsa
Cara Menggunakan Virtual Account
Melihat Daftar Virtual Account (VA) yang Dibuat
- Masuk ke dashboard.
- Pergi ke:
“Terima Uang” → “Virtual Account” → “Daftar VA”
Di halaman ini, Anda dapat melihat VA yang sudah Anda buat dengan detail informasi berikut: Nomor VA yang telah dibuat, Status pembayaran, Jumlah transaksi, Jenis VA, serta Jumlah transaksi yang telah diselesaikan. Anda juga dapat mengekspor daftar VA beserta detailnya dalam format PDF, Excel, atau CSV sesuai kebutuhan.
Melihat Daftar Pembayaran Virtual Account (VA)
- Masuk ke dashboard.
- Pergi ke:
“Terima Uang” → “Virtual Account” → “Pembayaran Berlangsung”
Di halaman ini, Anda dapat melihat transaksi yang sudah diterima dari nomor VA yang sudah Anda buat dengan detail informasi berikut: Timestamp transaksi, Status transaksi, Jumlah pembayaran, Biaya admin, dan Informasi tambahan lainnya. Anda juga dapat mengekspor daftar VA beserta detailnya dalam format PDF, Excel, atau CSV sesuai kebutuhan.
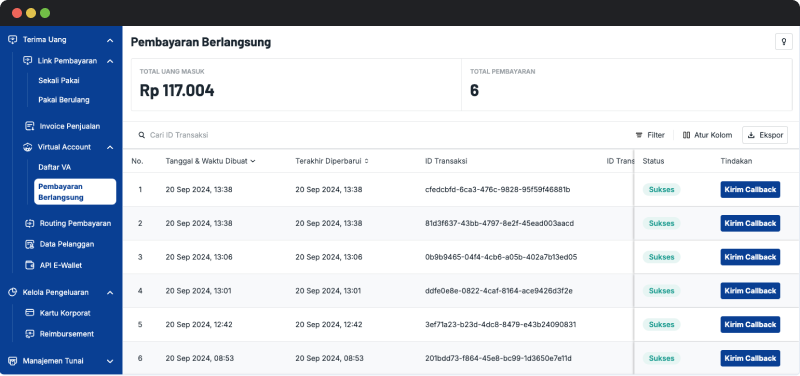
Detail Virtual Account Tiap Bank
| Nama Bank | Kode Bank | Open Amount | Closed Amount | Max. Masa Berlaku |
|---|---|---|---|---|
| BCA | 014 | Ya | Ya | Lifetime |
| BNI | 009 | Sebagian* | Ya | Lifetime |
| BRI | 002 | Ya | Ya | Lifetime |
| Bank Mandiri | 008 | Ya | Ya | Lifetime |
| Bank CIMB | 022 | Ya | Ya | Lifetime |
| Bank SMBC | 213 | Ya | Ya | Lifetime |
| BSI | 451 | Tidak | Ya | 70 hari setelah dibuat. |
| Bank Permata | 013 | Ya | Ya | Lifetime |
*Untuk informasi lebih lanjut, silakan hubungi perwakilan bisnis kami.
Catatan: Tidak ada batas waktu minimum untuk masa berlaku Virtual Account (VA). Namun, disarankan untuk menetapkan masa berlaku yang wajar agar pelanggan memiliki cukup waktu untuk menyelesaikan pembayaran dengan nyaman.
Daftar Metode Pembayaran untuk VA
Pelanggan Anda dapat melakukan pembayaran melalui VA dengan metode berikut:
| Nama Bank | SKN | RTGS | ATM | Mobile Banking & Internet Banking Intrabank | Internet Banking Interbank | Mobile Banking Interbank |
|---|---|---|---|---|---|---|
| Bank Mandiri | Ya | Ya | Ya | Ya | Ya | Ya |
| BRI | Ya | Ya | Ya | Ya | Tidak | Ya |
| BNI | Ya | Ya | Ya | Ya | Tidak | Ya |
| Permata | Ya | Ya | Ya | Ya | Tidak | Ya |
| CIMB Niaga/CIMB Niaga Syariah | Ya | Ya | Ya | Ya (Mobile Banking), Tidak (Internet Banking) | Tidak | Ya |
| BCA | Tidak | Tidak | Ya | Ya | Tidak | Tidak |
| SMBC | Ya | Tidak | Ya | Ya (Mobile Banking), Tidak (Internet Banking) | Tidak | Ya |
| BSI | Tidak | Tidak | Ya | Ya | Ya | Ya |
API E-Wallet Aggregator
API E-Wallet Aggregator adalah fitur yang membantu Anda untuk menerima pembayaran dari berbagai macam E-wallet. Dengan satu integrasi, maka Anda dapat mengakses semua E-wallet yang tersedia di OY!.
Alur API E-Wallet Aggregator
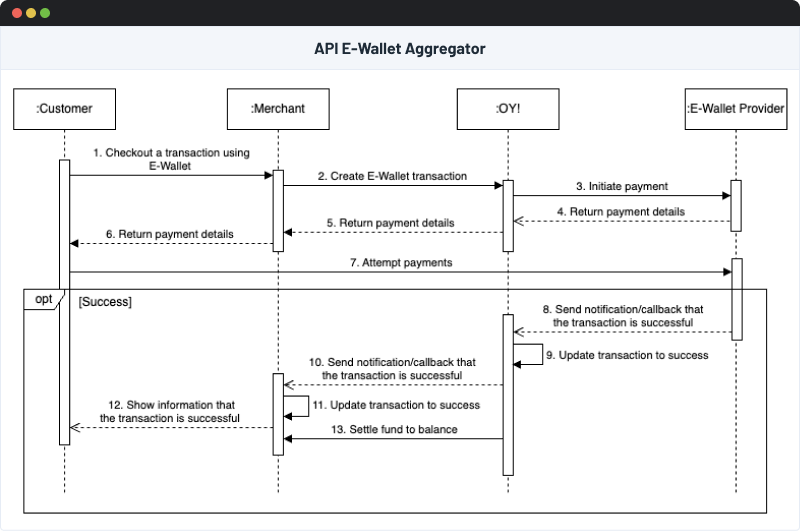
Fitur E-Wallet Aggregator
Produk E-wallet Aggregator kami mendukung transaksi E-wallet dari provider berikut:
- ShopeePay
- LinkAja
- DANA
- OVO
Pantau Transaksi via Dashboard
Semua transaksi E-wallet yang telah dibuat dapat dipantau melalui Dashboard OY!. Masuk ke dashboard OY! dan pergi ke tab E-Wallet. Di dalam dashboard, Anda dapat melihat detail setiap transaksi, termasuk informasi yang diinput saat pembuatan, status transaksi, dan nomor referensi pembayaran. Gunakan fitur pencarian dan filter untuk menemukan transaksi tertentu dengan cepat. Transaksi dapat diekspor dalam berbagai format: Excel (.xlsx), PDF (.pdf), dan CSV (.csv).
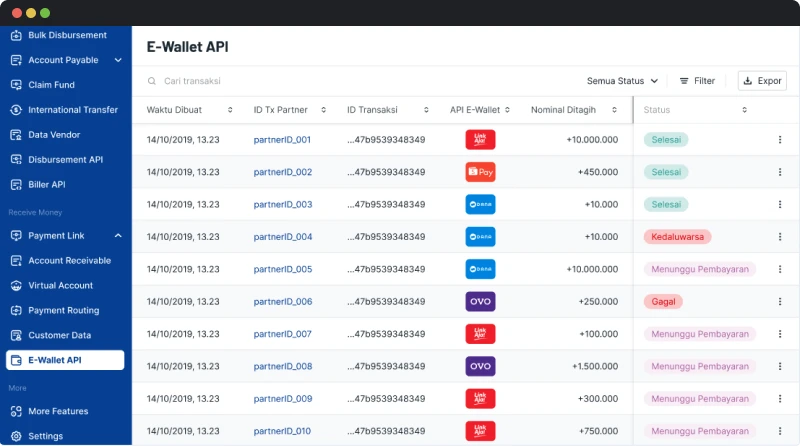
Cara Mengaktifkan
Berikut adalah panduan untuk mengaktifkan fitur API E-Wallet:
- Buat akun di OY!
- Lakukan verifikasi akun dengan mengisi formulir verifikasi. Pastikan Anda mencentang produk “Terima Uang”, karena API E-Wallet termasuk dalam kategori produk ini.
- Tim OY! akan meninjau dan memverifikasi formulir serta dokumen yang telah Anda kirimkan.
- Setelah verifikasi disetujui, atur informasi rekening bank penerima.
Catatan Penting: Pastikan informasi rekening bank penerima untuk menerima saldo OY! benar, karena Anda hanya dapat mengaturnya sekali saja melalui dashboard demi alasan keamanan. - Ikuti proses registrasi untuk setiap E-wallet yang ingin Anda gunakan. Panduan lengkapnya dapat ditemukan di bagian E-Wallet Activation.
- Kirimkan alamat IP dan URL Callback ke perwakilan bisnis Anda atau melalui email ke business.support@oyindonesia.com.
- OY! akan mengirimkan Production API Key sebagai otorisasi API melalui perwakilan bisnis Anda.
Catatan: Key Staging/Demo API dapat diakses melalui dashboard dengan masuk ke mode “Demo”, lalu temukan API key di menu kiri bawah. - Integrasikan API ke sistem Anda dengan mengikuti panduan di API Docs E-Wallet
Cara Membuat Transaksi E-Wallet via API
Transaksi E-Wallet hanya dapat dibuat melalui API. Ikuti langkah-langkah berikut untuk membuat transaksi E-Wallet melalui API:
- Integrasikan API Create E-Wallet Transaction ke dalam sistem Anda. Panduan lengkap dapat ditemukan di Create E-Wallet - API Docs.
- Hit API OY! untuk membuat transaksi E-Wallet.
- OY! akan mengembalikan informasi yang diperlukan untuk menyelesaikan pembayaran.
- Untuk E-wallet dengan metode redirection (ShopeePay, DANA, LinkAja), OY! akan mengembalikan URL E-wallet yang dapat dibagikan kepada pelanggan untuk menyelesaikan pembayaran.
- Untuk E-wallet dengan metode push notification (OVO), penyedia E-wallet akan mengirimkan notifikasi ke aplikasi E-wallet pelanggan untuk menyelesaikan pembayaran.
Catatan: Jika Anda melakukan hit API Create E-Wallet Transaction di mode Staging/Demo, API akan selalu mengembalikan URL yang sama dalam respons:
https://pay-dev.shareitpay.in/aggregate-pay-gate
URL ini tidak dapat digunakan untuk mensimulasikan pembayaran. Untuk simulasi pembayaran, silakan merujuk ke bagian Simulate E-Wallet Payments - Product Docs.
Bukti Pembayaran
Pelanggan Anda dapat menerima bukti pembayaran yang berhasil melalui email yang Anda berikan saat proses pembuatan transaksi. Anda dapat mengatur pengiriman bukti bayar melalui email kepada pelanggan dengan langkah-langkah berikut:
- Masuk ke dashboard OY!
- Buka menu “Pengaturan” -> “Notifikasi”
- Klik Tab “Terima Uang (ke Pengirim)”
- Pilih “Aktifkan Notifikasi Transaksi yang Berhasil” untuk API E-Wallet. (Pengaturan API E-Wallet akan muncul bila Anda sudah mengaktifkan produk API E-Wallet.)
- Pilih logo yang akan tertera di email dalam format URL. Contoh: (https://example.com/image.jpg)
- Jika Anda tidak memiliki URL logo, gunakan tools online seperti snipboard.io atau imgbb untuk mengonversi logo Anda ke URL.
- Berikut adalah contoh URL yang benar:
Snipboard.io: https://i.snipboard.io/image.jpg
Imgbb: https://i.ibb.co/abcdef/image.jpg - Simpan perubahan dengan mengklik "Simpan Perubahan"
- Masukkan email pelanggan lewat parameter “email” saat membuat transaksi E-Wallet via API.
- Pelanggan Anda akan menerima bukti pembayaran yang berhasil ke email yang terdaftar setelah pembayaran dilakukan.
Catatan: Jika Anda tidak memasukkan alamat email pelanggan saat membuat transaksi, OY! tidak akan mengirimkan bukti transaksi melalui email, meskipun konfigurasi notifikasi sudah diaktifkan. Sebaliknya, jika Anda memasukkan alamat email tetapi konfigurasi notifikasi tidak diaktifkan, bukti transaksi juga tidak akan dikirimkan.
Retry Notifikasi/Callback untuk Pembayaran Berhasil
OY! akan mengirimkan notifikasi/callback ke sistem Anda setelah transaksi dinyatakan berhasil. Dengan demikian, Anda akan mendapatkan pemberitahuan saat pelanggan telah menyelesaikan pembayaran. Namun, ada kemungkinan sistem Anda tidak menerima notifikasi.
Dengan mengaktifkan Retry Callback, OY! akan mencoba mengirimkan ulang callback jika sistem Anda tidak menerimanya. Anda dapat meminta pengiriman ulang callback melalui Retry Callback Manual atau Retry Callback Otomatis.
Retry Callback Manual
Retry Callback Manual membantu Anda untuk mengirim ulang callback secara manual untuk setiap transaksi melalui dashboard. Berikut langkah-langkahnya:
- Masuk ke akun Anda
- Pastikan Anda telah mengatur Callback URL melalui “Pengaturan” → “Opsi Developer” → “Konfigurasi Callback” untuk produk E-Wallet Aggregator.
- Pastikan Anda telah whitelist IP OY! agar sistem Anda dapat menerima callback:
- 54.151.191.85
- 54.179.86.72
- Buka menu “API E-Wallet”.
- Cari transaksi yang ingin dikirim ulang callback-nya, lalu klik tombol tiga titik pada kolom “Tindakan”.
- Klik “Kirim Ulang Callback” untuk mengirim ulang callback, dan ulangi proses ini sesuai kebutuhan.
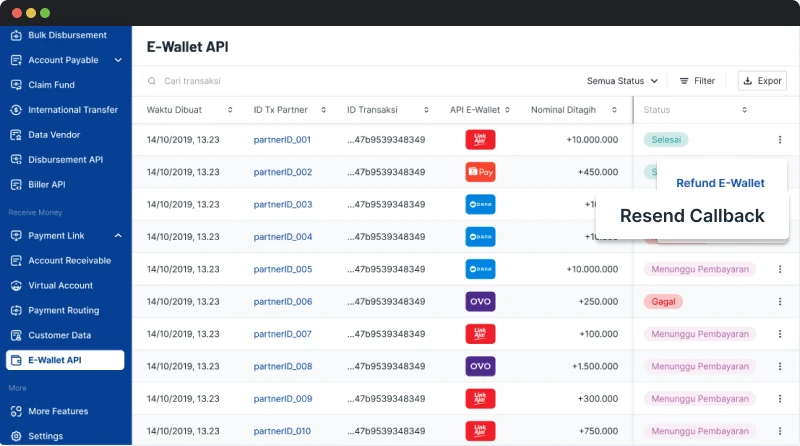
Retry Callback Otomatis
Ikuti langkah-langkah berikut untuk mengaktifkan Retry Callback Otomatis:
- Masuk ke akun Anda
- Buka menu “Pengaturan”, lalu pilih “Opsi Developer”.
- Pilih tab “Konfigurasi Callback”.
- Masukkan URL callback untuk produk yang ingin Anda aktifkan. Pastikan format URL benar, lalu validasi dengan mengklik “Validasi String URL”.
- Untuk mengaktifkan Retry Callback Otomatis, centang “Aktifkan Retry Callback Otomatis” untuk produk terkait. Masukkan email penerima yang akan menerima notifikasi jika callback gagal setelah semua percobaan dilakukan.
- Pastikan Anda telah whitelist IP OY! agar sistem dapat menerima callback:
- 54.151.191.85
- 54.179.86.72
- Pastikan sistem Anda menerapkan idempotency logic dengan menggunakan parameter “tx_ref_number” sebagai idempotency key untuk mencegah callback yang sama diproses sebagai pembayaran yang berbeda.
- Simpan perubahan
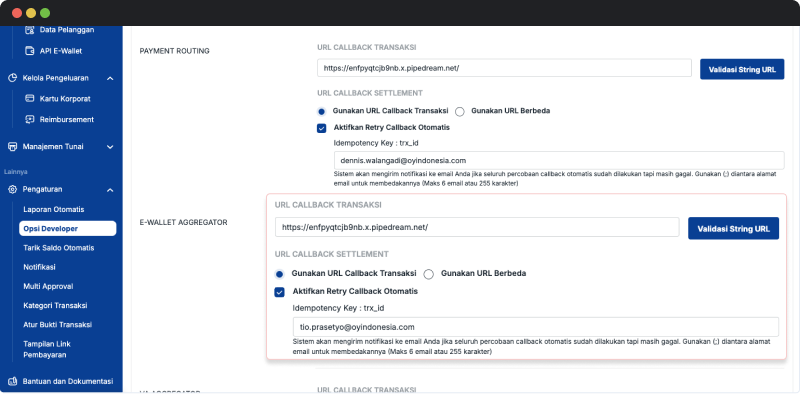
Refund Pembayaran ke Pelanggan
Jika pelanggan menerima produk yang tidak sesuai, seperti rusak, atau pesanan tidak terkirim, mereka dapat meminta pengembalian dana (refund). Anda dapat langsung mengembalikan pembayaran ke akun pelanggan melalui dashboard OY!. Refund dapat bersifat penuh atau sebagian. Refund penuh mengembalikan seluruh jumlah pembayaran (100%). Refund sebagian mengembalikan jumlah tertentu sesuai permintaan.
Fitur ini tidak dipungut biaya apa pun. Namun, biaya admin dari pembayaran awal tidak akan dikembalikan oleh OY! ke saldo Anda.
Terdapat beberapa syarat yang harus dipenuhi untuk melakukan refund:
- Refund hanya dapat dilakukan hingga 7 hari kalender setelah transaksi dinyatakan berhasil.
- Saldo Anda harus mencukupi agar kami dapat memotong jumlah transaksi yang akan dikembalikan.
- Refund hanya dapat dilakukan sekali untuk setiap transaksi yang berhasil, baik itu refund penuh maupun sebagian.
- Refund harus dilakukan pada jam operasional, sesuai dengan metode pembayaran yang digunakan. Lihat tabel di bawah untuk detailnya.
Saat ini, refund hanya tersedia untuk pembayaran melalui E-wallet sebagai berikut:
| Metode Pembayaran | Fitur Refund | Jam Operasional |
|---|---|---|
| DANA | Full, sebagian | 00.00 - 23.59 GMT+7 |
| ShopeePay | Full | 05.00 - 23.59 GMT+7 |
| LinkAja | Full | 00.00 - 23.59 GMT+7 |
| OVO | Tidak didukung | - |
Jika Anda menggunakan API Refund, OY! akan mengirimkan notifikasi ke sistem Anda melalui callback setelah transaksi berhasil direfund. Untuk detail lebih lengkapnya, silakan merujuk ke Refund Callback - API Docs. Transaksi refund juga akan ditampilkan pada Laporan Penyelesaian Anda.
Anda juga dapat memeriksa status permintaan refund melalui API. Untuk panduan lebih lanjut, silakan lihat Refund Check Status - API Docs.
Menyelesaikan Transaksi E-Wallet
Setiap penyedia E-wallet memiliki metode yang berbeda untuk menyelesaikan transaksi. Pertama adalah metode redirection (ShopeePay, LinkAja, DANA), pelanggan akan diarahkan ke halaman E-wallet untuk menyelesaikan pembayaran. Kedua adalah metode push notification (OVO), penyedia E-wallet akan mengirimkan notifikasi ke aplikasi OVO pelanggan untuk menyelesaikan pembayaran. Baca panduan lengkapnya di sini:
- Menyelesaikan transaksi E-wallet via ShopeePay Payment Journey
- Menyelesaikan transaksi E-wallet via LinkAja Payment Journey
- Menyelesaikan transaksi E-wallet via DANA Payment Journey
- Menyelesaikan transaksi E-wallet via OVO Payment Journey
Untuk menguji transaksi di mode demo, silakan merujuk ke Simulate E-Wallet Payments - Product Docs.
Mengecek Status Transaksi
Semua transaksi E-wallet yang dibuat akan ditampilkan di dashboard. Untuk melihat daftar transaksi yang telah dibuat, Anda bisa pergike menu “API E-wallet”.
Di dalam dashboard, Anda dapat melihat detail transaksi, termasuk informasi yang diinput saat pembuatan, status transaksi, dan nomor referensi pembayaran. Dashboard juga menyediakan fitur untuk mencari, memfilter, dan mengekspor daftar transaksi dalam berbagai format, seperti Excel (.xlsx), PDF (.pdf), dan CSV (.csv).
Terkadang, pelanggan mungkin sudah menyelesaikan pembayaran, tetapi status transaksi belum diperbarui menjadi sukses. Oleh karena itu, disarankan untuk secara berkala memeriksa status transaksi menggunakan Check Status E-Wallet API.
Menerima Dana ke Saldo
Setelah pelanggan menyelesaikan pembayaran, OY! akan secara otomatis memperbarui status transaksi dan mengirimkan callback ke sistem Anda untuk memberi tahu bahwa transaksi telah dibayar. Selain itu, OY! juga akan menyelesaikan (settle) dana ke saldo OY! Anda. Waktu settlement dana bervariasi tergantung pada penyedia layanan E-wallet, dengan estimasi penyelesaian dalam H+1 hingga H+2 hari kerja setelah pembayaran diterima.
API Routing Pembayaran
API Routing Pembayaran adalah layanan yang dapat membantu Anda menerima pembayaran dari pelanggan Anda dan mengirim uang ke penerima dalam satu API terintegrasi. Dengan layanan ini, Anda dapat secara otomatis mendistribusikan dana ke beberapa penerima setelah menerima pembayaran dari pelanggan. Menggunakan API Routing Pembayaran dapat membantu Anda menghemat waktu, karena menyediakan dua layanan sekaligus dalam satu integrasi.
| Tipe Routing Pembayaran | Fitur-Fitur | |
|---|---|---|
| Tipe Transaksi | Payment Aggregator | Hanya menerima pembayaran dari pelanggan. API all-in-one untuk menerima pembayaran melalui transfer bank, E-wallet, QRIS, dan kartu. |
| Payment Routing | Menerima pembayaran dari pelanggan dan secara otomatis meneruskan dana ke beberapa penerima menggunakan berbagai metode, seperti VA, E-wallet, QRIS, dll . | |
| Tipe Penerimaan Uang | Tanpa interface |
Anda memiliki halaman checkout sendiri, dan OY\! menyediakan detail pembayarannya. OY! menyediakan detail pembayaran setelah transaksi dibuat (misalnya, nomor VA, URL E-wallet, URL kode QR, dll.). Mendukung hanya satu metode pembayaran dalam satu transaksi (Single Payment & Direct Payment). |
| Dengan interface |
Menggunakan halaman checkout bawaan OY! (Link Pembayaran). OY! menyediakan Link Pembayaran setelah dibuat. Mendukung berbagai metode pembayaran dalam satu transaksi. |
|
Use Cases
Payment Aggregator
Single Payments
Single payment memungkinkan pelanggan menyelesaikan pembayaran dengan mudah. Tersedia untuk Bank Transfer (Virtual Account & Unique Code), E-Wallet, QRIS, dan Kartu Debit/Kredit.
Direct Payments
Direct payment memerlukan account linking, di mana pelanggan harus menghubungkan akun pembayaran mereka ke sistem Anda sebelum menyelesaikan pembayaran. Anda dapat menggunakan API Account Linking untuk proses ini.
Direct payment menawarkan pengalaman pembayaran yang lebih mudah.. Setelah akun terhubung, pelanggan tidak perlu membuka atau dialihkan ke aplikasi penyedia pembayaran untuk menyelesaikan transaksi.
Saat ini, fitur ini hanya tersedia untuk E-wallet ShopeePay.
Contoh Use Case Routing Pembayaran
Investasi
Regulasi OJK tidak mengizinkan aplikasi investasi menyimpan saldo pengguna. Anda dapat menggunakan routing pembayaran untuk menerima dana dari investor dan langsung mengirimkannya ke bank kustodian.
E-Commerce
Terima pembayaran barang dari pelanggan dan langsung kirimkan bagian pembayaran rekening bank merchant.
Pendidikan
Terima pembayaran uang sekolah dari orang tua dan secara otomatis kirimkan biaya administrasi ke rekening bank sekolah.
Aplikasi Pinjaman
Terima pembayaran cicilan dari peminjam dan langsung salurkan dana ke rekening penampungan pemberi pinjaman atau peminjam.
Alur Routing Pembayaran
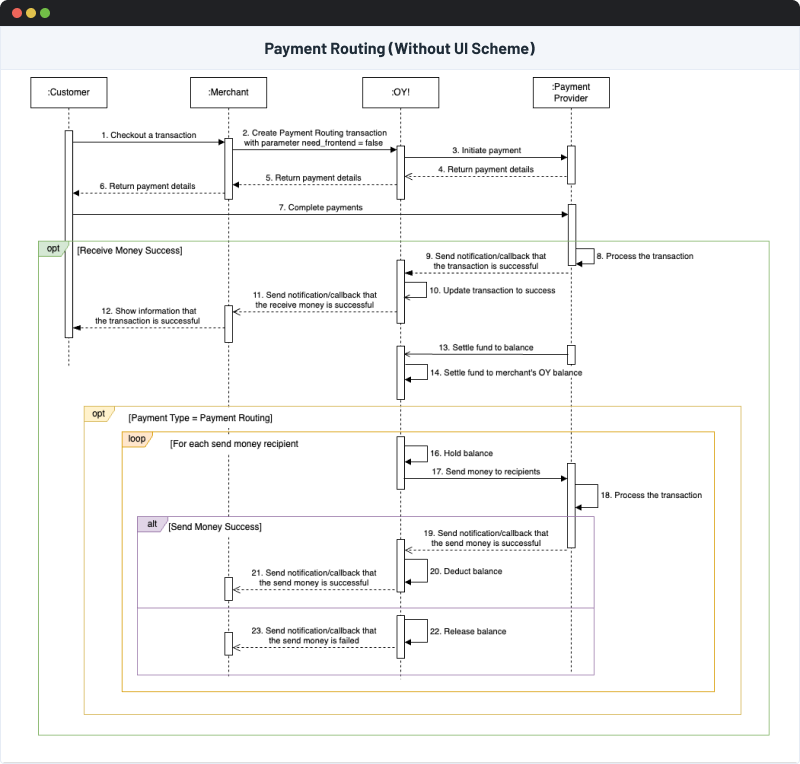
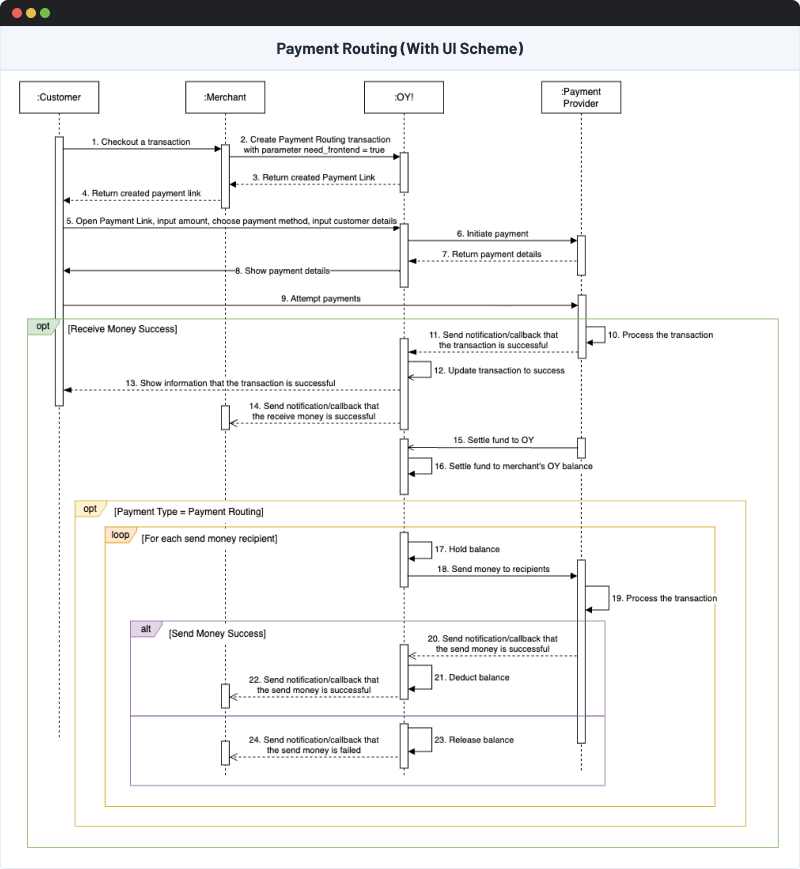
Fitur Routing Pembayaran
Mendukung Berbagai metode Pembayaran
OY! mendukung berbagai metode pembayaran dalam API Routing Pembayaran, termasuk:
- Transfer Bank
- Virtual Account: BCA, BNI, BRI, Mandiri, CIMB, SMBC, BSI, Permata
- Kode Unik: BCA
- E-Wallet
- Single Payments: ShopeePay, DANA, LinkAja
- Direct Payments: ShopeePay
- Kartu Debit/Kredit: Visa, Mastercard, JCB
- QRIS
Kirim Dana ke Banyak Penerima Secara Real-Time
Setelah menerima pembayaran dari pelanggan, OY! dapat langsung menerima dana hingga ke 10 penerima tanpa menunggu proses settlement, selama saldo di akun Anda mencukupi.
Perlu diperhatikan bahwa beberapa metode pembayaran mungkin tidak langsung masuk ke saldo secara real-time (misalnya QRIS dan E-wallet). Oleh karena itu, pastikan saldo Anda mencukupi untuk memproses pengiriman dana.
Gunakan Fitur Link Pembayaran untuk Menerima Dana
Terdapat dua jenis metode penerimaan dana: Dengan Interface dan Tanpa Interface. Tanpa Interface cocok digunakan jika Anda memiliki halaman checkout sendiri dan hanya membutuhkan detail pembayaran untuk menyelesaikan transaksi. Berikut adalah informasi pembayaran yang akan Anda terima setelah transaksi berhasil dibuat:
- Transfer Bank - Virtual Account: bank tujuan, nomor VA, dan jumlah transaksi.
- Transfer Bank - Kode Unik: bank tujuan, nomor rekening, nama rekening, nominal tagihan awal, nominal unik, dan total nominal.
- QRIS: URL untuk mengakses kode QR.
- E-Wallet: link untuk mengarahkan pelanggan ke E-wallet yang dipilih.
- Kartu debit/kredit: link untuk mengarahkan pelanggan agar mengisi detail kartu dan melanjutkan pembayaran.
Dengan Interface cocok jika Anda tidak memiliki halaman checkout sendiri. Anda dapat menggunakan halaman checkout bawaan OY! (Link Pembayaran) untuk transaksi Routing Pembayaran. Untuk mengaktifkan fitur ini, cukup isi parameter "need_frontend" dengan "TRUE" dalam API pembuatan transaksi.
Pelajari lebih lanjut tentang Link Pembayaran di Payment Link - Product Docs.
Buat Transaksi E-Wallet Direct Payment
API Routing Pembayaran mendukung transaksi Direct Payment, di mana pelanggan tidak perlu dialihkan ke aplikasi atau situs web penyedia pembayaran untuk menyelesaikan transaksi. Hal ini memberikan pengalaman pembayaran yang lebih mudah dan efisien.
Saat ini, fitur Direct Payment hanya tersedia untuk E-wallet ShopeePay.
Pelajari perbedaan antara Single Payment dan Direct Payment di E-Wallet Payment Type.
Lacak dan Pantau Transaksi
Semua transaksi Routing Pembayaran yang dibuat akan ditampilkan di Dashboard OY!. Untuk melihat daftar transaksi, silakan pergi ke menu Routing Pembayaran.
Di dalam dashboard, Anda dapat melihat detail transaksi, yaitu Informasi transaksi yang diinput saat pembuatan, status transaksi, serta nomor referensi pembayaran*
Dashboard juga menyediakan fitur untuk mencari, memfilter, dan mengekspor daftar transaksi dalam berbagai format, seperti Excel (.xlsx), PDF (.pdf), dan CSV (.csv).
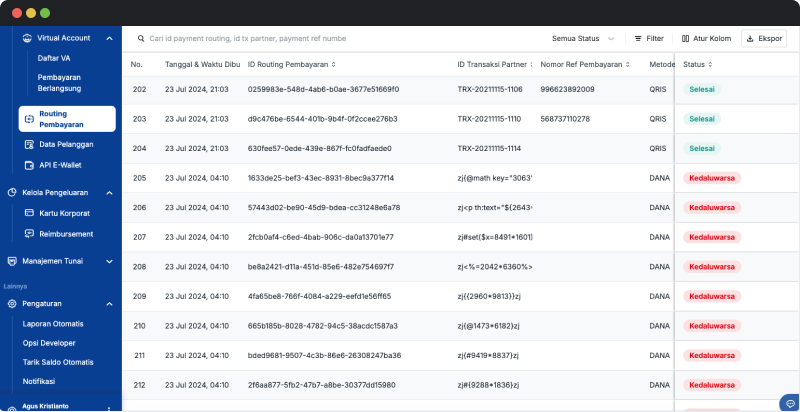
*Nomor Referensi Pembayaran adalah nomor identifikasi untuk pembayaran yang berhasil ketika pelanggan menyelesaikan transaksi QRIS. Nomor referensi ini juga ditampilkan pada bukti transaksi pelanggan. Fitur ini hanya tersedia untuk transaksi QRIS.
Gunakan Nomor Virtual Account yang Sama untuk Berbagai Transaksi
Satu pelanggan mungkin melakukan pembayaran untuk beberapa transaksi dengan menggunakan bank yang sama. Dengan membuar nomor VA yang sama untuk transaksi yang berbeda, pelanggan dapat lebih mudah melakukan pembayaran karena mereka bisa menyimpan nomor VA di aplikasi mobile banking mereka.
Namun, nomor VA yang sama hanya dapat digunakan untuk satu transaksi aktif dalam satu waktu.
Cara Mengaktifkan Fitur Routing Pembayaran
Ikuti langkah-langkah berikut untuk melakukan registrasi dan melakukan transaksi Routing Pembayaran:
- Buat akun di OY!
- Lakukan verifikasi akun dengan mengisi formulir verifikasi. Pastikan untuk mencentang produk Terima Uang dan Kirim Uang, karena Routing Pembayaran termasuk dalam produk ini.
- Tim OY! akan meninjau dan memverifikasi formulir serta dokumen yang dikirimkan.
- Setelah verifikasi disetujui, atur informasi rekening penerima.
Catatan Penting: Pastikan informasi rekening bank penerima benar, karena Anda hanya dapat mengaturnya sekali saja melalui dashboard demi alasan keamanan. 5. Secara default, Anda akan mendapatkan beberapa metode pembayaran, termasuk semua transfer bank (kecuali BCA). 6. Metode pembayaran lain seperti QRIS, E-Wallets, Kartu, dan BCA memerlukan onboarding tambahan agar bisa digunakan. Silakan merujuk ke panduan berikut: - Aktivasi E-Wallet - Aktivasi QRIS - Aktivasi VA BCA - Aktivasi Kartu Debit/Kredit 7. Kirimkan alamat IP dan URL Callback ke perwakilan bisnis Anda atau melalui email ke business.support@oyindonesia.com. 8. OY! akan mengirimkan Production API Key melalui perwakilan bisnis Anda.
Catatan: Key Staging/Demo API dapat diakses melalui dashboard dengan masuk ke mode “Demo”, lalu temukan API key di menu kiri bawah. 9. Integrasikan API Routing Pembayaran ke dalam sistem Anda. Ikuti panduan di dokumentasi API: Payment Routing - API Docs.
Cara Membuat Transaksi Routing Pembayaran
Setelah menyelesaikan proses registrasi, Anda dapat langsung membuat transaksi Routing Pembayaran menggunakan API. Anda bisa memilih skema tanpa Interface atau dengan Interface, tergantung pada kebutuhan Anda.
Skema Tanpa Interface
- Integrasikan API untuk membuat transaksi Payment Routing ke dalam sistem Anda. Untuk lebih jelasnya, silakan lihat Dokumentasi API: Create Payment Routing - API Docs
- Hit API OY! untuk membuat transaksi Routing Pembayaran.
- Masukkan parameter berikut: "need_frontend" → "FALSE"
- Pilih satu metode pembayaran: BANK_TRANSFER, EWALLET, QRIS, CARDS
- Tambahkan metode pembayaran yang dipilih ke parameter "list_enable_payment_method".
Catatan: Hanya satu metode pembayaran yang boleh dimasukkan, jika lebih dari satu akan muncul pesan error. 6. Pilih satu bank atau penyedia pembayaran (SOF) sesuai metode yang dipilih: * BANK_TRANSFER: 014, 009, 002, 008, 022, 213, 011, 016, 484, 451, 013. * EWALLET: shopeepay_ewallet, dana_ewallet, linkaja_ewallet * QRIS: QRIS * CARDS: CARDS 7. Tambahkan SOF yang dipilih ke parameter "list_enable_sof".
Catatan: Hanya satu SOF yang boleh dimasukkan, jika lebih dari satu akan muncul pesan error. 8. Jika menggunakan E-wallet Direct Payment, isi parameter "use_linked_account" dengan:
"TRUE" → Jika menggunakan ShopeePay Direct Payment
"FALSE" → Jika tidak menggunakan fitur ini
Pastikan Account Linking sudah dilakukan sebelum membuat transaksi Direct Payment.
9. Jika ingin langsung mengirim uang setelah menerima pembayaran, isi "payment_routing" dengan nomor rekening tujuan dan nominal dana yang akan dikirim ke masing-masing penerima
10. OY! akan mengembalikan informasi pembayaran sesuai metode yang dipilih:
- Transfer Bank - Virtual Account: bank tujuan, nomor VA, dan jumlah transaksi.
- Transfer Bank - Kode Unik: bank tujuan, nomor rekening, nama rekening, nominal tagihan awal, nominal unik, dan total nominal.
- QRIS: URL untuk mengakses kode QR.
- E-Wallet: link untuk mengarahkan pelanggan ke E-wallet yang dipilih.
- Kartu debit/kredit: link untuk mengarahkan pelanggan agar mengisi detail kartu dan melanjutkan pembayaran.
11. Tampilkan detail pembayaran kepada pelanggan di dalam aplikasi Anda.
Skema Dengan Interface
Jika Anda ingin menggunakan halaman checkout bawaan dari OY! (Link Pembayaran), ikuti langkah-langkah berikut:
- Integrasikan API untuk membuat transaksi Payment Routing ke dalam sistem Anda. Untuk lebih jelasnya, silakan lihat Dokumentasi API: Create Payment Routing - API Docs
- Hit API OY! untuk membuat transaksi Routing Pembayaran.
- Masukkan parameter berikut: "need_frontend" → "TRUE"
- Pilih satu metode pembayaran: BANK_TRANSFER, EWALLET, QRIS, CARDS
- Tambahkan daftar metode pembayaran yang dipilih ke dalam parameter "list_enable_payment_method".
Catatan: Anda bisa memasukkan lebih dari satu metode pembayaran agar pelanggan dapat memilih metode yang diinginkan. 6. Pilih bank atau penyedia pembayaran (SOF) untuk setiap metode pembayaran: - BANK_TRANSFER: 014, 009, 002, 008, 022, 213, 011, 016, 484, 451, 013 - EWALLET: shopeepay_ewallet, dana_ewallet, linkaja_ewallet - QRIS: QRIS - CARDS: CARDS 7. Tambahkan daftar SOF yang dipilih ke dalam parameter "list_enable_sof".
Catatan: Anda bisa memasukkan lebih dari satu bank/penyedia pembayaran agar pelanggan dapat memilih metode pembayaran yang diinginkan. 8. Jika ingin langsung mengirim uang setelah menerima pembayaran, isi "payment_routing" dengan nomor rekening tujuan dan nominal dana yang akan dikirim ke masing-masing penerima 9. OY! akan mengembalikan URL Link Pembayaran, yang dapat Anda bagikan kepada pelanggan untuk menyelesaikan pembayaran.
Cara Menyelesaikan Pembayaran
Skema Tanpa Interface
EachSetiap metode pembayaran memiliki alur yang berbeda untuk menyelesaikan transaksi, tergantung pada kebijakan masing-masing metode pembayaran. Silakan merujuk ke panduan berikut untuk menyelesaikan transaksi berdasarkan metode pembayaran yang digunakan:
Menyelesaikan transaksi Transfer Bank - Virtual Account
Menyelesaikan transaksi Transfer Bank - Kode Unik
Menyelesaikan transaksi E-Wallet
Menyelesaikan transaksi Kartu Debit/Kredit
Untuk melakukan simulasi transaksi di mode demo/staging, silakan merujuk ke panduan berikut:
Simulasi pembayaran Transfer Bank - Virtual Account
Simulasi pembayaran Transfer Bank - Kode Unik
Simulasi pembayaran QRIS (saat ini belum tersedia)
Simulasi pembayaran Kartu Debit/Kredit
Skema dengan Interface
Setelah Anda berhasil membuat transaksi Routing Pembayaran menggunakan skema dengan interface, Anda dapat membagikan Link Pembayaran kepada pelanggan Anda.
Langkah-langkah bagi pelanggan untuk menyelesaikan transaksi menggunakan skema dengan interface sama seperti menyelesaikan transaksi Link Pembayaran. Silakan merujuk ke panduan berikut.
Memeriksa Status Transaksi
Semua transaksi Routing Pembayaran yang telah dibuat akan ditampilkan di dashboard. Anda dapat pergi ke menu "Routing Pembayaran" untuk melihat daftar transaksi yang telah dibuat. Di dalam dashboard, Anda dapat melihat detail transaksi, termasuk informasi transaksi yang dimasukkan saat pembuatan, status transaksi, dan nomor referensi pembayaran*
Dashboard juga memiliki fitur untuk mencari, memfilter, dan mengekspor daftar transaksi dalam berbagai format, seperti Excel (.xlsx), PDF (.pdf), dan CSV (.csv).
Jika Anda tidak menerima callback transaksi dari sistem kami, Anda dapat menggunakan API Check Status untuk mendapatkan status transaksi terbaru.
Catatan: Nomor Referensi Pembayaran adalah nomor identifikasi untuk pembayaran yang berhasil ketika pelanggan menyelesaikan transaksi QRIS. Nomor referensi ini juga ditampilkan pada bukti transaksi pelanggan. Fitur ini hanya tersedia untuk transaksi QRIS.
Menerima Dana ke Saldo
Setelah pelanggan melakukan pembayaran, OY! akan memperbarui status transaksi dan mengirimkan notifikasi ke sistem Anda untuk mengonfirmasi bahwa transaksi telah dibayar. OY! kemudian akan menyelesaikan dana ke saldo akun OY! Anda.
Namun, waktu penyelesaian (settlement) dapat berbeda tergantung pada metode pembayaran yang digunakan, dengan rentang waktu mulai dari real-time hingga H+2 hari kerja.
Mengirim Dana ke Penerima
Routing Pembayaran memungkinkan Anda untuk meneruskan dana secara otomatis setelah transaksi dibayarkan oleh pelanggan. OY! secara otomatis mengirim dana ke penerima yang telah ditentukan dalam proses pembuatan transaksi setelah pembayaran diterima. Anda perlu memastikan bahwa saldo Anda mencukupi untuk melakukan proses pengiriman dana, terutama untuk metode pembayaran yang memiliki settlement non-real time; jika tidak, proses pengiriman dana akan gagal karena saldo tidak mencukupi.
QRIS Aggregator
Quick Response Code Indonesian Standard (QRIS) adalah standar pembayaran QR di Indonesia yang dikembangkan oleh Bank Indonesia. Pembayaran dilakukan oleh pelanggan dengan memindai QR melalui aplikasi m-banking atau E-wallet mereka. Pembayaran QR sangat cocok untuk transaksi bernilai kecil karena menawarkan biaya yang terjangkau (0,7% per transaksi). QRIS Aggregator dapat digunakan untuk membuat transaksi QRIS sebagai metode pembayaran untuk kemudian ditampilkan ke customer Anda.
Catatan: QRIS Aggregator menggunakan API Payment Routing yang sudah ada. Bagian ini hanya menjelaskan fitur, alur, dll. yang berhubungan dengan transaksi QRIS Aggregator. Semua transaksi akan ditampilkan di halaman dashboard OY! di bagian halaman Payment Routing.
Alur QRIS Aggregator

Fitur QRIS Aggregator
Jumlah maksimum per transaksi untuk QRIS adalah Rp10.000.000, sedangkan jumlah minimum per transaksi adalah Rp10.000, baik melalui Link Pembayaran maupun Routing Pembayaran. Jika Anda ingin menerima pembayaran di bawah Rp10.000, silakan hubungi perwakilan bisnis kami.
Cara Mengaktifkan
Ikuti langkah-langkah berikut untuk melakukan registrasi dan melakukan transaksi QRIS Aggregator:
- Buat akun di OY!
- Lakukan verifikasi akun dengan mengisi formulir verifikasi. Pastikan untuk mencentang produk Terima Uang dan Kirim Uang, karena Routing Pembayaran termasuk dalam produk ini.
- Tim OY! akan meninjau dan memverifikasi formulir serta dokumen yang dikirimkan.
- Setelah verifikasi disetujui, atur informasi rekening penerima. Catatan: Pastikan informasi rekening bank penerima benar, karena Anda hanya dapat mengaturnya sekali saja melalui dashboard demi alasan keamanan.
- Buka halaman Metode Pembayaran QRIS untuk informasi lebih detail mengenai apa yang diperlukan untuk aktivasi
- Kirimkan alamat IP dan URL Callback ke perwakilan bisnis Anda atau melalui email ke business.support@oyindonesia.com.
- OY! akan mengirimkan Production API Key melalui perwakilan bisnis Anda. Catatan: Key Staging/Demo API dapat diakses melalui dashboard dengan masuk ke mode “Demo”, lalu temukan API key di menu kiri bawah.
- Integrasikan QRIS Aggregator melalui API Payment Routing ke dalam sistem Anda. Ikuti panduan di dokumentasi QRIS Aggregator - API Docs.
Cara Membuat Transaksi QRIS Aggregator
Setelah Anda berhasil menyelesaikan proses registrasi untuk metode pembayaran QRIS, Anda dapat langsung membuat transaksi QRIS Aggregator melalui Payment Routing (hanya melalui API). Anda akan menggunakan Payment Routing Tanpa UI saat menerapkan skema QRIS Aggregator.
- Integrasikan API QRIS Aggregator API QRIS Aggregator melalui Payment Routing.
- Panggil API Create QRIS transaction milik OY!.
- Masukkan parameter “need_frontend” dengan nilai "false".
- Pilih QRIS sebagai metode pembayaran dengan
- Mengisi QRIS dalam parameter list_enable_payment_method.
- Mengisi QRIS dalam parameter list_enable_sof.
- OY! akan mengembalikan URL untuk mengakses kode QR guna menyelesaikan pembayaran.
- Tampilkan kode QR tersebut kepada pelanggan Anda di dalam aplikasi.
Cara Menyelesaikan Pembayaran
Silakan merujuk pada bagian berikut ini.
Memeriksa Status Transaksi
Semua transaksi QRIS Aggregator yang telah dibuat akan ditampilkan di dashboard. Anda dapat pergi ke menu "Routing Pembayaran" untuk melihat daftar transaksi yang telah dibuat. Di dalam dashboard, Anda dapat melihat detail transaksi, termasuk informasi transaksi yang dimasukkan saat pembuatan, status transaksi, dan nomor referensi pembayaran* Dashboard juga memiliki fitur untuk mencari, memfilter, dan mengekspor daftar transaksi dalam berbagai format, seperti Excel (.xlsx), PDF (.pdf), dan CSV (.csv).
Jika Anda tidak menerima callback transaksi dari sistem kami, Anda dapat menggunakan API Check Status untuk mendapatkan status transaksi terbaru. Check Status QRIS Transaction - API Docs.
*Nomor Referensi Pembayaran adalah nomor identifikasi untuk pembayaran yang berhasil ketika pelanggan menyelesaikan transaksi QRIS. Nomor referensi ini juga ditampilkan pada bukti transaksi pelanggan.
Menerima Dana ke Saldo
Setelah pelanggan melakukan pembayaran, OY! akan memperbarui status transaksi dan mengirimkan notifikasi ke sistem Anda untuk mengkonfirmasi bahwa transaksi telah dibayar. OY! kemudian akan menyelesaikan dana ke saldo akun OY! Anda. Namun, waktu penyelesaian (settlement) dapat berbeda tergantung pada metode pembayaran yang digunakan, dengan rentang waktu mulai dari real-time hingga H+2 hari kerja.
API Account Linking
Tautan Pembayaran atau Account Linking adalah fitur yang dapat membantu pelanggan Anda untuk menautkan akun pembayarannya ke sistem Anda melalui proses tokenization. Dengan menautkan akun, pelanggan Anda dapat melihat saldo akun mereka di dalam aplikasi Anda dan nantinya dapat melakukan pembayaran tanpa diminta untuk memasukkan rincian kartu atau nomor E-wallet. Untuk saat ini, fitur ini mendukung E-wallet ShopeePay dan DANA. Fitur ini gratis tanpa biaya sepeser pun.
Alur Account Linking
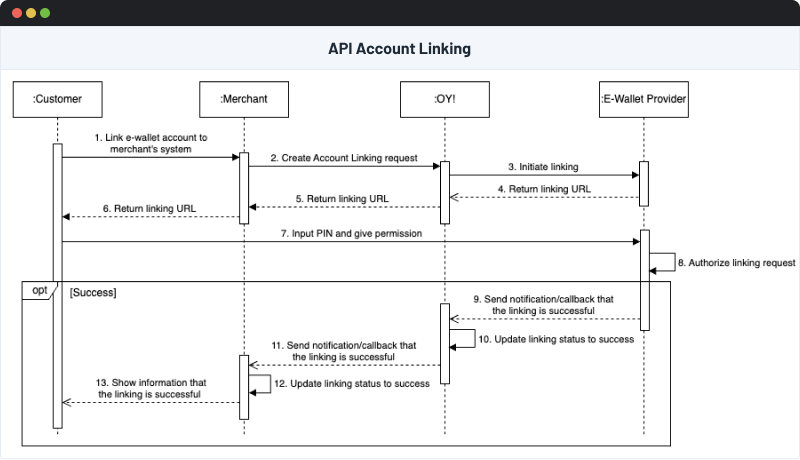
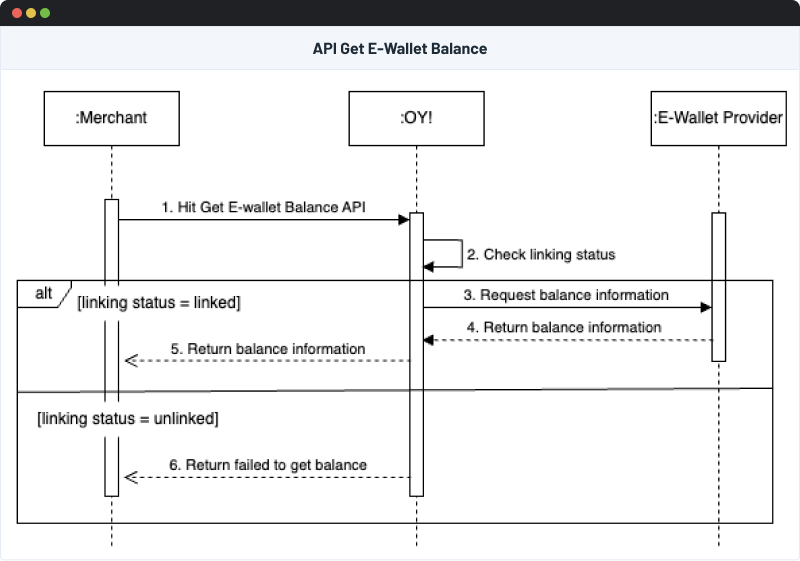
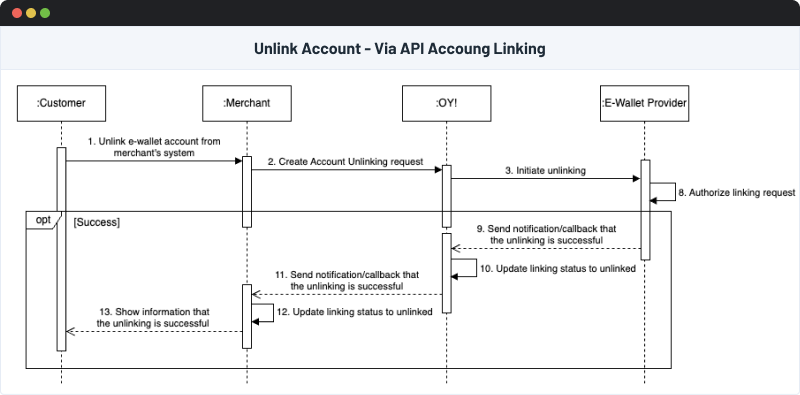
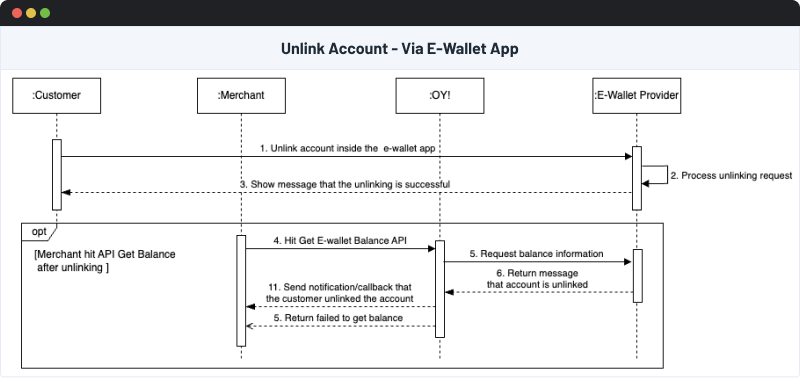
Cara mengaktifkan fitur Account Linking
Ikuti langkah-langkah berikut untuk mengaktifkan fitur Account Linking:
- Buat akun OY! Indonesia.
- Verifikasi akun Anda dengan cara mengisi formulir verifikasi. Pastikan Anda menceklis produk “Terima Uang”, karena fitur ini diperuntukkan untuk produk Terima Uang
- Tim kami akan mereview formulir dan dokumen Anda.
- Setelah akun Anda terverifikasi, siapkan informasi rekening bank penerima sebagai rekening penerima saldo OY!.
Catatan penting: pastikan informasi rekening bank penerima sudah benar, karena tidak dapat diubah melalui dashboard OY! - Kirimkan alamat IP, callback URL, dan redirect URL Anda kepada tim kami atau ke email business.support@oyindonesia.com.
- OY! Akan mengirimkan API Key Production sebagai otorisasi API melalui tim kami.
Catatan: API Key Staging/Demo dapat diakses melalui Dashboard OY! dengan pergi ke mode "Demo," selanjutnya key Anda dapat ditemukan di menu kiri bawah. - Integrasikan API Account Linking ke sistem Anda. Silakan ikuti panduan yang ada di API Documentation di halaman berikut.
Menautkan akun pembayaran pelanggan ke aplikasi Anda
Pelanggan Anda dapat menautkan akun pembayaran mereka ke aplikasi Anda dengan meng-hit API Account Linking. Ikuti langkah-langkah berikut untuk melakukannya :
- Integrasikan API Account Linking ke sistem Anda. Untuk lebih jelasnya, silakan buka halaman berikut.
- Hit API Account Linking. Sebagai respons, Anda akan menerima URL linking. URL ini akan digunakan pelanggan Anda untuk memberikan izin permintaan penautan akun.
- Pelanggan Anda memberikan izin dan memasukkan PIN yang diperlukan untuk mengotorisasi permintaan.
- Penyedia pembayaran akan memproses permintaan, dan OY! akan mengirimkan callback kepada Anda untuk memberitahu bahwa akun telah berhasil ditautkan.
- Setelah akun berhasil ditautkan, pelanggan akan diarahkan kembali ke redirect URL yang Anda tentukan saat proses aktivasi fitur.
Melihat informasi saldo pelanggan Anda
Setelah pelanggan menautkan akun pembayaran mereka, Anda dapat mendapatkan informasi saldo akun pelanggan dengan menggunakan API Get E-Wallet balance. Anda dapat menampilkan saldo tersebut di dalam aplikasi Anda. Misalnya, menampilkan saldo selama proses checkout, sehingga pelanggan dapat mengetahui saldo mereka sebelum memilih metode pembayaran. Anda mendapatkan informasi lebih lanjut mengenai API Get E-Wallet balance di halaman berikut.
Melepas tautan pembayaran pelanggan dari aplikasi Anda
Pelanggan yang telah menautkan akun pembayaran mereka dapat melepasnya kapan saja. Mereka dapat melakukannya melalui API Account Unlinking atau melalui aplikasi penyedia pembayaran. Menggunakan API Account Unlinking memungkinkan pelanggan Anda untuk memutuskan tautan akun di dalam aplikasi Anda. Pilihan lain yang dapat dilakukan pelanggan adalah melepas tautan akun melalui aplikasi penyedia pembayaran.
Ikuti langkah-langkah berikut untuk memandu Anda dan pelanggan Anda saat melepas tautan akun:
API Account Unlinking
- Integrasikan API Account Unlinking ke sistem Anda. Lihat selengkapnya di API Docs.
- Hit API Account Unlinking OY!. Setelah Anda hit API kami, OY! akan meng-hit sistem penyedia pembayaran untuk melepas tautan akun pelanggan.
- OY! akan mengirimkan callback untuk memberi tahu Anda bahwa pelepasan tautan akun berhasil.
Aplikasi Penyedia Pembayaran
ShopeePay
- Pelanggan Anda membuka aplikasi ShopeePay
- Pada menu, pilih OY! sebagai aplikasi yang terhubung
- Pada bawah halaman “Rincian Layanan” , klik “Hentikan Terhubung ke Layanan”
DANA
- Pelanggan Anda membuka aplikasi DANA
- Pilih Akun → Akun Terhubung
- Klik “Lihat Lebih” pada OY!
- Checklist salah satu atau semua perangkat yang terhubung
- Pilih “Hapus Semua”
Account Receivable
Payment Link Account Receivable product provides features to help you manage your invoices and payments. This product supports invoice customization and payment customization based on your customer needs. Creation for Account Receivable is available on OY! dashboard and/or API.
Disclaimer: the word “account receivable” is used interchangeably with “invoice” in this document
Payment Flow
- You create account receivable (i.e. invoice) for your customers and share it through email or WhatsApp
- Your customers can make payments either through the link attached to the invoice or directly via a Virtual Account (VA) number.
- OY! detects the payments and notifies you about the payments through callback and payment status update on your dashboard
- The payments received will be settled in your OY! dashboard
Key Features
Various options of creating account receivable
1. Creating account receivable through dashboard
- No integration needed
Offer easiest way to invoicing through dashboard without any technical development.
- Manage your customer data easily
You can edit or deactivate the customer data as you need. The customization includes taxes imposed and type of payment as explained below (with payment invoice link or fixed virtual account), so it can be customizable according to your needs.
- Various payment methods
We have various payment options that you can use to receive payments from your customer:
- Payment invoice link (Bank Transfer (via Virtual Account and Unique Code), Credit/Debit card, E-Wallet (ShopeePay, DANA, LinkAja, OVO), QRIS, and Retail outlets (Alfamart and Indomaret))
- Fixed Virtual Account. Fixed VA is a virtual account where your customer uses the same account number for every payment. This means they will pay the same virtual account for every invoice you send. However, you can’t send a new invoice to the customer until the previous one has been paid.
- Customizable Invoice to Personalize Your Business
Create invoice templates based on your business personalization. We provide a lot of invoice templates and are able to change the color and business logo that suits your business branding.
2. Creating account receivable through API
Seamless integration with your customer's purchase journey. Simply send us an API request and we will respond with an account receivable (i.e. invoice) link that you can embed to your system.
Added level of customization Below are the things that you can customize:
- Amount (specify the amount and choose between open amount vs closed amount)
- Admin fee (choose whether the admin fee will be paid by your customers or borne by you)
- Payment method (choose the payment methods displayed to your customers among Bank Transfer (via Virtual Account and Unique Code), Credit/Debit card, E-Wallet (ShopeePay, DANA, LinkAja, OVO), QRIS, and retail outlets (Alfamart and Indomaret). Additionally, you can choose which banks are enabled for Bank Transfer method.
- Payment invoice expiration date
- The customer data for invoicing
Various Payment Methods. Our payment invoice provides multiple payment options: Bank Transfer (via Virtual Account and Unique Code), Credit/Debit card, E-Wallet (ShopeePay, DANA, LinkAja, OVO), QRIS, and retail outlets (Alfamart and Indomaret).
Upload or Create a PDF for your Invoice Billing. We help you to generate your invoice using OY! PDF templates also you can attach your invoice supporting documents via our API.
Account Receivable Delivery by Email and/or WhatsApp. You can choose to send the created link to your customers through Email and/or WhatsApp for better payment conversion. By default, our system will send the invoice through email but if you want to share the invoice and payment invoice link through WhatsApp, follow the steps here.
Capability to monitor payment invoice/account receivable details on dashboard
Whether you create the account receivable through dashboard or API, you can check the list of transactions through dashboard easily.
Support Multi Entity Management
With this feature, you will be able to create invoices from your users through account receivable created on behalf of a Sub-Entity account. When your customers make a successful transaction, the transaction will be recorded in the Sub-Entity Account's balance. As a main account, you can view the Sub-Entity Account's balance and transaction list anytime under “Sub-Entity Statement” in the “Multi Entity” menu.
Click here for more information on this feature.
Registration and Set Up
For dashboard-generated invoices
Follow this check-list to ensure you're all set up to use the service:
- Create an account for OY! business
- Upgrade your account by submitting the required documentation
- Have your upgrade request approved
- Set up your receiving bank account information (note: ensure that the receiving bank account information is accurate as it cannot be changed via OY! dashboard for security reasons)
- Once your account is approved, you can start creating account receivable transactions
For API-generated invoices
- Create an account OY! business
- Upgrade your account by submitting the required documentation
- Have your upgrade request approved
- Set up your receiving bank account information (note: ensure that the receiving bank account information is accurate as it cannot be changed via OY! dashboard for security reasons)
- Submit your IPs to your business representative
- Set your callback URLs in “Developer Option” under the “Settings” menu. Please input your callback URLs in the Payment Link’s section
- Receive an API Key from us (note: it is required for API authorization purpose)
- Integrate with our Account Receivable API
Testing
Creating dashboard-generated dummy account receivable
- Log on to your OY! dashboard
- Choose "Demo" environment
- Click “Customer Data” under Receive Money menu
- Click “Create New Customer” on the top right corner
- Fill in the required fields regarding Customer Information then click “Next”
- Fill in the required fields regarding Tax and Payment Information then click “Save”
- Start to create a new invoice by choosing “Account Receivable” under the Receive Money menu
- Click "Create New Invoice" on the top right corner
- Fill in the necessary details
| Parameter | Description |
|---|---|
| Invoice Number | The number of the invoice to be created |
| Invoice Date | The date of the invoice |
| Due Date | Due date of a transaction. You can choose between 7, 14, 30, 45, or 60 days after the created date of the invoice OR you can also input a specific/custom date. Your customer will get reminders to pay on D-1, D-Day, and D+7 from the transaction due date through email. |
| Link Expiry Datetime | You can set your payment invoice link expiry date and time for your convenience. The expiry time selected will also appear on PDF documents. |
| Customer | The name of the customer whom the invoice is addressed to. You can choose the name of the customer from the dropdown. To create a new customer, follow the instructions here. |
| Product Description | The name and/or description of the product |
| Quantity | The quantity of the product |
| Unit Price | Unit price of the product |
| Amount | Total amount for the product (amount = quantity x unit price) |
| Notes | The note to be displayed in the automatically generated invoice file |
| Additional Documents | The supporting documents that will be attached in the email along with the invoice. Accept PDF & Excel files. Maximum of 4 documents (maximum 5MB each). |
| Invoice Payment | You can choose between "Payment Link" (the invoice will be embedded with a payment link that the customer can use to make a payment) or "Invoice Only" (the invoice will not be embedded with a payment link). For "Invoice Only", invoice status can be adjusted at any time for record purposes. |
| Payment Method | The payment method that you can choose to enable/disable for your customers only if you choose “Payment Link” as your invoice payment type above. The payment methods available are Bank Transfer (via Virtual Account and Unique Code), Credit/Debit card, E-Wallet (ShopeePay, DANA, LinkAja, OVO), QRIS, and retail outlets (Alfamart and Indomaret). |
| Admin Fee Method | You can choose between "Included in total amount" or "Excluded from total amount". "Included in total amount" means the admin fee will be deducted from the payment amount made by the customer. "Excluded from total amount" means the admin fee will be added to the customer's total payment (Total Amount = Specified Amount + Admin Fee) |
Creating API-generated dummy account receivable
- Create an OY! business account
- Send a request to activate API Payment Link product and obtain staging API Key to your business representative
- Create the customer data first by sending a request to https://api-stg.oyindonesia.com/api/account-receivable/customers. Enter the required and optional fields, as referenced in the API reference docs
- Then, you can try to create an account receivable by sending a request to https://api-stg.oyindonesia.com/api/account-receivable/invoices. Enter the required and optional fields, as referenced in the API reference docs
Accessing and monitoring the created test account receivable
Whether you create the link through dashboard or API, you can see the details of your link on the OY! Dashboard, you can check it on “Account Receivable” under the Receive Money menu.
Mock Credentials for Testing
- For payment via Credit Card or Debit Card, you may use the credentials below to simulate an end-to-end payment journey for a successful transaction in the staging environment:
| Card Details | Values |
|---|---|
| Card Number | 2223000000000007 |
| Card Expired Month/Year | 01/39 |
| Card CVN | 100 |
| Card Holder Name | John Doe |
- Click the payment invoice link
- You’ll be redirected to page to choose which transaction you want to proceed
- Choose your payment method (in this case please choose “Credit/Debit Card”) then click “Bayar”
- You’ll be redirected to the summary of the payment
- Please click “Bayar via CARDS”
- You’ll be redirected to page to process your payment
- Please fill in the credentials above, email, phone number, and also mark the box for terms and conditions then click “Pay”
- You’ll see loading page that informs you the system is processing your payment
- Congratulations! You’ve completed your (dummy) payment on account receivable using credit/debit card
- For bank transfer you can test process payment from payment invoice link and mock the transaction using callback from our OY! Dashboard with demo environment
- Click the payment invoice link
- You’ll be redirected to page to choose which transaction you want to proceed
- Choose your payment method (in this case please choose bank transfer BCA) then click “Bayar”
- You’ll see loading page that informs you the system is processing your payment
- Copy the VA number then open the OY! dashboard and choose demo environment
- Go to section “Callback Bank Transfer” under the “Settings” menu
- Select the Transaction Type (in this case please select “Virtual Account”), Bank Name, VA Number, Amount, and Payment Date and Time then click “Send Callback”
- Congratulations! You’ve completed your (dummy) payment on account receivable using bank transfer
- For e-wallet you can test to process payment from payment invoice link, specifically Shopeepay and LinkAja
- Click the payment invoice link
- You’ll be redirected to page to choose which transaction you want to proceed
- Choose your payment method (in this case please choose e-wallet category) then click “Bayar”
- You’ll see loading page that informs you the system is processing your payment
- Go to “One Time” on section “Payment Link”
- Copy the “Ref Number” on transaction you’ve created for Account Receivable (you can see the amount of transaction and customer name)
- Go to the “E-wallet Callback”
- Choose e-wallet type you’ve choose on the payment link
- Paste the “Ref Number” on the form Ref Number
- Put the amount of transaction
- Click “Send Callback”, you can check your transaction successfully paid on Account Receivable (demo) page
- Congratulations! You’ve completed your (dummy) payment on account receivable using e-wallet
Note: Currently we only provide dummy transactions using credit/debit card, bank transfer, and e-wallet. Please use only the mentioned payment method, otherwise your payment may not be processed successfully.
How to Use Account Receivable via Dashboard
- Log on to your OY! dashboard
- Choose "Production" environment
- Choose “Account Receivable” under Receive Money menu
- Click "Create New Invoice" on the top right corner
- Fill in the necessary details
| Parameter | Description |
|---|---|
| Invoice Number | The number of the invoice to be created |
| Invoice Date | The date of the invoice |
| Due Date | Due date of a transaction. You can choose between 7, 14, 30, 45, or 60 days after the created date of the invoice OR you can also input a specific/custom date. Your customer will get reminders to pay on D-1, D-Day, and D+7 from the transaction due date through email. |
| Link Expiry Datetime | You can set your payment invoice link expiry date and time for your convenience. The expiry time selected will also appear on PDF documents. |
| Customer | The name of the customer whom the invoice is addressed to. You can choose the name of the customer from the dropdown. To create a new customer, follow the instructions here. |
| Product Description | The name and/or description of the product |
| Quantity | The quantity of the product |
| Unit Price | Unit price of the product |
| Amount | Total amount for the product (amount = quantity x unit price) |
| Notes | The note to be displayed in the automatically generated invoice file |
| Additional Documents | The supporting documents that will be attached in the email along with the invoice. Accept PDF & Excel files. Maximum of 4 documents (maximum 5MB each). |
| Invoice Payment | You can choose between "Payment Link" (the invoice will be embedded with a payment link that the customer can use to make a payment) or "Invoice Only" (the invoice will not be embedded with a payment link). For "Invoice Only", invoice status can be adjusted at any time for record purposes. |
| Payment Method | The payment method that you can choose to enable/disable for your customers. The payment methods available are Bank Transfer (via Virtual Account and Unique Code), Cards (Credit Card/Debit Card), E-Wallet (ShopeePay, DANA, LinkAja, OVO), QRIS, and retail outlets (Alfamart and Indomaret). |
| Admin Fee Method | You can choose between "Included in total amount" or "Excluded from total amount". "Included in total amount" means the admin fee will be deducted from the payment amount made by the customer. "Excluded from total amount" means the admin fee will be added to the customer's total payment (Total Amount = Specified Amount + Admin Fee) |
Create Invoice form
Invoice details inside dashboard
Invoice preview inside the dashboard
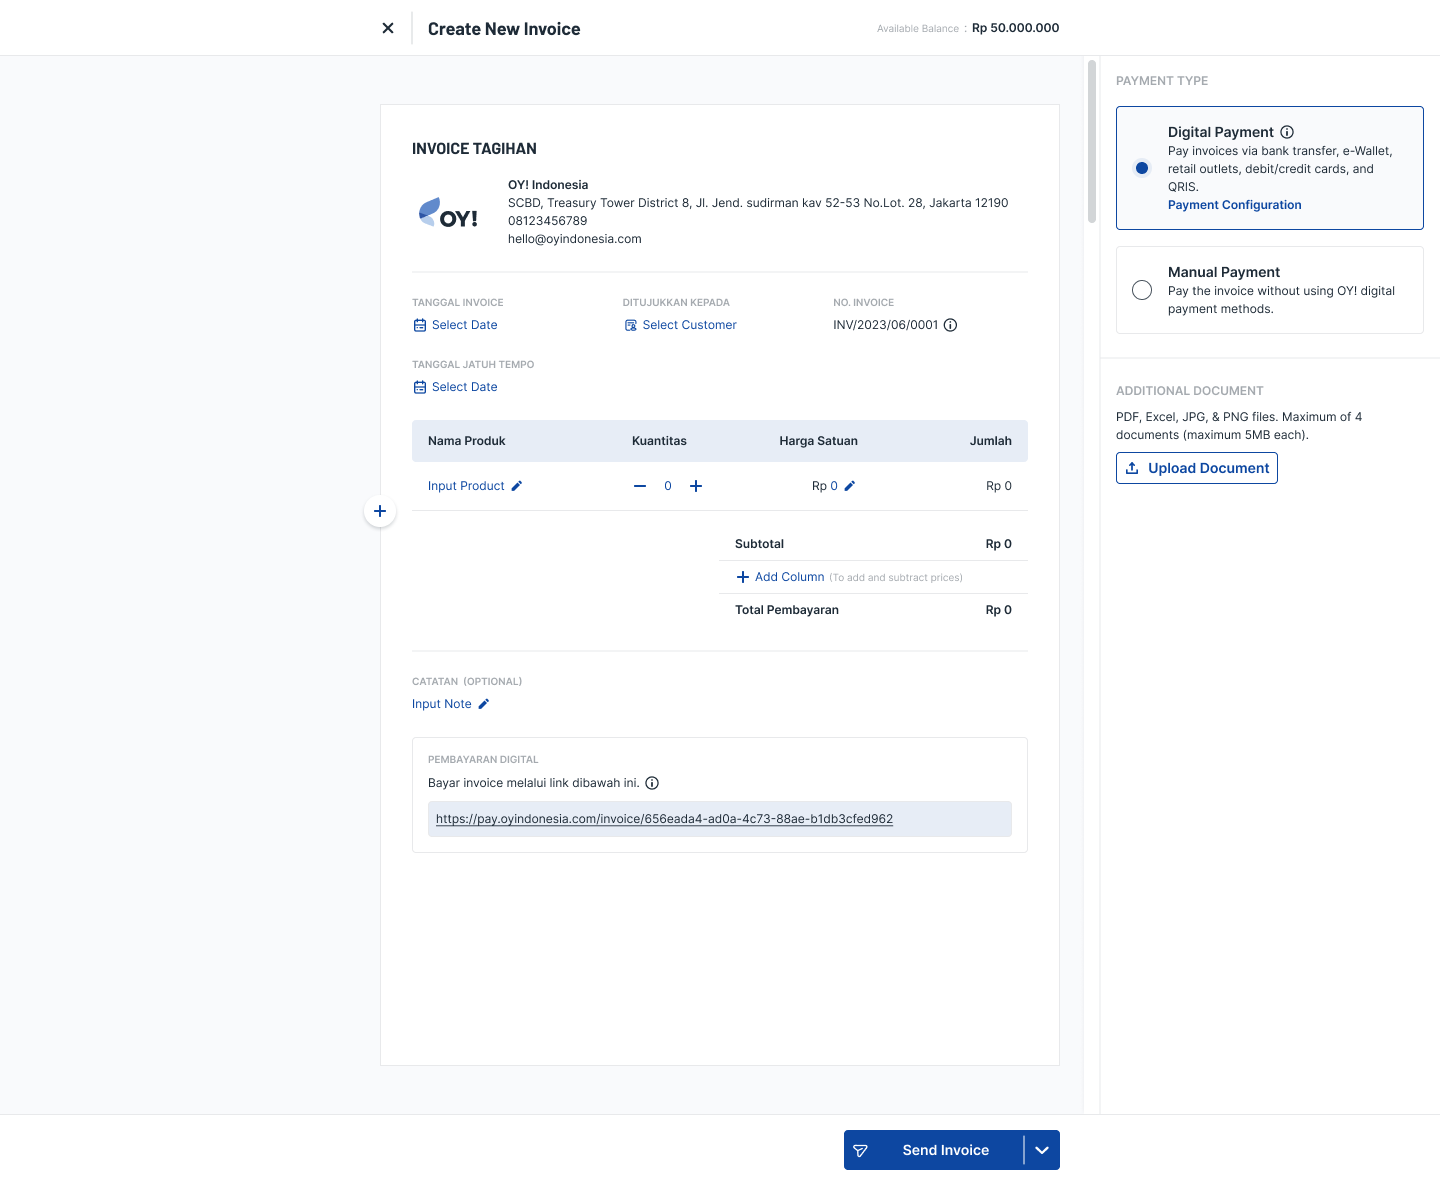
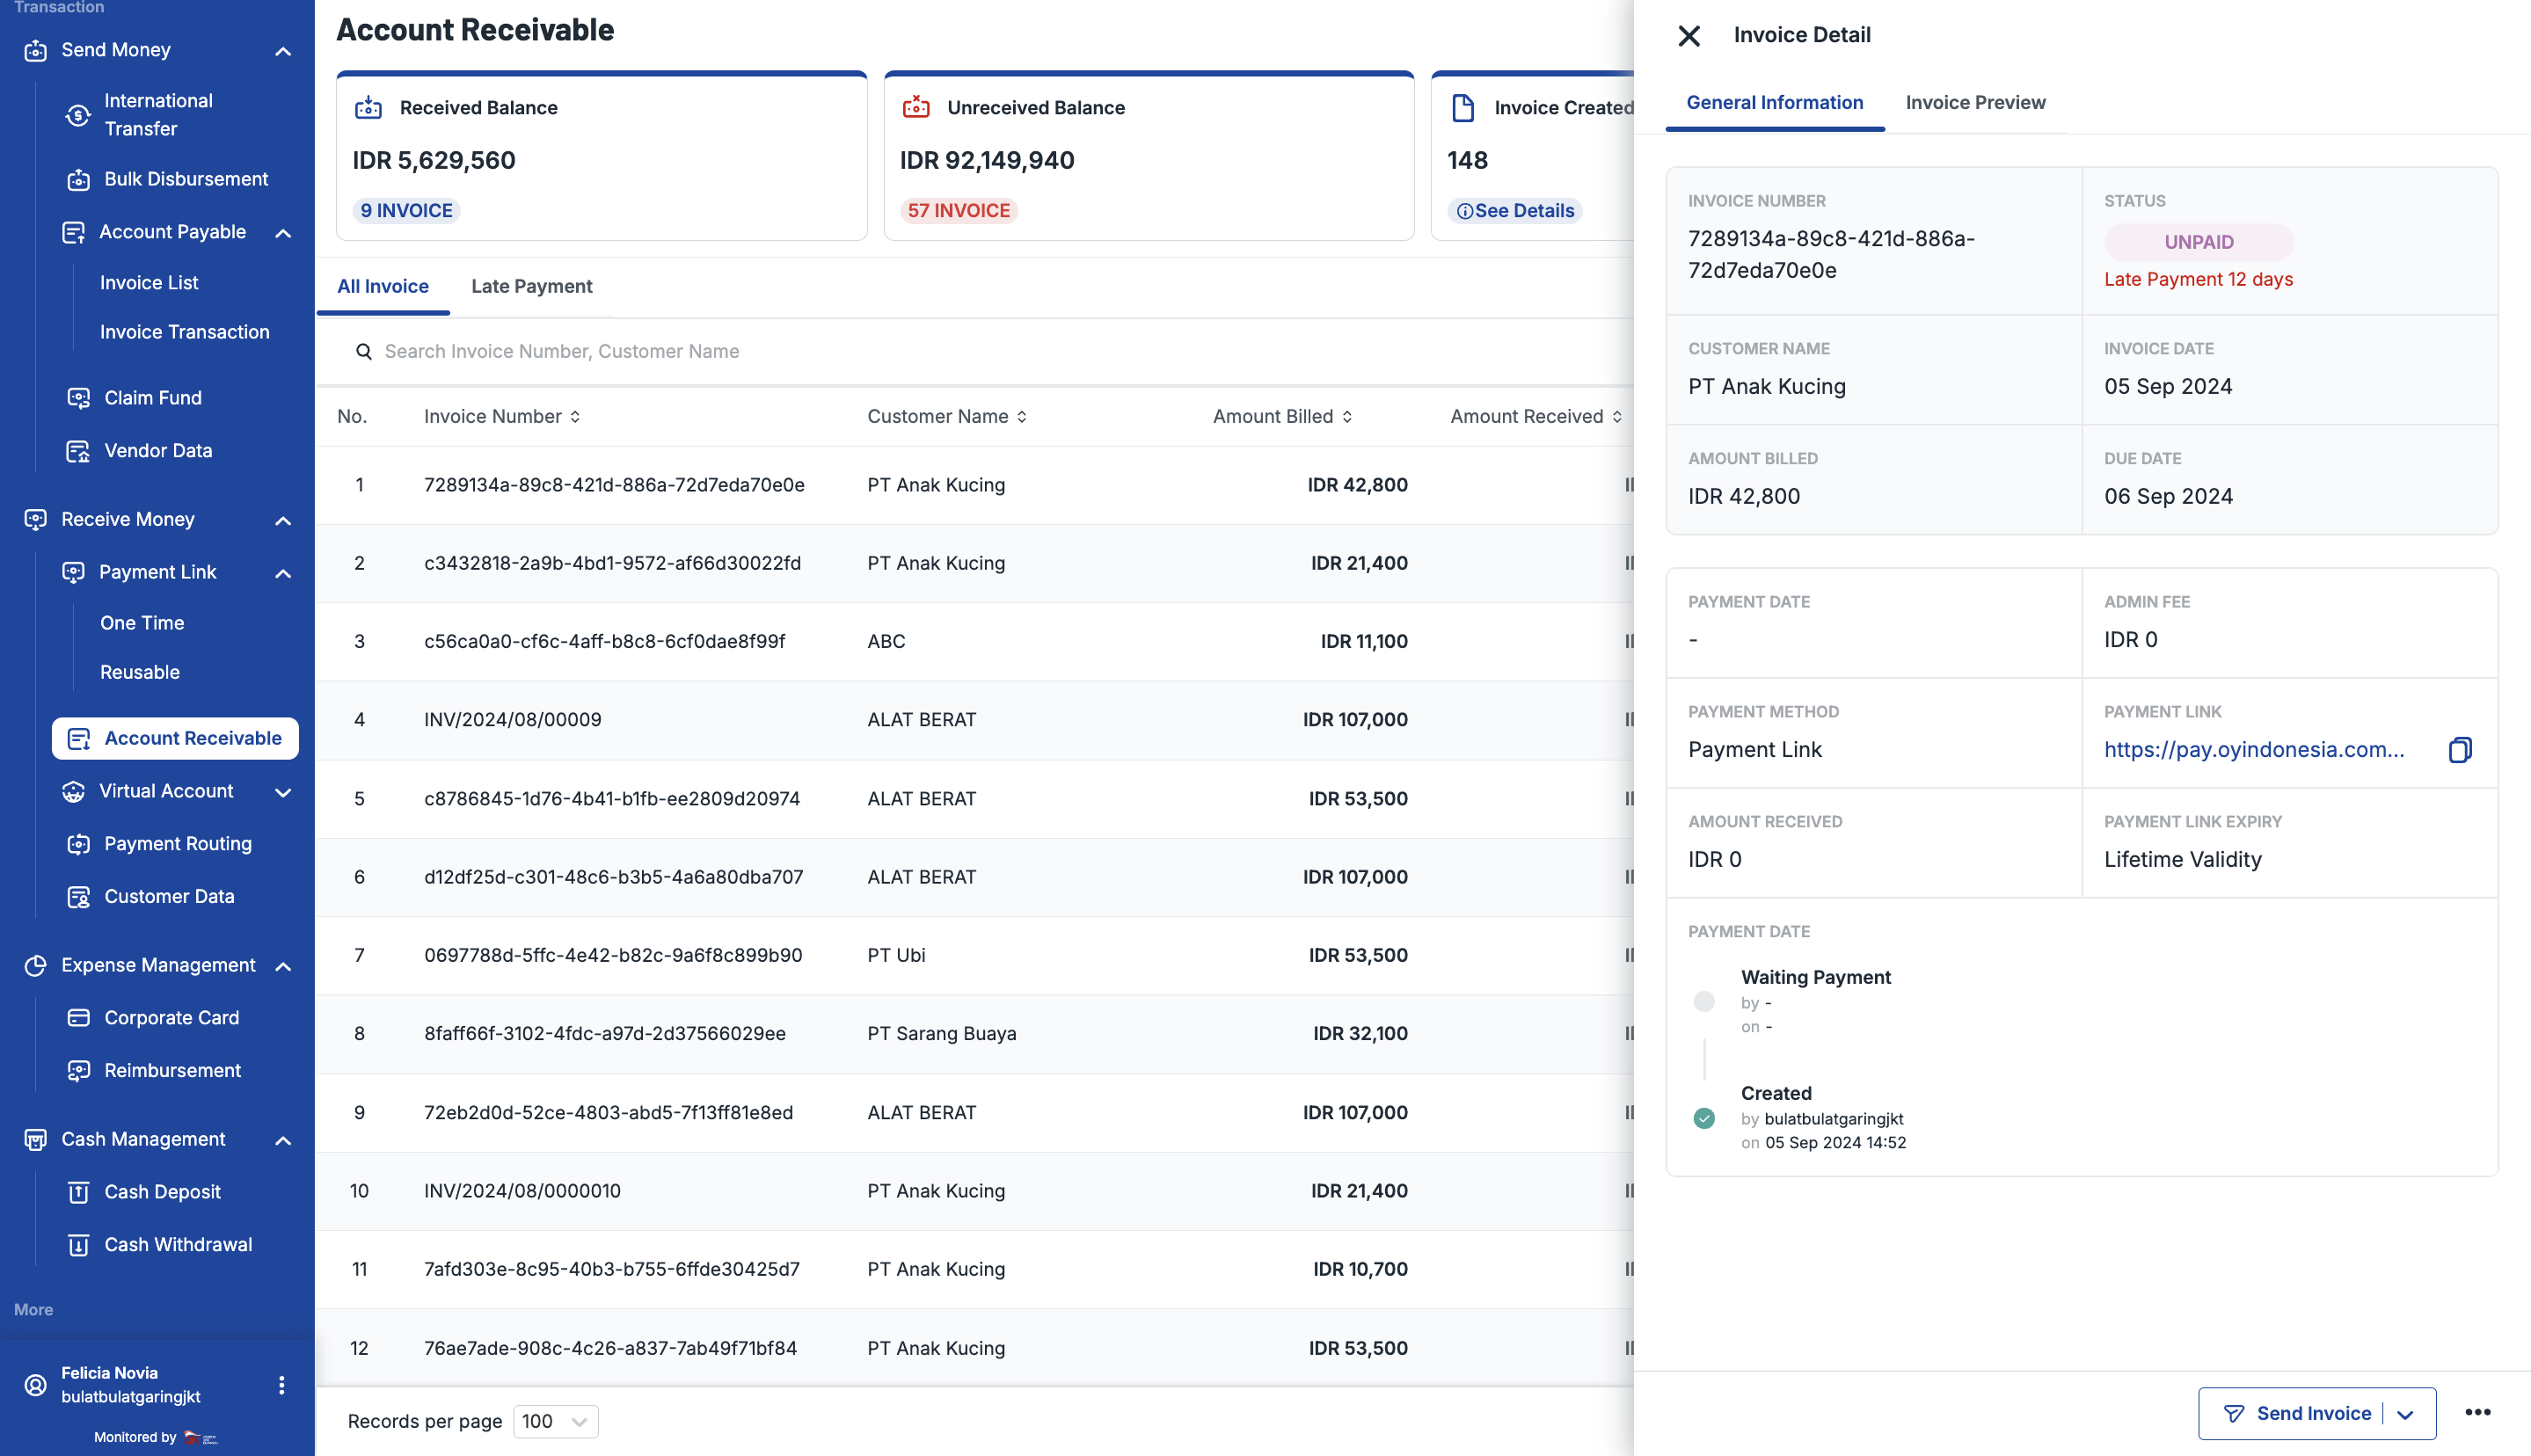
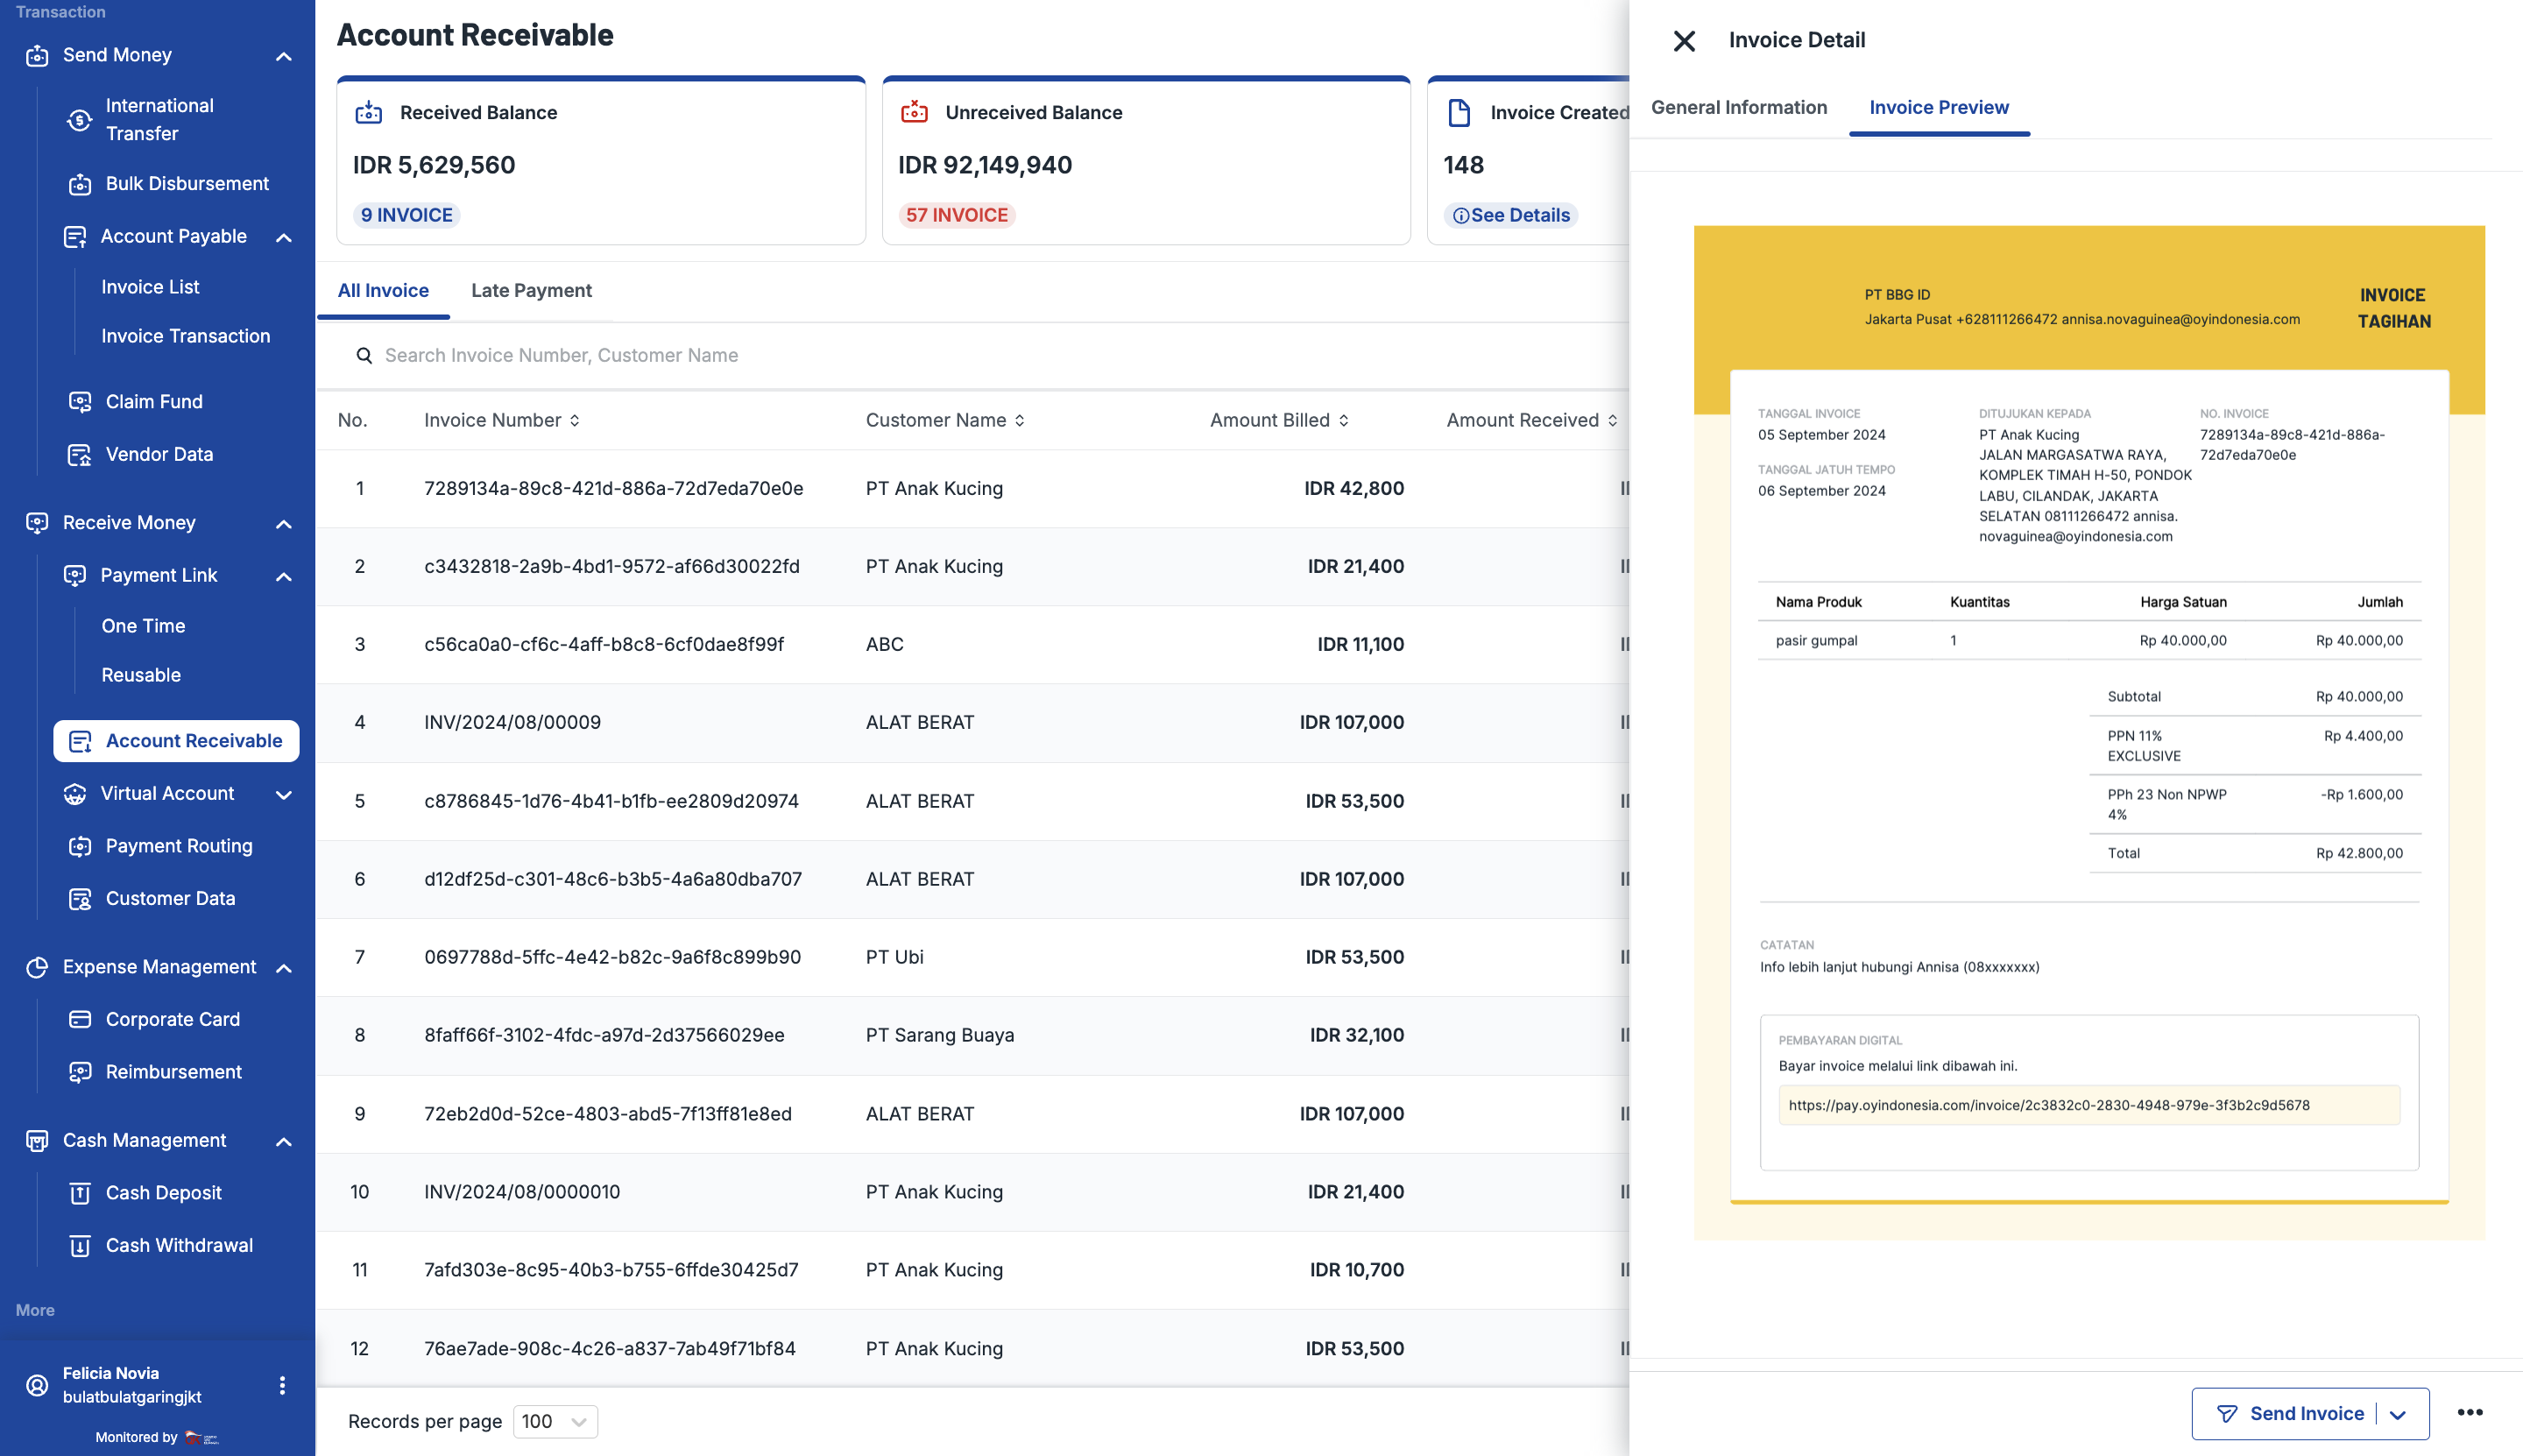
Monitoring the account receivable
All of the created invoices (via API or Dashboard) can be monitored through your dashboard (Invoice List).
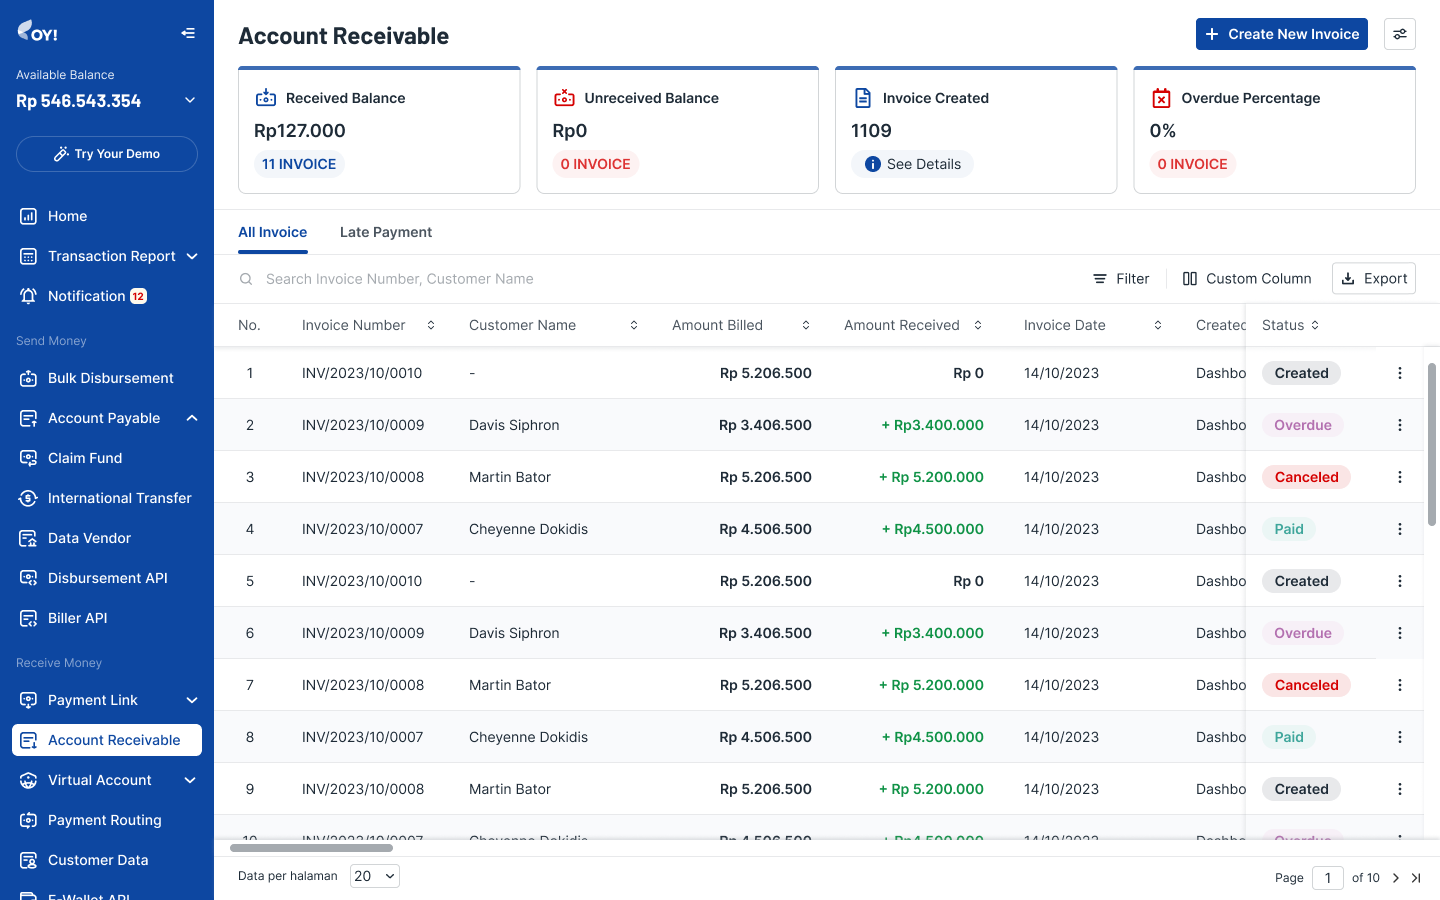
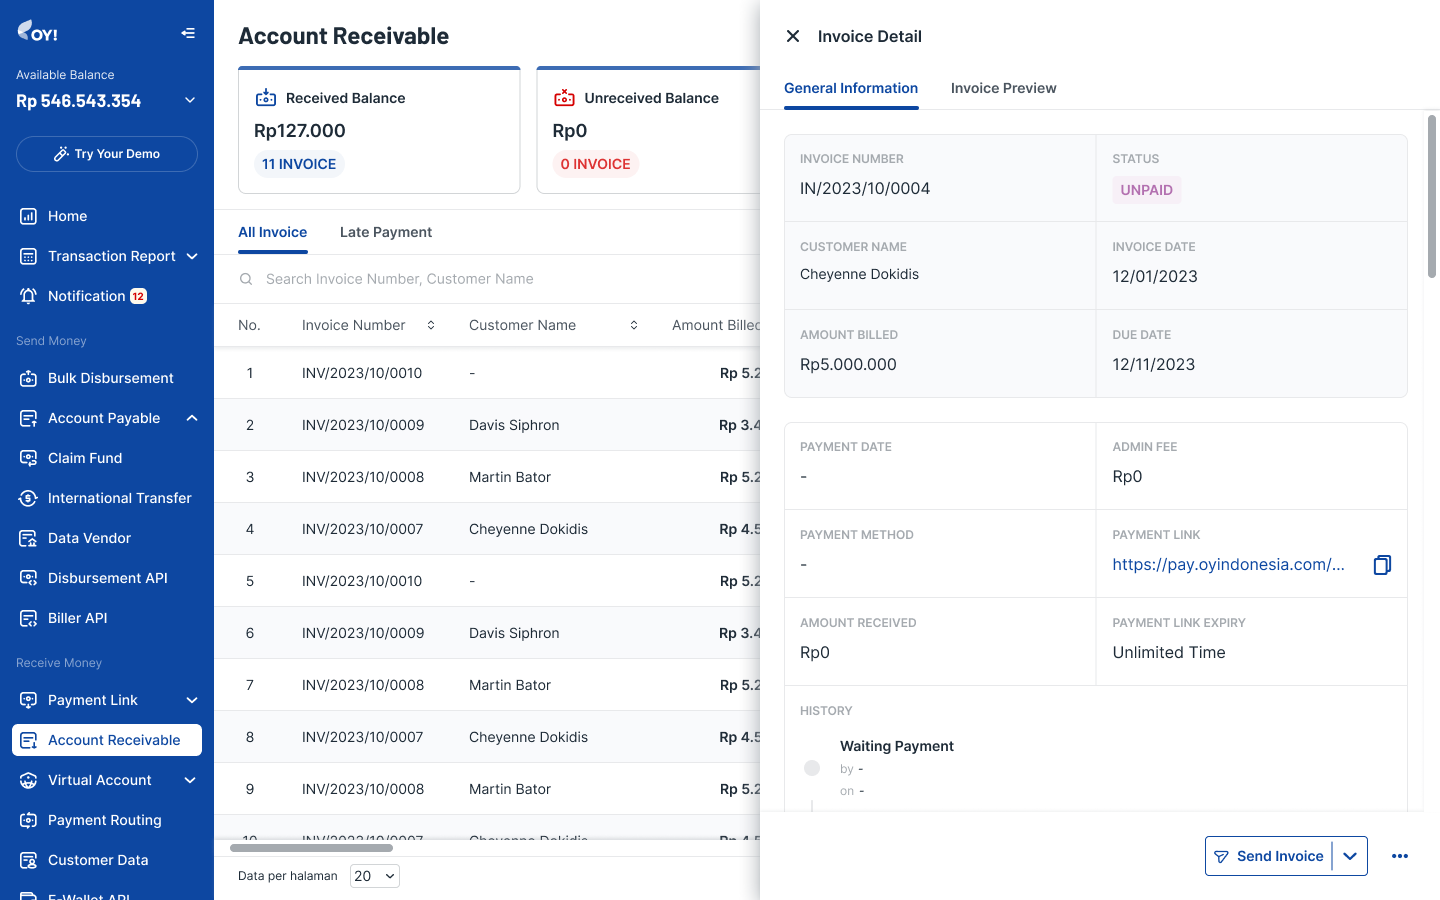
The transaction details that you can see are:
| Column Name | Definition |
|---|---|
| Invoice Number | The number of the invoice created |
| Customer Name | The name of the customer whom the invoice belongs to the amount billed for that particular transaction |
| Amount Billed | The amount billed for that particular transaction |
| Admin Fee | The admin fee charged for that particular transaction |
| Amount Received | The amount received / the amount of payment made by the customer. This will only be filled in after the customer has completed the payment |
| Invoice Date | The date of the invoice |
| Payment Date | The date of payment (if the invoice has been successfully paid by the customer) |
| Due Date | The invoice due date |
| Days Past Due | How many days an invoice has gone unpaid past the due date. For example, if the due date is 1 July and the invoice is not paid by 4 July, then Days Past Due will be filled in with “Late Payment 3 days”. |
| Payment Link Expiry | Maximum date and time that a payment link can stay valid for before expiring permanently. |
| Status | The transaction status. Possible values are CREATED, PAID, CANCELED, and OVERDUE |
In terms of status, below are the status mapping between API Invoice and status in dashboard
| API Invoice Status | Dashboard Status |
|---|---|
| CREATED, WAITING PAYMENT | UNPAID |
| PAID | PAID |
| CANCELLED | CANCELED |
| OVERDUE | UNPAID (with details under the Late Payment Tab on the Invoice Details page) |
Definition for each status
| API Invoice Status | Explanation |
|---|---|
| CREATED | You already created the account receivable invoice and the customer hasn't made any action. |
| WAITING PAYMENT | Your customer already chooses the payment method and needs to pay before the time limit ends. |
| PAID | Your customer has successfully paid the invoice. |
| CANCELLED | The invoice has already been deleted (this can be from OY! dashboard or API request). |
| OVERDUE | The invoice has passed the invoice payment deadline. |
There are several actions that you can take for the created invoice:
| Action | Definition |
|---|---|
| Send invoice | Send the invoice to the customer's defined email |
| Download invoice | Download the PDF file of the invoice |
| Delete | Delete the invoice. Only invoice with status CREATED can be deleted |
Creating a Customer for Account Receivable
There are 2 ways to create a Customer:
Option 1: through “Create Invoice” 1. Click “Select Customer” 1. Click "Add New Customer" 1. Fill in Customer ID, Customer Name (mandatory), PIC Name, Customer Phone Number, Customer Email, Address, and Tax Type (mandatory). 1. Click “Save”
Create Invoice page
Add Customer from Create Invoice
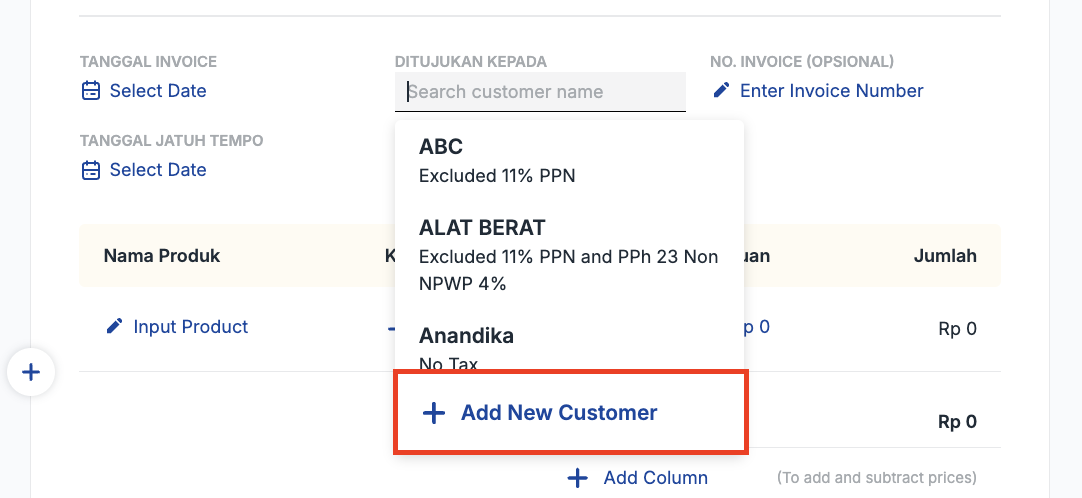
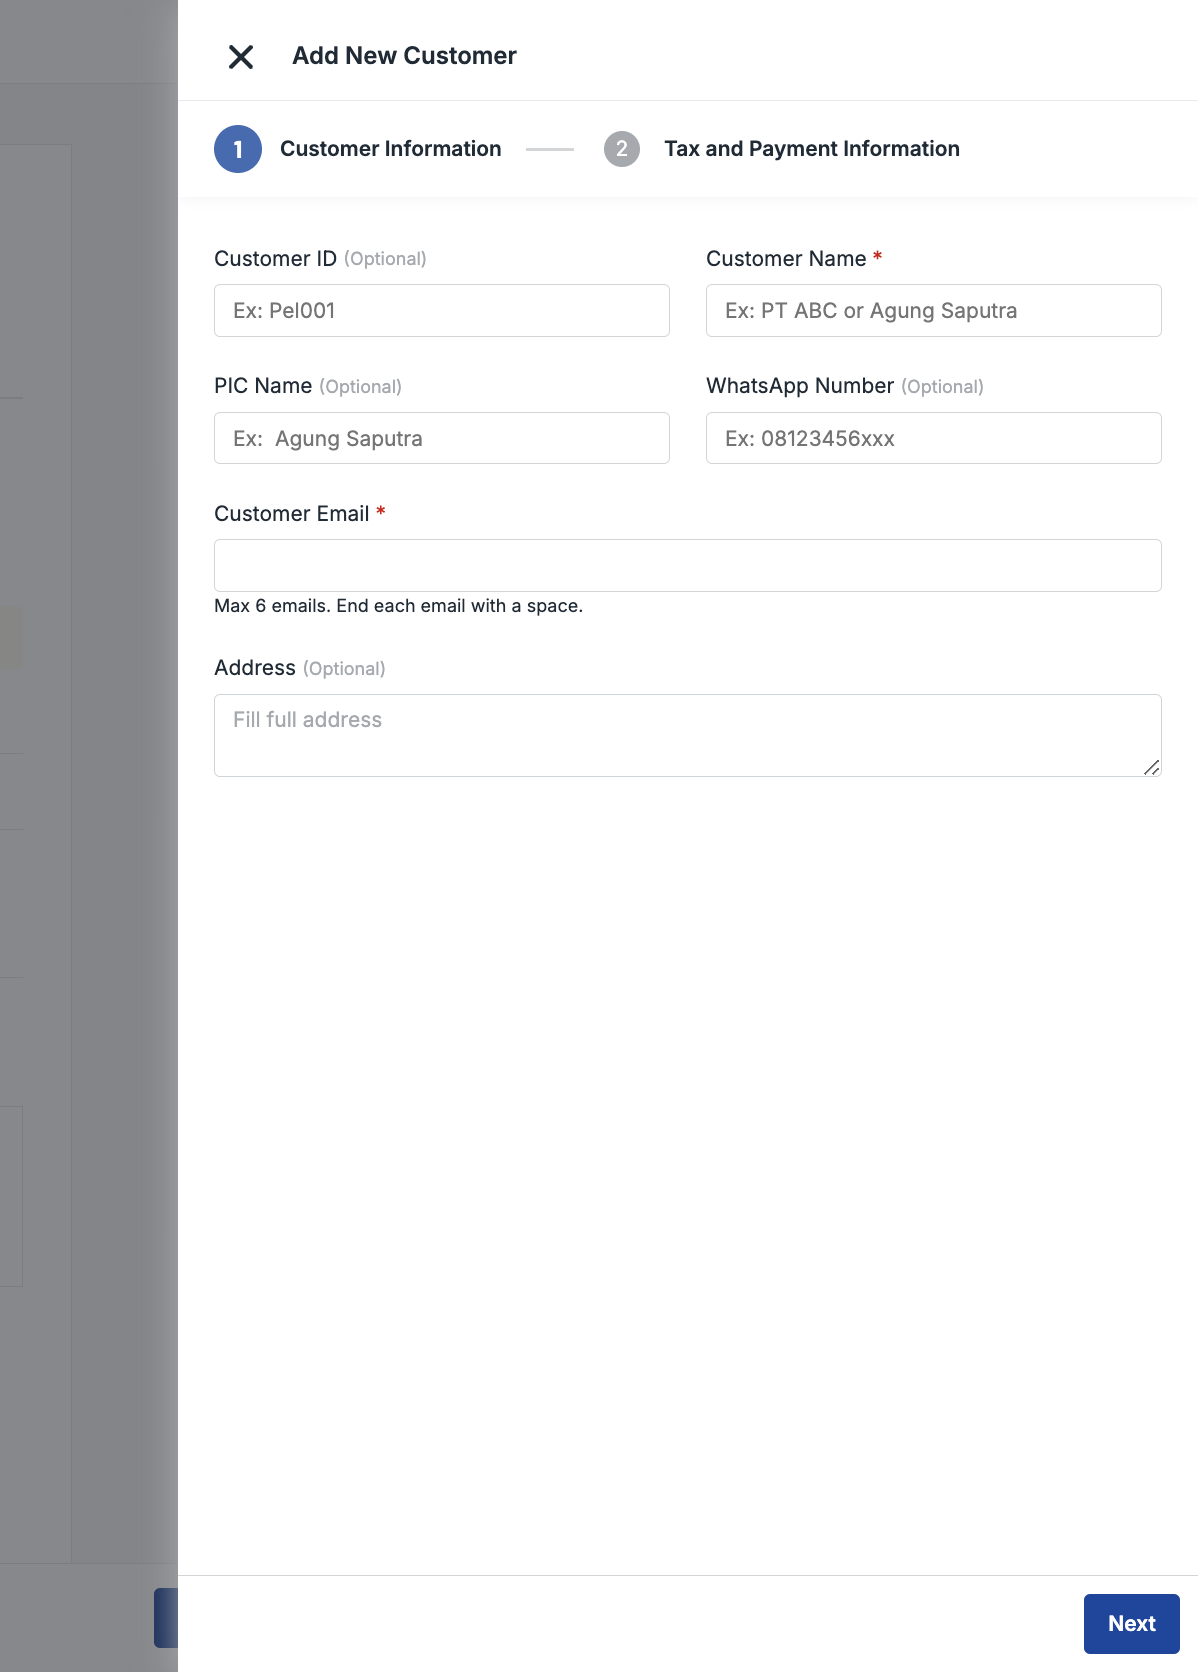
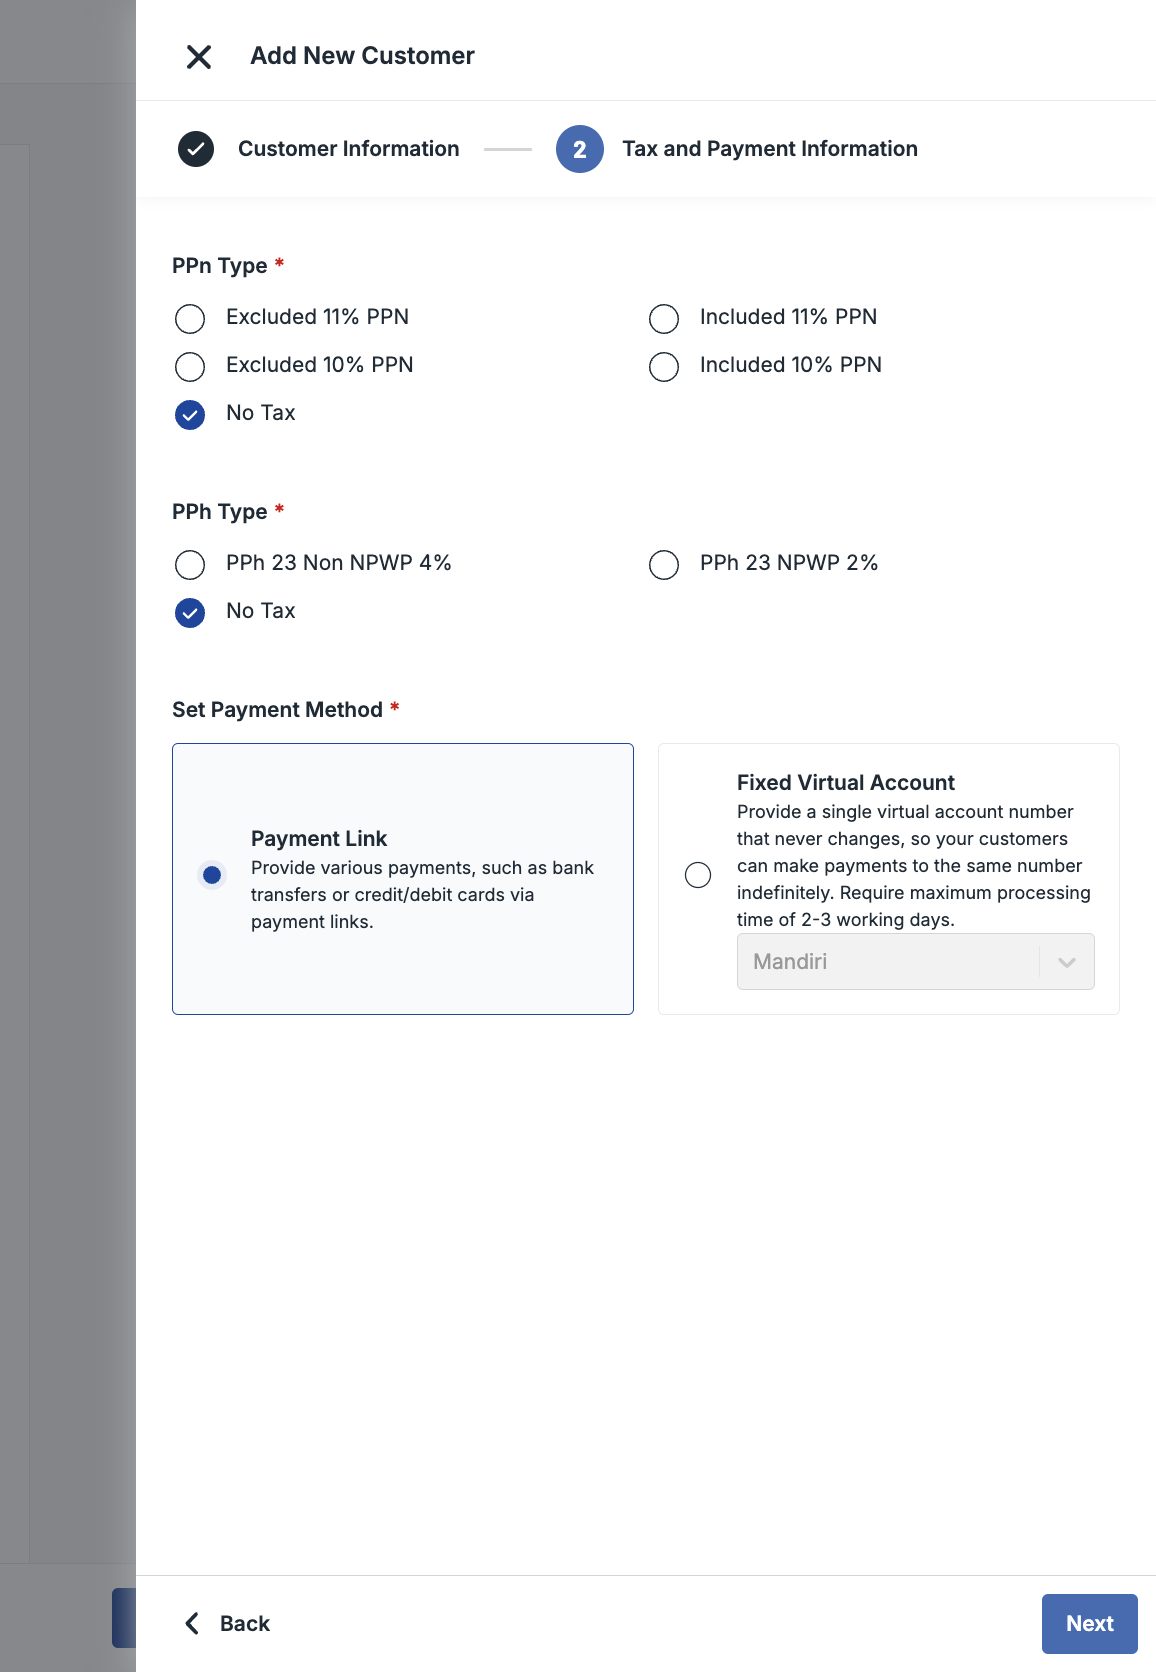
For tax type, explanation is as follows:
| Tax Type | Definition |
|---|---|
| No tax | Tax will not be added to the subtotal |
| PPN 10% Inclusive | Tax will not be added upon the subtotal because the subtotal is assumed to be tax inclusive. For transactions prior to April 2022, a 10% PPN applies. |
| PPN 10% Exclusive | Tax will be added separately to the subtotal. For transactions prior to April 2022, a 10% PPN applies. |
| PPN 11% Inclusive | Tax will not be added upon the subtotal because the subtotal is assumed to be tax inclusive. PPN 11% is applicable for transactions after April 2022. |
| PPN 11% Exclusive | Tax will be added separately to the subtotal. PPN 11% is applicable for transactions after April 2022. |
| PPh 23 Non NPWP 4% | Tax will be subtracted from the subtotal |
| PPh 23 NPWP 2% | Tax will be subtracted from the subtotal |
Option 2: Through "Customer Management" menu 1. Click "Customer Management" sidebar under the "Receive Money" menu 1. Click "Add new customer" 1. Fill in Customer ID, Customer Name (mandatory), PIC Name, Customer Phone Number, Customer Email, Address then click “Next” 1. Fill in Tax Type (mandatory) then click "Save"
Customer Management page
Create Customer page
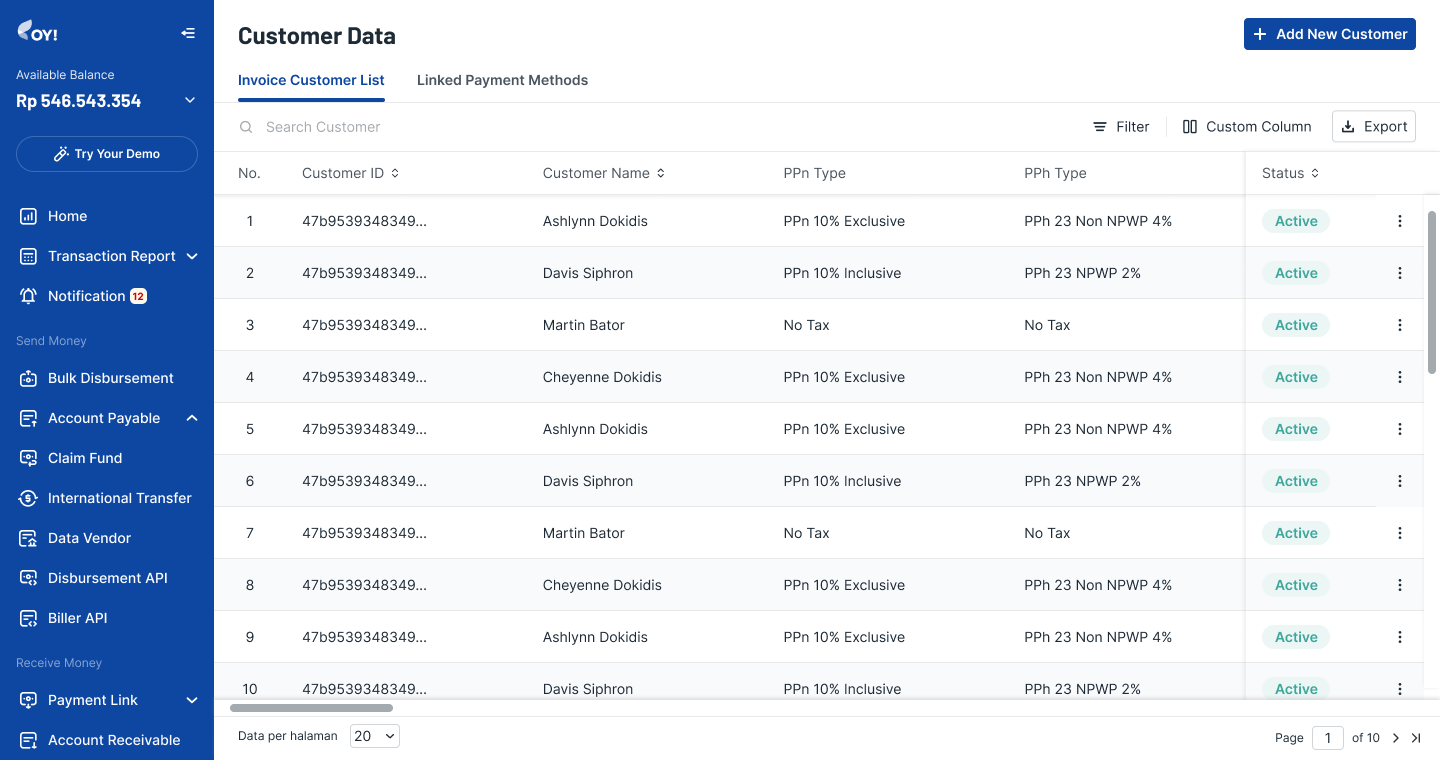
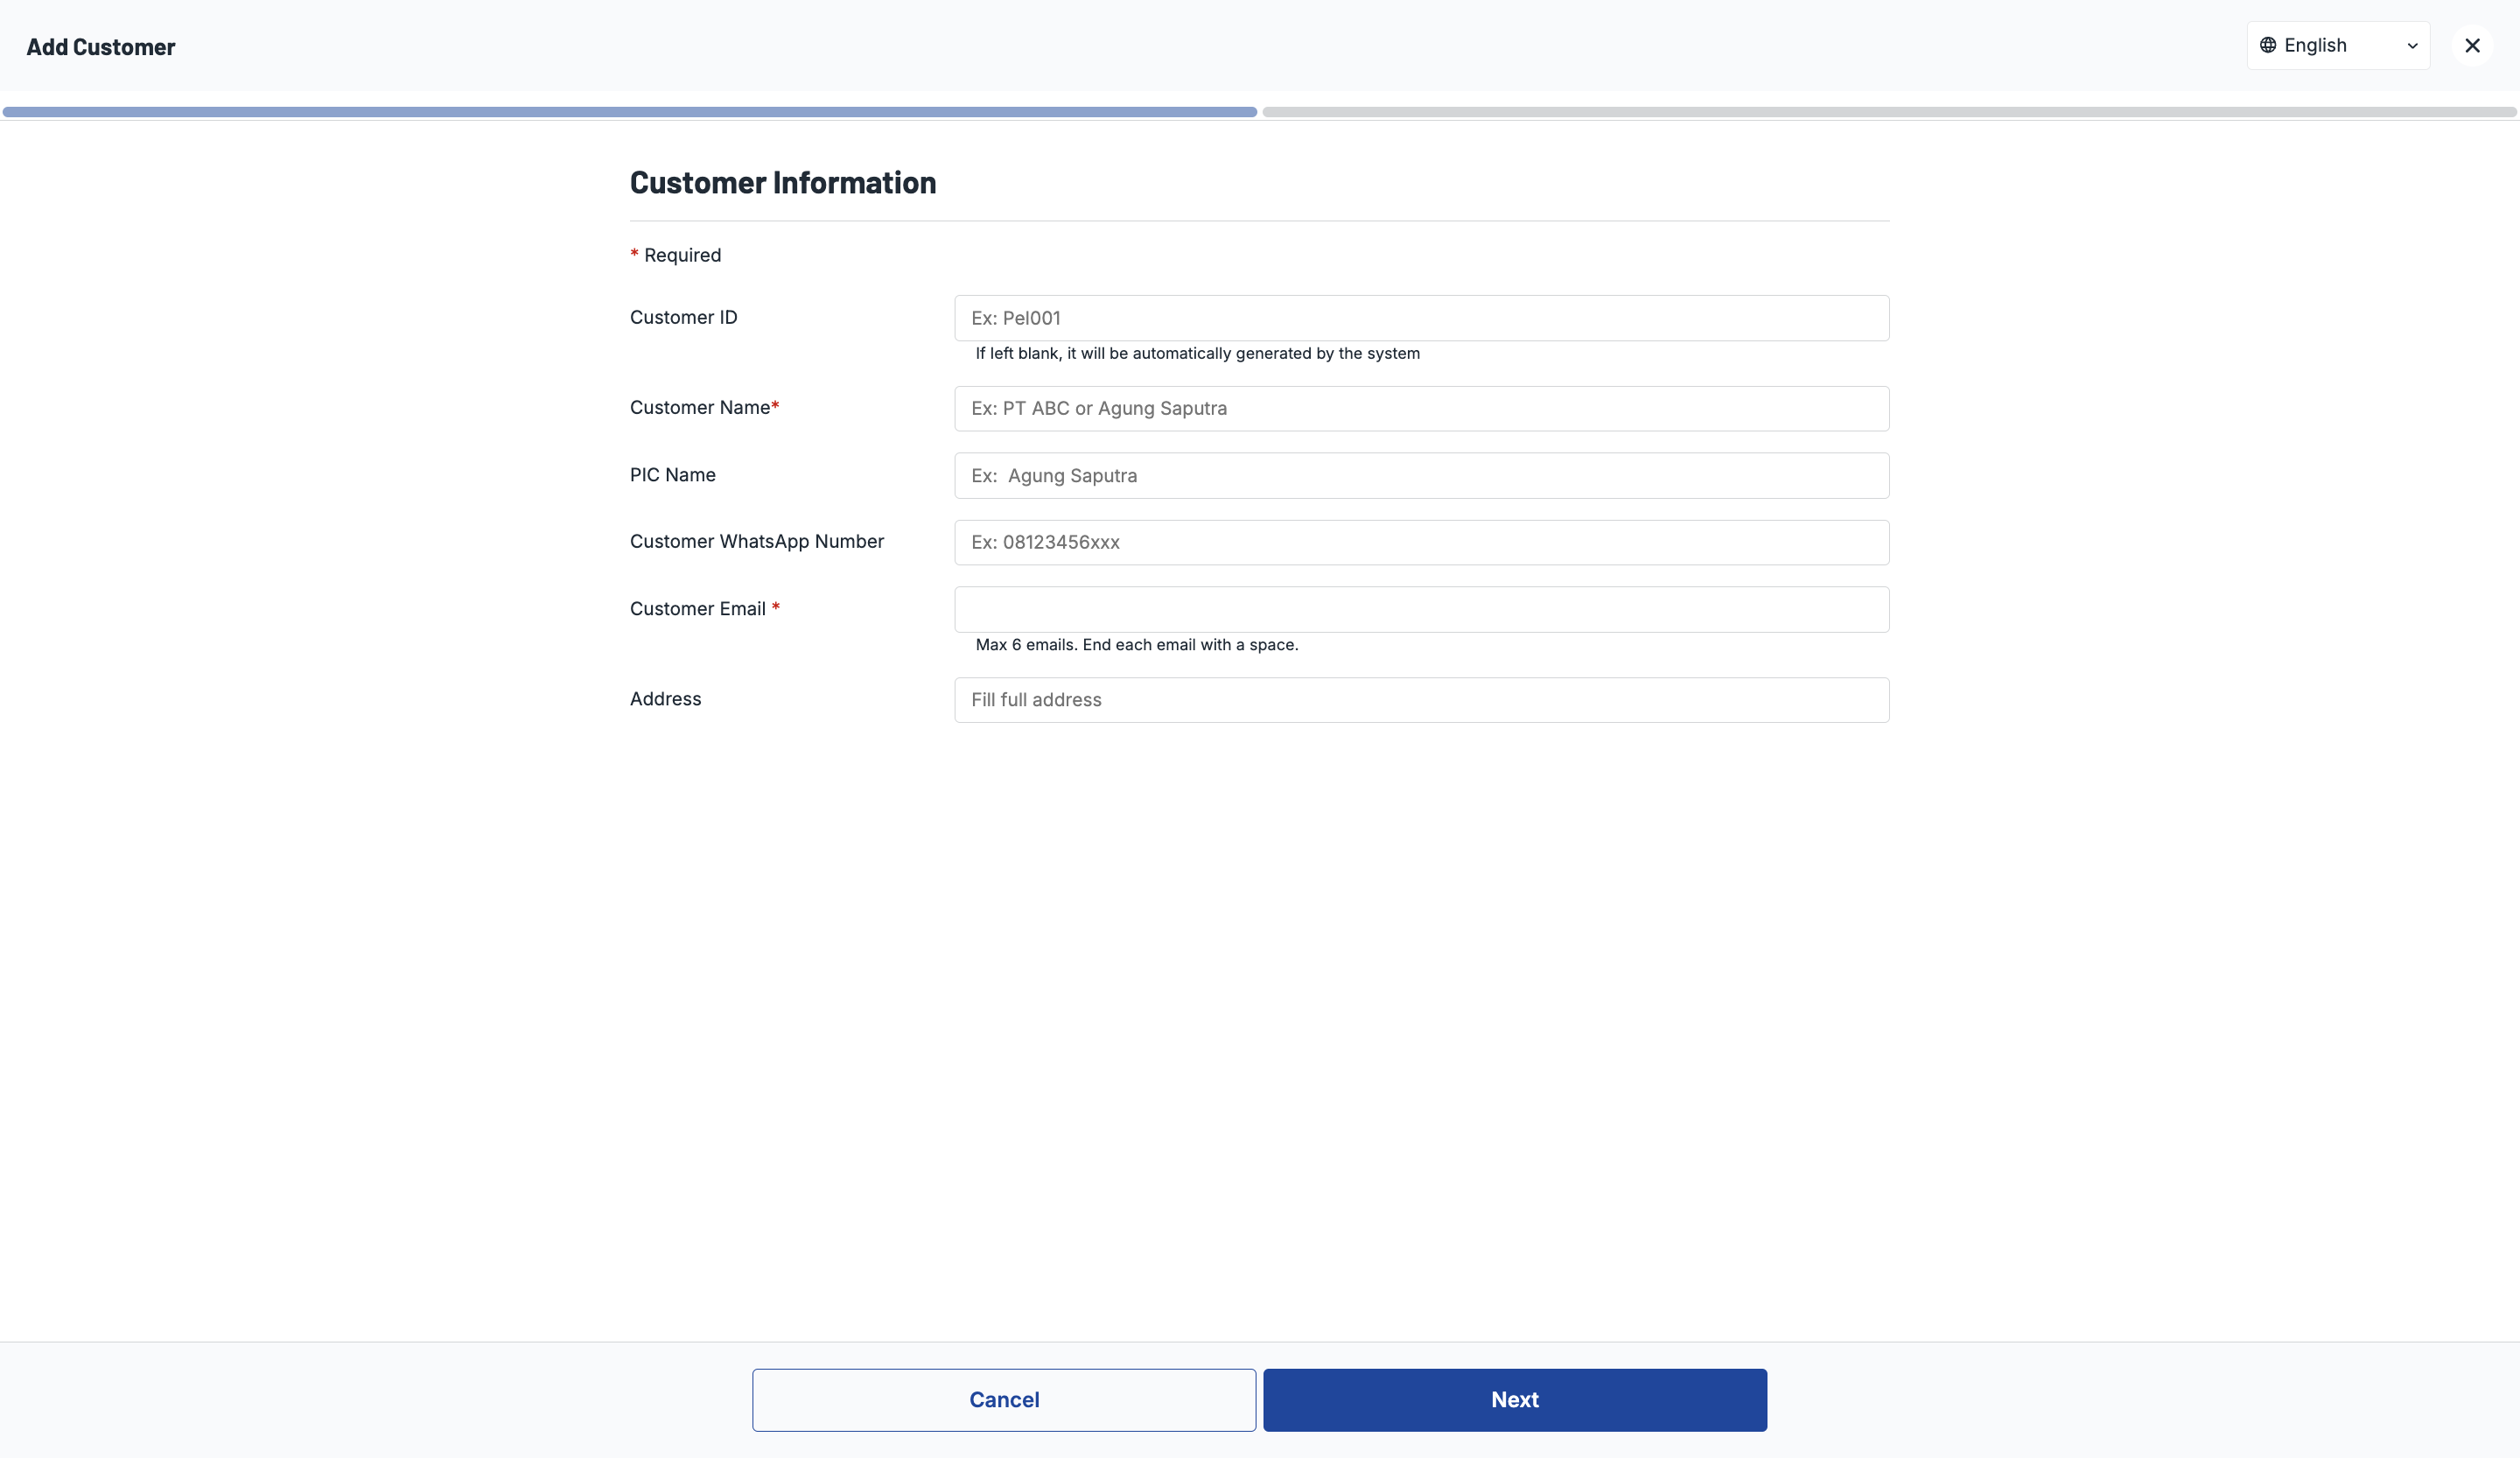
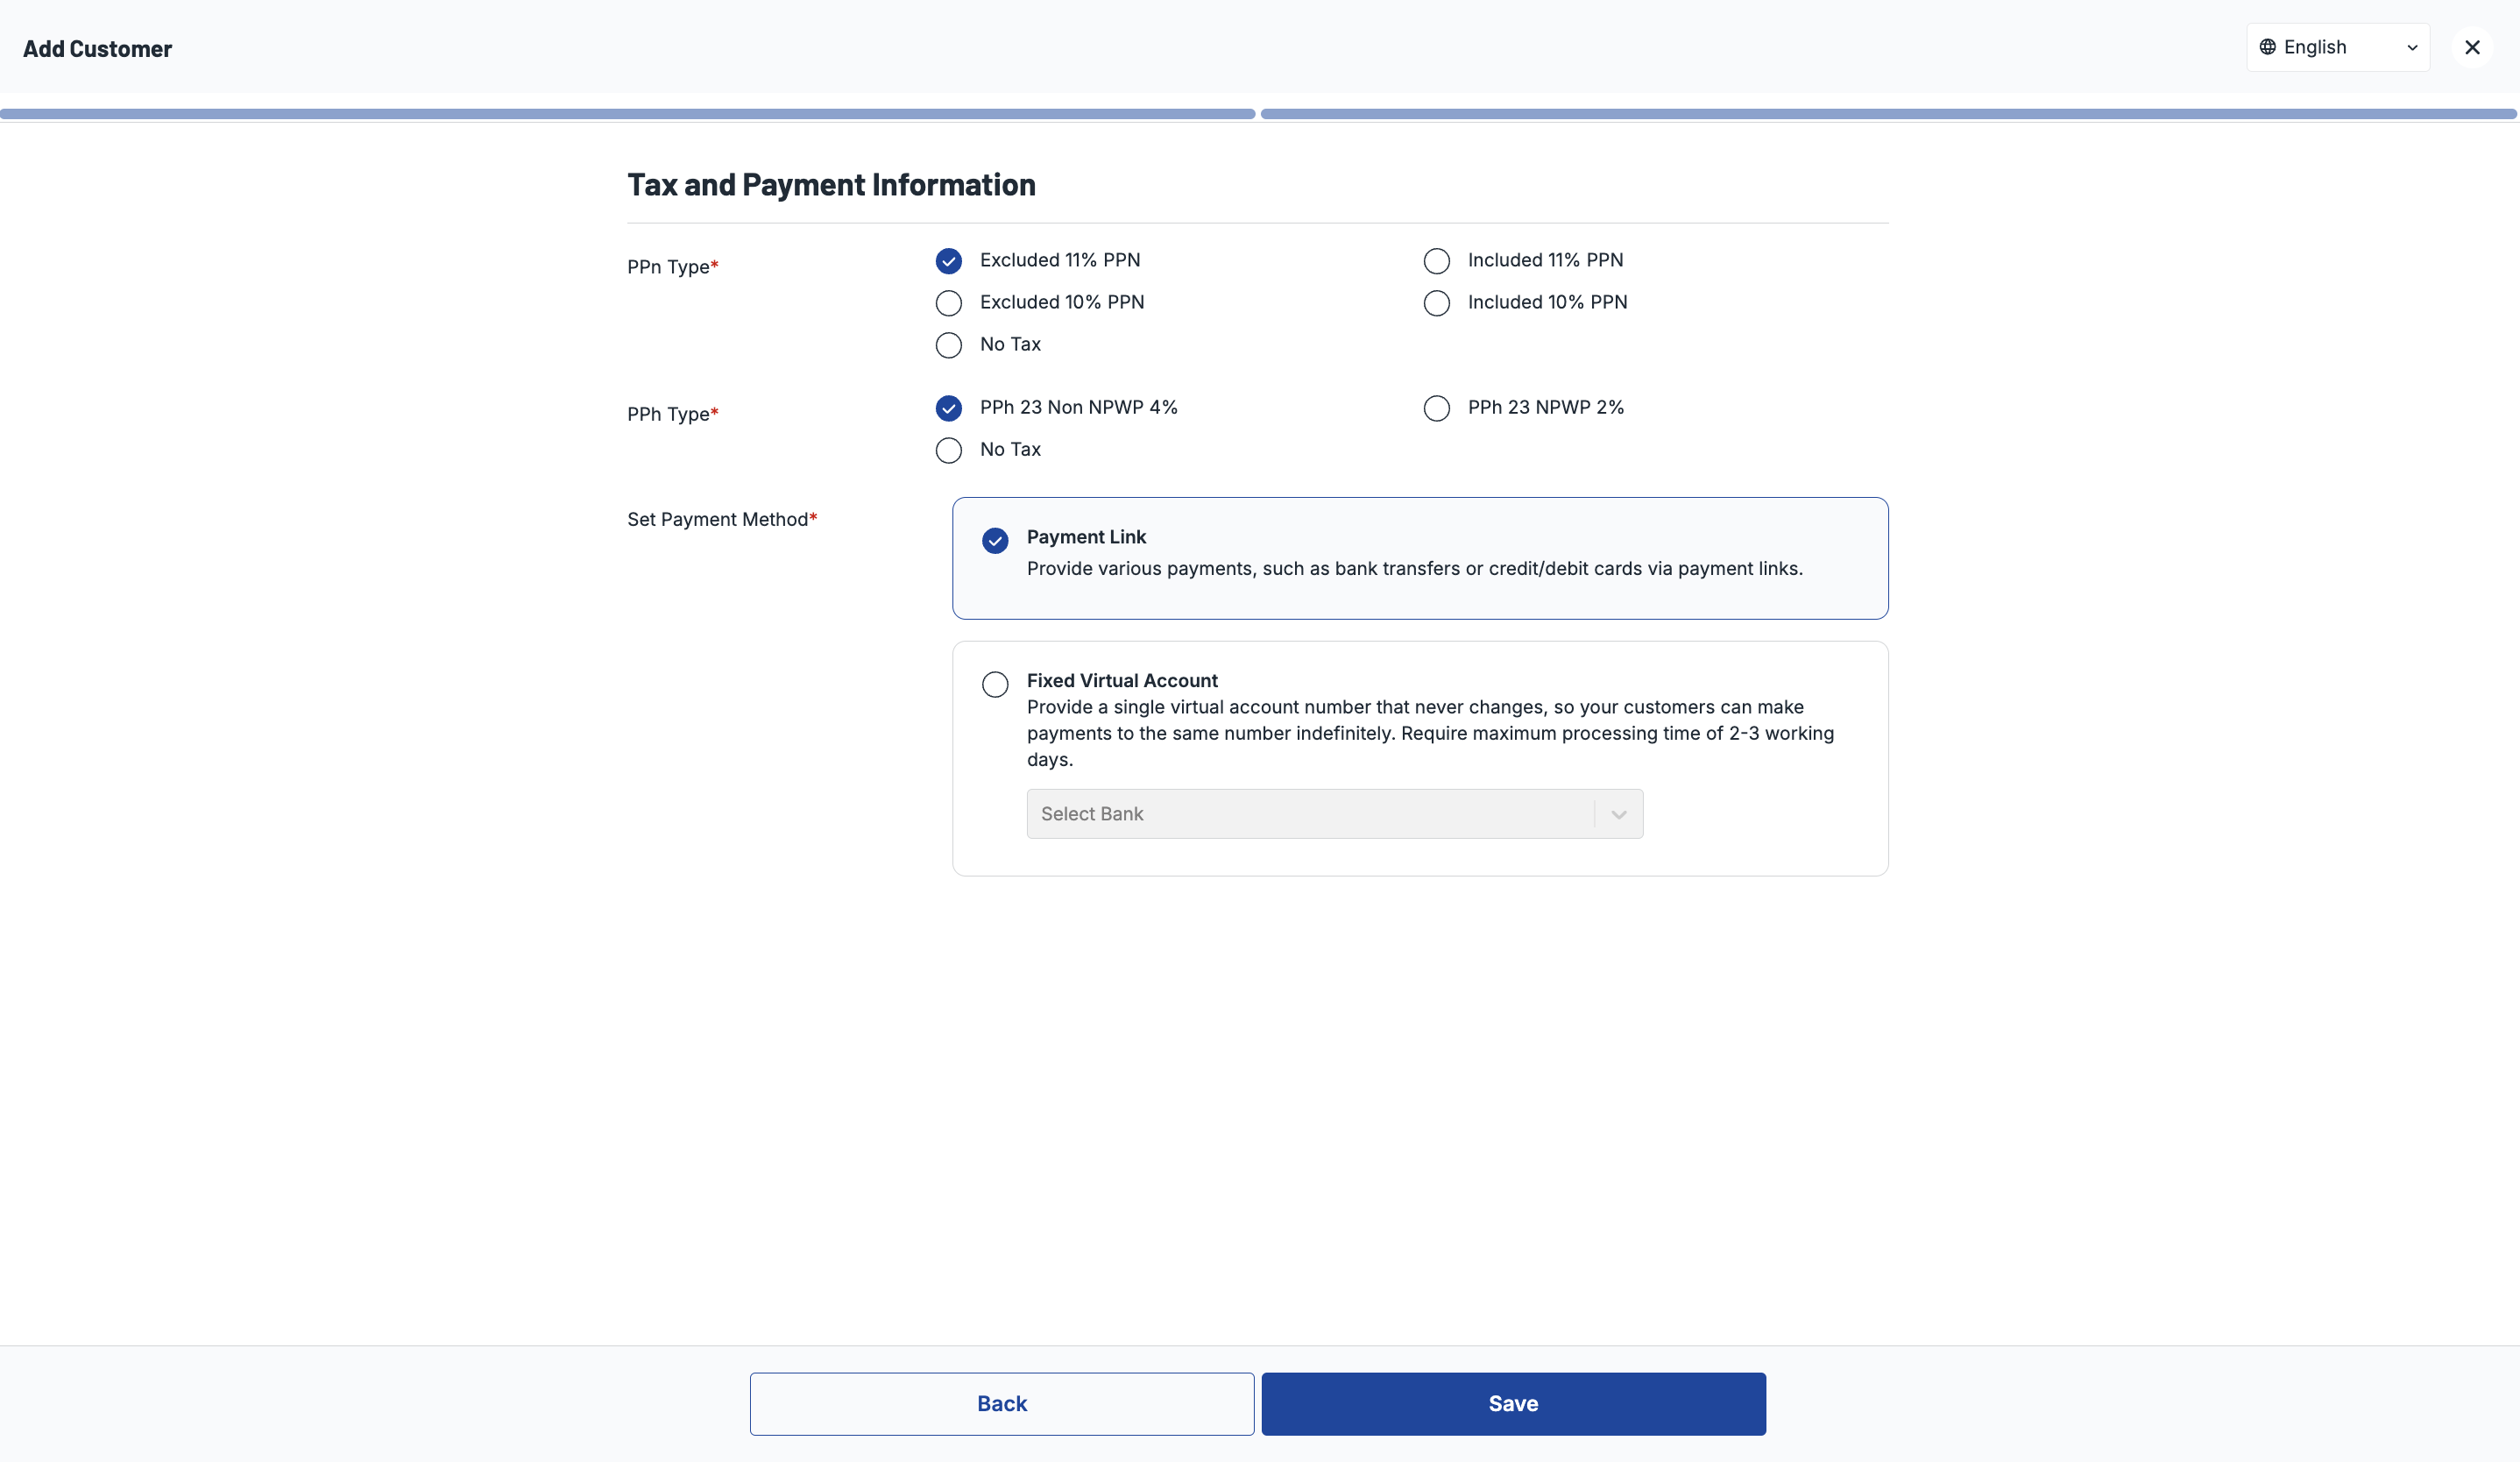
All of the created customers can be monitored through your dashboard (Customer List). There are several actions that you take for the customer data:
| Actions | Functions |
|---|---|
| Edit | To edit the data of the customer |
| Activate/Deactivate | To deactivate / reactivate the customer |
If you click on the row you selected, you will be able to see the detailed data of the customer, including the list of invoices belonging to that customer.
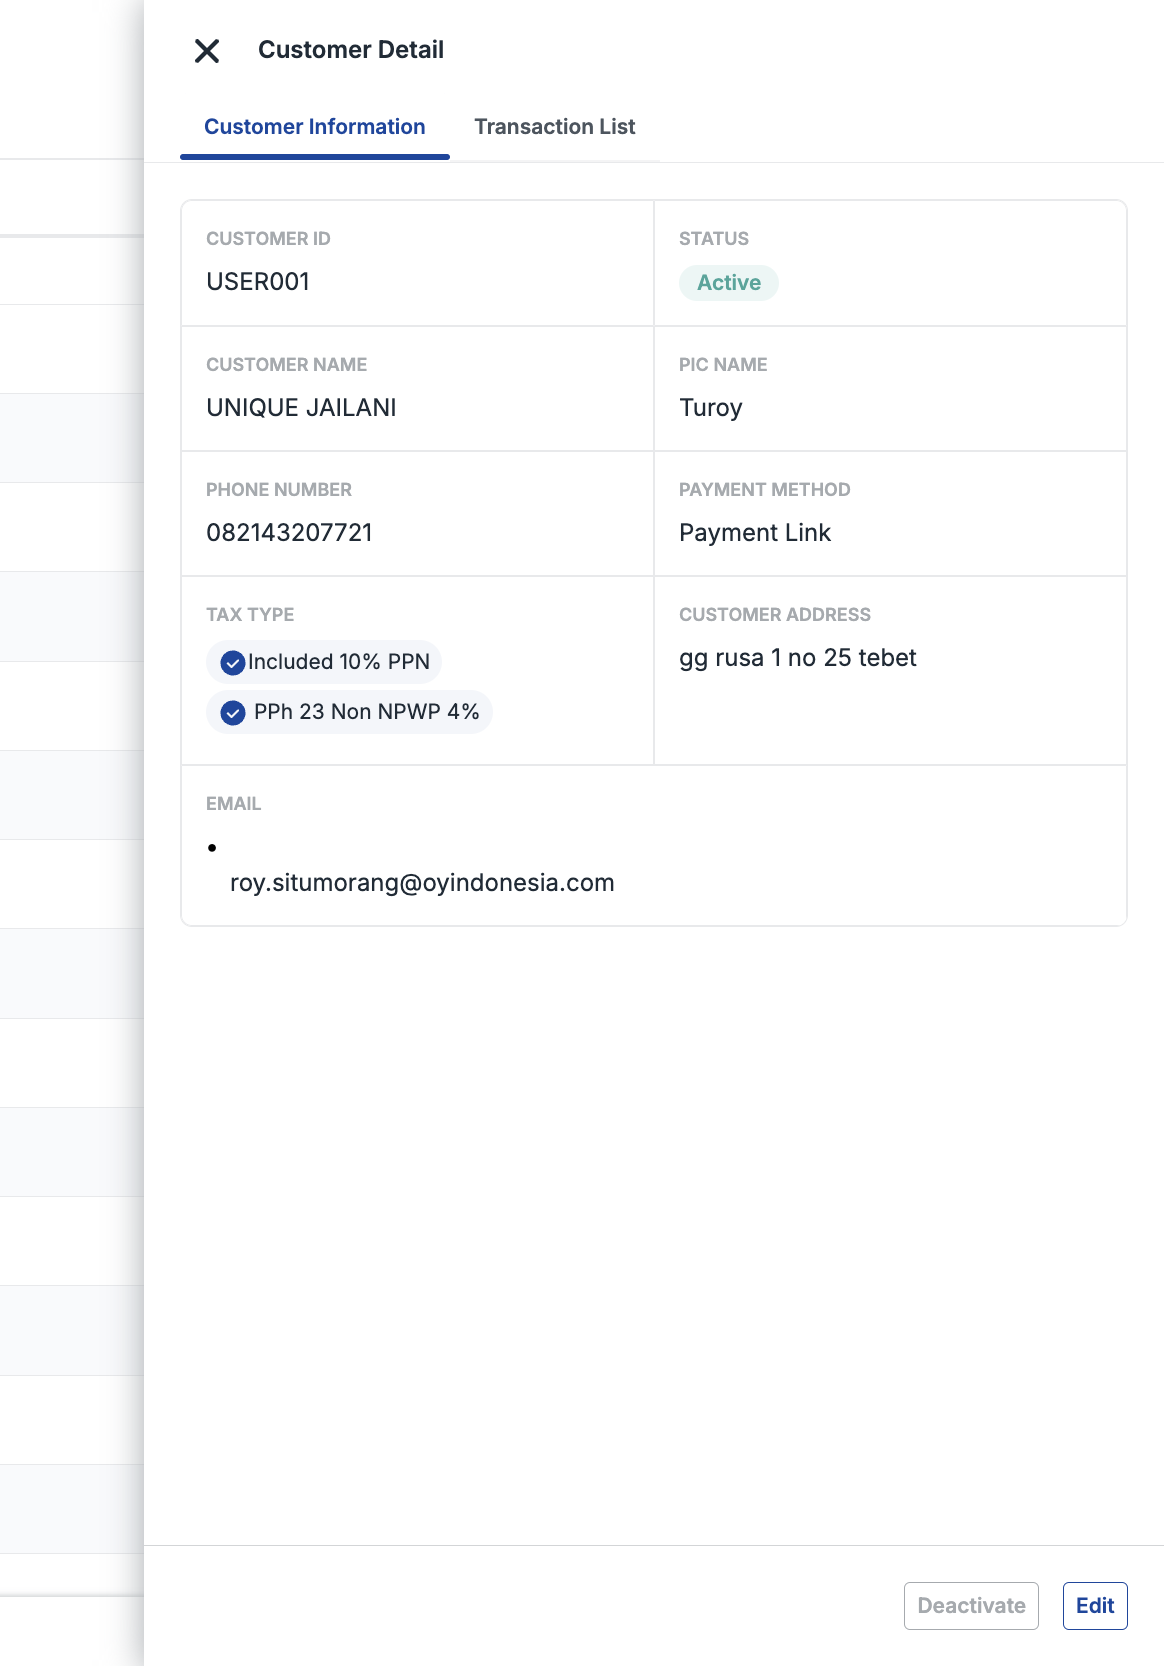
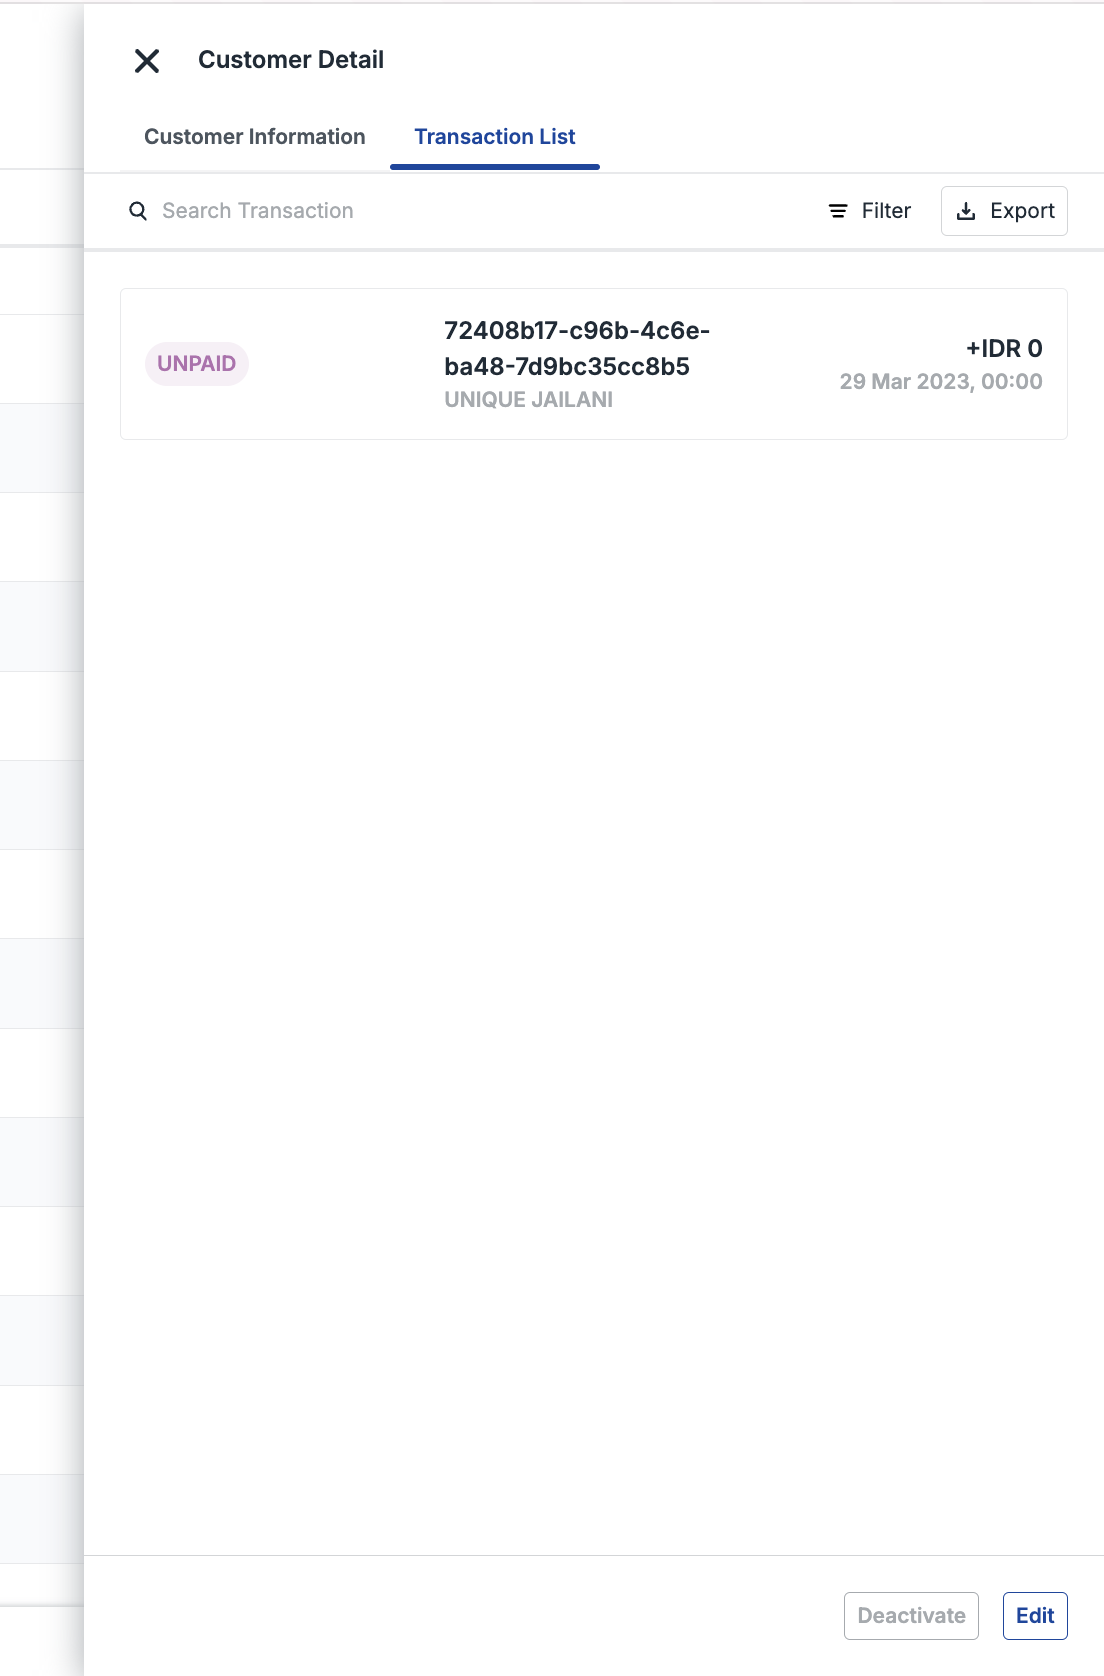
Amount Customization for Account Receivable
OY! has a feature that allows you to add the price of the subtotal (addition) and/or deduct the price from subtotal. For example, if you want to apply a discount for your customers, or if you want to add shipping fee,service fee, or any other charges that you would like to add or deduct from the subtotal of the invoice. You may refer to the steps below:
- Click "add column" below the subtotal
- Choose "addition" or "subtraction" from the dropdown
- Fill in the description
- Fill in the amount
Invoice Creation page
Add Column page
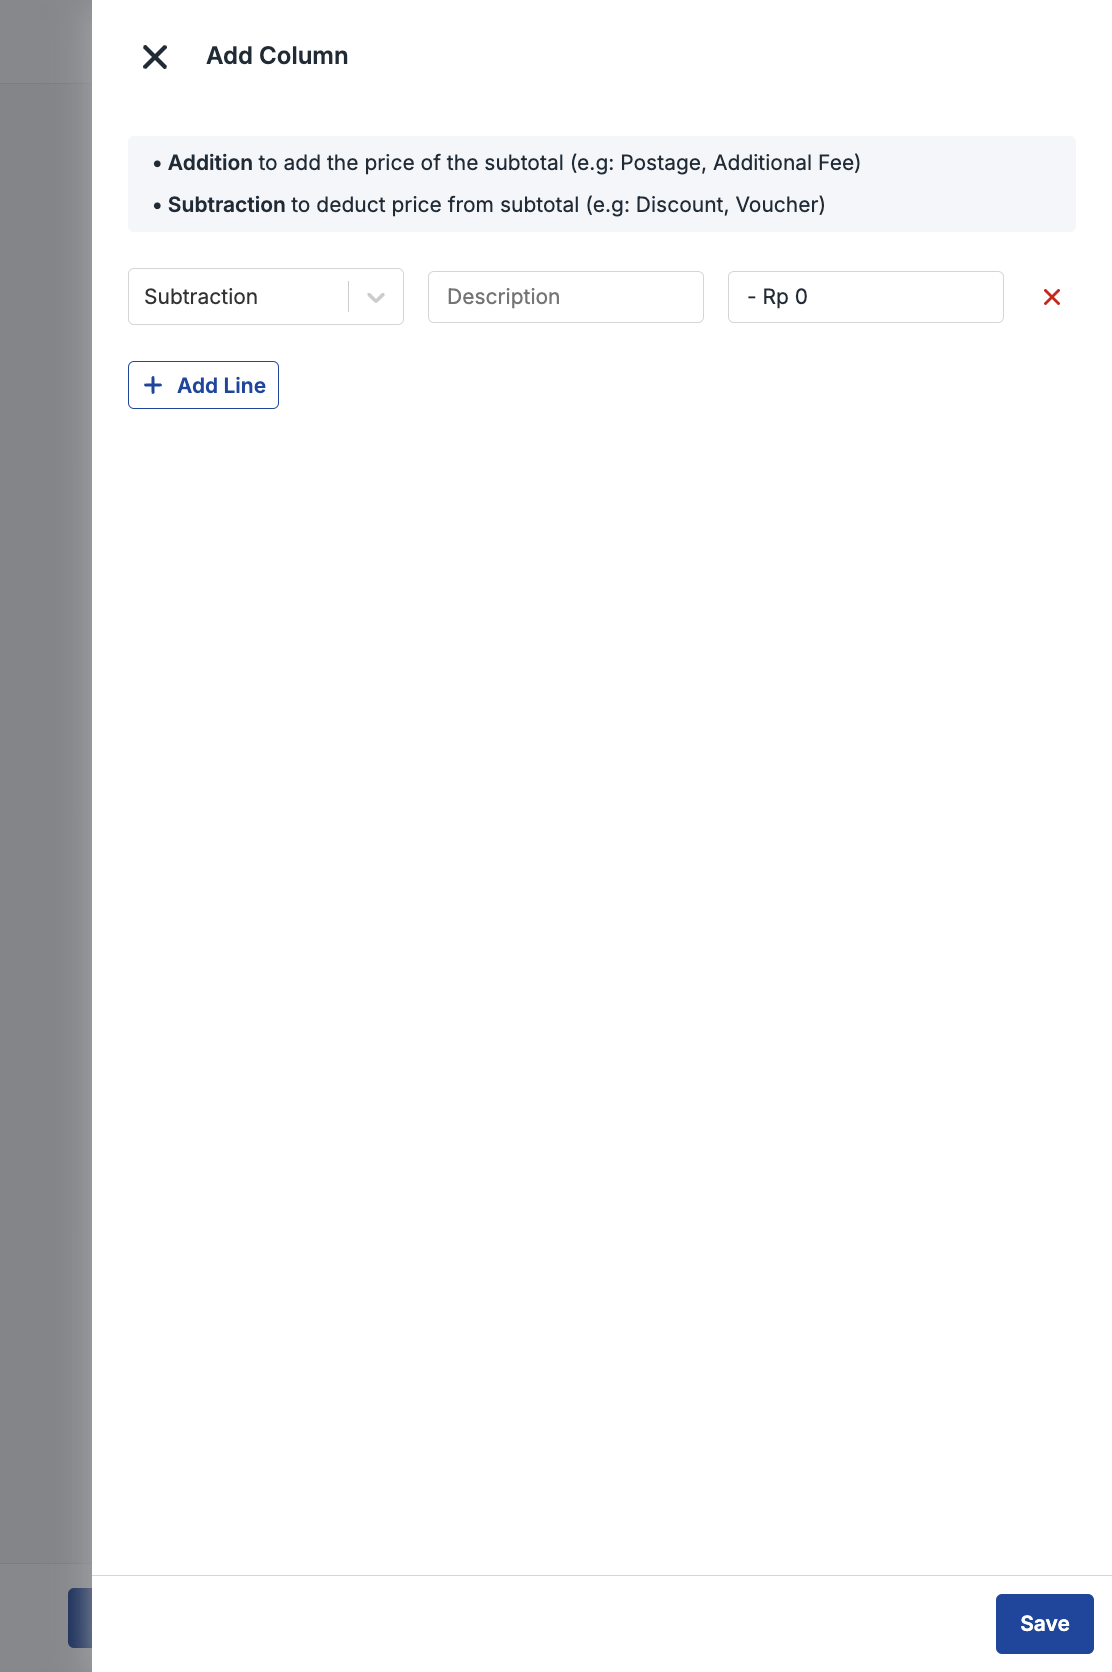
How to Use Account Receivable via API
OY! allows invoices creation via API. Here are the steps:
- Create the customer data first by sending a request to https://partner.oyindonesia.com/api/account-receivable/customers. Enter the required and optional fields, as referenced in the API reference docs
- Then, you can try to create an account receivable by sending a request to https://partner.oyindonesia.com/api/account-receivable/invoices. Enter the required and optional fields, as referenced in the API reference docs
- An endpoint to check your account receivable invoice data is also available and can be accessed at any time.
- Lastly, we provide an endpoint to cancel your account receivable invoice based on id (unique payment id). The invoice must still be active, a payment method must not have been selected, and status must still be in “WAITING_PAYMENT”.
Just like the account receivable creation from OY! dashboard you can see the transactions and their details from the OY! dashboard. This report will include all payment links generated both via OY! dashboard and API. Data can be differentiate by column “Created Via” on Account Receivable table, if your invoice is created via API then it will fills with “API”, otherwise it will fills with “Dashboard”.
Customizing the UI of Payment Link & Account Receivable
In order to maintain a consistent brand experience for your customers, you can customize the look and feel of both your Payment Link & Account Receivable in the Dashboard, where you can do the following things:
- Upload a link address to logo
- Choose the button color and the theme color of the payment link
The updated logo will be reflected in both products.
How to customize the UI via Payment Link or Account Receivable
- Log onto your OY! dashboard
- Go to “Account Receivable” section under “Receive Money” menu
- Click the “Settings" icon located at the top right of the page
- Click “Set Appearance” tab
- Click “Open Configuration” for “Payment Link Display”
- You will be redirected to the Settings page
- Input the URL for your logo (if you’re using snipboard.io [https://snipboard.io/], the correct URL should be in “https://i.snipboard.io/image.jpg” format. If you’re using imgbb.com [https://imgbb.com/], the correct URL should be in “https://i.ibb.co/abcdef/image.jpg” format)
- Select your header color (you can select from our available color picker tools or you can input the 6-digit #HEX code)
- Select your button and link color (you can select from our available color picker tools or you can input the 6-digit #HEX code)
- Click "Save"
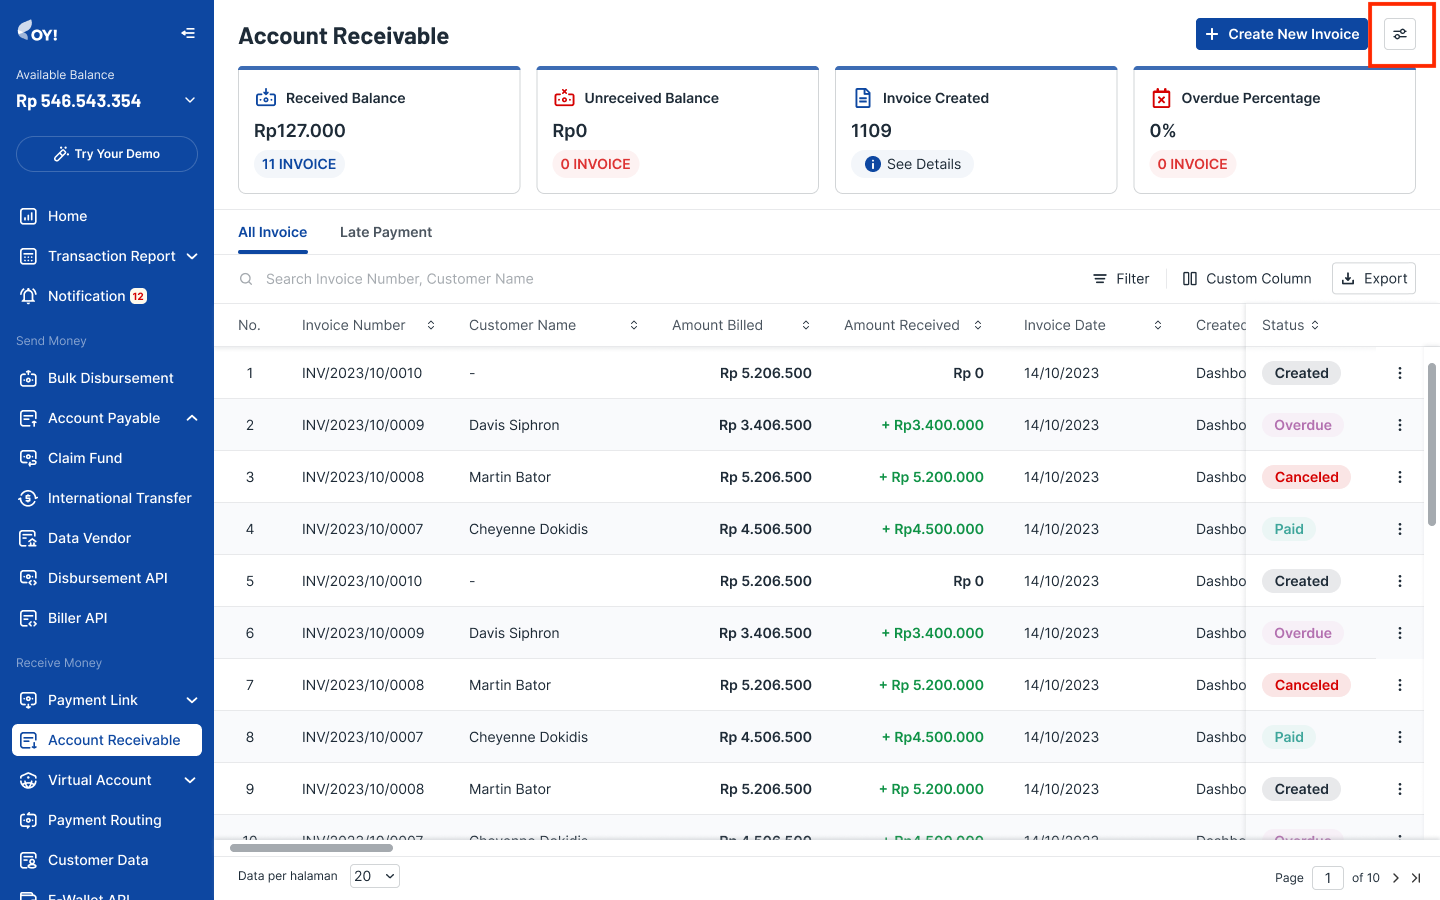
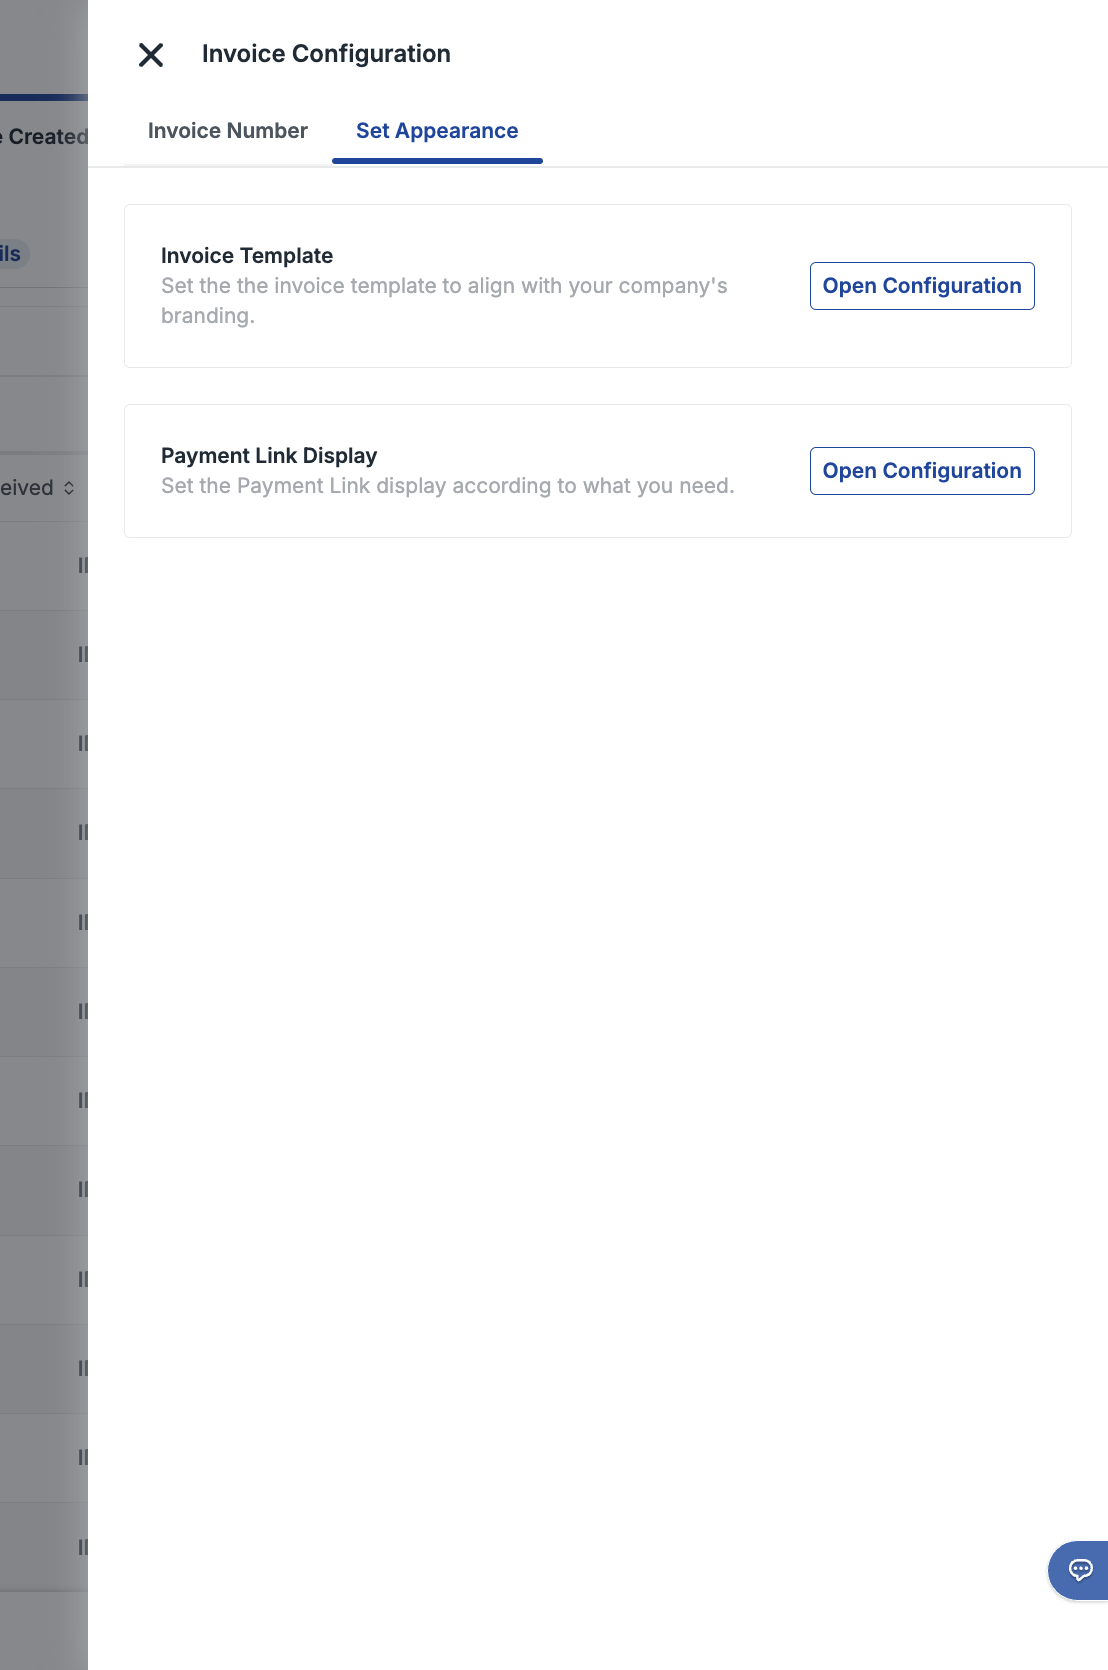
- Payment Link Display Settings
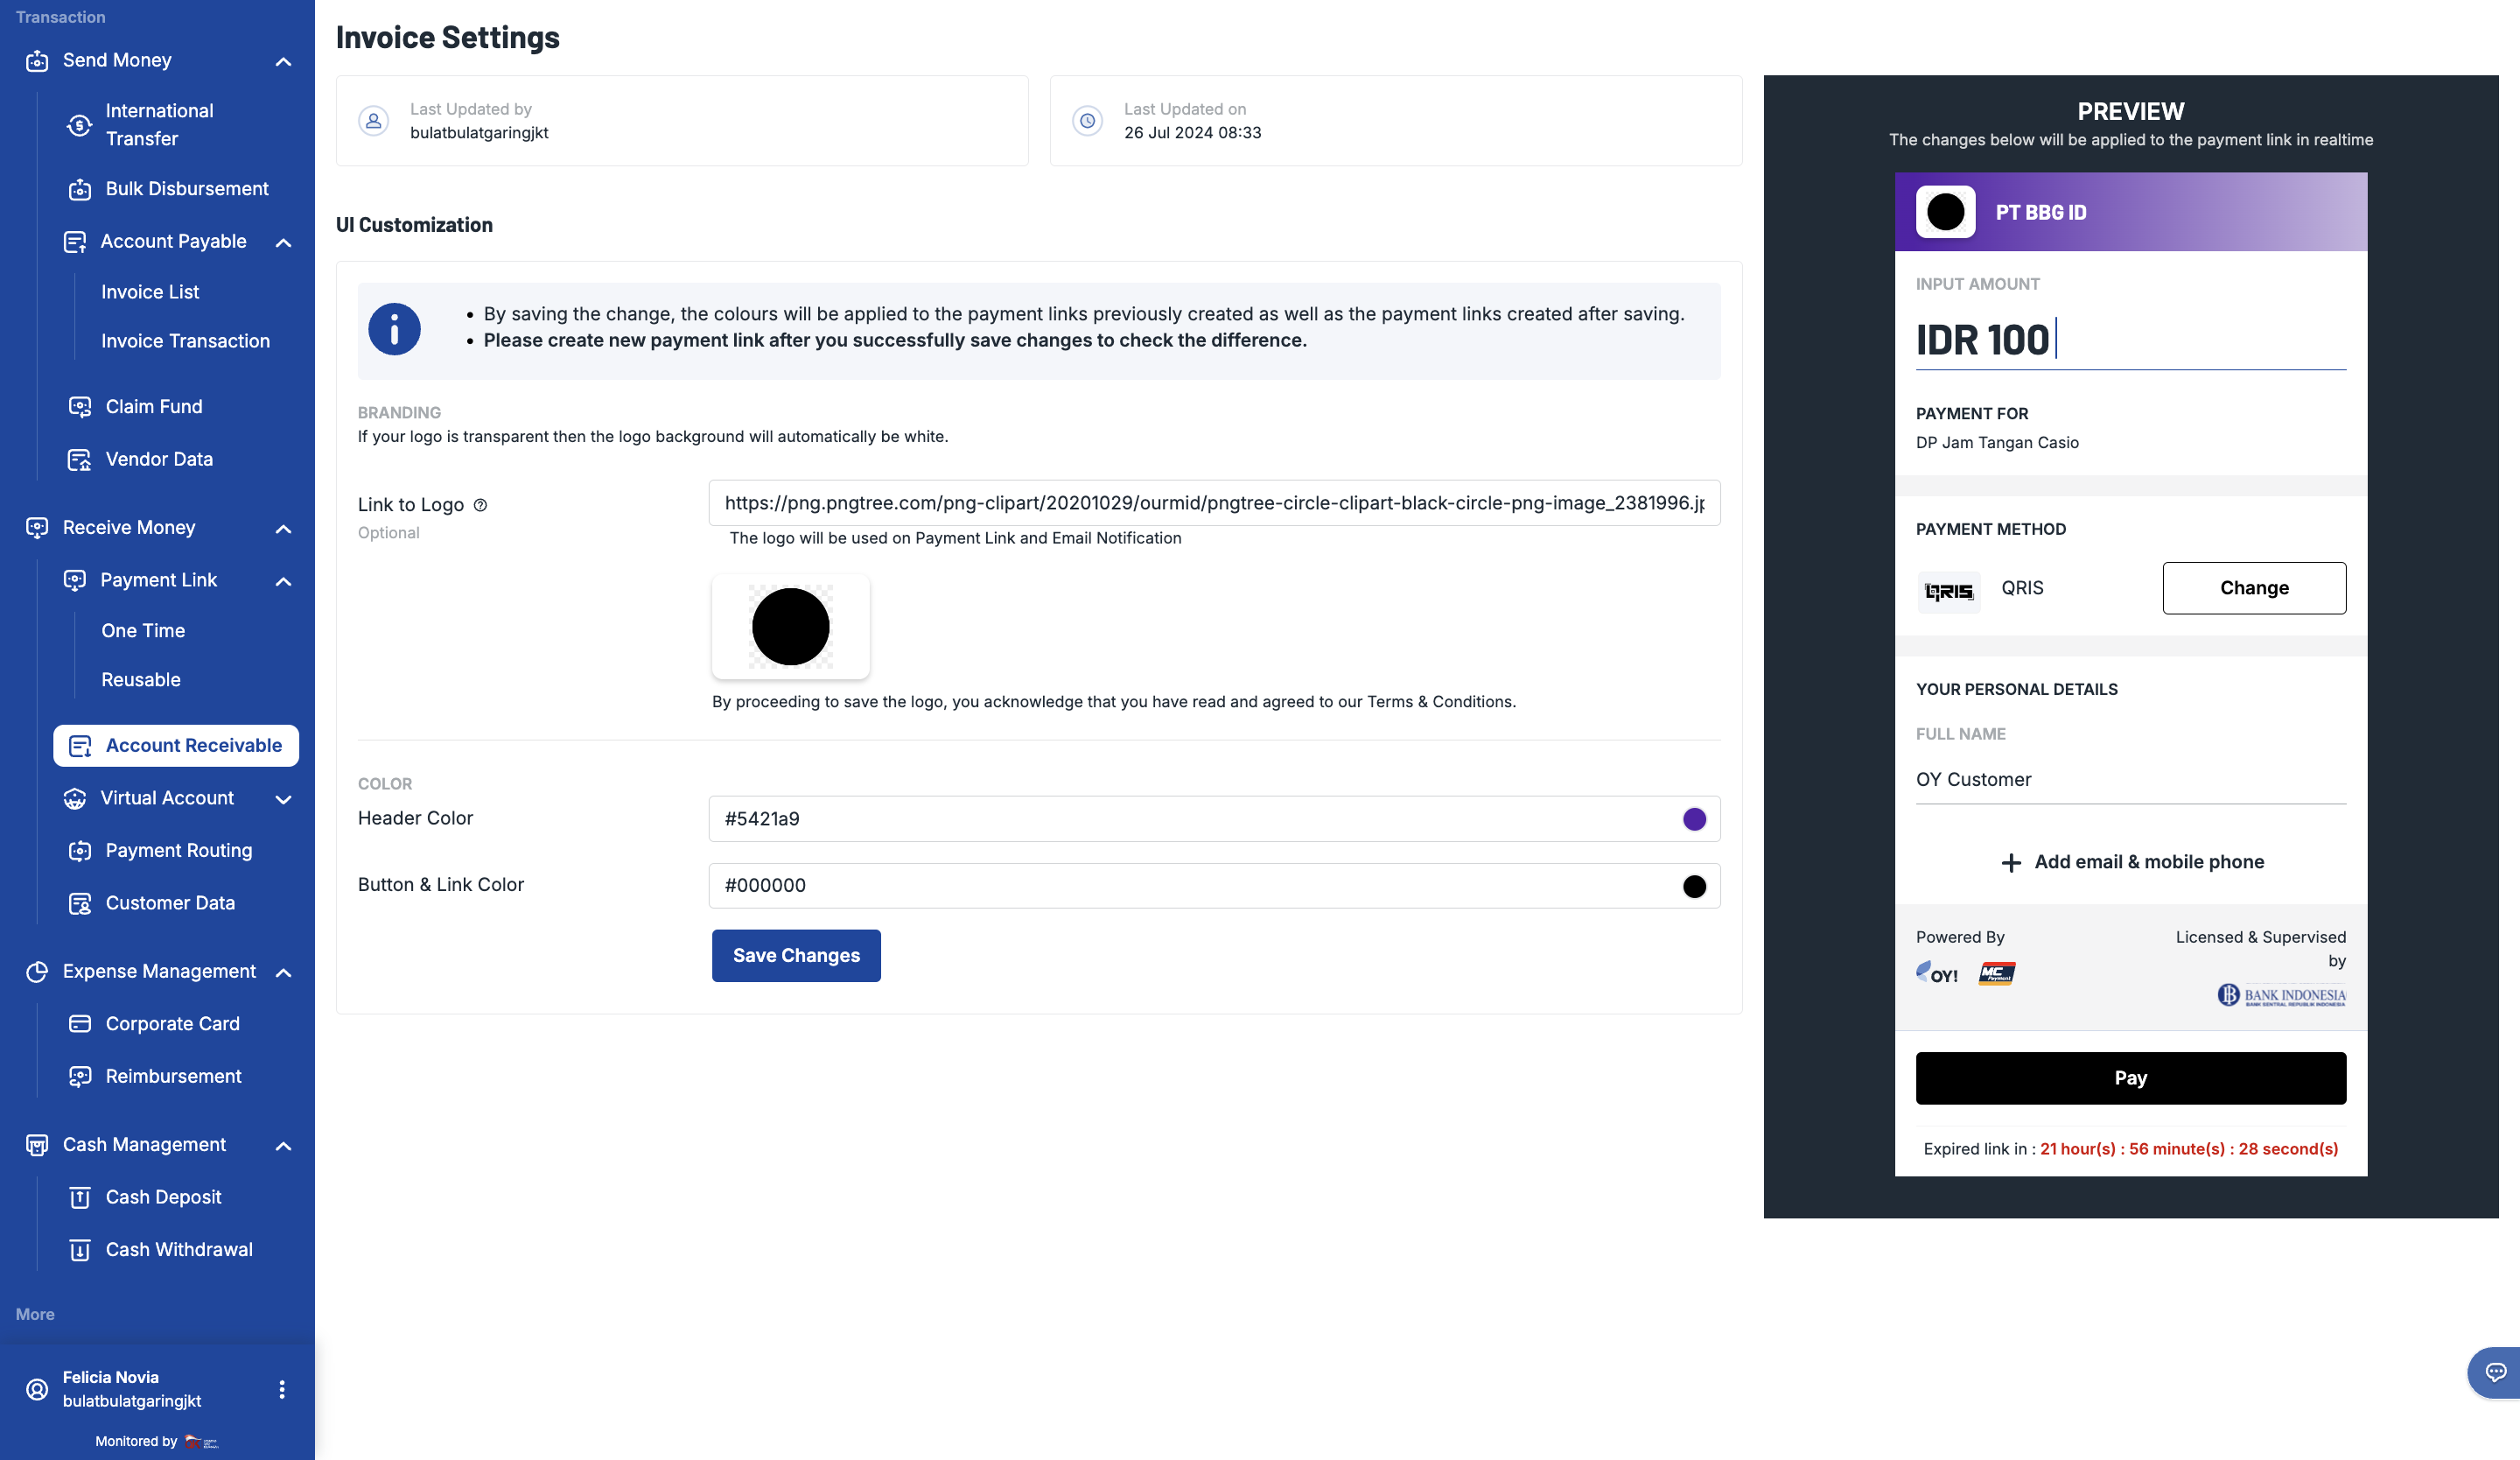
Note: * By saving the changes, the colors will be applied to the payment links previously created (before saving) as well as the payment links created after saving and also account receivable PDF documents. * Please check your existing payment link or create a new one. You will see that your changes have been successfully saved.
Customizing Account Receivable Invoice Template and Color
For a more personalized touch on the invoice, you can now customize your template look in the Dashboard, where you can do the following things: 1. Change invoice logo 1. Change Invoice template 1. Change Invoice color
How to customize the Account Receivable Invoice UI: 1. Log onto your OY! dashboard 1. Go to Account Receivable section in the dashboard 1. Click the “Settings" icon located at the top right next to “Create New Invoice” button 1. Click “Open Configuration” for “Invoice Template” 1. Input the URL of your logo. Changing the logo here will automatically update the logo in Payment Link, Invoice and 1.Email Notifications. 1. Select your color theme (you can select from our available color picker tools or you can input the 6-digit #HEX code). This color will be the main theme color in your invoice. 1. Select your template from our template selections. Changes will be reflected immediately in the preview area 1. Click “Save”
- Account Receivable Configuration page
- Invoice Template Configuration page

How to Set Automated Invoice Number
For your convenience, you have the option to auto-generate invoice numbers. No more worrying about the sequence of invoice numbers. The invoice number template has been pre-defined by OY!.
- Log onto your OY! dashboard
- Go to Payment Link or Account Receivable section in the dashboard
- Click the 'Settings" icon located at the top right next to “Create New Invoice” button
- Turn the toggle on. You can now adjust the automatic invoice number format
- Click “Save” to continue
- Account Receivable Configuration page
- Configuration Invoice Number page
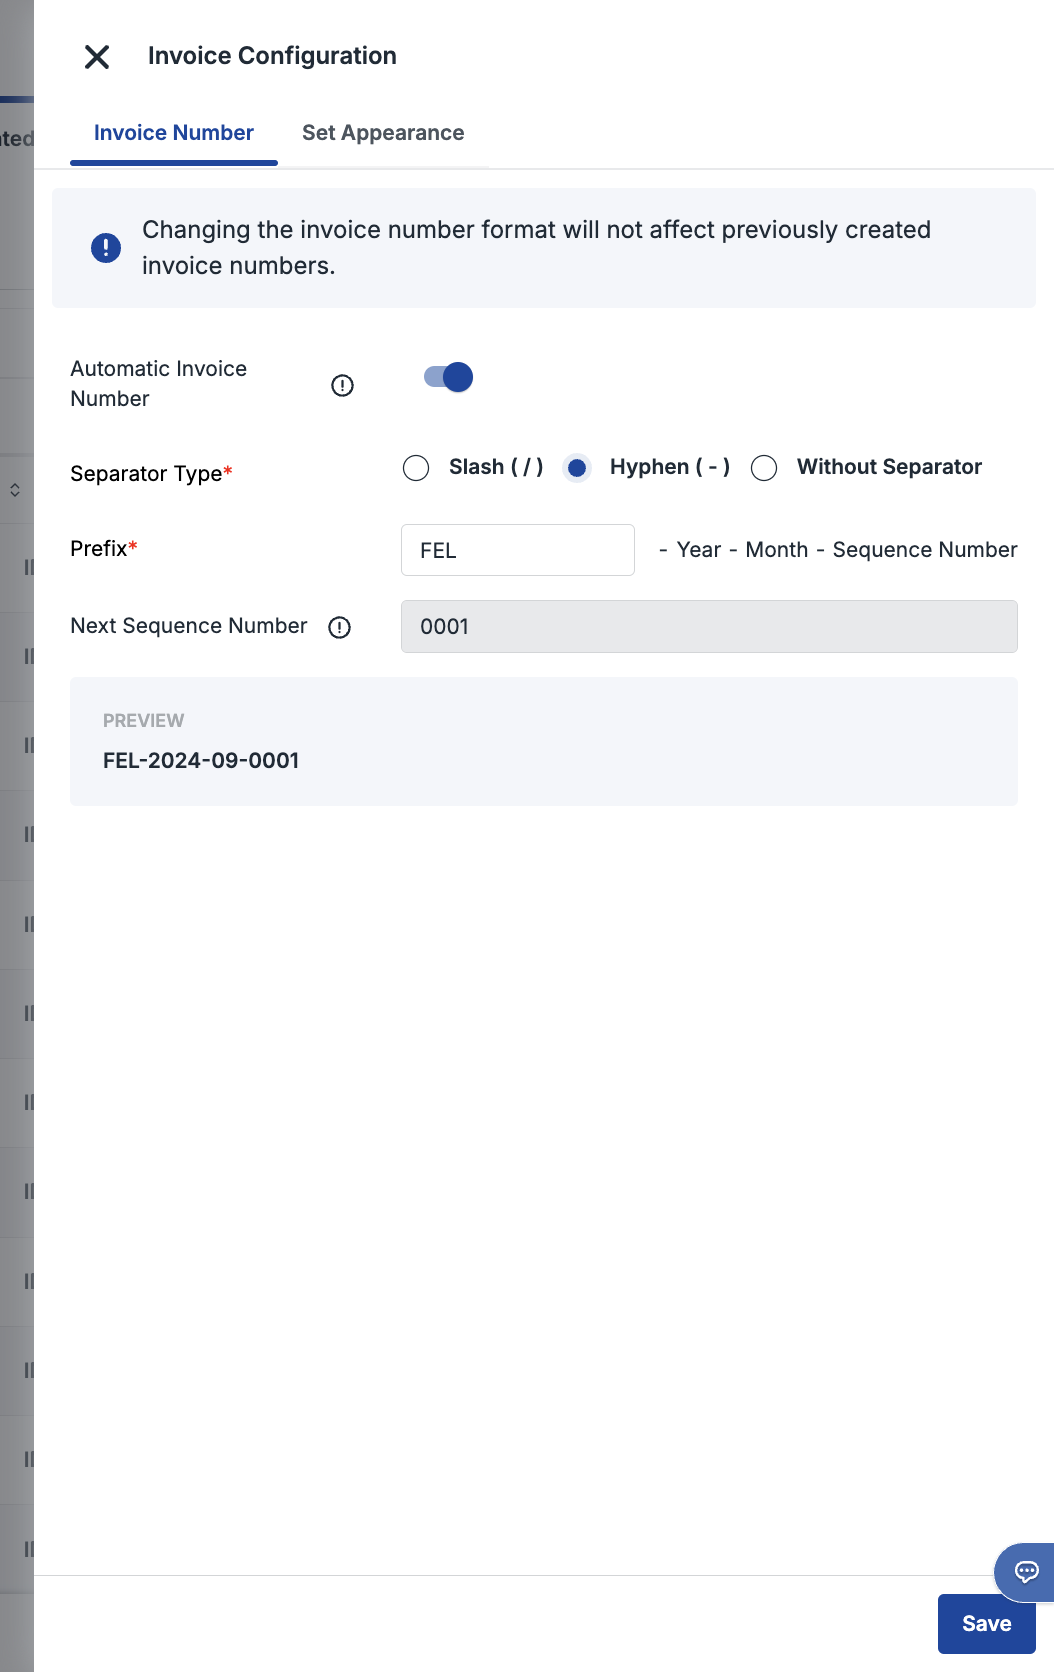
Note: this changes will not impact your previously created invoices
Sending Account Receivable Invoice with Payment Link via WhatsApp
For your convenience, you can now distribute invoices to your users via WhatsApp using the default message template. If you are interested in using this feature, please kindly contact our business representative or customer service team.
There will be 2 different ways to distribute the invoice via Whatsapp and there is a maximum of one Whatsapp message per unpaid invoice. When the status is paid, customers will get a payment confirmation from Whatsapp too.
- Option 1 - via Create New Invoice
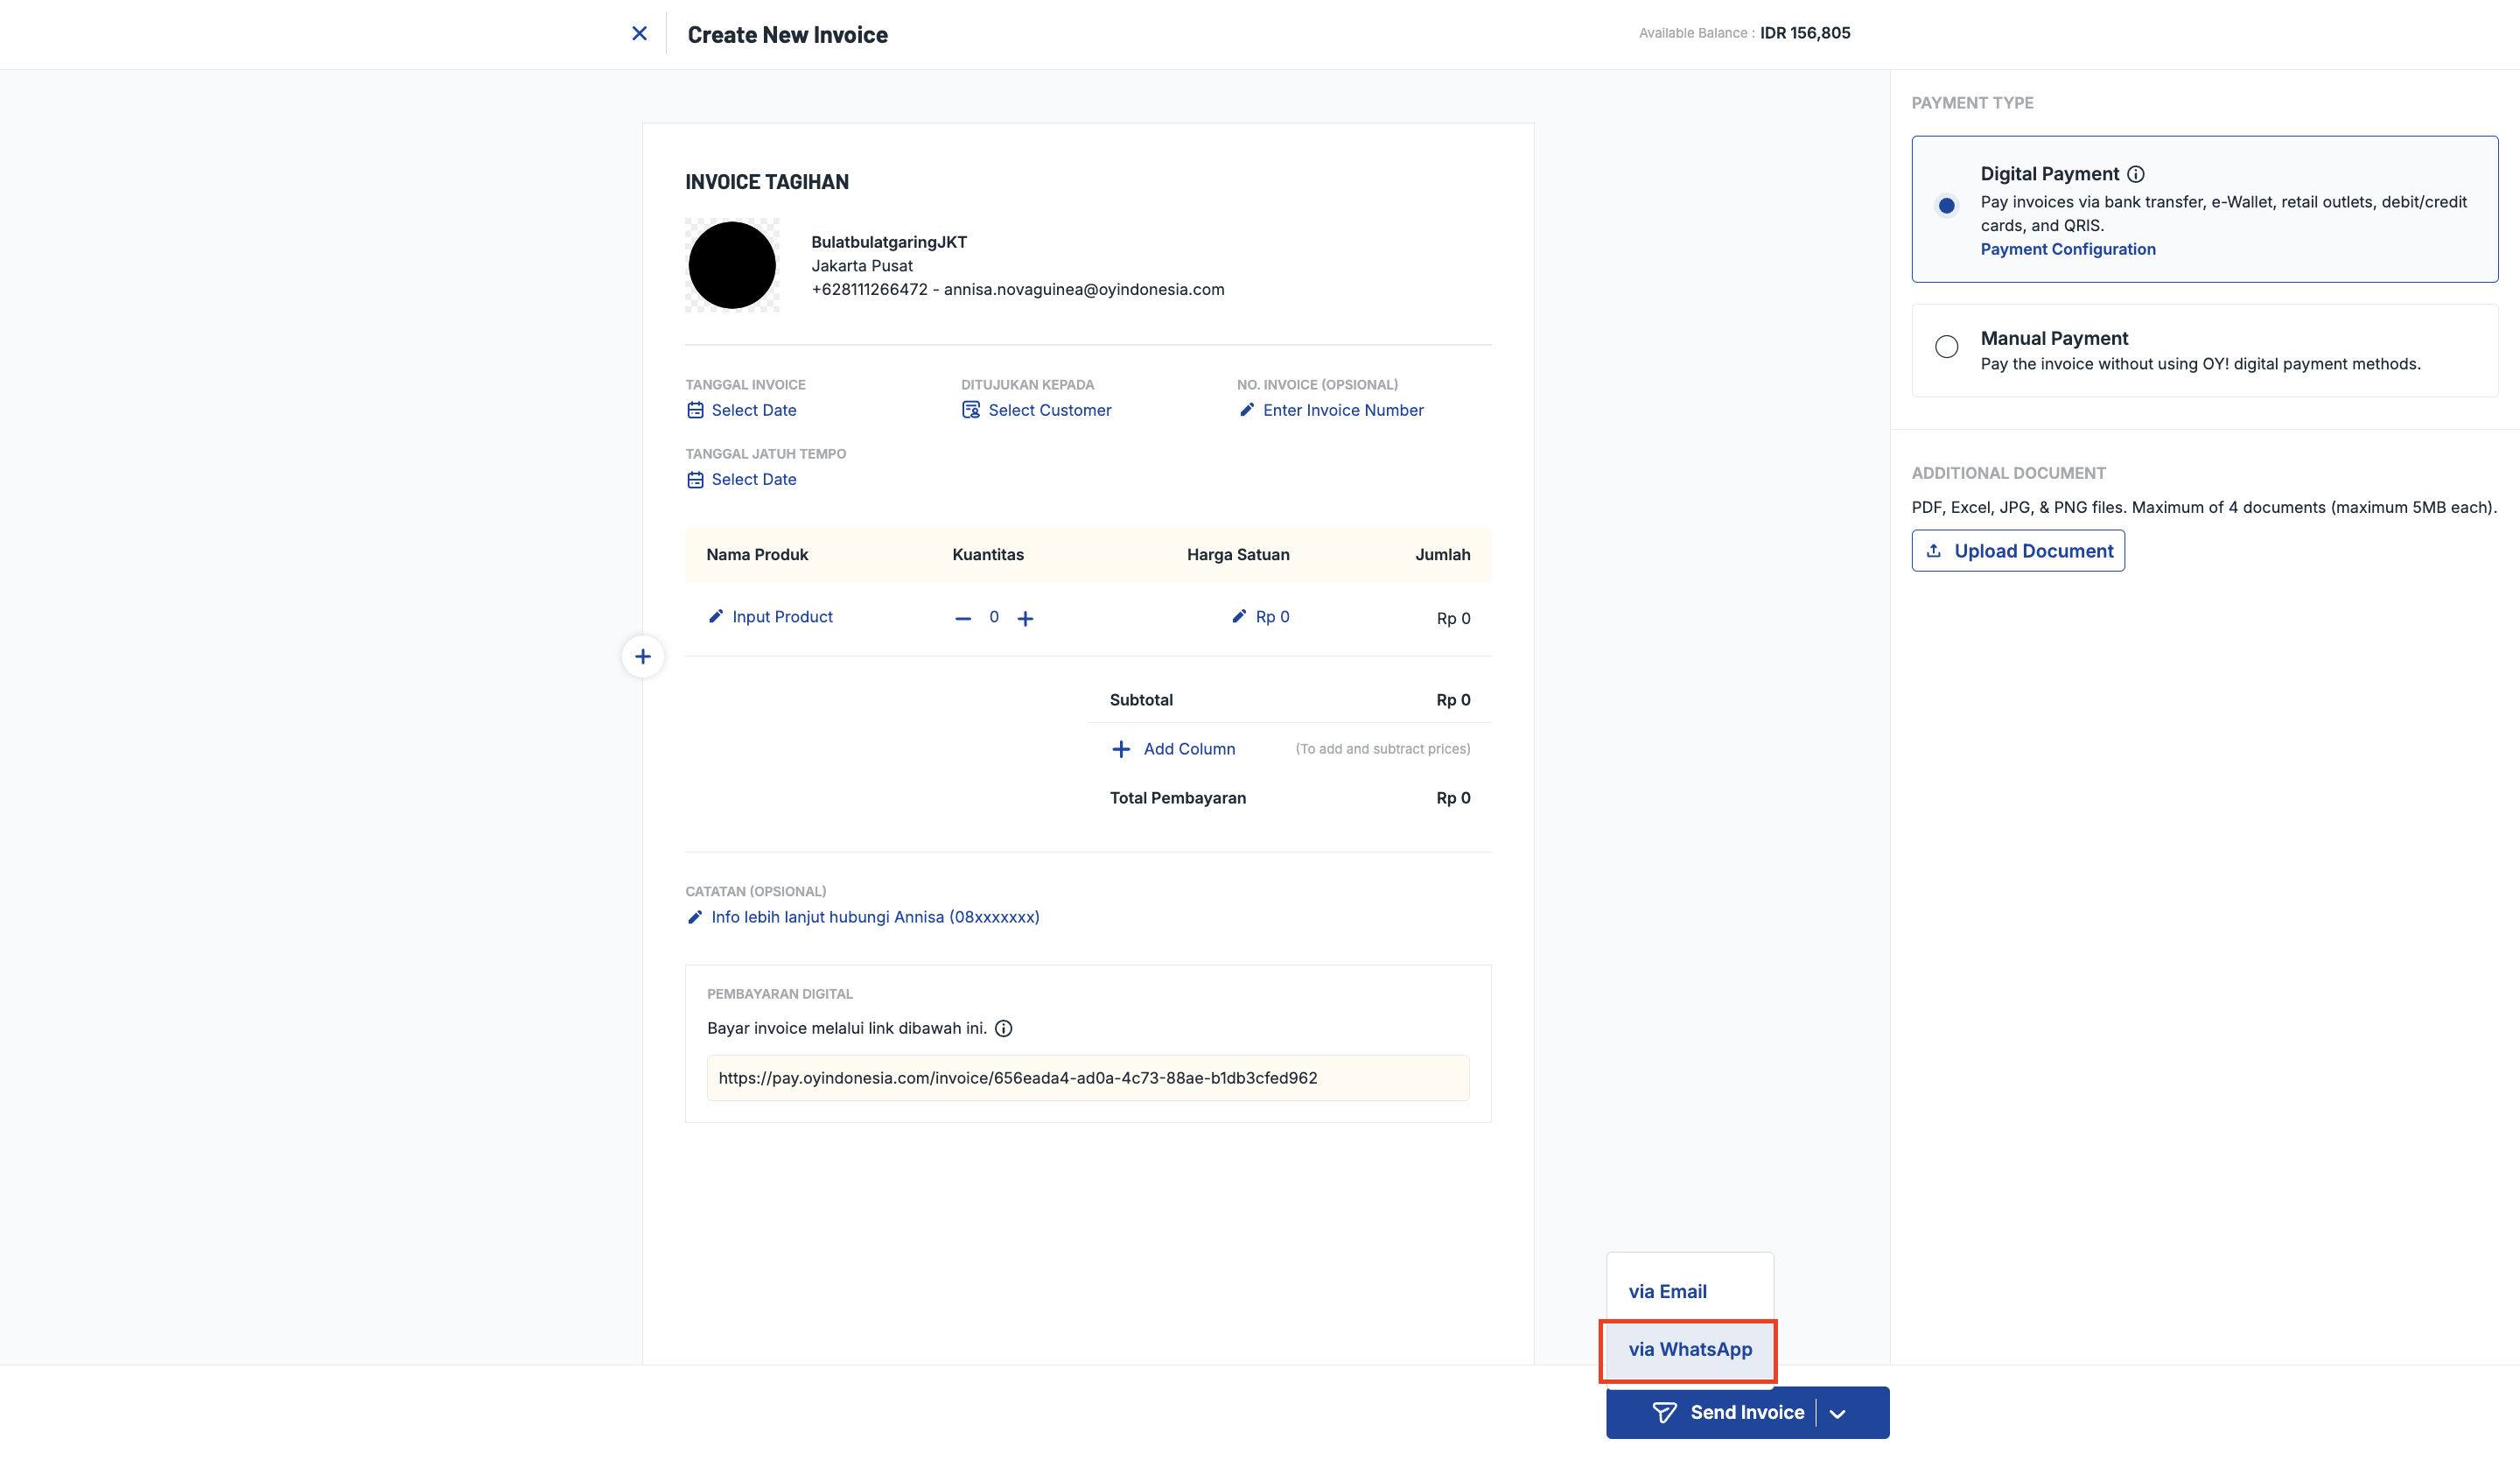
- Option 2 - via Invoice Table
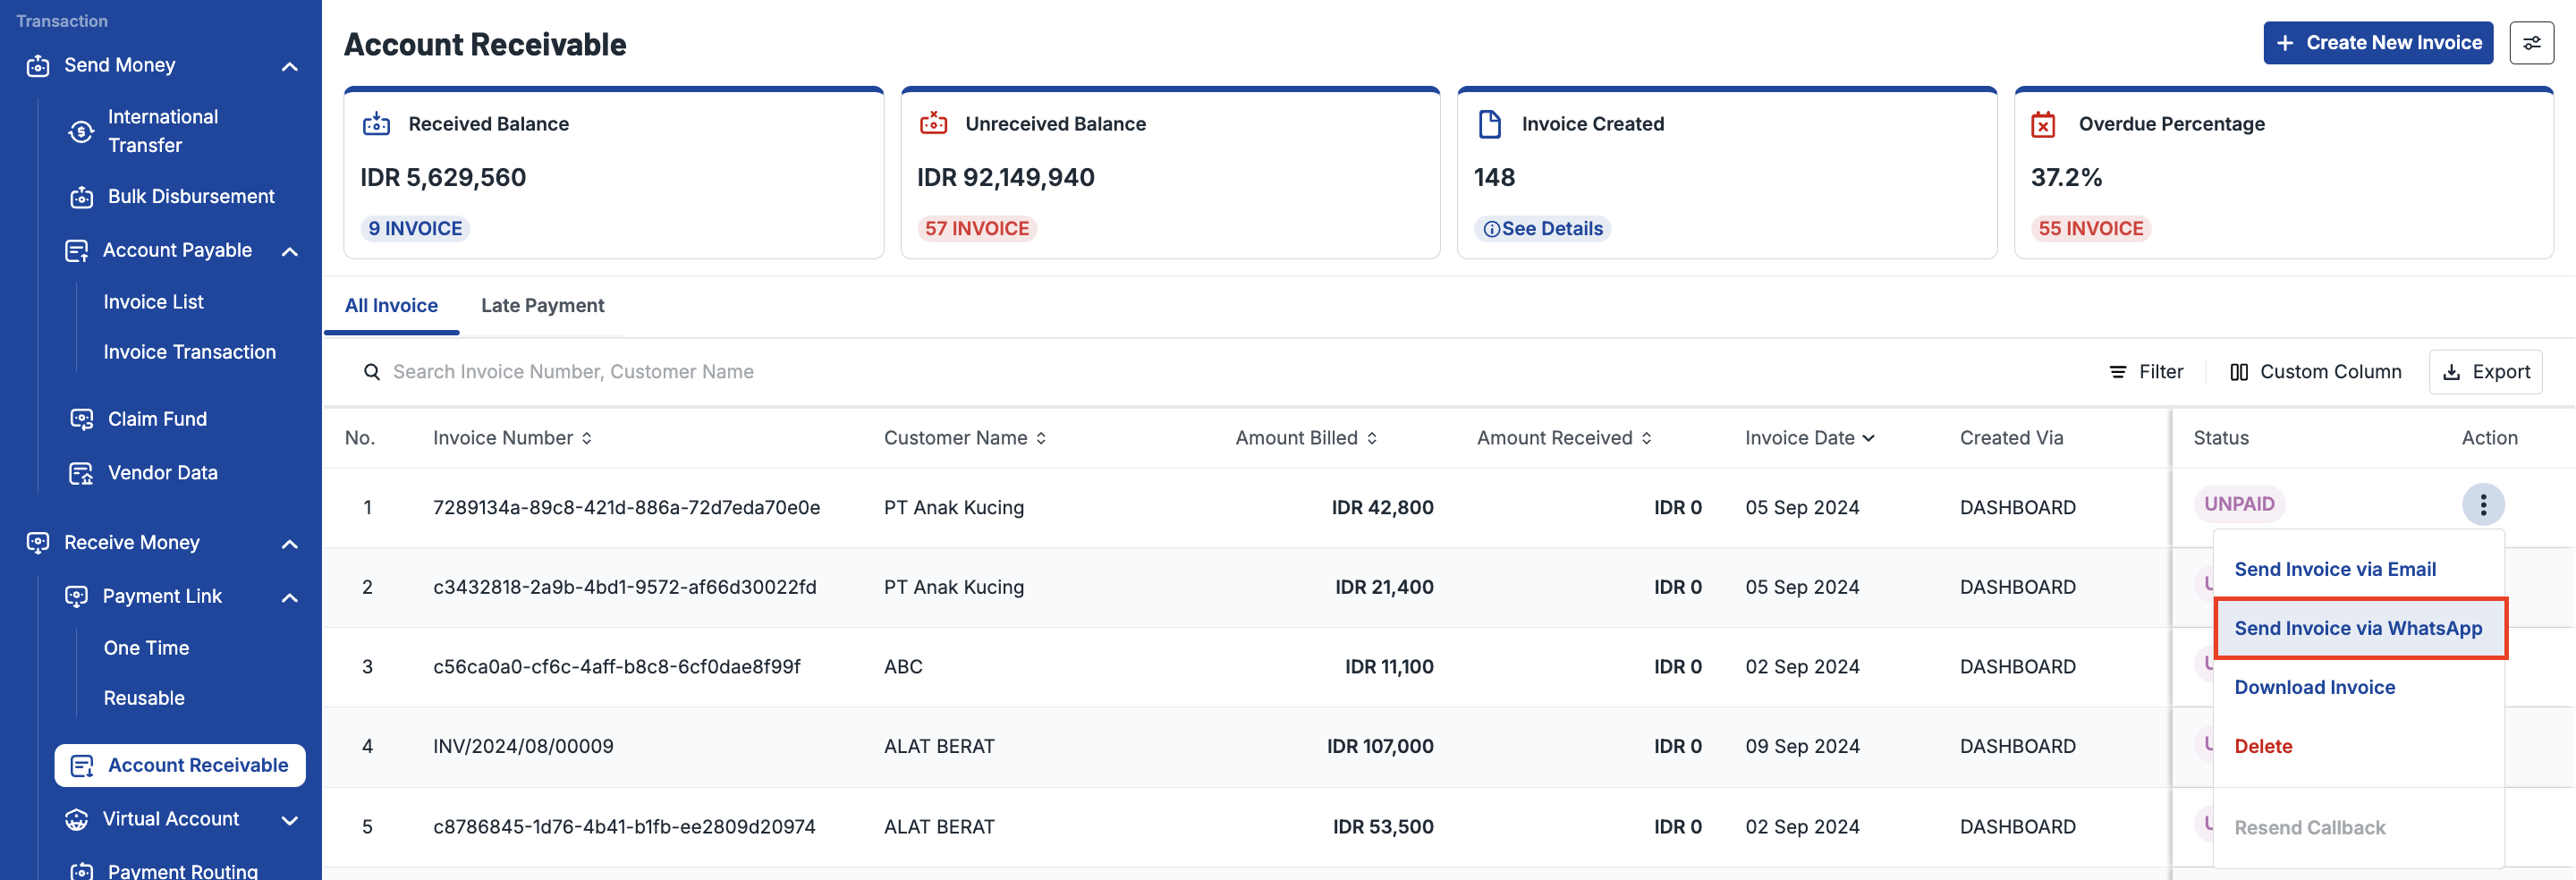
- Option 3 - via Invoice Details
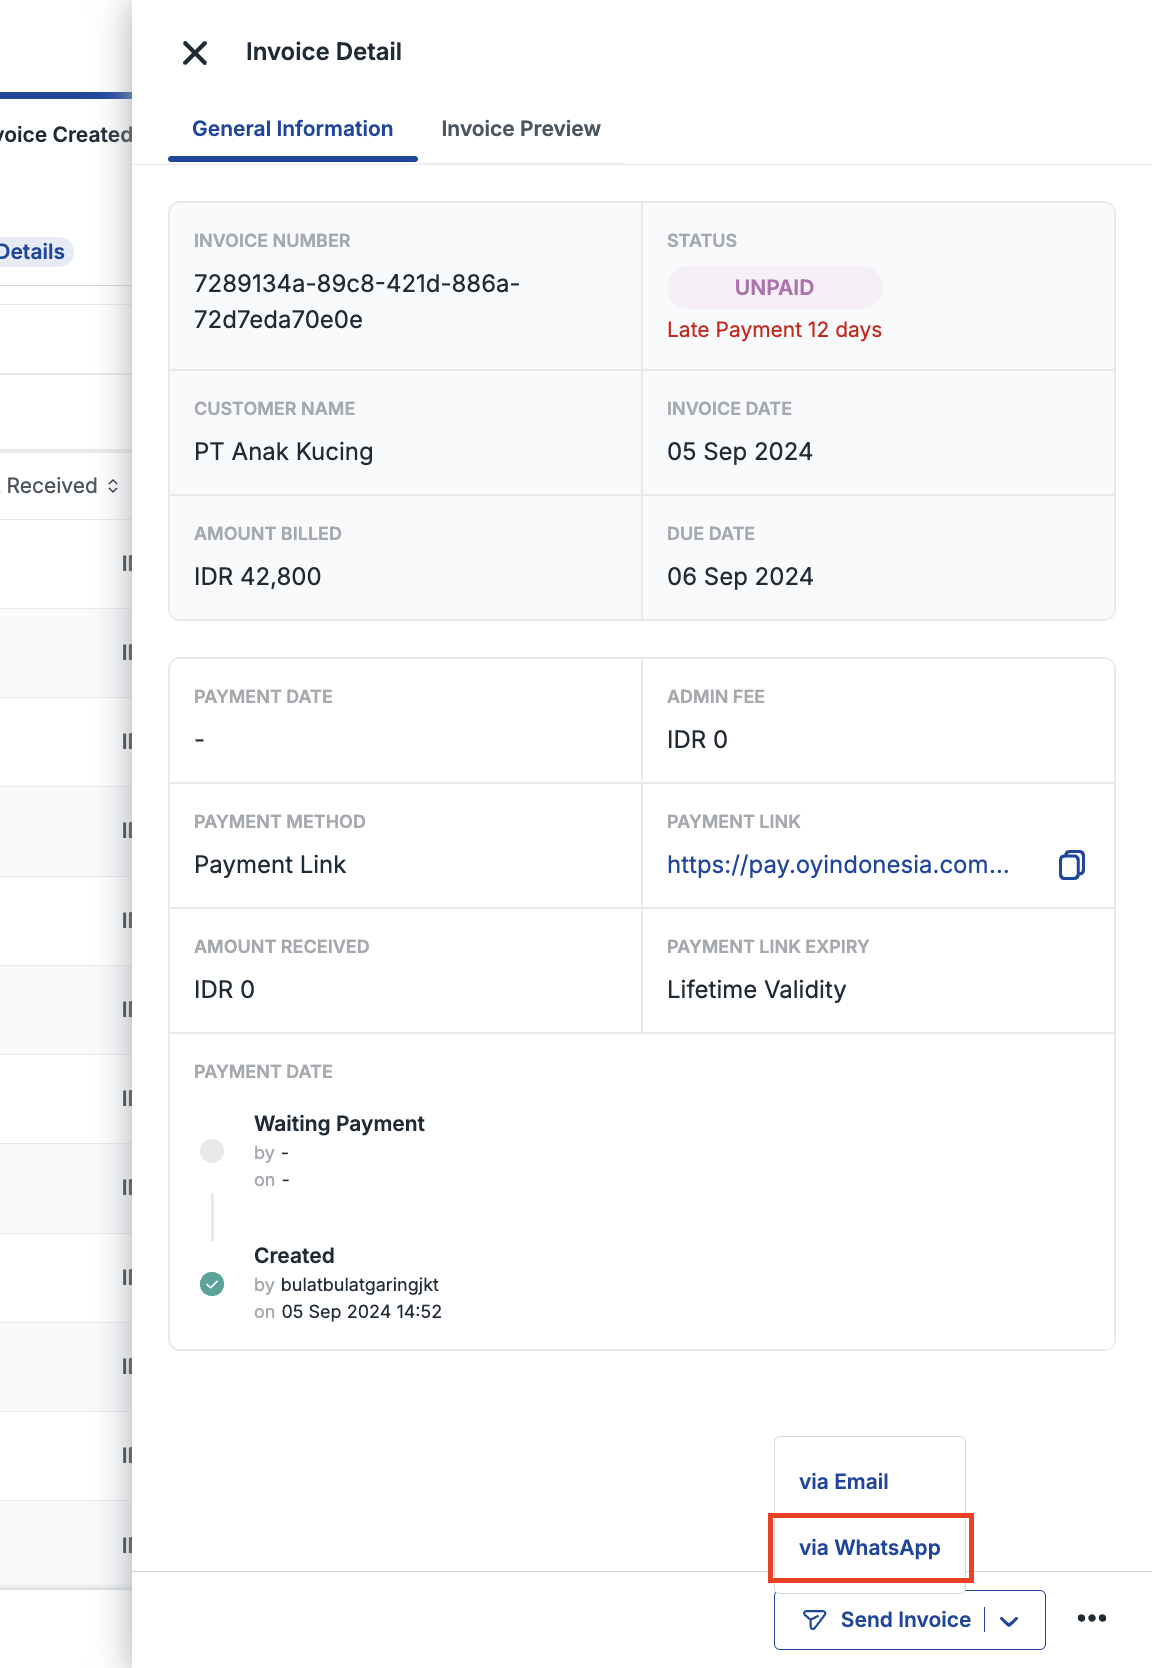
Expense Management
Corporate Card
OY! Corporate Card product provides the offer to create customized virtual corporate cards that can be used to manage online transactions (e.g. software subscriptions, corporate travel expenses, purchase of supplies, etc.) without hassle. Virtual Corporate Card can be created through the OY! dashboard, therefore no technical integration is required to use this product. Please contact our business representative for further details about this feature.
Key Features for Virtual Corporate Card
| Feature | Description |
|---|---|
| Card creation | You can use the funds directly from your OY! balance for corporate card needs. It is essential to top-up your OY! balance according to your desired card limit. |
| Card control | Create and control the card based on your requirements. You can set the limit amount (in Rupiah), validity period, card renewal frequency and even transaction limitations directly through OY! dashboard. Moreover, you can block and deactivate the card in real-time! Everything on your fingertips. |
| Real-time transaction | Transactions can be tracked easily through OY! dashboard and card holder’s page in real-time. There is no need to wait until the end of month for a full transaction statement. |
| Analytics dashboard | All transactions are recorded and reported in the analytics dashboard, helping companies easily manage and monitor their budgets. |
Registration and Set Up
Follow the below check-list to ensure you're all set up to use the service: 1. Create an account for OY! business 1. Upgrade your account by submitting the required documentations 1. Have your upgrade request approved 1. Set up your receiving bank account information (note: ensure that the receiving bank account information is accurate as it cannot be changed via OY! dashboard for security reasons) 1. Once your account is approved, you can start using Virtual Corporate Card product
Testing
- Log in to your OY! Dashboard.
- If you haven’t set approver, please follow steps in How to Set Approver for Virtual Card
- Select the "Demo" environment.
- Navigate to "Corporate Card" product under the Expense Management menu.
- Create a virtual corporate card by follow steps on How to Create Virtual Corporate Card
- Your approver will receive email regarding approval request to create virtual corporate card, ask them to approve or reject the card for testing purposes
- After your approver approves the request, the registered cardholder will receive email regarding dummy card information and virtual card status data on the demo OY! dashboard will be updated
How to Create Virtual Corporate Card
You can create new virtual corporate card by following these steps: 1. Log in to your OY! dashboard 1. Click “Corporate Card” under Expense Management menu 1. Click “Add New Card” 1. Choose "Virtual" for "Card Type" and usage frequency either single usage or multiple usage and click “Next” 1. Fill in Cardholder details and Card details 1. Once submitted, virtual card will be in “waiting for approval” state 1. After the approval step, the virtual card is ready to be used for transactions.
Notes: Once your OY! balance is transferred to a virtual corporate card, it can only be used for virtual card transactions.
- Corporate Card Dashboard
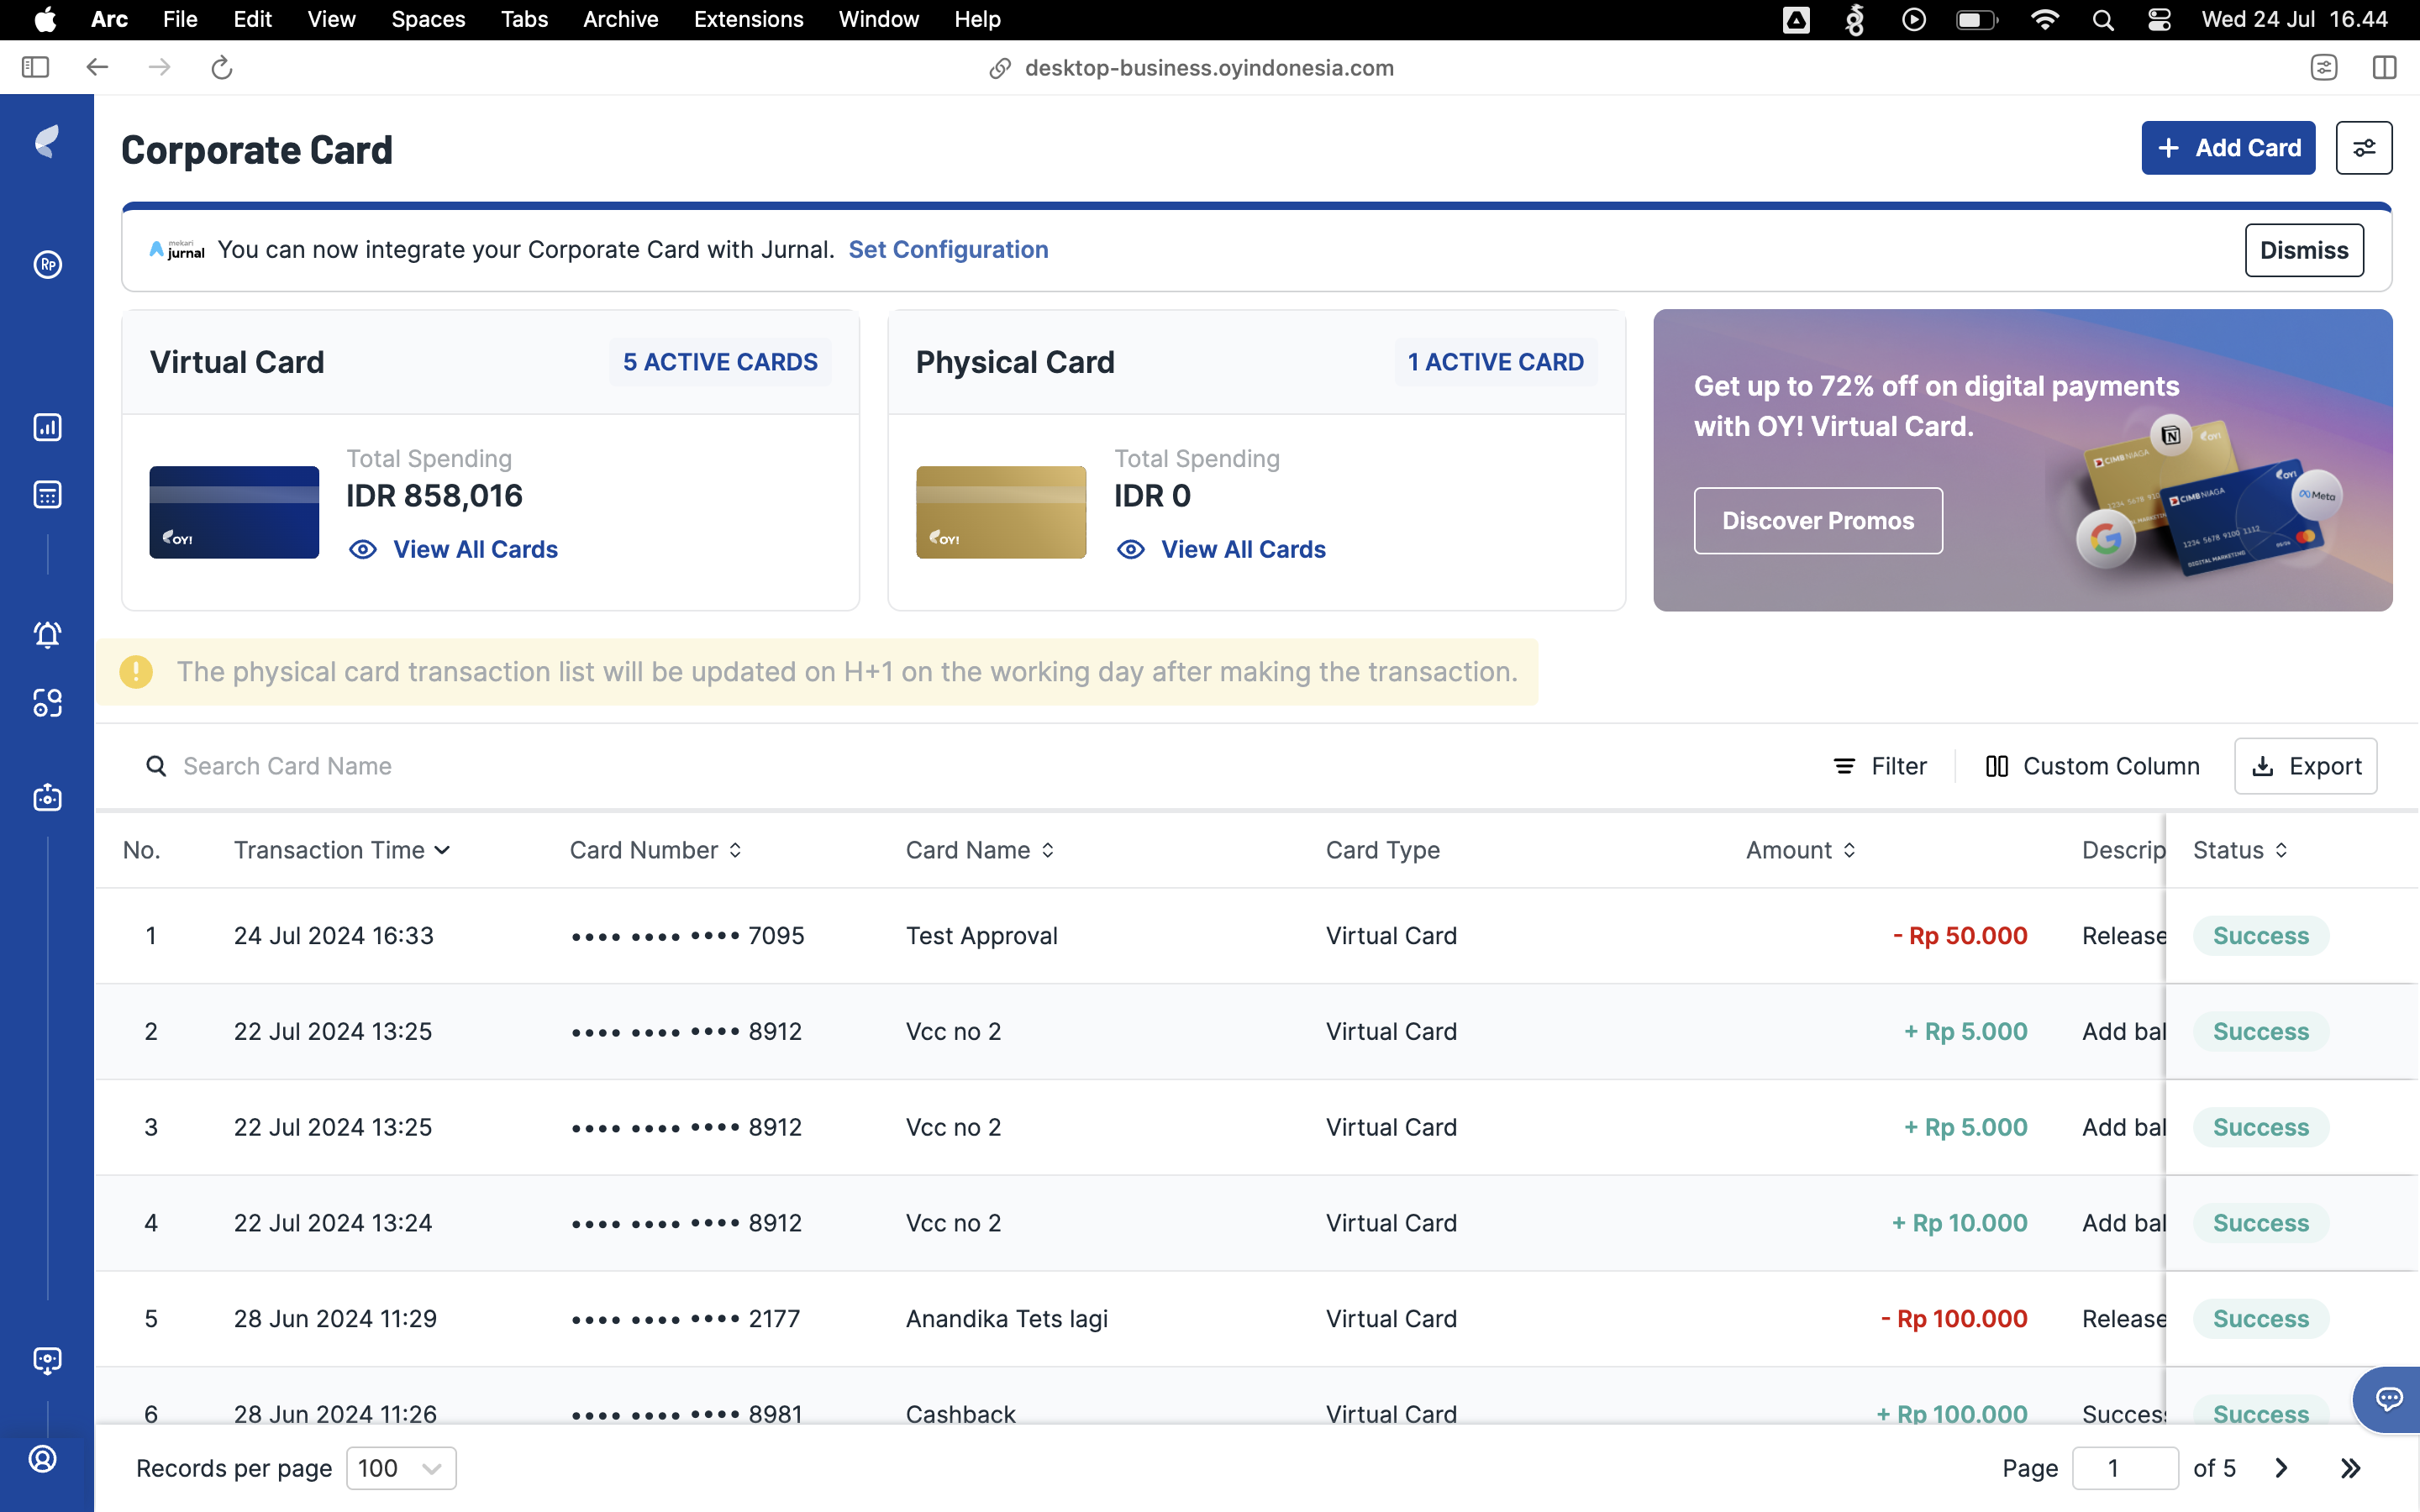
- Virtual Card Type
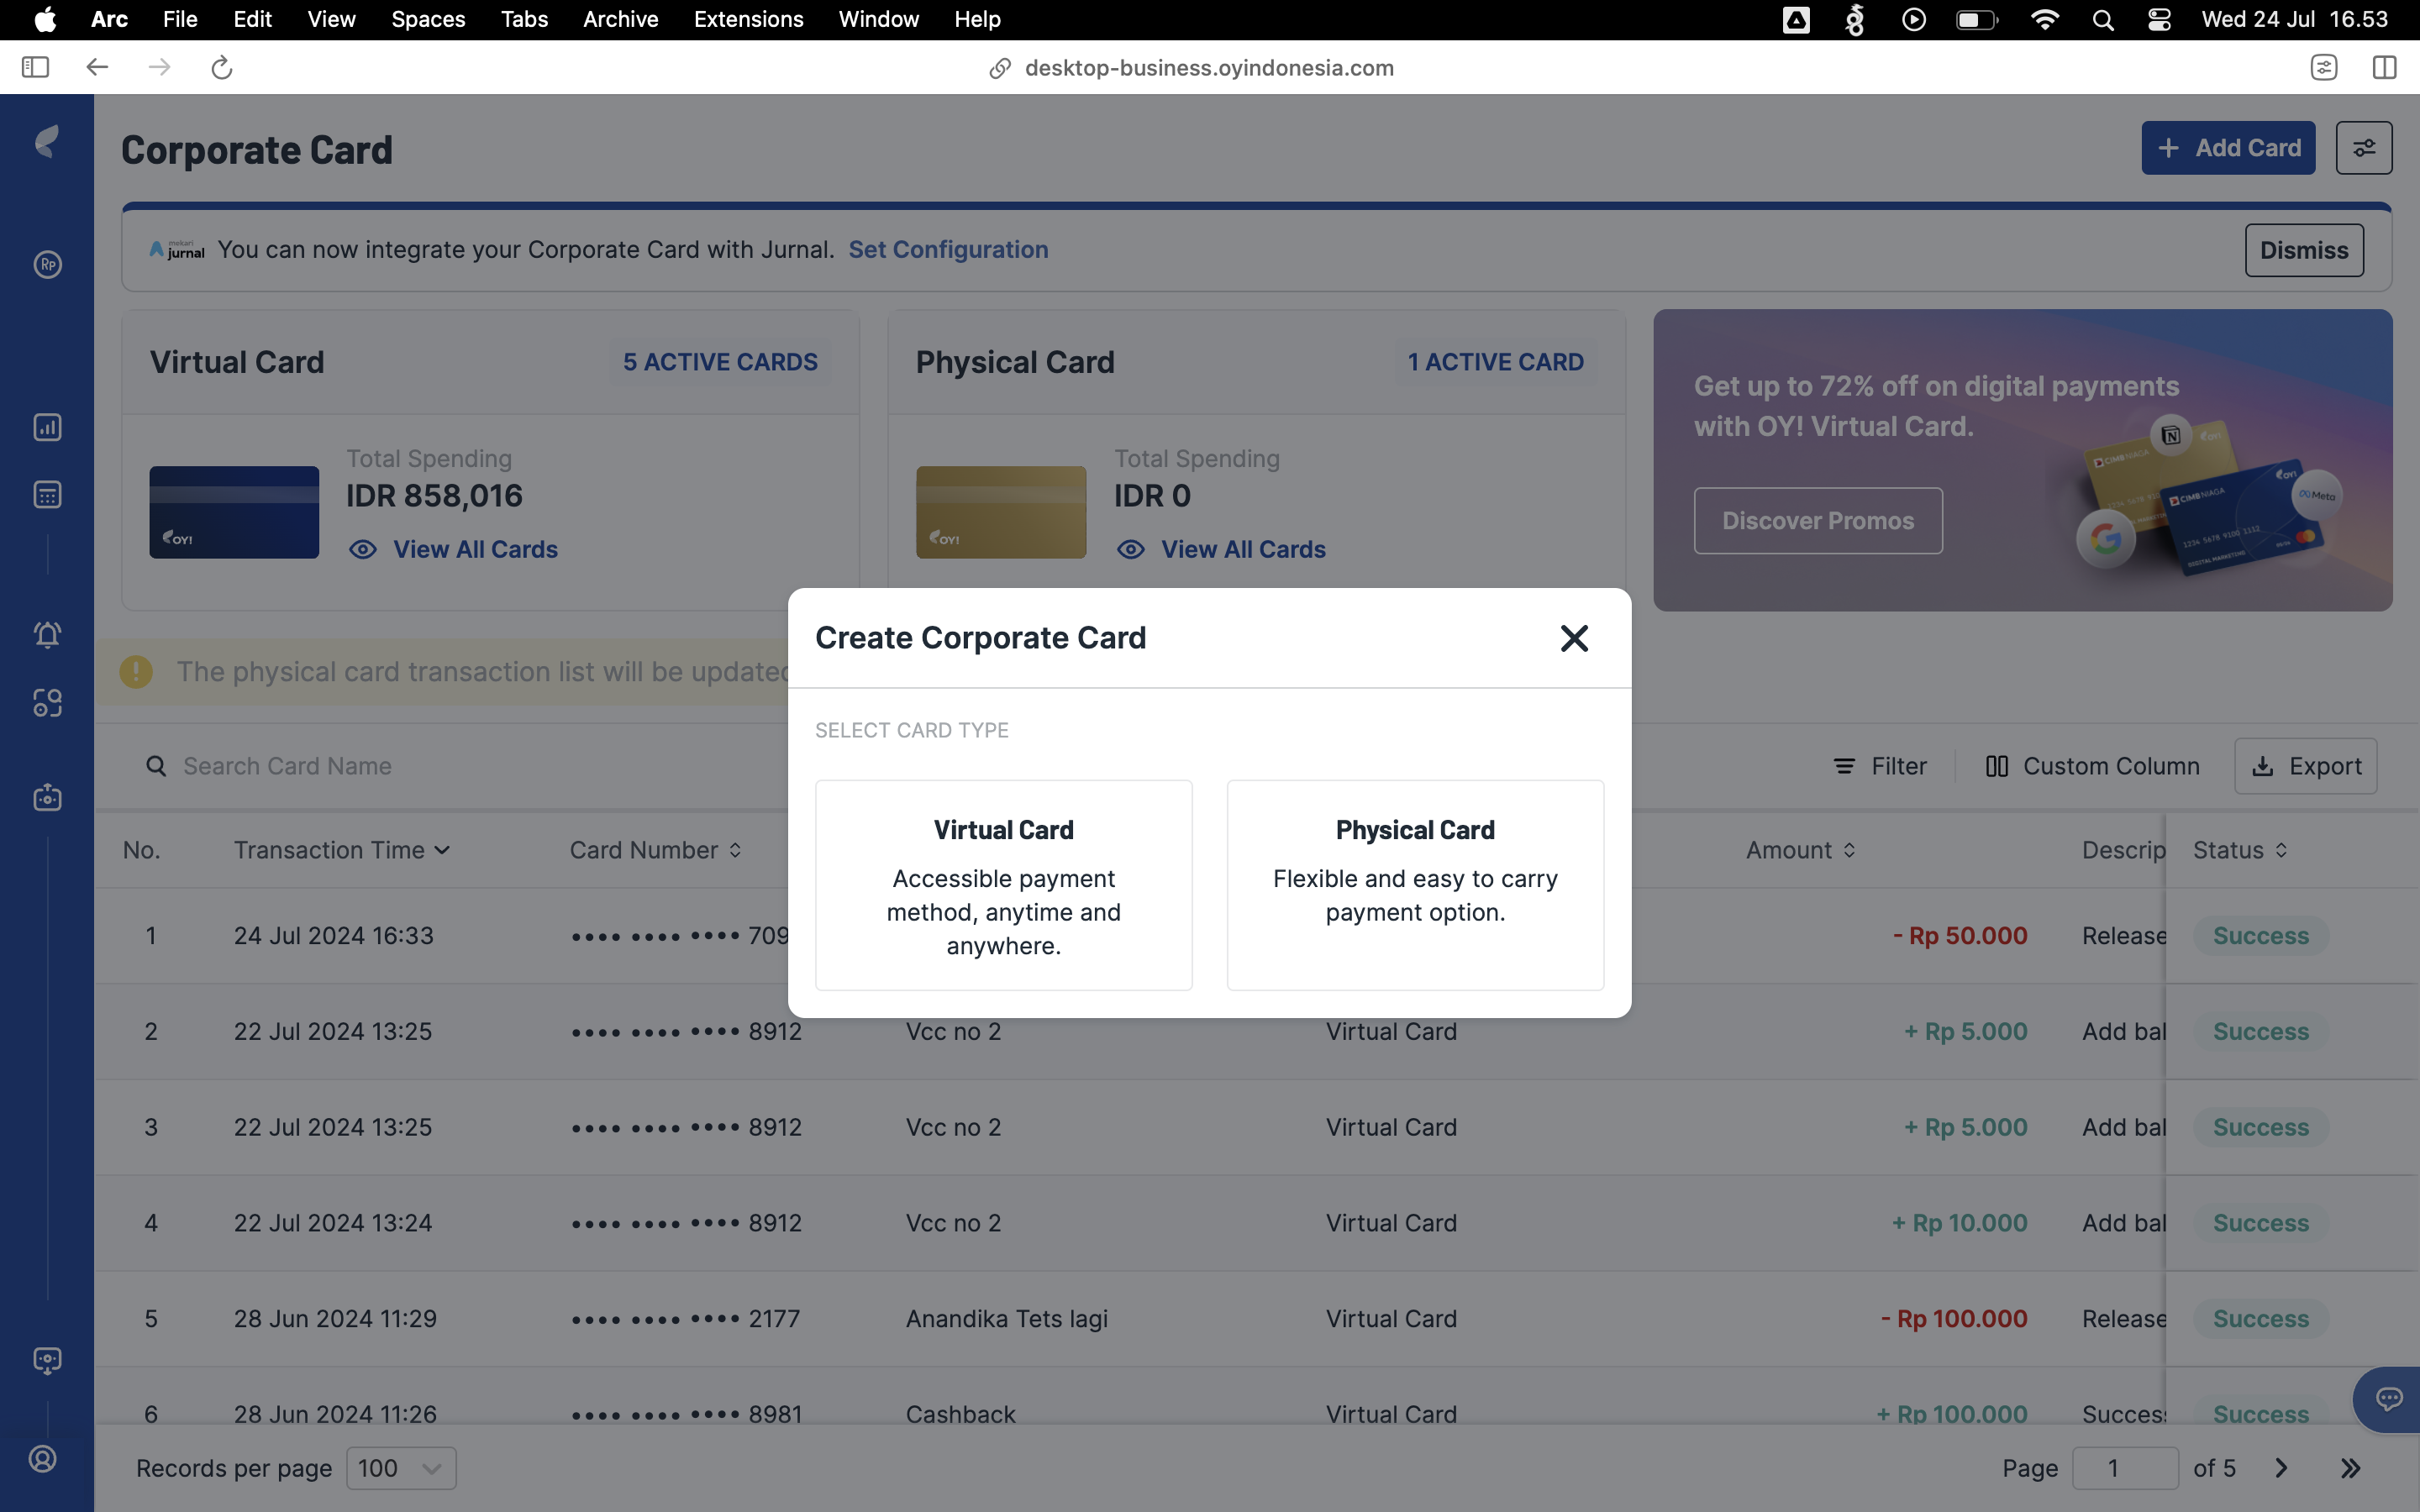
- Virtual Card Form
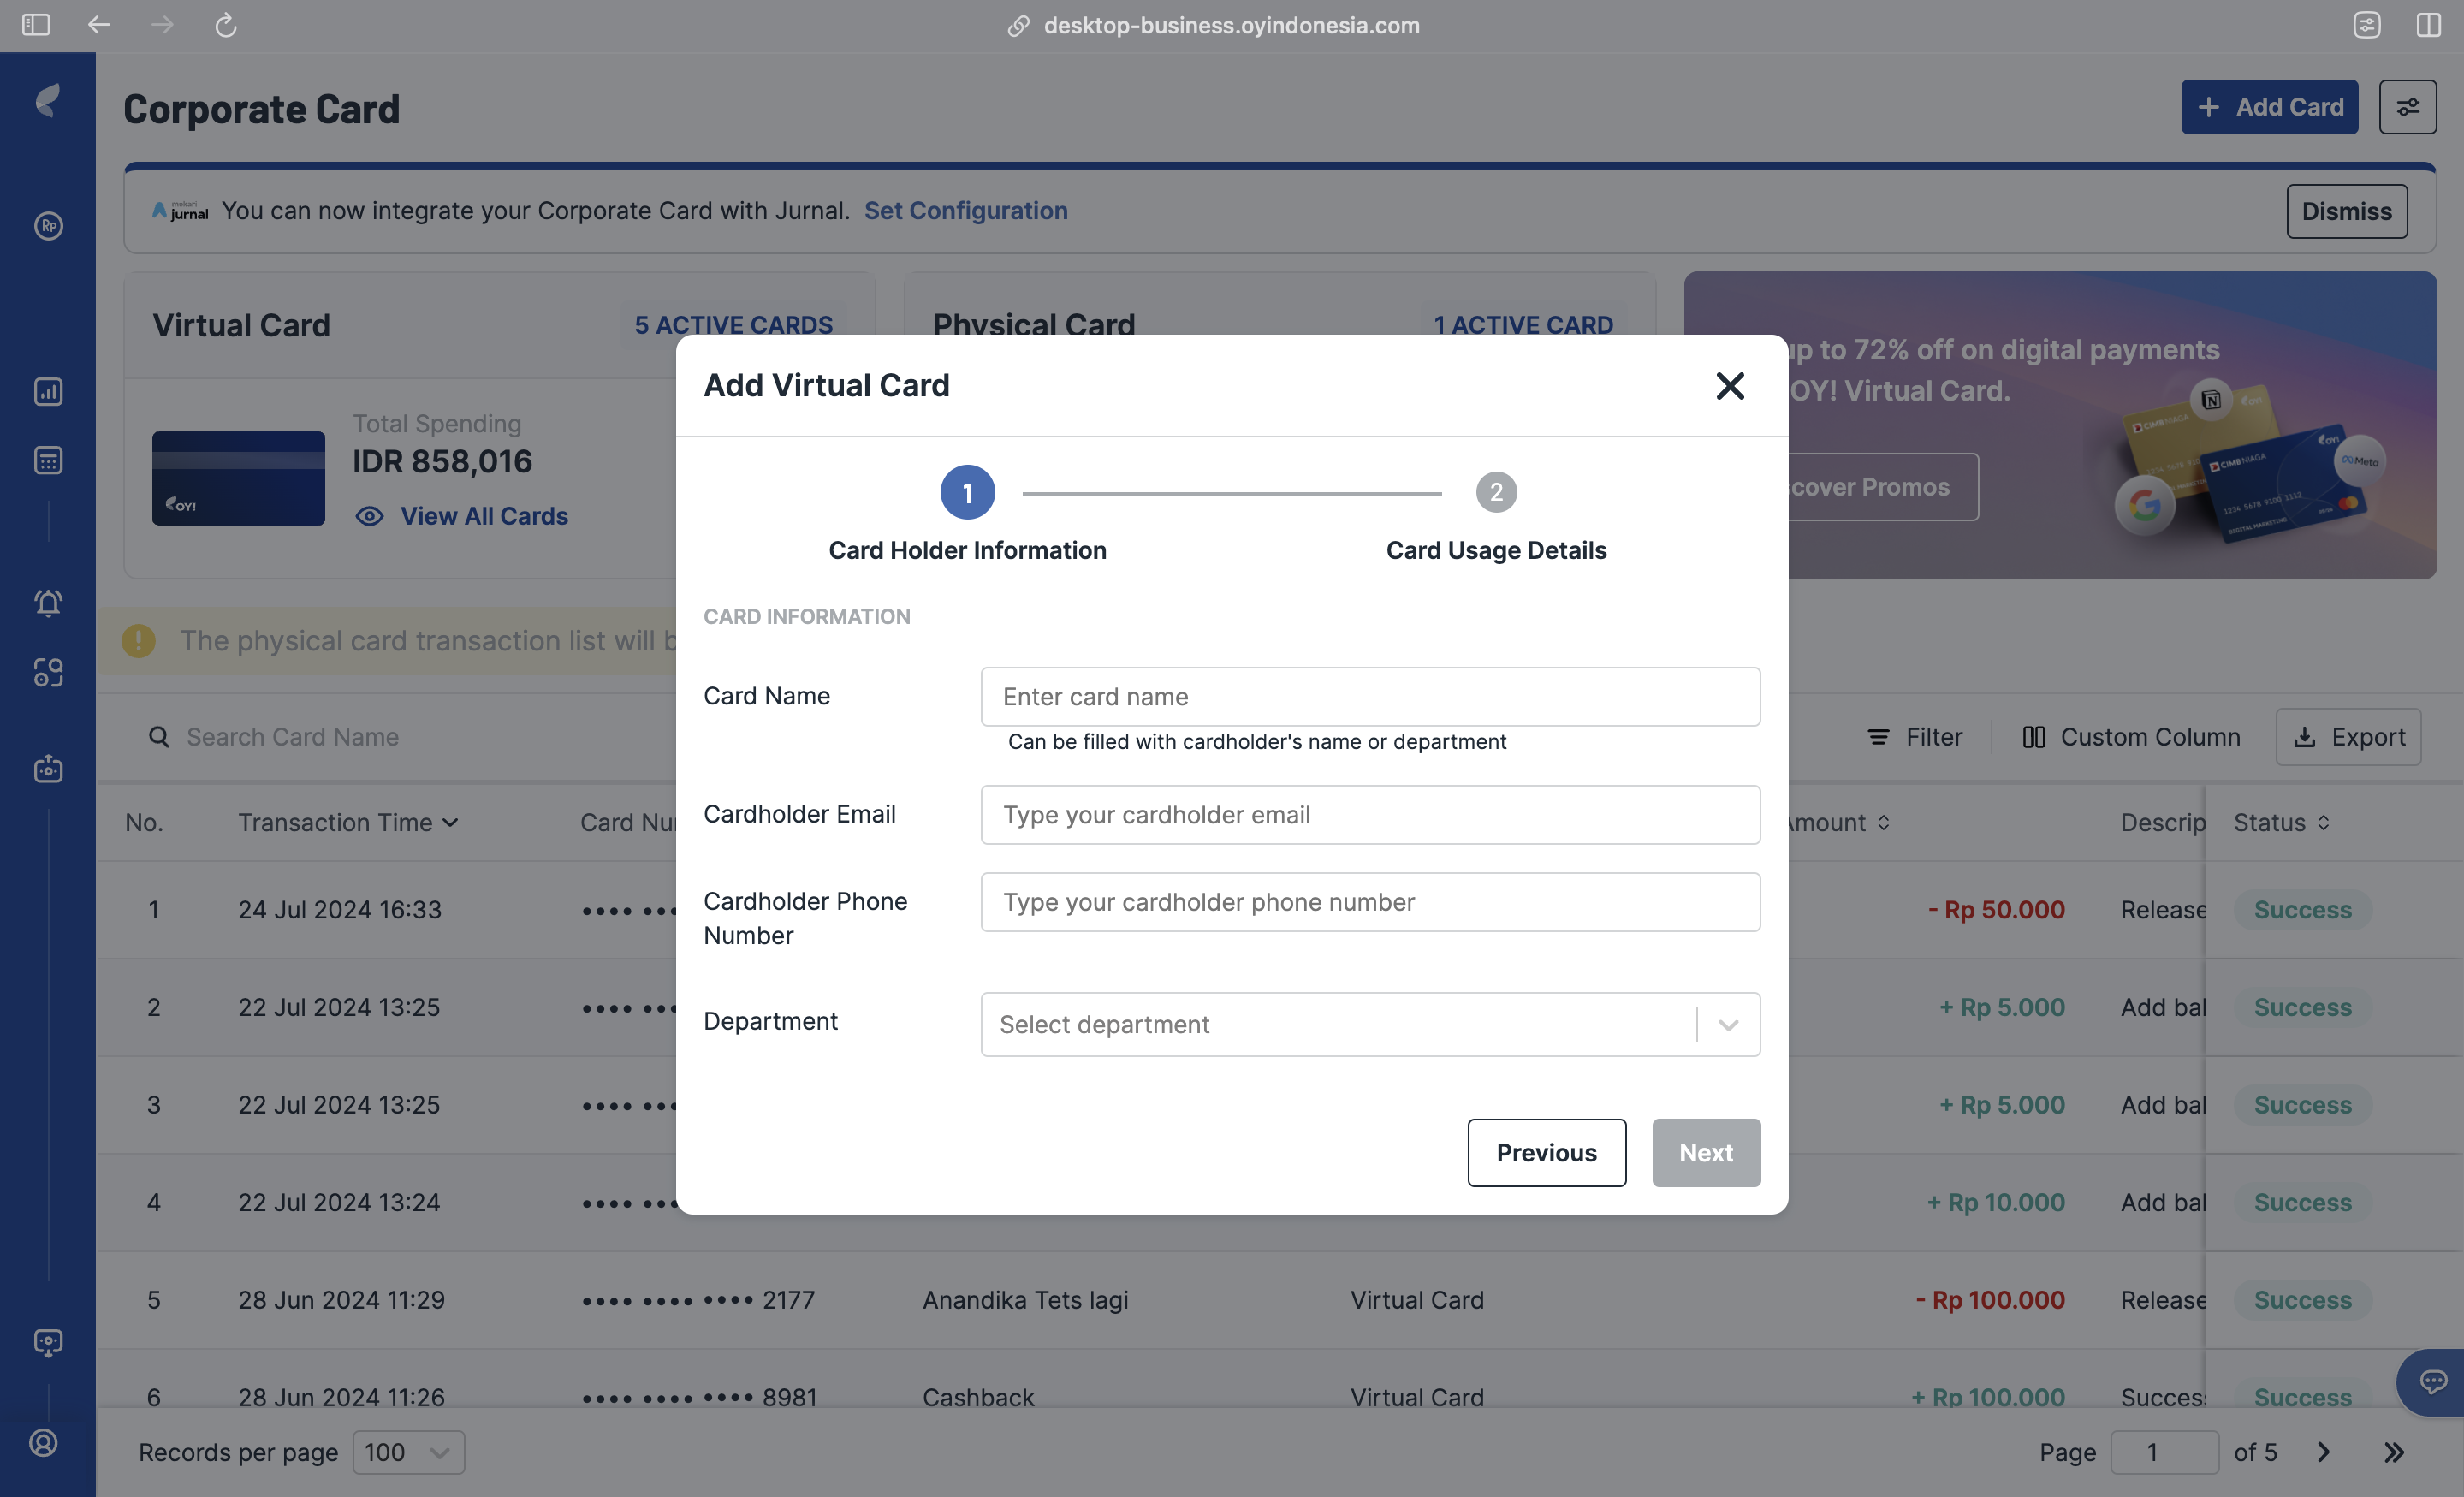
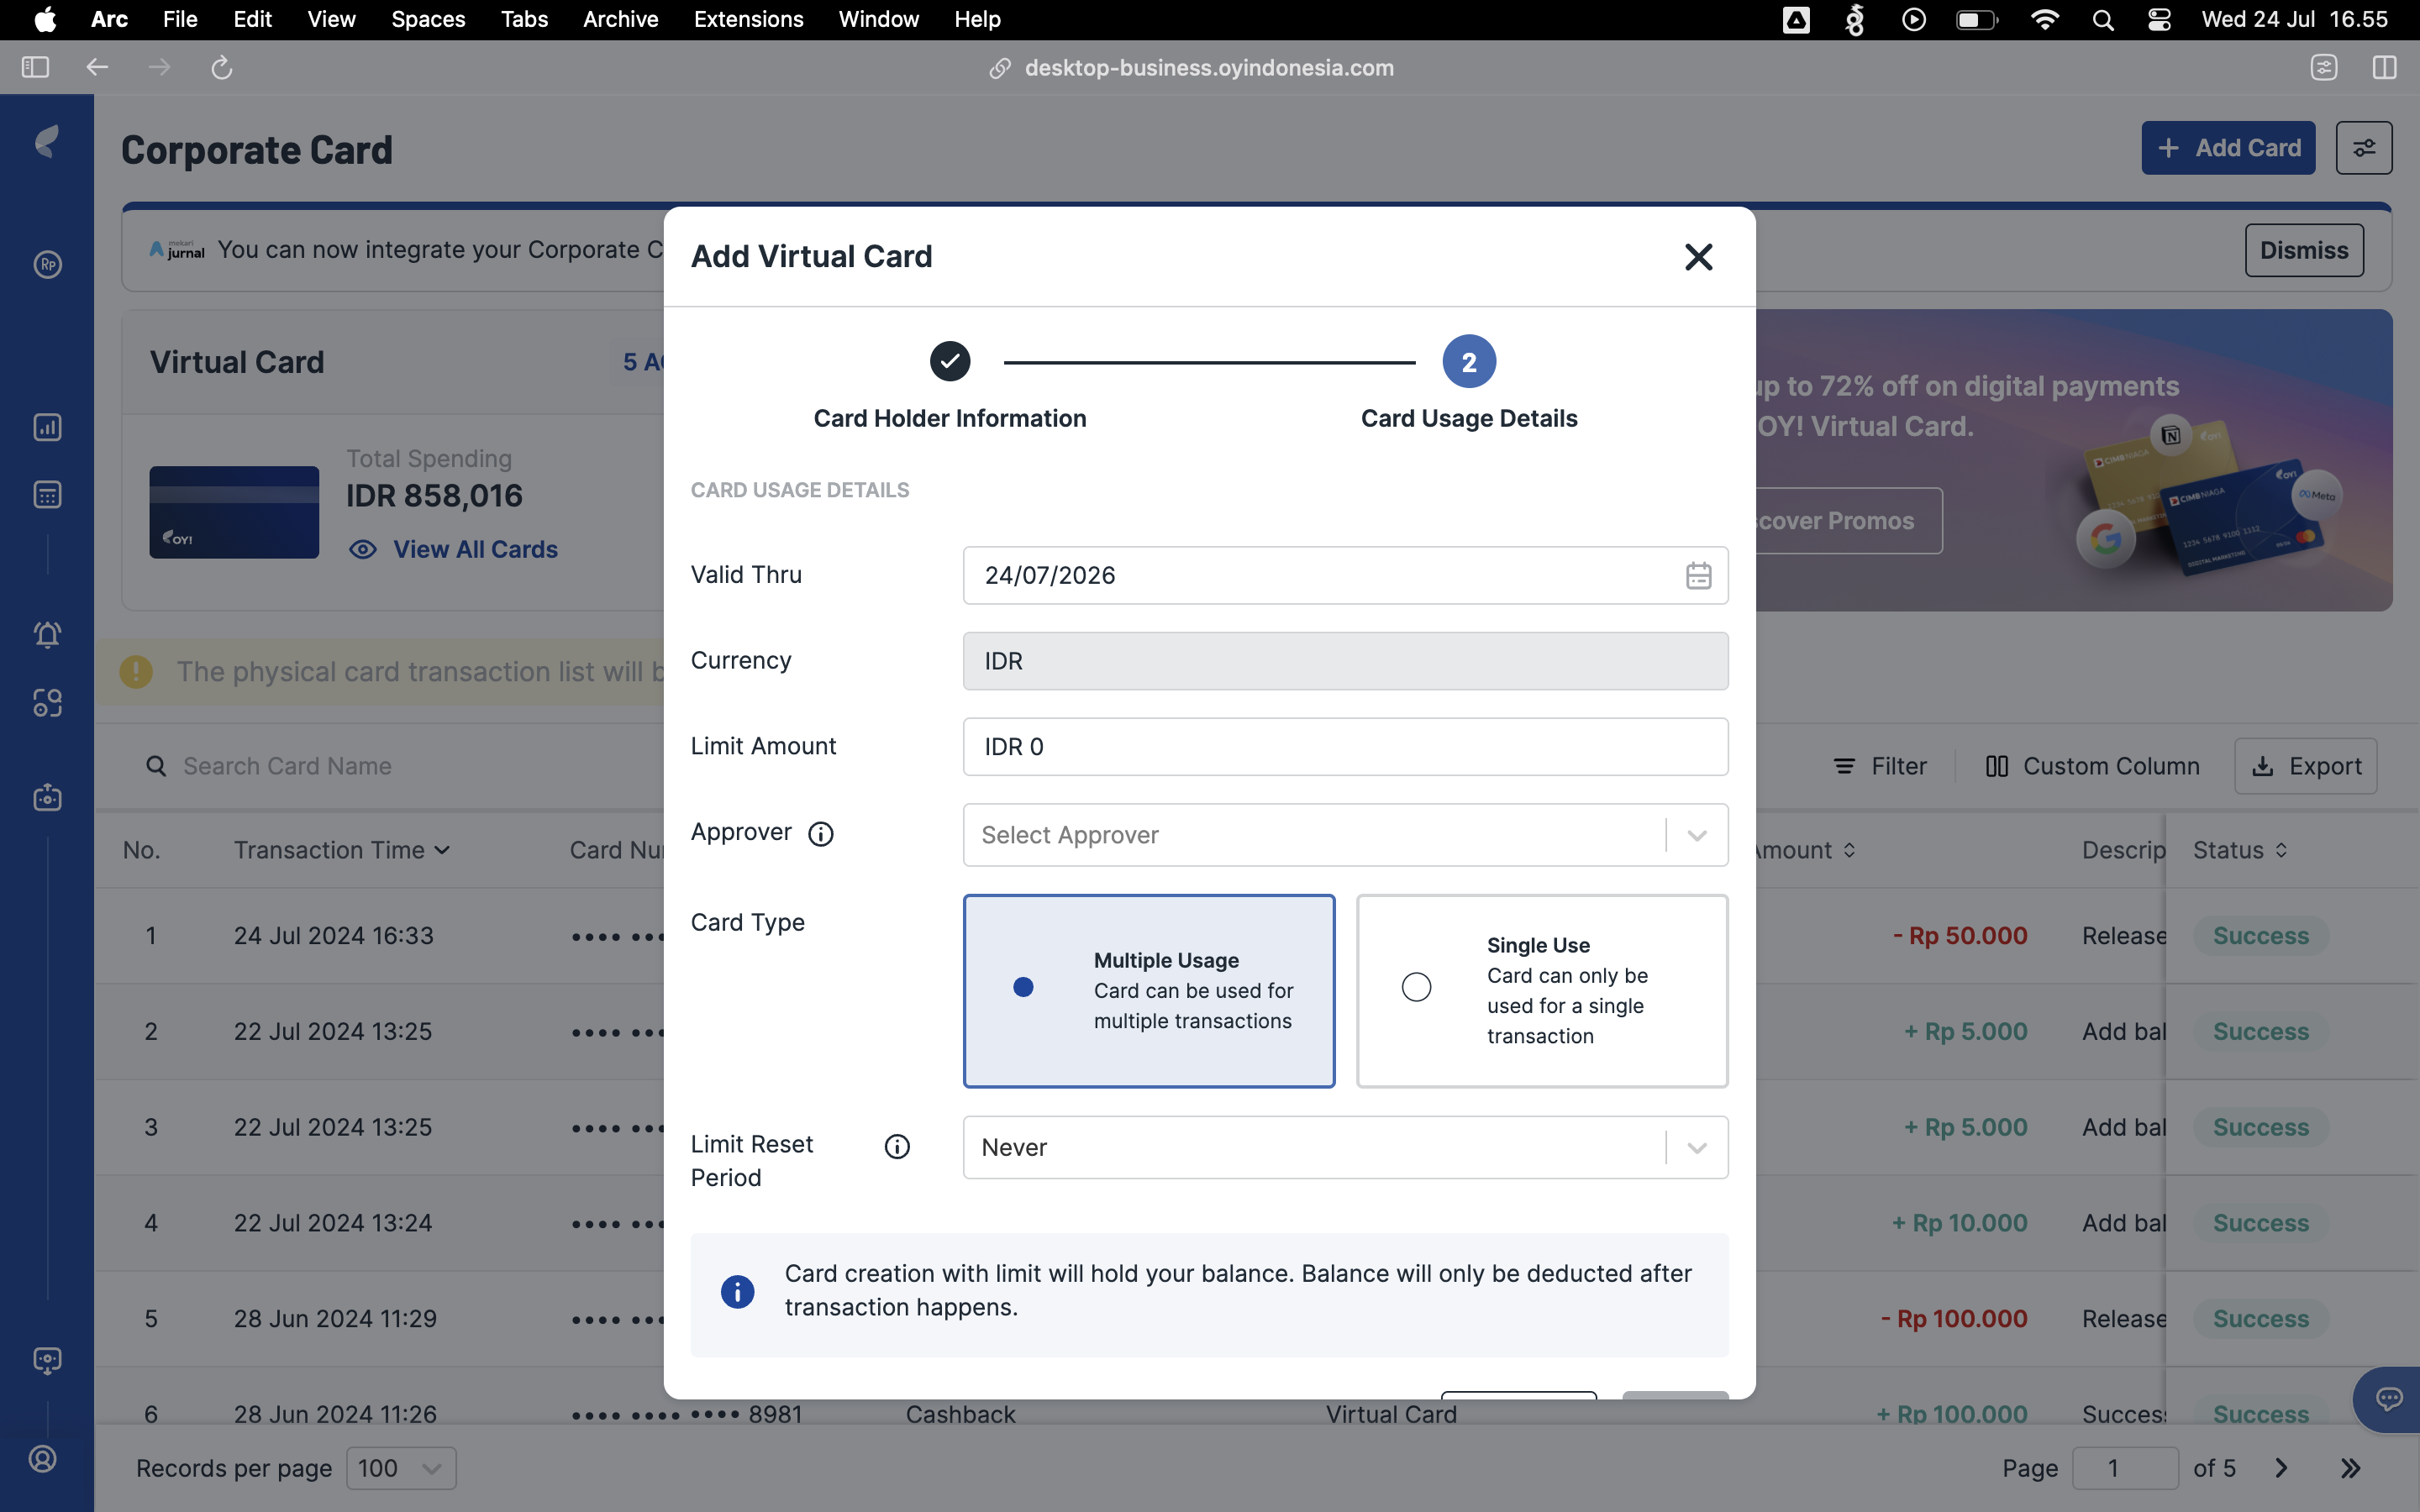
How to Transact with Virtual Card
Steps to use virtual card for online transaction: 1. Access your card information (including remaining balance & transaction) via email and enter OTP sent to the phone number registered. 1. Once accessed, input all of your card information into merchant side under “Credit / Debit Card” Option 1. Input 16 digit number, expiry date (MM/YY) and CVV 1. Submit the information and proceed with the transaction and the transaction should be successful. 1. For record purposes, you can upload the invoice for each transaction inside OY! dashboard.
- Virtual Card Information
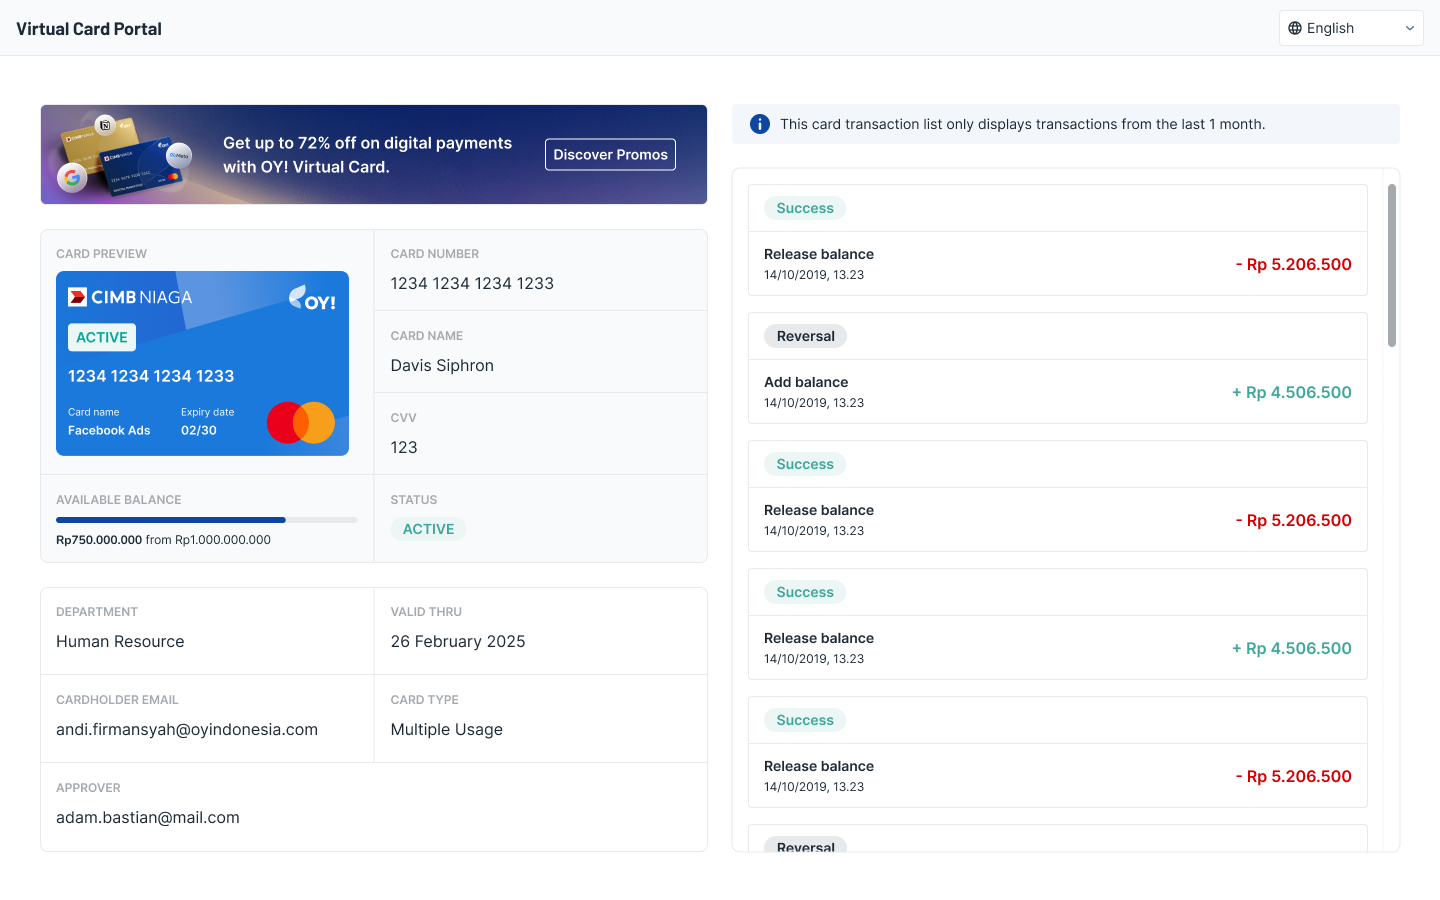
- Virtual Card Transaction Details
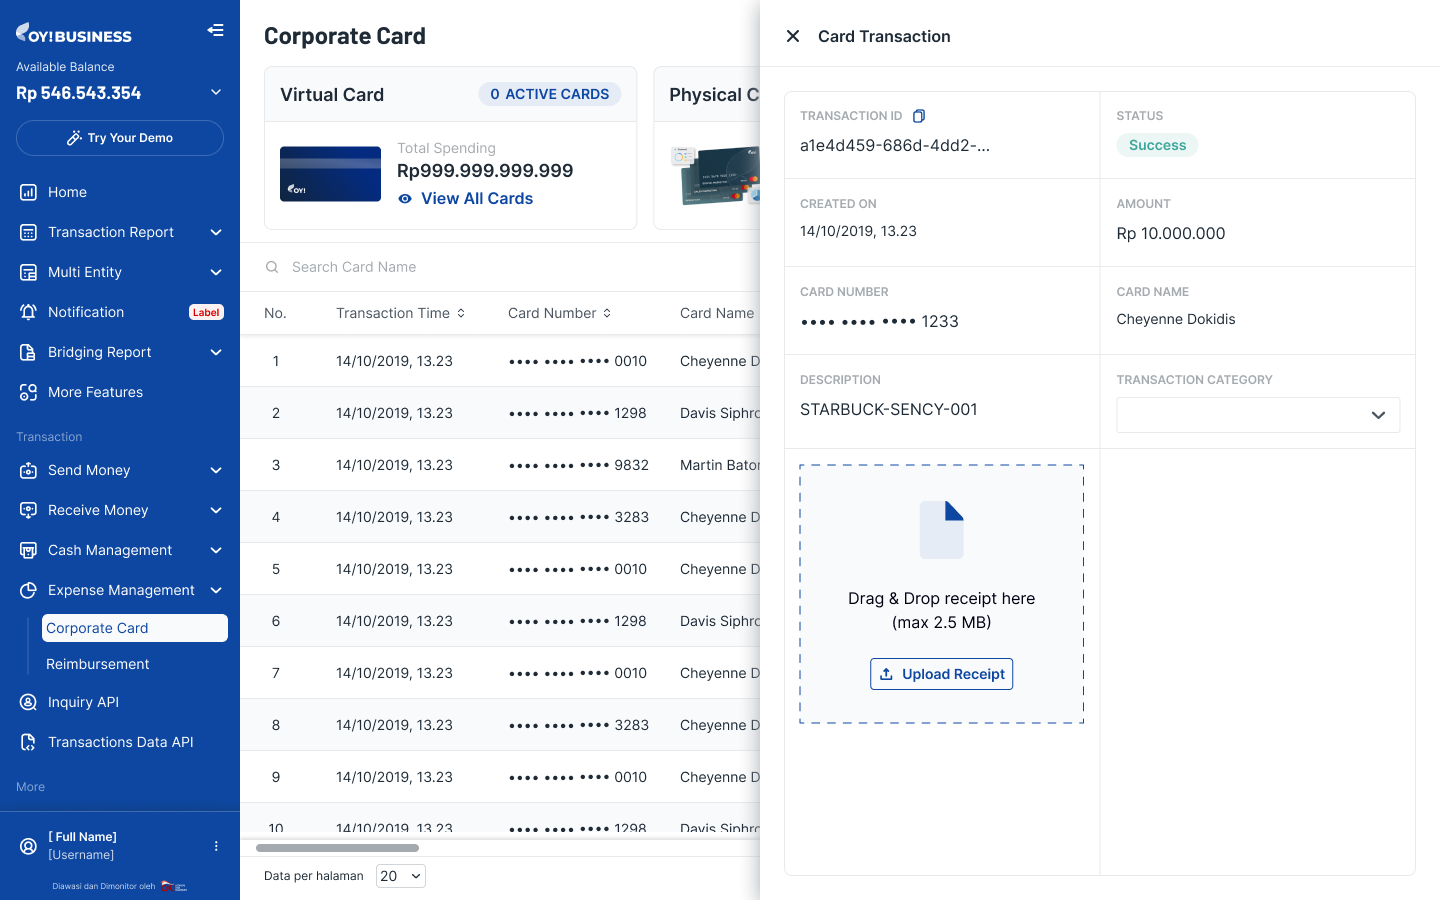
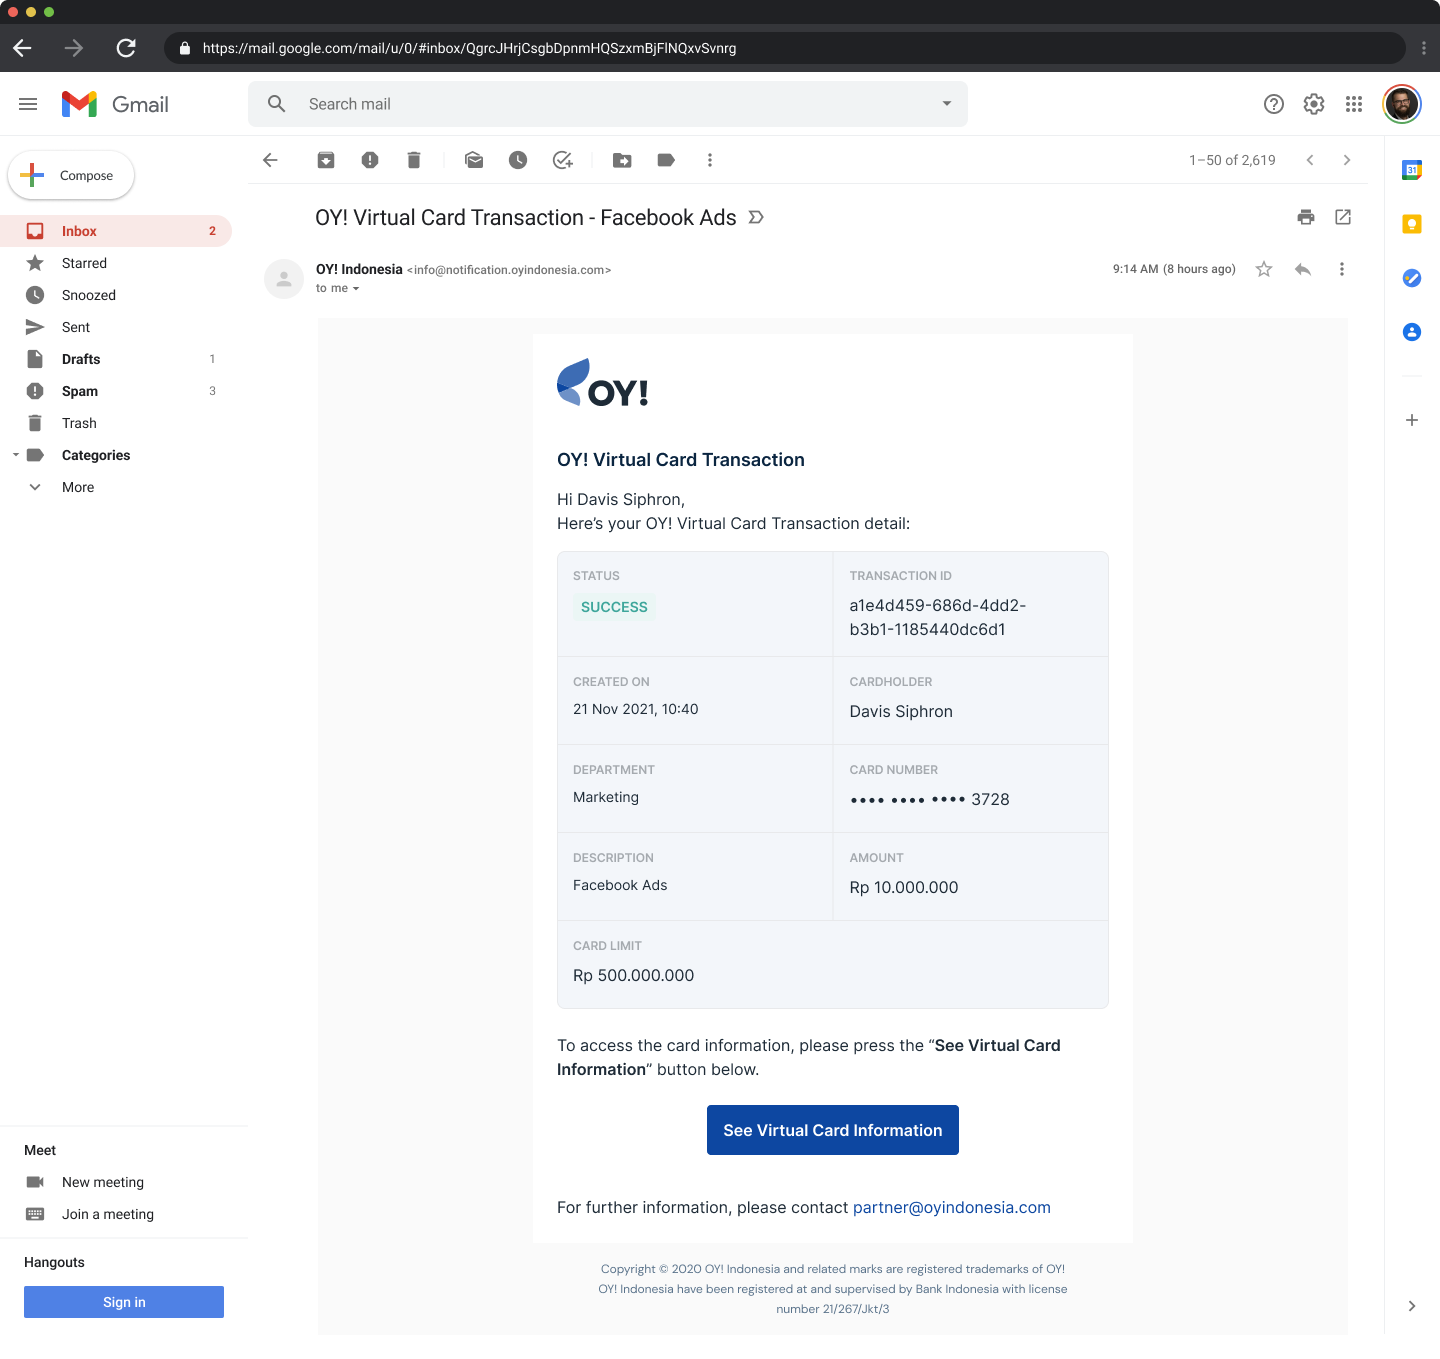
Virtual Card Status Status| Description ------ | ----------- Pending Approval | Card has been requested but not yet approved. Requests are valid for 14 days. Active | Card is ready to be used for transactions. Active with Warning | Card is active with balance, but only <15% balance remaining. Inactive | Card has been blocked. The card can be activated any time needed through OY! dashboard. Need top-up | New card has been created but failed to top-up the card balance due to insufficient OY! balance, OR current card limit is 0 and passed renewal time due to insufficient OY! balance. Expired | Card is expired or intentionally archived permanently. Rejected | Card is rejected by approver.
Transaction Status Transaction Status | Description ------ | ----------- Successful | Transaction was successful. Failed | Failed transaction issue that related to OY! balance (top-up card or create card). Reversal | Transaction was canceled, and the amount was refunded due to errors, returns, or fraud. Declined | Transaction was declined by the merchant. Refund | Refund by merchant.
How to Set Approver for Virtual Card
- Log in to your OY! dashboard
- Click “Corporate Card” under Expense Management menu
- During first time product activation, you are required to fill in approver data
- Fill in the approver details
- You are required to review and check the T&C, then confirm your approver details
- Approver will receive confirmation email
- Add New Approver
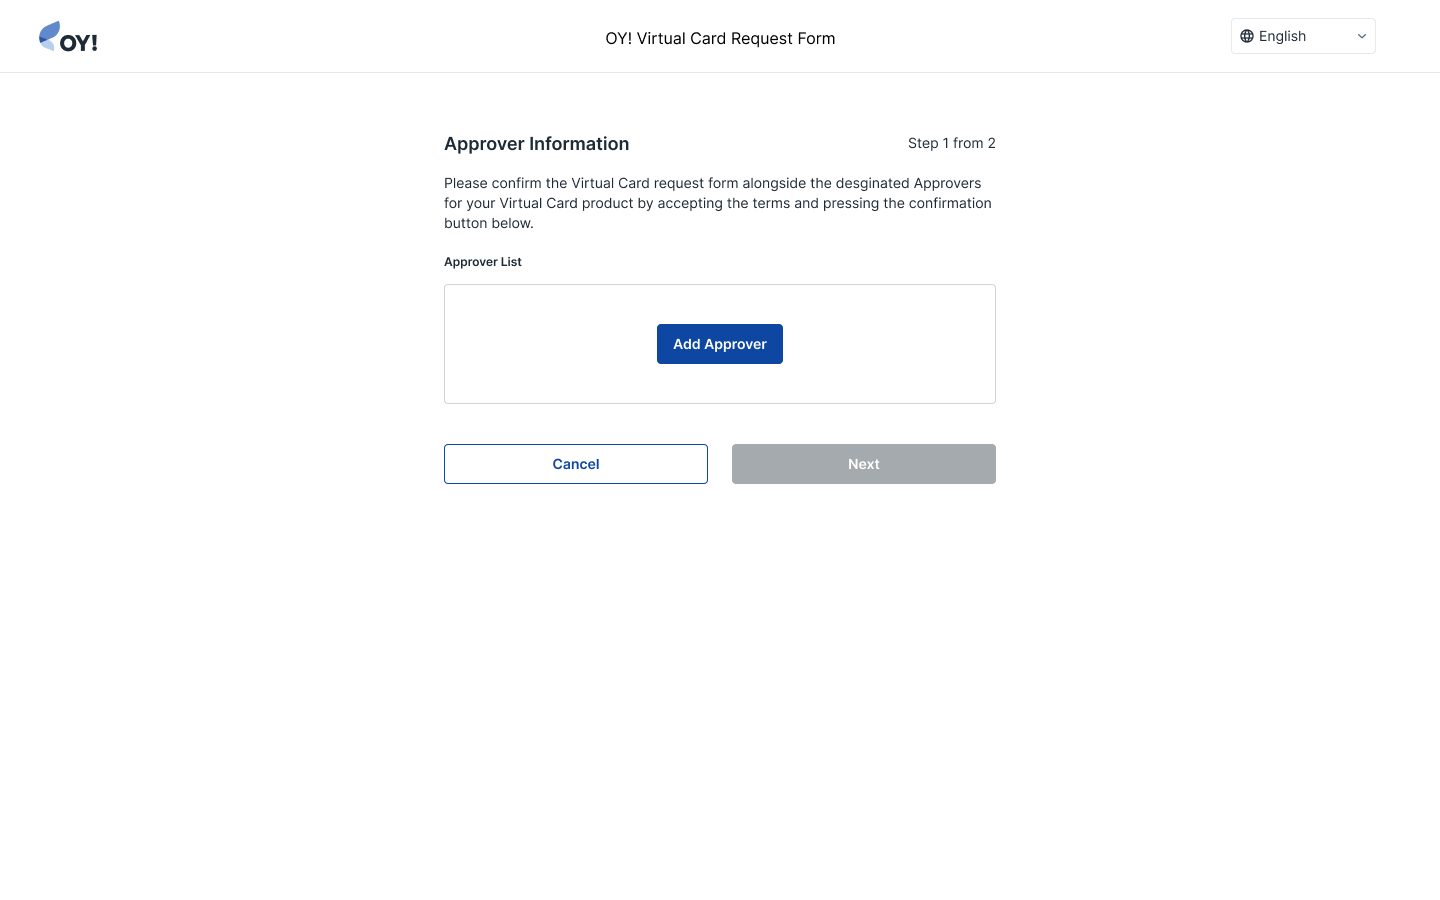
- Approver Form
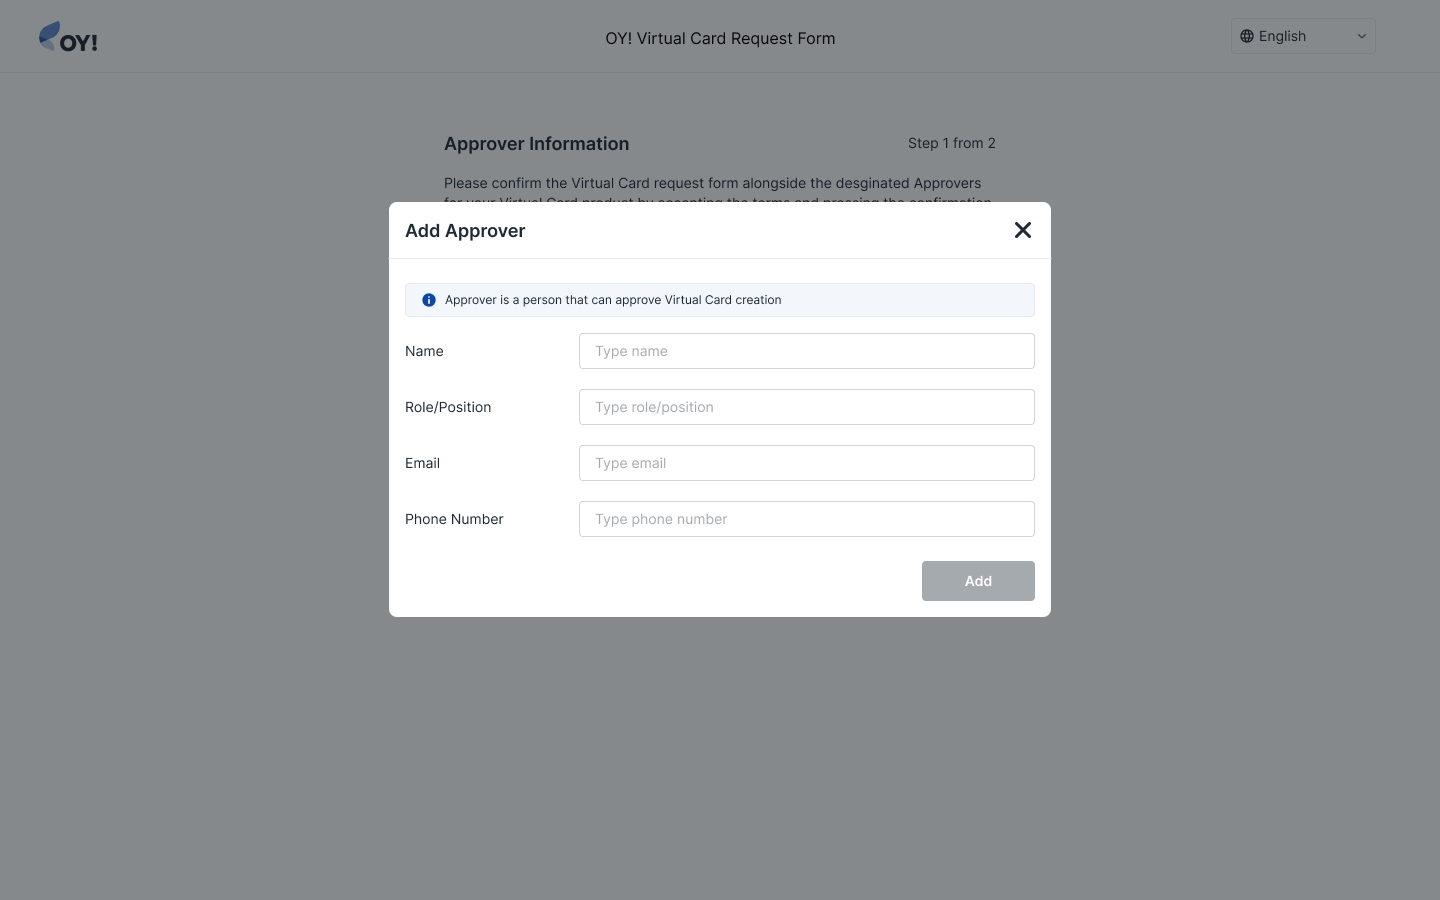
Notes: Approver data cannot be added or edited through OY! dashboard for security purposes. Please contact our business representative for help.
| Parameter | Description |
|---|---|
| Name | Approver Name |
| Position | Approver Role |
| Phone Number | Approver Phone Number |
| Approver email for card approval purposes |
How to Monitor and Manage Virtual Cards
- Log in to your OY! dashboard
- Click “Corporate Card” under Expense Management menu
- Click “See All Cards”
- Dashboard will show analytics dashboard (divided per department) and list of card to manage
- Click the card that needs to be managed

Card Actions Card Actions | Description ------ | ----------- Resend Card Info | To resend card info to cardholders, in case of missing email. Edit Information | To edit the card limit. Editing card limits will lead to card temporary blockage and require reapproval flow again. Block | To temporarily lock the card, limit remains in the card and card’s status will be “Inactive” Archive | To permanently lock the card, card limit will be reduced to 0 and remaining card limit will be returned to OY! balance. Renew Limit | To renew the card limit with a desired amount using OY! balance. Resend Approval Notification | To remind approver to approve the card request in case of missing email. Delete | Only applicable for "Pending Approval" card. This will archive the card so the card is no longer used.
How to Set Up Card Configuration
- Log in to your OY! dashboard
- Click “Corporate Card” under Expense Management menu
- Click “Corporate Card Configuration”
- Select Department / Category / Approver
- You can choose to whether add new, edit existing or delete
- Click "Save Changes"
- Department page prior to “Edit Department” button
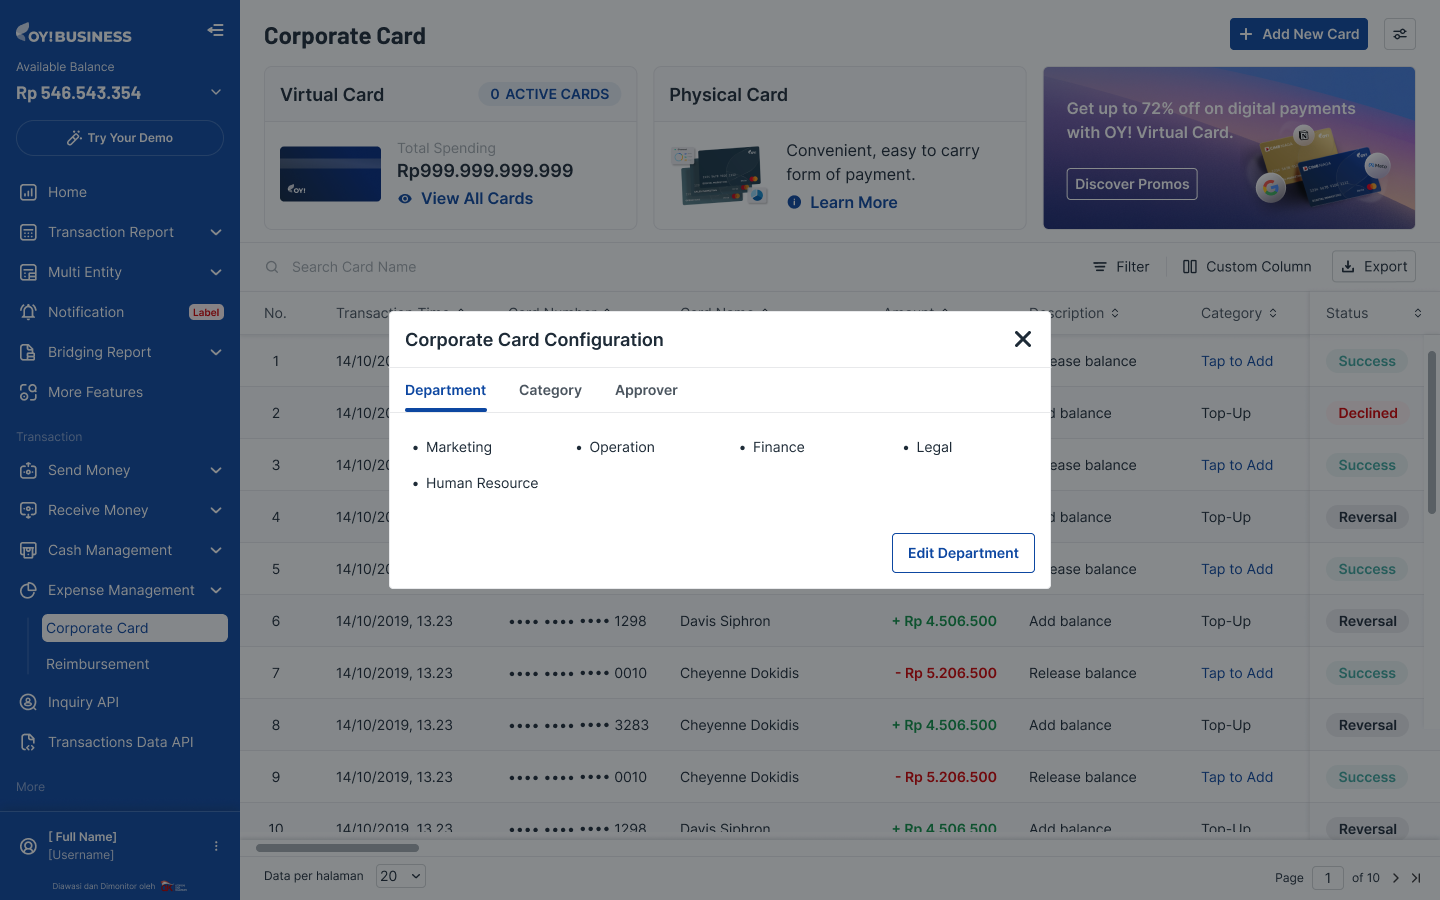

- Category page

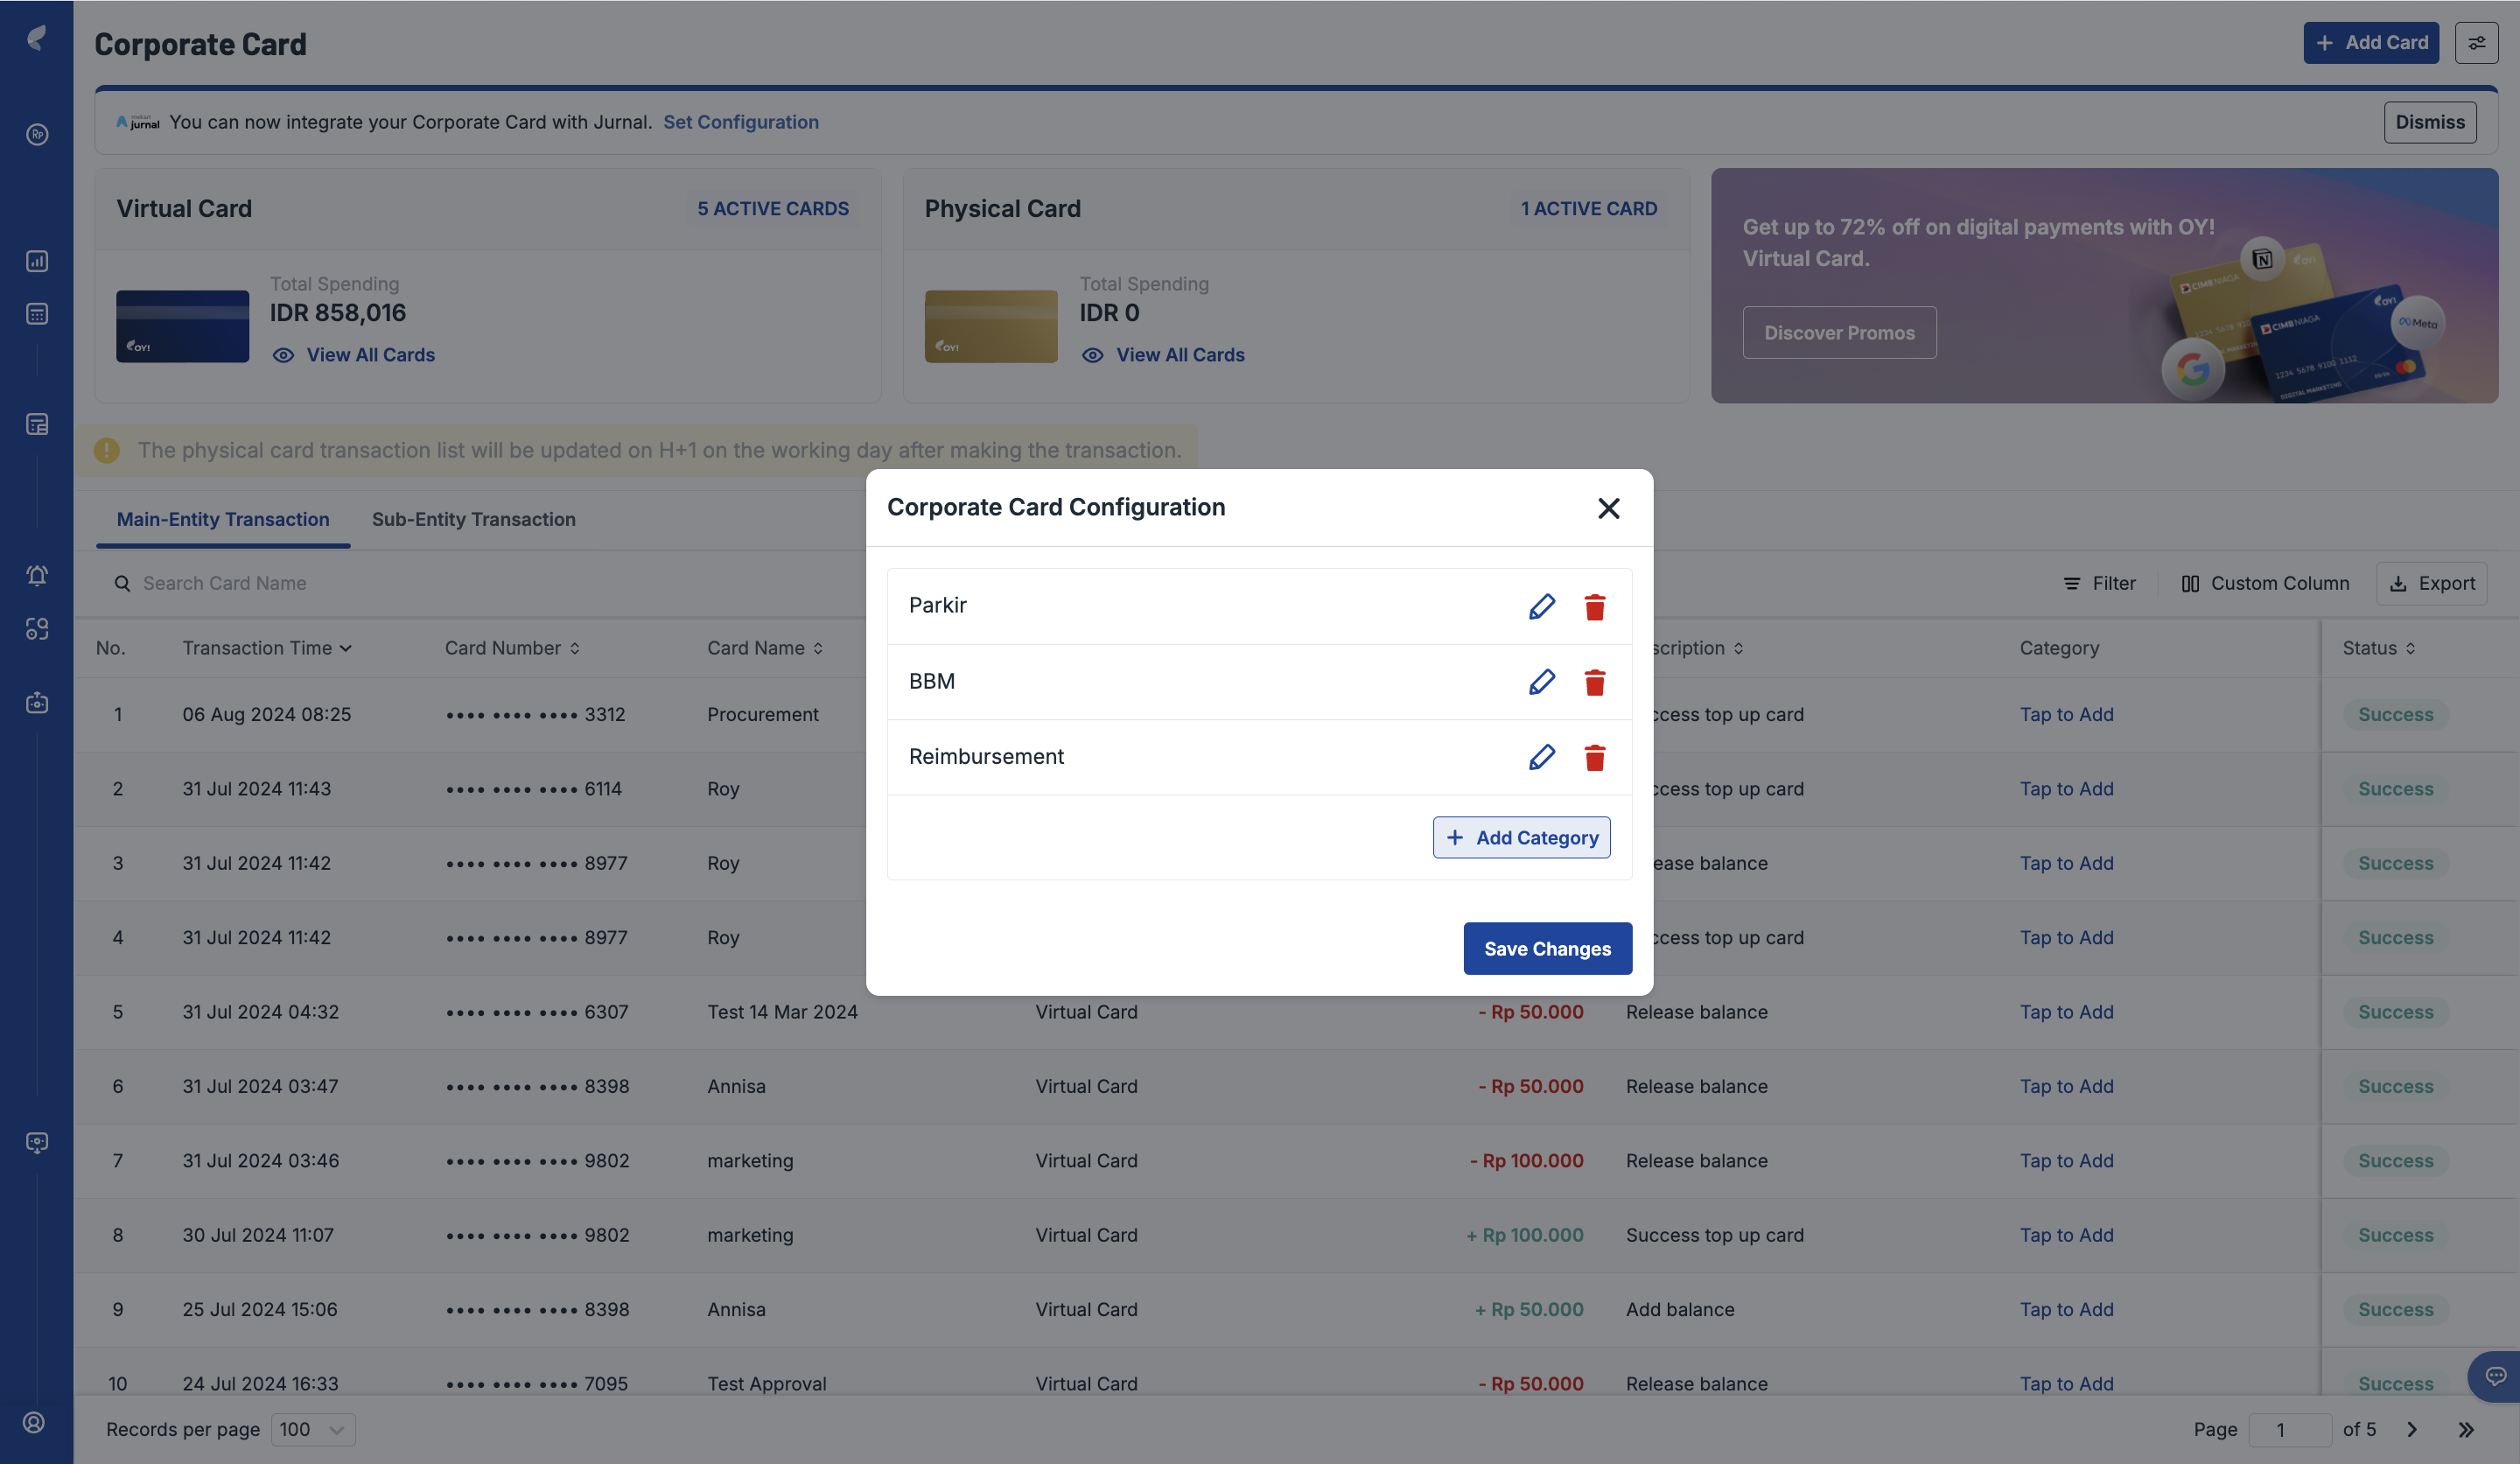
- Approver page
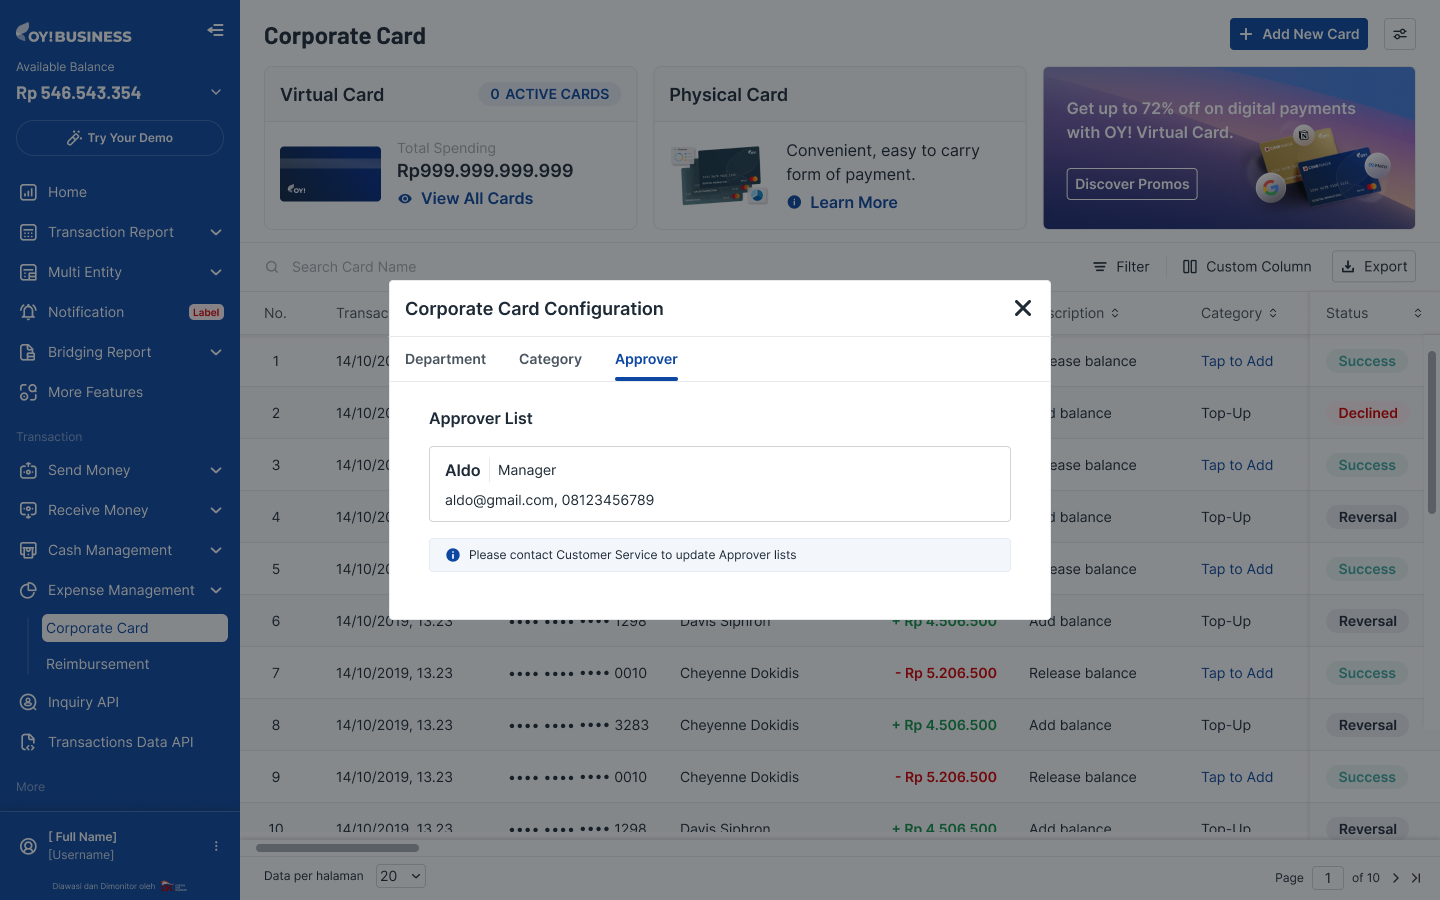
Decline Transaction Possible Reasons
| Issues | Explanations |
|---|---|
| Card utilization is more than requested | Admin requests a card for single use only, but it is being used for more than one transaction. Please request a multiple use card if you expect the card to process multiple transactions. |
| Insufficient balance on the card | The balance on the card is less than the transaction amount. In this case, the cardholder may need to ask the Admin to top up the card. For example: The card balance is Rp 300,000 but the transaction amount is Rp 302,000. Since the card balance is less than the transaction amount, the transaction will not be processed successfully |
| Card is inactive | The card is temporarily blocked by the Admin. Cardholder needs to ask the Admin to activate the card. |
| Card is expired | The virtual card is no longer valid because it has passed its expiration date. Admin or cardholder can check the expired date from dashboard or virtual card information page. |
| Invalid card number | Cardholder entered the card number incorrectly. Please input the 16 digit card number correctly. |
| Invalid expiry date | Cardholder made an error entering the card expiry date. Please enter the correct expiry date. |
| Invalid CVV | Cardholder made an error inputting the CVV number. Please enter the correct CVV. |
| Issuer network not supported | Not all overseas merchants can process transactions for certain reasons. If you experience a declined error, please check the merchant's capabilities; they might only accept physical cards, regional restrictions, or other reasons. |
Notes 1. Transactions will be settled according to the bank’s instructions. 1. Successful card transactions will directly reduce card limit. 1. For refunds, please contact the merchant where you made the purchase. OY! is not responsible for processing refunds until we receive the funds back from the merchant. 1. Refund duration will depend on the merchant and the bank. 1. Once a refund has been issued, the balance will be returned back to your OY! balance. 1. It is your responsibility to block card usage if you notice any suspicious transactions.
Reimbursement
OY! Reimbursement product offers an easy way to manage employee reimbursement requests and fund disbursements all in one platform. Employees can simply request reimbursement via the link sent to their email. No technical integration is required to utilize the product.
Key Features
| Feature | Description |
|---|---|
| Approval Capability | To ensure no fraudulent requests are made, a double approval mechanism exists in the product and is mandatory for the reimbursement process. The first layer is for the team manager via email, and the second layer applies to the admin via the dashboard. Our reimbursement product features a double approval mechanism to ensure integrity. |
| Disbursement Scheduling | Admin can also immediately schedule the disbursement time after approval from the team manager. Currently, the scheduled disbursement options are 1 day, 3 days, 7 days, and 14 days from the day of admin approval, allowing flexibility in managing cash flows. |
| Reimbursement Details | For admin, every reimbursement request from employees can be accessed through the OY! dashboard, including the uploaded file, to ensure it matches the requested amount. |
| Reimbursement Tracking | For employees, no more hassle in checking reimbursement progress with the admin. Your employee will receive a tracking email to check progress in real-time. |
Notes: * First approval: Team Manager * Second approval: Admin (it can be Finance Team or HR Team)
This ensures that each approval request is reviewed by at least two reviewers, providing an extra layer of oversight and security.
Registration and Set Up
Follow the below check-list to ensure you're all set up to use the service:
- Create an account for OY! business
- Upgrade your account by submitting the required documentations
- Have your upgrade request approved
- Set up your receiving bank account information (note: ensure that the receiving bank account information is accurate as it cannot be changed via OY! dashboard for security reasons)
- Once your account is approved, you can start using Reimbursement product
Testing
- Log in to your OY! Dashboard.
- If you haven’t set approver for team manager, please follow steps in How to Set Approver
- Select the "Demo" environment.
- Navigate to "Reimbursement" product under the Expense Management menu.
- Follow steps How to Distribute Reimbursement Link first to able open the reimbursement request page
- Then create reimbursement request by follow the step How to Fill Reimbursement
- Your reimbursement request will appear in Reimbursement table (in Demo environment) also sent to registered Team Manager’s email
- Ask your registered Team Manager to open the link that was sent to their email and approve it for testing purposes. Your team manager can follow steps in How to Approve Transaction.
- After your team manager approve or reject the transaction, it will reflect on your Demo OY! Dashboard. Afterward, as an admin you can approve or reject the transaction and schedule the disbursement as explained in How to Schedule Disbursement
How to Set Approver
By default, admin is the second approver for reimbursement requests. However, you need to register your Team Manager as the first approver for reimbursement requests. Setting up the approver will only occur once when the page is first opened. 1. Log in to your OY! dashboard. 1. Navigate to "Reimbursement" product under the Expense Management menu. 1. Click on "Create Reimbursement Link." 1. Choose "Register Approver." 1. Fill in the approver's name, email address, and department. 1. After registration, the approver will receive a notification via email.
- Approver registration page
Notes * Approver emails are mapped based on department names, and duplicate department names are not allowed. * After submission, addition, editing, or deletion of existing approvers can only be done via OY! Customer Service. * Team managers will only receive notifications via email; no dashboard access is required. * The approver list view is accessible in the dashboard under Reimbursement configuration.
How to Distribute Reimbursement Link
After Approver registration, you can start sharing the reimbursement link with employees through two methods:
- Via Bulk Upload:
- Download the sample file and input a list of employee emails in CSV or XLSX format.
- Upload the file for email distribution, then click “Submit”.
- Employees will receive the form link in their email and can use it to submit a reimbursement request.
- Via Link Distribution
- Copy the link and distribute it using any convenient method.
- Employees may fill the form and proceed to submit a reimbursement request.
- Bulk Upload and Link Distribution page from OY! Dashboard
How to Fill Reimbursement Request
- Click reimbursement link that has been shared from Admin.
- Fill the Employee Information and Reimbursement Request then click “Submit”.
- You will receive confirmation email regarding reimbursement request has been submitted
- Form Reimbursement Request page
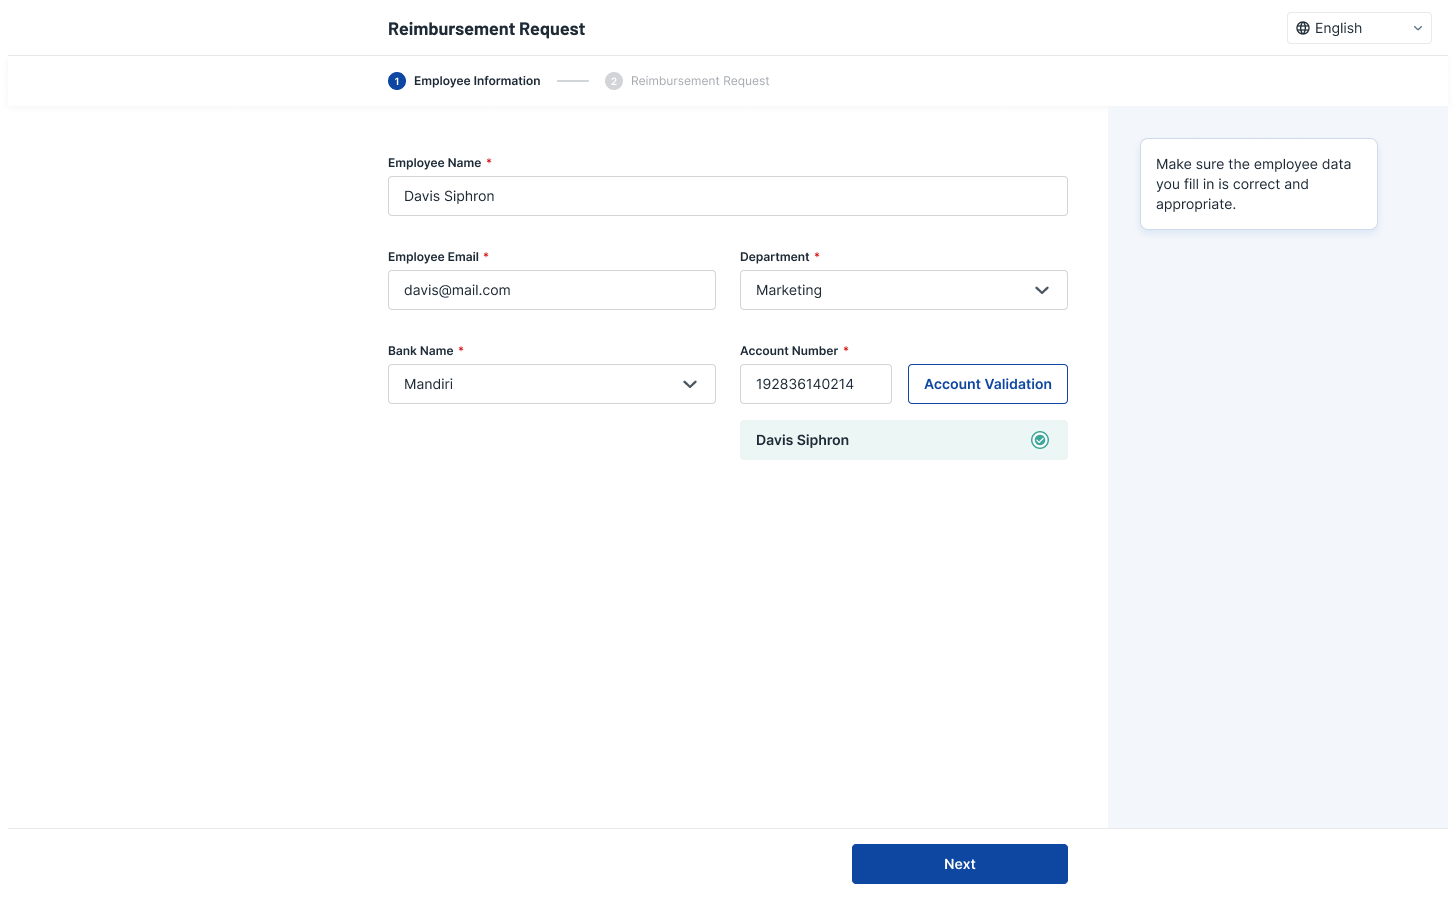
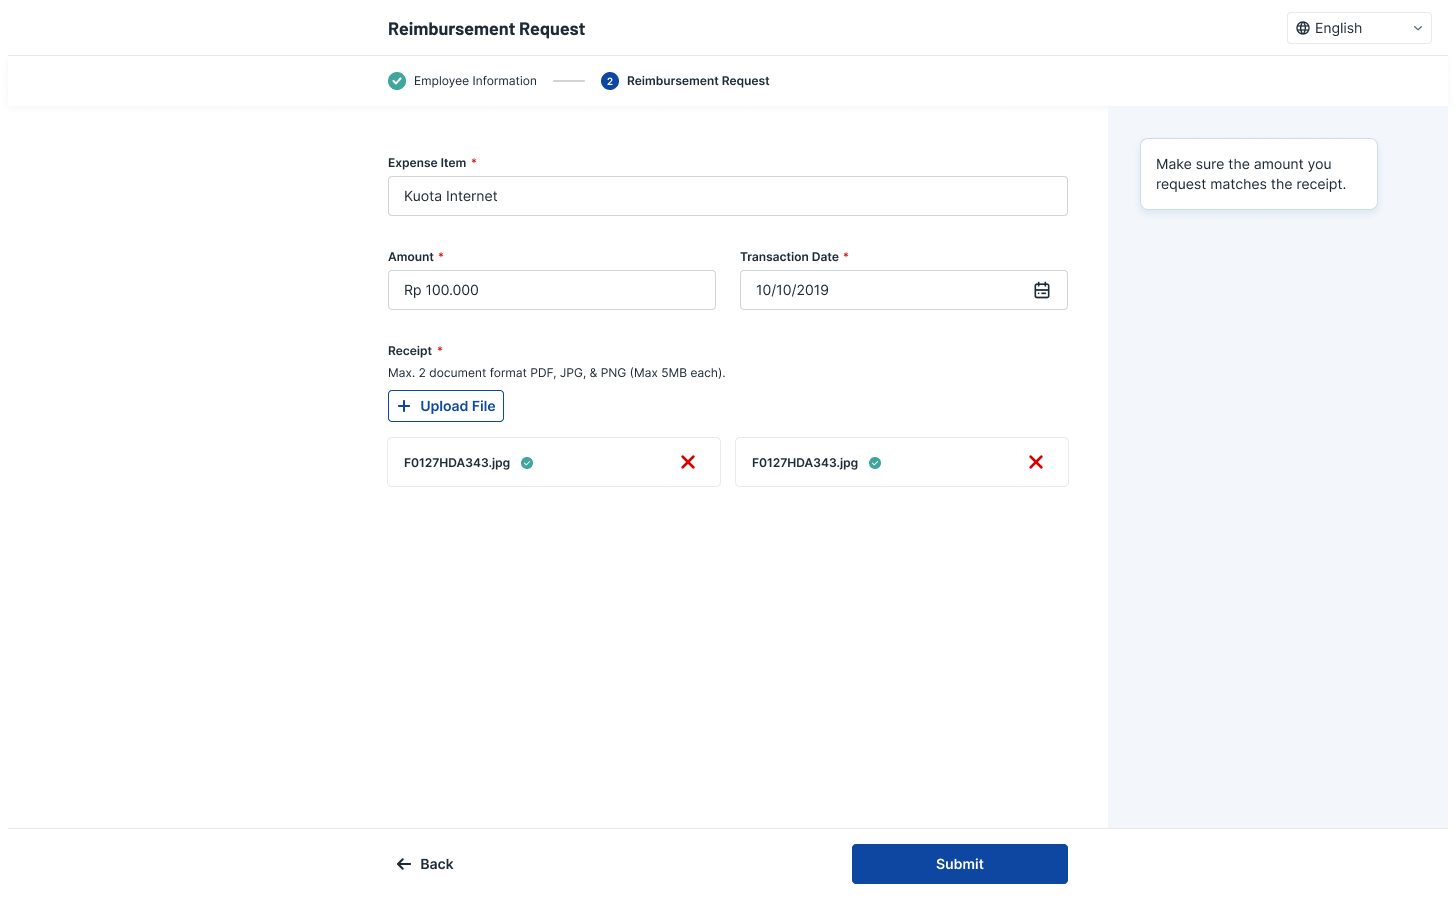
Mandatory Parameters in the Form
| Parameter | Description |
|---|---|
| Employee Name | Employee identification purposes |
| Employee Email | This will be used to trigger tracking to employee post-submission |
| Department | Department will be mapped to approver's email directly |
| Bank Name | Disbursement bank name |
| Account Number | Disbursement bank account number. Bank account validity can be checked prior reimbursement submission |
| Item | Reimbursement item name or description |
| Amount | Reimbursement total amount (in IDR). Minimum Rp 20.000 |
| Upload File | Placeholder to upload invoice document. Max 2 file with PDF, JPG, & PNG format (Each file max 5MB). |
| Transaction Date | Date of transaction printed on the invoice |
Notes: you can resend the link anytime in case employees do not receive the email.
How to Approve Transaction (Reporting Manager)
- When a new request is submitted by an employee, the respective team manager will receive a notification and an approver portal link via email.
- Inside the link, the team manager can find all reimbursement requests with certain statuses (rejected, approved, and need approval).
- The team manager can choose to either reject the request with a reason or simply approve.
- Approving the request will trigger an update inside the OY! Dashboard and employee tracker page.
- Approver portal (unique per approver)
- Approver - request details with action buttons
How to Schedule Disbursement
Scheduled disbursement can only be done if the team manager has approved the request, and the OY! dashboard admin agrees to schedule the disbursement.
- Open the OY! Dashboard and check the Reimbursement transaction list.
- Requests with "Need Approval" status mean that the team manager has approved the requests and will require further approval from the dashboard side.
- OY! dashboard admin can either reject with a reason or approve with a scheduled disbursement day.
- Request list in dashboard
- Request detail in dashboard
Note: If there is insufficient balance on the day of scheduled disbursement, you can retry the fund transfer manually after a successful OY! balance top up.
Dashboard Status
| Status | Description |
|---|---|
| Pending Approval | Submitted by employee but no action yet from Team Manager. |
| Need Approval | Approved by approver but no action yet from OY! dashboard admin. |
| Canceled | Cancellation can only be performed by the employee. No further action needed. |
| Completed | Money has been successfully disbursed to employee’s bank account. |
| Rejected | Rejected by OY! dashboard admin or Team Manager. |
| Scheduled Payment | Request has been successfully approved, waiting for scheduled disbursement time. |
| Failed | Disbursement failed due to technical failures. |
| Insufficient Balance | Fail to disburse due to insufficient OY! balance (OY! dashboard admin can retry payment manually from dashboard after a successful top up of OY! balance). |
How to Check Reimbursement Progress (Employee)
- Employees can fill in the reimbursement request form portal via email.
- Once submitted, the employee will receive a tracking email.
- Inside the link, employees can find real-time reimbursement progress, from the submission timestamp until disbursement timestamp.
- Employees can still cancel the request if the team manager has not yet approved.
- Employee Tracker page
![]()
- Employee Tracker page -- Transaction Detail
![]()
Tracker Status
| Status | Description |
|---|---|
| Pending Payment | Request approved but money not yet received |
| Scheduled Payment | Request has been successfully approved, waiting for scheduled disbursement time. |
| Rejected | Rejected by admin or Team Manager |
| Canceled | Canceled by employee |
| Waiting Approval | Submitted but no action yet from Team Manager or admin |
| Completed | Money has been disbursed successfully |
Note: The tracking email is applicable to each employee per reimbursement request.
SSD (Soal Sering Ditanya)
API Kirim Uang & Multitransfer
Apa itu jadwal maintenance bank? apakah partner akan diinformasikan terkait itu?
Jadwal maintenance bank akan menghentikan semua transaksi ke bank terkait selama periode tertentu. Biasanya, tiap bank punya jadwal maintenance yang sudah dijadwalkan, yang tentunya berbeda antara satu bank dan bank lainnya. Agar transaksi Anda nyaman, kami akan membuat antrean transaksi yang diajukan saat jam pemeliharaan dan akan otomatis dikirimkan setelah maintenance selesai.
Berapa limit maksimal untuk mengirimkan uang?
Setiap e-wallet mempunyai limit maksimal masing-masing, berikut penjelasannya:
| E-Wallet | Tipe Akun | Limit Maksimal |
|---|---|---|
| OVO | OVO Club | Rp 2.000.000 |
| OVO | OVO Premier | Rp 10.000.000 |
| DANA | DANA Verified | Rp 2.000.000 |
| DANA | DANA Premium | Rp 10.000.000 |
| GoPay | Unverified | Rp 2.000.000 |
| GoPay | Verified | Rp 10.000.000 |
Berapa limit minimal untuk mengirimkan uang?
Setiap e-wallet mempunyai limit minimal masing-masing, berikut penjelasannya:
| E-Wallet | Limit Minimal |
|---|---|
| OVO | Rp 10.000 |
| DANA | Rp 10.000 |
| GoPay | Rp 10.000 |
| Linkaja | Rp 10.000 |
Apakah ada waktu Cut-Off time (COT) ?
Tidak ada. Kami beroperasi 24 jam, termasuk pada hari libur.
Apakah ada batasan volume transaksi dan nominal transaksi dalam sehari?
Tidak ada batasan harian untuk berapa banyak transaksi Multitransfer yang Anda buat. Tidak ada batasan juga untuk nominal transaksi transaksi Multitransfer.
Berapa banyak alamat email yang dapat saya kirimkan untuk notifikasi transaksi?
Anda dapat mengirimkan hingga 5 email per transaksi dengan batas maksimal 255 karakter.
Apakah saya bisa mengirimkan "catatan" yang ada di dalam mutasi rekening penerima?
Ya. Namun, kami hanya mendukung catatan untuk 7 bank ini: BCA, BNI, BRI, CIMB, DBS, Mandiri, dan Permata. Namun, harap diperhatikan bahwa jika terdapat gangguan saat kami menghubungkan ke bank yang disebutkan di atas, sistem kami tidak dapat mendukung agar catatan tersebut muncul dalam mutasi rekening bankpenerima.
Apakah saldo yang diterima dari API VA Aggregator dan produk Link Pembayaran serta Invoice dapat langsung digunakan untuk produk Kirim Uang?
Ya. Dana yang diterima dari API VA Aggregator dan produk Link Pembayaran serta Invoice akan secara otomatis masuk ke dalam saldo OY! Anda secara real-time, memungkinkan Anda untuk langsung menggunakan saldo tersebut untuk mengirimkan uang.
[Khusus Multitransfer] Bagaimana jika nama penerima di dokumen unduhan xlsx atau CSV berbeda dengan nama di rekening bank? Untuk apa nama & nomor telepon pelanggan digunakan?
Selama nomor rekening bank valid dan aktif, transaksi akan tetap dikirimkan.
Nama dan nomor telepon hanya terlihat oleh partner dan digunakan untuk dokumentasi partner sendiri. Nama dan nomor telepon yang tercantum tidak akan digunakan oleh OY!
[Khusus API Kirim Uang] Apakah pengiriman uang dilakukan secara real-time?
Ya. Pencairan yang dilakukan melalui API Kirim Uang semuanya dilakukan secara real-time.
API VA Aggregator
Bank apa saja yang didukung untuk produk API VA Aggregator?
Saat ini kami memiliki 8 bank yang tersedia untuk API VA Aggregator. Anda dapat melihat daftar bank di sini.
Apakah saldo yang saya terima langsung masuk secara real-time?
Ya, semua saldo yang Anda terima bersifat real-time dan akan segera tersedia masuk ke saldo OY! Anda.
Link Pembayaran/Invoice
Apa saja metode pembayaran yang tersedia untuk pelanggan saya?
Kami menyediakan berbagai metode pembayaran melalui transfer bank, e-wallet, kartu kredit/debit, dan kode QR dengan detail sebagai berikut:
Transfer bank melalui Virtual Account: BCA, BNI, BRI, CIMB Niaga, Mandiri, dan Permata Bank.
Transfer dengan kode unik: BCA
Kartu kredit/debit: VISA, Mastercard
E-Wallet: ShopeePay, DANA, LinkAja, OVO
Kode QR: QRIS
Apa yang dimaksud dengan VA closed dan open amount? Apa yang terjadi jika nominal yang dibayarkan oleh pelanggan berbeda dari nominal yang tertera di Link Pembayaran yang saya buat?
Closed Amount adalah jenis Virtual Account yang hanya menerima pembayaran dengan nominal yang ditentukan. Pengguna tidak akan dapat membayar nominal selain dari nominal yang tertera.
Open Amount adalah jenis Virtual Account VA yang dapat menerima pembayaran dengan nominal berapa pun. Jika pelanggan membayar nominal lebih dari yang tertera, link pembayaran akan tetap aktif. Link pembayaran akan berubah status menjadi SELESAI hanya ketika mencapai nominal TOTAL yang ditentukan.
Apa perbedaan antara transfer bank melalui Virtual Account dan transfer bank melalui kode unik?
Transfer bank melalui Virtual Account (VA) akan menghasilkan nomor rekening tujuan transfer yang khusus untuk setiap transaksi. Anda dapat membuat transaksi dengan jenis open amount atau closed menggunakan VA. Penjelasan rinci tentang VA dapat dilihat di sini. Anda dapat membuat transaksi VA melalui API Routing Pembayaran atau Link Pembayaran .
Berbeda dari sebelumnya, transfer bank melalui kode unik menghasilkan kode unik untuk setiap transaksi, tetapi nomor rekening tujuan akan tetap sama. Total nominal yang dibayarkan akan dikurangi dengan nilai kode unik tersebut. Sebagai contoh, pelanggan Anda ingin membayar transaksi sebesar Rp100.000 dan mendapatkan Rp100 sebagai kode unik. Jadi, pelanggan Anda akan membayar total Rp 99.900 untuk menyelesaikan pembayaran. Kode Unik juga memiliki keterbatasan dibandingkan dengan VA, di mana Anda hanya dapat membuat transaksi kode unik selama jam operasional (03.00 pagi - 08.30 malam GMT+7).
Routing Pembayaran
Apa saja metode pembayaran yang tersedia untuk pelanggan saya?
Kami menyediakan berbagai metode pembayaran melalui transfer bank, e-wallet, kartu kredit/debit, dan kode QR dengan detail sebagai berikut:
Transfer bank melalui Virtual Account: BCA, BNI, BRI, CIMB Niaga, Mandiri, dan Permata Bank.
Transfer dengan kode unik: BCA
Kartu kredit/debit: VISA, Mastercard
E-Wallet: ShopeePay, DANA, LinkAja, OVO
Kode QR: QRIS
Apa perbedaan antara transfer bank melalui Virtual Account dan transfer bank melalui kode unik?
Transfer bank melalui Virtual Account (VA) akan menghasilkan nomor rekening tujuan transfer yang khusus untuk setiap transaksi. Anda dapat membuat transaksi dengan jenis open amount atau closed menggunakan VA. Penjelasan rinci tentang VA dapat dilihat disini. Anda dapat membuat transaksi VA melalui API Routing Pembayaran atau VA Aggregator.
Berbeda dari sebelumnya, transfer bank melalui kode unik menghasilkan kode unik untuk setiap transaksi, tetapi nomor rekening tujuan akan tetap sama. Total nominal yang dibayarkan akan dikurangi dengan nilai kode unik tersebut. Sebagai contoh, pelanggan Anda ingin membayar transaksi sebesar Rp100.000 dan mendapatkan Rp100 sebagai kode unik. Jadi, pelanggan Anda akan membayar total Rp 99.900 untuk menyelesaikan pembayaran. Kode Unik juga memiliki keterbatasan dibandingkan dengan VA, di mana Anda hanya dapat membuat transaksi kode unik selama jam operasional (03.00 pagi - 08.30 malam GMT+7). Anda dapat membuat transaksi kode unik melalui API Routing Pembayaran atau Link Pembayaran .
Apa perbedaan antara E-Wallet Sekali Pakai dan E-Wallet Direct Payment?
Pembayaran E-wallet sekali pakai dapat membuat URL pembayaran yang bisa dibayar oleh siapa pun. Begitu URL pembayaran dibuka, pelanggan Anda akan diarahkan ke aplikasi E-wallet dan menyelesaikan pembayaran di dalam aplikasi E-wallet.
Sementara, E-wallet direct payment dapat membuat URL pembayaran yang diperuntukkan untuk pengguna tertentu. Pelanggan Anda perlu menghubungkan akun E-wallet mereka terlebih dahulu dengan melakukan Account Linking. Setelah pelanggan menghubungkan akun mereka dengan aplikasi Anda, maka otomatis pembayaran akan dapat dilakukan. OY! akan mengembalikan otentikasi kepada pelanggan untuk memasukkan PIN E-wallet dan menyelesaikan pembayaran. Dengan menggunakan direct payment, pelanggan Anda akan menyelesaikan transaksi di dalam aplikasi Anda sendiri. Berikut adalah detail pembayaran masing-masing E-wallet:
| Sekali Pakai | Direct | |
|---|---|---|
| E-Wallet yang didukung | ShopeePay, LinkAja, DANA, OVO | ShopeePay |
| Harus menghubungkan akun terlebih dahulu? | Tidak | Ya |
| Dapat dibuat melalui.. | API Payment Routing Payment Link API E-Wallet Aggregator |
API Payment Routing |
| Mengirimkan nomor HP saat permintaan pembuatan API. | Opsional | Wajib |
| Siapa yang dapat melakukan pembayaran? | Semua user/guest | User Tertentu |
| Pembayaran dilakukan di | Di aplikasi E-wallet | Di aplikasi Anda sendiri |