 en
en


Home
Welcome to OY! We aim to be among the world class financial services and always put our customers first in everything that we do. Armed with receive money (accepting payments) and send money (fund disbursement) products and services, we are ready to help your business achieve higher growth through swift and secure payment infrastructure solutions.
How OY! Can Help
Our Product Suites
Money-Out (Disbursement)
- API Disburse
- Bulk Disbursement
Money-In (Accepting Payments)
- Virtual Account (VA) Aggregator
- Payment Link Page/Invoice
Registration Process
Registration process begins with creating an account. Creating an account is 100% free and enables you to try our product suites in staging/test environment, where you can execute money-in and money-out dummy transactions (without real money movement).
After successfully creating an account, if you are interested to go live (execute real money-in and/or money-out transactions) or integrate with OY!, you are required to upgrade your account by submitting supporting legal documentations.
Creating Account
Follow the steps below to create an account:
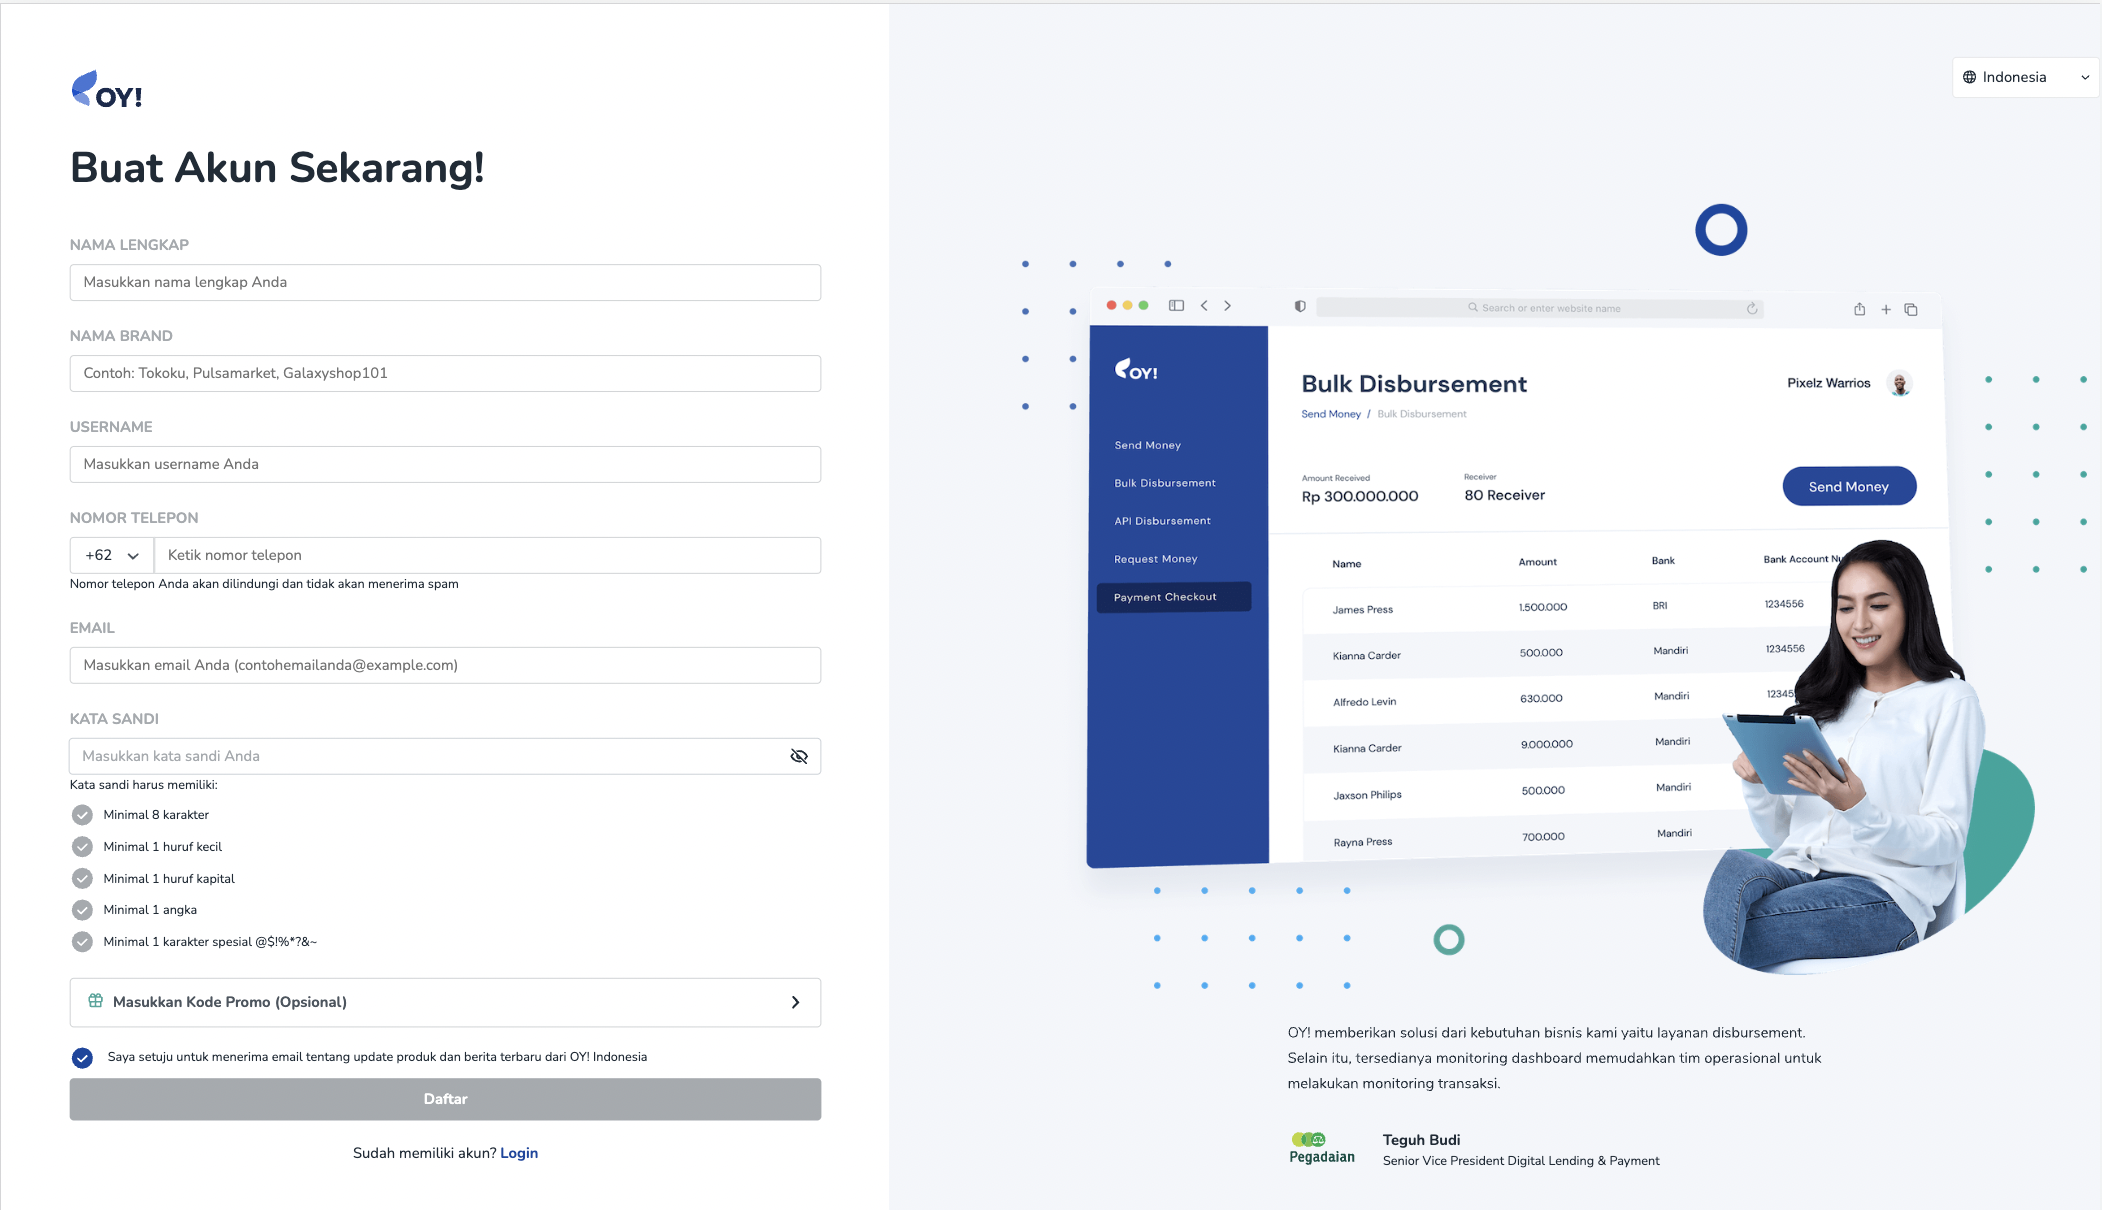
1. Register on the OY! dashboard: To create your account, please register here, and complete the form with all the required information.
Please note that your username cannot be changed once the registration form is submitted.
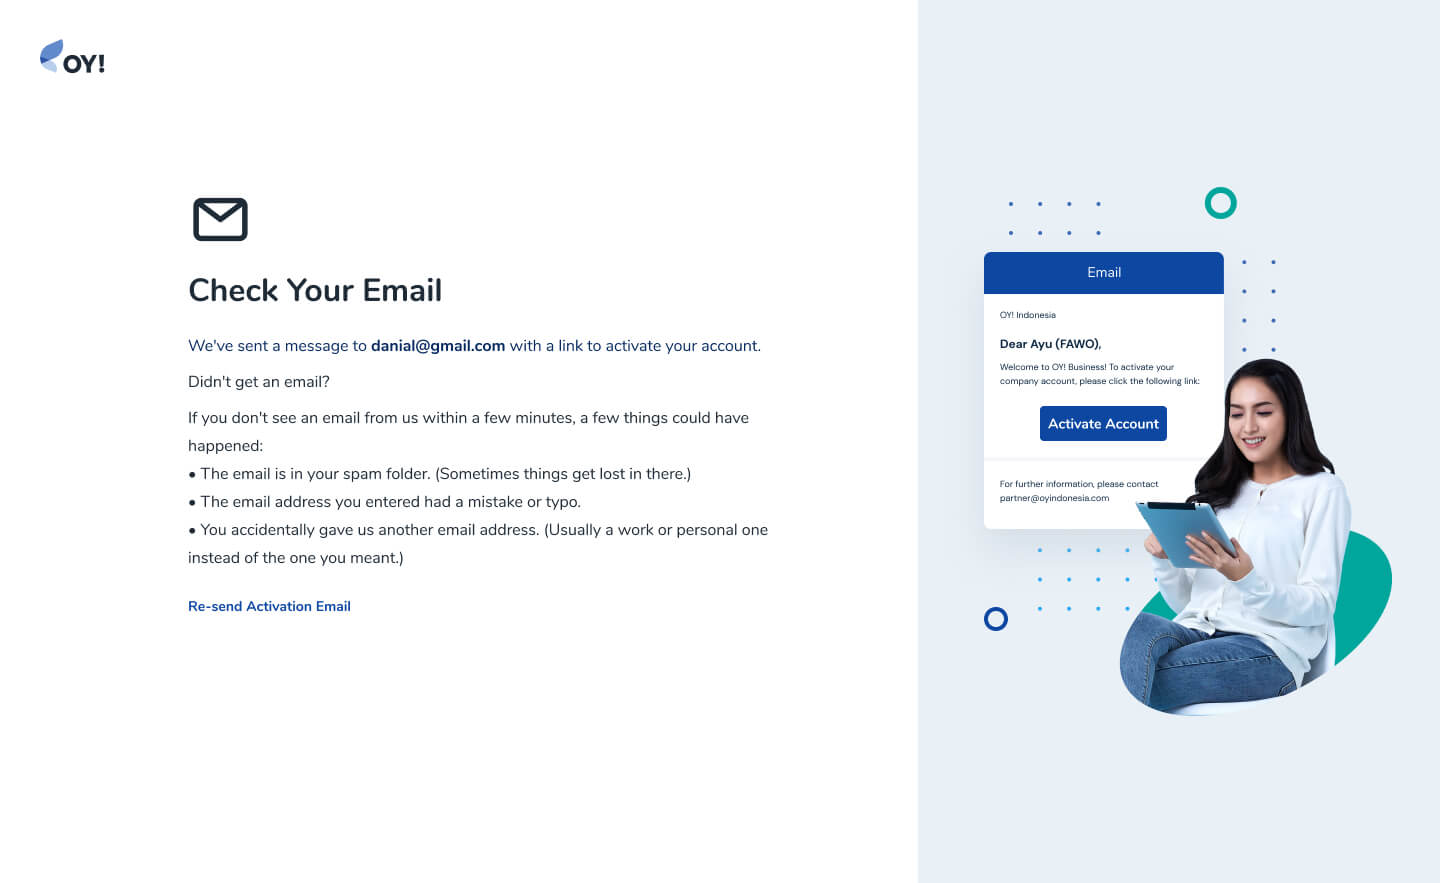
2. Activate your account: Once the registration is submitted, an activation link will be sent to the email registered. Once you are successfully logged in, you will be able to try our product suites in staging/test environment, where you can execute money-in and money-out dummy transactions (without real money movement). If you are ready to proceed to go live or integrate with OY!, refer to the below sections for more information on the steps to upgrade your account.
Once you are successfully logged in, you will be able to try our product suites in staging/test environment, where you can execute money-in and money-out dummy transactions (without real money movement).
If you are ready to proceed to go live or integrate with OY!, refer to the below sections for more information on the steps to upgrade your account.
Verifying Your Business
Follow the steps below to verify your business:
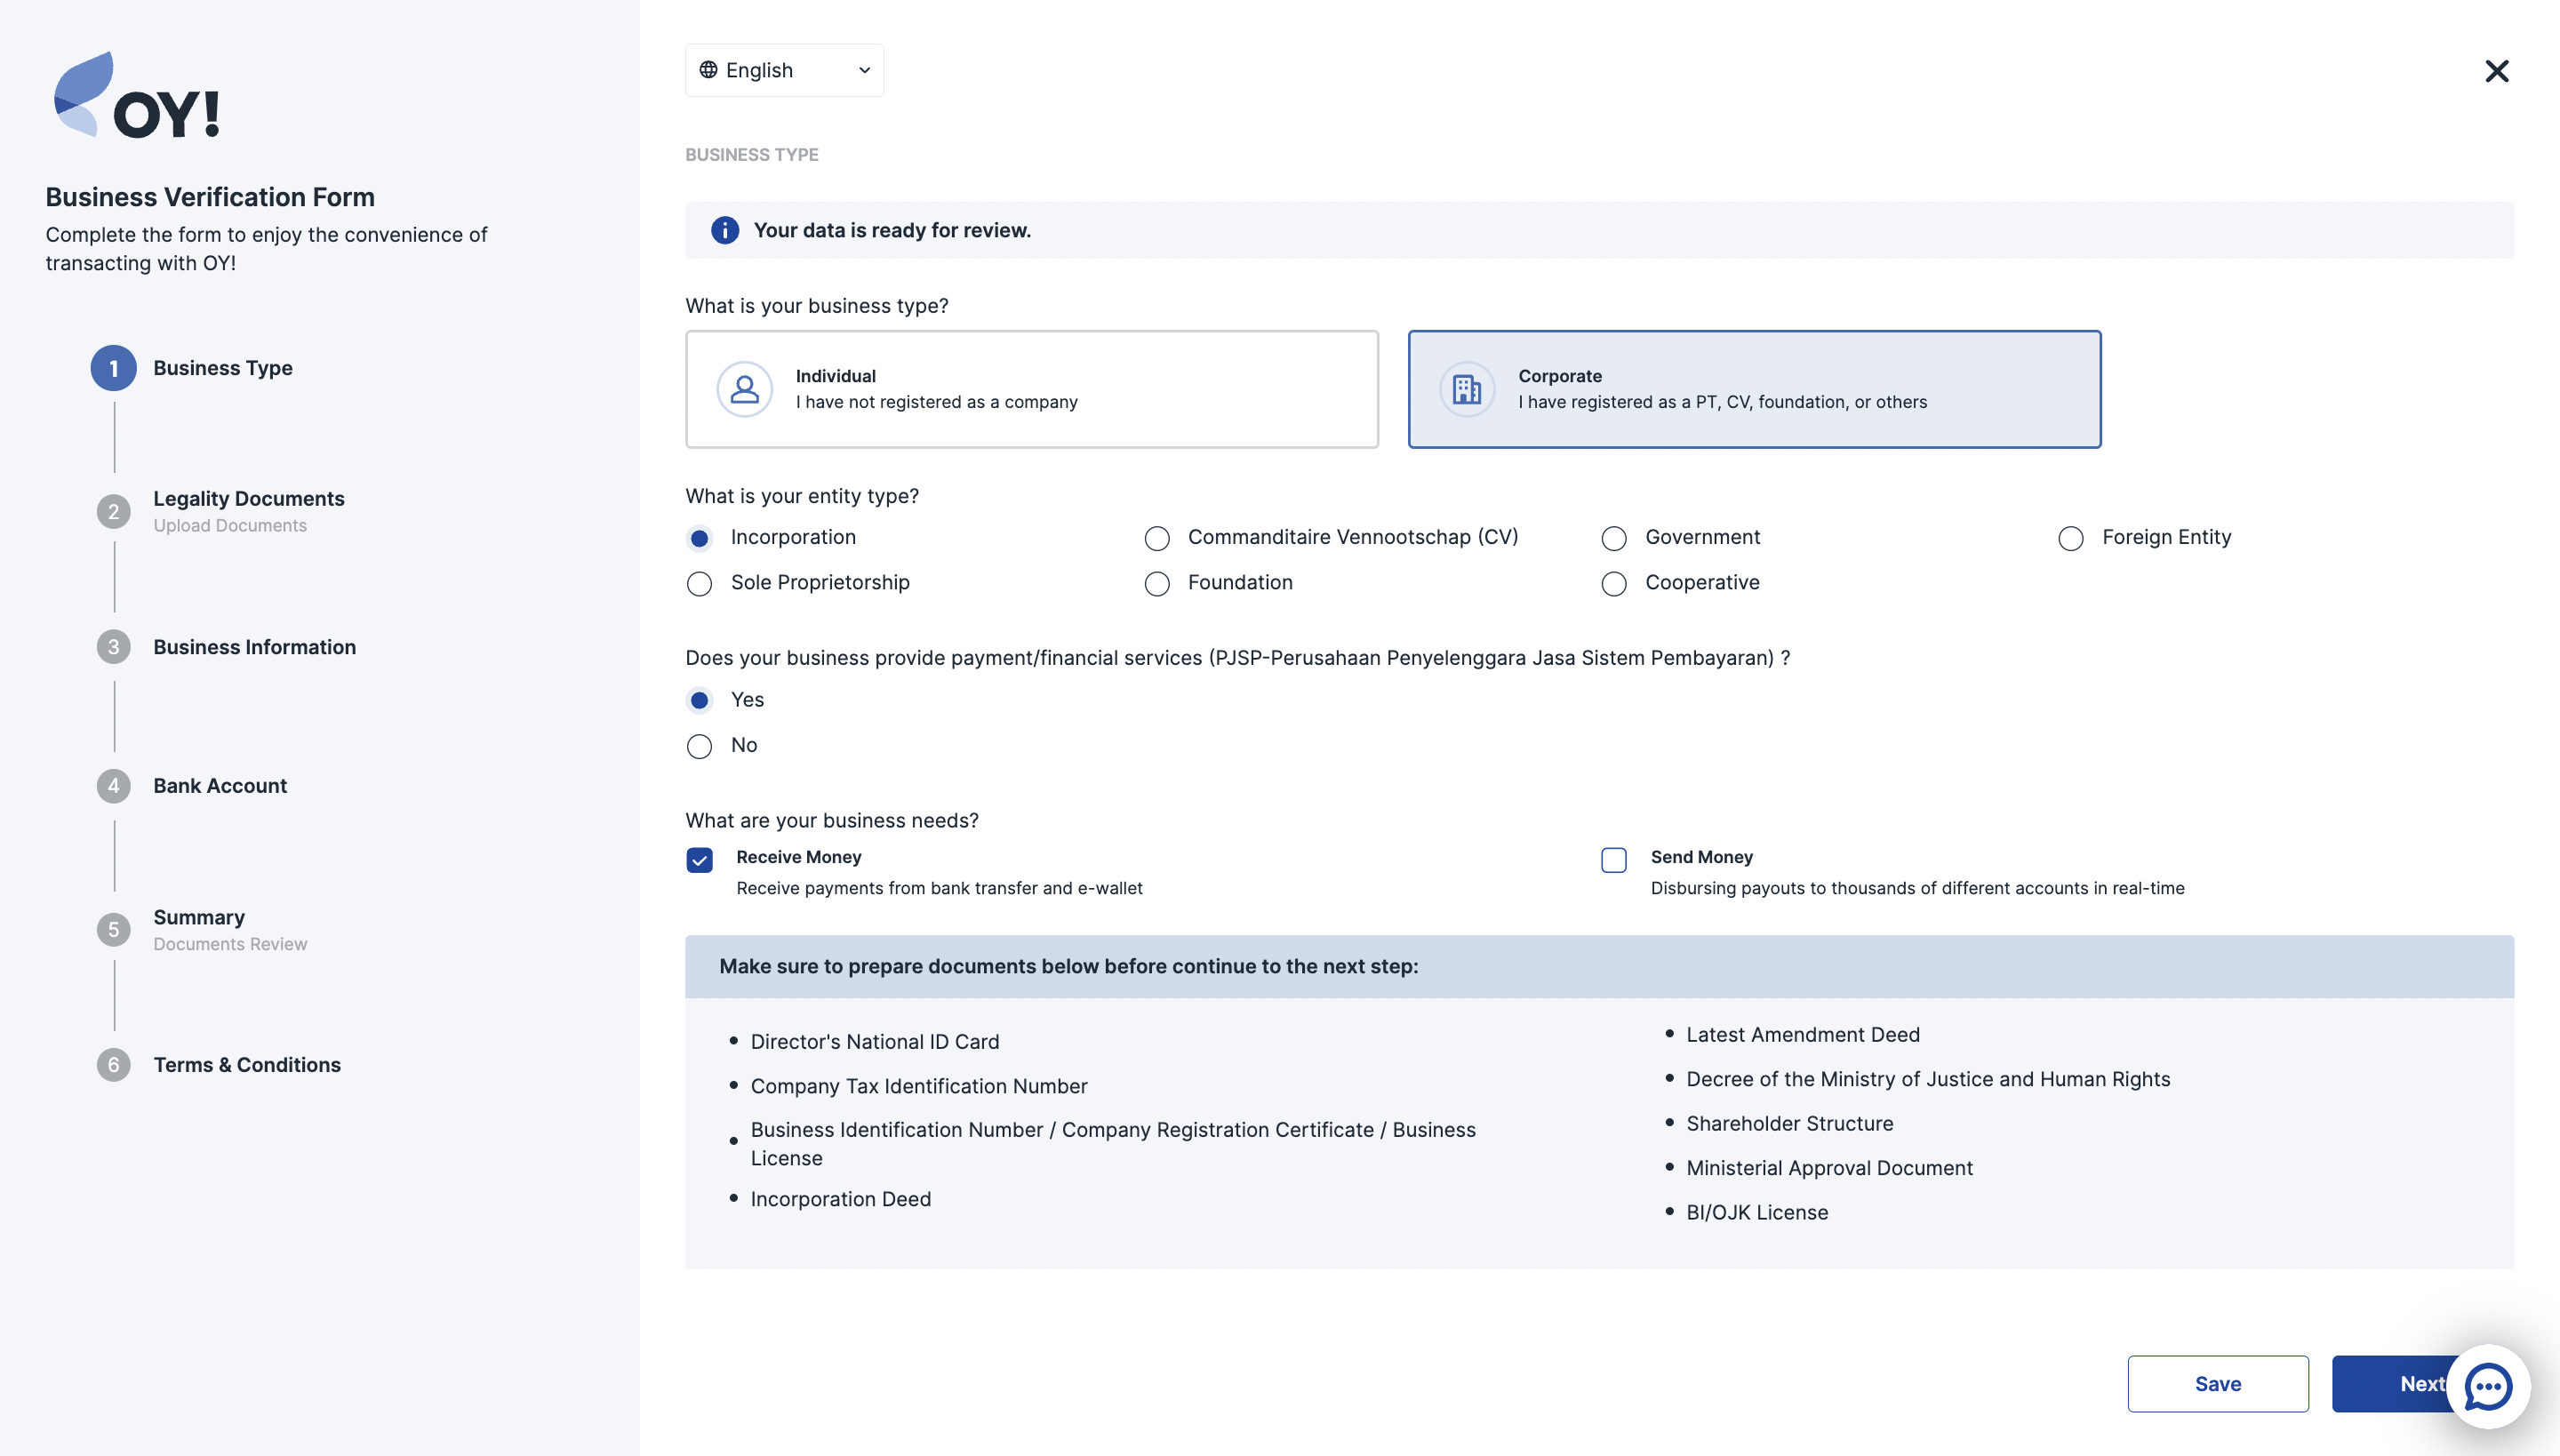
1. Request to Verify your Business: To access the full version of our products and services, please select “Verify Your Business” on the menu at the left side of the OY! dashboard (Production environment) and complete all the required information.
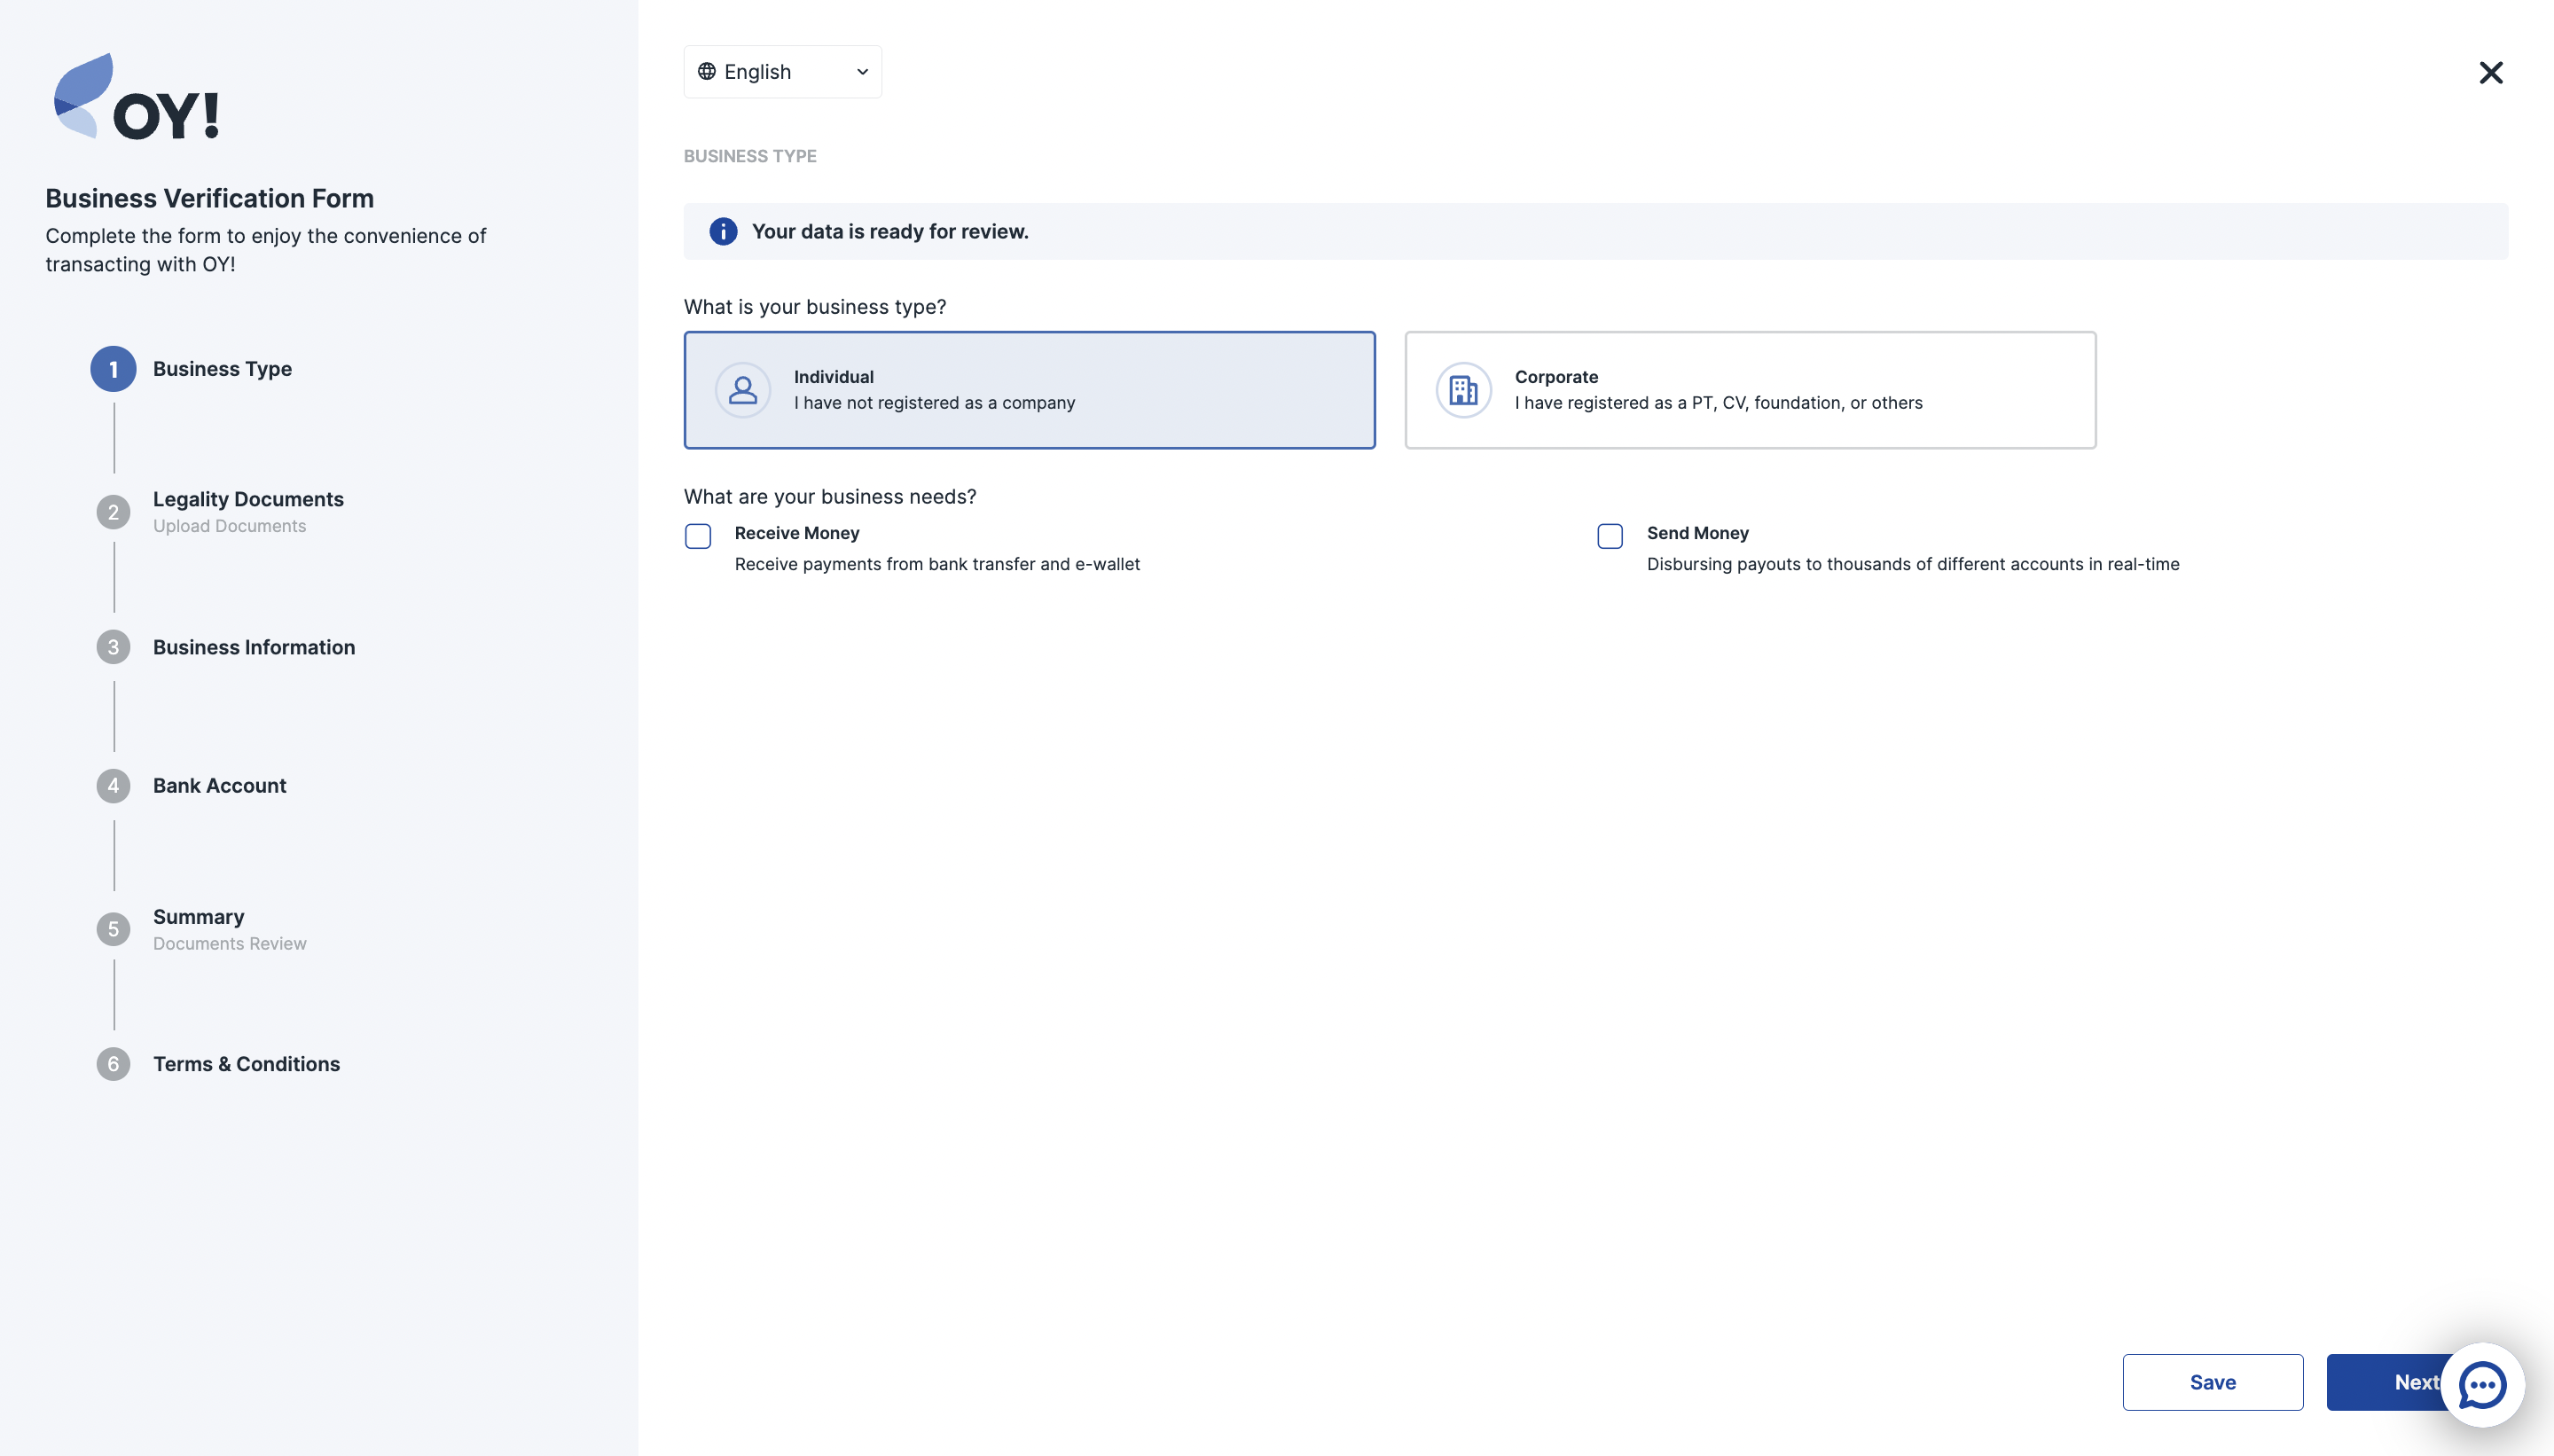
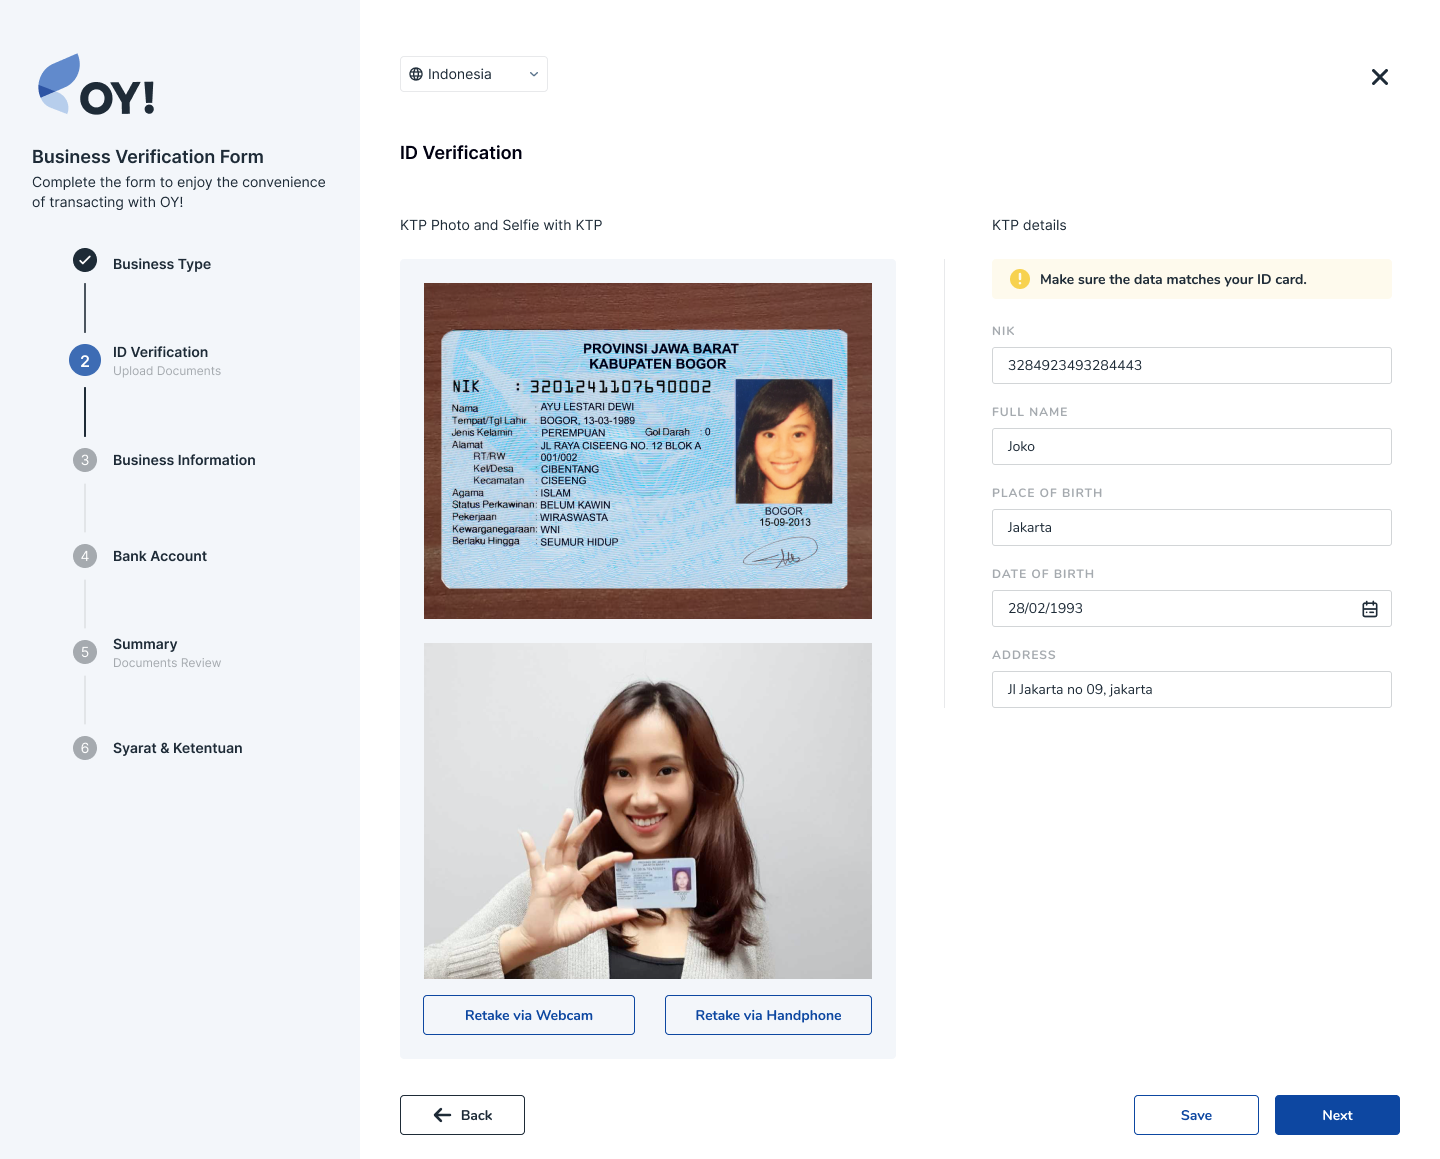
2. For Individual User: Upload ID Card for Identity Verification: Please take an identity card photo and a Selfie photo holding an identity card. The system will automatically read your Identity card photo to fill the form, make sure all information is correct based on your ID card.
- For Individual type of business

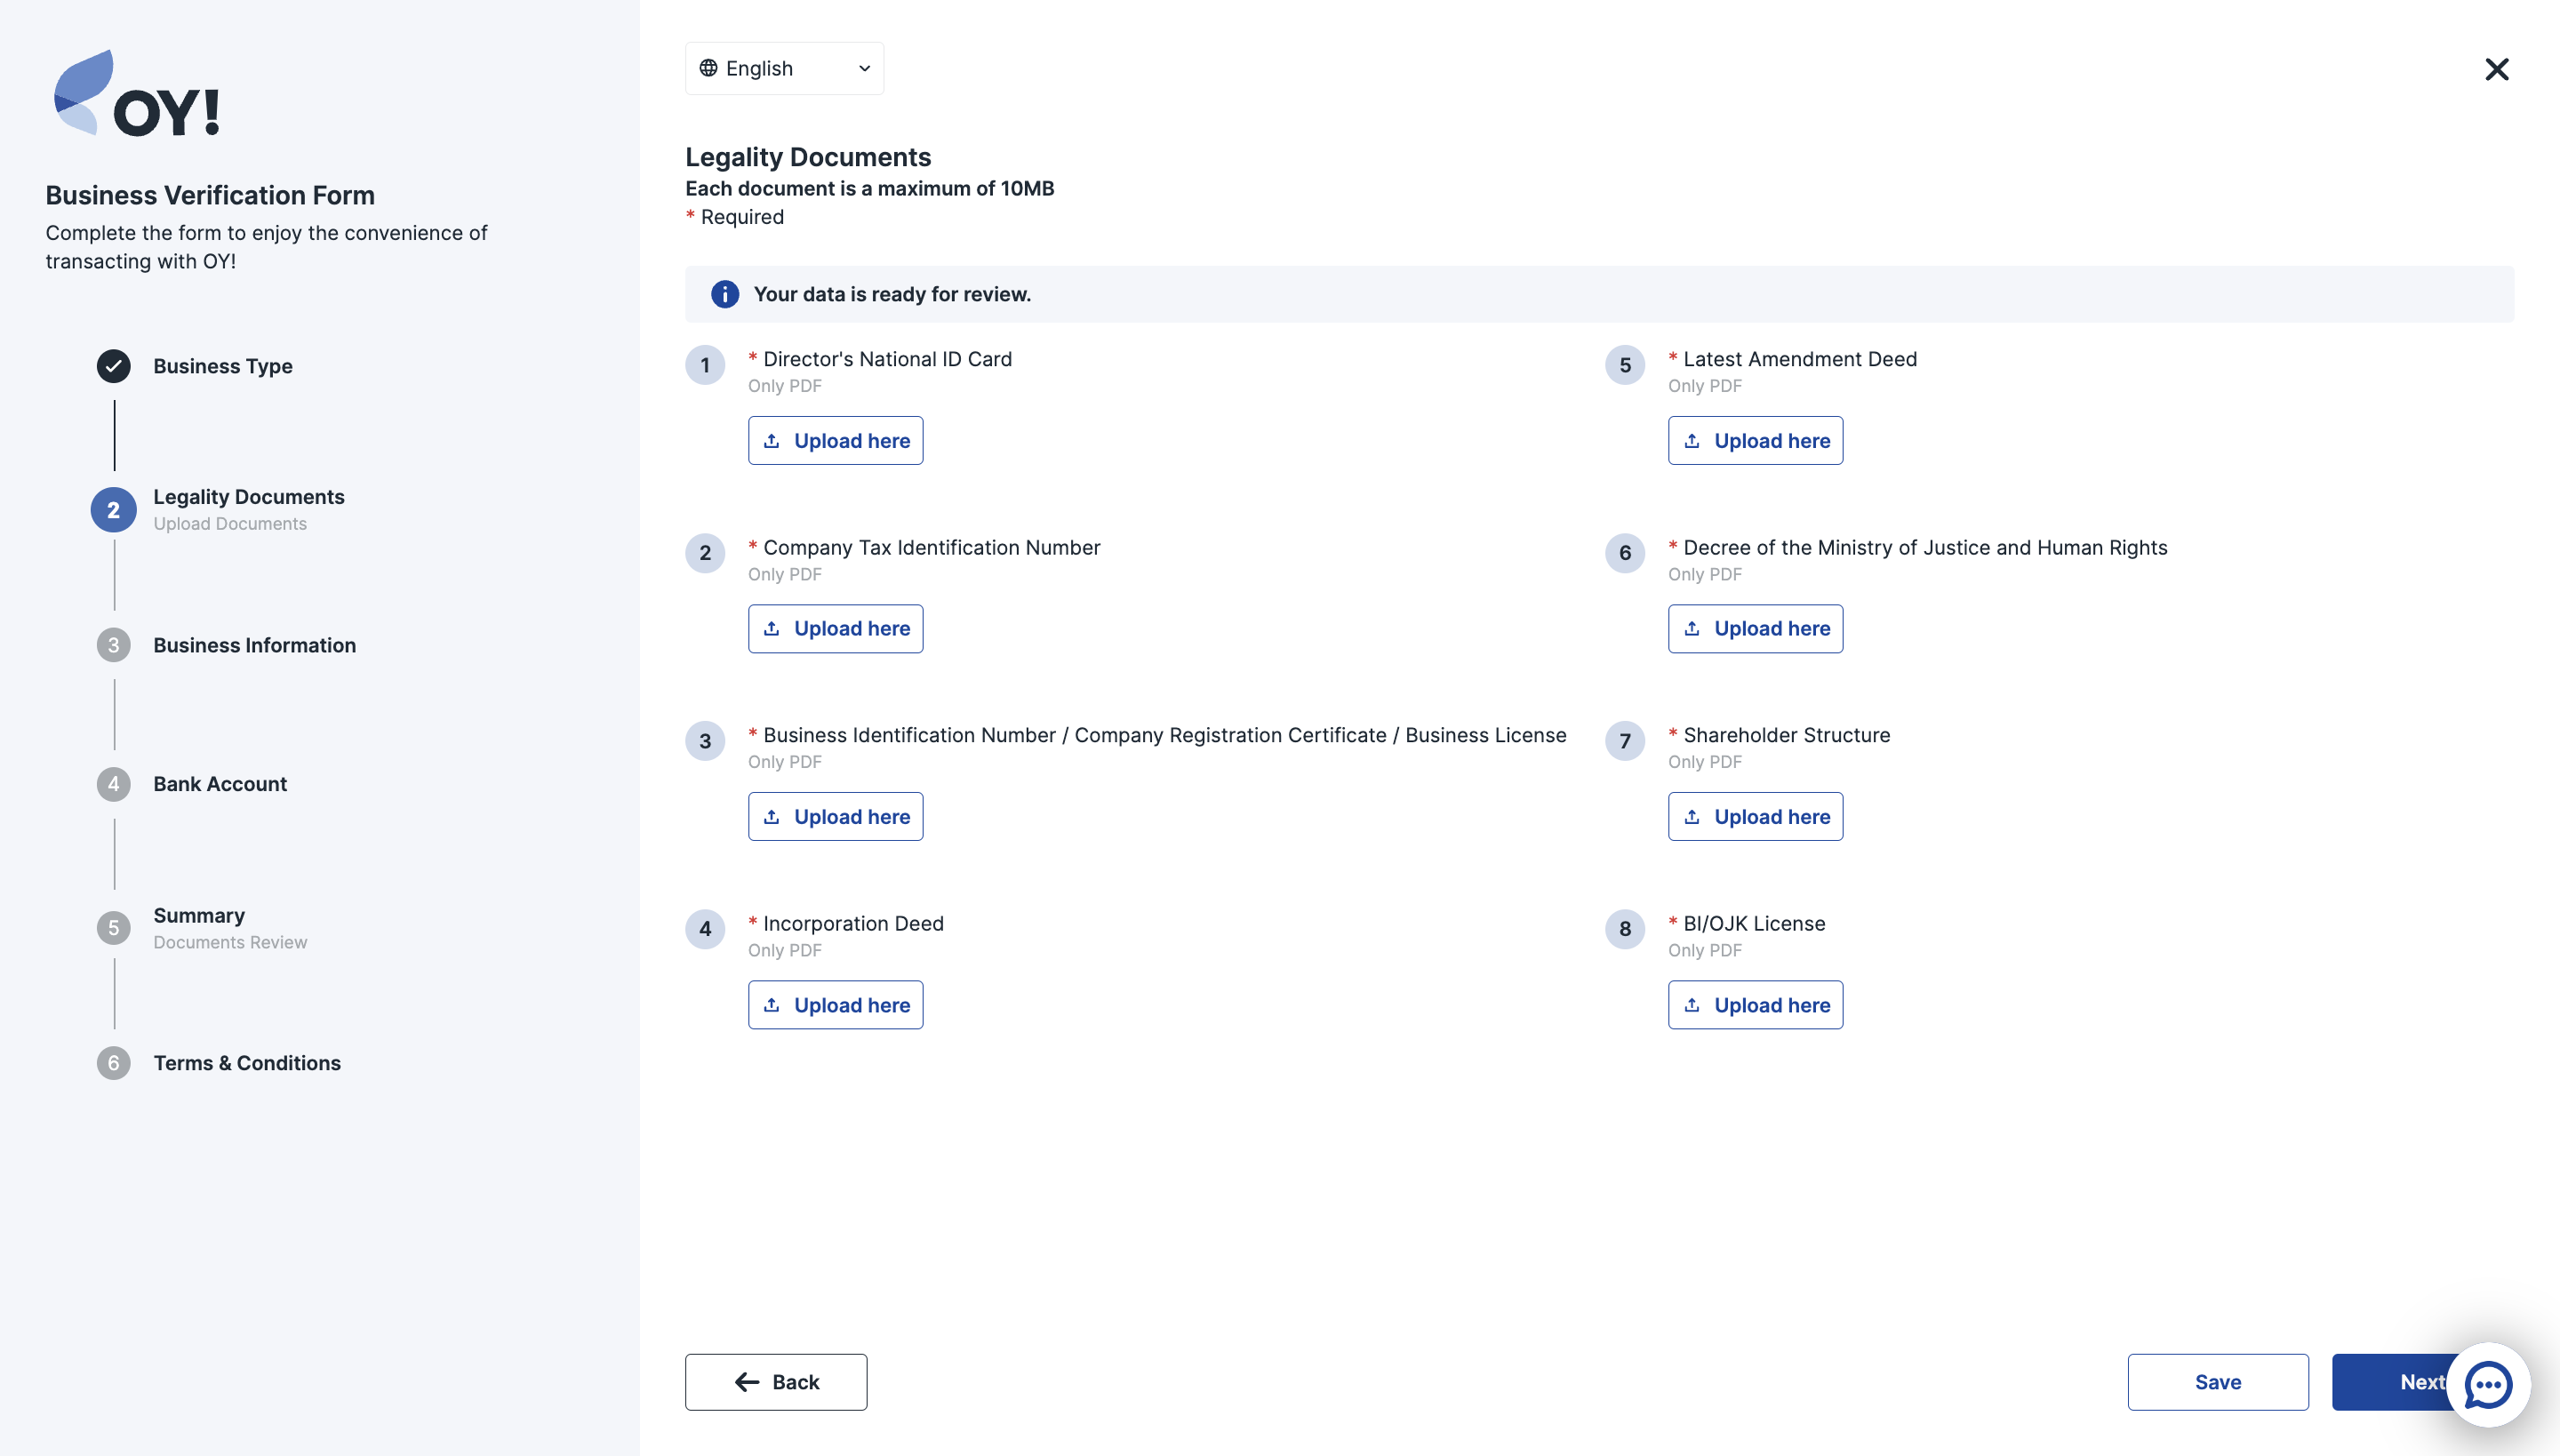
2. For Corporate User: Upload the Legality Documents: We ask for different legality documents for different types of corporate entities. After choosing your corporate type we will show you what document you need to submit.
Please upload the required supporting documents according to your business type. Documents are only accepted in PDF format and must be less than 10 MB in size each.
Here is an example for Corporate (PJSP) type of business
For Corporate (Non PJSP) type of business

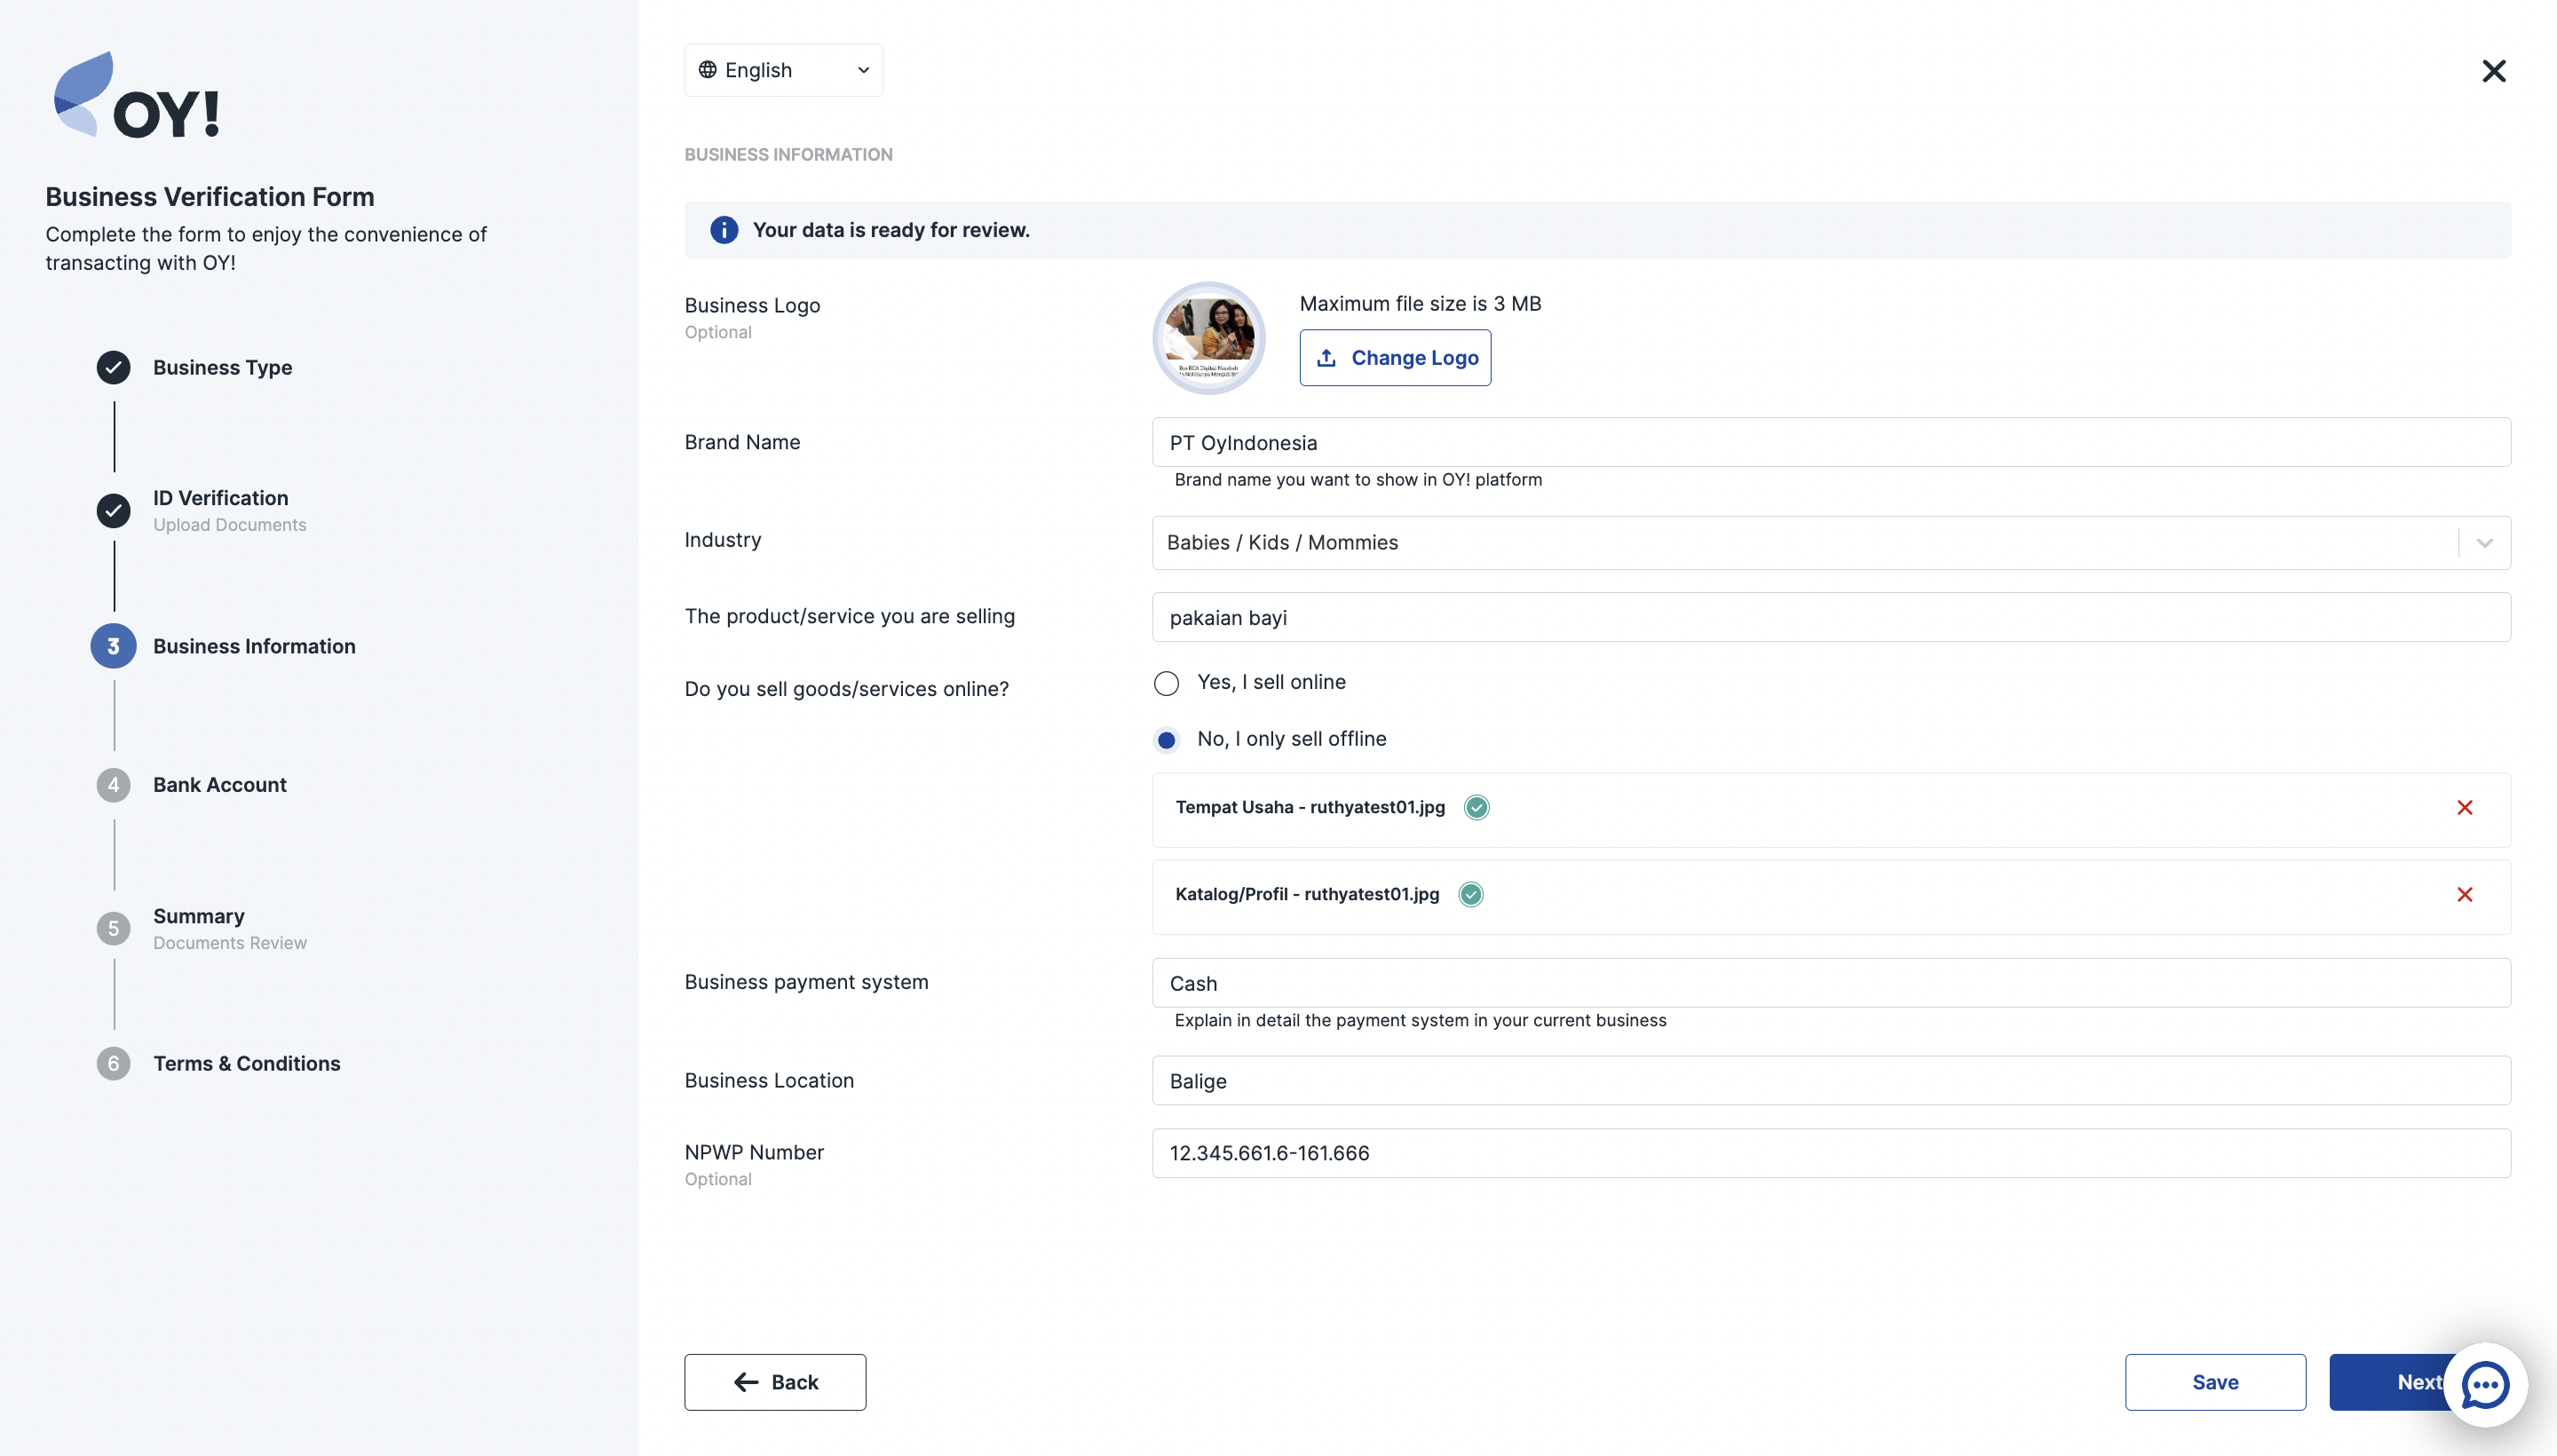
3. Fill Business Information Form: Let us know more about your business by filling out the Business Information form. Please note that you will not be able to change this field in the need revision status.
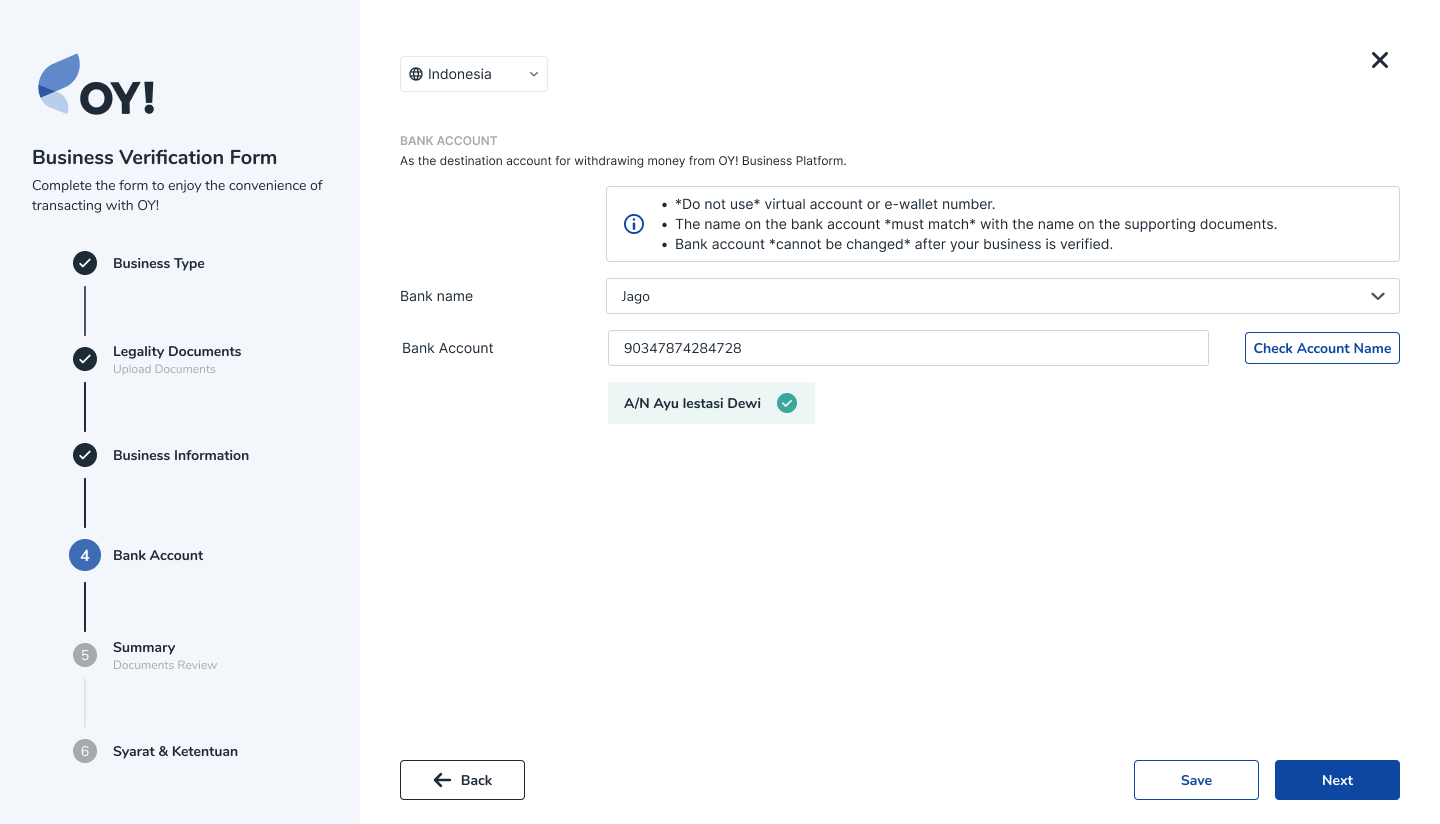
4. Submit your Bank Account: Add Bank Account Information as the destination account for withdrawing money from OY! Business Platform.
Please note that the receiving bank account information cannot be changed via the OY! dashboard once your business verification request is approved for security reasons. Please contact us at partner@oyindonesia.com to change the receiving bank account information.
5. Submit your Request: Click “Submit”, and a new status of “Waiting for Approval” should appear on the Home page, indicating that your request has been submitted along with your supporting documents.
This process should take about 1-2 working days. In the event that the status of your request is Need Revision or Rejected, please keep reading below. Otherwise, you are good to go!
Status: Need Revision
Upon reviewing the upgrade request, we might ask for additional documentations. Please follow the steps below:
1. Read our report: A report will be sent to your email regarding the information and documents that will need to be revised or added.
2. Refill out the form: We will show you which part of the form and document that will need to be revised. When submitting another request to verify your business, please resubmit all your supporting documents. Documents are only accepted in PDF format and must be less than 10 MB in size.
3. Submit your request: Click “Submit & Request to Upgrade”, and a new status of “Upgrade Account Requested” should appear on this page, indicating that your request has been submitted along with your supporting documents.
Please note that after 3 or more revision processes, you will need longer waiting time to submit your next verification request. We will inform you via email or dashboard when you can do the next submission.
For further inquiries, please contact us at partner@oyindonesia.com and our representative will get in touch.
Status: Rejected
For further inquiries regarding this review, please contact us at partner@oyindonesia.com and our representative will get in touch.
Required Supporting Documents
Below is the list of documentation to be submitted for an upgrade request:
- For Individual type of business
- ID Card
- For Corporate (PJSP) type of business
- Company’s Nomor Pokok Wajib Pajak (NPWP)
- Surat Izin Usaha Perdagangan (SIUP)/ Tanda Daftar Perusahaan (TDP) / Nomor Induk Berusaha (NIB)
- SK Kemenhukam
- Legalized Akta Perubahan Terakhir
- Legalized Akta Pendirian Perseroan
- Director’s National ID Card (KTP)
- Shareholder Structure
- License from BI/OJK
- Pengesahan Kementerian Terkait
- For Corporate (Non PJSP) type of business
- Company’s Nomor Pokok Wajib Pajak (NPWP)
- Surat Izin Usaha Perdagangan (SIUP)/ Tanda Daftar Perusahaan (TDP) / Nomor Induk Berusaha (NIB)
- SK Kemenhukam
- Legalized Akta Perubahan Terakhir
- Legalized Akta Pendirian Perseroan
- Director’s National ID Card (KTP)
- Shareholder Structure
- Pengesahan Kementerian Terkait
Completion/Go-Live Checklist
Once you're ready to execute real money-in and money-out transactions or integrate with OY!, follow the below check-list to ensure you're all set up:
Create an account
Upgrade your account by submitting the required documentations
Have your upgrade request approved
(Required if you want to use our API) Submit your IPs and callback URLs (both for staging and production environment) to your business representative or to partner@oyindonesia.com
(Required if you want to use our API) Request your staging and production API Key to our business representative (note: you are not required to upgrade your account to request staging API Key. Upgrade is only required if you want to request Production API Key).
(Optional) Perform testing. We recommend that you thoroughly test before going live. We’ve provided a Staging Mode in our dashboard, where you can test transactions to understand how our products work, without using real money. If you are a developer, you can also test your integrations.
(Optional) If your company wants to have multiple users: Create additional sub-account users under User Management
OY! Dashboard Tutorial
Login
To be able to login to Dashboard;
- Go to https://desktop-business.oyindonesia.com/login.
- Make sure the username and password that you input are correct.
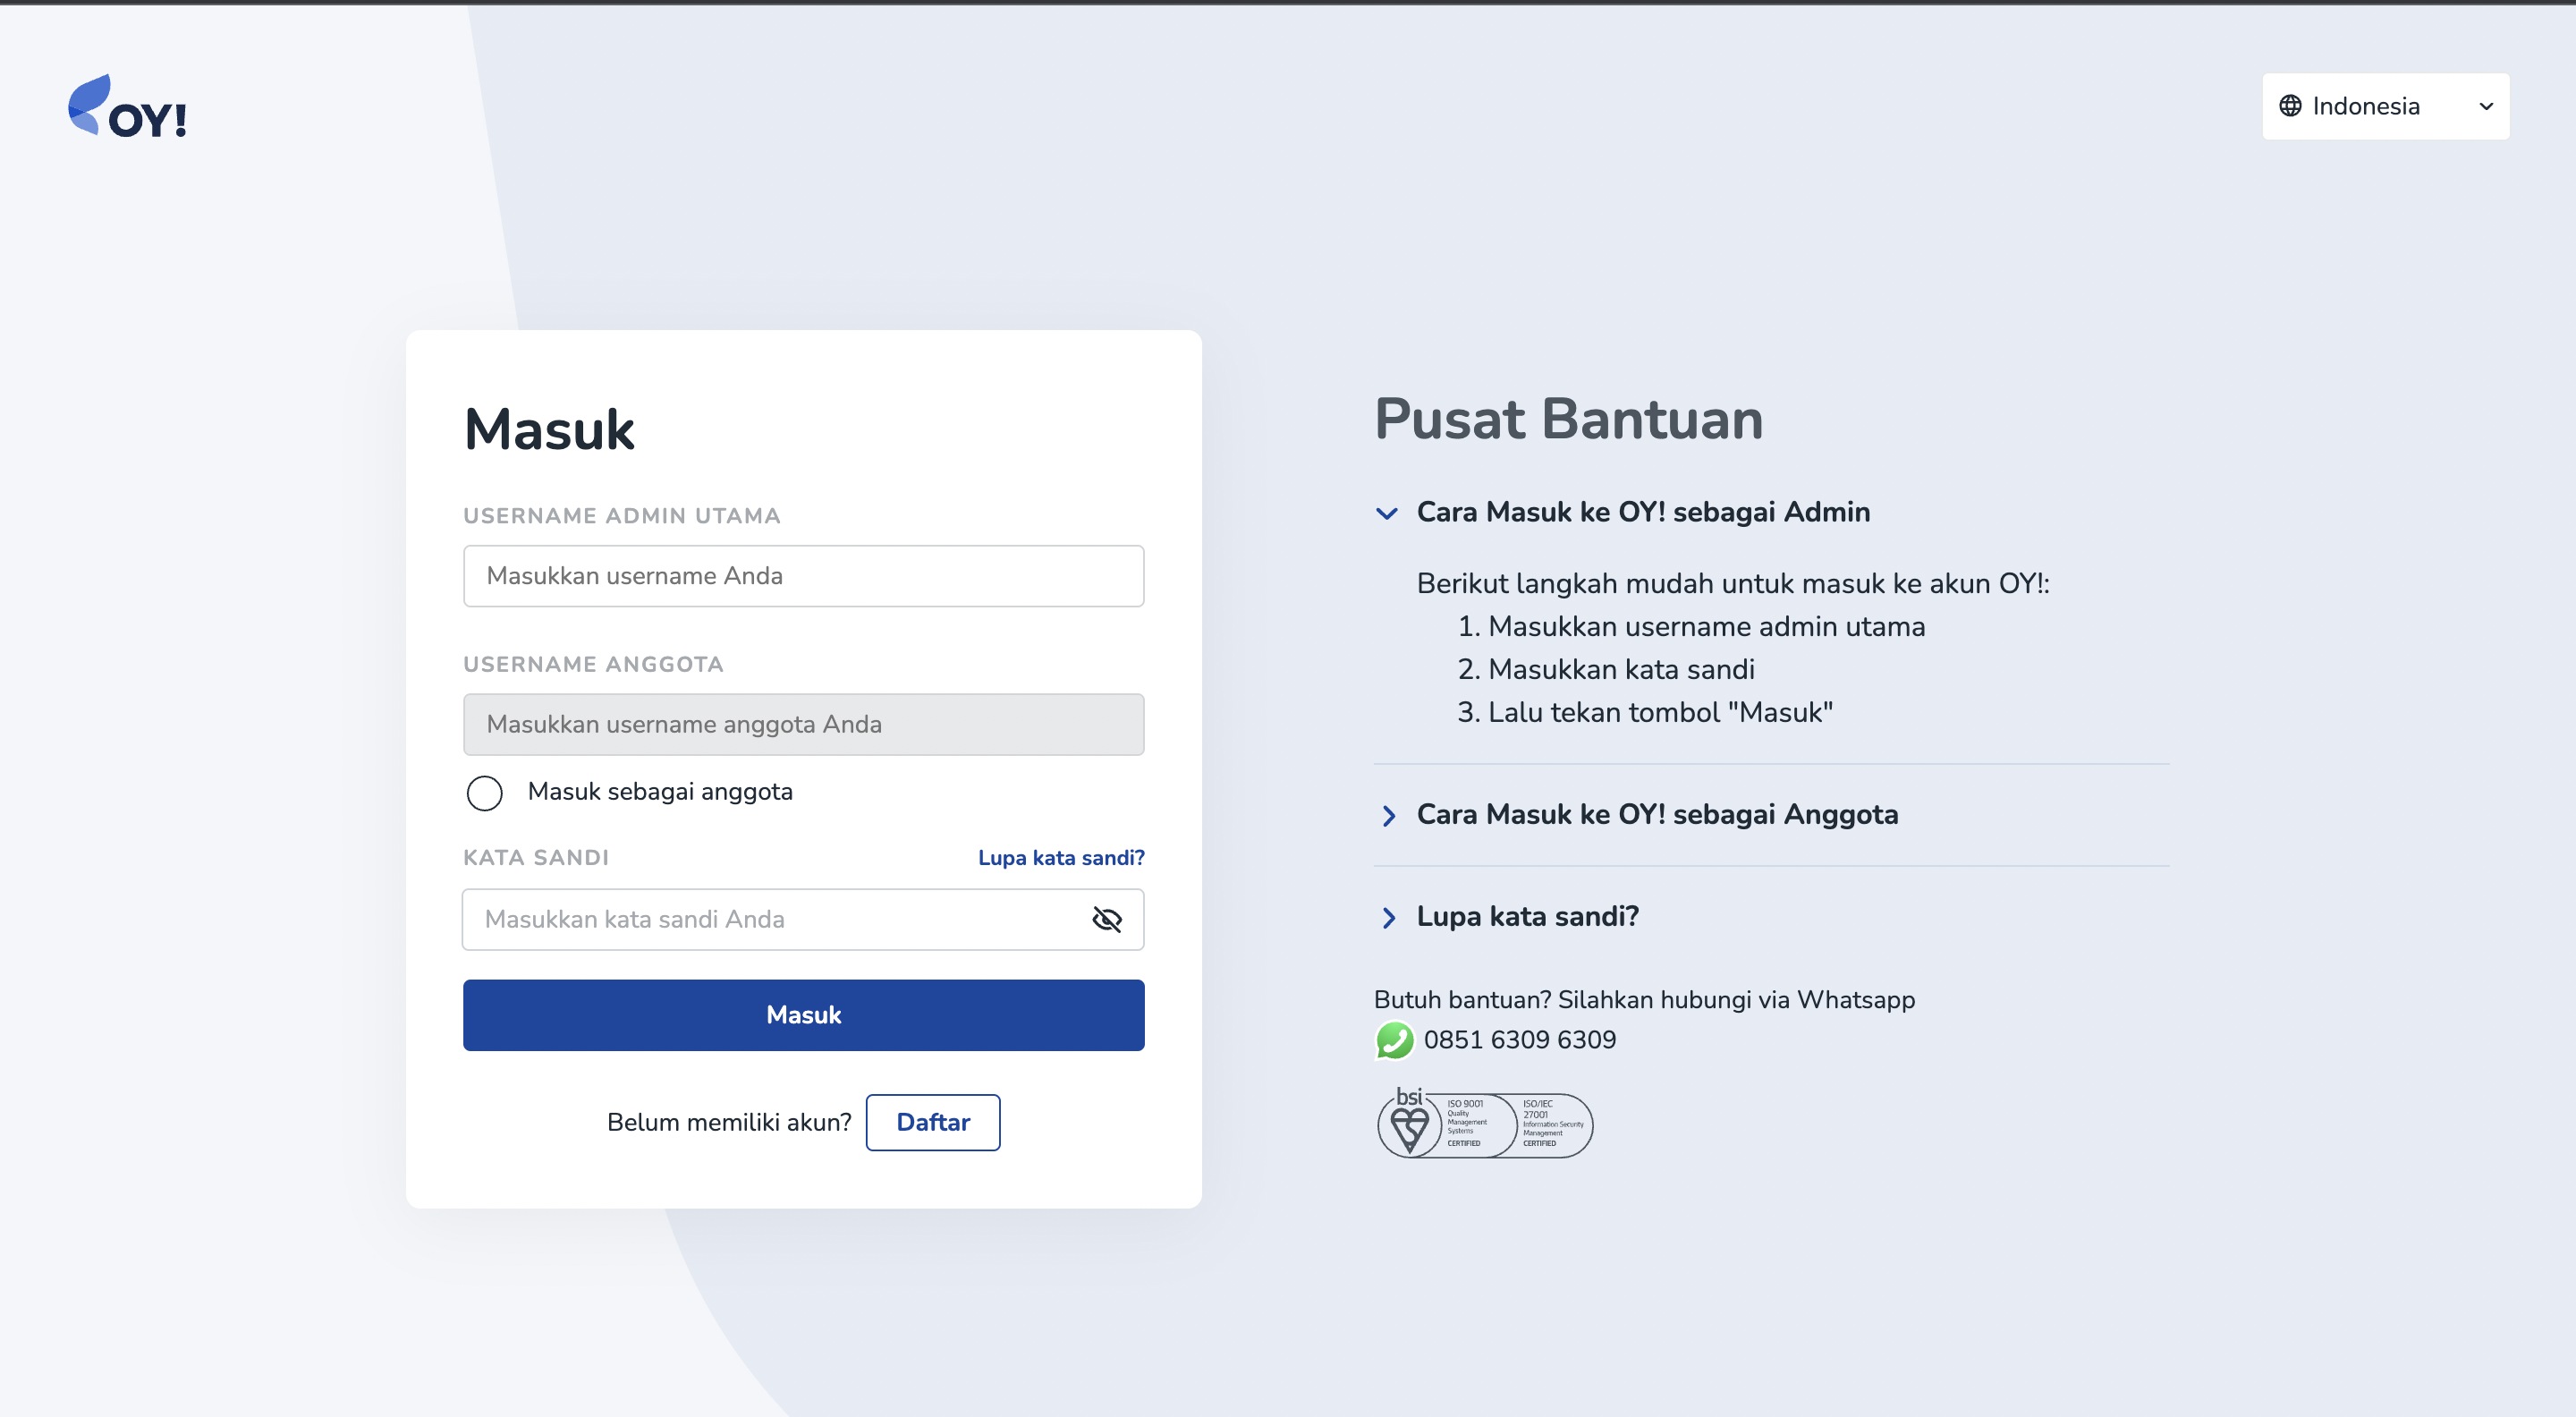
- You will be redirected to the input the OTP page. The OTP will be sent to the email associated with your username. Then, input the OTP number.
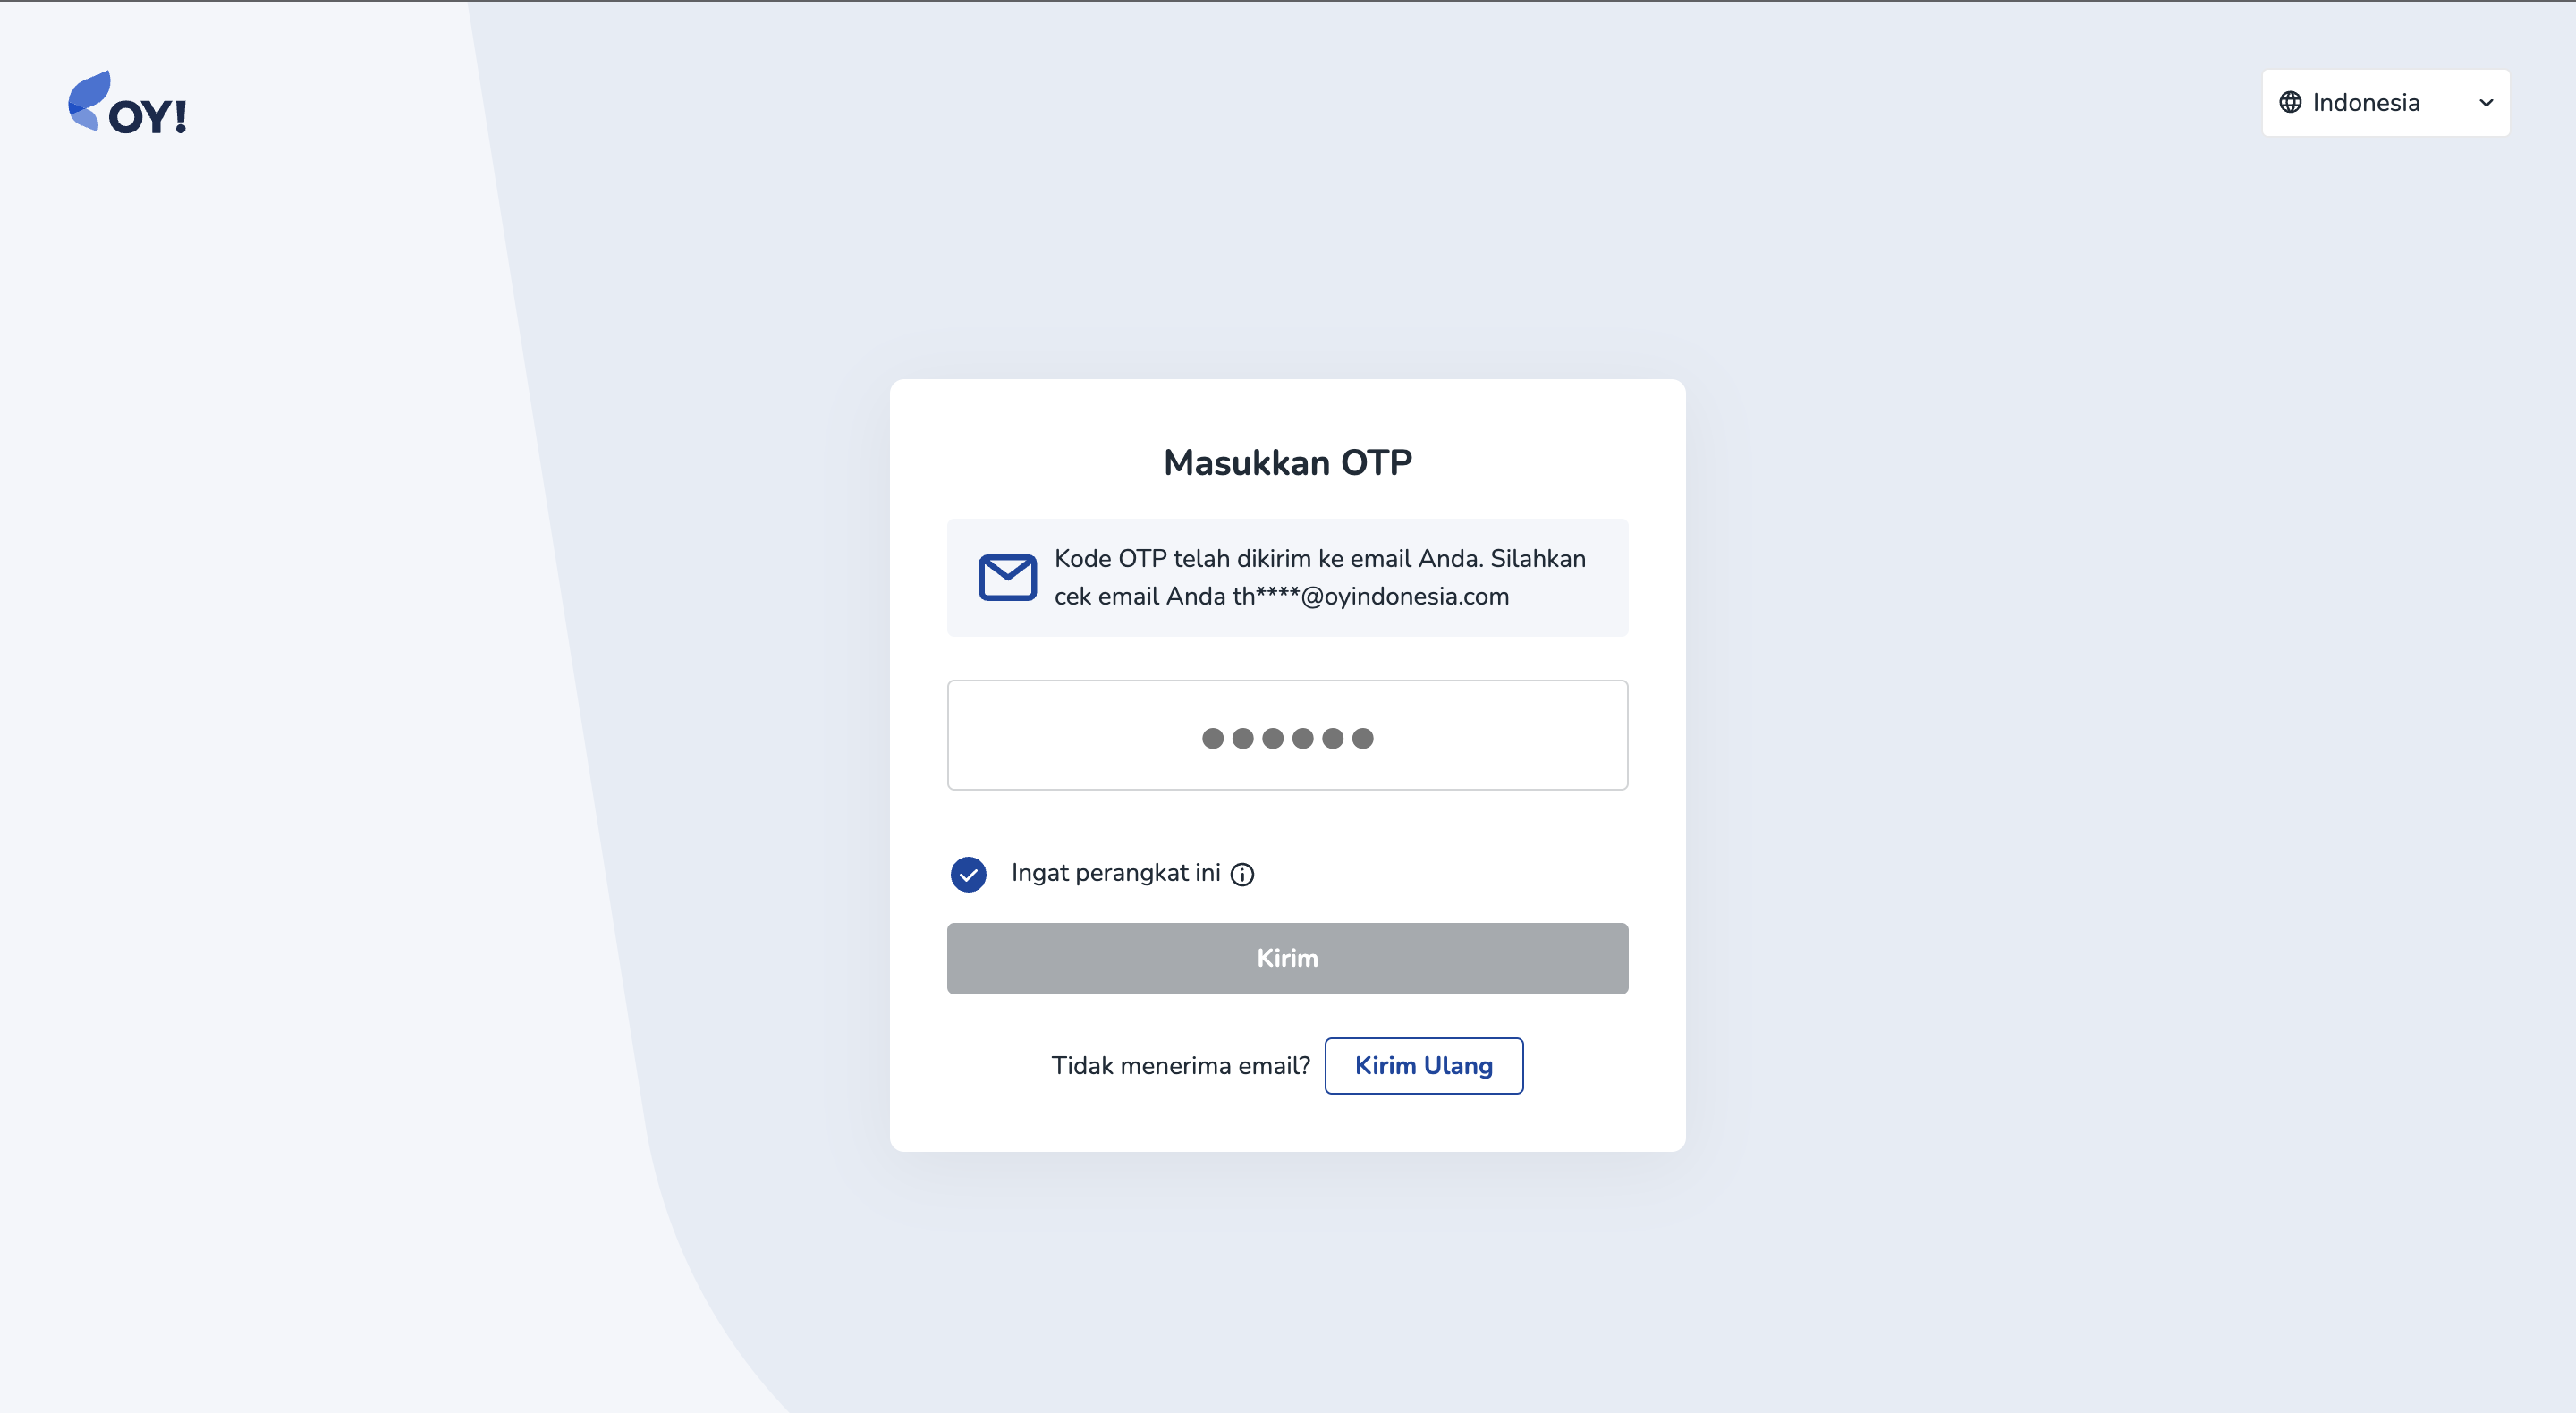

If you tick the 'Remember this device' option, you are not required to input an OTP when you log back in next time. Hence, point 2 is required only when you login for the first time after you create your account.
Dashboard Analytics
Analytics feature allows you to get some insights about your earning and spending transaction that happened in OY!. With this feature, you can get information about how much money you have spent and how much money you have earned in a time interval. You can see your transaction growth on daily, weekly, or monthly basis. You also can select the time range. You will get some insights about the trend of your business transaction. Therefore, this feature can help you to generate new business decision to grow your business.
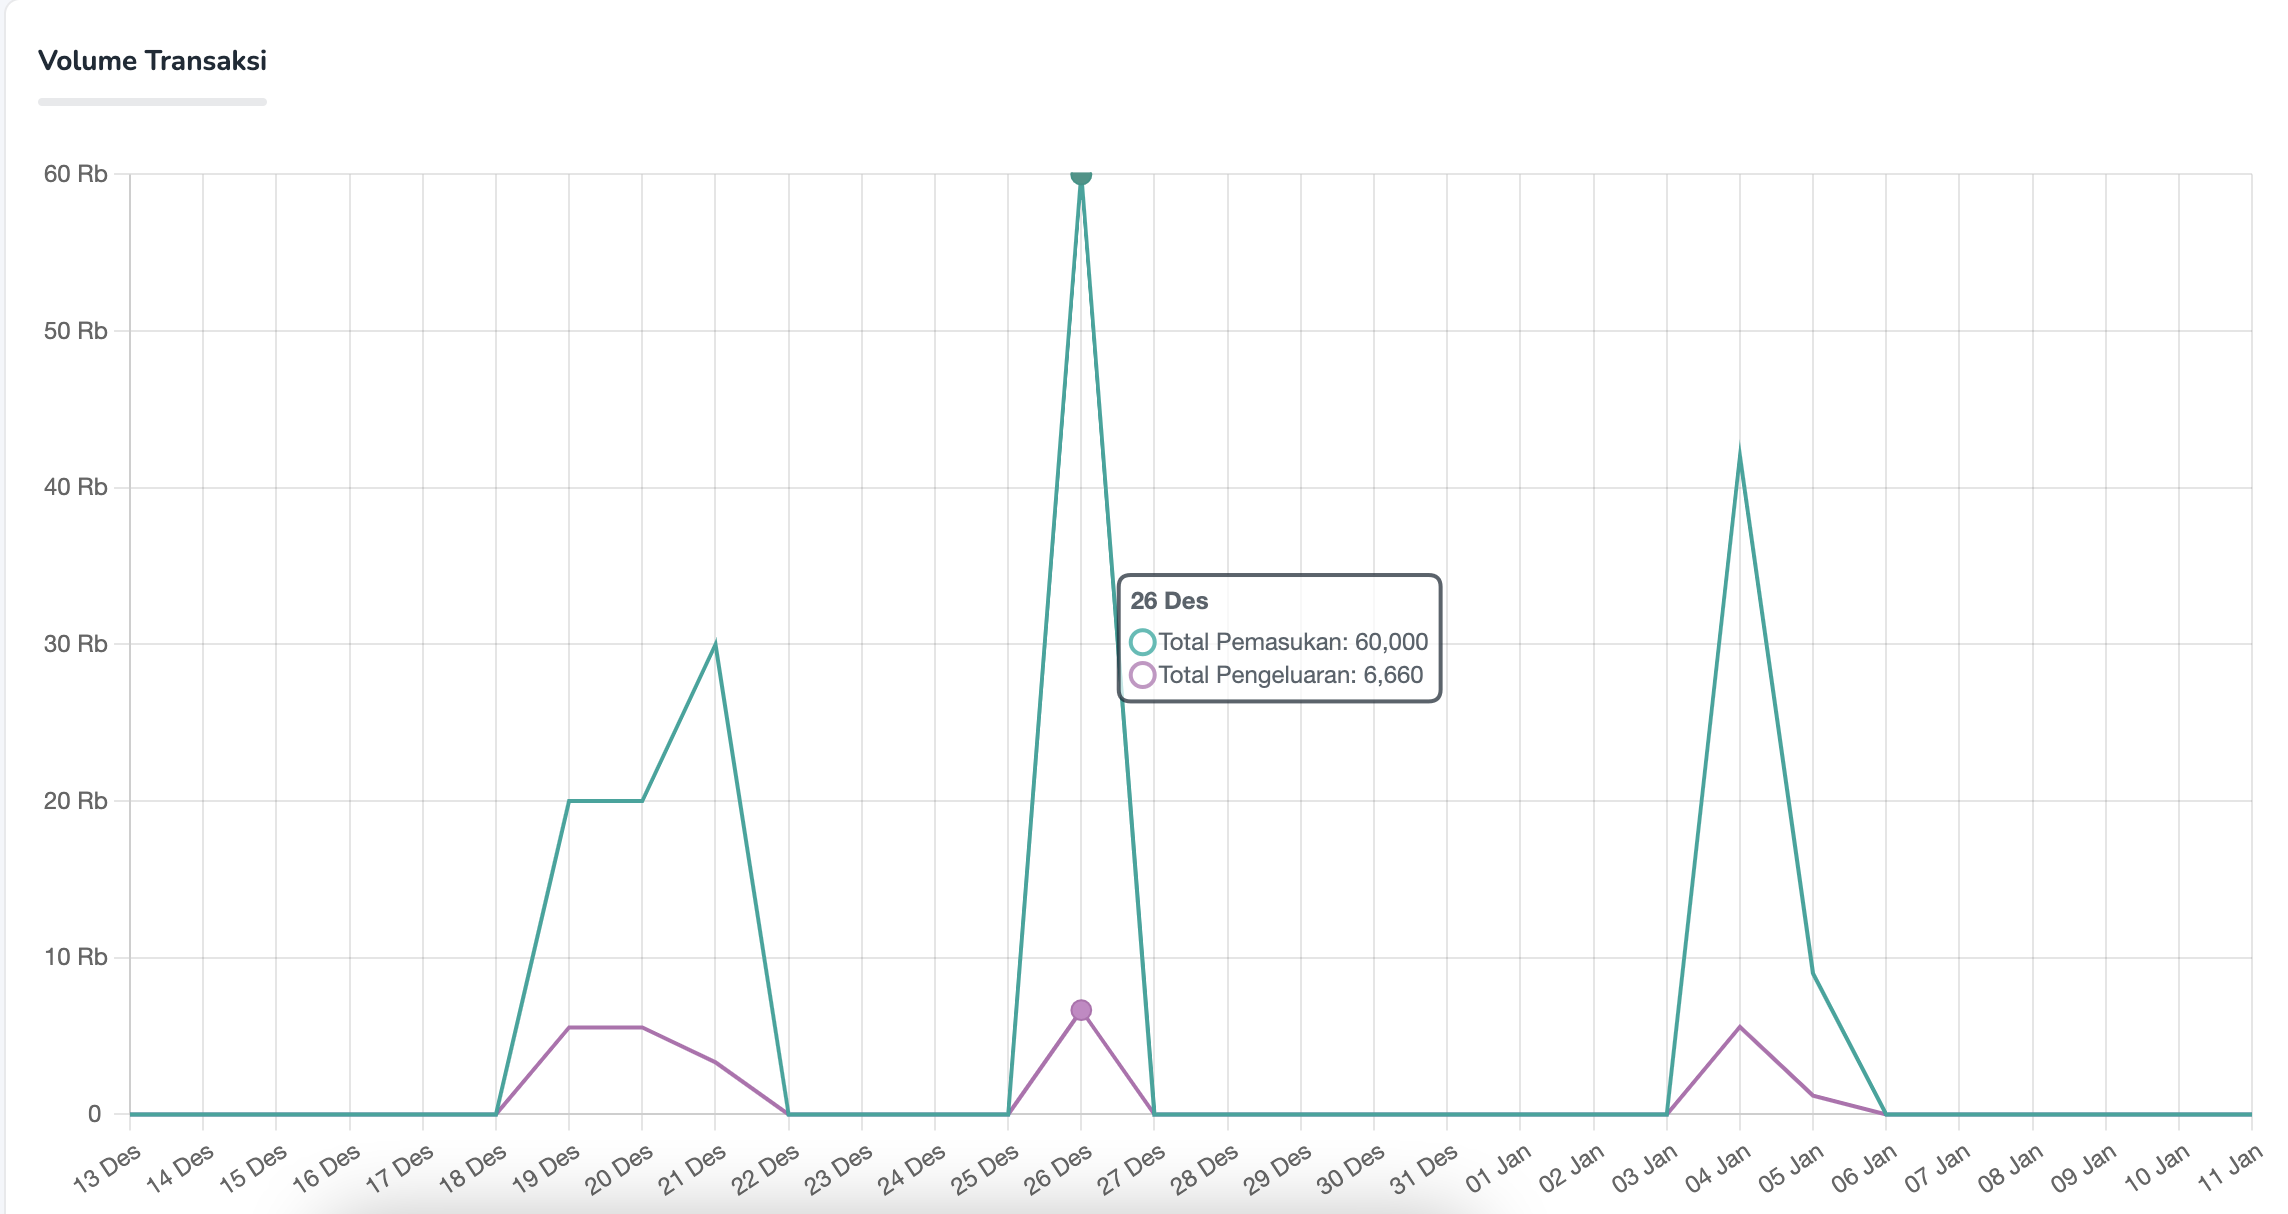
- You can select which time granularity and time period you want to see you transaction growth with.
- The increase and decrease indicator will compare your transaction performance from the time period you select vs the previous period.
- If you put your cursor in a line point, the number of transaction volume will be displayed.
For VA, Payment Link, and E-wallet users. Now you can see the comparison of conversion between each payment method your end users are using. This data can be a great insight for you so you know which channel most of your users are using.

User Management
If you have a Super Admin role, you are able to add account for your team members and define the role for them.
These are the following steps to add new users;
- Login to Dashboard.
- Go to Accounts -> User Management.
- Click the 'Create User' button
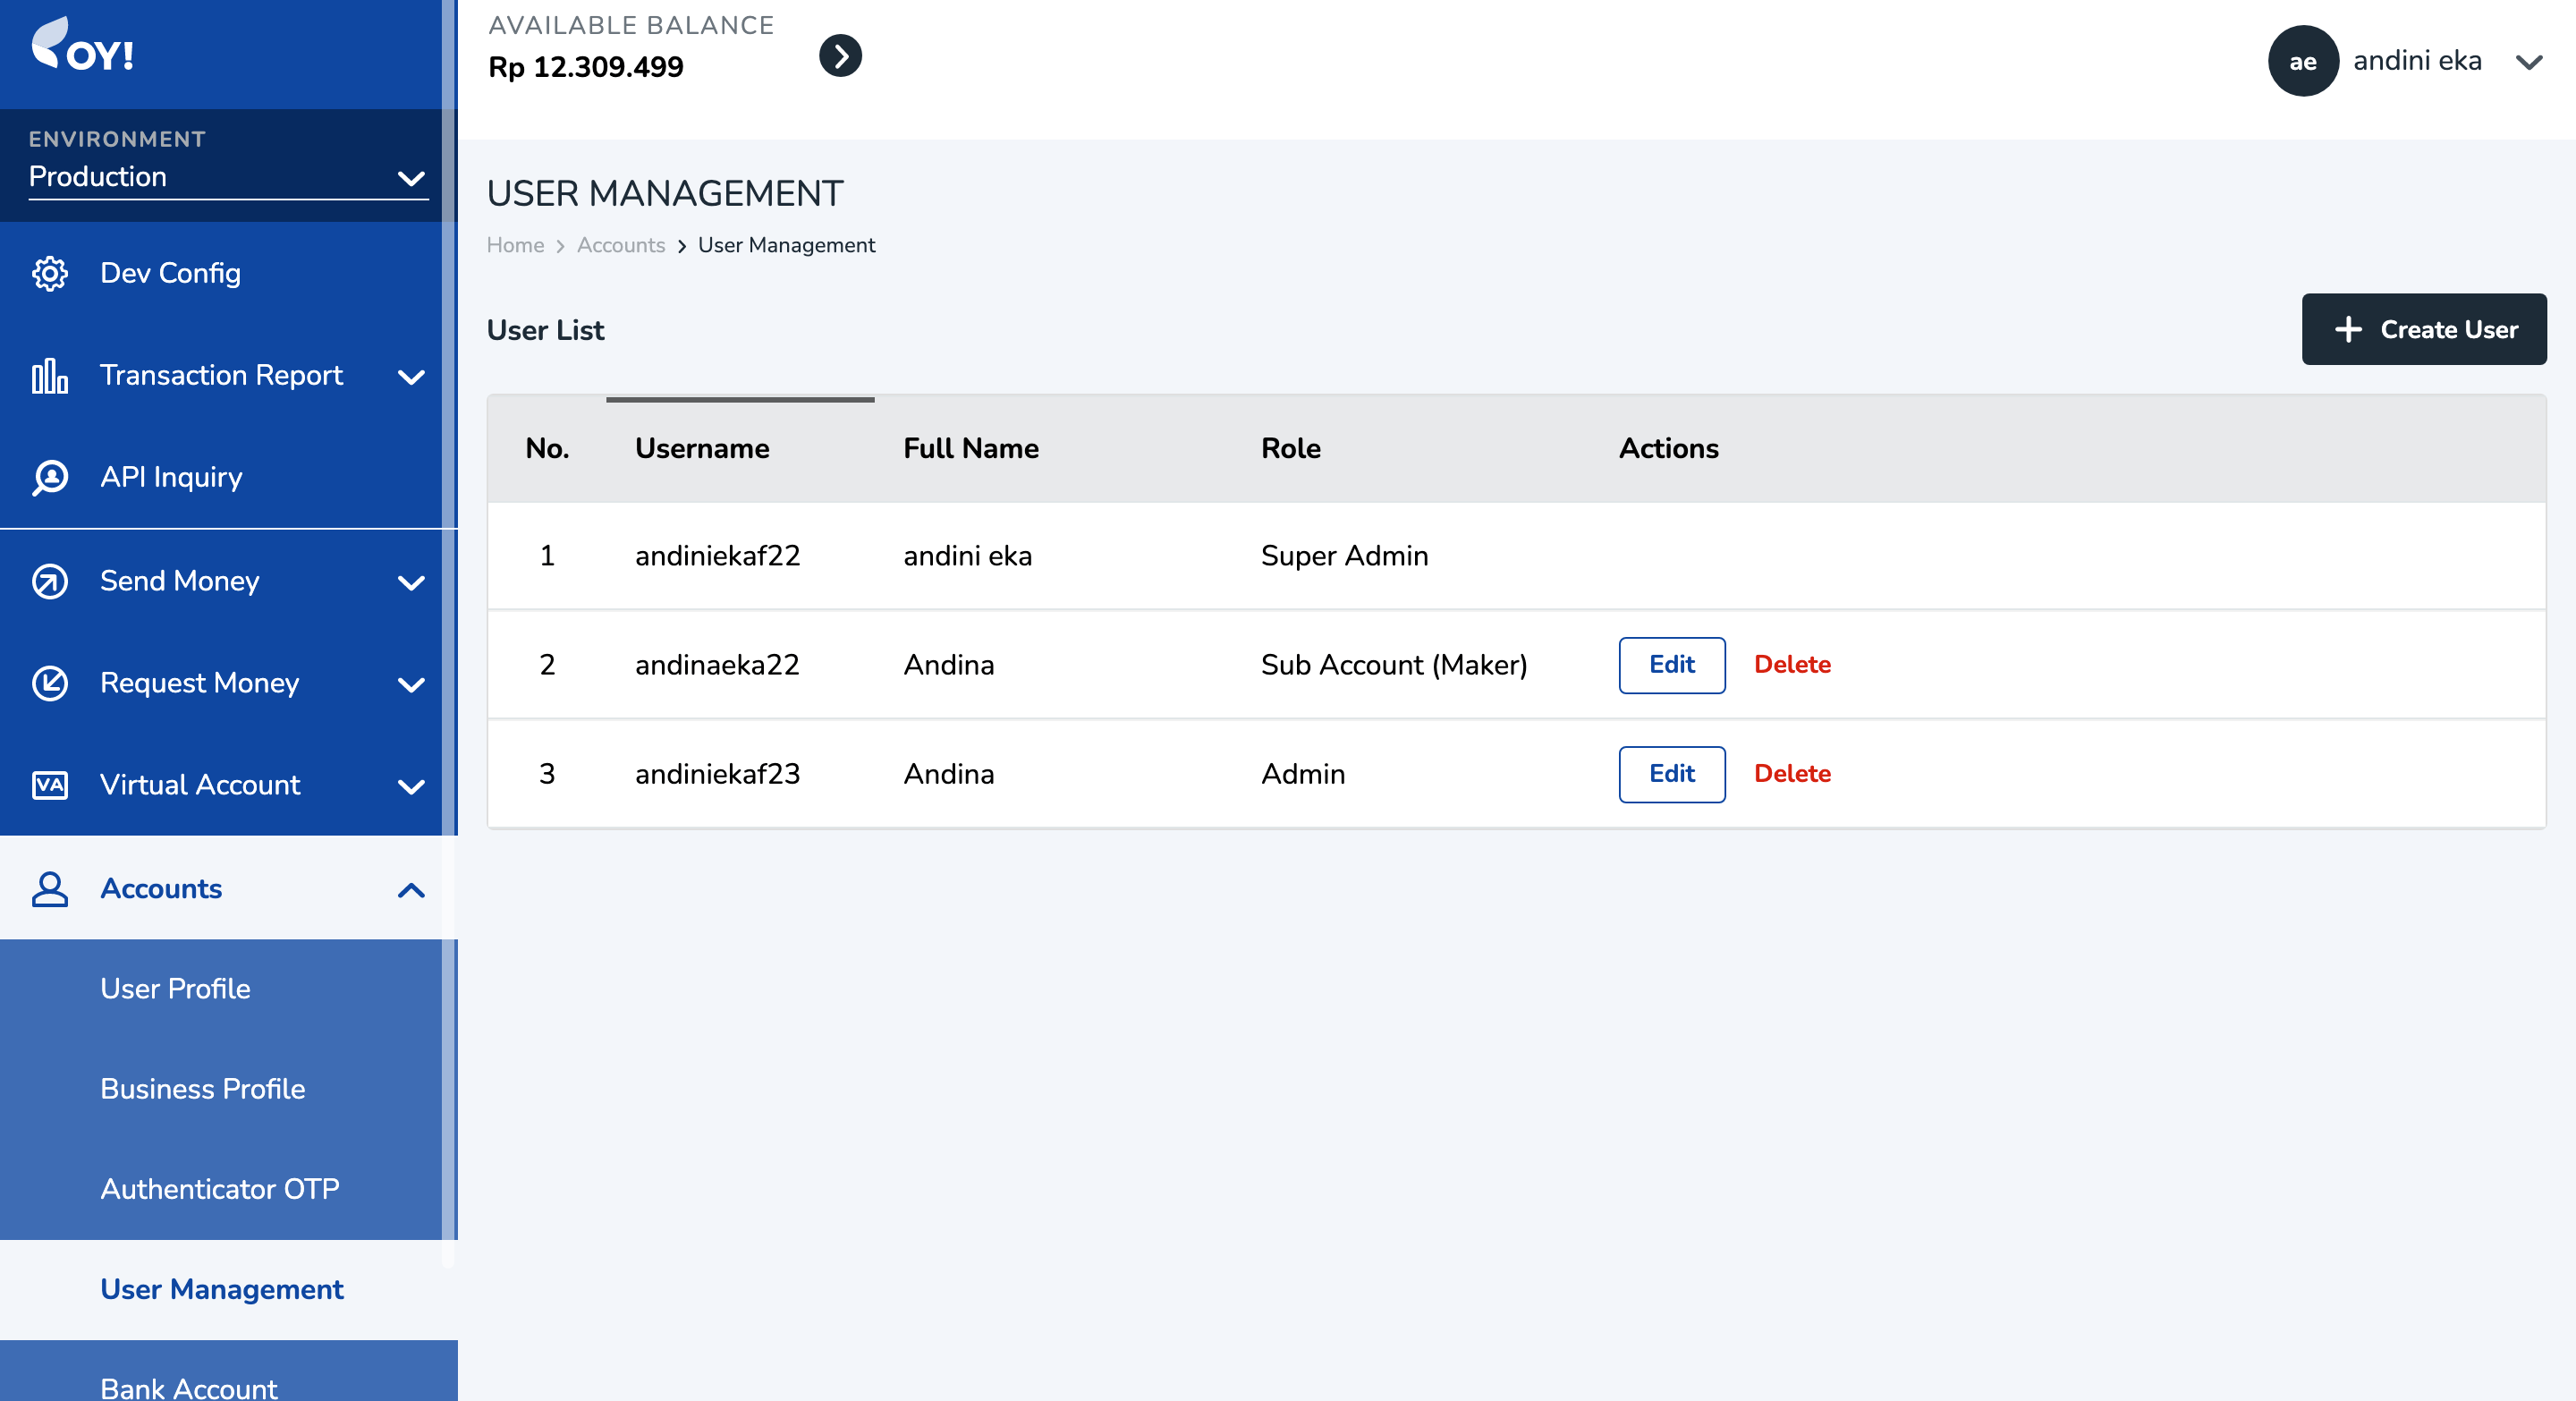
- Fill in the full name, username, email, phone number (optional), and password
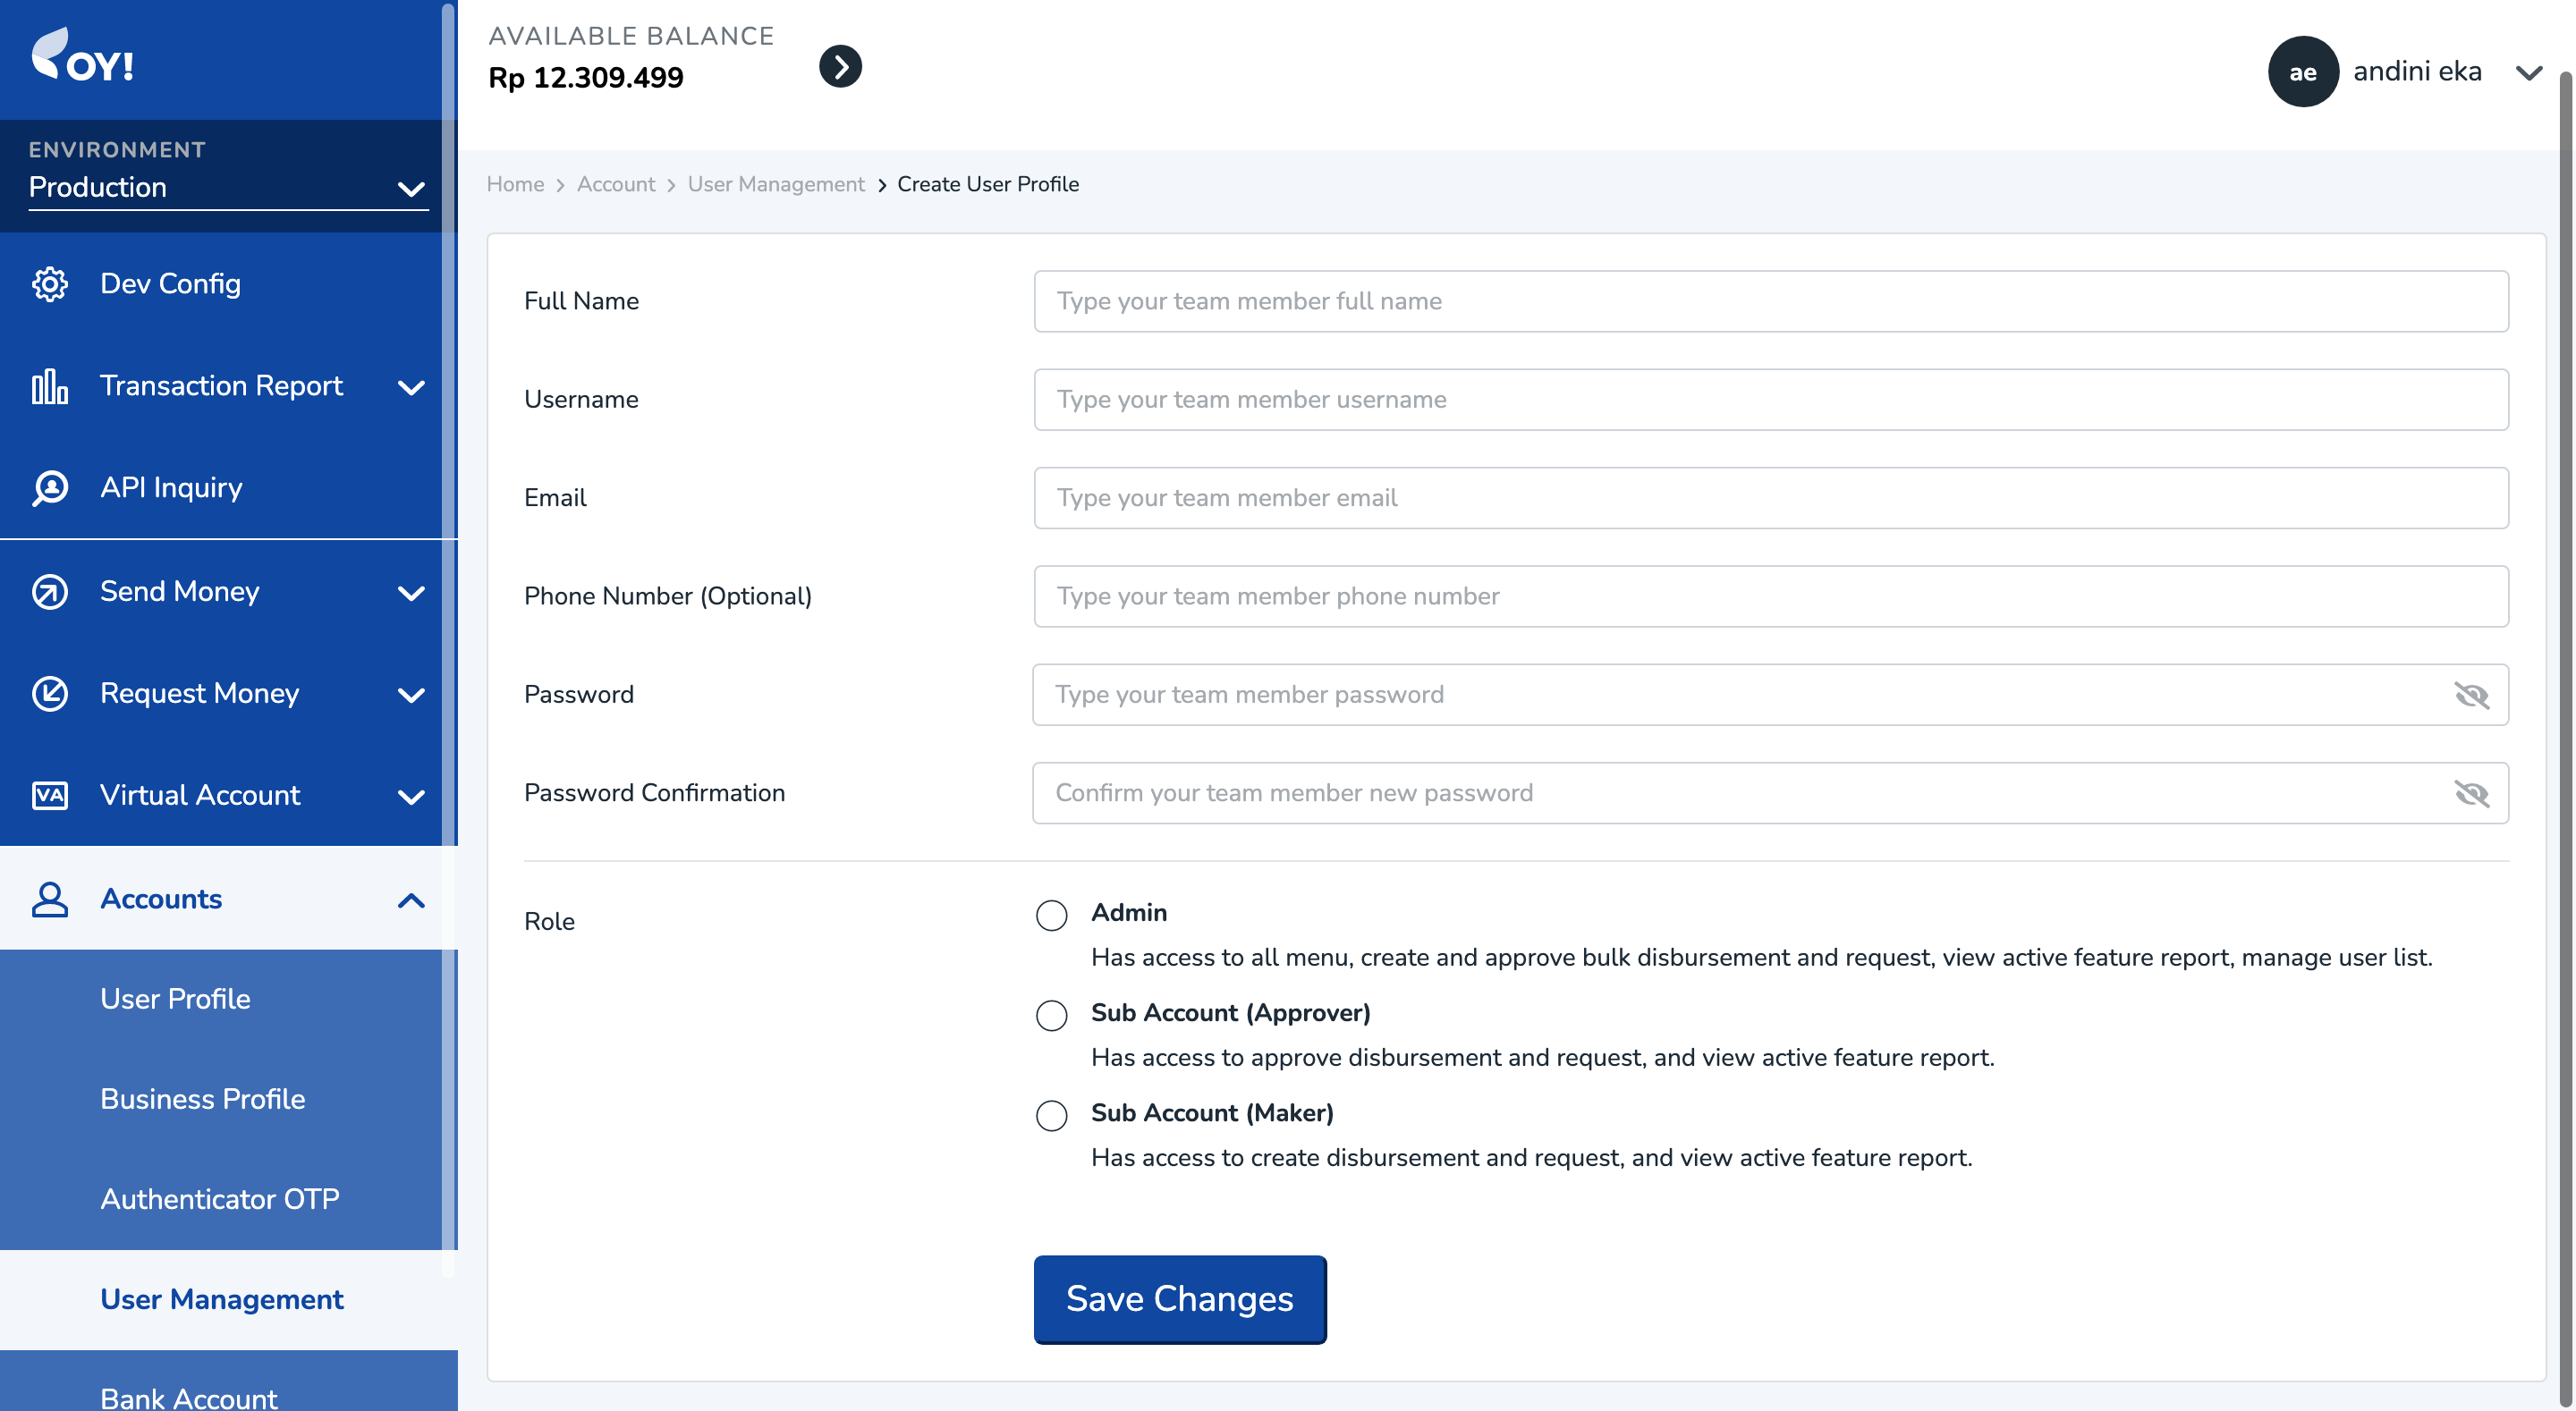
- Choose the role that you want to assign your team member(s) to. You can select between Admin, Approver, and Maker
Aside from adding new users, a Super Admin is also able to edit and delete their existing users through clicking edit/delete button on the User List table.
Here are the access control matrix in OY! Dashboard:
Dashboard features
| Task | Superadmin | Admin | Approver | Maker |
|---|---|---|---|---|
| Upgrade Account | Can upgrade | Can upgrade | - | - |
| Analytics | Can view | Can view | Can view | Can view |
| Account Statement | Can view and export | Can view and export | Can view and export | Can view and export |
| Settlement Report | Can view and export | Can view and export | Can view and export | Can view and export |
| Top up Balance | Can top up | Can top up | Can top up | Can top up |
| Withdraw Balance | Can withdraw | Can withdraw | Can withdraw | Can withdraw |
| Add User | Can add user | Can add user | - | - |
| User Profile | Can view and edit | Can view and edit | Can view and edit | Can view and edit |
| Business Profile | Can view and edit | Can view and edit | Can view and edit | Can view and edit |
| Authenticator OTP | Has permission | Has permission | Has permission | Has permission |
| Add Payment Method | Can add | Can add | - | - |
| Set up auto report | Can set up | Can set up | - | - |
| Set up auto withdrawal | Can set up | Can set up | - | - |
| Set up multi approval | Can set up | Can set up | - | - |
| Set up notification settings | Can set up | Can set up | - | - |
| Set up developer options | Can set up | Can set up | - | - |
| Add transaction category | Can add | Can add | - | - |
| Config Transaction Receipt | Can config | Can config | Can config | Can config |
Multi Entity Management
| Task | Superadmin | Admin | Approver | Maker |
|---|---|---|---|---|
| Create Sub-entity | Can create | Can create | - | - |
| Top up Sub-entity via Dashboard | Can top up | Can top up | - | - |
| Disconenct Sub-entity | Can disconnect | Can disconnect | - | - |
Bulk Disbursement Product
| Task | Superadmin | Admin | Approver | Maker |
|---|---|---|---|---|
| Create Disbursement Campaign | Can create | Can create | - | Can create |
| Approve Disbursement Campaign | Can approve | Can approve | Can approve | - |
| View and Export Bulk Disbursement Report | Can view and export | Can view and export | Can view and export | Can view and export |
Claim Fund Product
| Task | Superadmin | Admin | Approver | Maker |
|---|---|---|---|---|
| Create Claim Fund | Can create | Can create | - | Can create |
| Approve Claim Fund | Can approve | Can approve | Can approve | - |
| View and Export Claim Fund Report | Can view and export | Can view and export | Can view and export | Can view and export |
Account Payable Invoice
| Task | Superadmin | Admin | Approver | Maker |
|---|---|---|---|---|
| Create AP Invoice | Can create | Can create | - | Can create |
| Approve AP Invoice | Can approve | Can approve | Can approve | - |
| View and Export AP Report | Can view and export | Can view and export | Can view and export | Can view and export |
Payment Link One time and Reusable Product
| Task | Superadmin | Admin | Approver | Maker |
|---|---|---|---|---|
| Create Payment Link | Can create | Can create | Can Create | Can create |
| View and Export Payment Link Report | Can view and export | Can view and export | Can view and export | Can view and export |
Virtual Account
| Task | Superadmin | Admin | Approver | Maker |
|---|---|---|---|---|
| Create VA via Dashboard | Can create | Can create | Can Create | Can create |
| View and Export VA Report | Can view and export | Can view and export | Can view and export | Can view and export |
E-Wallet Aggregator
| Task | Superadmin | Admin | Approver | Maker |
|---|---|---|---|---|
| View and Export E-Wallet Report | Can view and export | Can view and export | Can view and export | Can view and export |
Account Receivable Invoice
| Task | Superadmin | Admin | Approver | Maker |
|---|---|---|---|---|
| Create AR Invoice | Can create | Can create | Can create | Can create |
| View and Export AP Report | Can view and export | Can view and export | Can view and export | Can view and export |
API Inquiry
| Task | Superadmin | Admin | Approver | Maker |
|---|---|---|---|---|
| View and Export API Inquiry Report | Can view and export | Can view and export | Can view and export | Can view and export |
API Transaction Data
| Task | Superadmin | Admin | Approver | Maker |
|---|---|---|---|---|
| View and Export API Transaction Data Report | Can view and export | Can view and export | Can view and export | Can view and export |
2-Factor Authentication
To increase the security of your account, you can set up 2-factor Authentication. Currently, the security method that OY provides is through an authenticator app
These are the following steps to set up the 2-factor authentication;
- Login to Dashboard.
- Go to Accounts -> Authenticator OTP.
- Download Authenticator App in your smartphone (from Play Store/App Store) or PC (you can download an extension for your browser). Examples of the app: Google Authenticator, Microsoft Authenticator, Authy, etc
- Scan the barcode displayed on your OY Dashboard with your Authenticator App OR enter the setup key displayed next to it on your Authenticator App.
- Please type in the 6-numerical code displayed on your Authenticator App in the 'Authenticator OTP' on OY Dashboard.
Top Up
Top up is used to add balance to your OY account.
Here's how you can access the top-up menu on your dashboard;
- Login to Dashboard.
- Go to Transaction Report -> Account Statement.
- Click the 'How To Top Up' button. There are 2 ways in which you can top up your OY account:
Top Up via Virtual Account
The Virtual Account number information can be found on 'How to Top Up Balance via VA' tab once you click the 'How To Top Up' button. If you choose to top up via VA, the topped up amount will be credited into your account real-time and you do not need to send any manual confirmation to OY

Manual Top Up via Bank Transfer
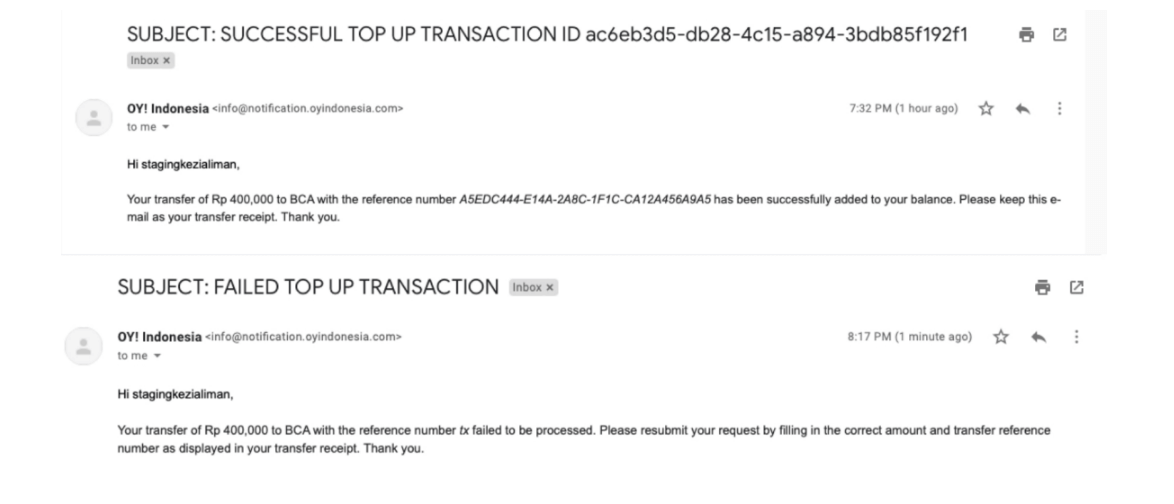
Aside from Virtual Account, you can also transfer the top up money to OY's giro account. If you choose to top up via this method, you need to perform a manual confirmation in order that your money can be credited into your account.
After you have completed the fund transfer to OY! Indonesia, you need to perform the following steps;
- Click the 'Manual Top Up Confirmation' tab on the top-up menu
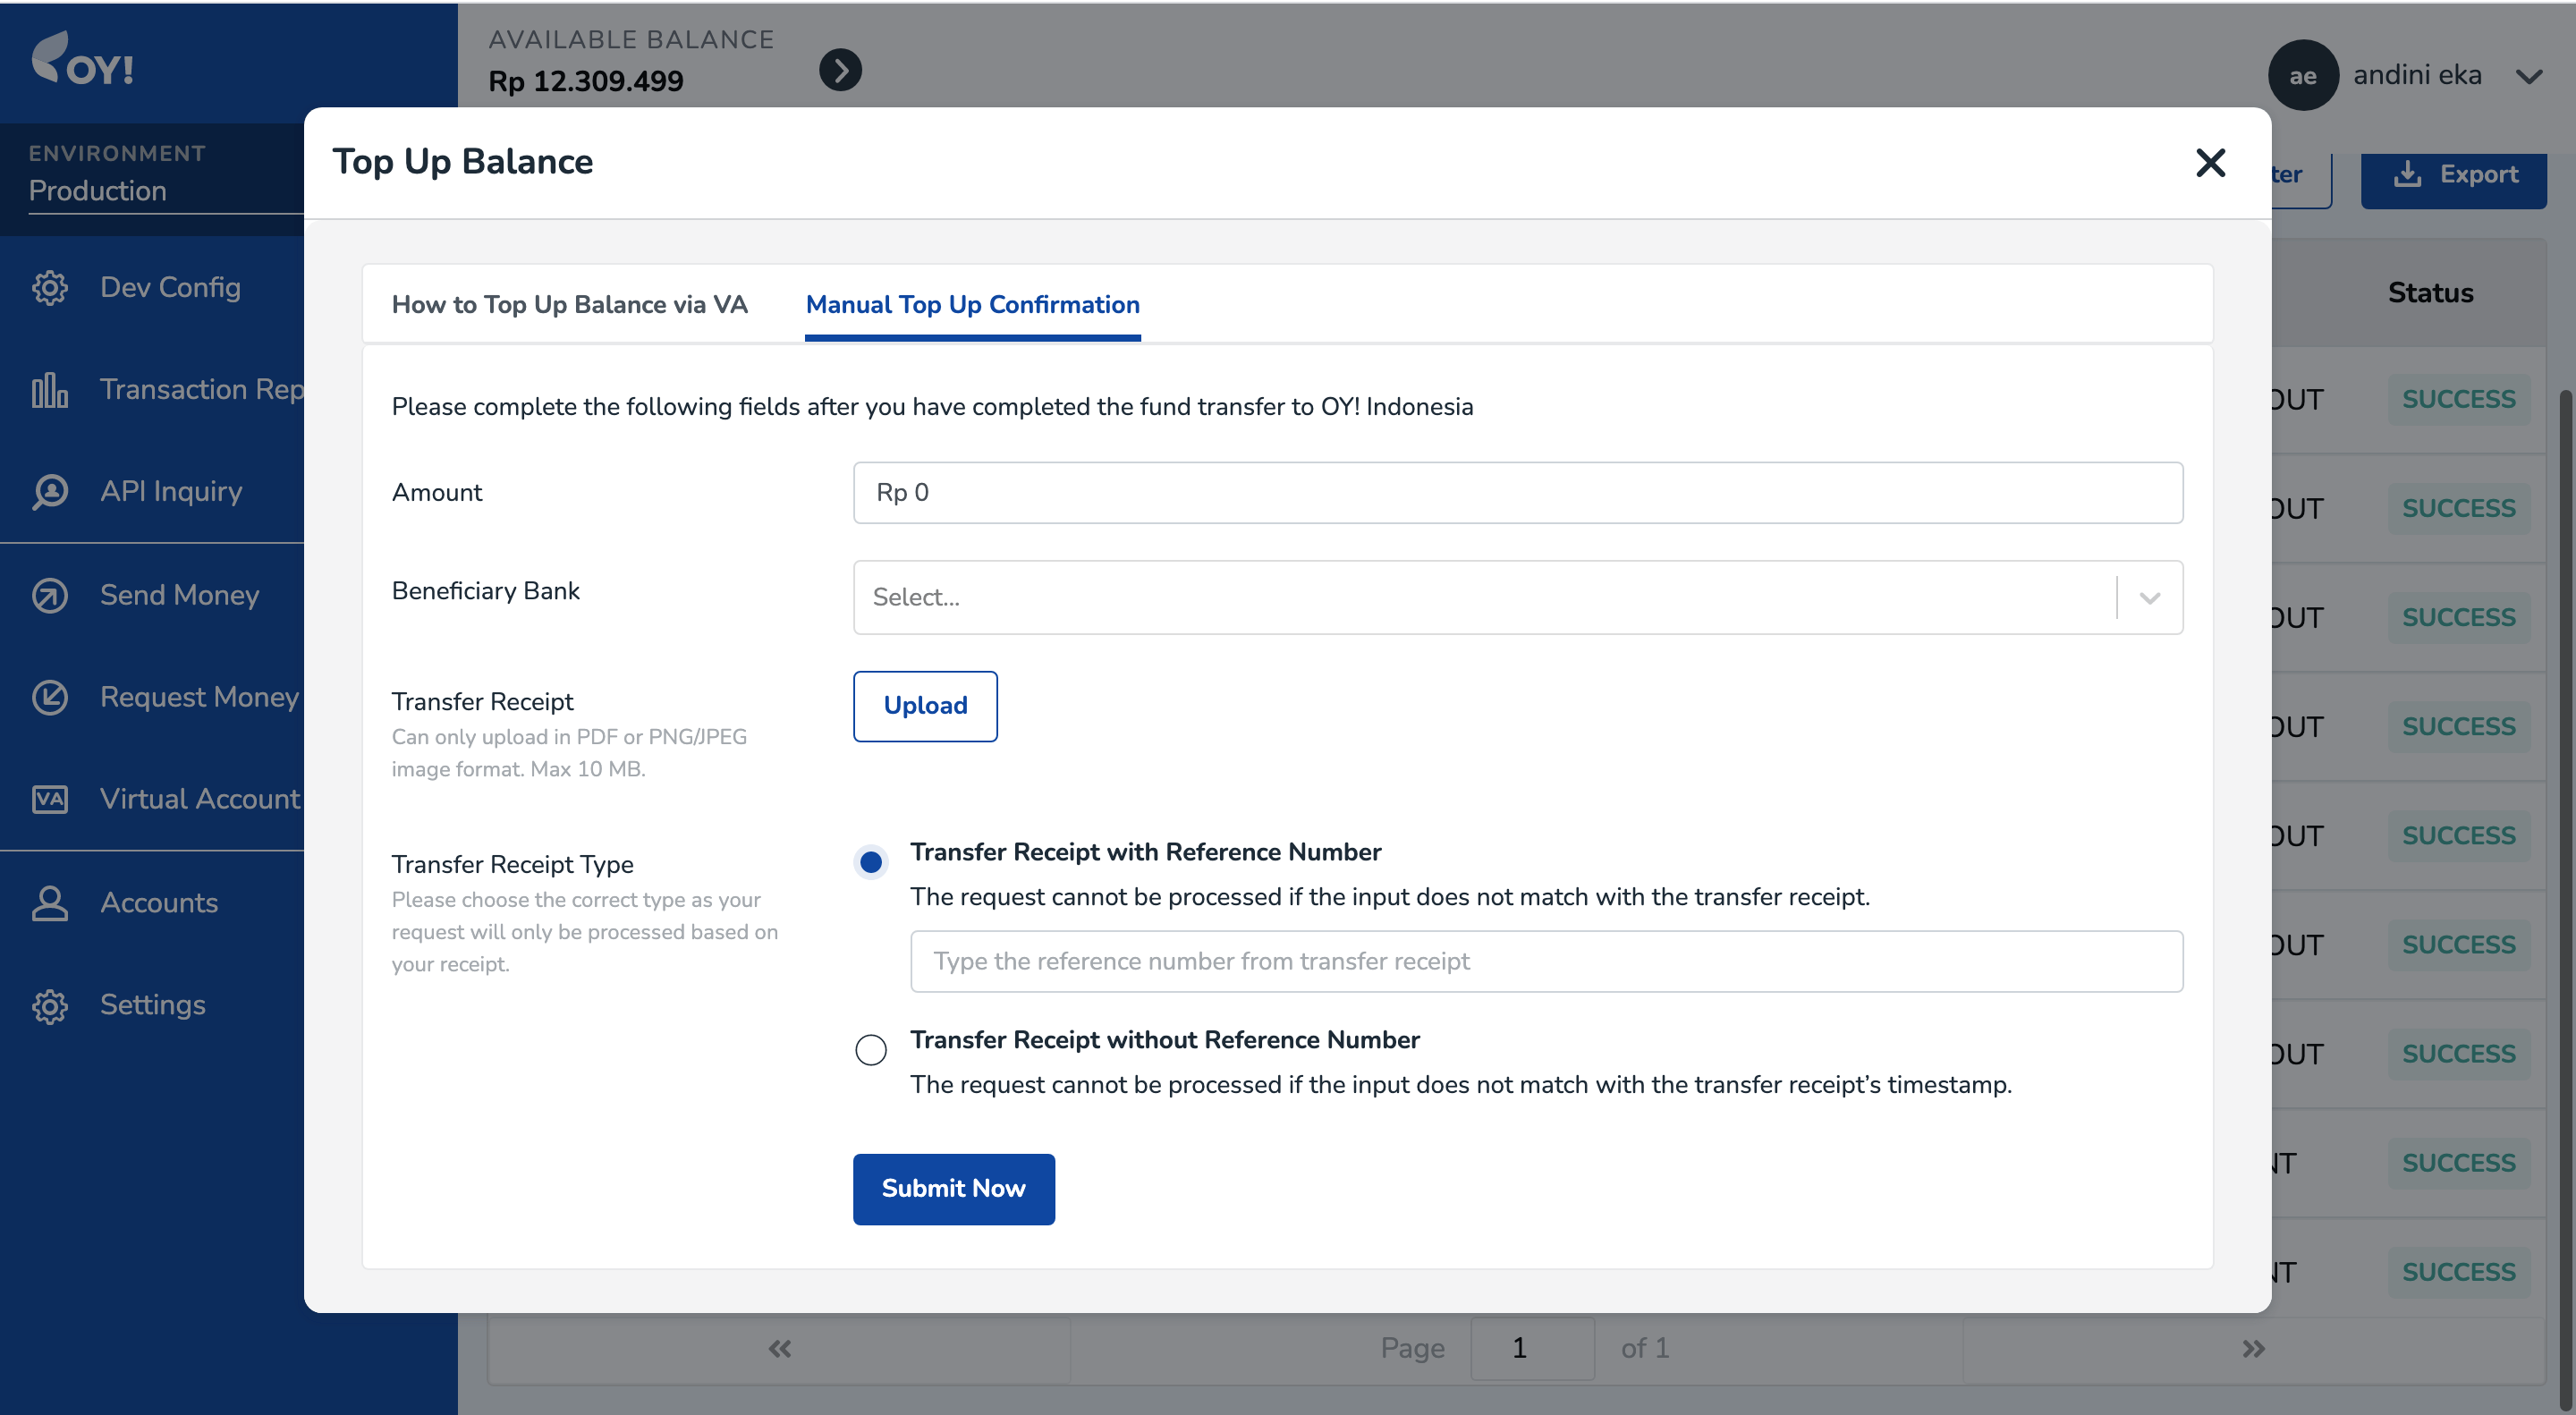
- Fill in the fields with the following information;
| Field Name | Description |
|---|---|
| Amount | The amount that you have topped up (as per written in the Bukti Transfer) |
| Beneficiary Bank | A dropdown where you can choose to which bank you have transferred the top up amount to |
| Transfer Receipt | Click the upload button to upload the Bukti Transfer obtained after you have successfully performed the transfer. Can be in PDF, PNG, or JPEG format, with max. file size 10 MB |
| Transfer Receipt Type | Transfer Receipt with Reference Number --> If your uploaded transfer receipt displays the reference number, you need to choose this option. Transfer Receipt without Reference Number --> If your uploaded transfer receipt doesn't display the reference number, you need to choose this option and fill in the date & timestamp according to your Bukti Transfer. |
- Click 'Submit Now'
- You will receive a receipt of your transaction in your email, stating that your transaction is currently being processed
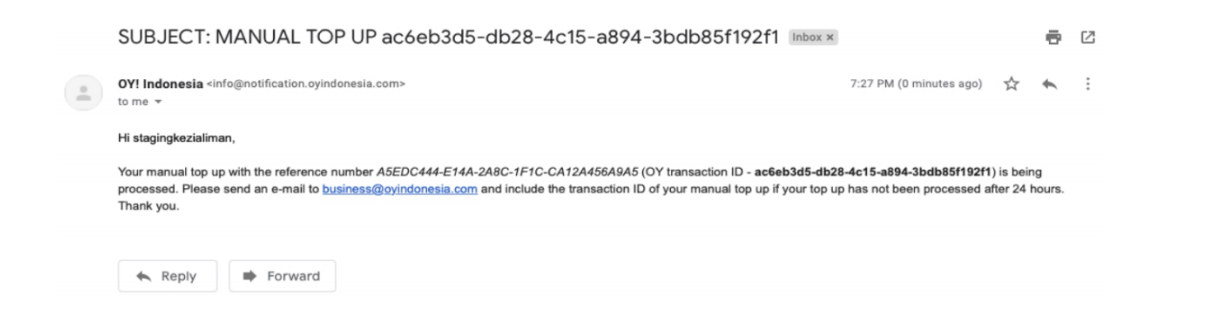
- You will receive an email confirming whether your top up is success or failed
Top Up using BCA with Unique Code
Now, we provide you with a new method for BCA. Top-up using BCA with a unique code allows you to top up your balance in a real-time manner. You do not have to confirm manually as we will automatically detect your top-up and reflect it to your balance.
Steps:
- In the top up page, click on the “BCA Unique Code” tab.
- Input the amount you want to top up. Note : The minimum amount that we allow for this method is IDR10,000.
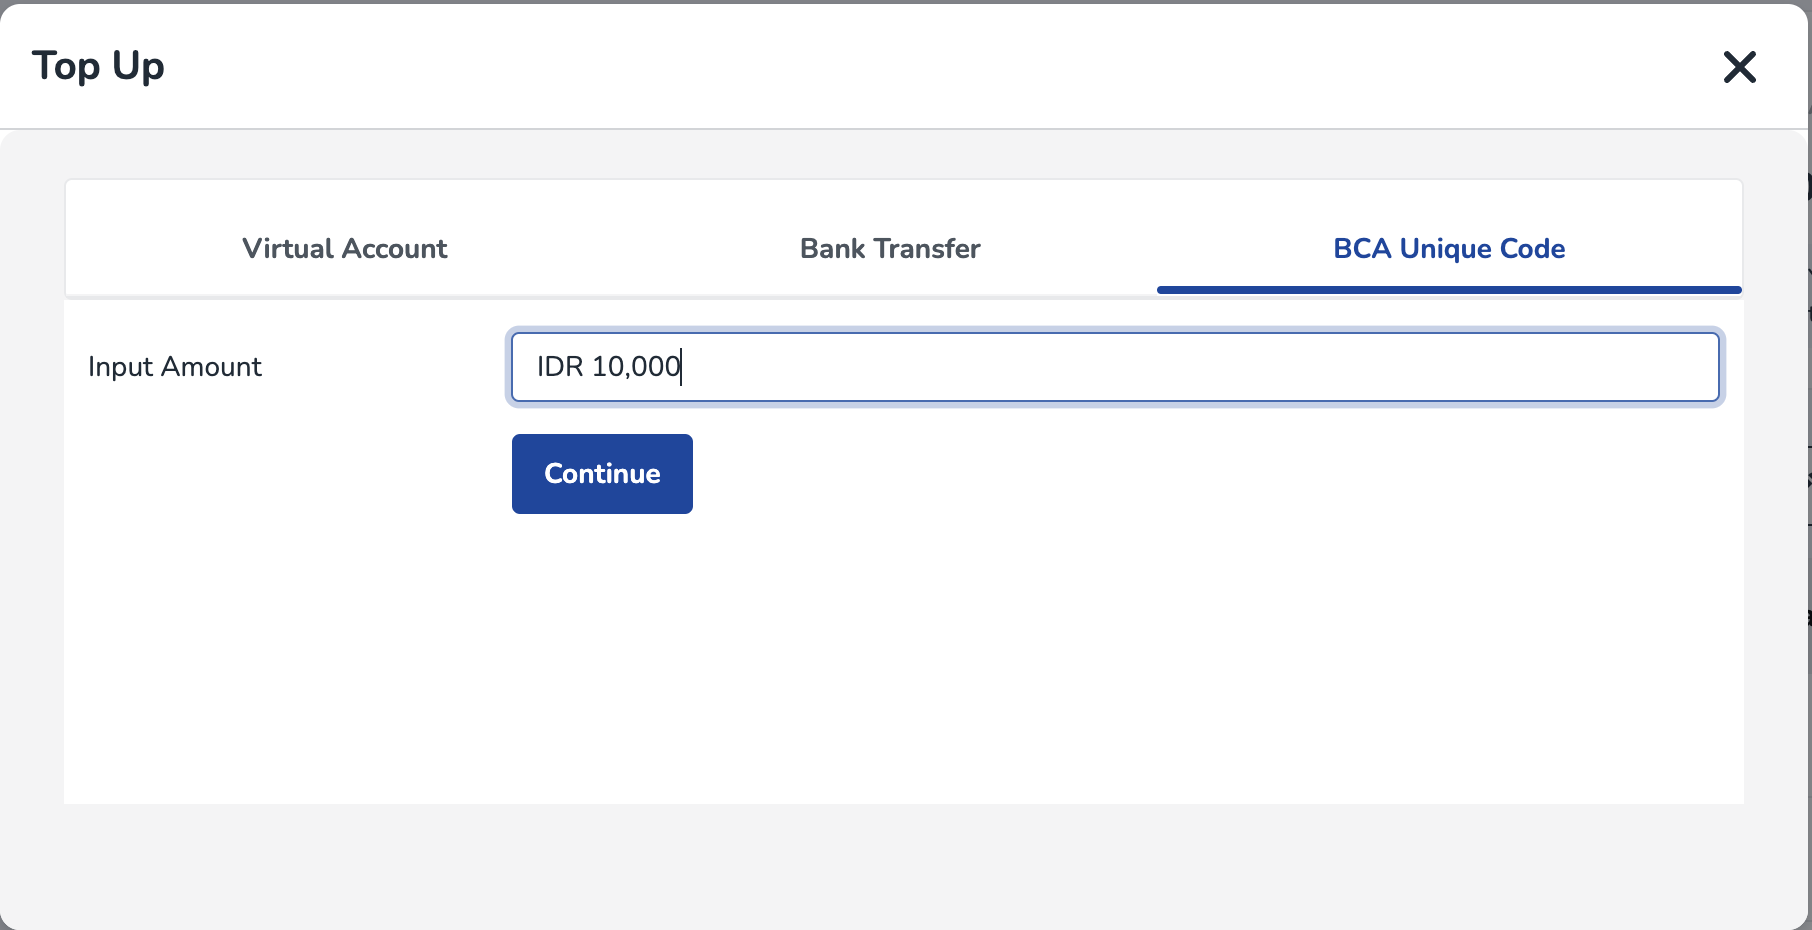
- OY! will display the amount you input PLUS three-digits unique code generated by us. Transfer the exact nominal that appeared on the screen to the bank account stated on the page. Please make sure to use BCA bank account.
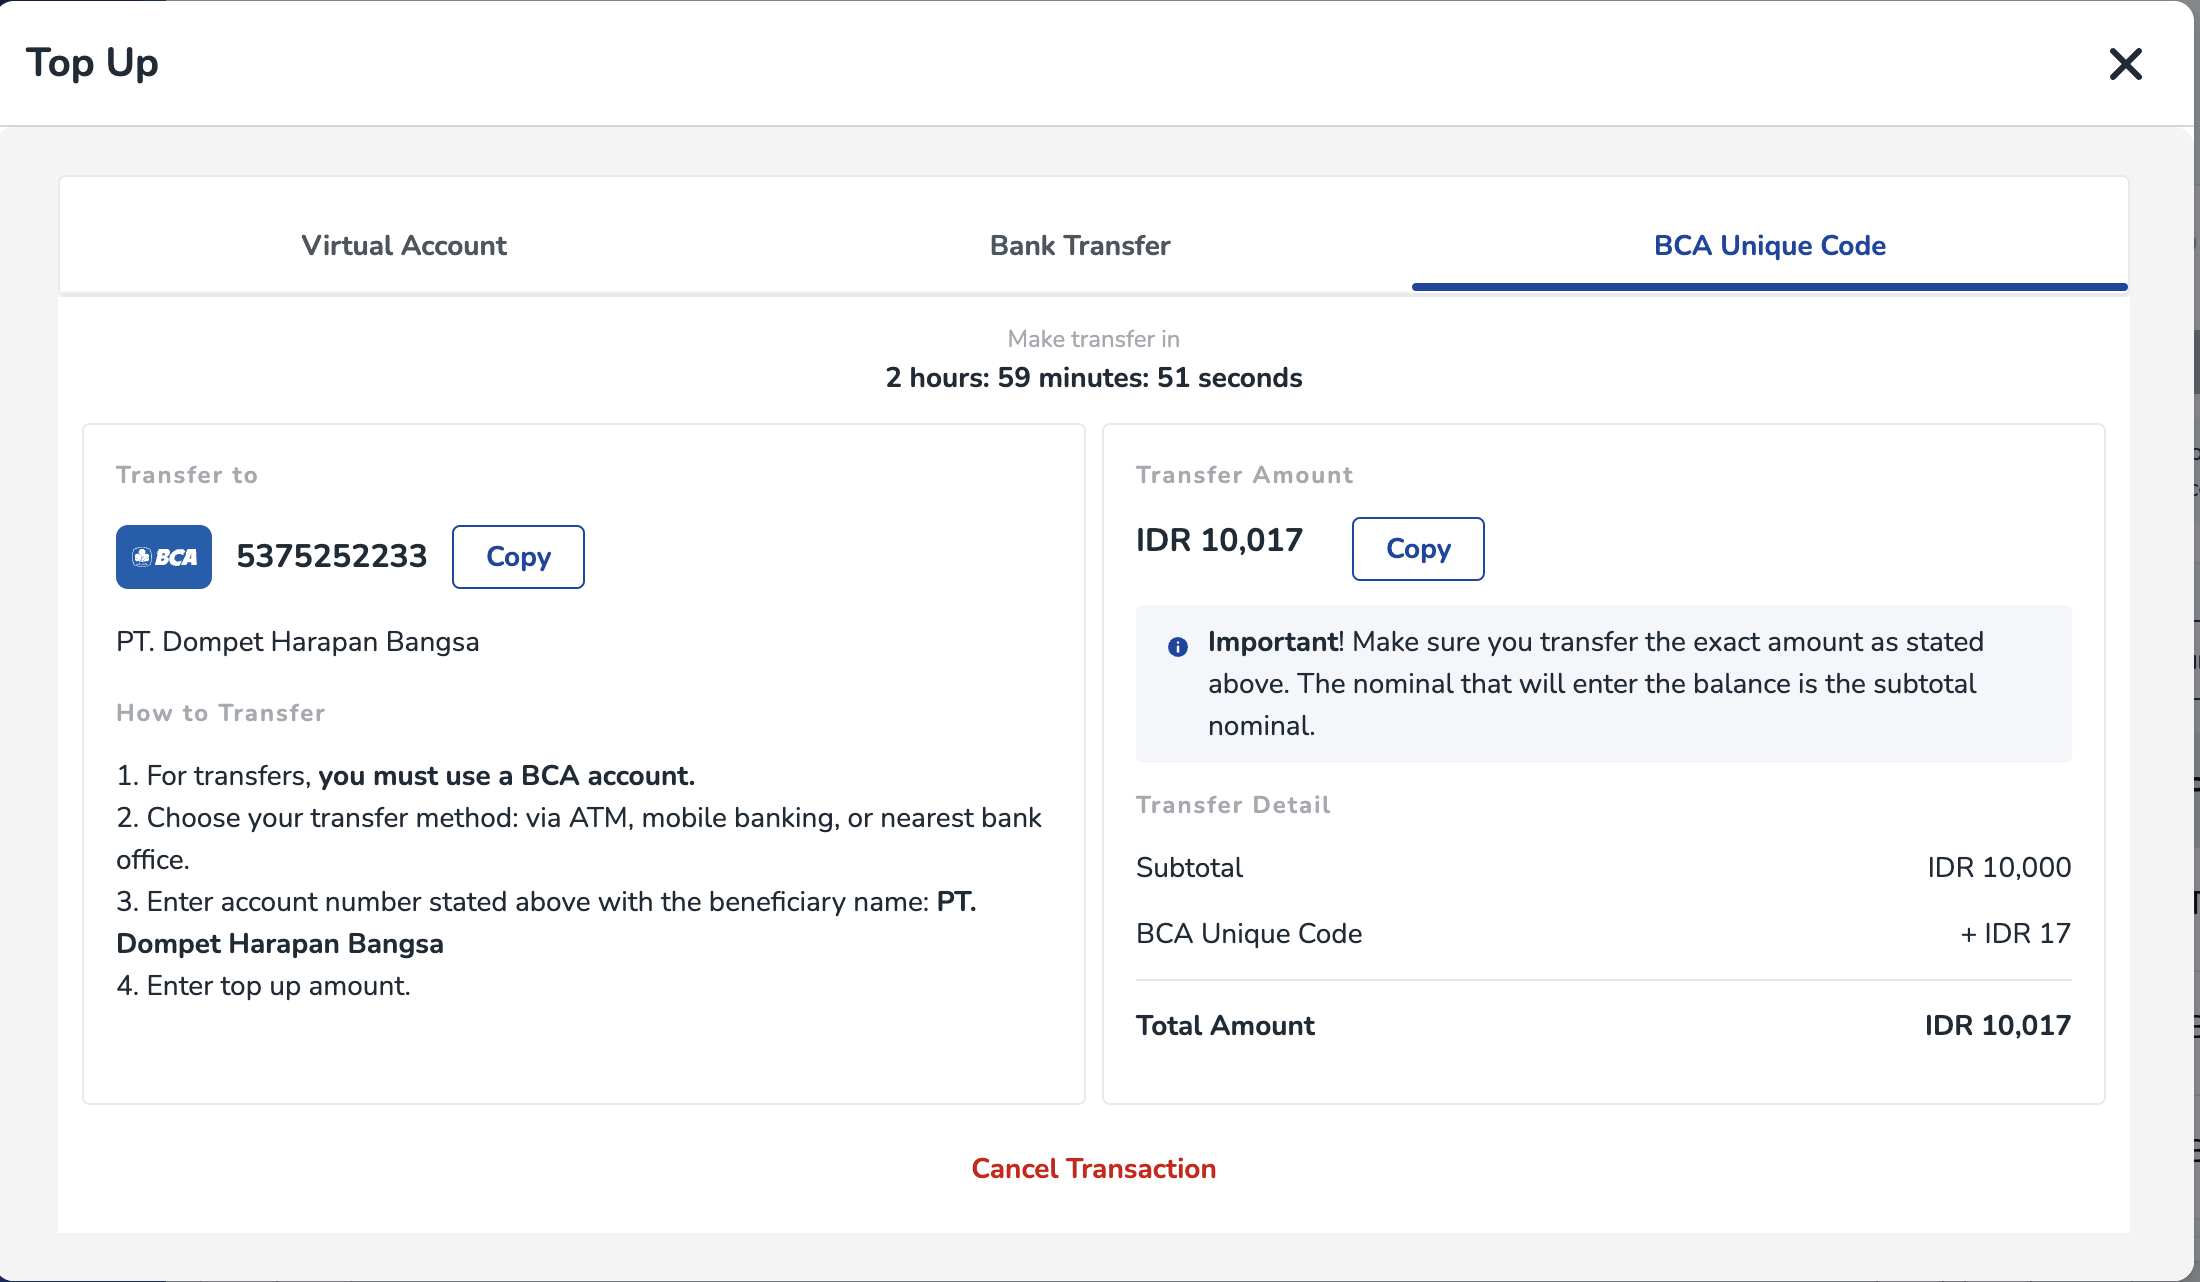
- After the transaction is successful, the ORIGINAL AMOUNT will be reflected in your balance. Note : The operational hour for this method is every day, from 3.01 AM to 8.00 PM. Outside those hours, this method will be closed.

Withdrawal
When you want to withdraw, do the following steps:
- Go to Transaction Report -> Account Statement
- Click Withdraw
- Fill in the amount that you want to withdraw
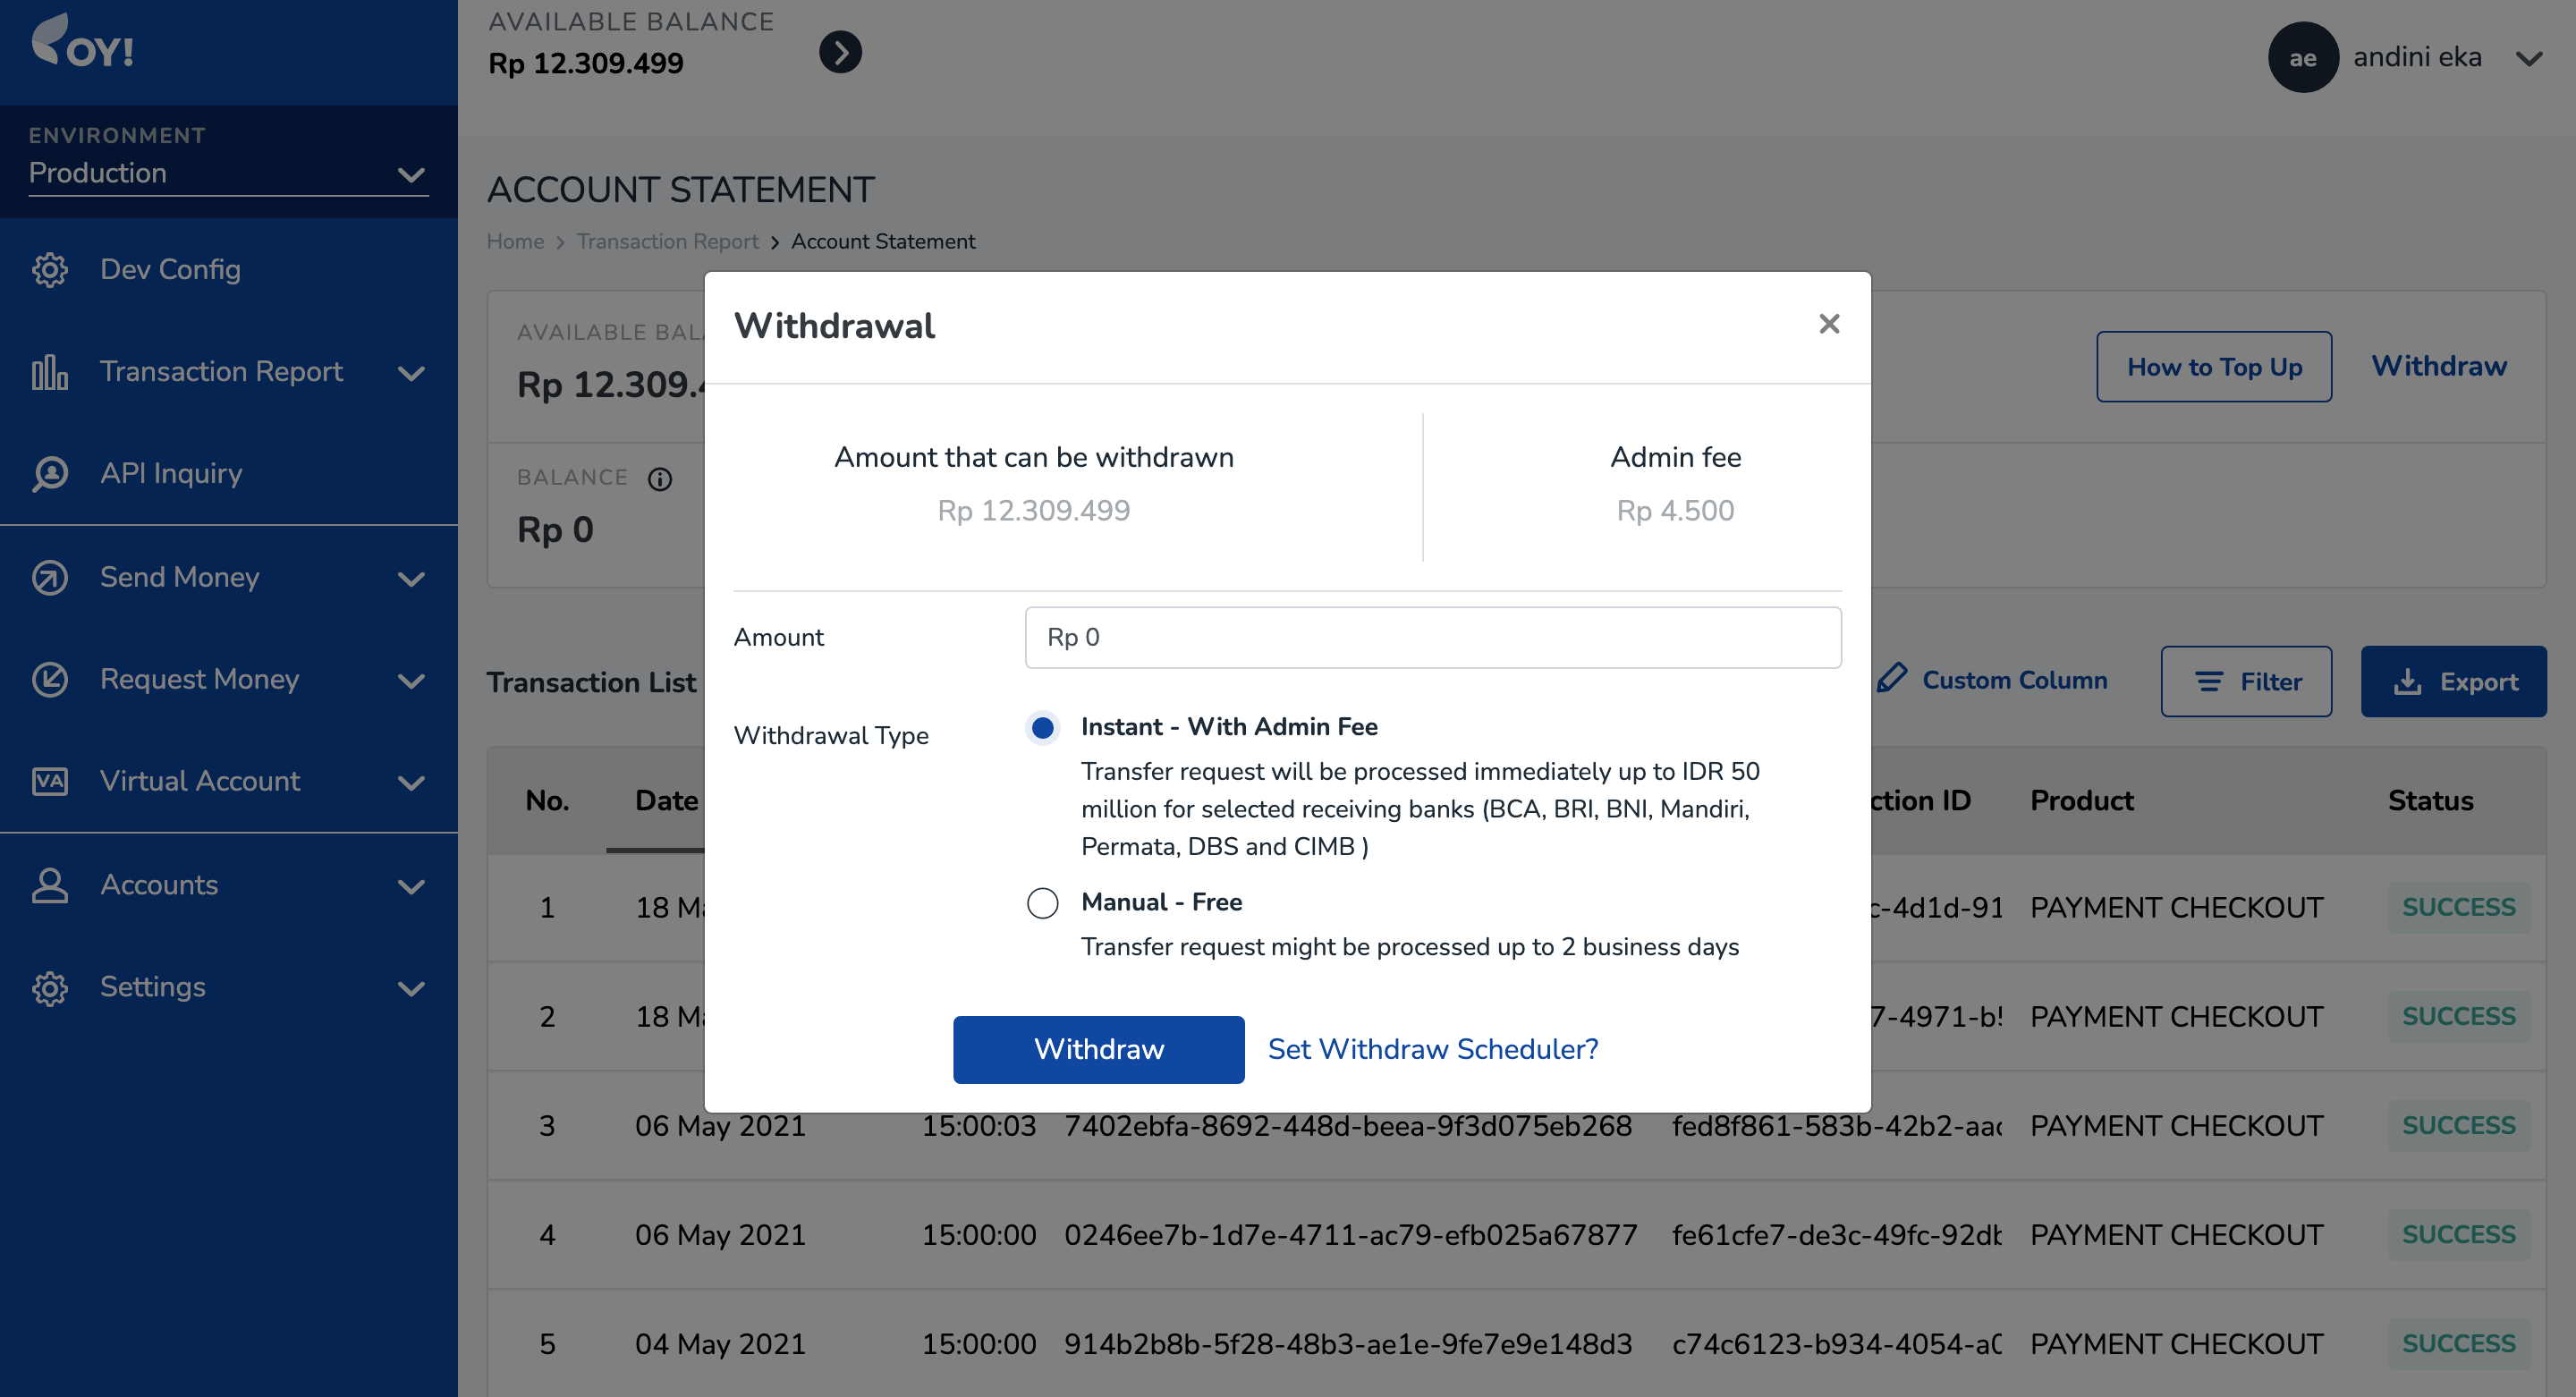
- Choose your withdrawal type. You can pick one from the following options:
- Instant with admin fee -> This means that your withdrawal will be processed and arrive into your receiving bank real-time. If the amount to be withdrawn is <= IDR 50 million and the receiving banks are BCA, BRI, BNI, Mandiri, Permata, DBS and CIMB Niaga, you can choose this option. You will be charged an admin fee if you choose this option
- Manual -> This means that your withdrawal will be processed up to 2 business days. If the amount to be withdrawn is > IDR 50 million OR the receiving banks are not BCA, BRI, BNI, Mandiri, Permata, DBS or CIMB Niaga, you have to choose this option. You will NOT be charged an admin fee if you choose this option.
Setting Up Auto Withdrawal Process
If you want to set up an Auto Withdrawal periodically, go to Settings -> Auto Withdrawal.
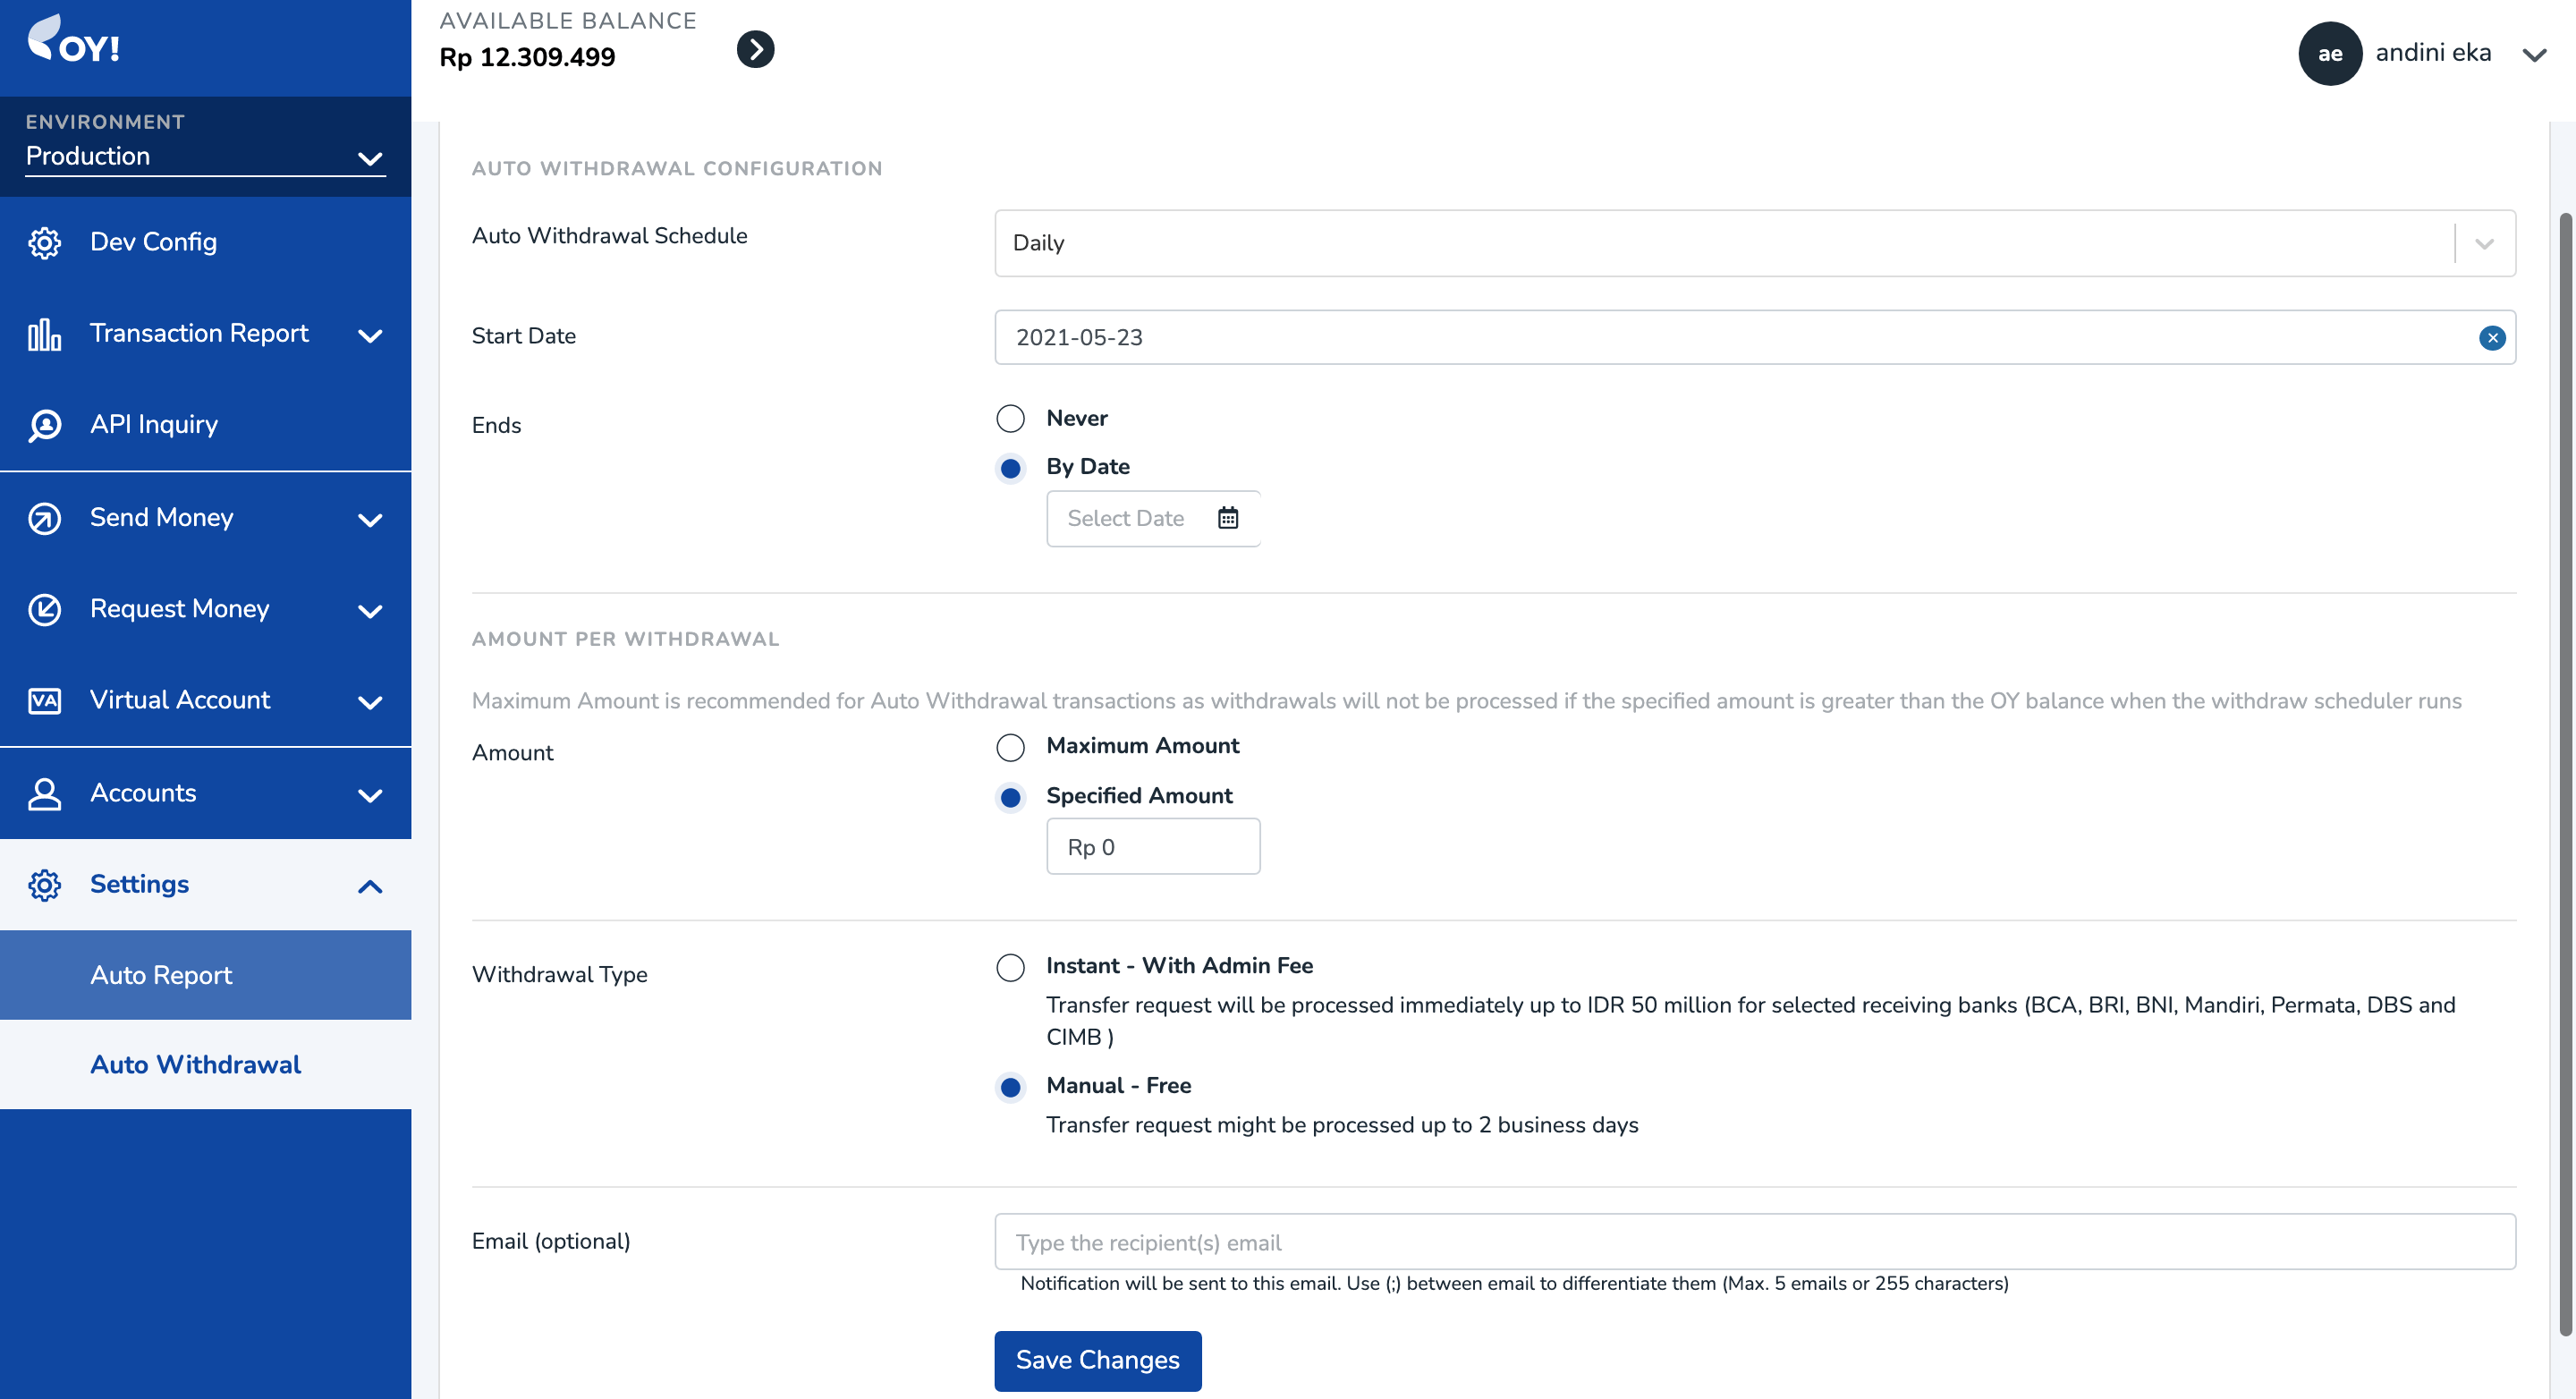
Here's how you can configure the auto withdrawal settings;
| Field Name | Description |
|---|---|
| Auto Withdrawal Schedule | The schedule of your auto withdrawal. Options available: Daily, Weekly, Bi-Weekly, Monthly |
| Start Date | Start date of your auto withdrawal schedule |
| Ends | Options available: Never -> if the auto withdrawal will go on for an indefinite time, By Date -> if the auto withdrawal will end on a specific date. If you choose this option, you need to fill in the date on which you plan to end the auto withdrawal process |
| Amount | Amount to be automatically withdrawn. Options available: Maxiitym amount -> Withdraw the maximum available balance, Specified Amount -> custom specified amount. Note: Maximum Amount is recommended for Auto Withdrawal transactions as withdrawals will not be processed if the specified amount is greater than the OY balance when the withdraw scheduler runs |
| Withdrawal Type | Options available: 1) Instant, or 2) Manual. |
| An email we will send the notification to. Use (;) between email to differentiate them (Max. 5 emails can be inputted) |
Transaction Report - Settlement Report
Settlement Report stores the list of transactions corresponding to payment methods that are not settled on a real-time basis (delayed settlement). For example, if for VA BCA the settlement time is H+2, each new VA BCA transaction performed by your customers will appear on the Settlement Report.
To access the Settlement report;
- Login to Dashboard
- Go to Transaction Report -> Settlement Report
The Settlement Report consists of the following information;
- Total Amount to be Settled Today: This tells you the sum of amount scheduled to be settled to your account statement balance today
- Total Delayed Settlement Amount: This tells you the sum of amount not yet settled to your account statement. (the settlement status is still not SUCCESS)
- The Settlement Transaction List Table
| Field Name | Description | Example |
|---|---|---|
| Transaction Date | The date on which your customer performs the transaction | 11 May 2021 |
| Transaction Time | The time at which your customer performs the transaction | 17:44:09 |
| Transaction ID | A unique transaction ID given by OY | d4b26687-34b9-43d3-9d08-af440bcbaca7 |
| Partner Transaction ID | A unique transaction ID that is assigned by you for a given transaction | TXID_001 |
| Product | The product associated with a given transaction. This will be filled with VIRTUAL_ACCOUNT if the transaction comes from Virtual Account Aggregator product, or PAYMENT_CHECKOUT if the transaction comes from Payment Link product | VIRTUAL_ACCOUNT |
| Payment Method | The payment method associated with a given transaction. Possible values: VA [Bank Name], CARDS, QRIS, EWALLET SHOPEEPAY | VA BCA |
| Transfer Amount | The transaction amount (before getting deducted with admin fee | +Rp 10.000 |
| Admin Fee | The admin fee associated with a given transaction | -Rp 1.000 |
| Total Amount | The transaction amount that has been deducted with admin fee | +9,000 |
| Settlement Date | The scheduled settlement date for a given transaction | 12 May 2021 |
| Settlement Time | The scheduled settlement timestamp for a given transaction | 15:00:00 |
| Settlement Status | The settlement status for a given transaction. Possible values: WAITING (if the amount is not yet settled to your account statement balance), SUCCESS (if the amount has been settled to your account statement balance). | SUCCESS |
If the Settlement Status of a transaction is still WAITING, it will not yet appear as a row in your Account Statement report and the amount will not yet be added in your Account Statement balance.
If the Settlement Status of a transaction is already SUCCESS, it will appear as a row in your Account Statement report and the amount will be added in your Account Statement balance.
Callback for Delayed Settlement (Non-Real Time Settlement)
If your settlement is non-real time, for every transaction whose payment method is settled H+>0, you will receive two callbacks with details as follows:
- 1st Callback -> To be sent after your customer successfully executes the transaction. For example, if your customer executes the transaction on 11 May 2021 at 14:00:00, that is also when we send the 1st Callback to you. In the 1st callback, the settlement status is set to WAITING (because it is not yet settled to your Account Statement balance)
- 2nd Callback -> To be sent after the settlement status is changed from WAITING into SUCCESS. For example, if the settlement status is changed into SUCCESS on 12 May 2021 at 15:00:00, that is also when we send the 2nd Callback to you. In the 2nd callback, the settlement status is SUCCESS
Capability to Export and Filter the Settlement Report
Export: You are able to export/download the settlement report in CSV, PDF, and XLSX.
Filter: You are able to filter the settlement report by transaction date (range), product, payment method, settlement date (range), and settlement status
Notification
You can enable or disable notification settings for low balance, send money products and receive money products if you have a super admin or admin role:
- Login to dashboard https://business.oyindonesia.com/
- Go to Settings -> Notification
- If you want to notified by email if your balance is low, set in the "Low Balance" tab. Input the amount threshold and the email where the notification will be sent to.
- Choose whether or not you want notifications enabled or disabled for Bulk Disbursement or API Disbursement. a. Enable Notification: Email notification will be sent for pending, failed and success transactions. b. Disable Success Notification: email notification will only be sent for pending and failed transactions.
- Choose whether or not you want notifications enabled or disabled for Payment Link, or VA. a. Enable Notification: Email notification will be sent for success transactions. b. Disable Success Notification: No email notification will be sent.
- The email field: allows the user to add, remove, and edit email notification receivers in this column, which can hold up to three email addresses.
- Click ‘Save Changes’

Multi Entity Management
Multi Entity Management is a feature that can help you handle complex relations between entities in your business in the OY! Dashboard. You can connect to other entities in the form of Main Entity - Sub Entities (1 to N relationship). The one who become the Main Entity will have a capability to oversee te sub-entities' transaction and execute transaction using its sub-entities' balance. Please contact our Business Development if you’re interested to use this feature.
With this feature you will be able to :
- Have a detailed report on transactions performed by all of sub-entity account.
- Distribute balance between the main entity account to sub-entity account.
- Use sub-entity account balance to disburse funds.
- Receive money using Payment Link on behalf of sub-entity's username.
- Free admin fee to disburse between related user.
Registration & Setup
Prerequisites
- Register an account on the OY! dashboard
- Activate your account through the activation link sent via email
- Upgrade your account
- Upgrade request is approved
- Contact our representatives to enable the feature
How To Use
To properly used Multi Entity Management, we required several accounts to be linked together. Each account can be used independently, and there will be some requirements that you should fulfil in order to use this feature. Please contact our representatives for more information.
A. Link to Sub-entity Account
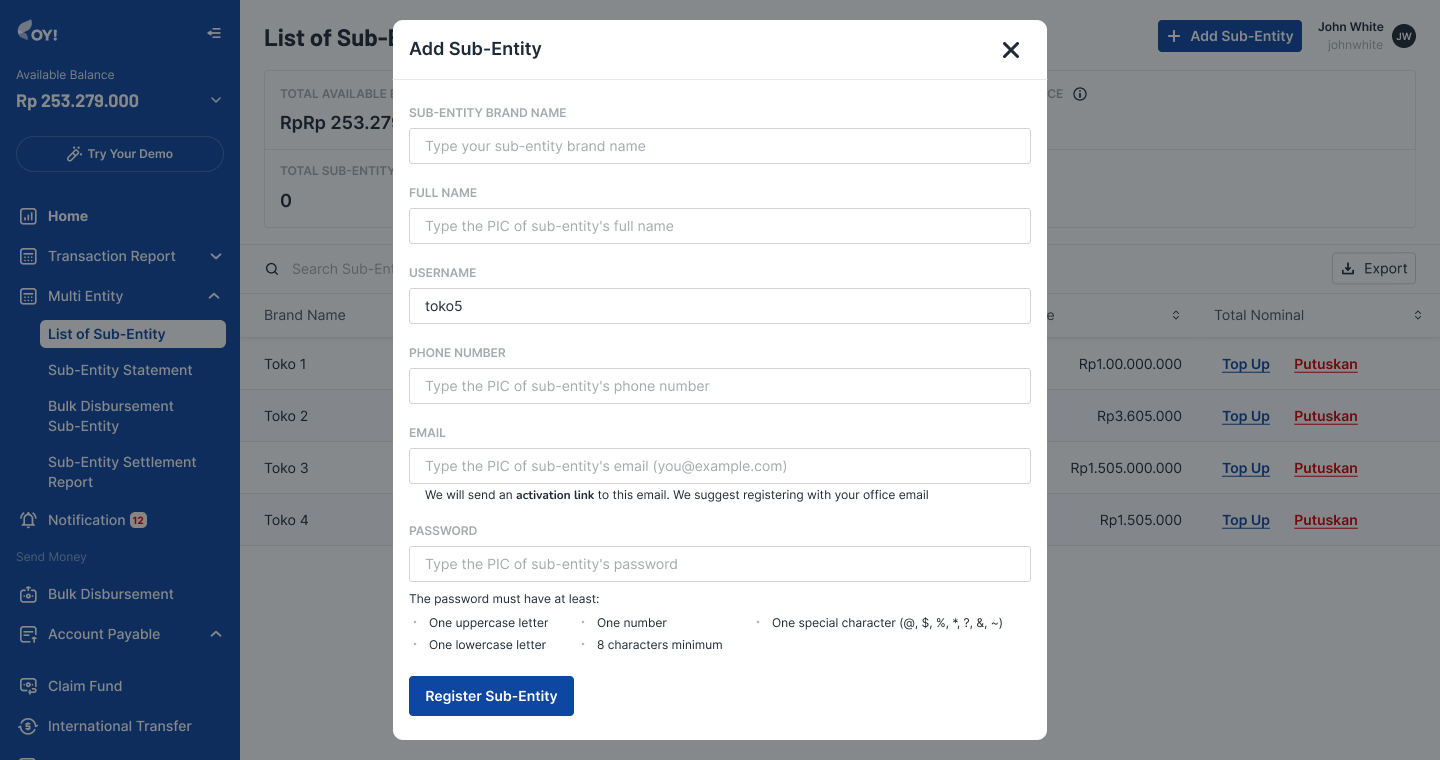
- For Main Entity Account
To add a new sub-entity,please 1) Log in to Dashboard with main account credential 2) Go to Multi Entity → List of Sub-entity
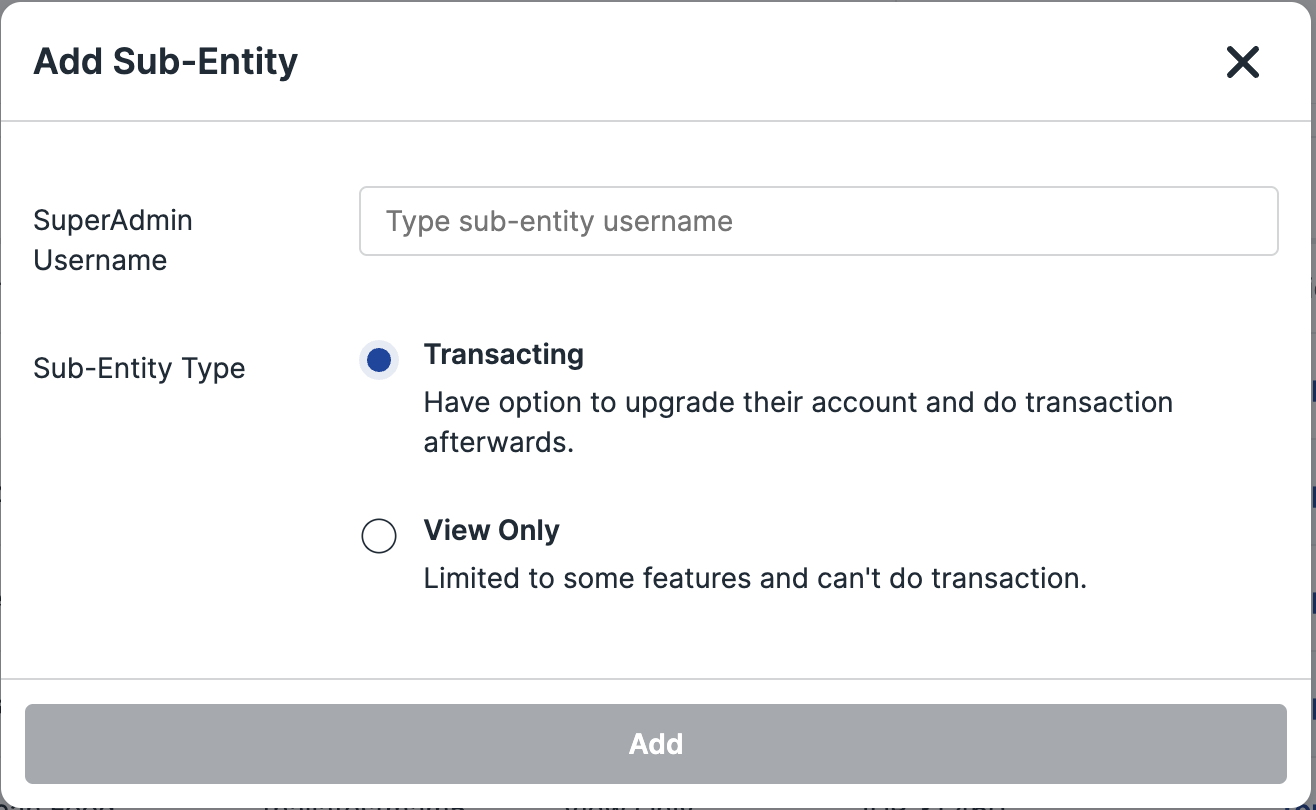
- Click the “+ Add Sub-Entity
- Fill in the username for the sub-entity you wished to connect. You can find your username from the menu Accounts → User Profile in the Username section
- Click Add and then if the account is found in the system you can confirm by clicking Connect in the confirmation window
 After confirming, the request will be sent to the respective account to be accepted
- For Sub-entity Account
To receive a request from a main entity , please 1) Log in to dashboard with child credential 2) Go to Transaction Report → Account Statement
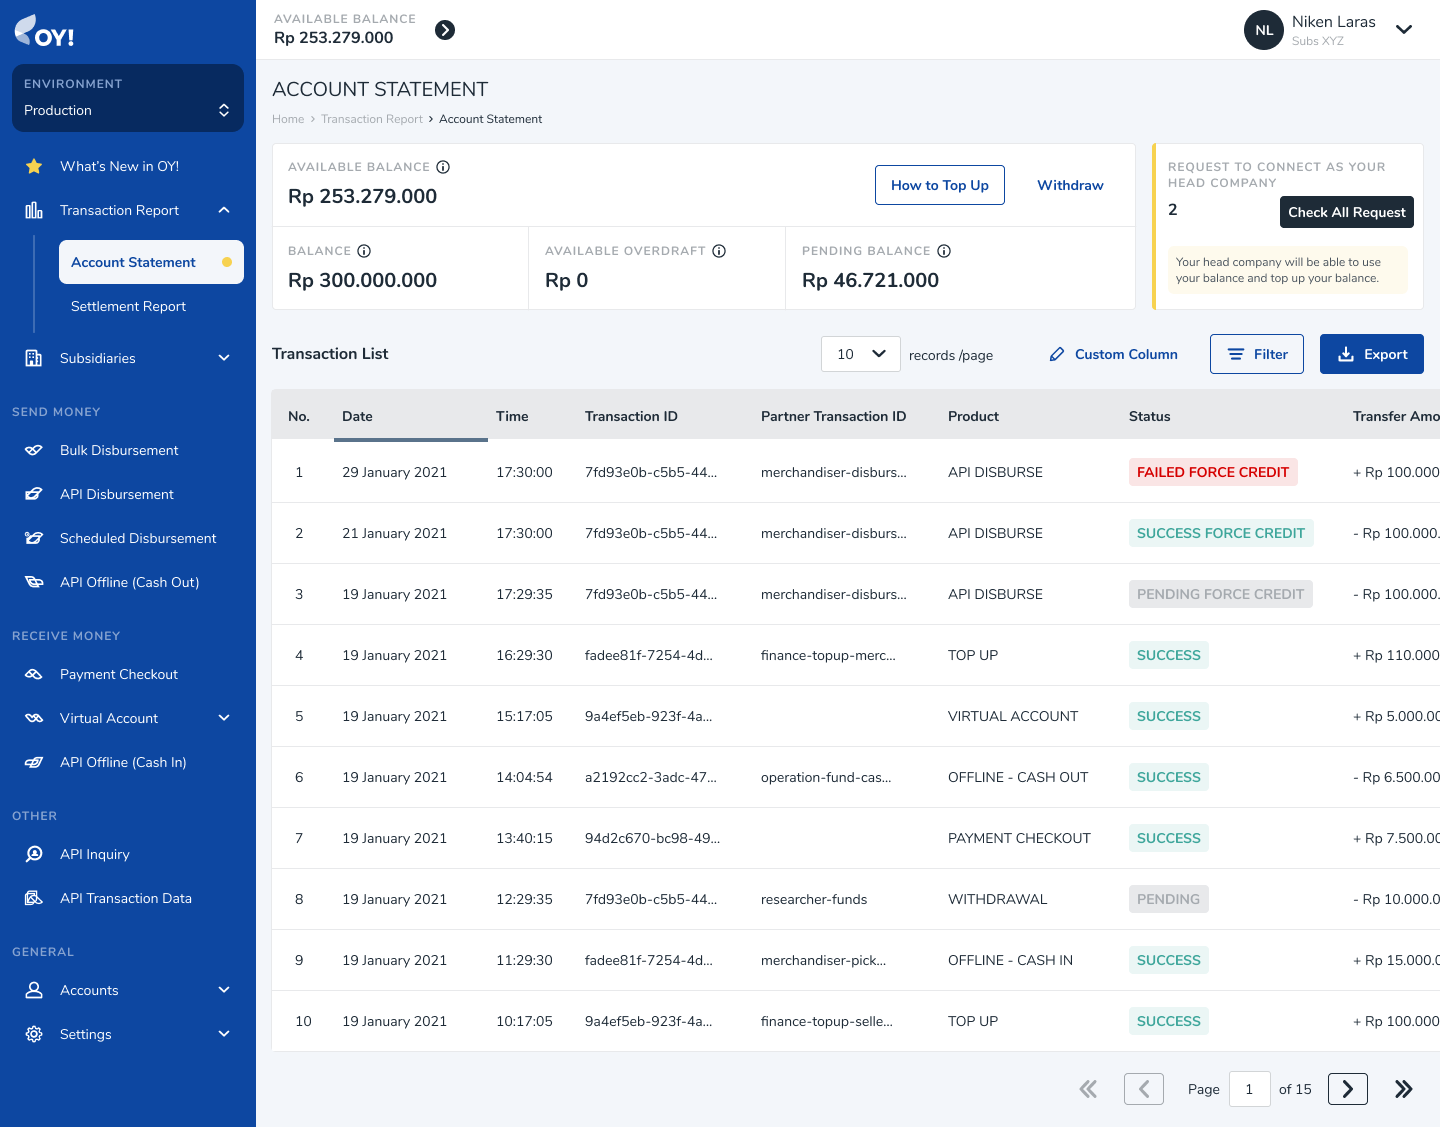
- Click the “Check All request” button that can be found near the top right corner of the page
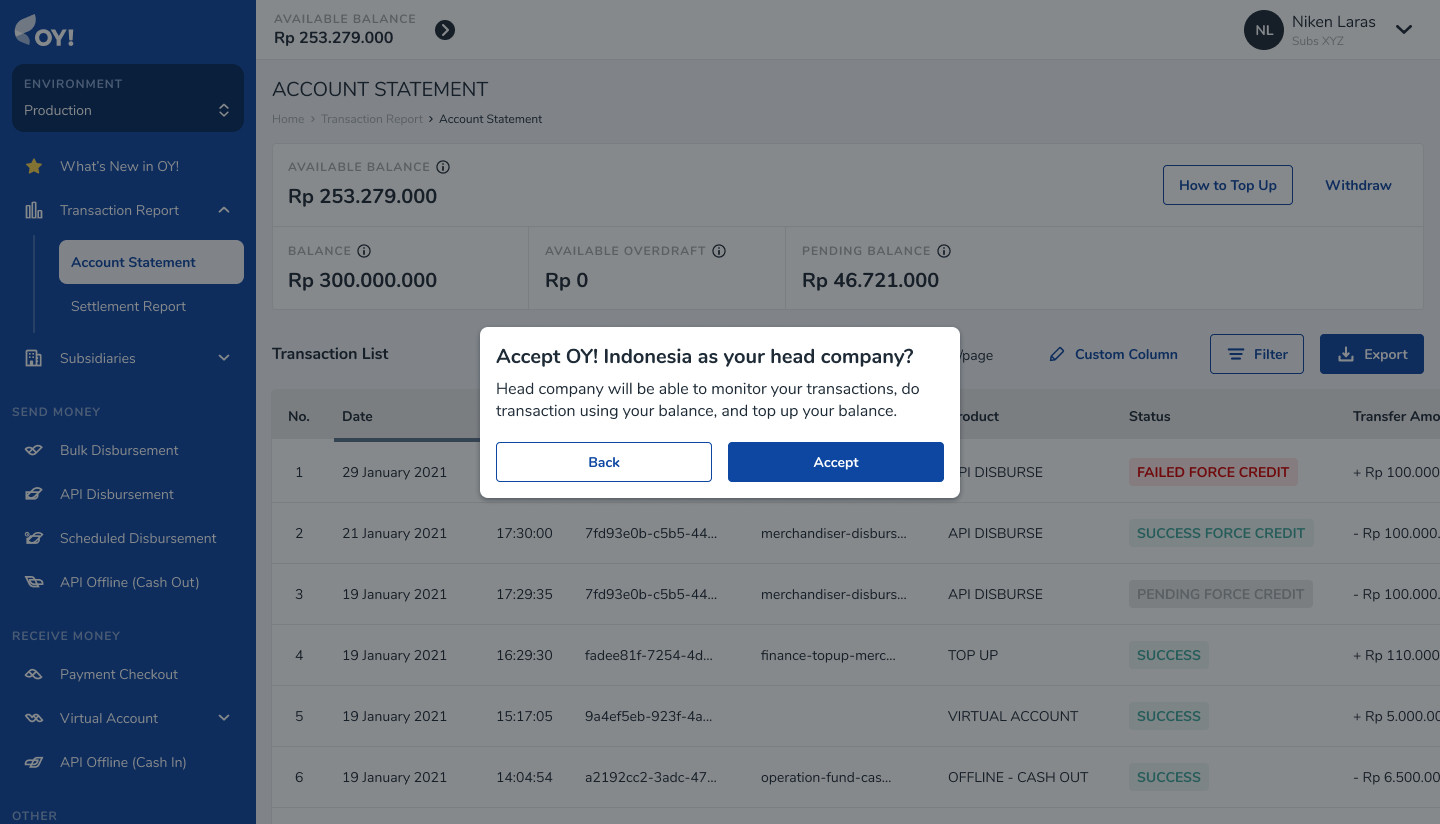
- You will see the incoming request to be the main entity account for your account, then you can choose which account is the correct account for the main entity by click Accept in the respective account and confirmation window

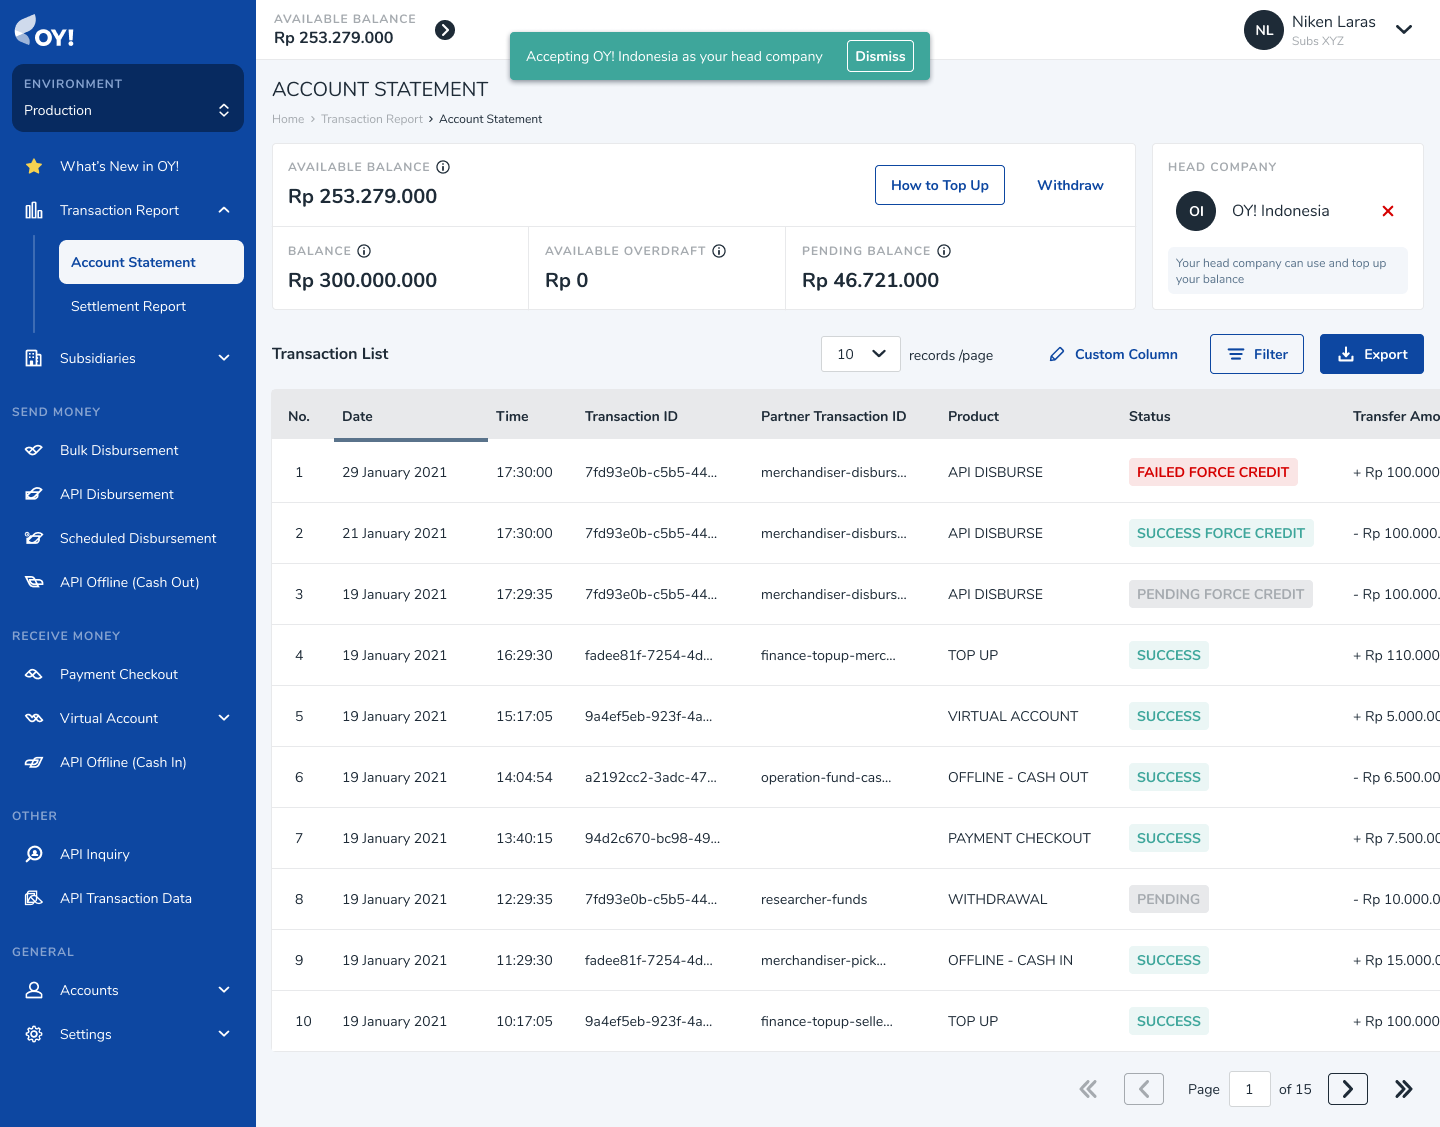
- After successfully received the main entity request to connect, you will find your parent information near the top right corner of your page, and you are now connected with your main entity.
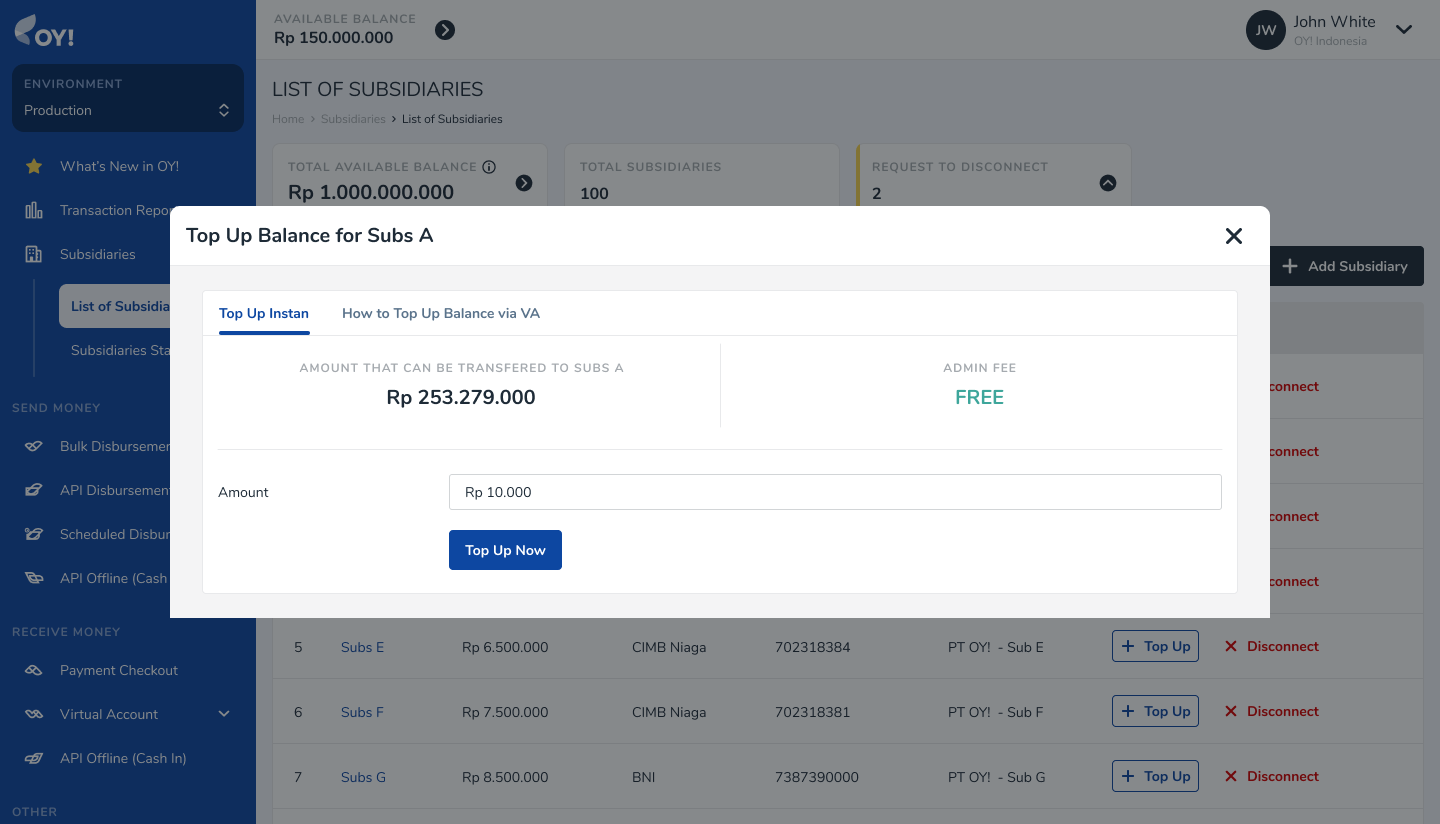
B. Topup money to a sub-entity account
After connected with your sub-entities, you can transfer money to the sub-entity account by accessing the menu Multi Entity → List of Sub-entity 1. Find the account that you wished to top-up 2. Click the “+ Top Up” button 3. Fill in the amount you wish to top-up 4. Click the “Top Up Now” button to proceed 5. You can also do Top Up by transfer to one of the VA provided (see “How to Top Up Balance via VA”
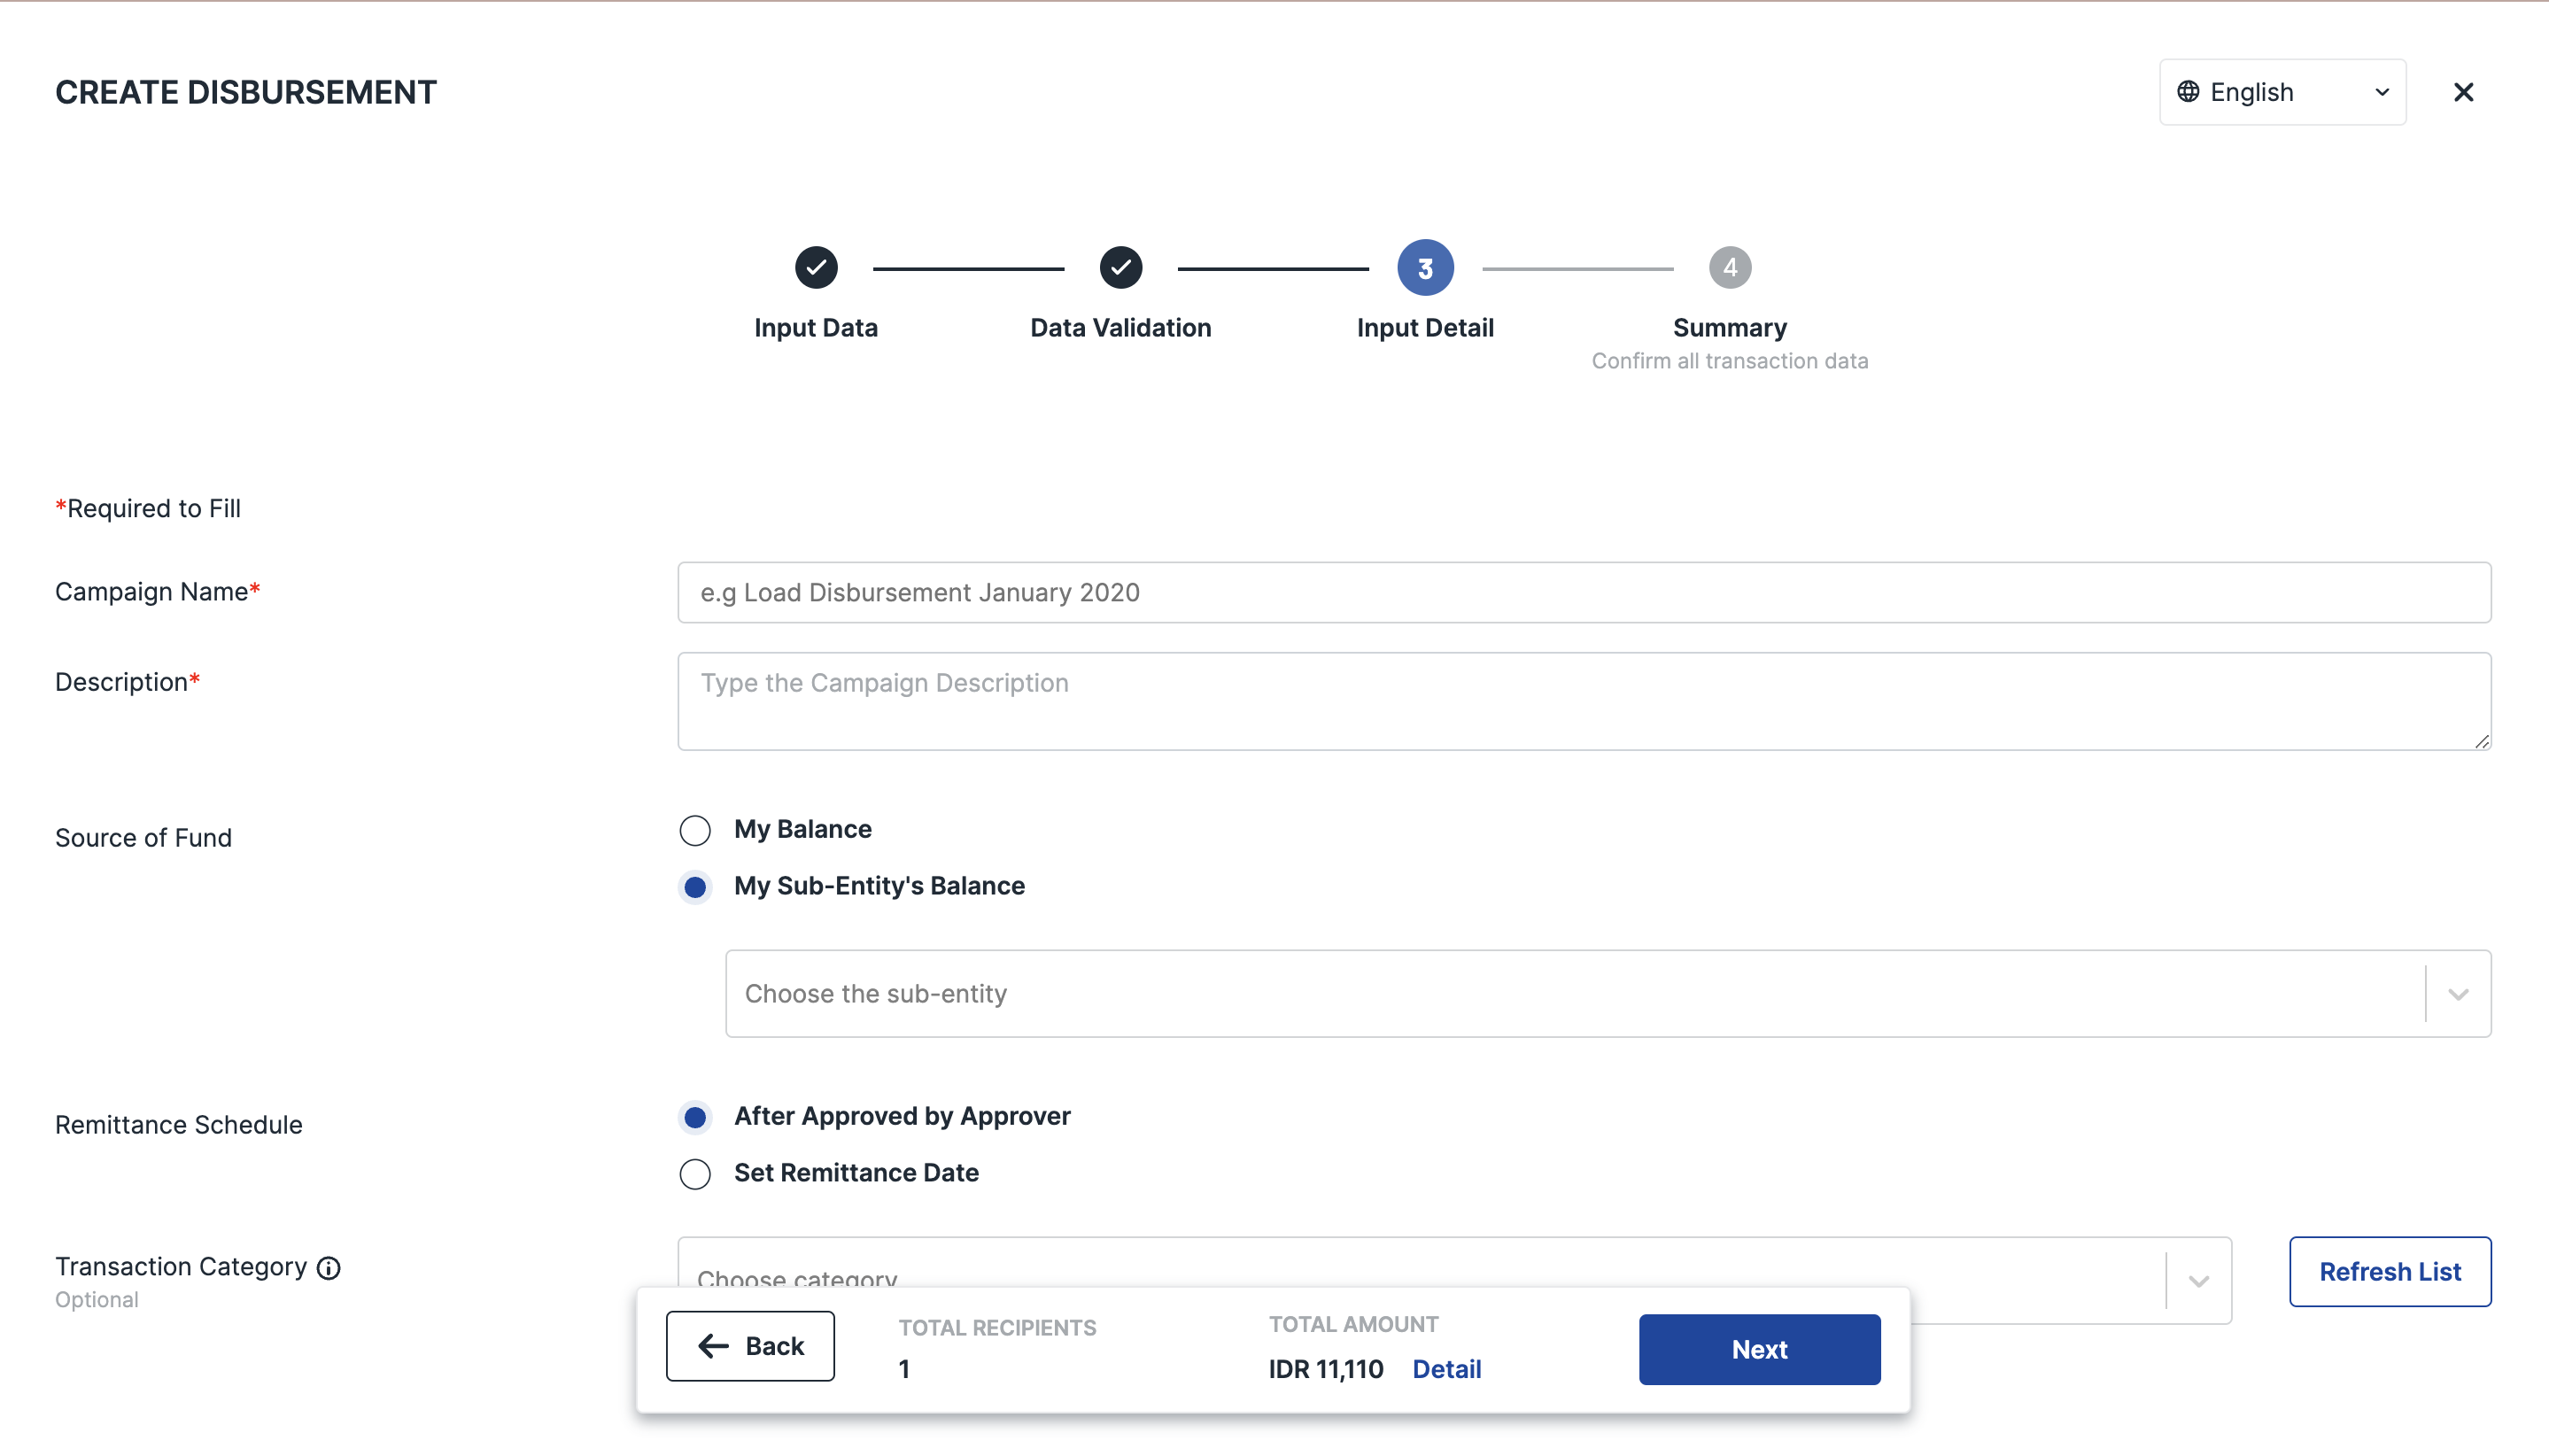
C. Disburse Money using a sub-entity's balance
In Multi Entity Management, you will be able to do disbursement using your sub-entity account on their behalf. To do this you could
- Access the Bulk Disbursement menu and clicking on “+ Create Disbursement” button
- Select your sub-entity balance as a source of fund to do disbursement by selecting “My Sub-entity Balance” and choose the appropriate account.
- After choosing the balance you could proceed to do disbursement just like regular disbursement
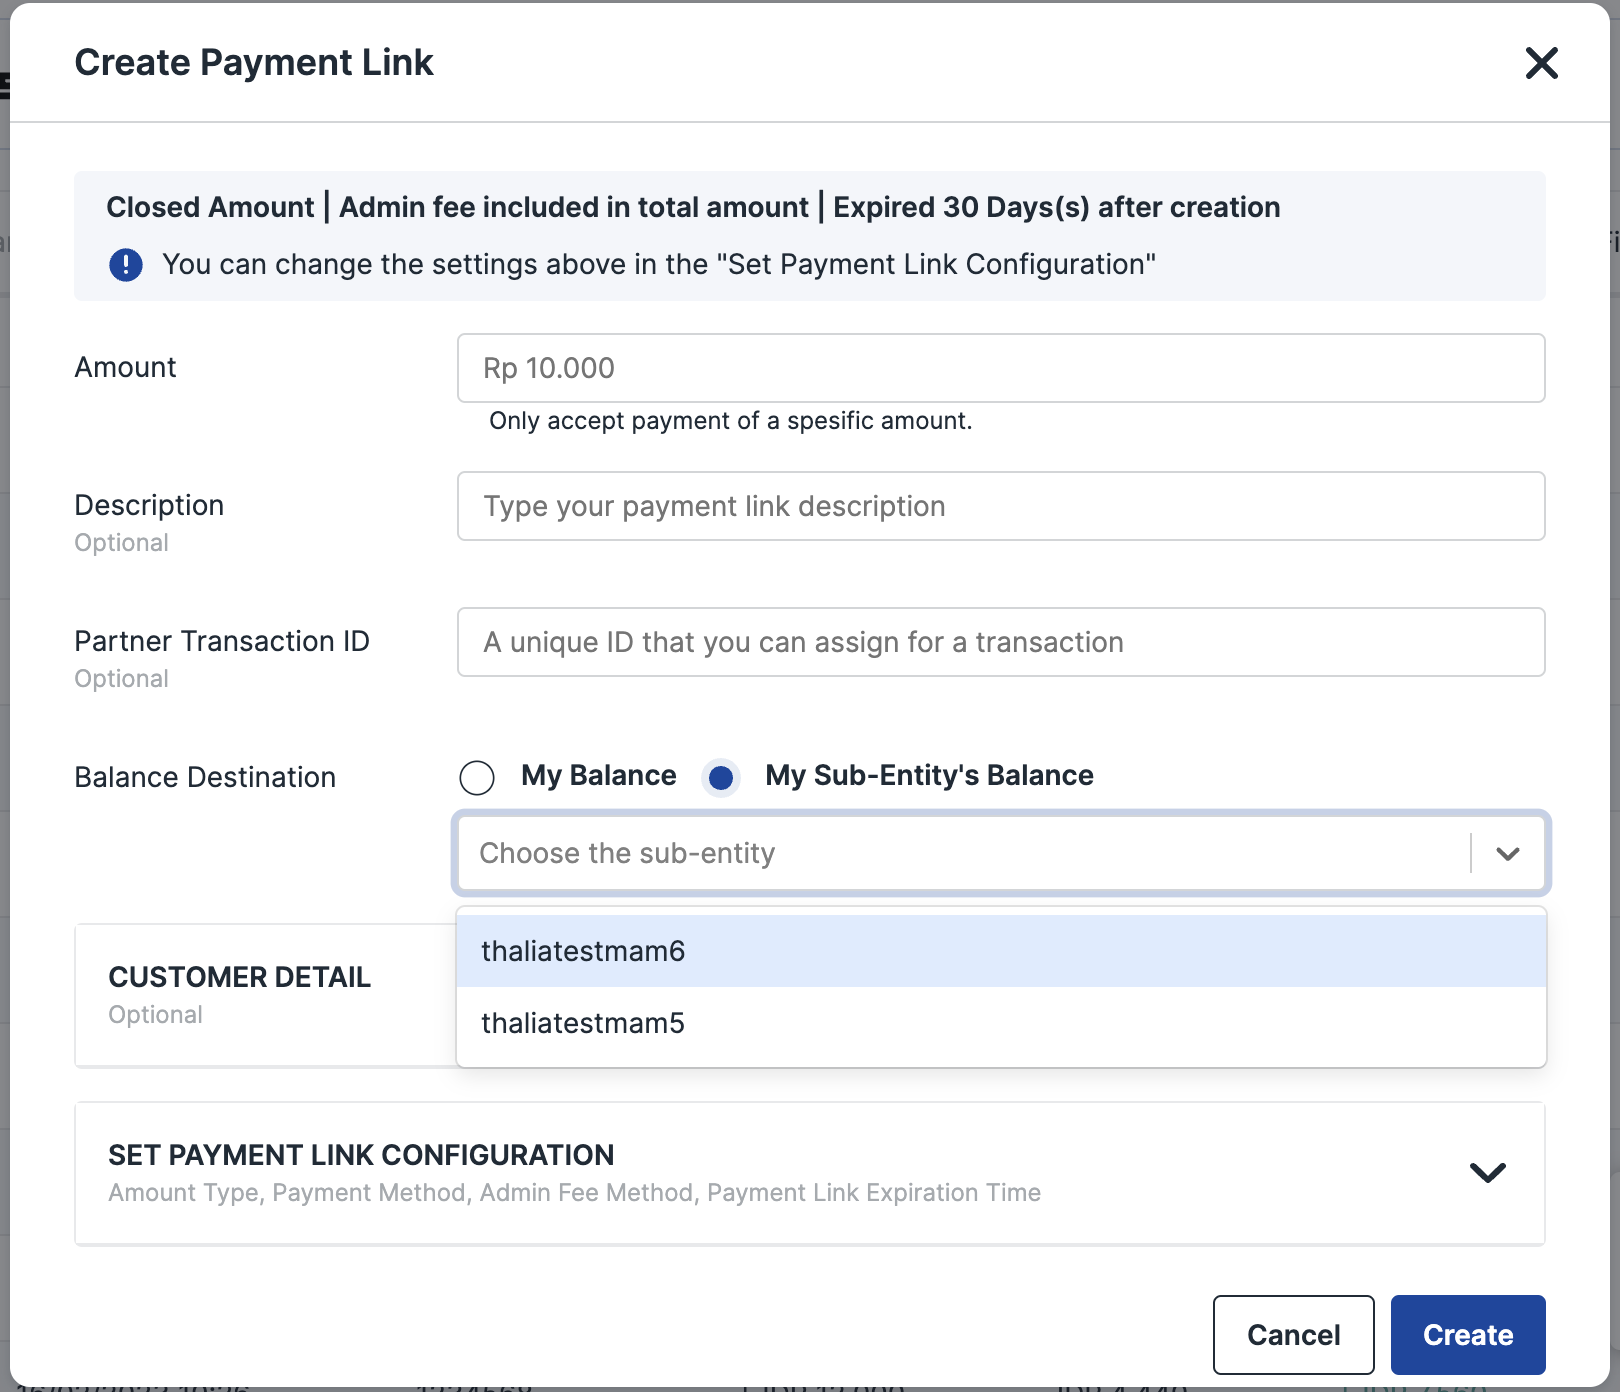
D. Create a payment link on behalf of a sub-entity account
With this feature, you will be able to accept payment from your users through Payment Link created on behalf of your sub-entity account. When your users make a successful transaction, the transaction will be recorded in the Sub-entity Account's balance. As a main entity, you are equipped with the ability to view the Sub-entity Account's balance and transaction list anytime through Multi Entity → Sub-entity Statement.
Follow the below steps to create a payment link on behalf of a sub-entity account:
Via API
Hit API Create Payment Link and fill in "child_balance" parameter with the username of a sub-entity account that you will set as the balance destination for the transaction. When your users make a successful transaction, the transaction will be recorded in the specified Sub-entity Account's balance.
Via Dashboard
- Click Payment Link -> One-time (if you want to create a one-time payment link) or Click Payment Link -> Reusable (if you want to create a reusable payment link)
- Click "Create One-Time Link" (for one-time payment link) or click "Create Reusable Link" (for reusable payment link)
- You will see a pop-up to proceed with the creation process
- Fill in "Balance Destination" with "My Balance" (if the balance destination of the transaction is your own) or "Sub-entity Balance" (if the balance destination of the transaction is your sub-entity's). If you select "Sub-entity Balance", you will see a dropdown to select a username of the sub-entity account. Only 1 sub-entity account is currently allowed to be a balance destination
- If you select "Sub-entity Balance", when your users make a successful transaction, the transaction will be recorded in the specified Sub-entity Account's balance.
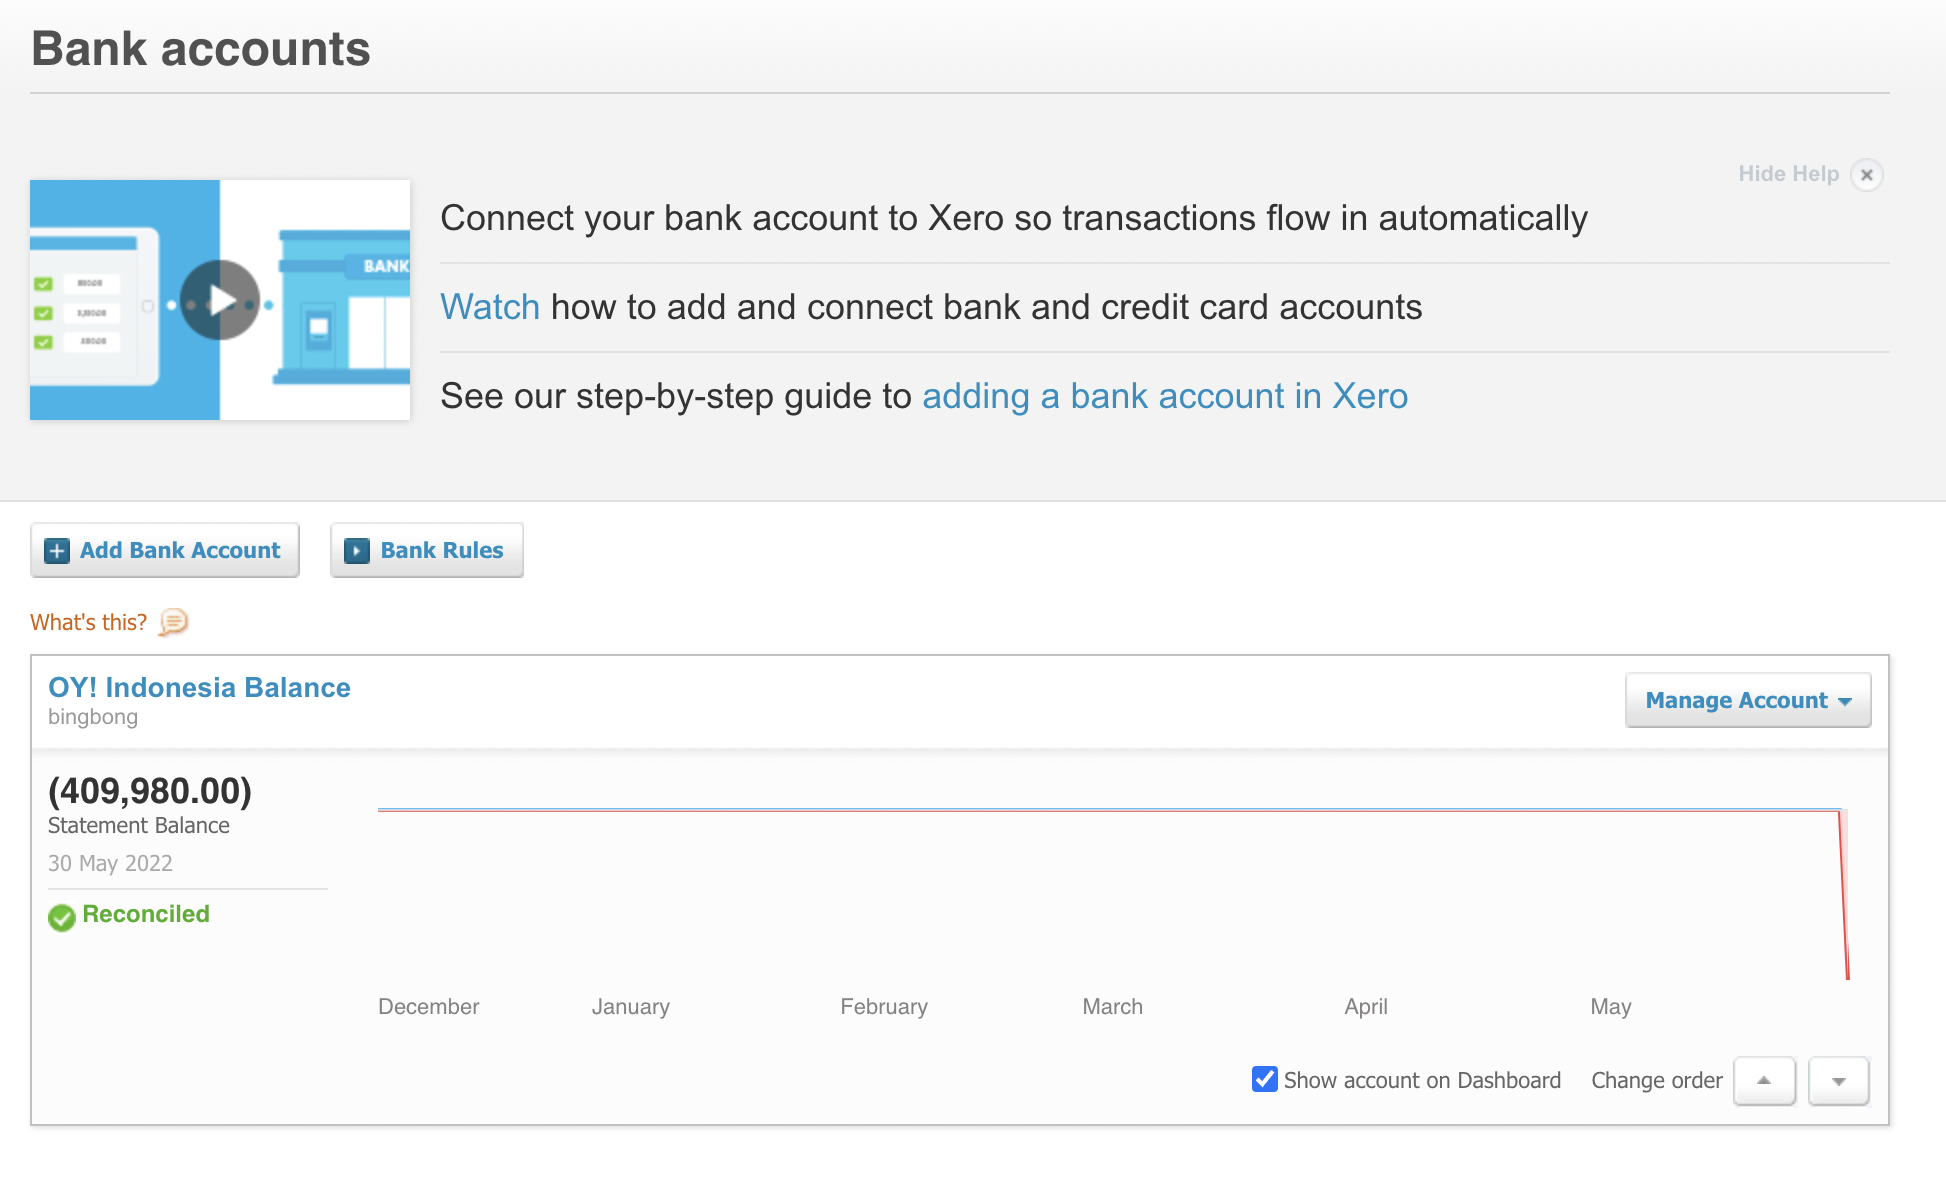
Xero Integration
Xero is an accounting platform that is mainly used by companies. We have integrated our system to Xero system in order to help you optimize your workflow. By connecting your OY! account to your Xero account, you do not have to login to your Xero account. Means that you do not have to manually record your transaction that happened in OY! to Xero. You will get seamless experience of recording your transaction.
How does it works?
Once you have connected your Xero account in OY!, any transaction that happened in OY! will be automatically recorded to your Xero tenant account. Upon successful connection, we will trigger creation of new Bank Account, which is OY! Balance Bank Account. Any transaction that happened in OY! will be recorded in that bank account, to SPEND or RECEIVE money transaction. Then, you will be required to map your Xero’s Chart of Account. Mapping your Chart of Accounts will help us to put your transaction into a correct Account.
Connect your Xero
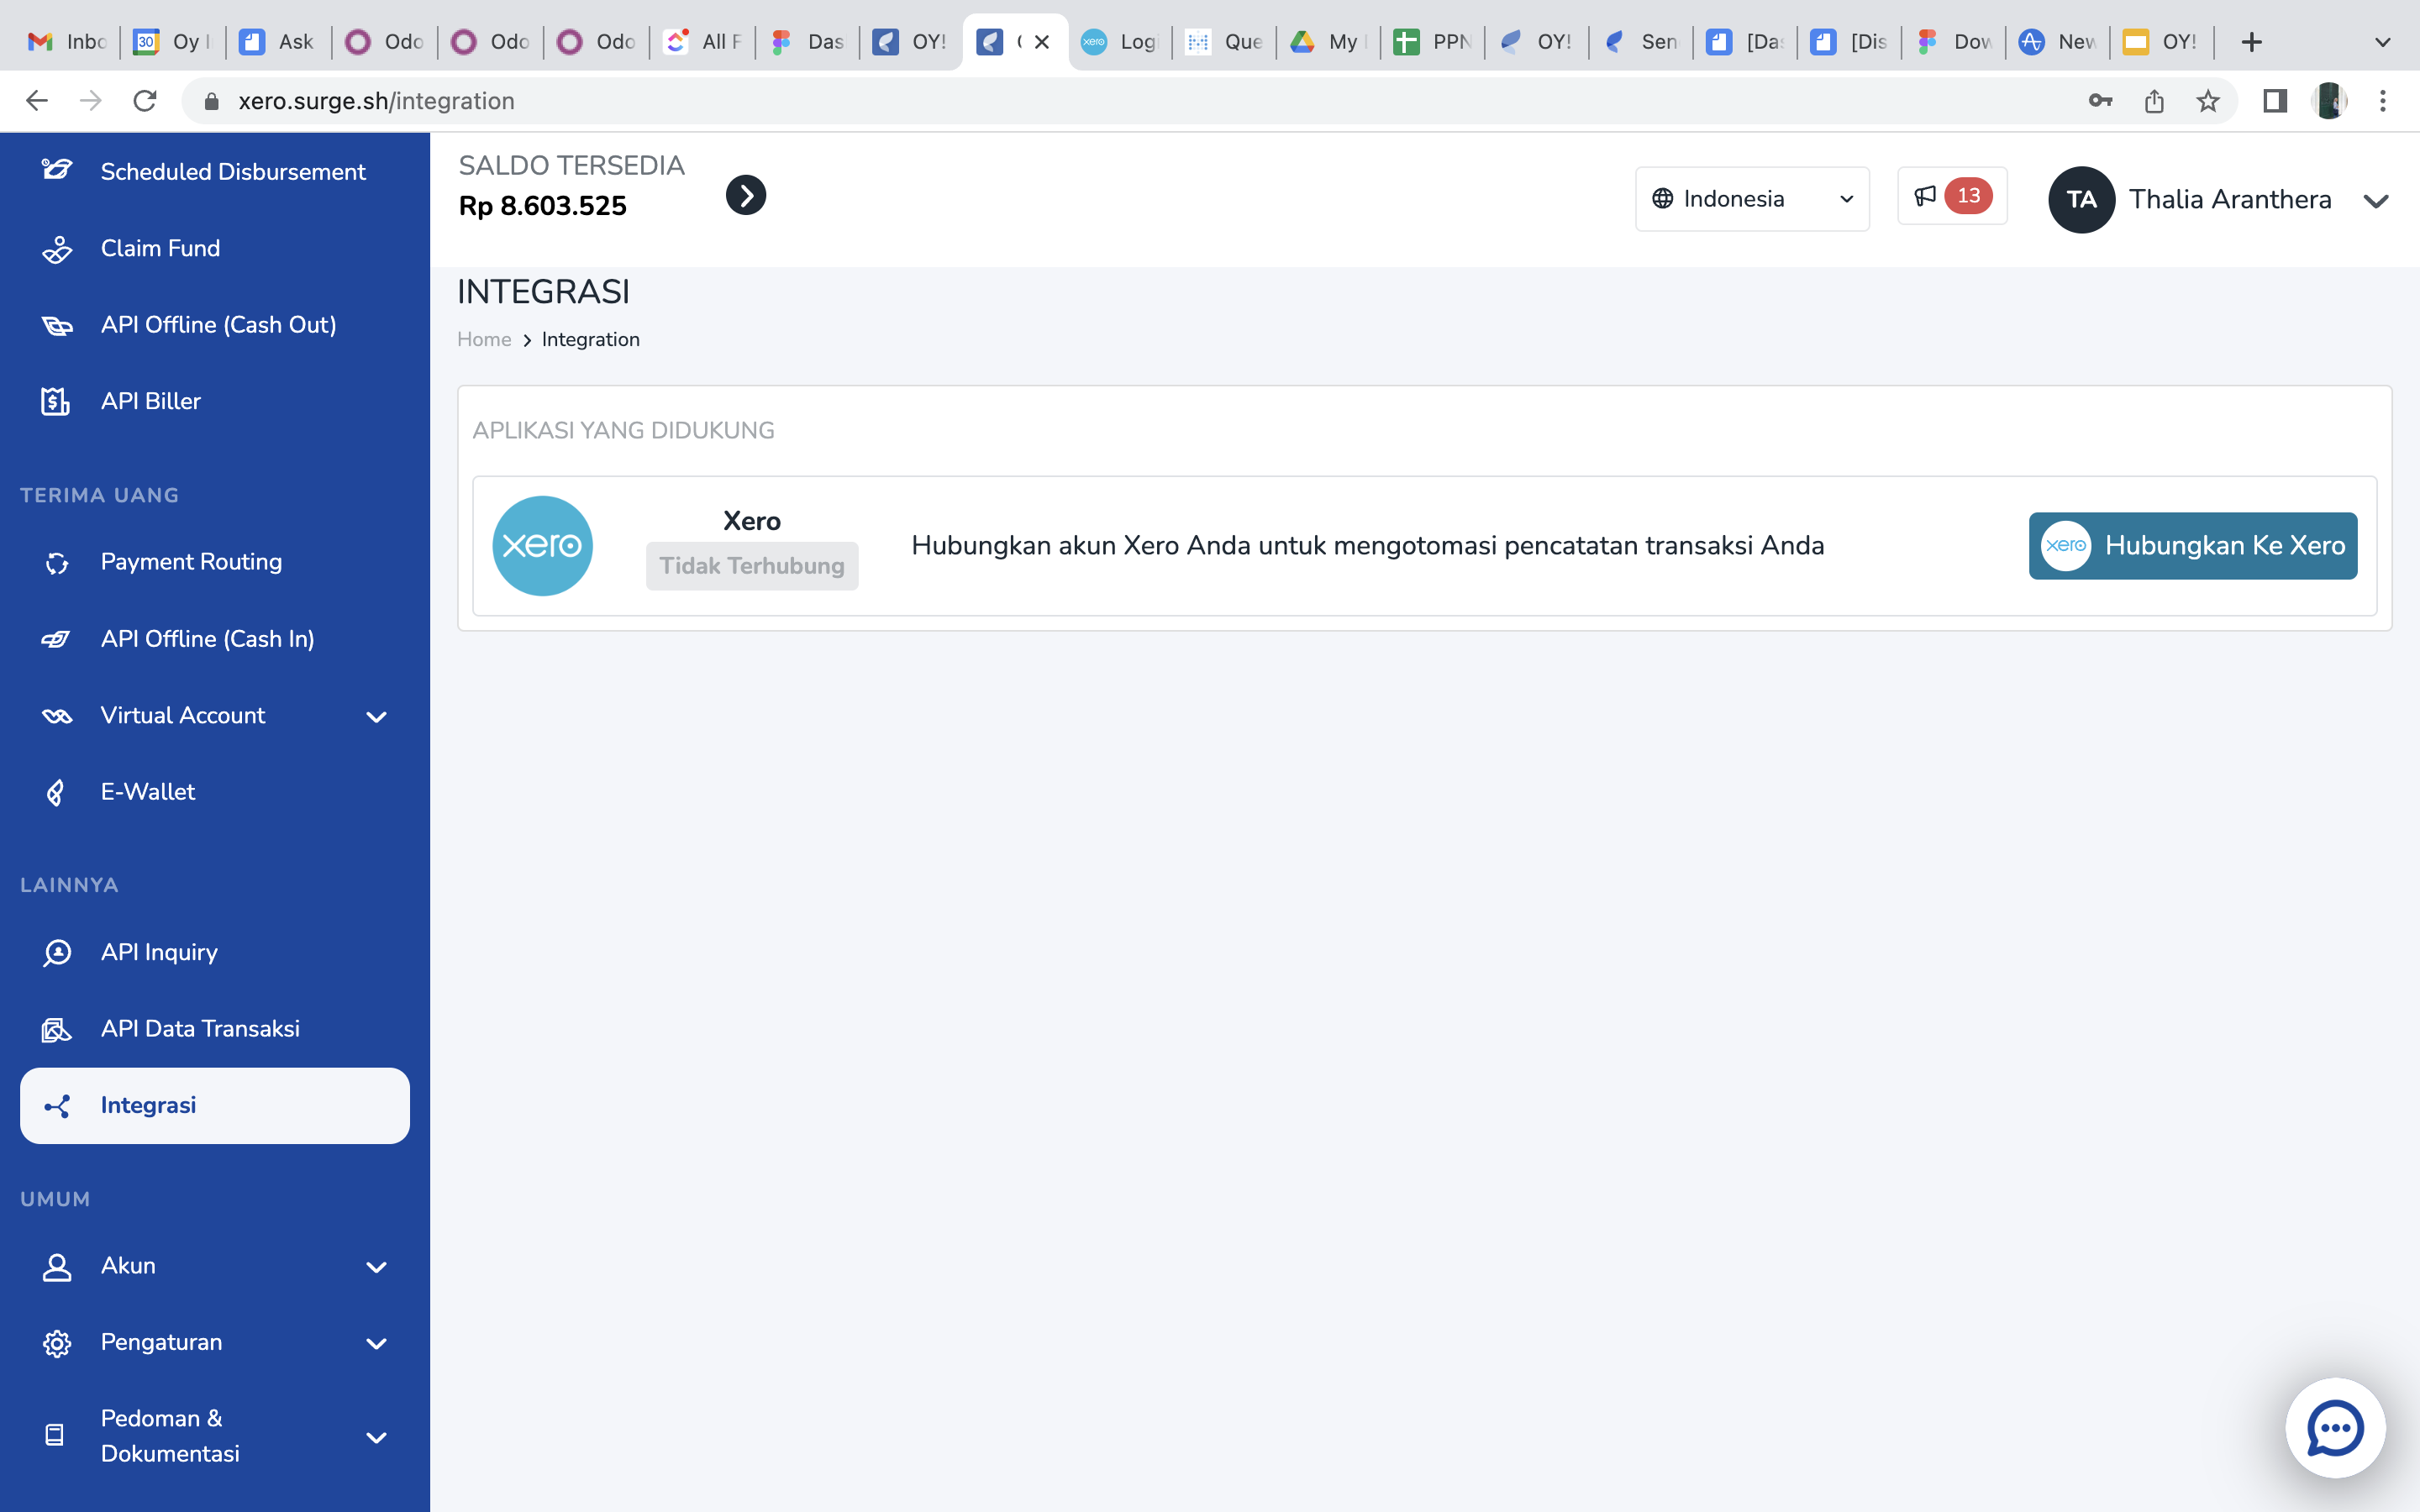
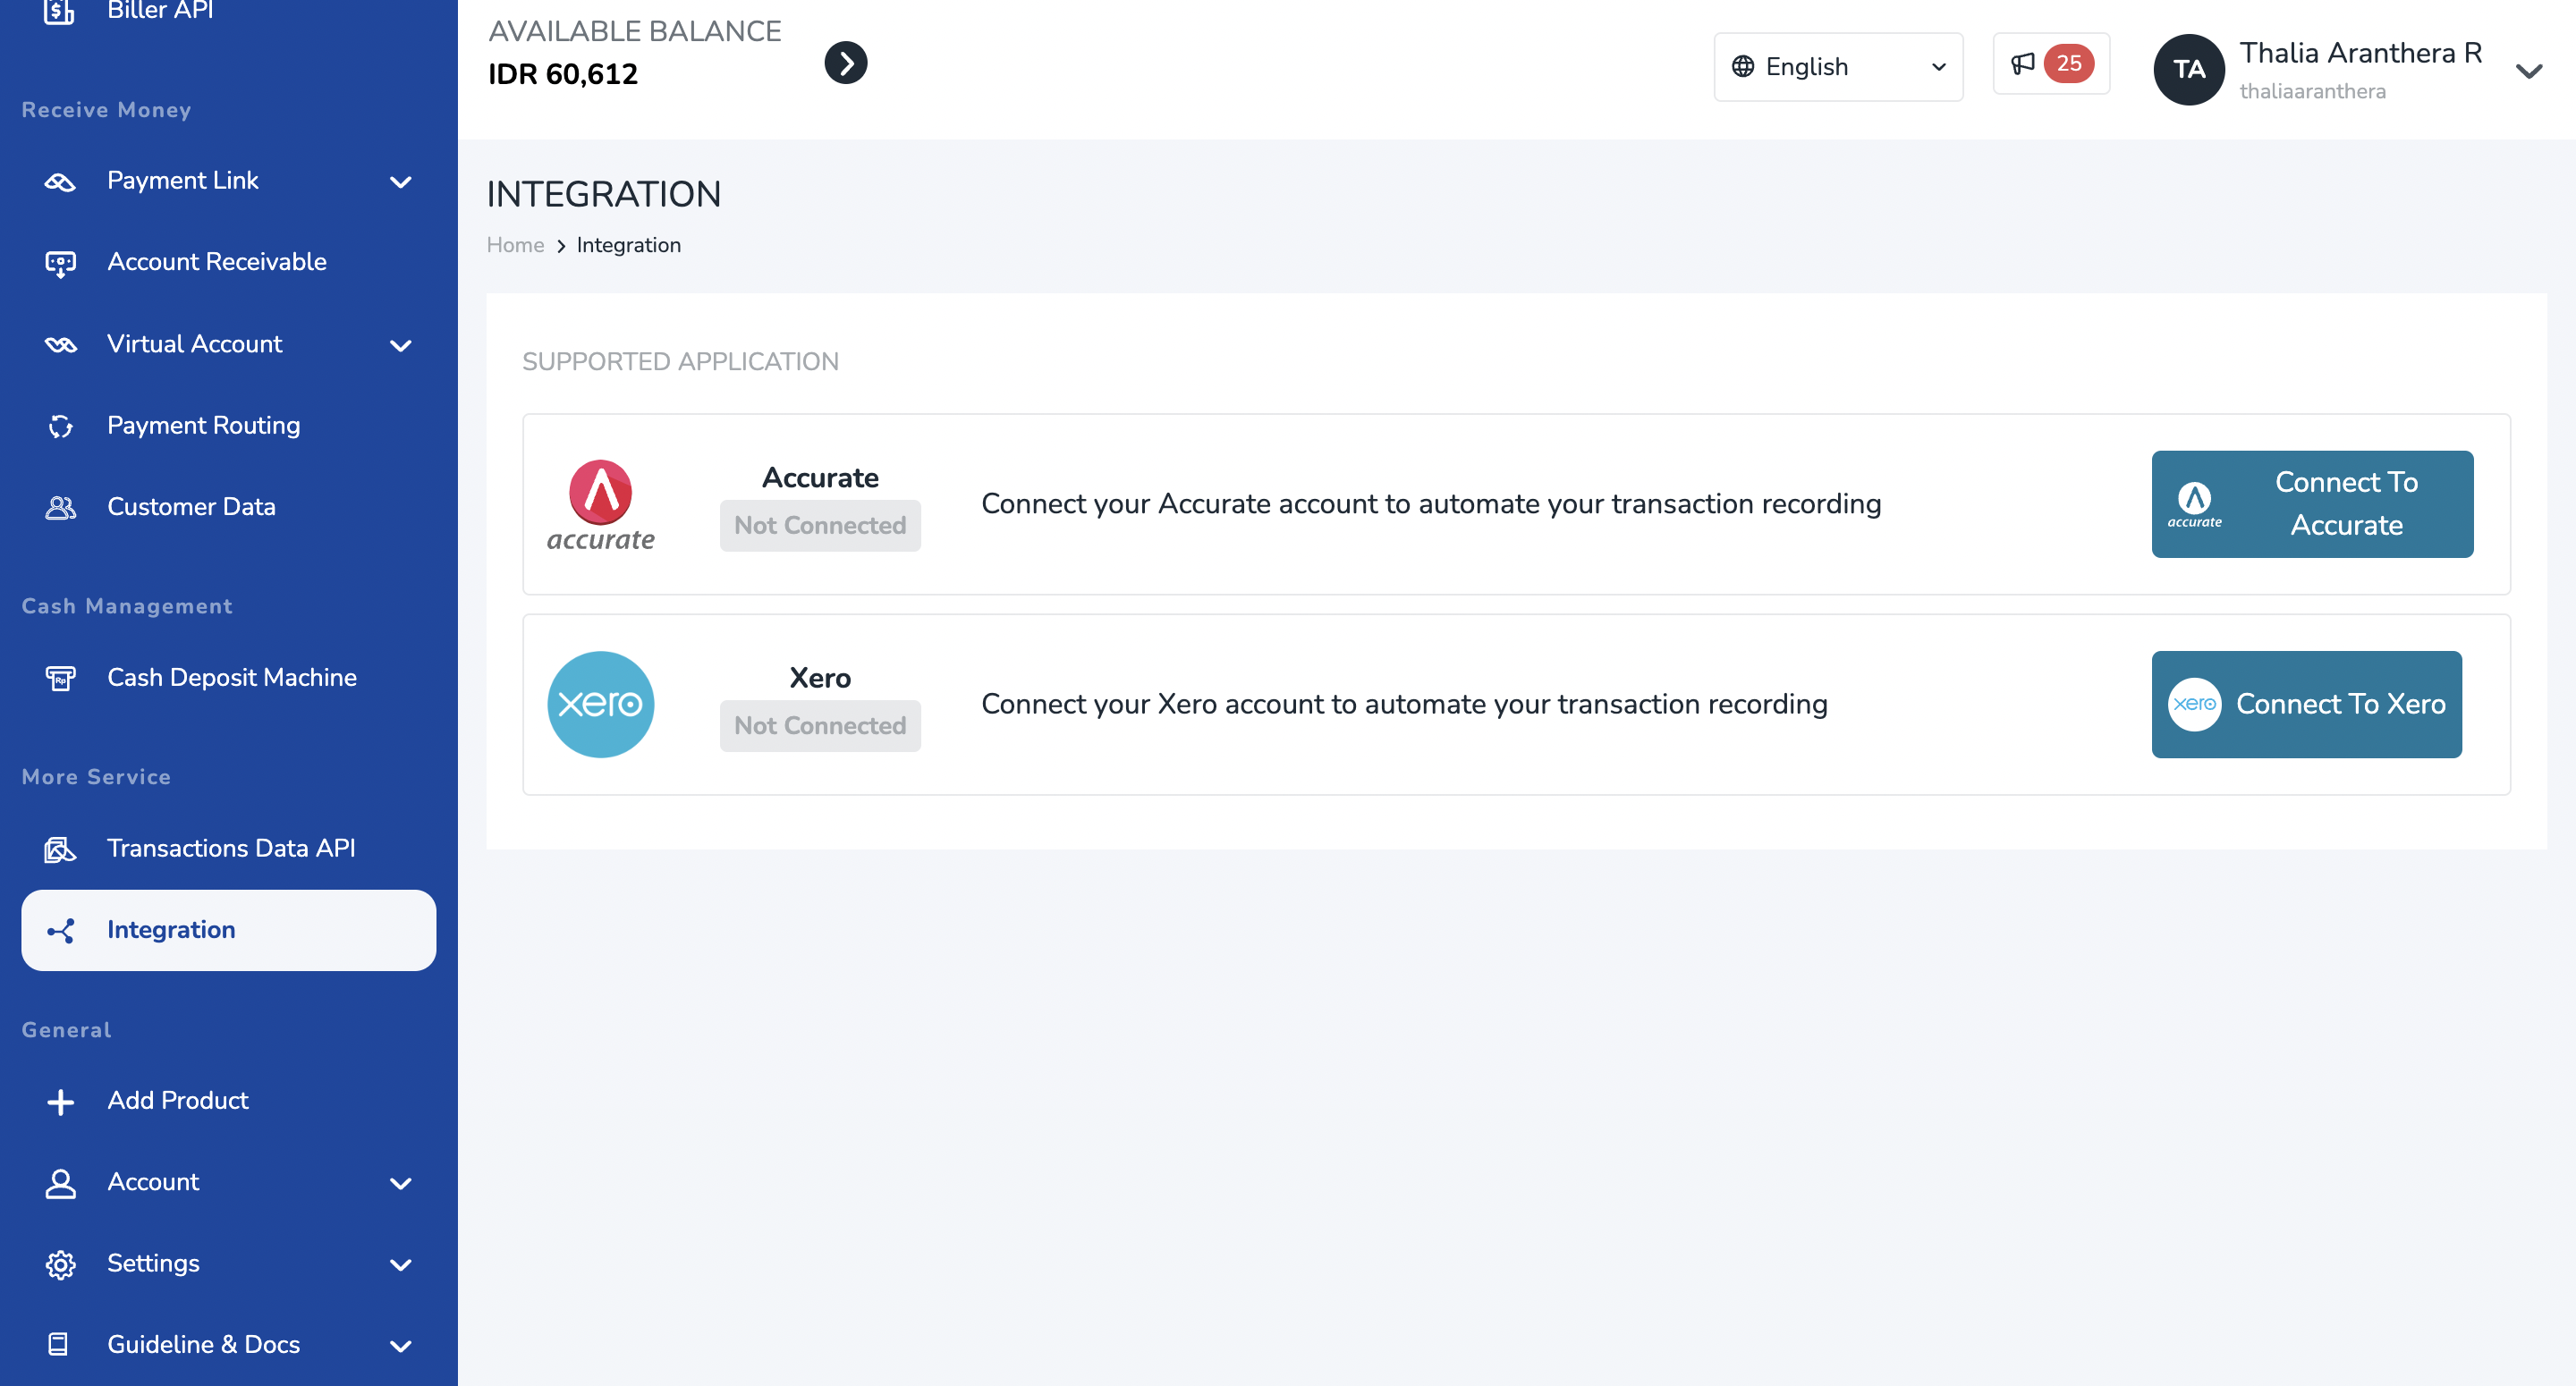
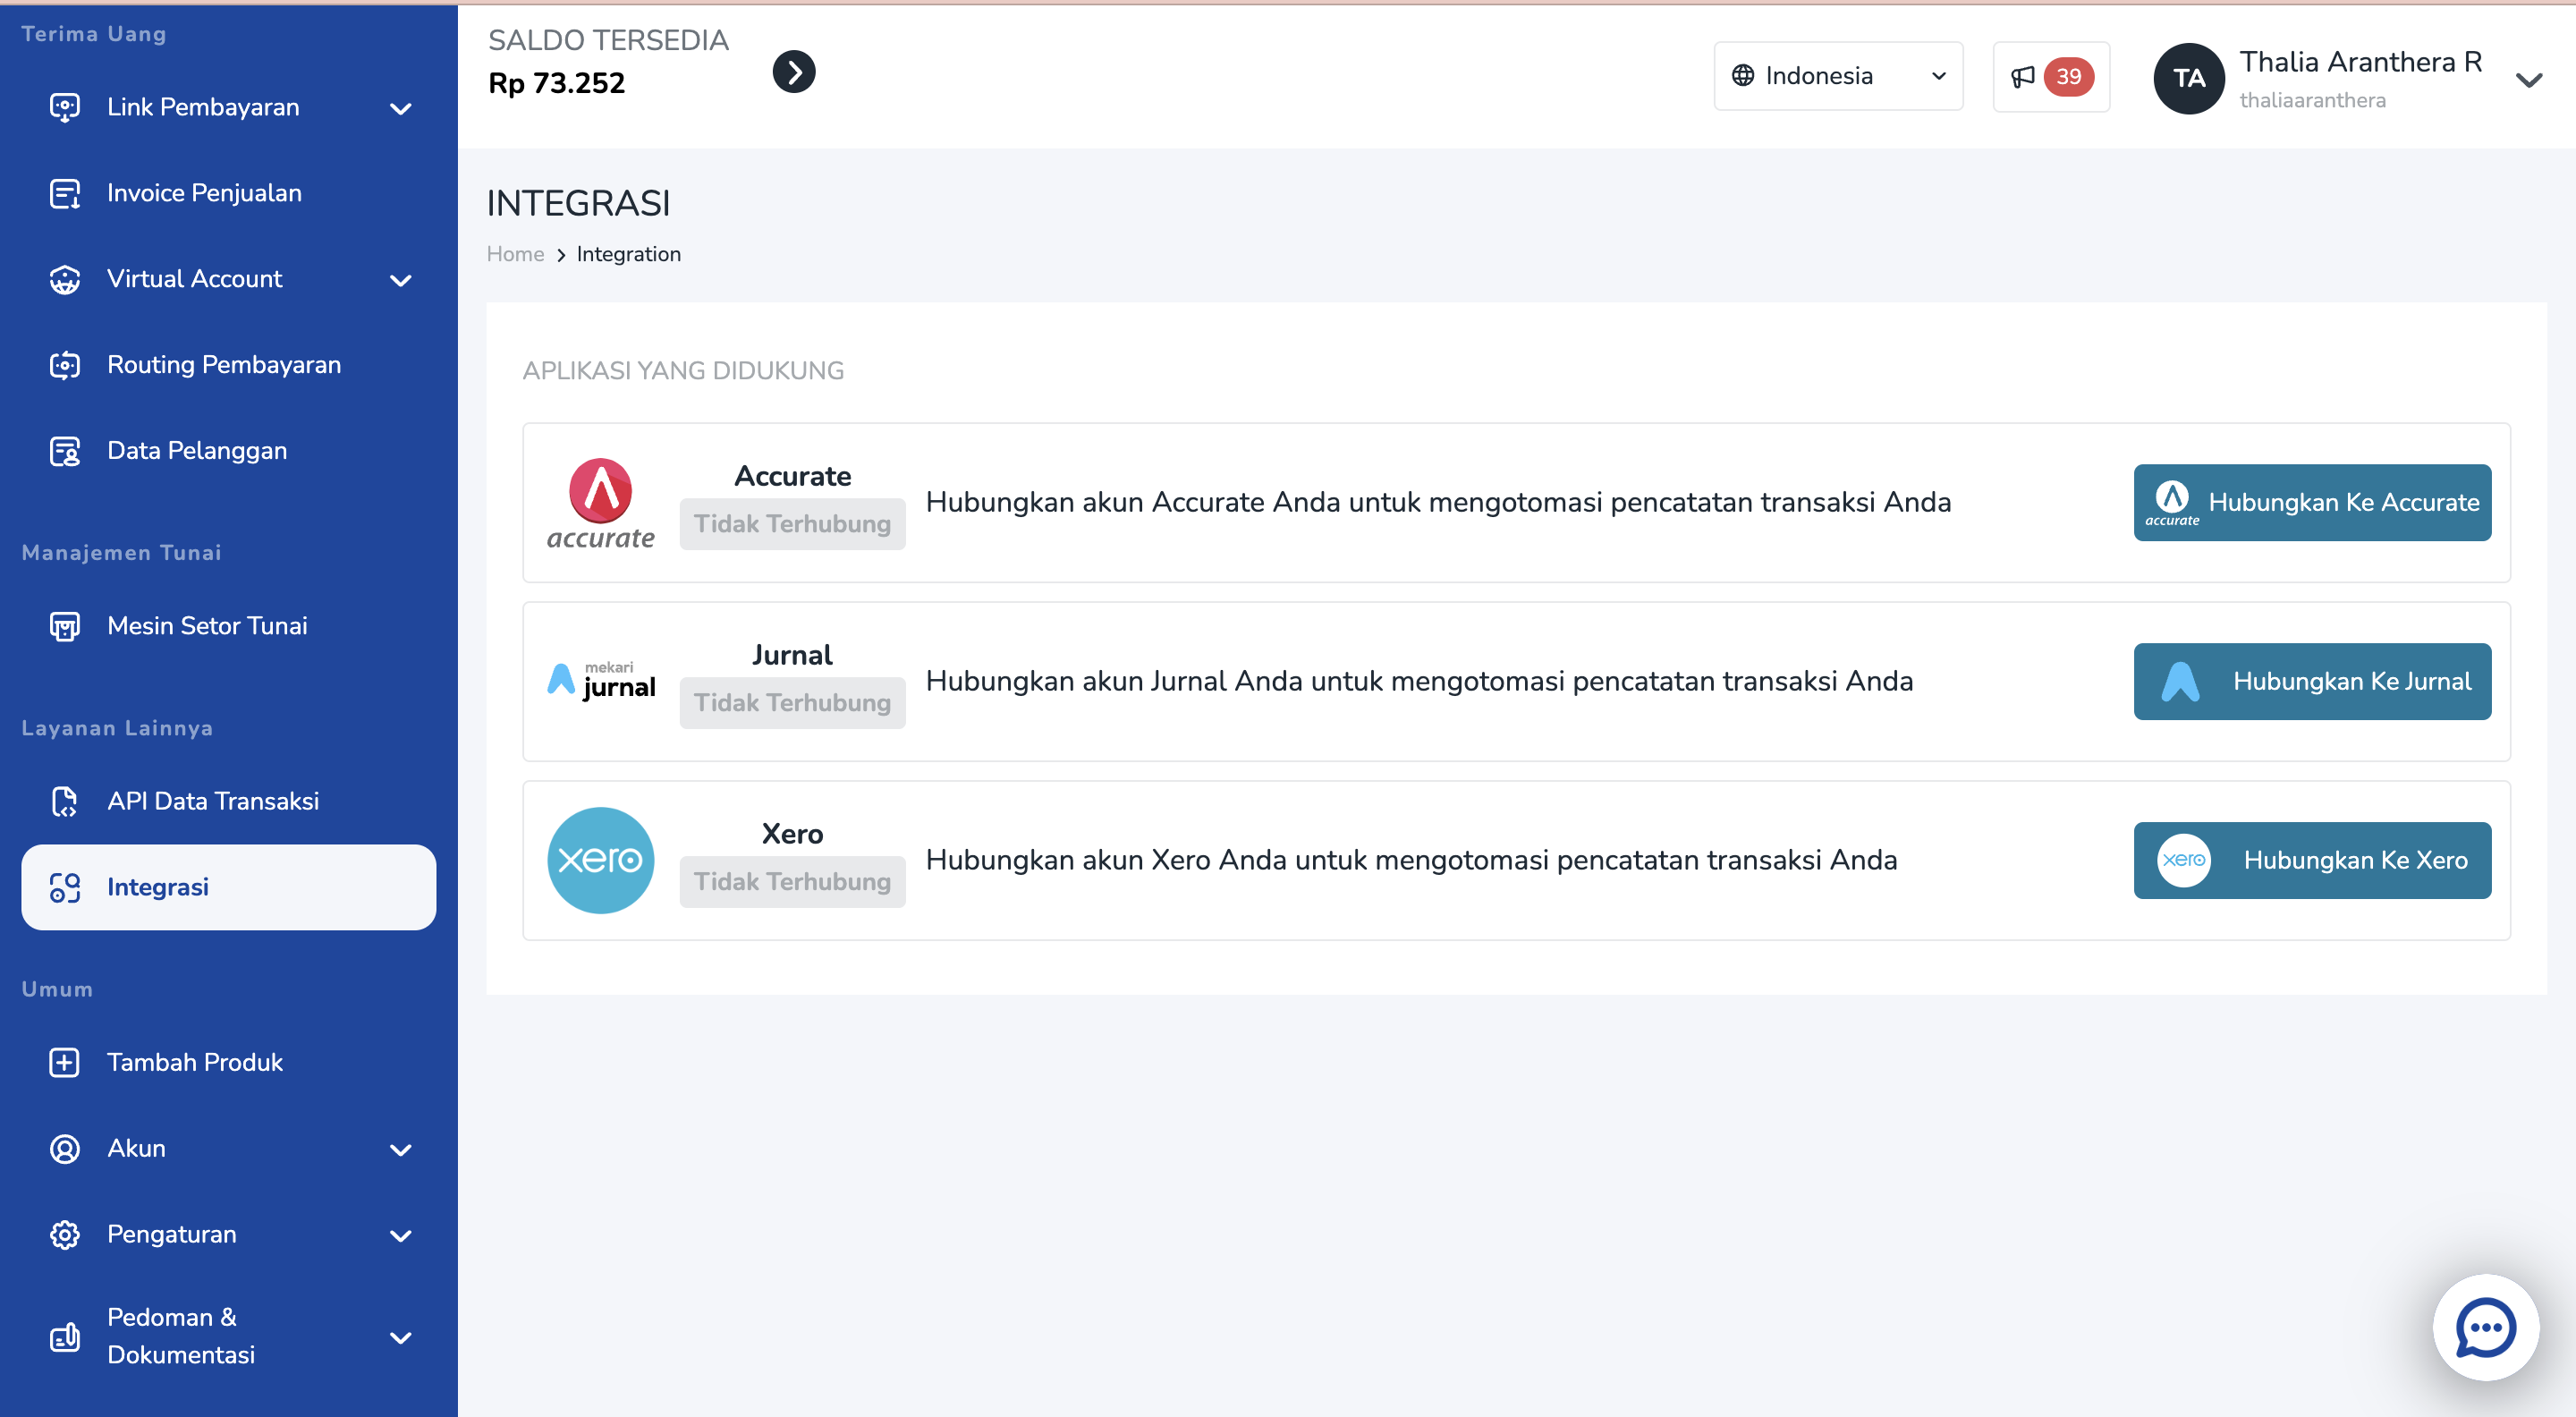
Login to your dashboard. In the sidebar, select Integration menu.
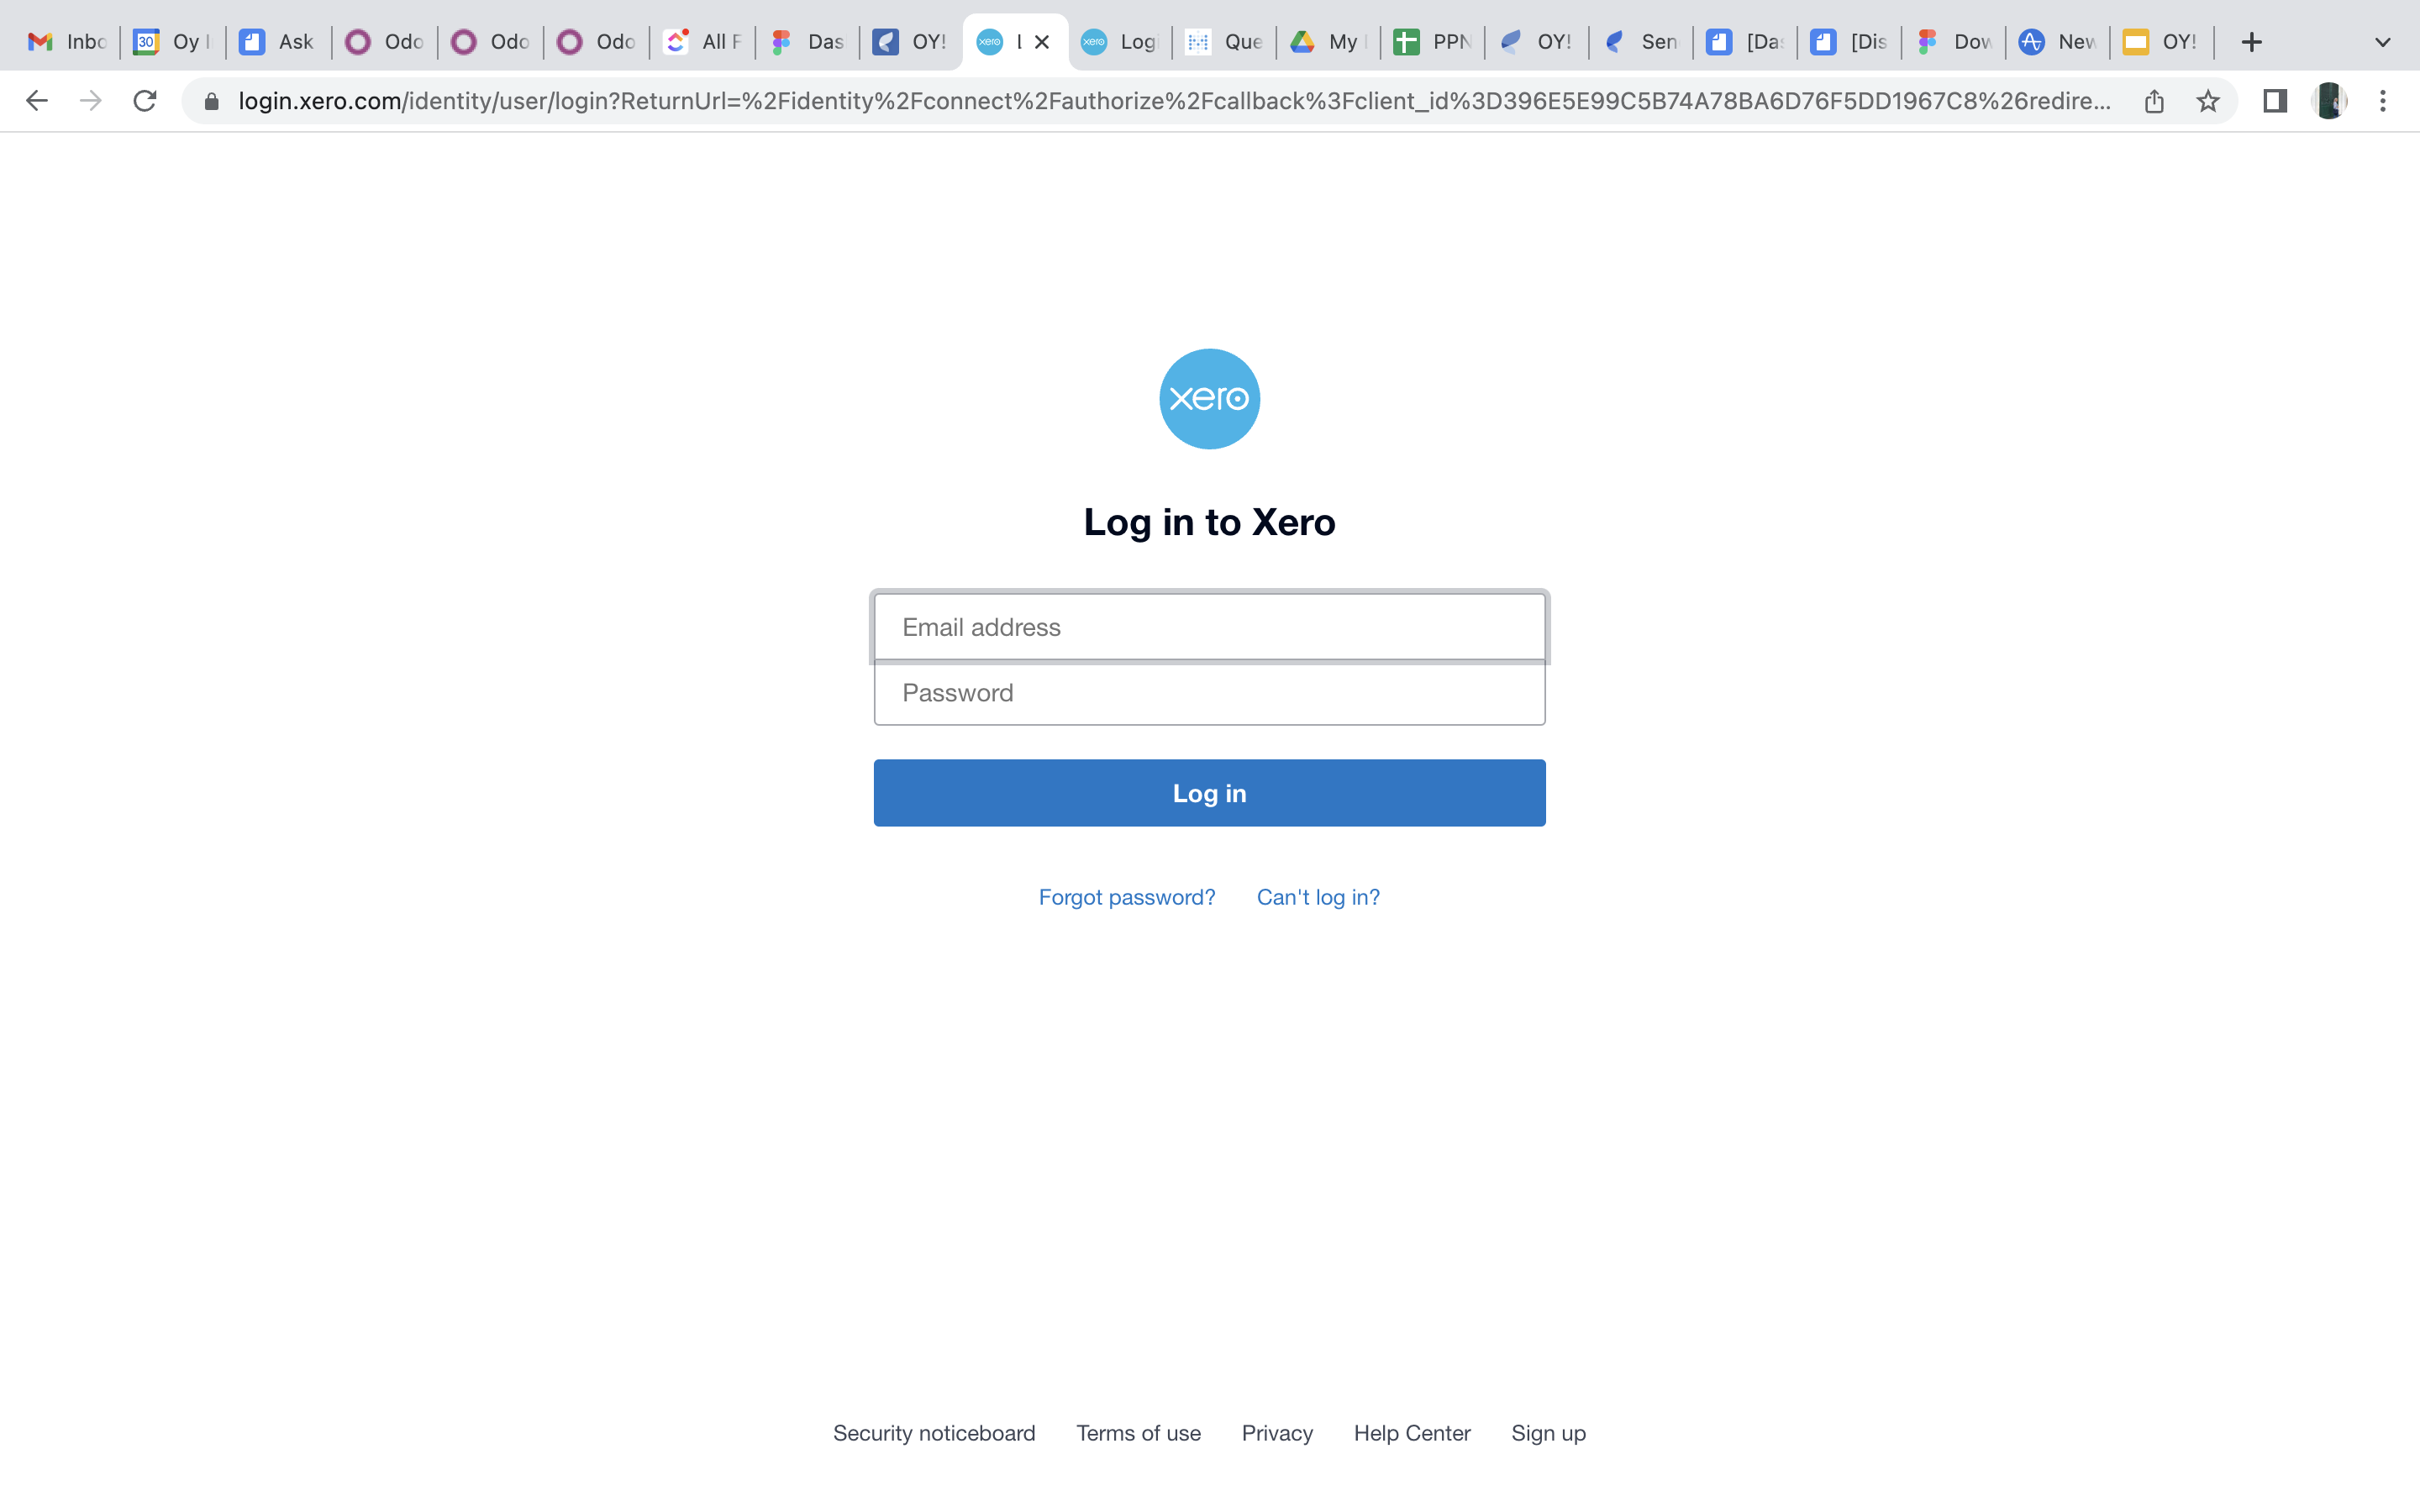
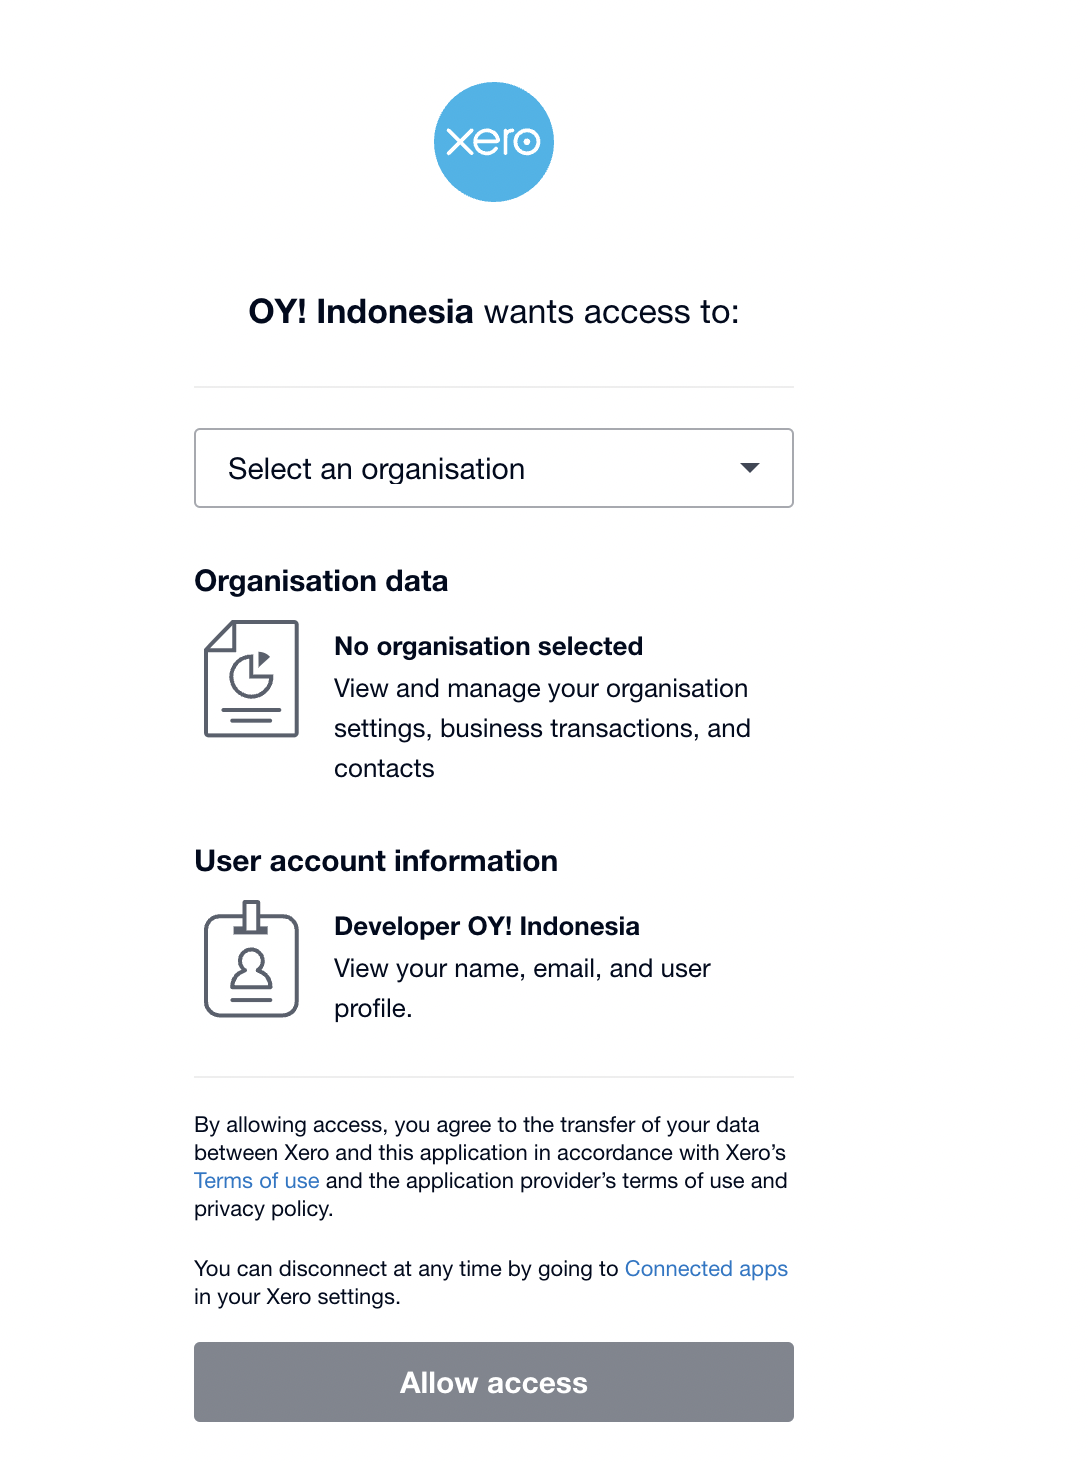
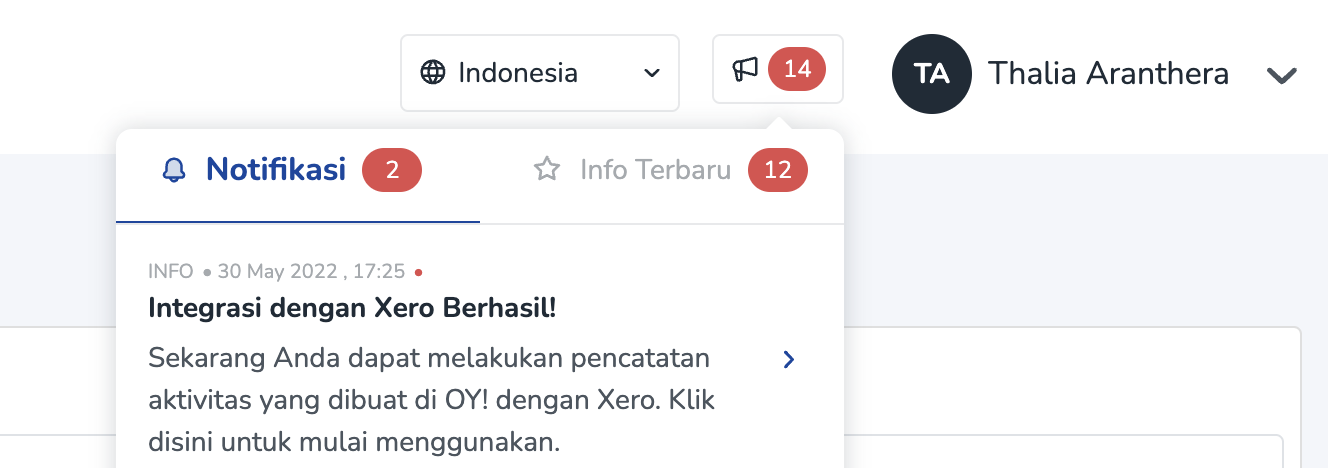
You will see Xero menu. Click “Connect” to connect your Xero account to OY!. You will be redirected to Xero’s login page. Once you have successfully logged in to Xero, a notification will appear.
Preview for Xero's login page
Preview for Notification
- Upon success connect to Xero, we will create a new Bank Account into your Xero account, named “OY! balance” in which any transaction happened in OY! will be recorded there.
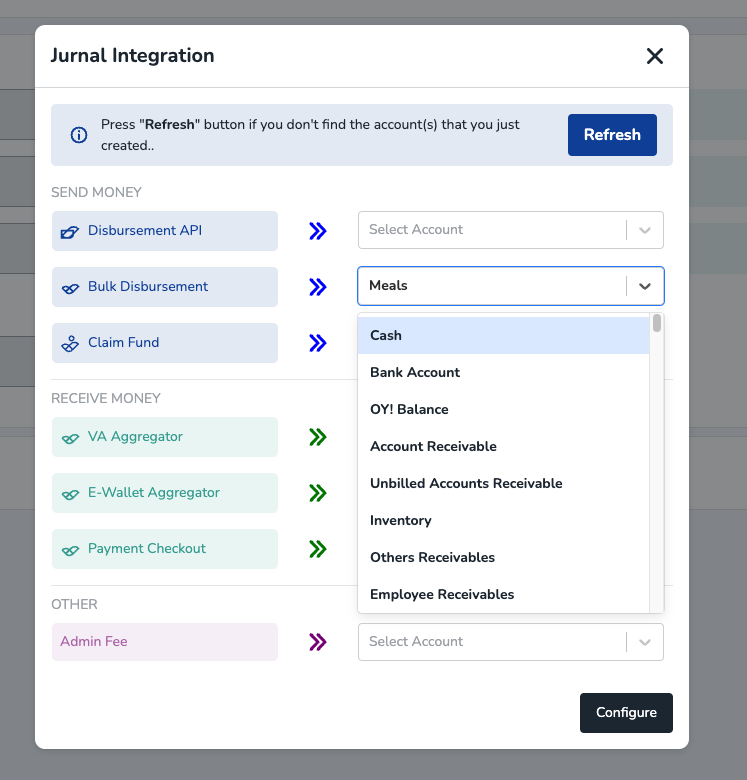
Map your Chart of Account
Once you have successfully connected to Xero, you will be directed to a page to map your Chart of Account.
Then, map each product to the corresponding Account. Any transaction using each product will be put into the chart of account you defined in this page.
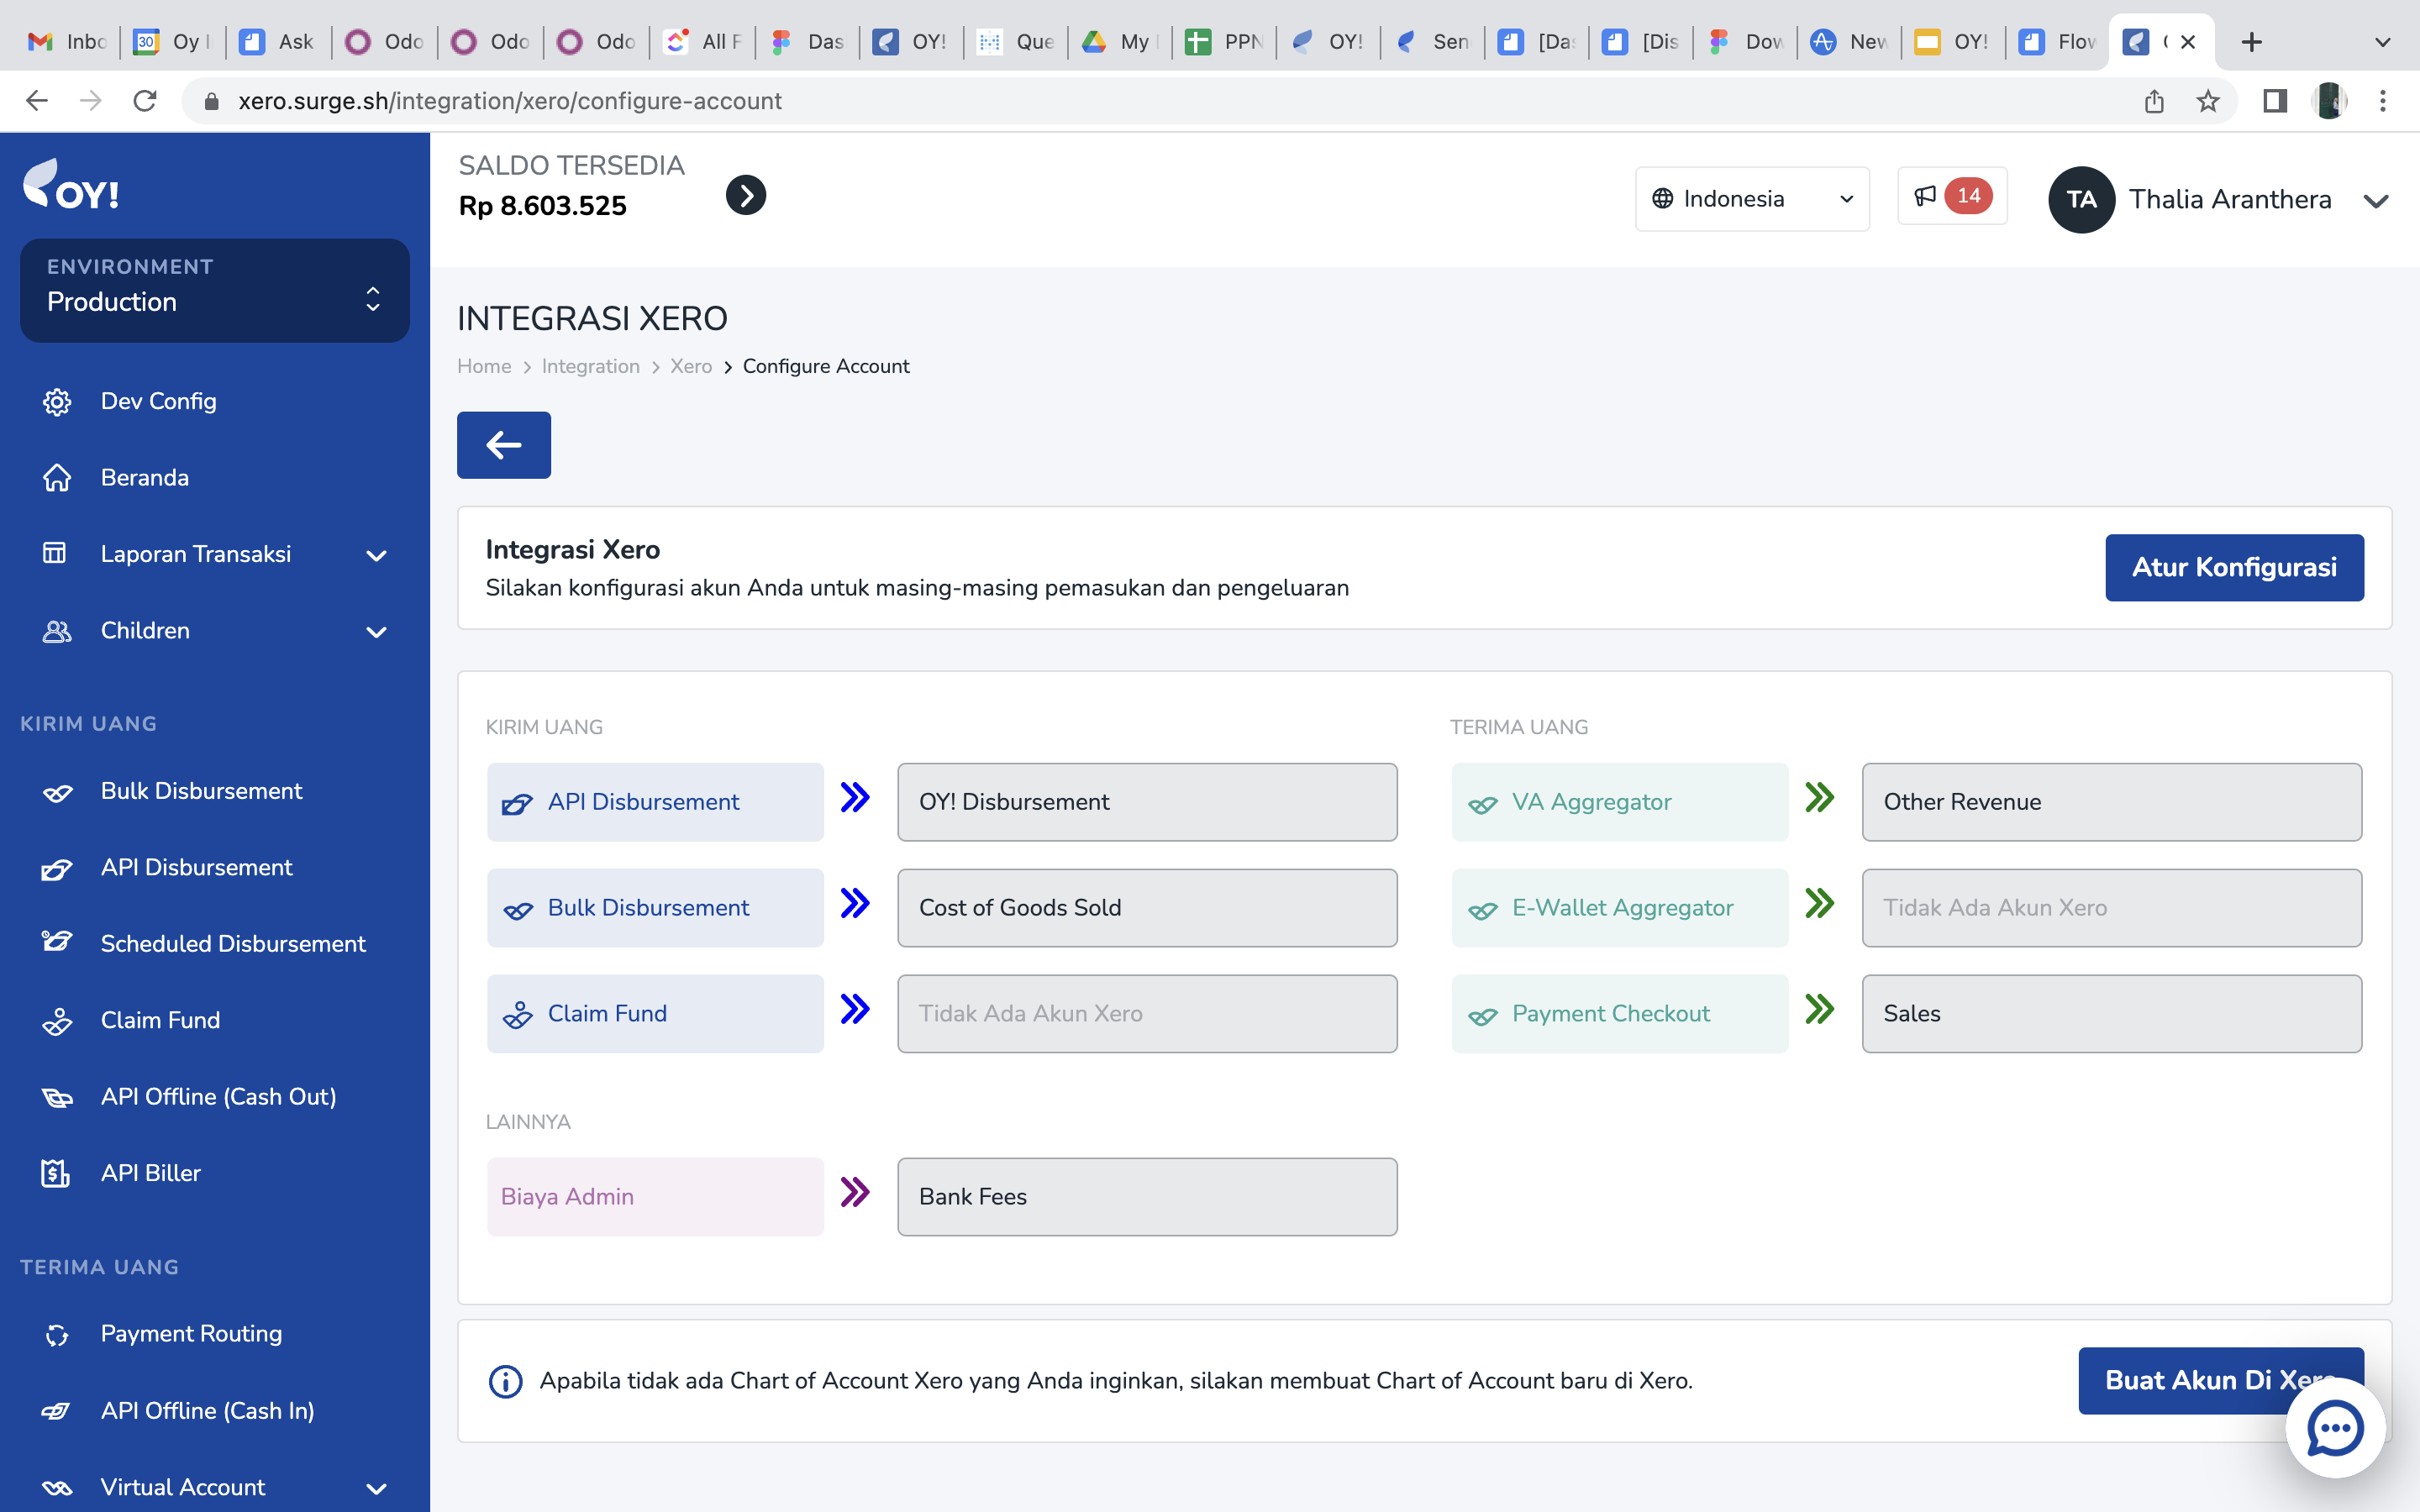
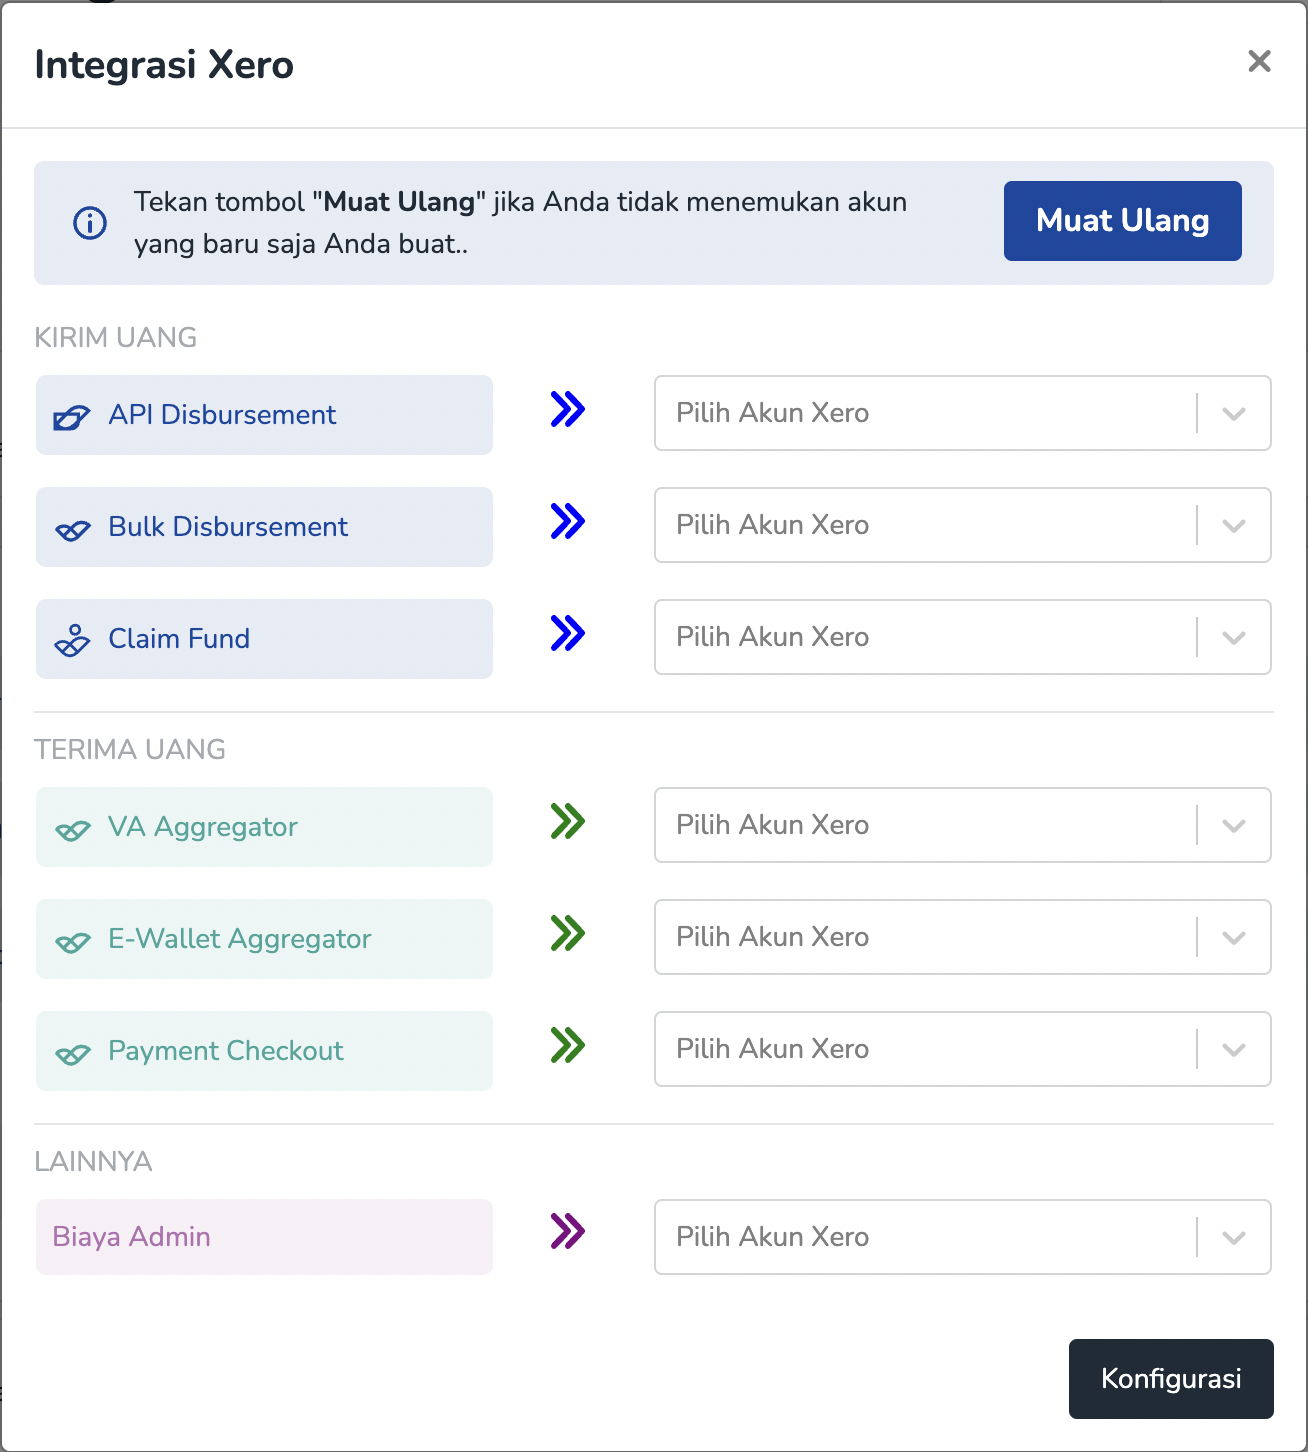
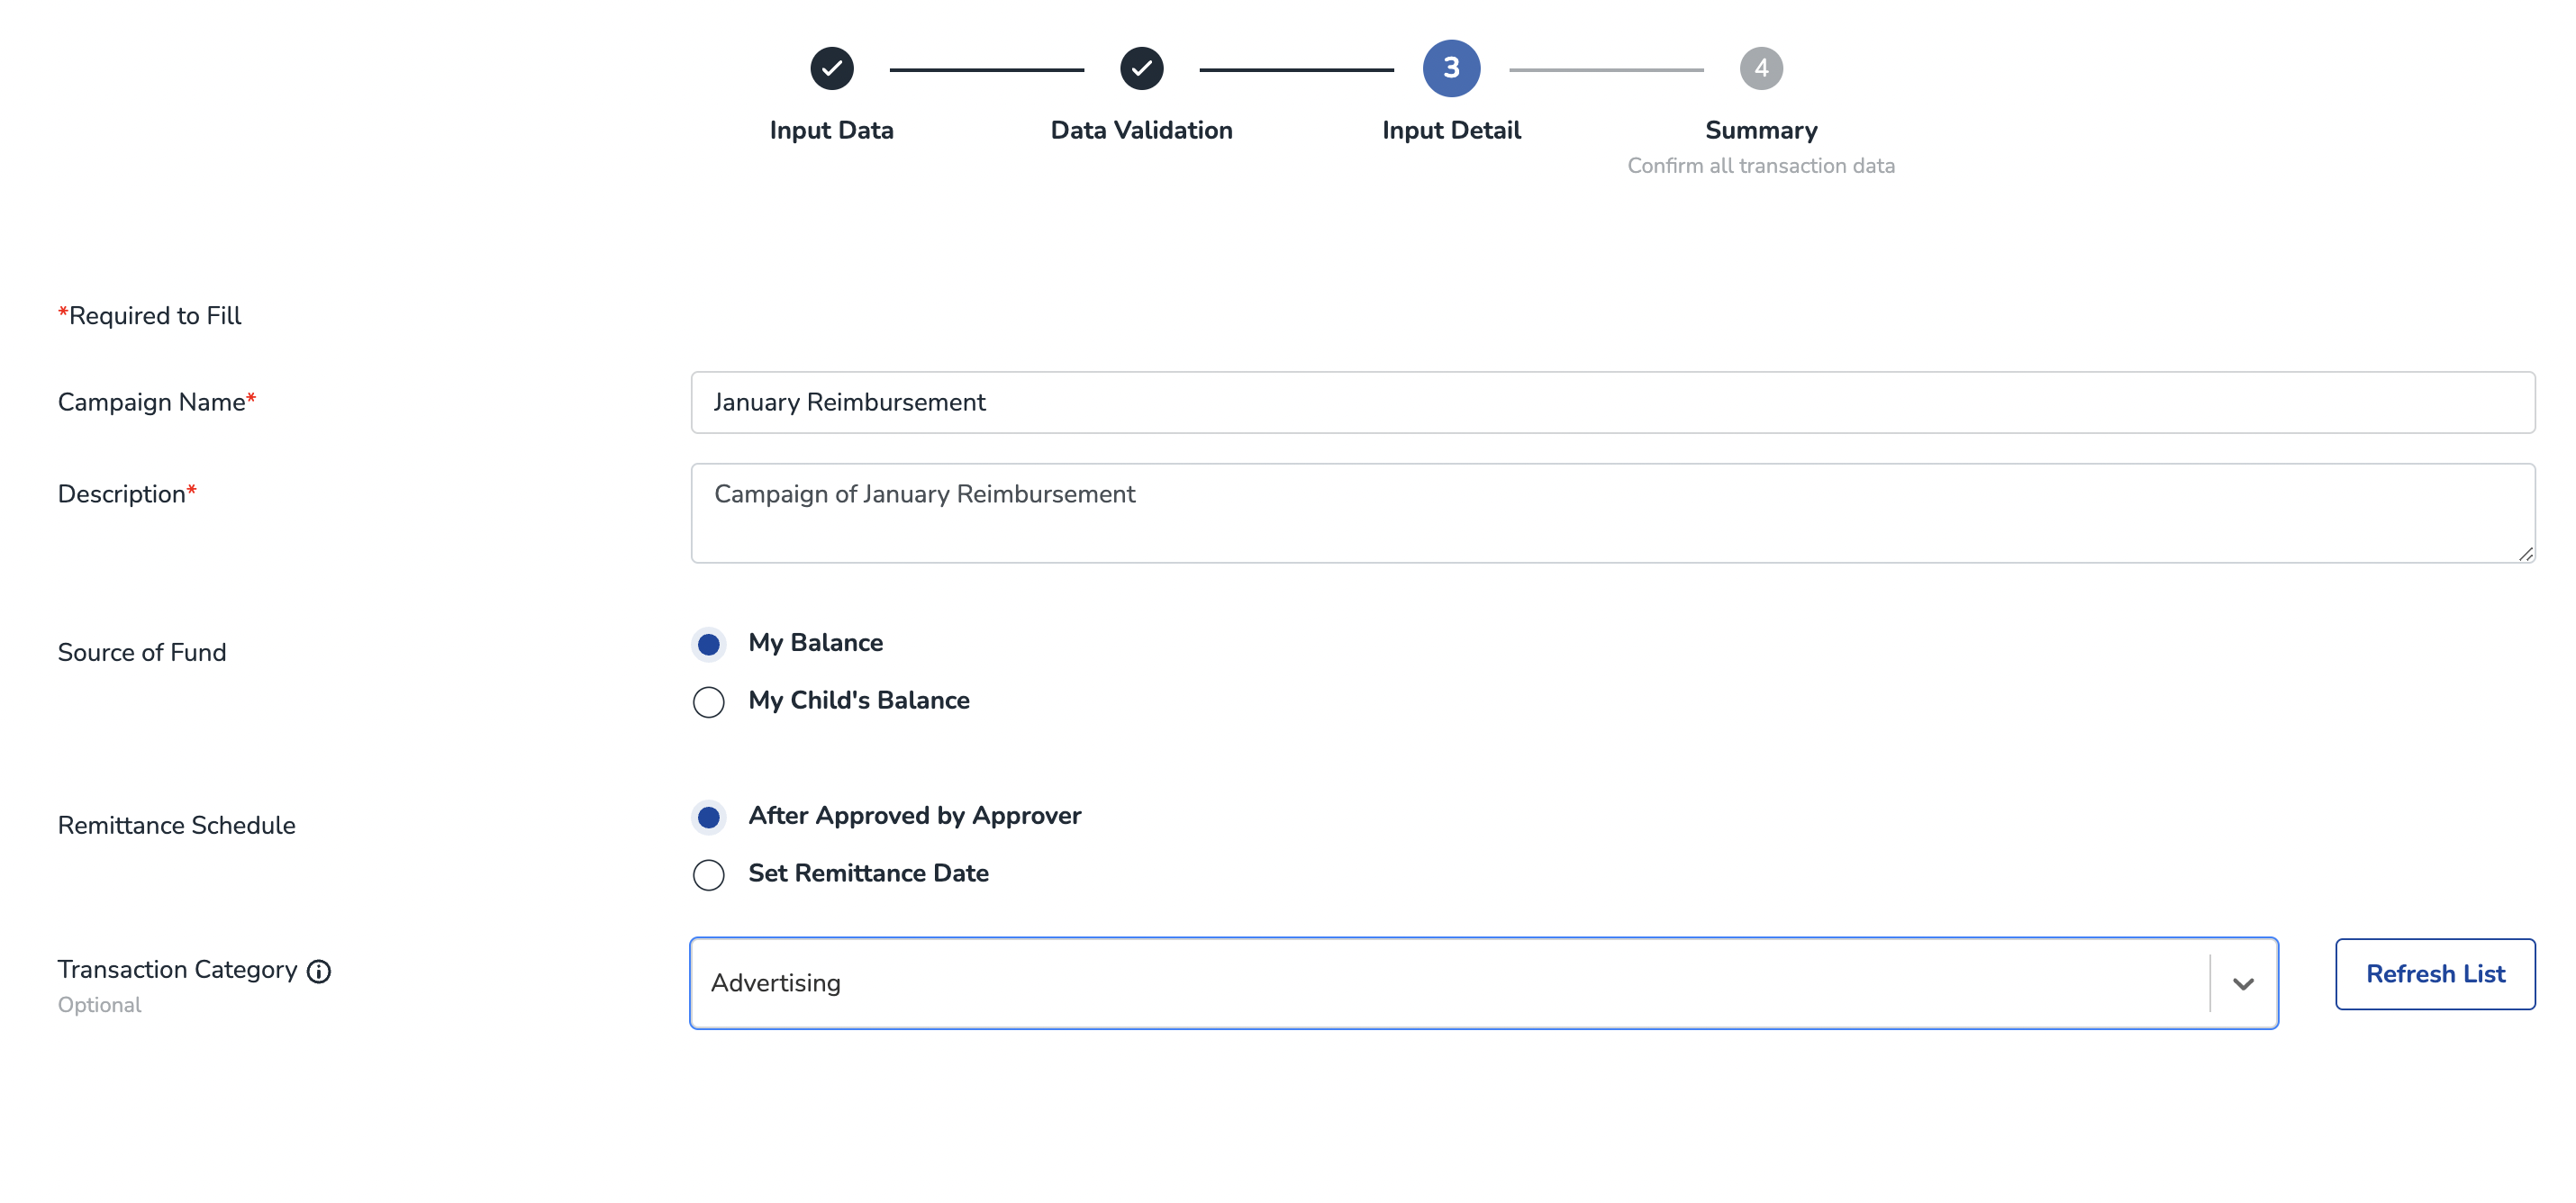
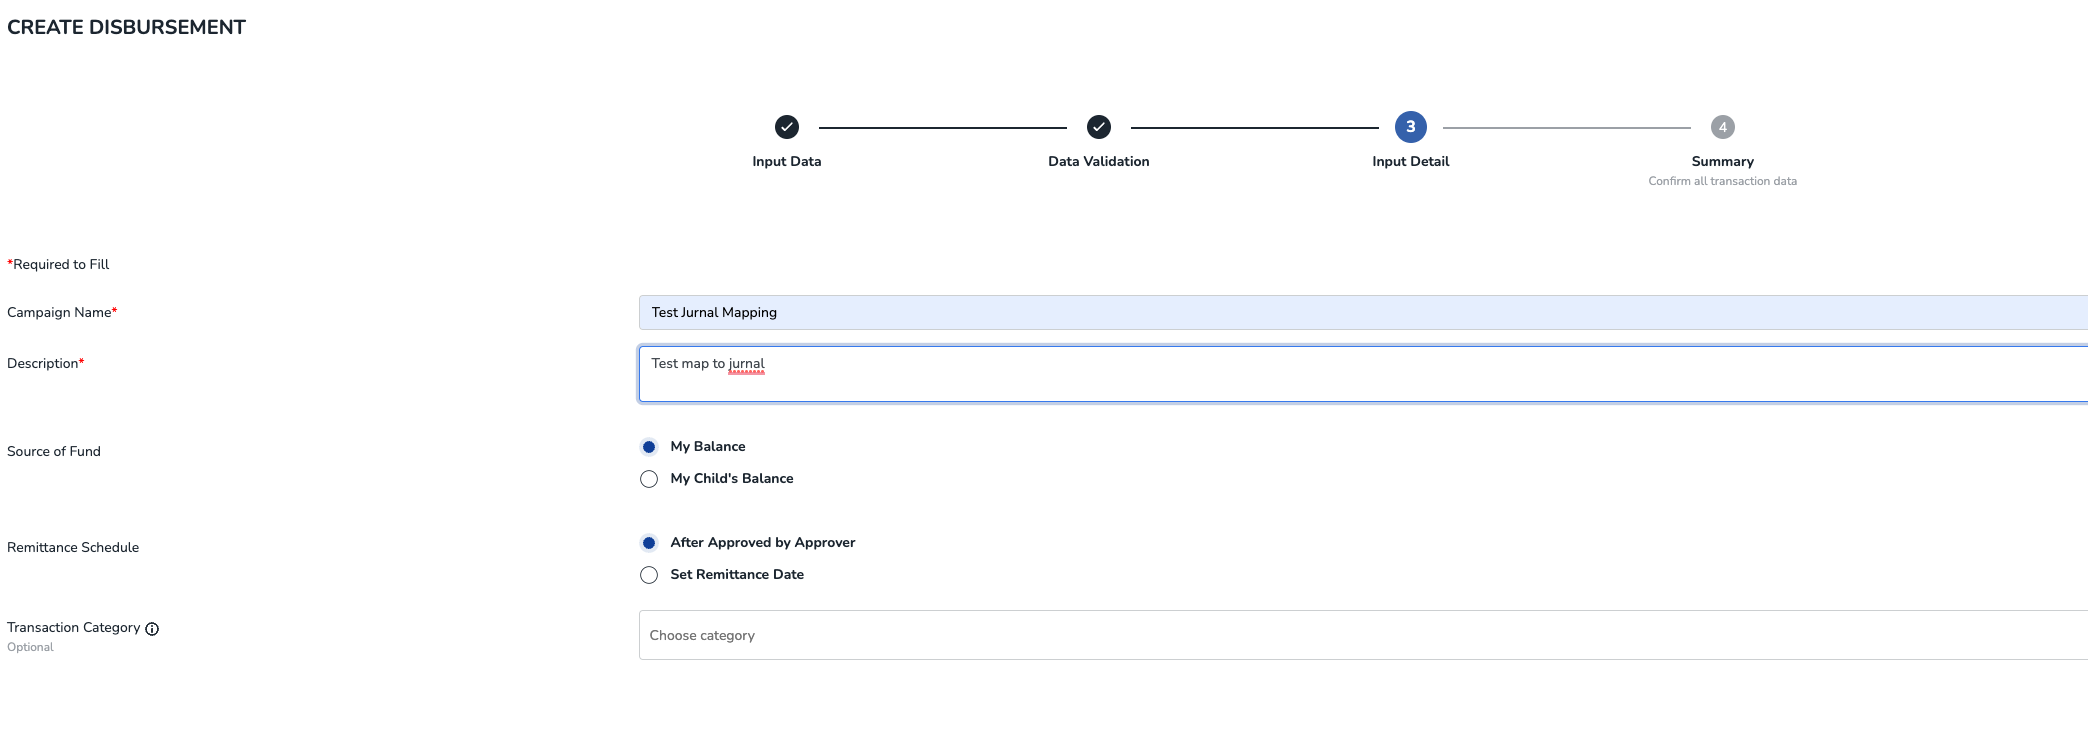
Note: Special for Bulk Disbursement product, you can define the Chart of Account later in the campaign creation process - Step 3 Input Detail page. In the Transaction Category field.
- You can change the CoA mapping anytime as needed, just go to Integration >> Xero >> Configuration.
Record Transaction to Xero
- Now, your OY! account has been connected to your Xero account and each products has been mapped to its corresponding Chart of Account.
- Any success transaction that happened in OY! will be recorded to Xero with the corresponding Account you defined in Mapping Account menu.
- Transaction in OY! will be treated as SPEND or RECEIVE money transaction in a bank account (OY! Balance).
- Each transaction will contains of two rows. Row 1 contains of amount of transaction where row 2 contains of admin fee.
- In this version, any tax will be excluded. Means that you will need to input manually the tax invoice you obtained from OY! team to your Xero.
Disconnected your Xero
- To disconnect your Xero account from OY!, open the Integration menu on the sidebar. Then select “Disconnect”.
- Then, you will be disconnected from Xero. Any transaction that you execute via OY! will not be recorded into Xero.
Accurate Integration
Accurate is a local accounting platform that is mainly used by companies in Indonesia. We have integrated our system to Accurate system in order to help you optimize your workflow. By connecting your OY! account to your Accurate account, you do not have to log in to your Accurate account. This means that you do not have to manually record your transaction that happened in OY! to Accurate. You will get a seamless experience of recording your transaction.
How does it works?
Once you have connected your Accurate account in OY!, any transaction that happened in OY! will be automatically recorded to your Accurate account. Upon successful connection, we will trigger the creation of a new Bank Account, which is OY! Balance Bank Account. Transactions that happened in OY! will be recorded in that bank account, to PEMASUKAN or PENGELUARAN module. Then, you will be required to map your Accurate’s Chart of Account (in Accurate, it is Akun Perkiraan). Mapping your Chart of Accounts will help us to put your transaction into the correct Account.
Connect your Accurate
- Login to your OY! dashboard. In the sidebar, select the Integration menu.
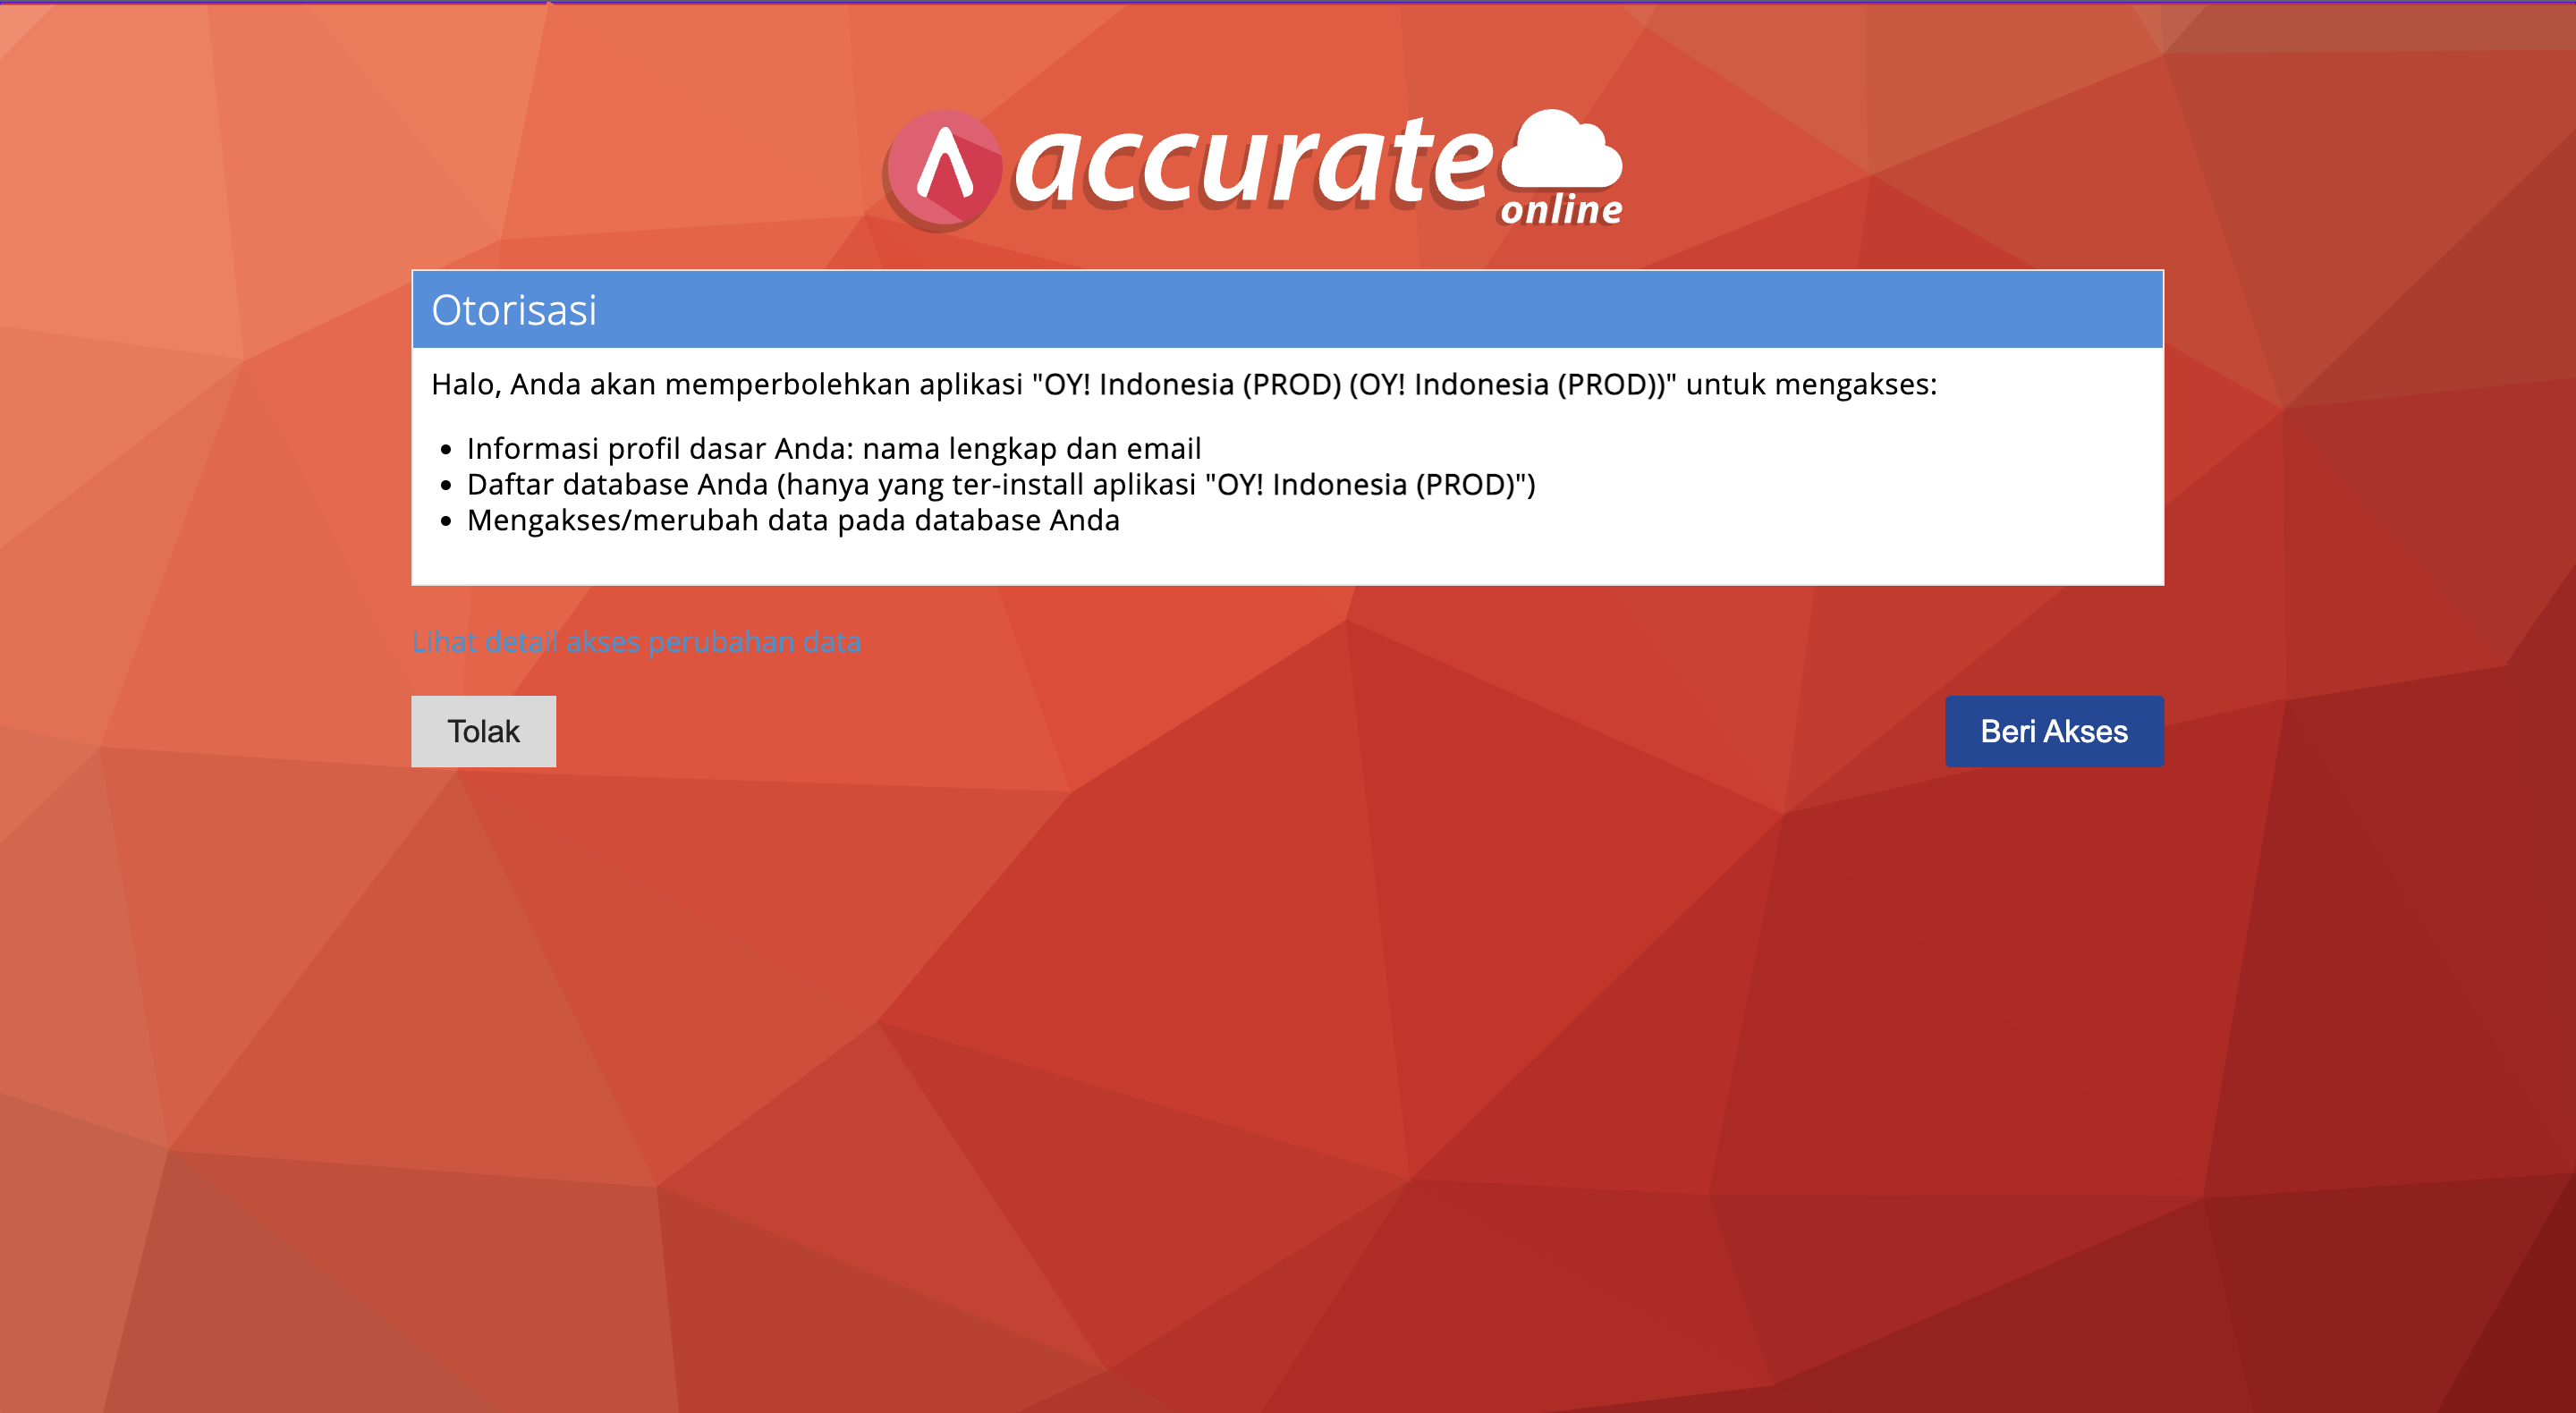
- You will see Accurate menu. Click “Connect” to connect your Accurate account to OY!. You will be redirected to Accurate’s login page.
After login to your Accurate account, click Allow to allow conection between OY! and Accurate.
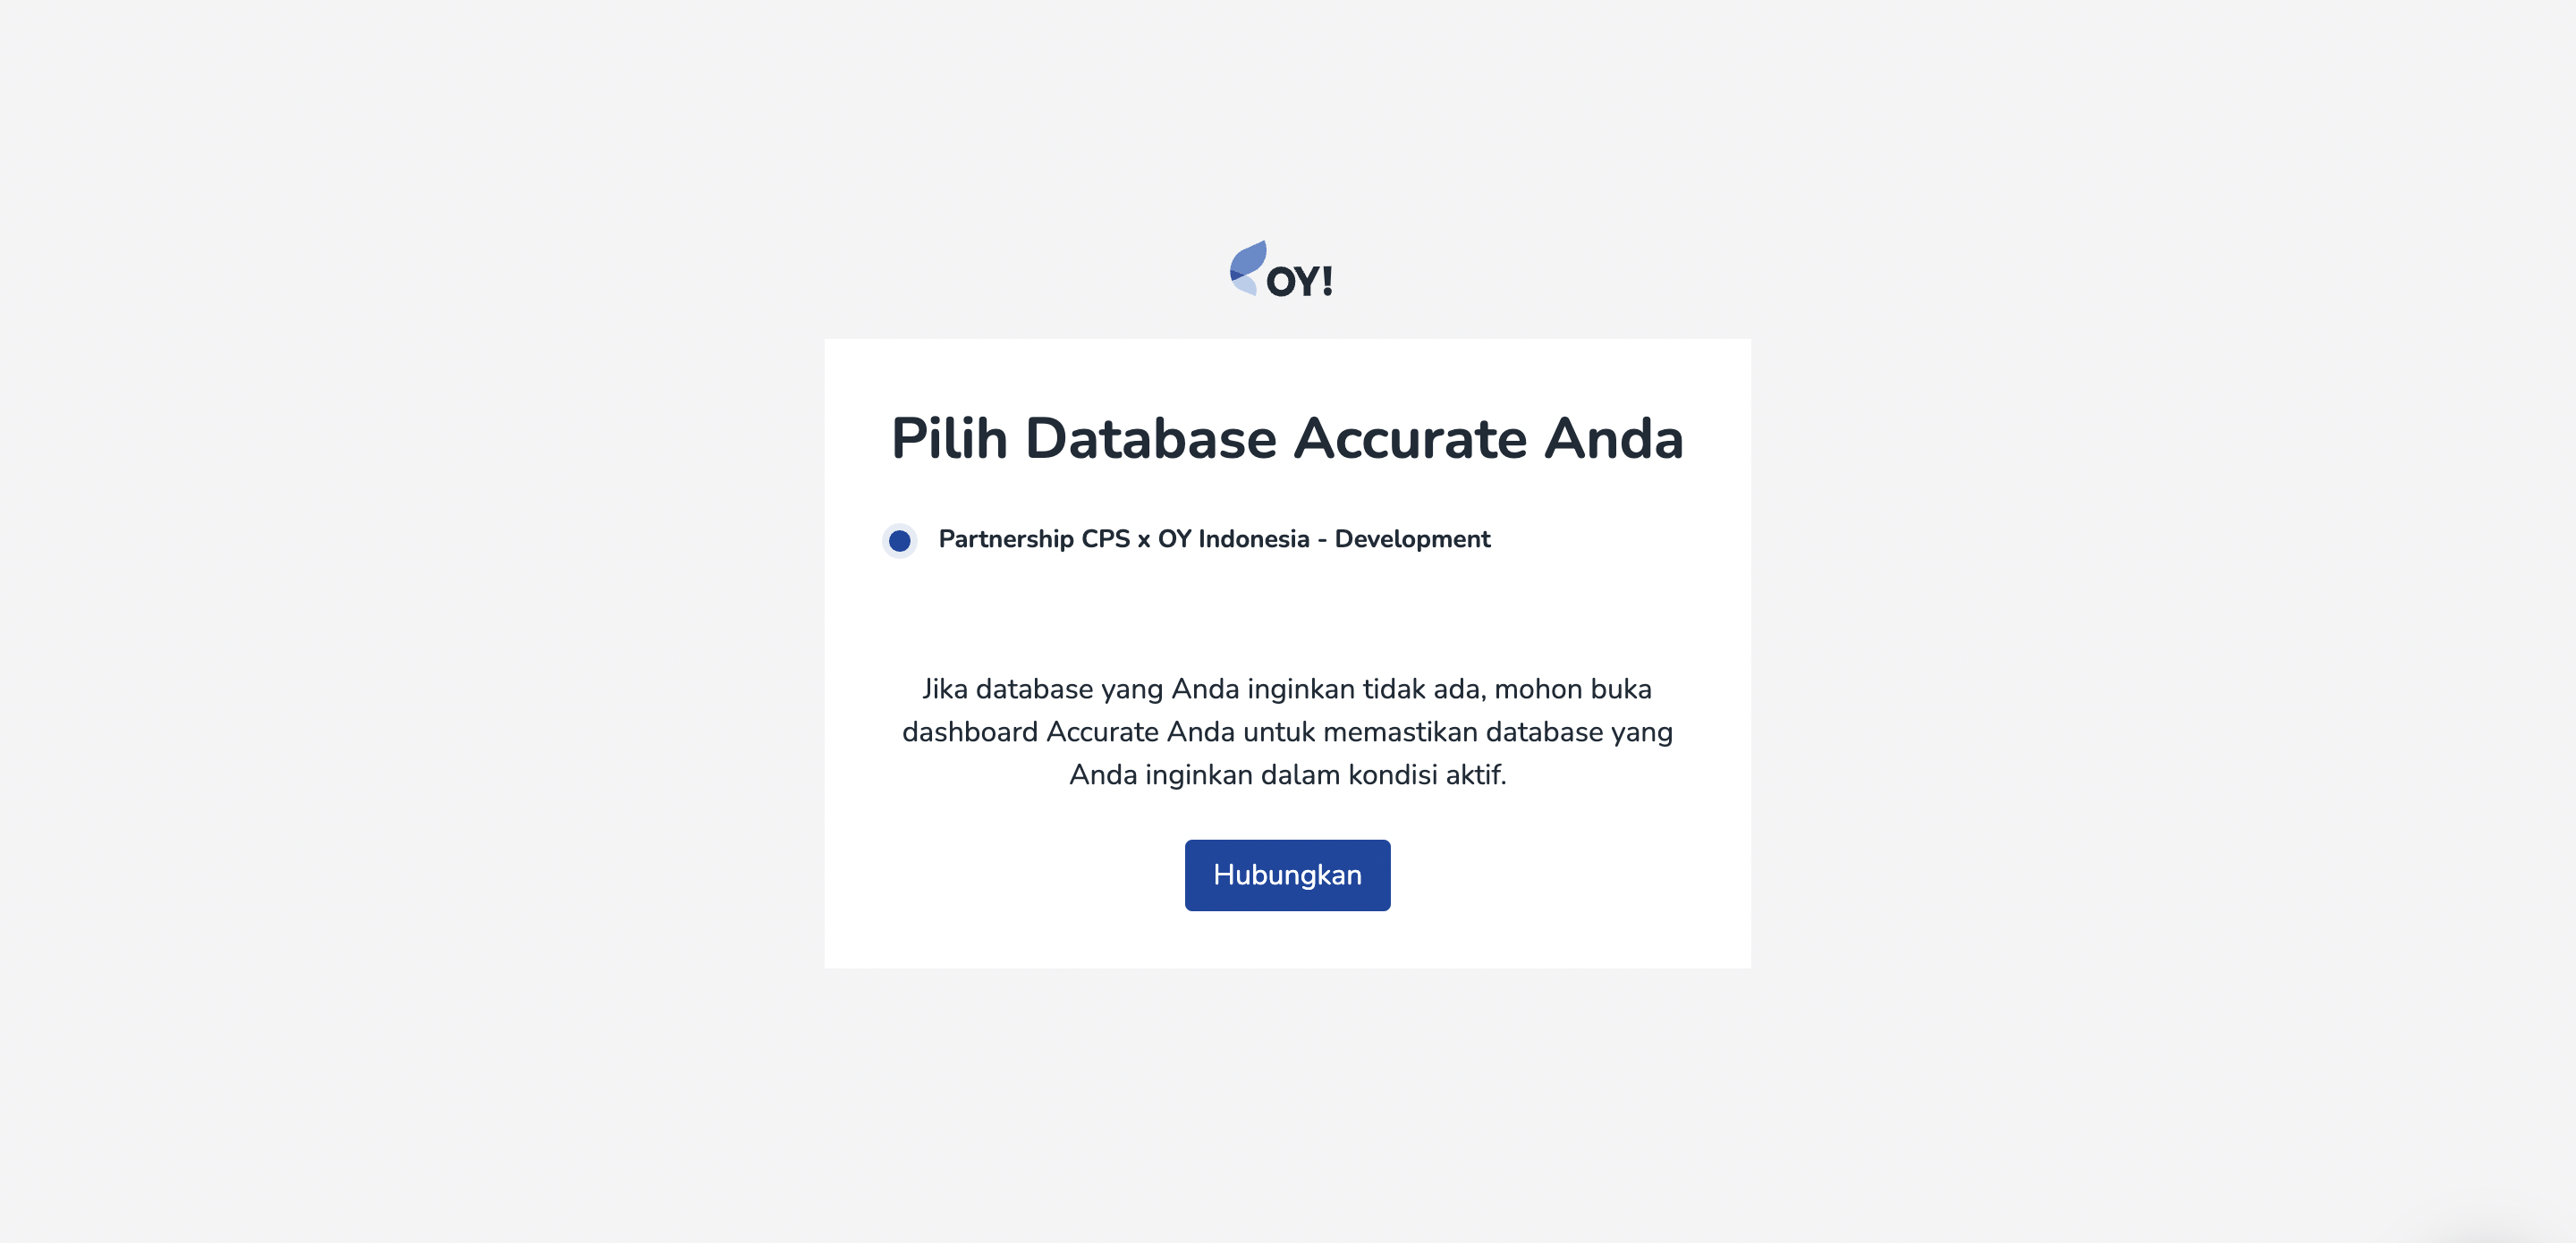
Next, please select an Accurate database that you want to connect with your OY! account.
Once you have successfully connected to Accurate, a notification in your OY! dashboard will appear and you can see your status is now "Connected/Terhubung".
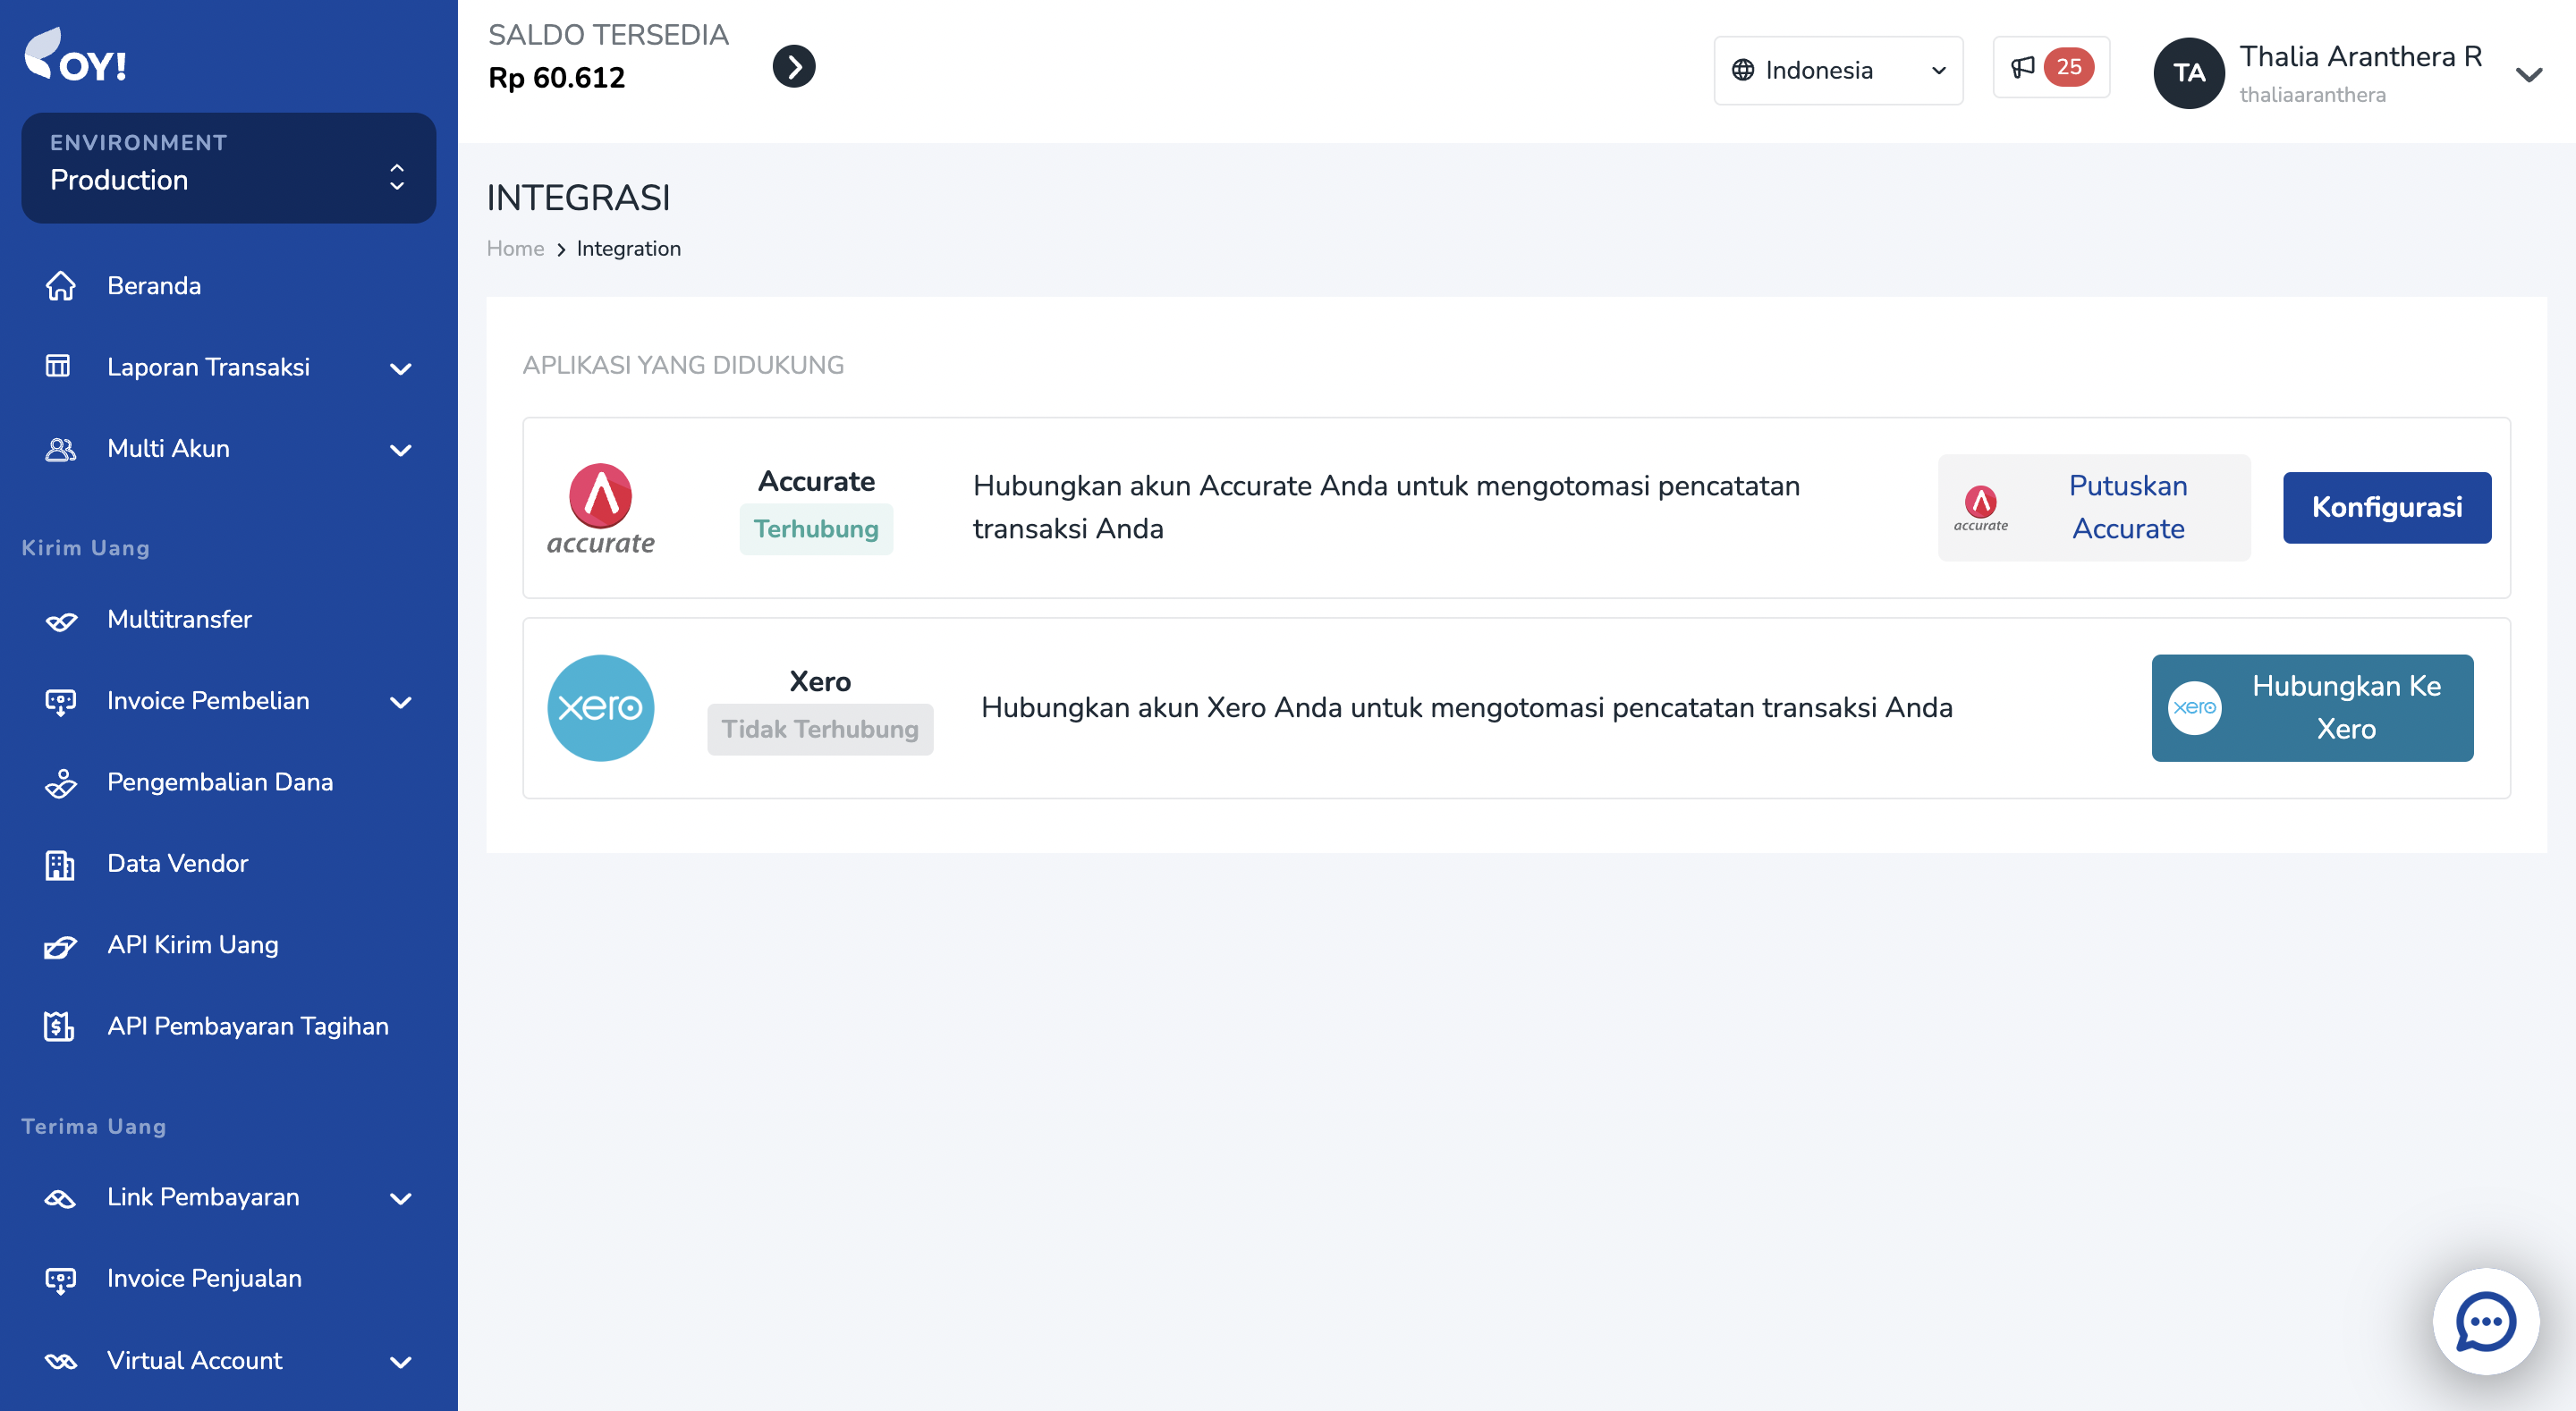
Upon success connecting to Accurate, we will create a new Bank Account into your Accurate account, named “OY! balance” in which any transaction that happened in OY! will be recorded there. Your current OY! balance will also be mapped there.
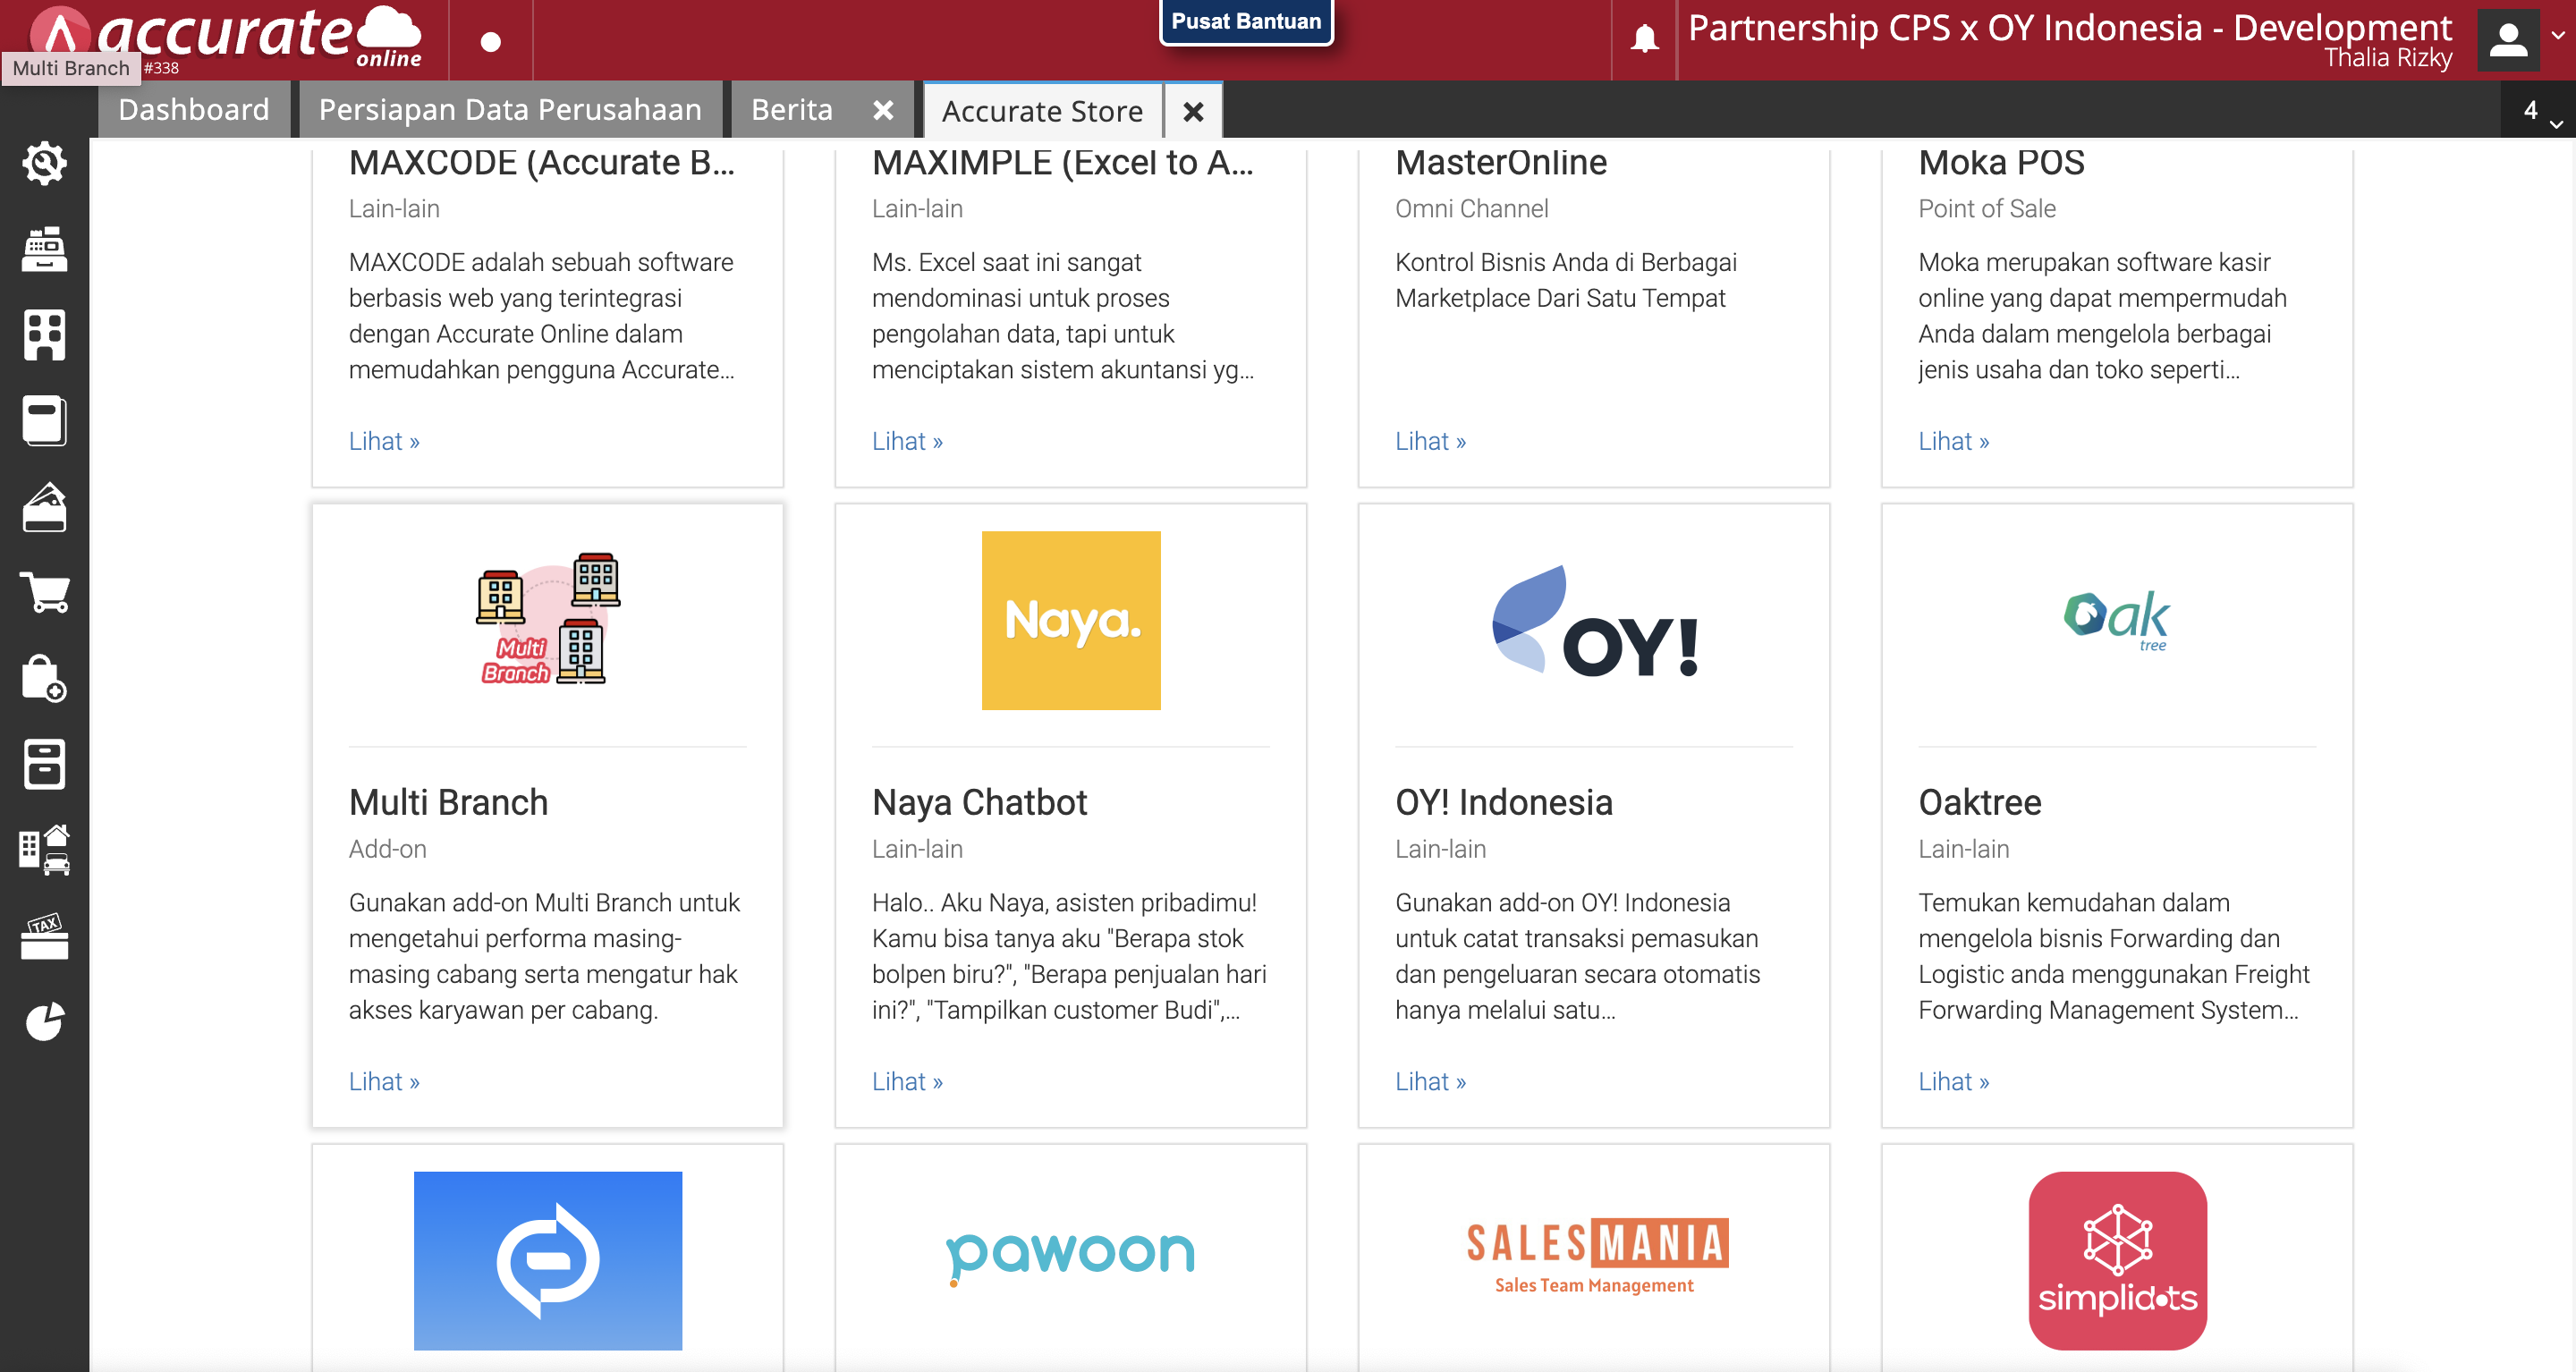
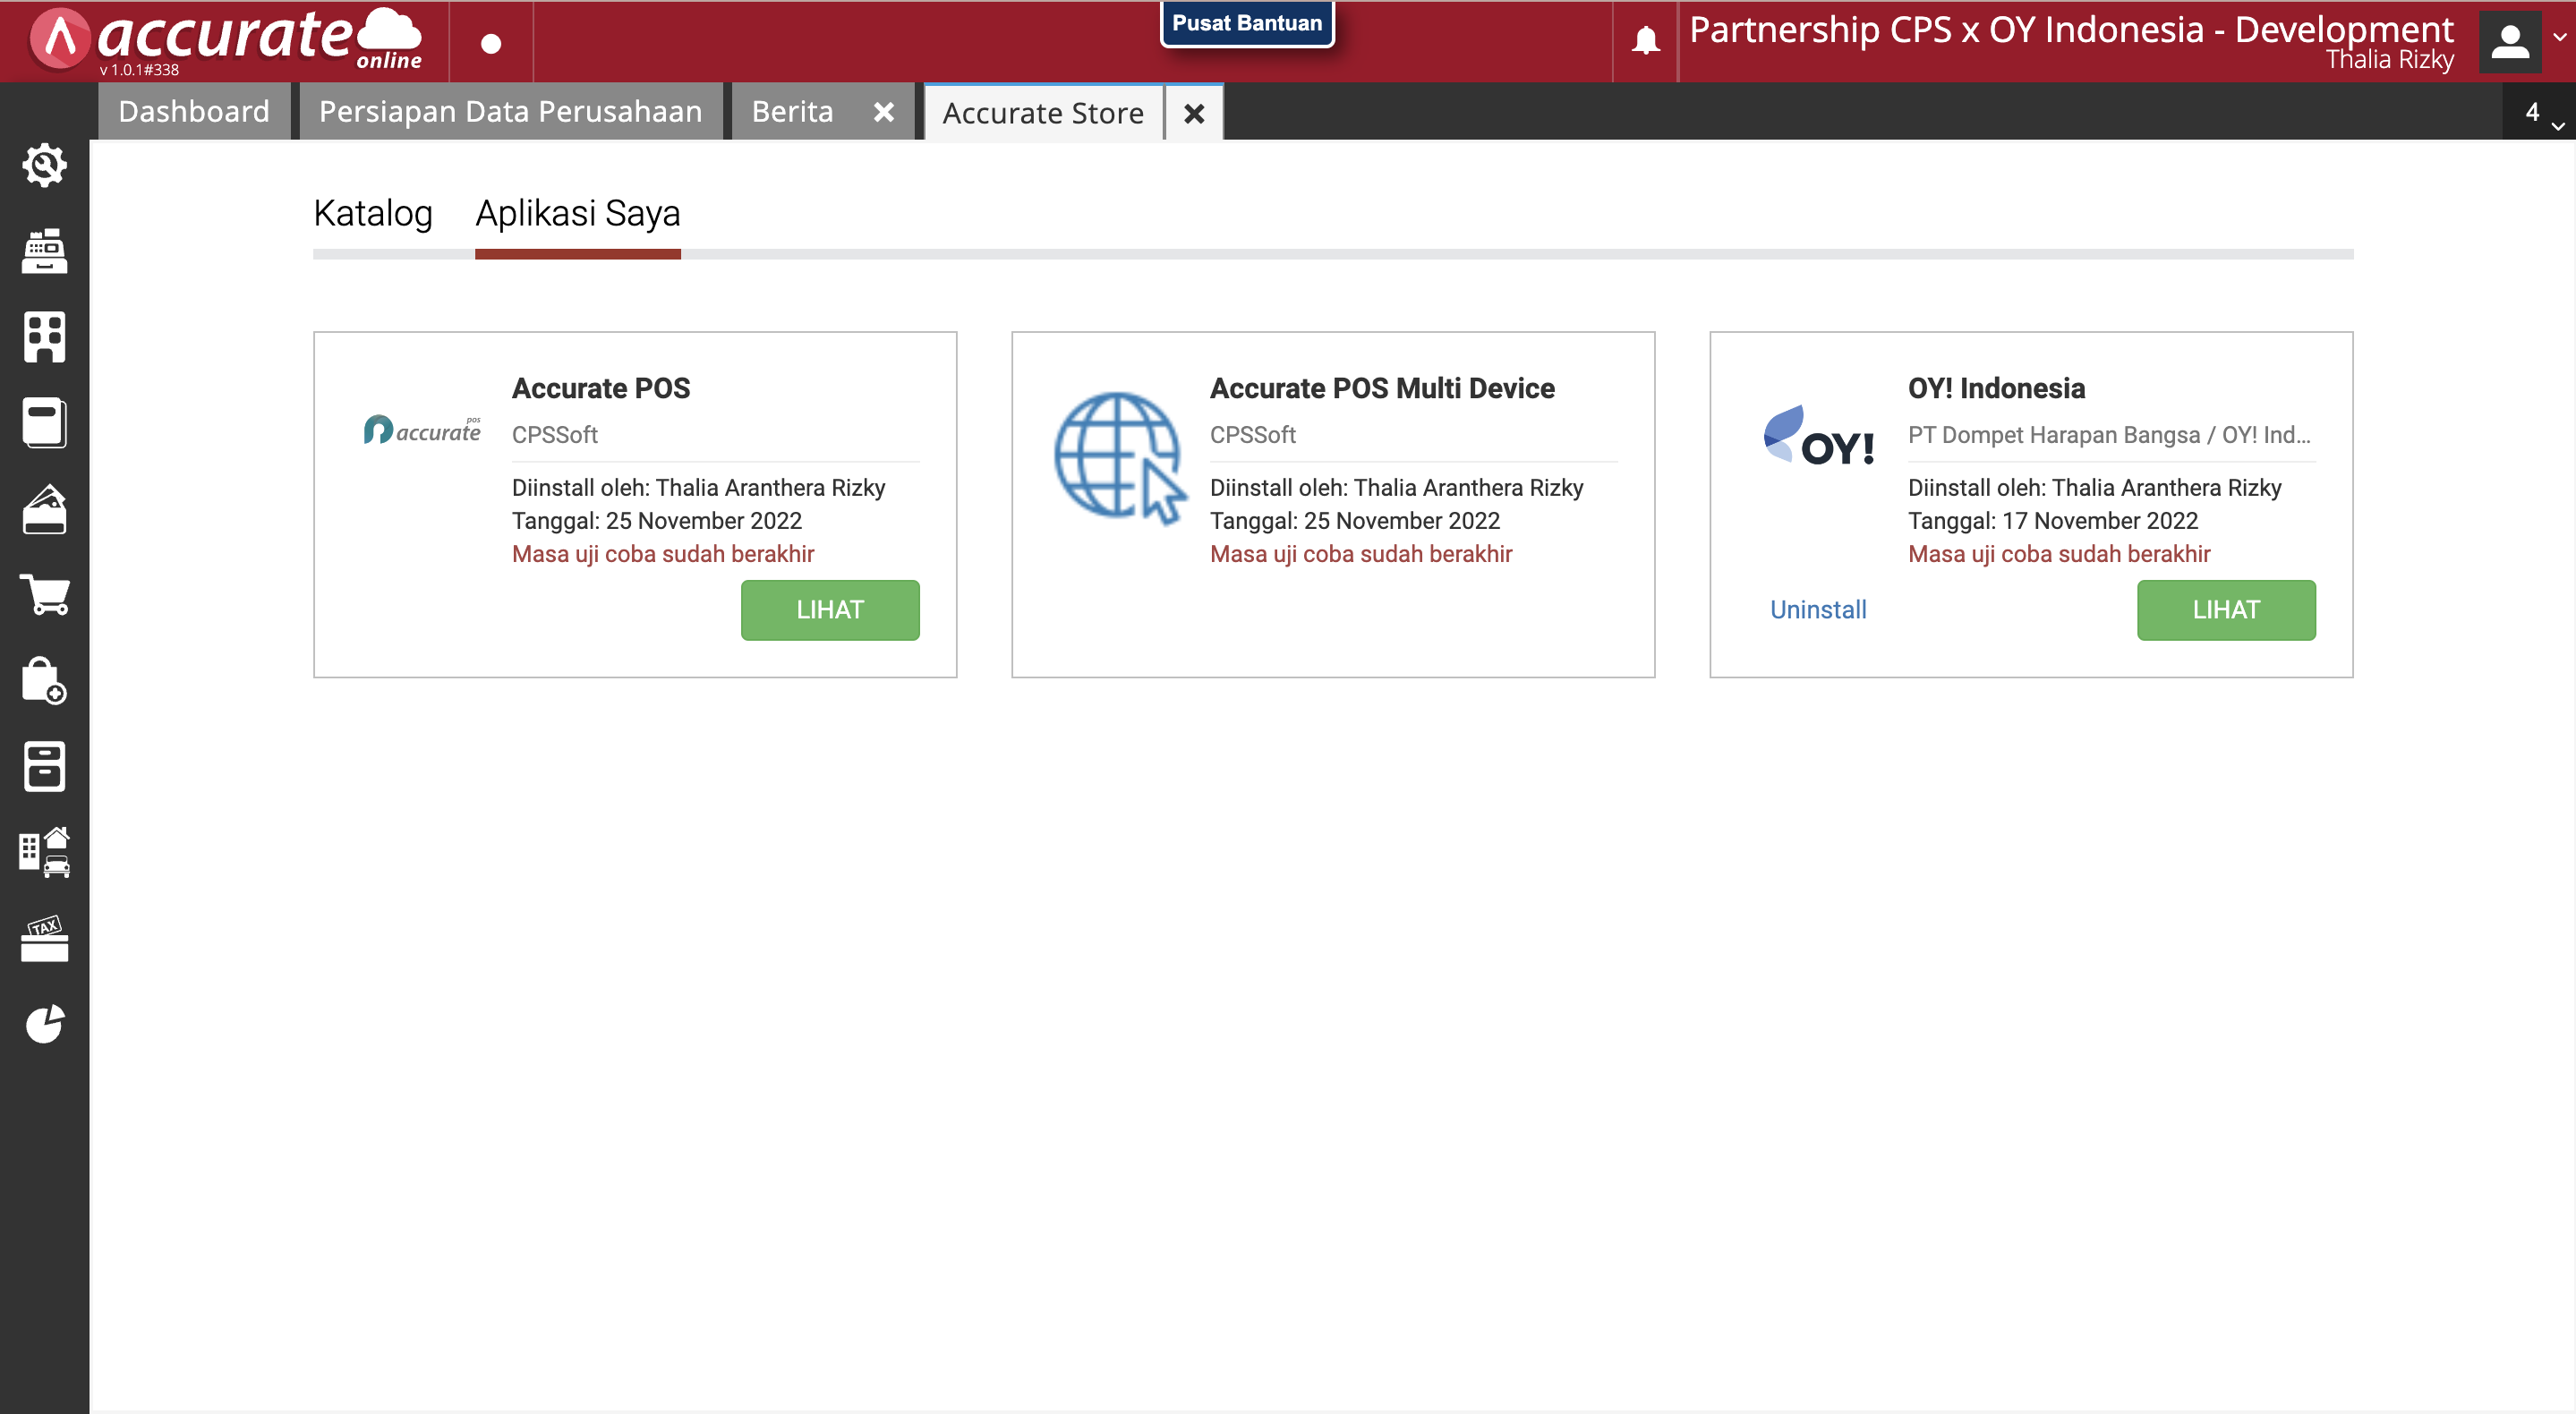
In your Accurate Dashboard, you can see that OY! Indonesia app will be listed in the Accurate Store >> Aplikasi Saya menu.
Note: A fee of IDR 20k/month will be added to your Accurate billing.
Map your Chart of Account (Akun Perkiraan)
- Click on "Configure" to map your Chart of Account (Akun Perkiraan).
- Then, map each product to the corresponding Account. Any transaction using each product will be put into the Chart of Accounts you defined on this page.
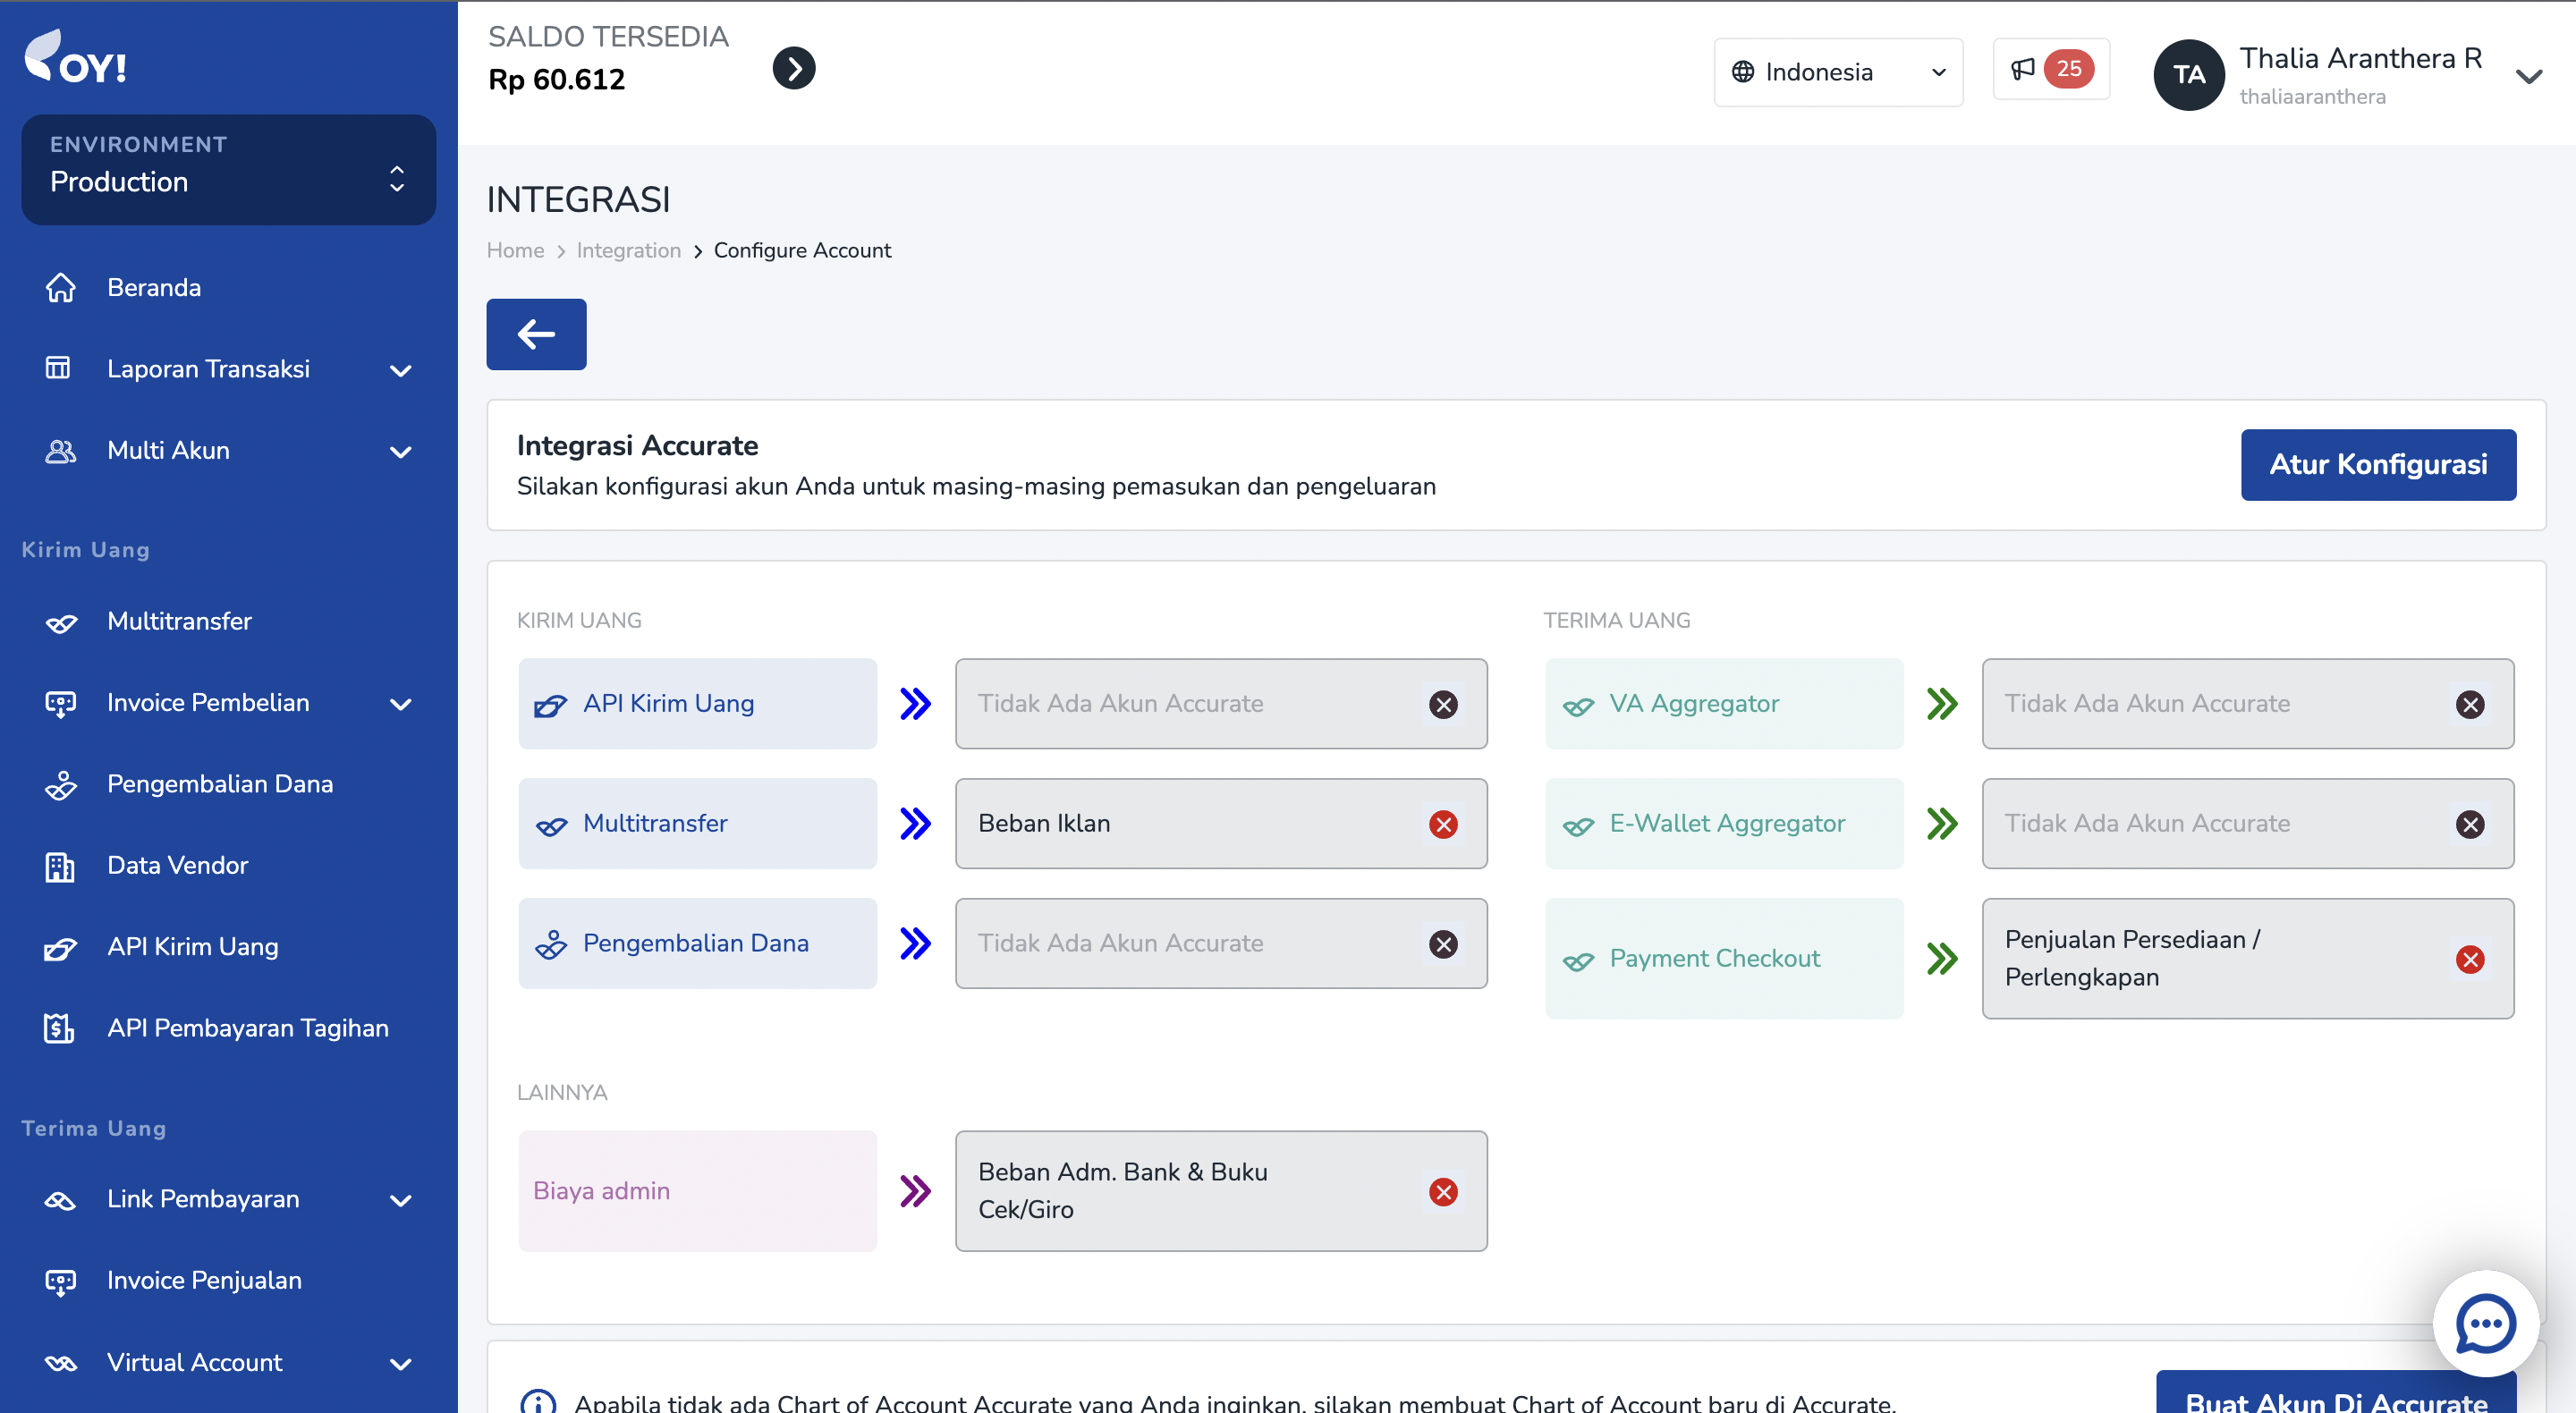
Note: Special for Bulk Disbursement product, you can define the Chart of Account later in the campaign creation process - Step 3 Input Detail page. In the Transaction Category field.
- You can change the CoA mapping anytime as needed, just go to Integration >> Accurate >> Configure.
Record Transaction to Accurate
- Now, your OY! account has been connected to your Accurate account and each product has been mapped to its corresponding Chart of Account.
- Any successful transaction that happened in OY! will be recorded to Accurate with the corresponding Account you defined in the Mapping Account menu.
- Transactions in OY! will be recorded in Pengeluaran or Pemasukan module, under OY! Balance bank account. It will also credited/debited your OY! Balance Bank Account.
- Note: For some reasons, we do not map Top up and Withdraw balance transactions to Jurnal. Therefore, you should adjust your bank’s Cash Bank account balance as well as OY! Indonesia Cash Bank account balance in your Accurate dashboard everytime you execute top up and withdraw transactions.
Disconnected your Accurate
- To disconnect your Accurate account from OY!, open the Integration menu on the sidebar. Then select “Disconnect”.
- Then, you will be disconnected from Accurate. Any transaction that you execute via OY! will not be recorded in Accurate.
- Note: To remove the bill, please make sure you also uninstall OY! app in your Accurate dashboard.
Jurnal Integration
Jurnal is a local accounting platform that is mainly used by companies in Indonesia. We have integrated our system to the Jurnal system in order to help you optimize your workflow. By connecting your OY! Account, you do not have to manually record your transaction that happened in OY! to Jurnal. You will get a seamless experience of recording your transaction.
How does it work?
Once you have connected your Jurnal account in OY!, any transaction that happened in OY! will be automatically recorded to your Jurnal account. Upon successful connection, we will trigger the creation of a new Bank Account, which is OY! Balance Bank Account. You will be required to map your Jurnal’s Chart of Account. Mapping your Chart of Accounts will help us to put your transaction into the correct Account. Transactions that happened in OY! will be recorded in that bank account, into the EXPENSES or SALES INVOICE modules.
Connect your Jurnal
- Before connecting your Jurnal account, you need to log in to your Jurnal account in your browser.
Login to your OY! dashboard. In the sidebar, select the "Integration" menu.
You will see the Jurnal menu. Click “Connect” to connect your Jurnal account to OY!.
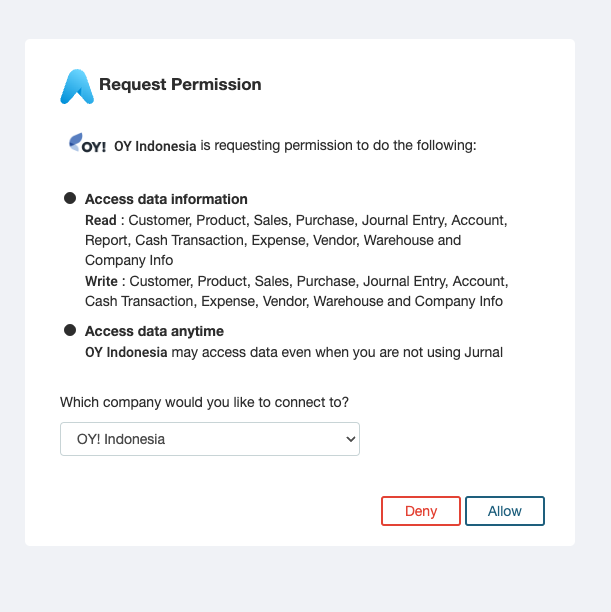
- There will be a page to ask for your consent regarding this connection process. Make sure to select OY! Indonesia. Click Allow to allow connection between OY! and Jurnal.
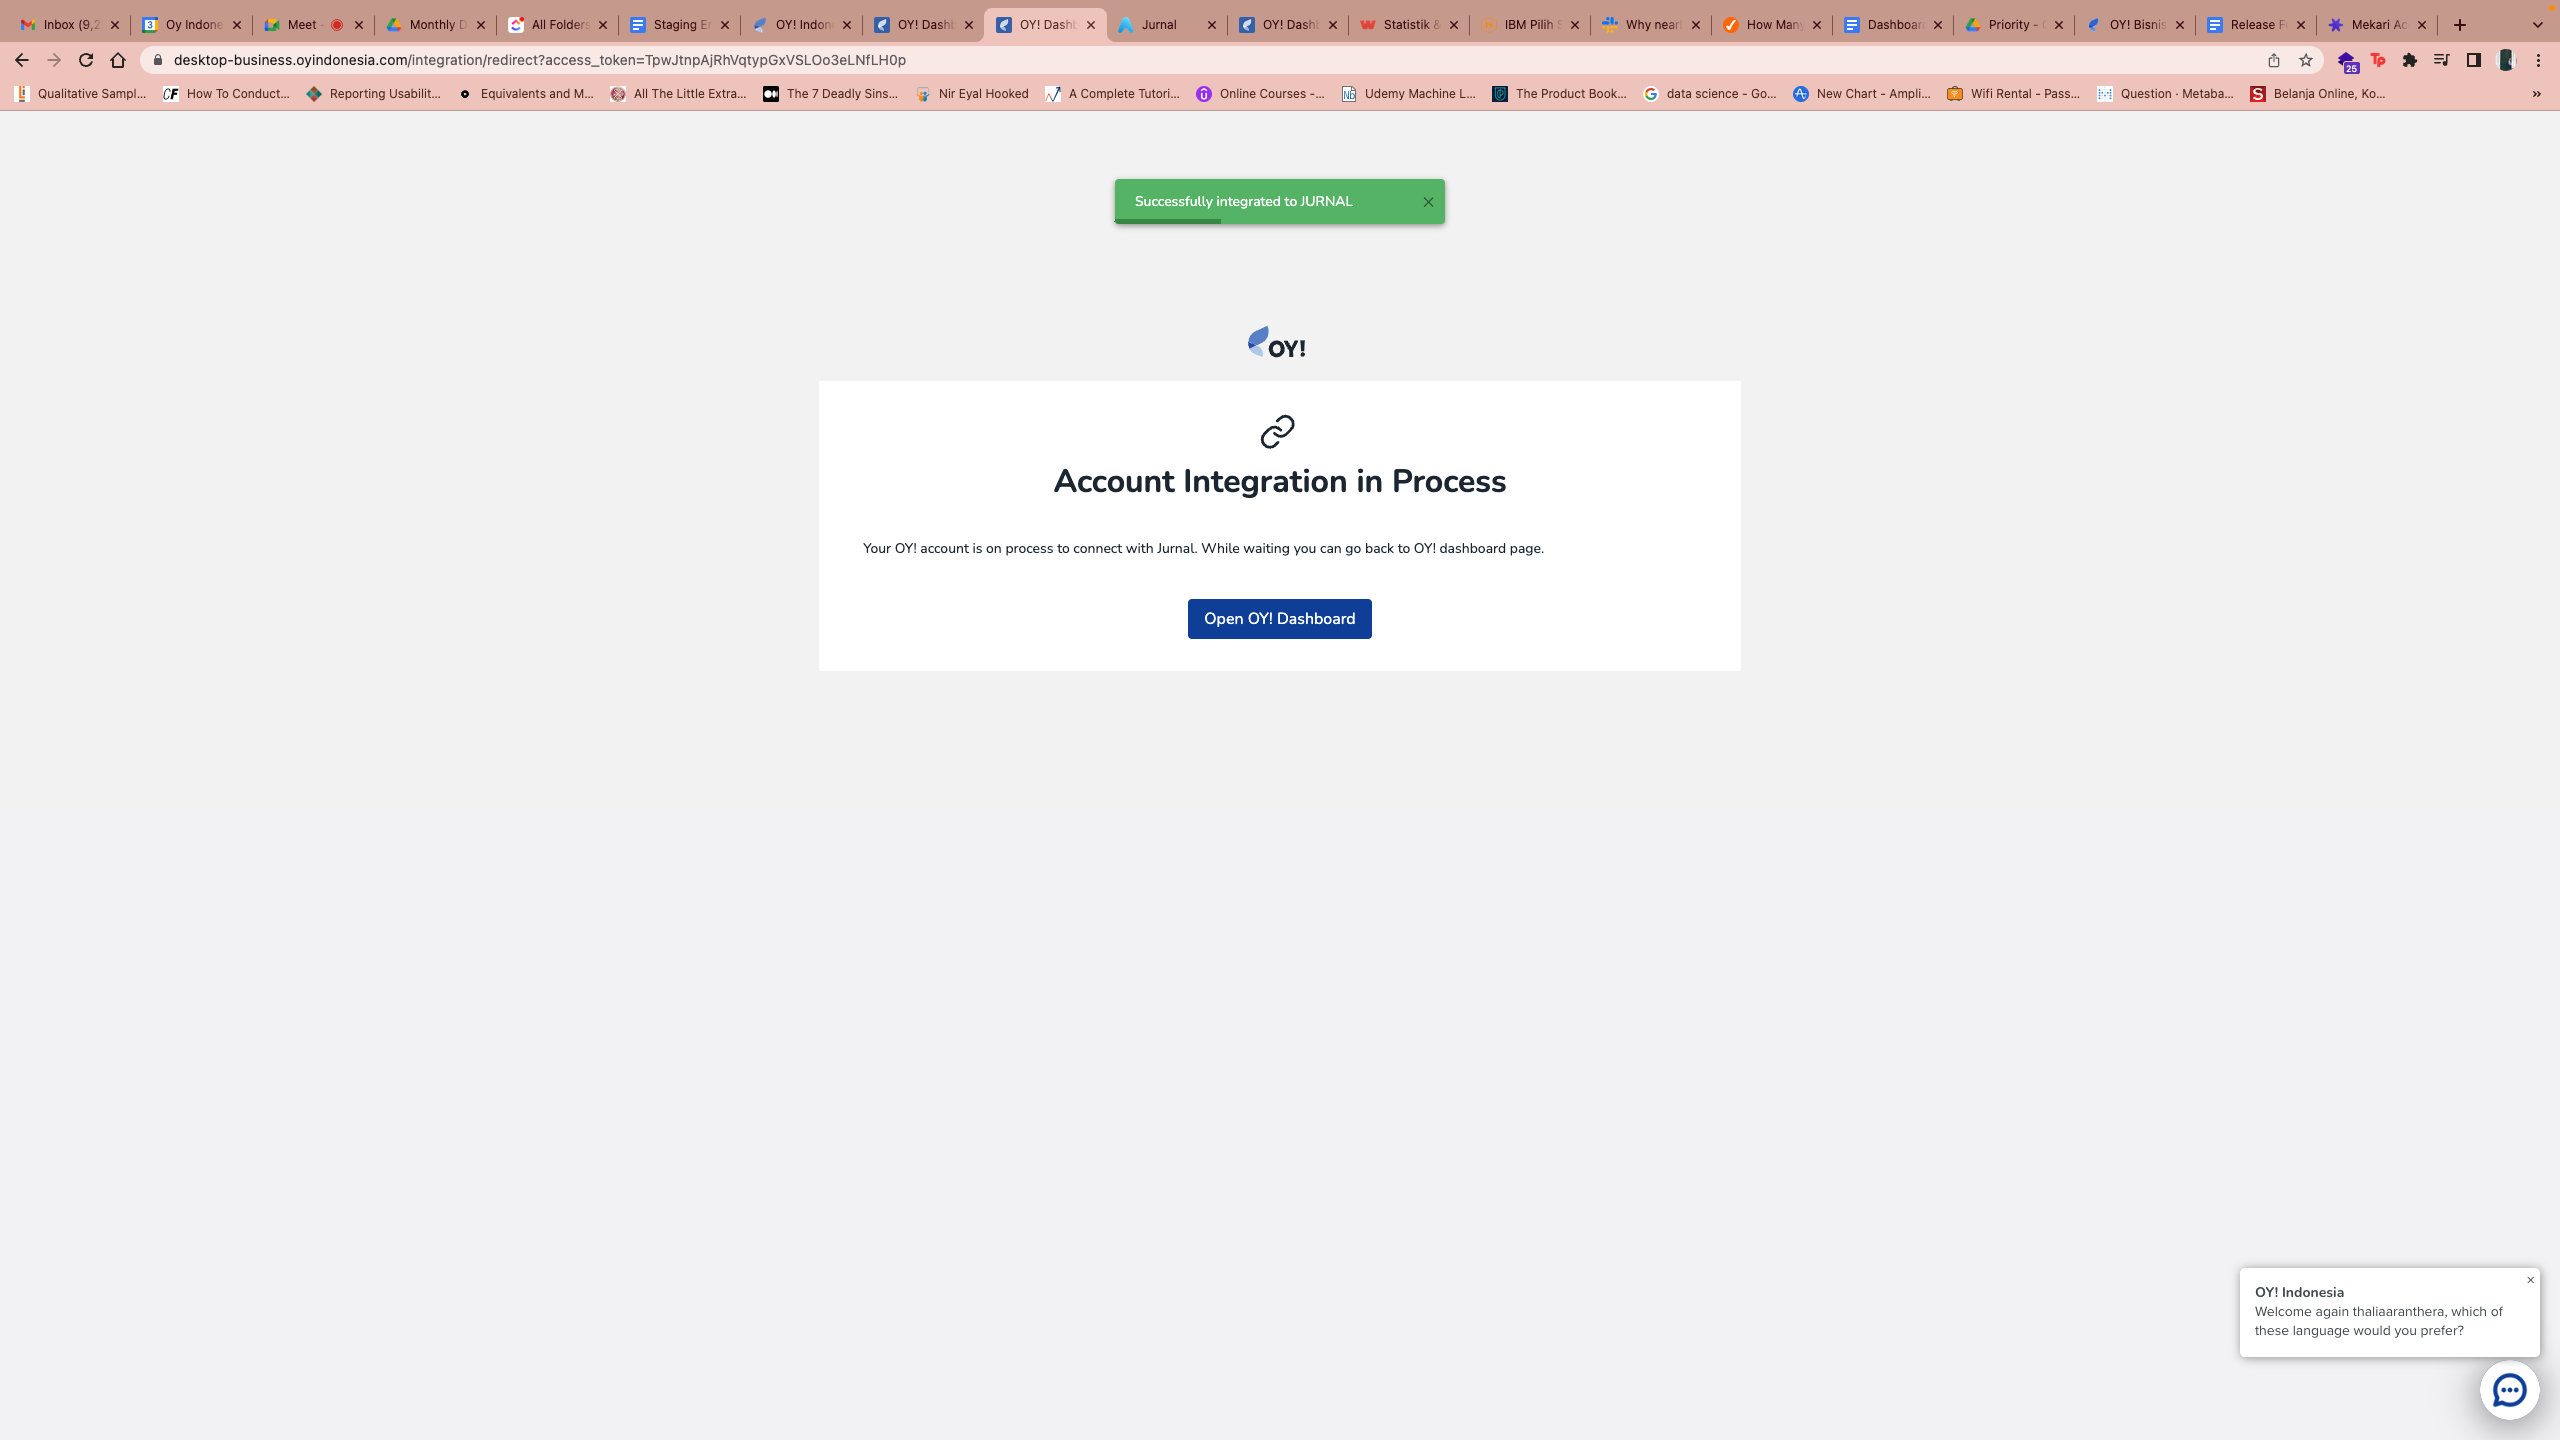
- Once you have successfully connected to Jurnal, a notification in your OY! dashboard will appear and you can see your status is now "Connected/ Terhubung".

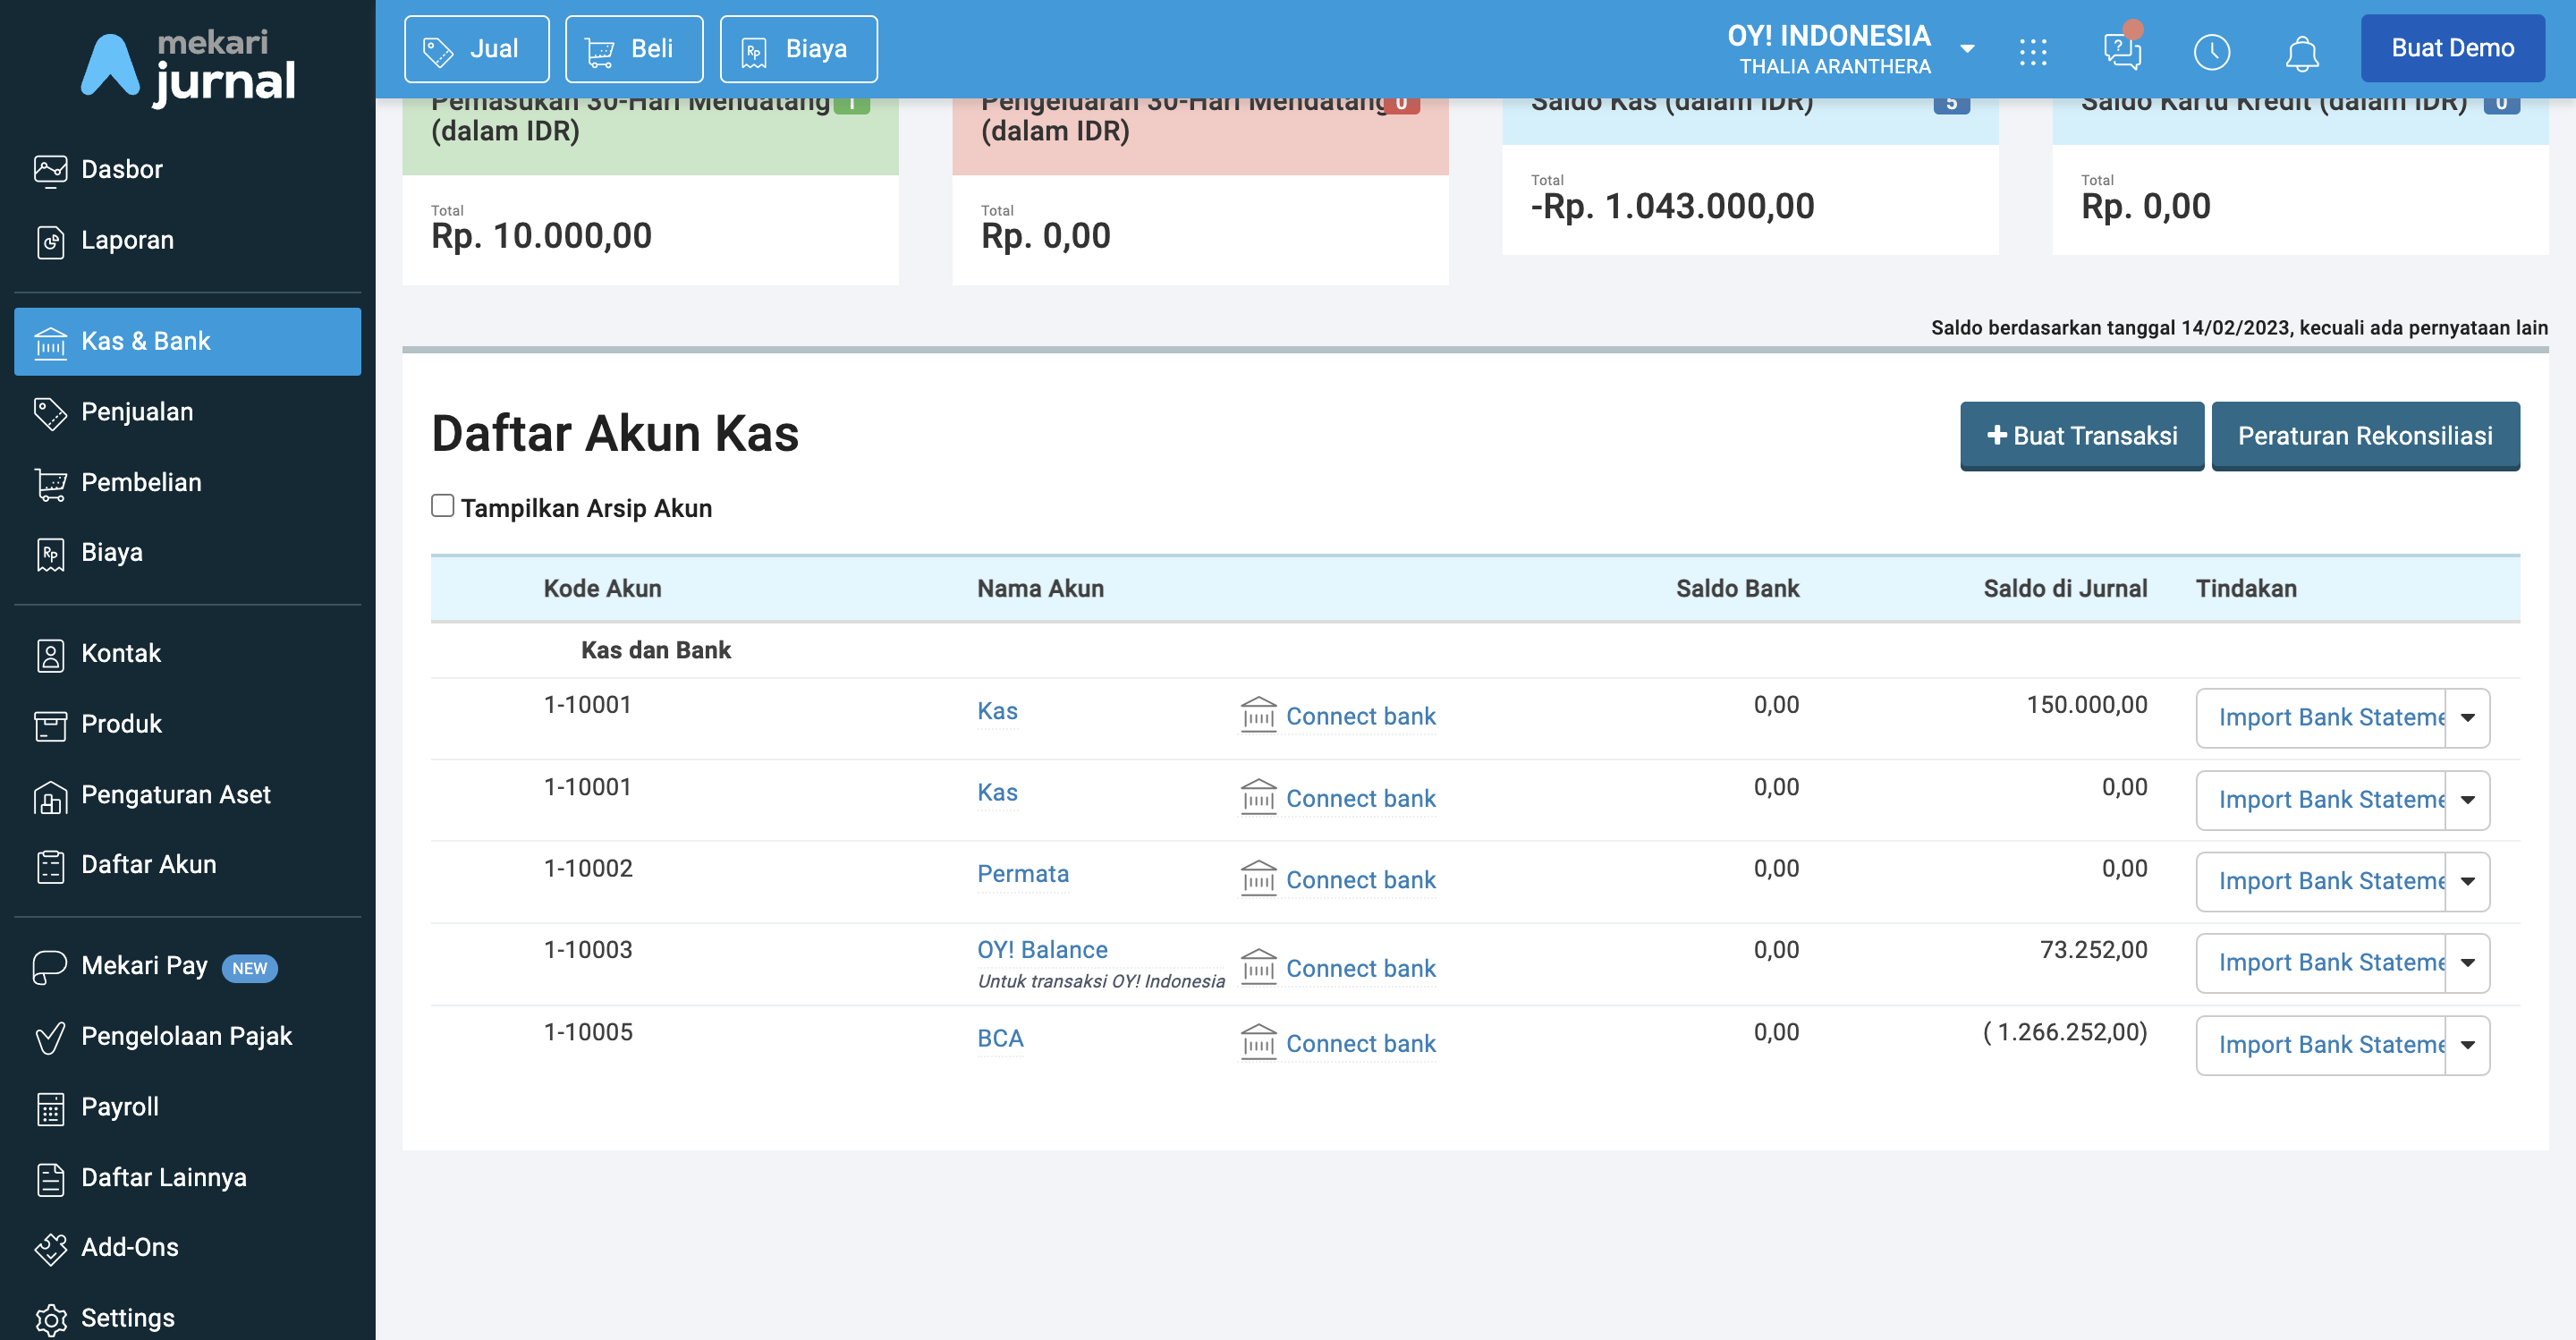
- Upon success connecting to Jurnal, we will create a new Bank Account into your Jurnal account, named “OY! Balance”. Any transaction that happened in OY! will be recorded under that bank account. Your current OY! balance will be mapped into your OY! Balance Cash Bank Account as a bank deposit transaction.
Map your Chart of Account
Click on "Configure" button in the "Integrasi" menu to map your Chart of Account.
Then, map each product to the corresponding Account. Any transaction using each product will be put into the Chart of Accounts you defined on this page.
- Note: Special for Bulk Disbursement product, you can define the Chart of Account later in the campaign creation process - Step 3 Input Detail page. In the Transaction Category field.
You can change the CoA mapping anytime as needed, just go to Integration >> Jurnal >> Configure.
Note: currently, we do not include mapping and recording the PPN tax. The applied tax will be recorded to Admin Fee Chart of Account. We will update this document as soon as possible once we have included mapping PPN function.
Record Transaction to Jurnal
- Now, your OY! account has been connected to your Jurnal account and each product has been mapped to its corresponding Chart of Account.
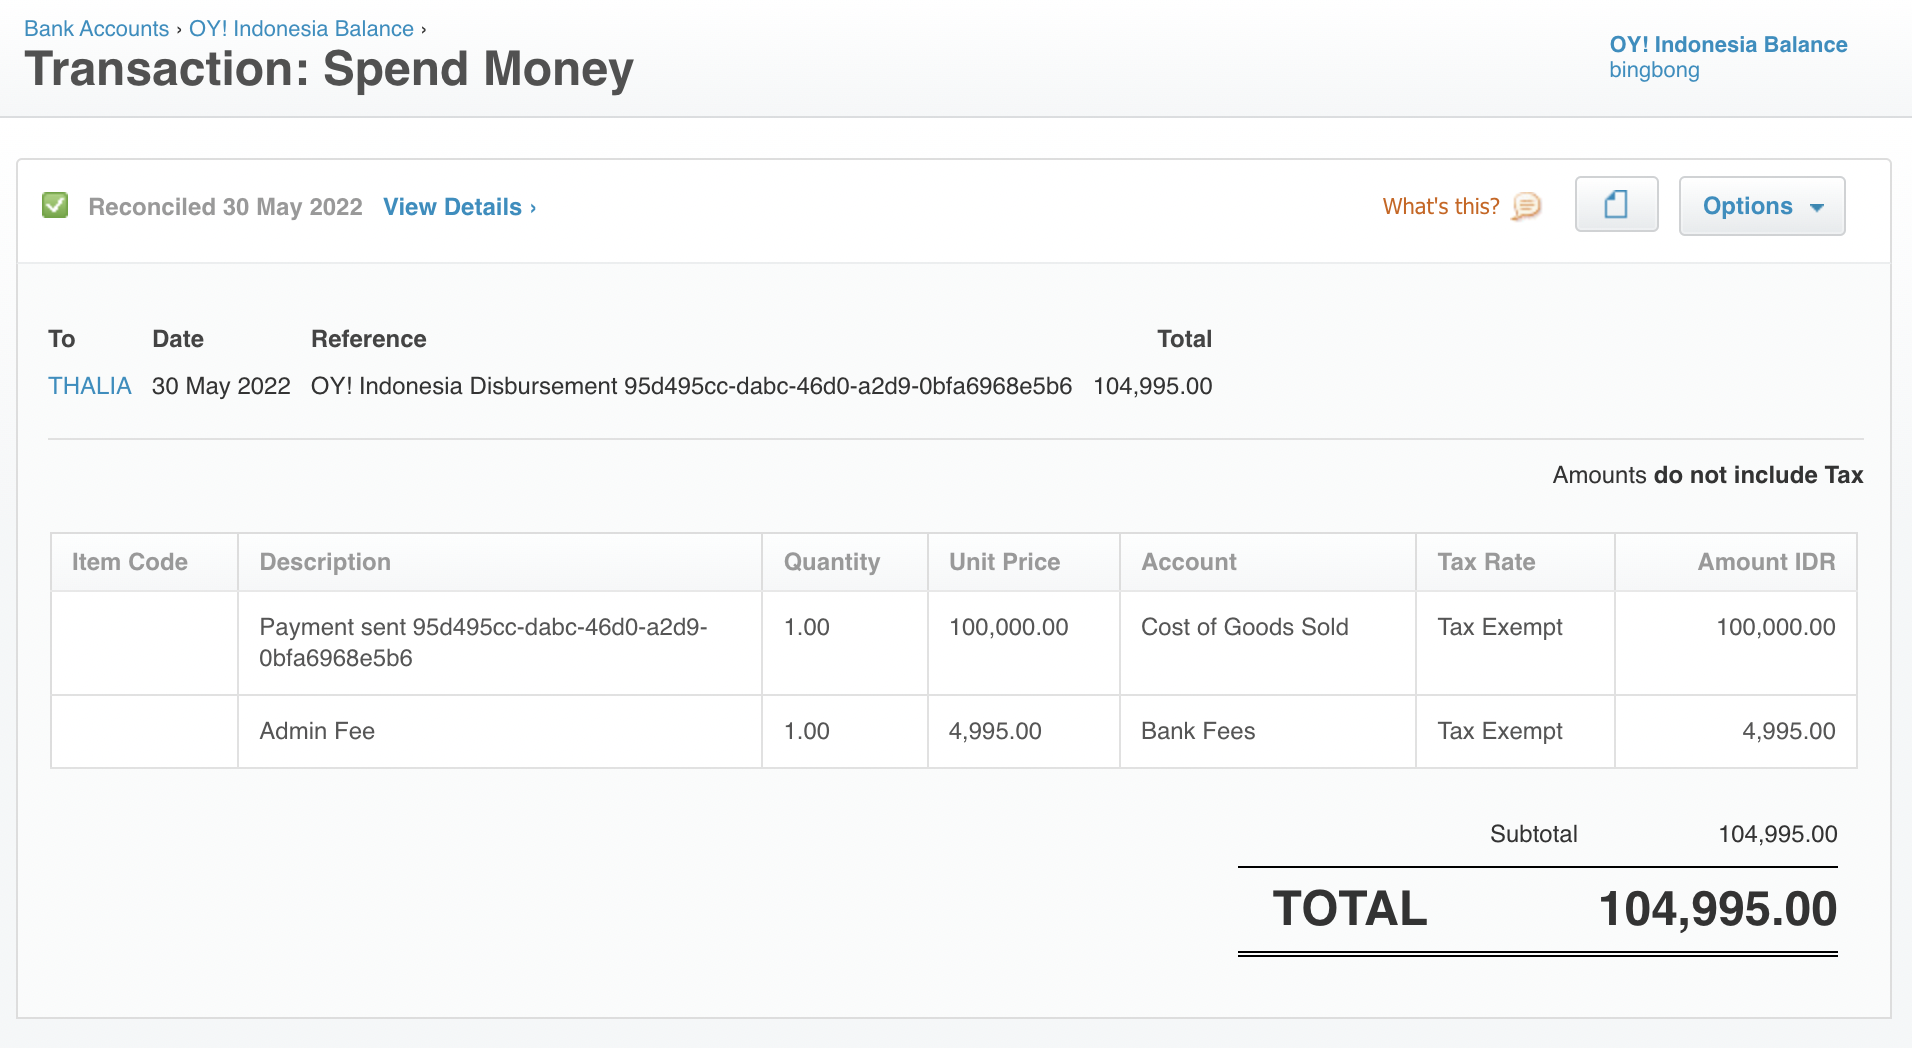
Any successful transaction that happened in OY! will be recorded to Jurnal with the corresponding Account you defined in the Mapping Account menu. Transactions from OY! will be recorded in the Expenses or Sales Invoice module, under OY! Balance bank account and it will credited/debited your OY! balance bank account. Note: Admin Fee of Receive Money transactions will be recorded in the Expenses module.
In this image, we show you a Disbursement Transaction with CoA "Iklan & Promosi" and admin fee with CoA "Komisi & Fee". It is recorded into the "Expenses" module in your Jurnal account with status LUNAS.
Note: For some reasons, we do not map Top up and Withdraw balance transactions to Jurnal. Therefore, you should adjust your bank’s Cash Bank account balance as well as OY! Indonesia Cash Bank account balance in your Jurnal dashboard everytime you execute top up and withdraw transactions.
Disconnected your Jurnal
- To disconnect your Jurnal account from OY!, open the Integration menu on the sidebar. Then select “Disconnect”.
- Then, you will be disconnected from Jurnal. Any transaction that you execute via OY! will not be recorded in Jurnal.
OY!'s Authorization Callback
When you successfully complete a transaction using OY!'s API-based product, OY! will send a callback to your system. To keep your system secure, we have provided a feature that allows you to control and approve these callbacks from OY! before they are received by your system.
Currently, we only support configuration for the OAuth 2.0 protocol. If your system uses OAuth 2.0, you can set up OY! callbacks to be directed to an authorization process before they are received by your system. To do this, simply enter the Authorization URL, client ID, and client secret via your dashboard.
How to Setup Authorization Callback
You can follow the steps below to set up callback authorization via your dashboard:
- Log in to the OY! dashboard as a super admin or admin, then select the "Settings" menu, and choose "Developer Options."
- Click on the "Authorization Callback" tab. Then, you should input your authorization details (Authorization URL, client ID, and client secret). This step is necessary to allow OY! to complete the authorization process before sending a callback to you.
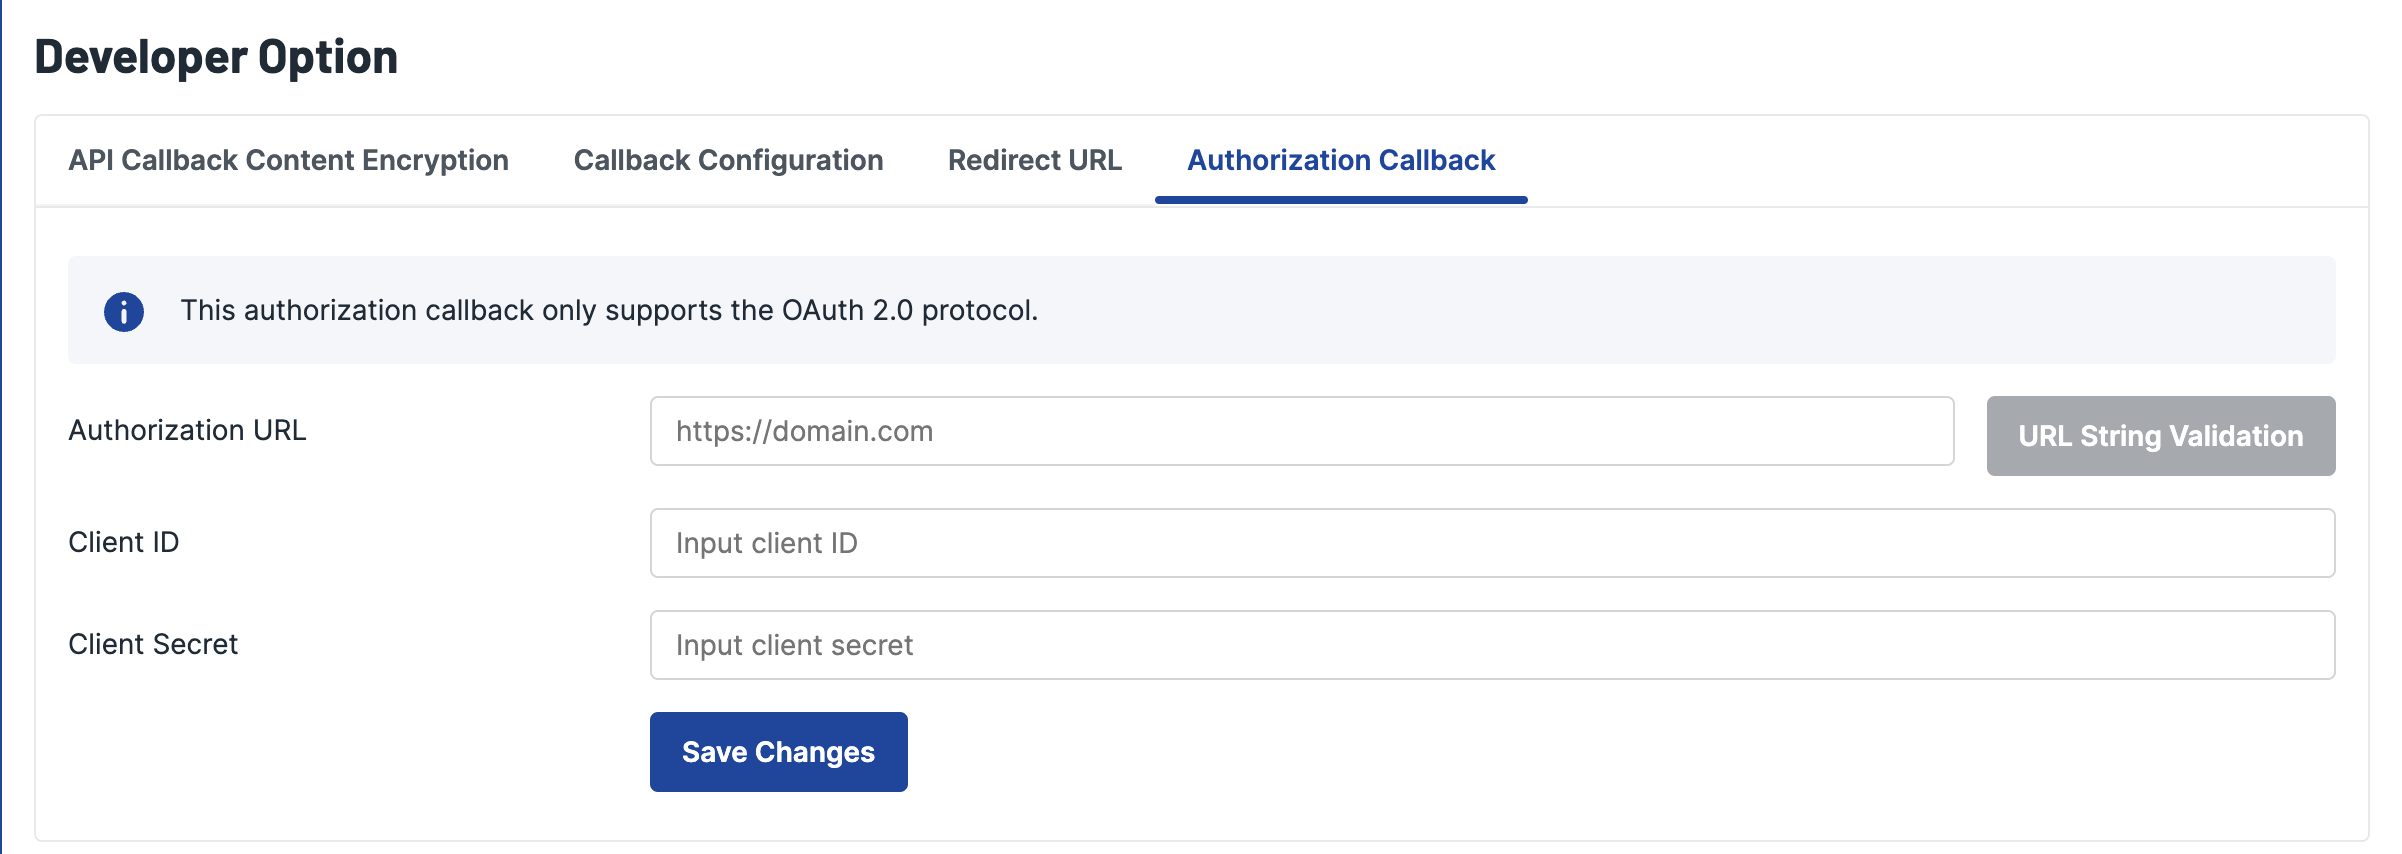
- Click the "Save changes" button.
- Once you have configured your OAuth 2.0 credentials, all callbacks from OY! will go through your authorization process before you can receive them. OY! will obtain an access token along with the expiry time from your system.
- If you no longer want callbacks from OY! to go through the authorization process, you can remove all the OAuth information or credentials you've entered on this page and then click "Save Changes."
OY! Business App
OY! Business App
Great news for you who always in mobility mode but you need to access our dashboard! Now you can access your OY! dashboard from the tip of your finger. OY! Business offers you with easy access to OY! Dashboard, so you can do your financial activities everywhere you are, without opening your laptop or PC. In this app, you can see your balance, account statement, transaction status, send money and also receive money. Yes, doing transaction is now easier than before!
Register and KYB
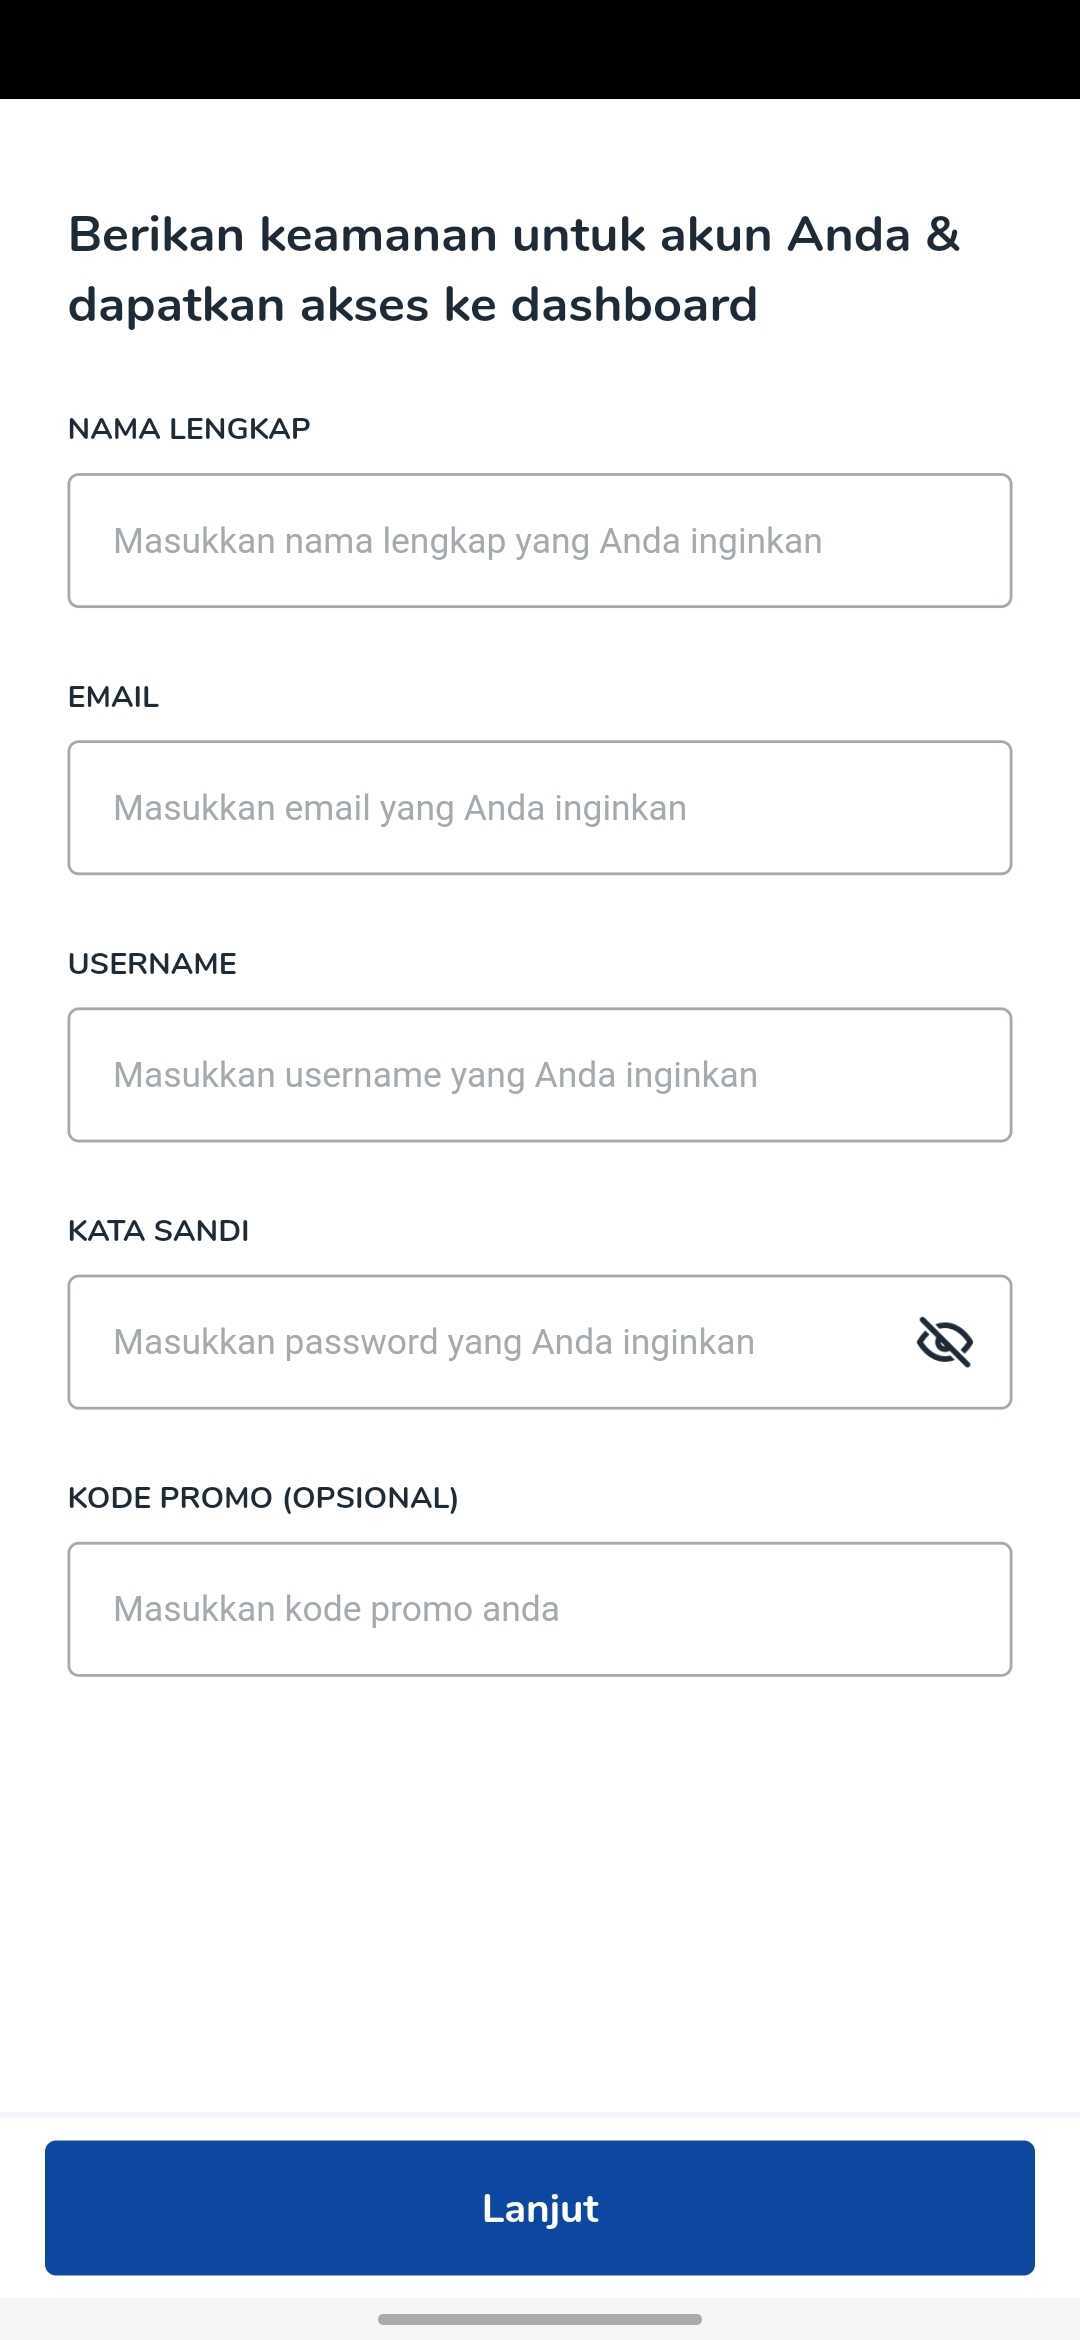
- Open your OY! Business app in your Android phone.
- If it is your first time opening this application, you have to input your phone number.
- Then, app will shows list of accounts that are tied to the phone number you entered before.
- If you want to create a new account, tap “Buat Sekarang”. Then follow the instruction.
- Once you success registering your new account, you can also submit your KYB.
Login
- Open your OY! Business app in your Android phone.
- If it is your first time opening this application, you will need to input your phone number to verify your account.
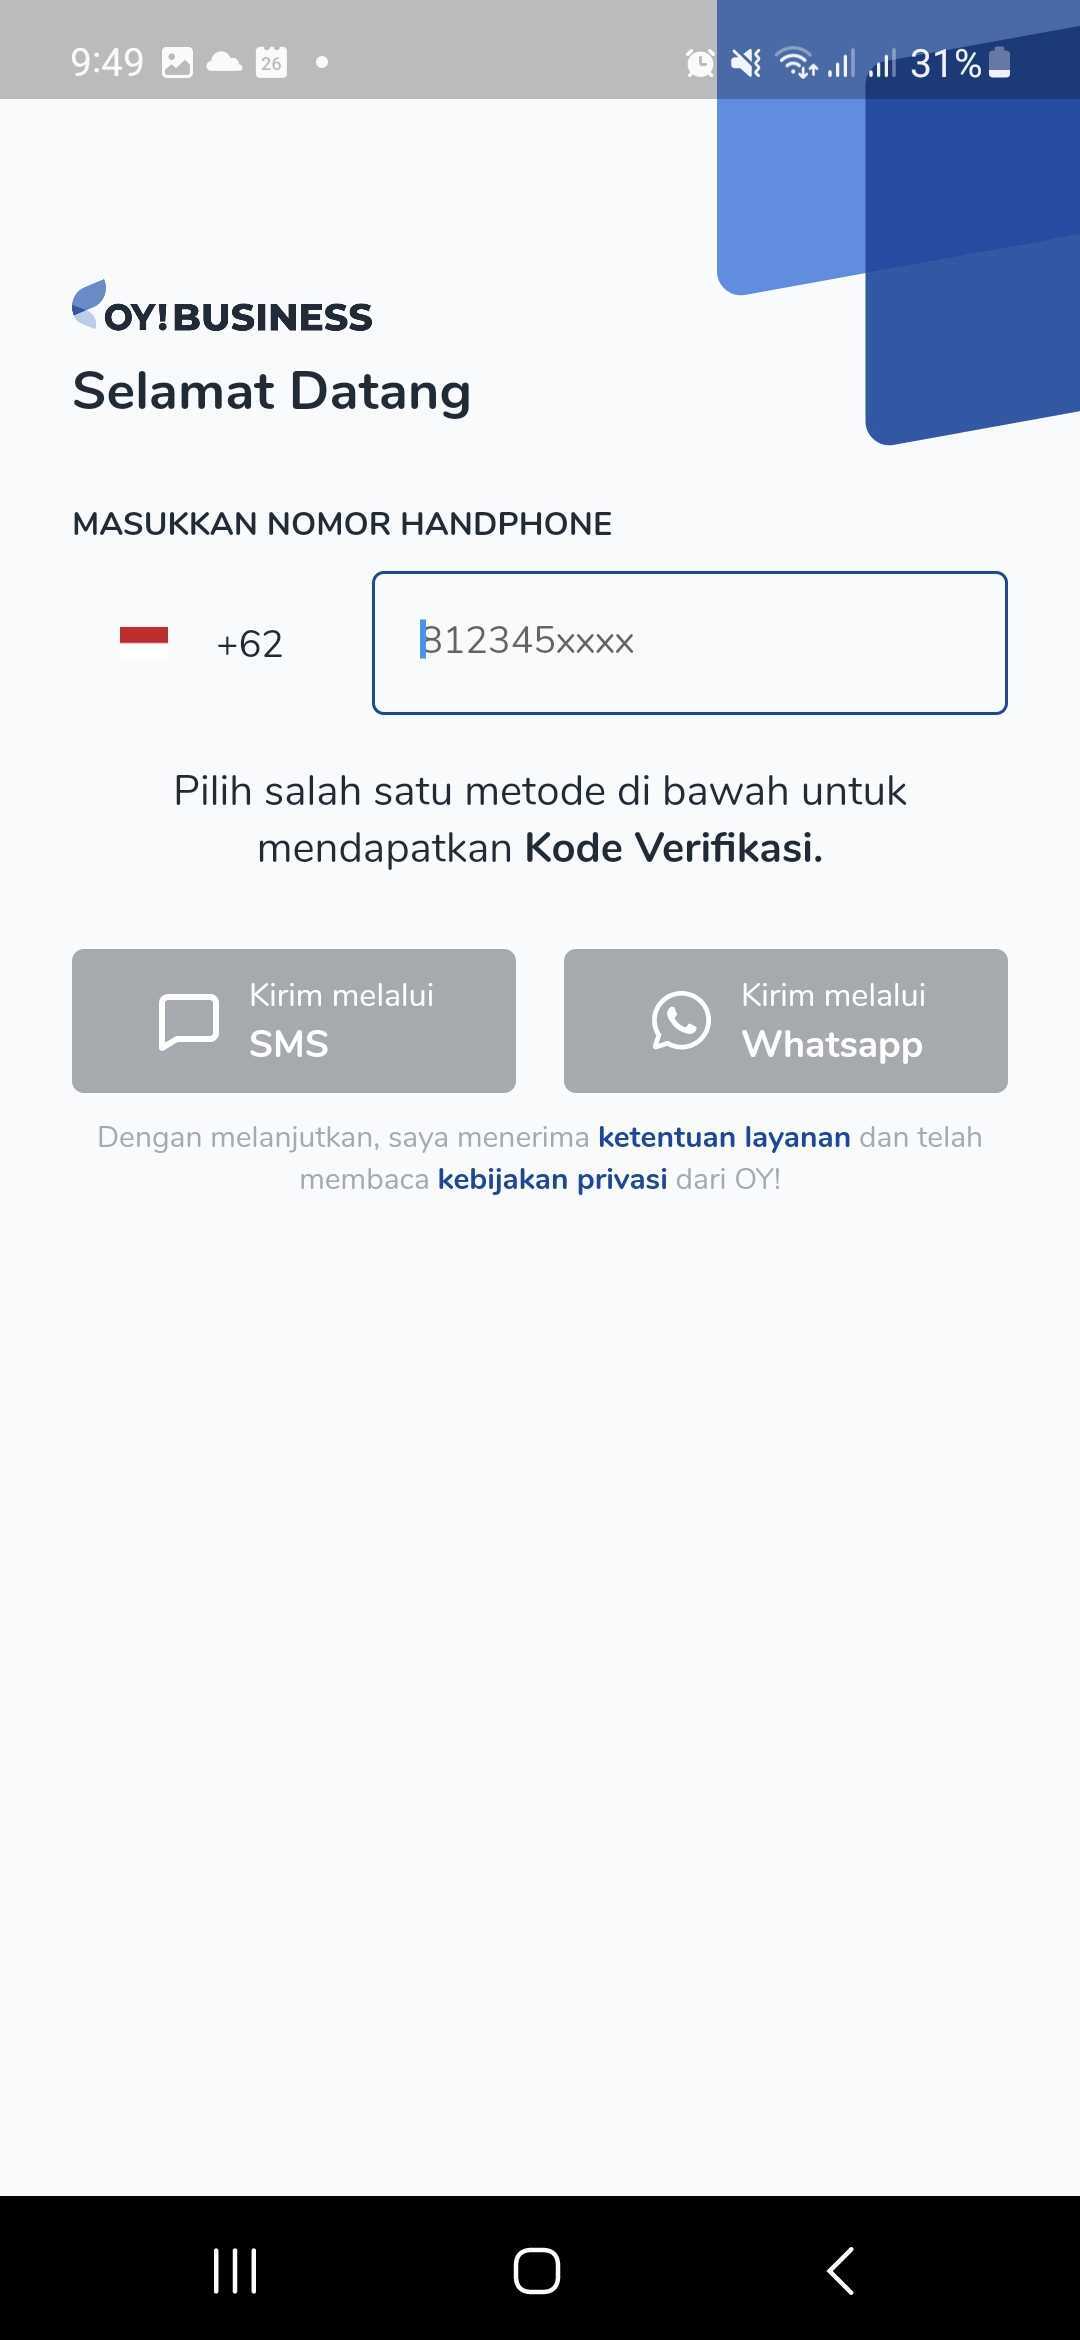
- Next, select which method for sending OTP. Make sure to input the right phone number. Then, please input the OTP number we just sent you.
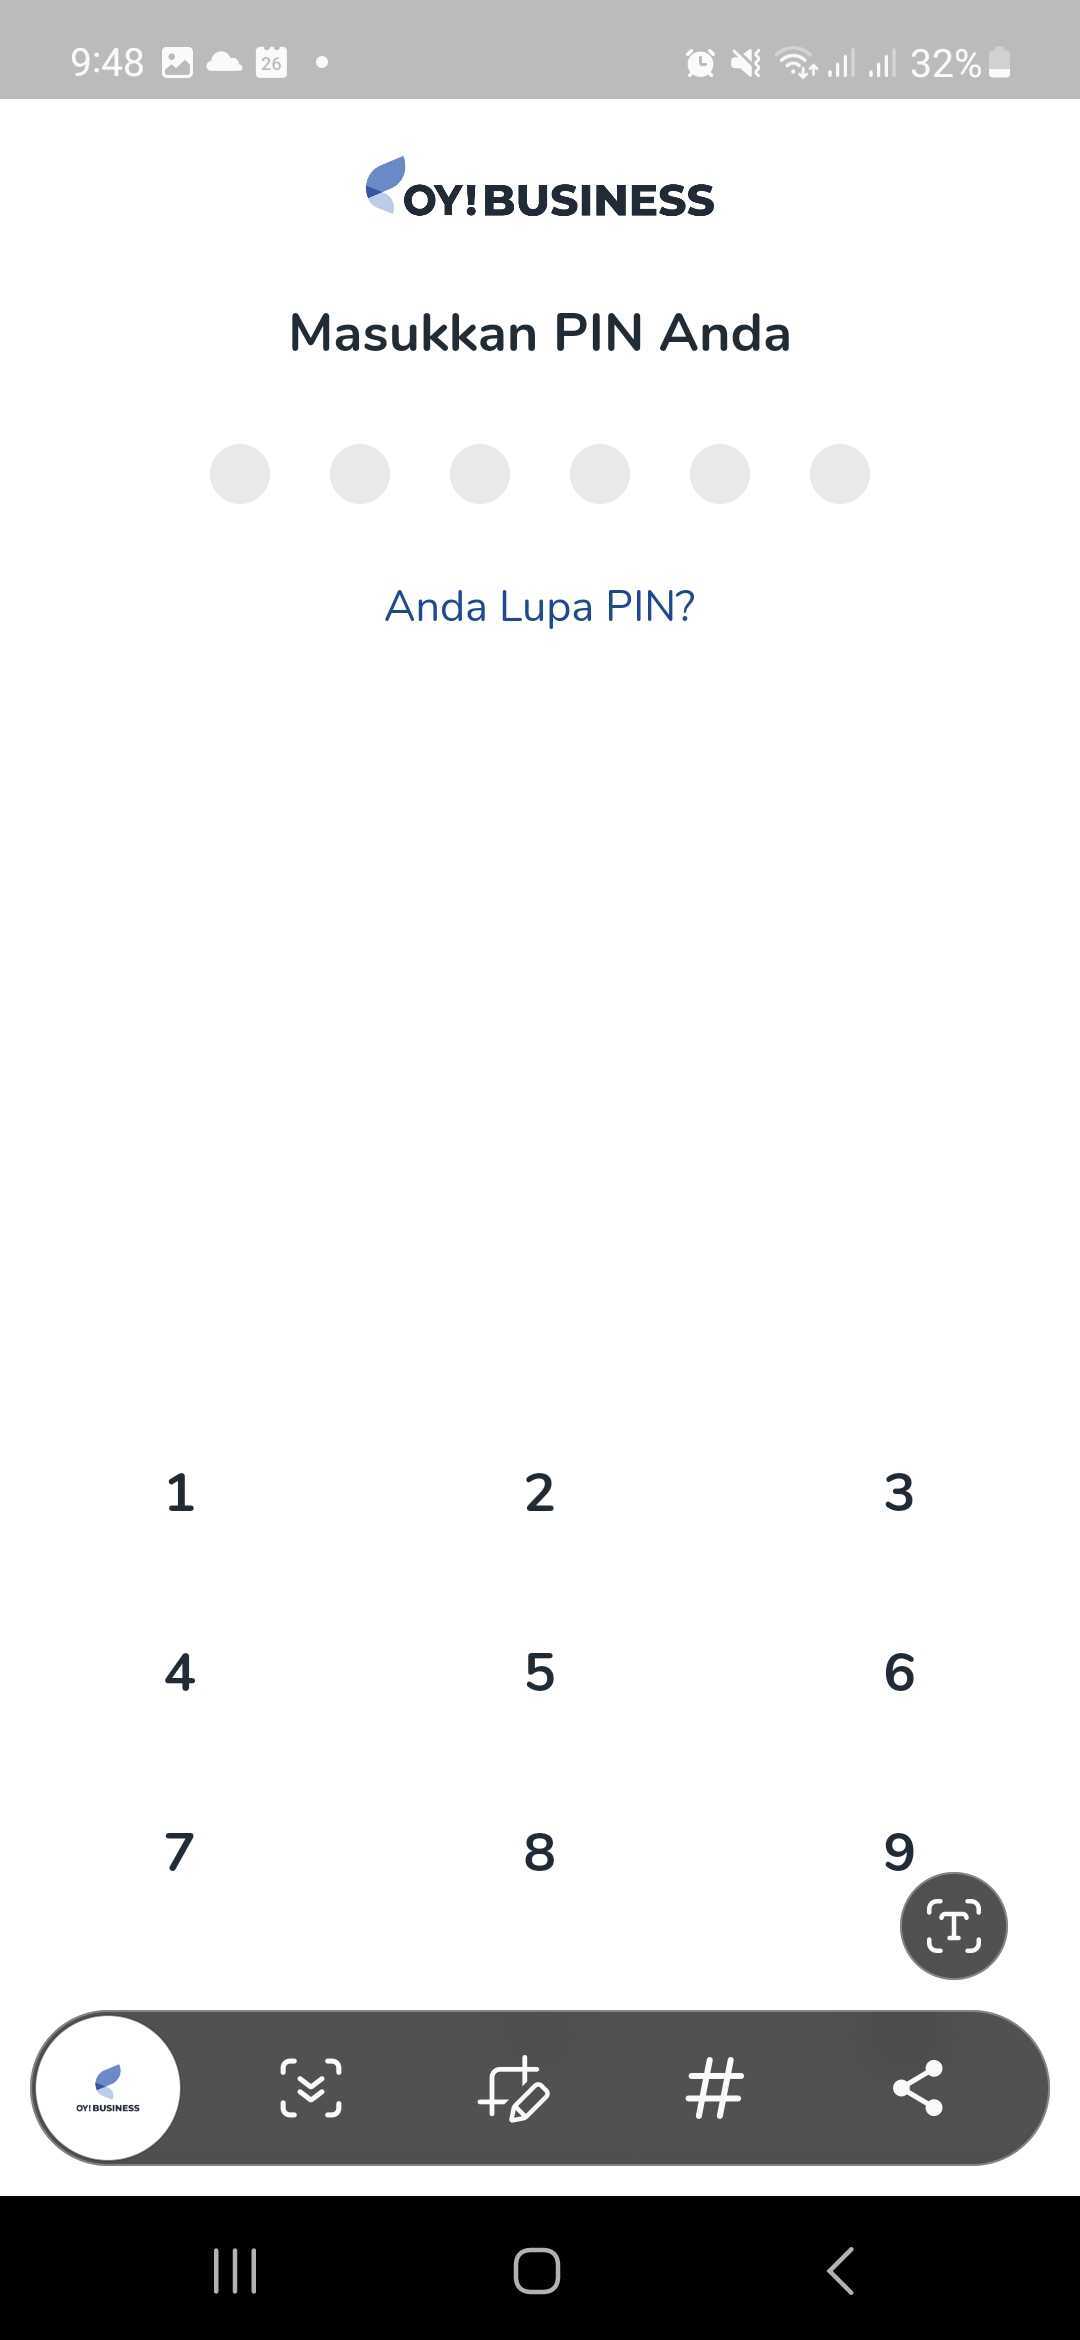
- If the phone number is not yet registed in OY!, you will be required to create a new account.
- However, if your phone number have been registered to OY! before, the app will displays list of accounts that are tied to the phone number you entered before.
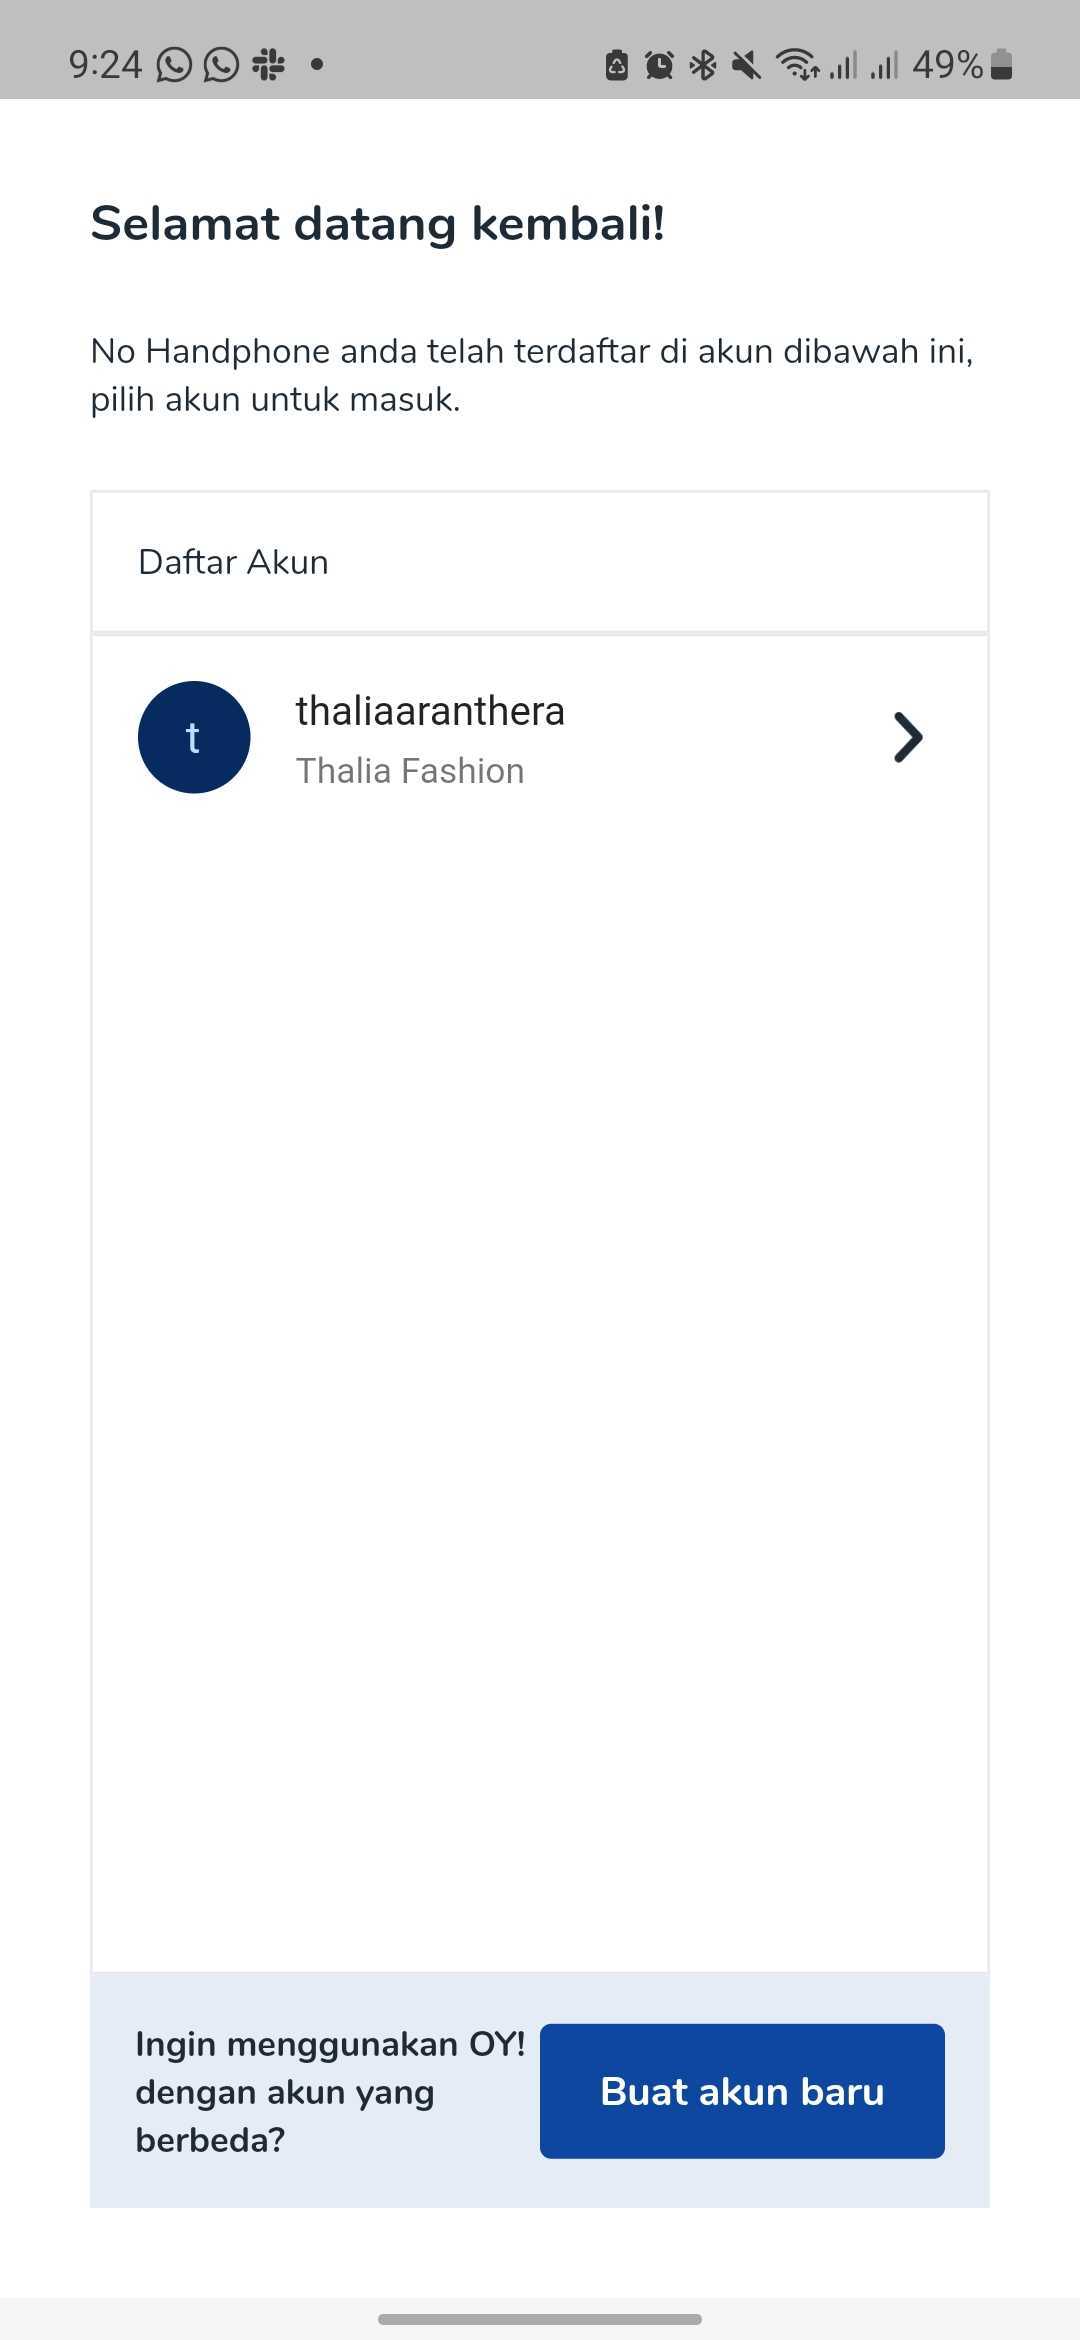
- Select an account you want to log in to.
- First time logging in, you will be required to create a new PIN. This PIN will be used to log in to that account in the business app environment.
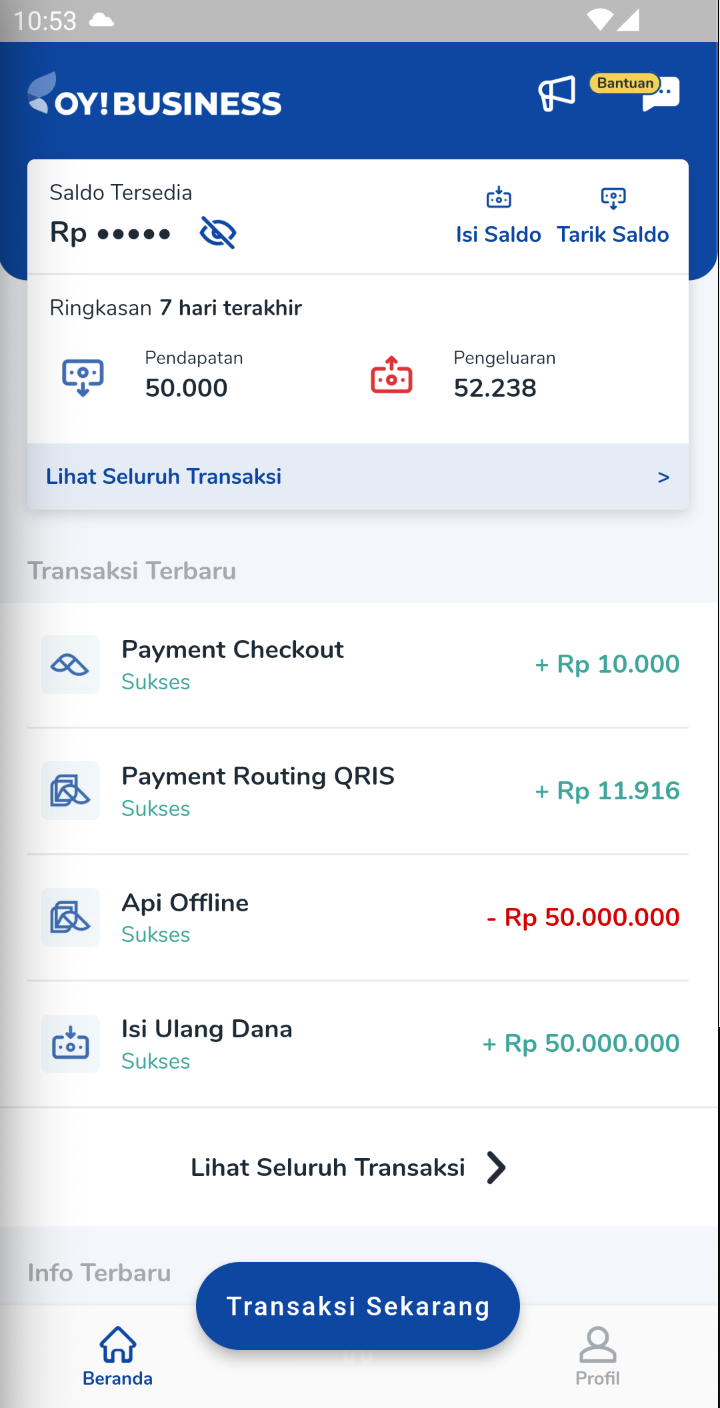
- Once you have successfully logged in, you will be directed to homepage. Here, you can see your balance and see your latest transaction.
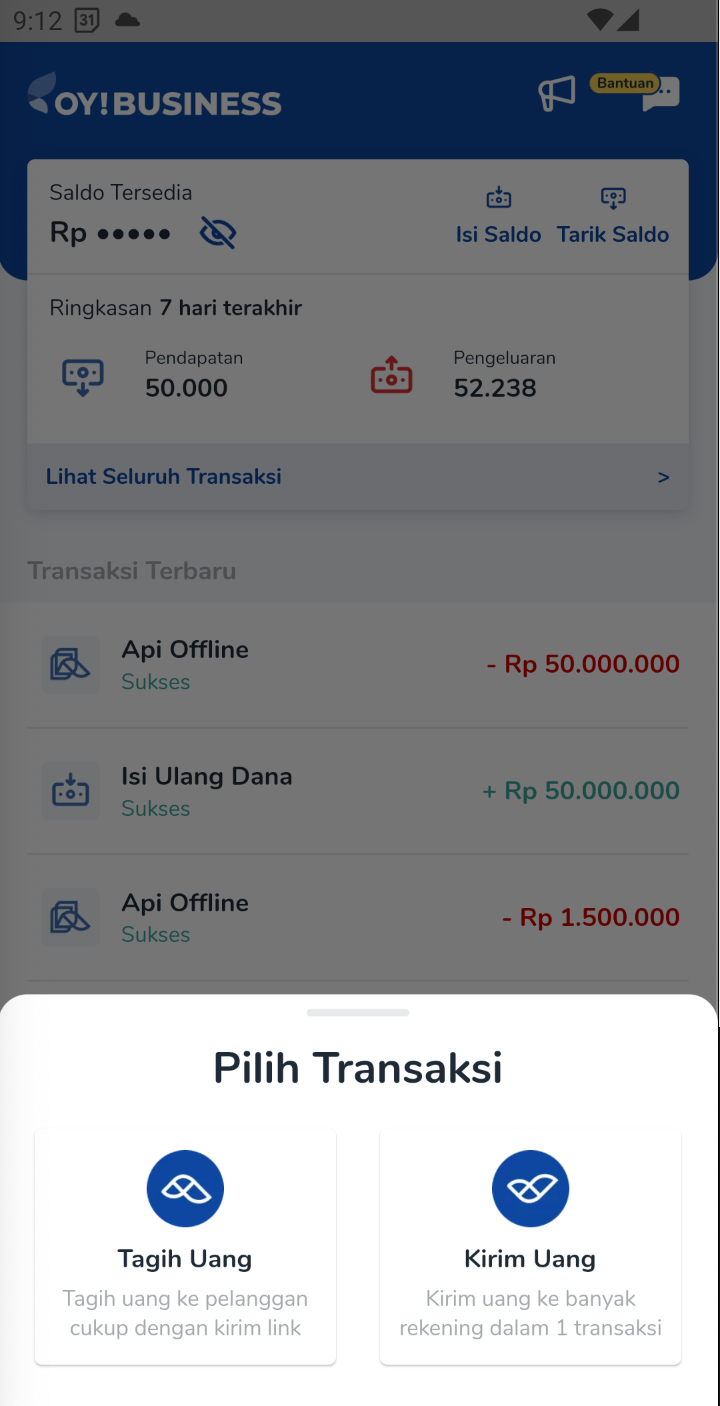
Create Payment Link
- In the homepage tap “Transaksi Sekarang” button.
- Then, select “Tagih Uang”.
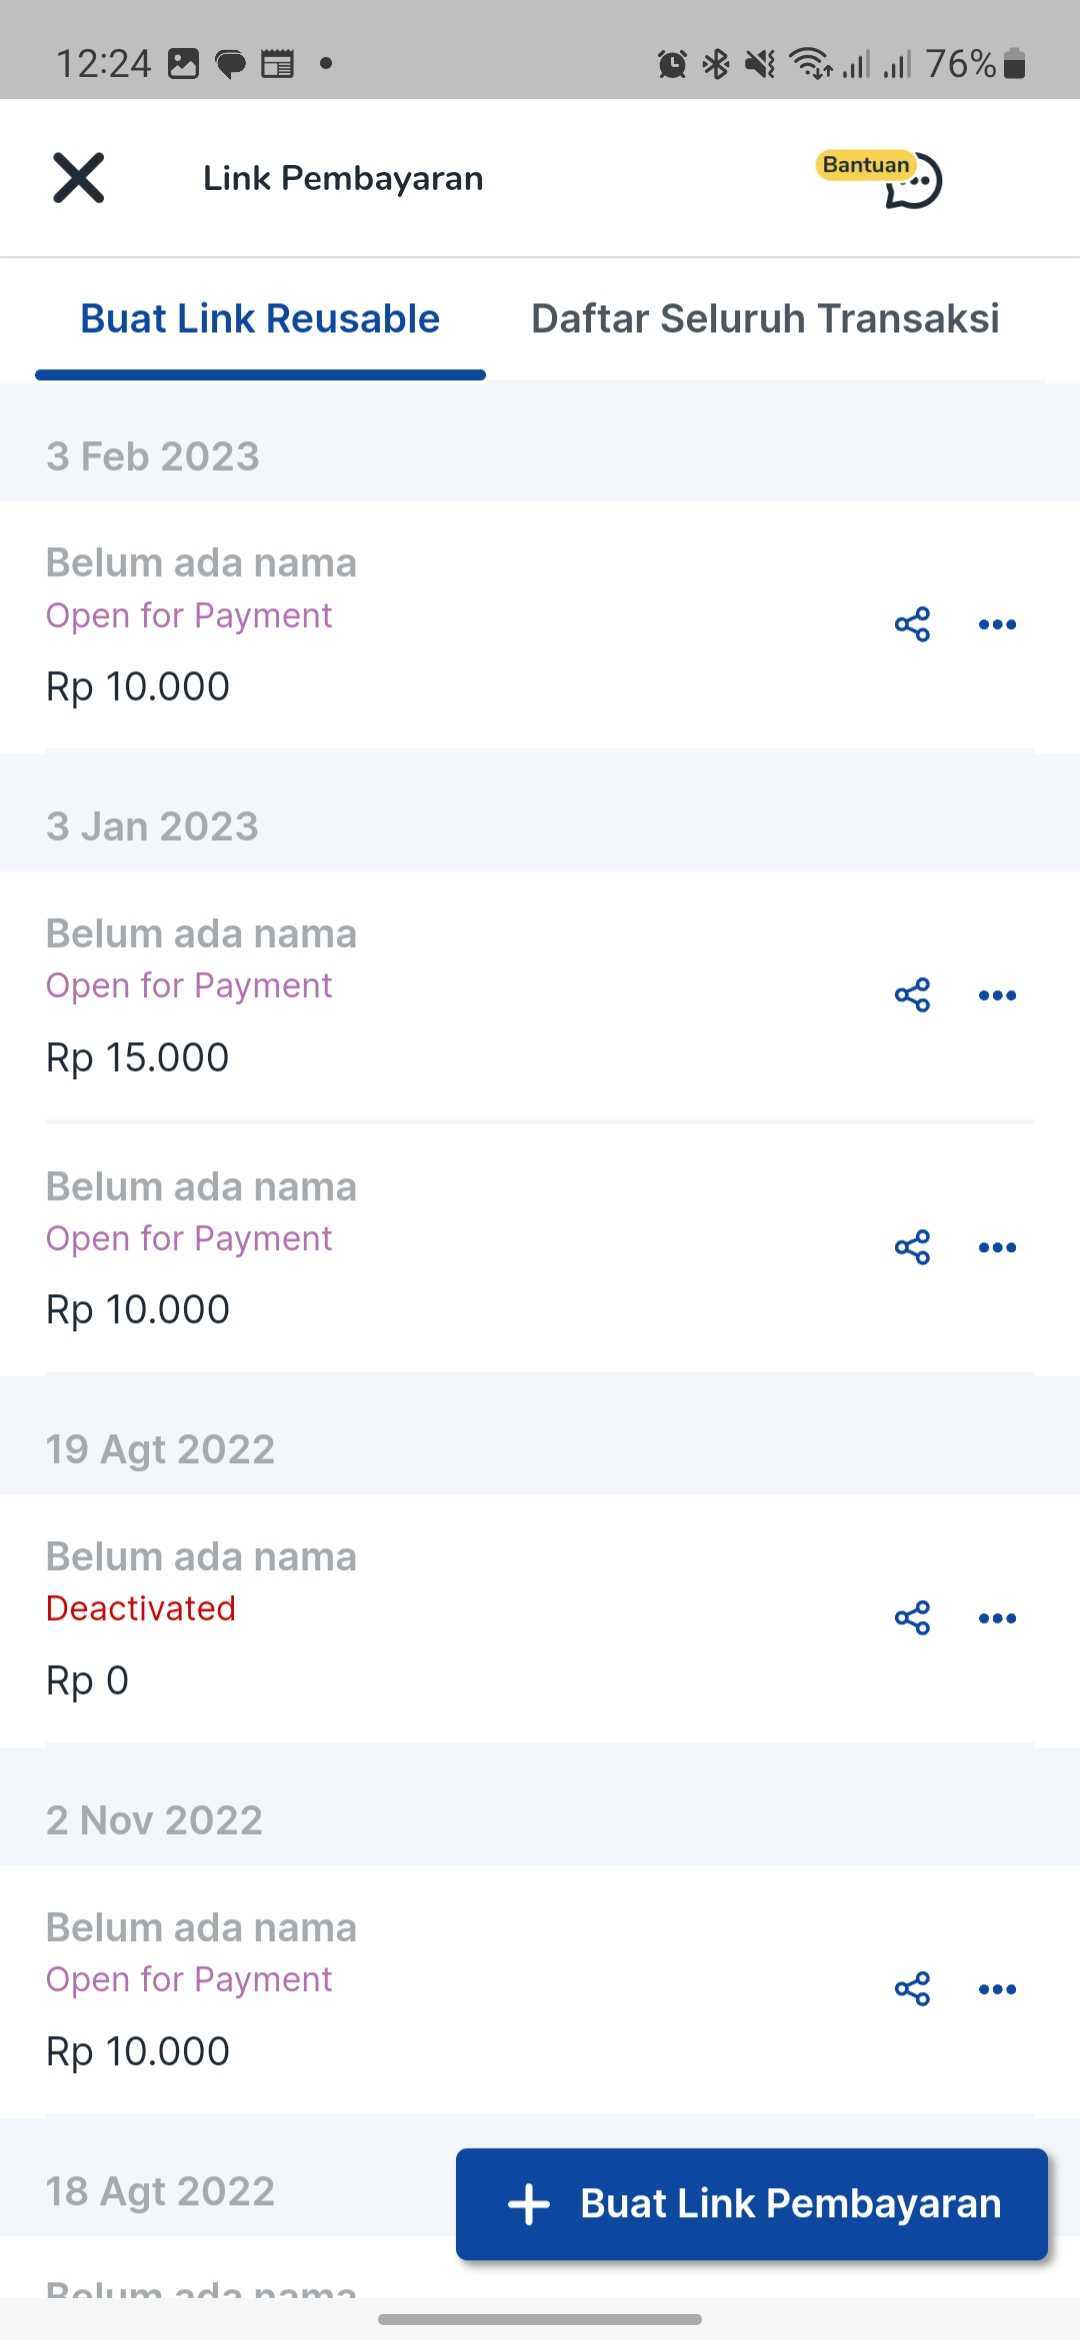
- You will see your history of payment links and its transaction history. Then, tap “Buat Link Pembayaran” button in the bottom right.
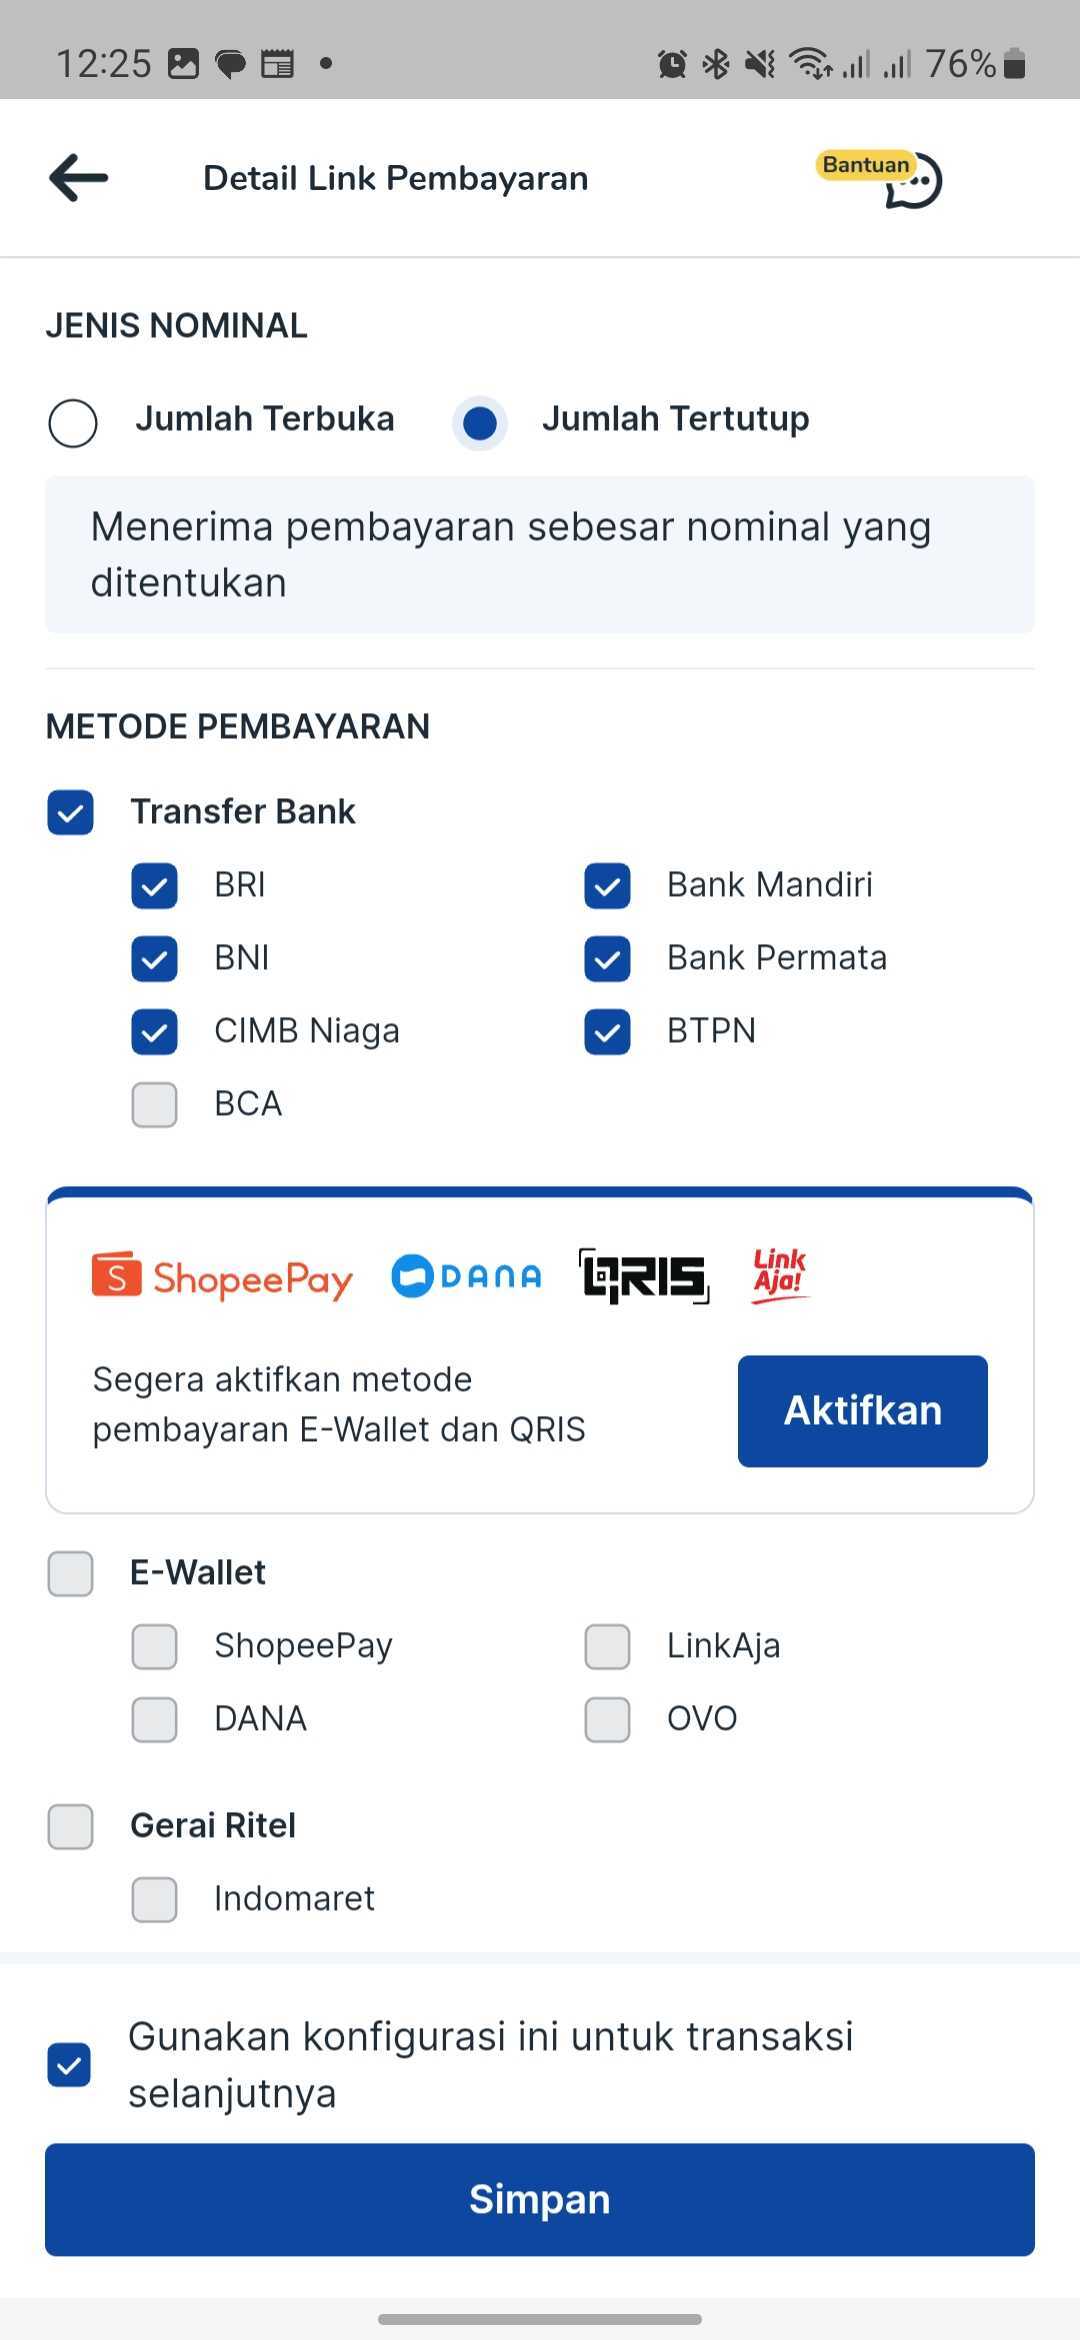
- Configure the payment link you want to create and fill all the required details. In this page, you can set the amount method (closed or open amount), admin fee method, payment link expiry date, and payment method(s) you want to provide to your customer(s). Them klik "Simpan".
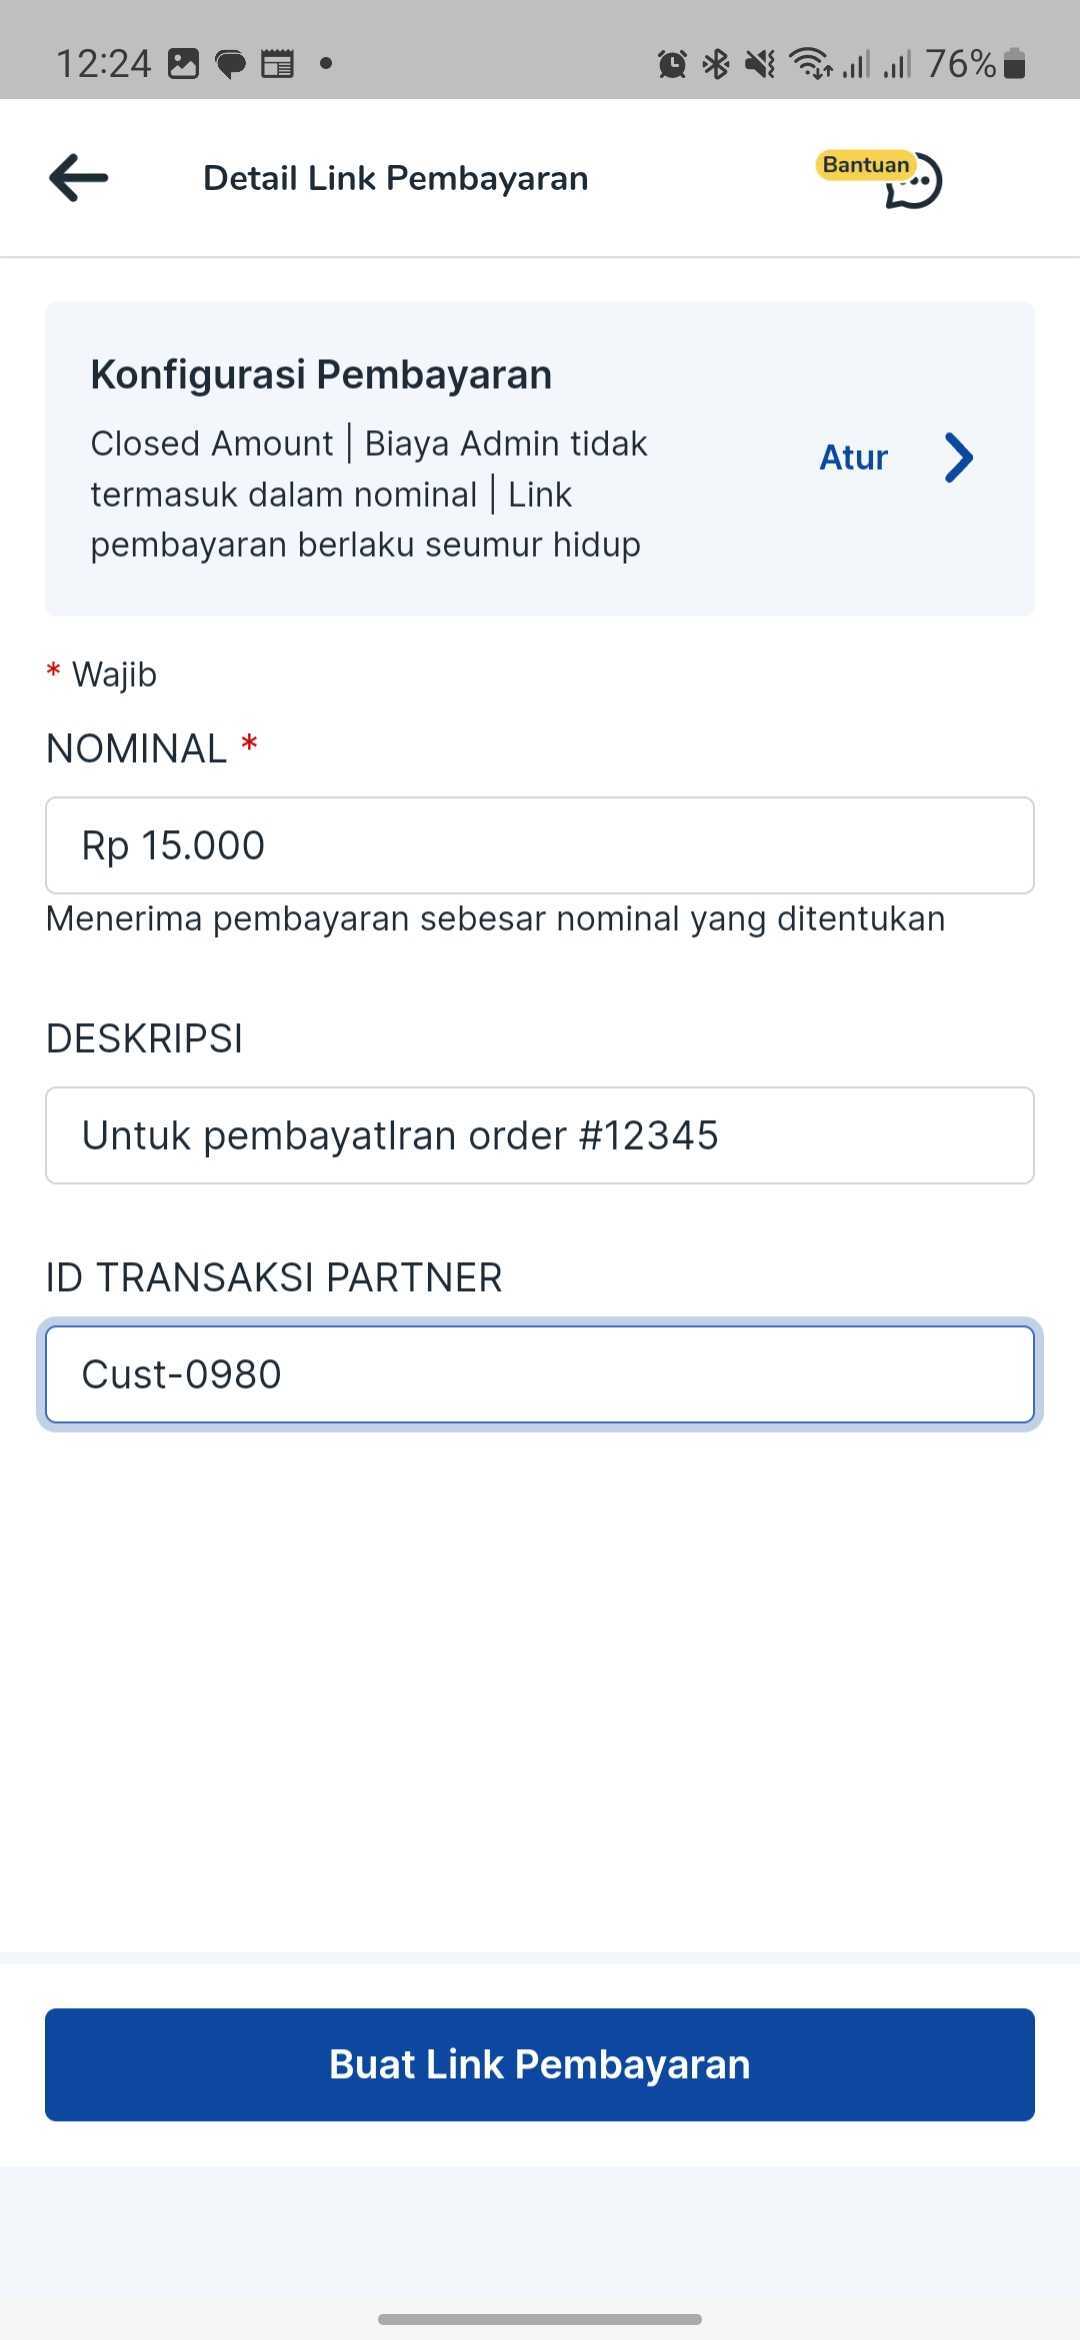
- Define the amount (if you select closed amount in the configuration page), description, and the transaction ID. Then, tap “Buat Link Pembayaran” button.
- Payment Link has been created and now you can share the link to your customer to receive payment from them.
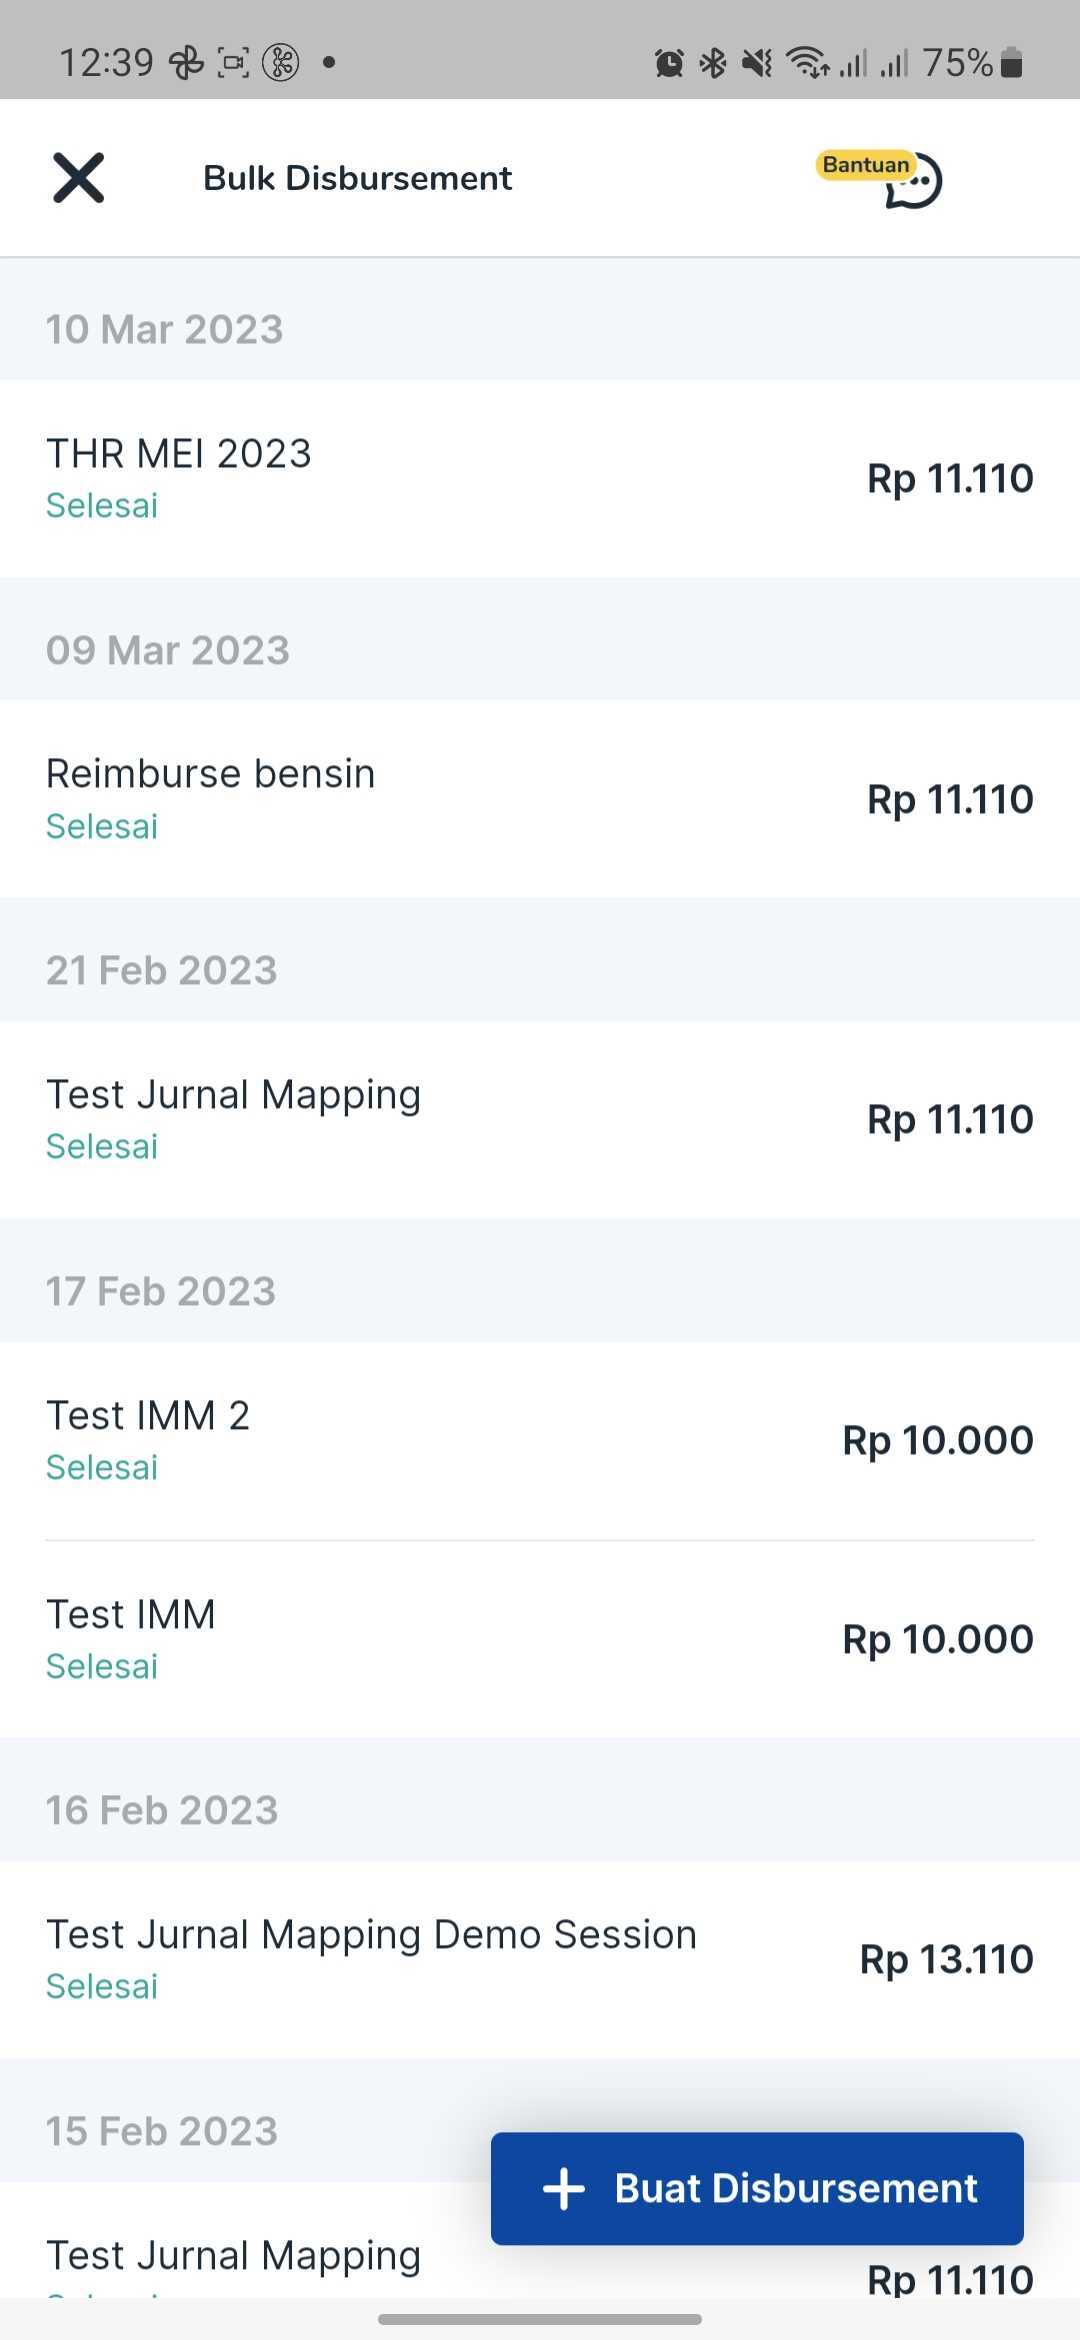
Send Money (Bulk Disbursement)
- In the homepage tap “Transaksi Sekarang” button.
- Then, select “Kirim Uang”.
- You will see your bulk disbursement campaign history. Then, tap “Buat Disbursement” button in the bottom right.
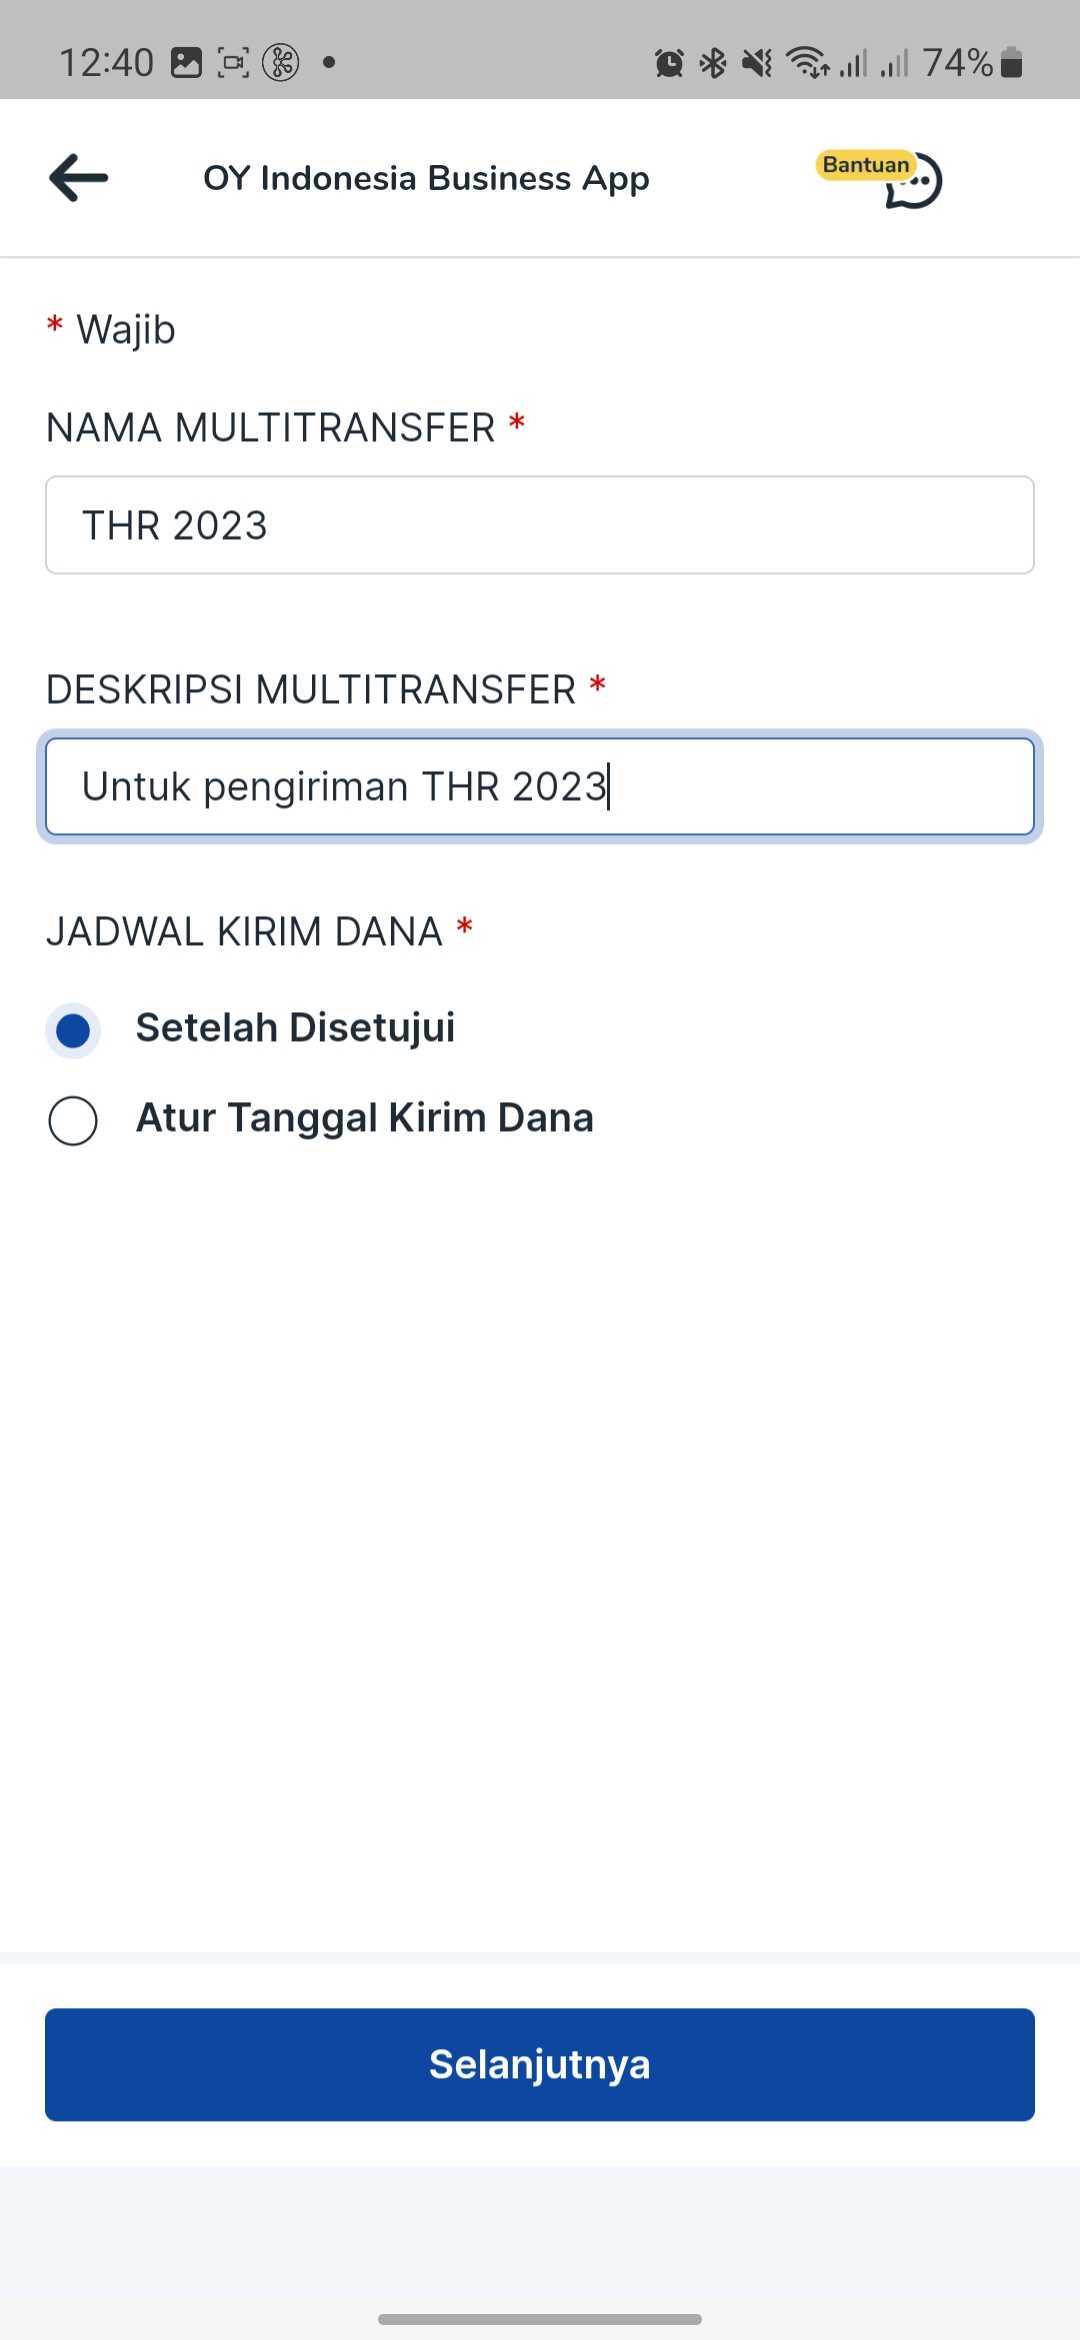
- Create your Bulk Disbursement campaign. First, fill out your campaign details.

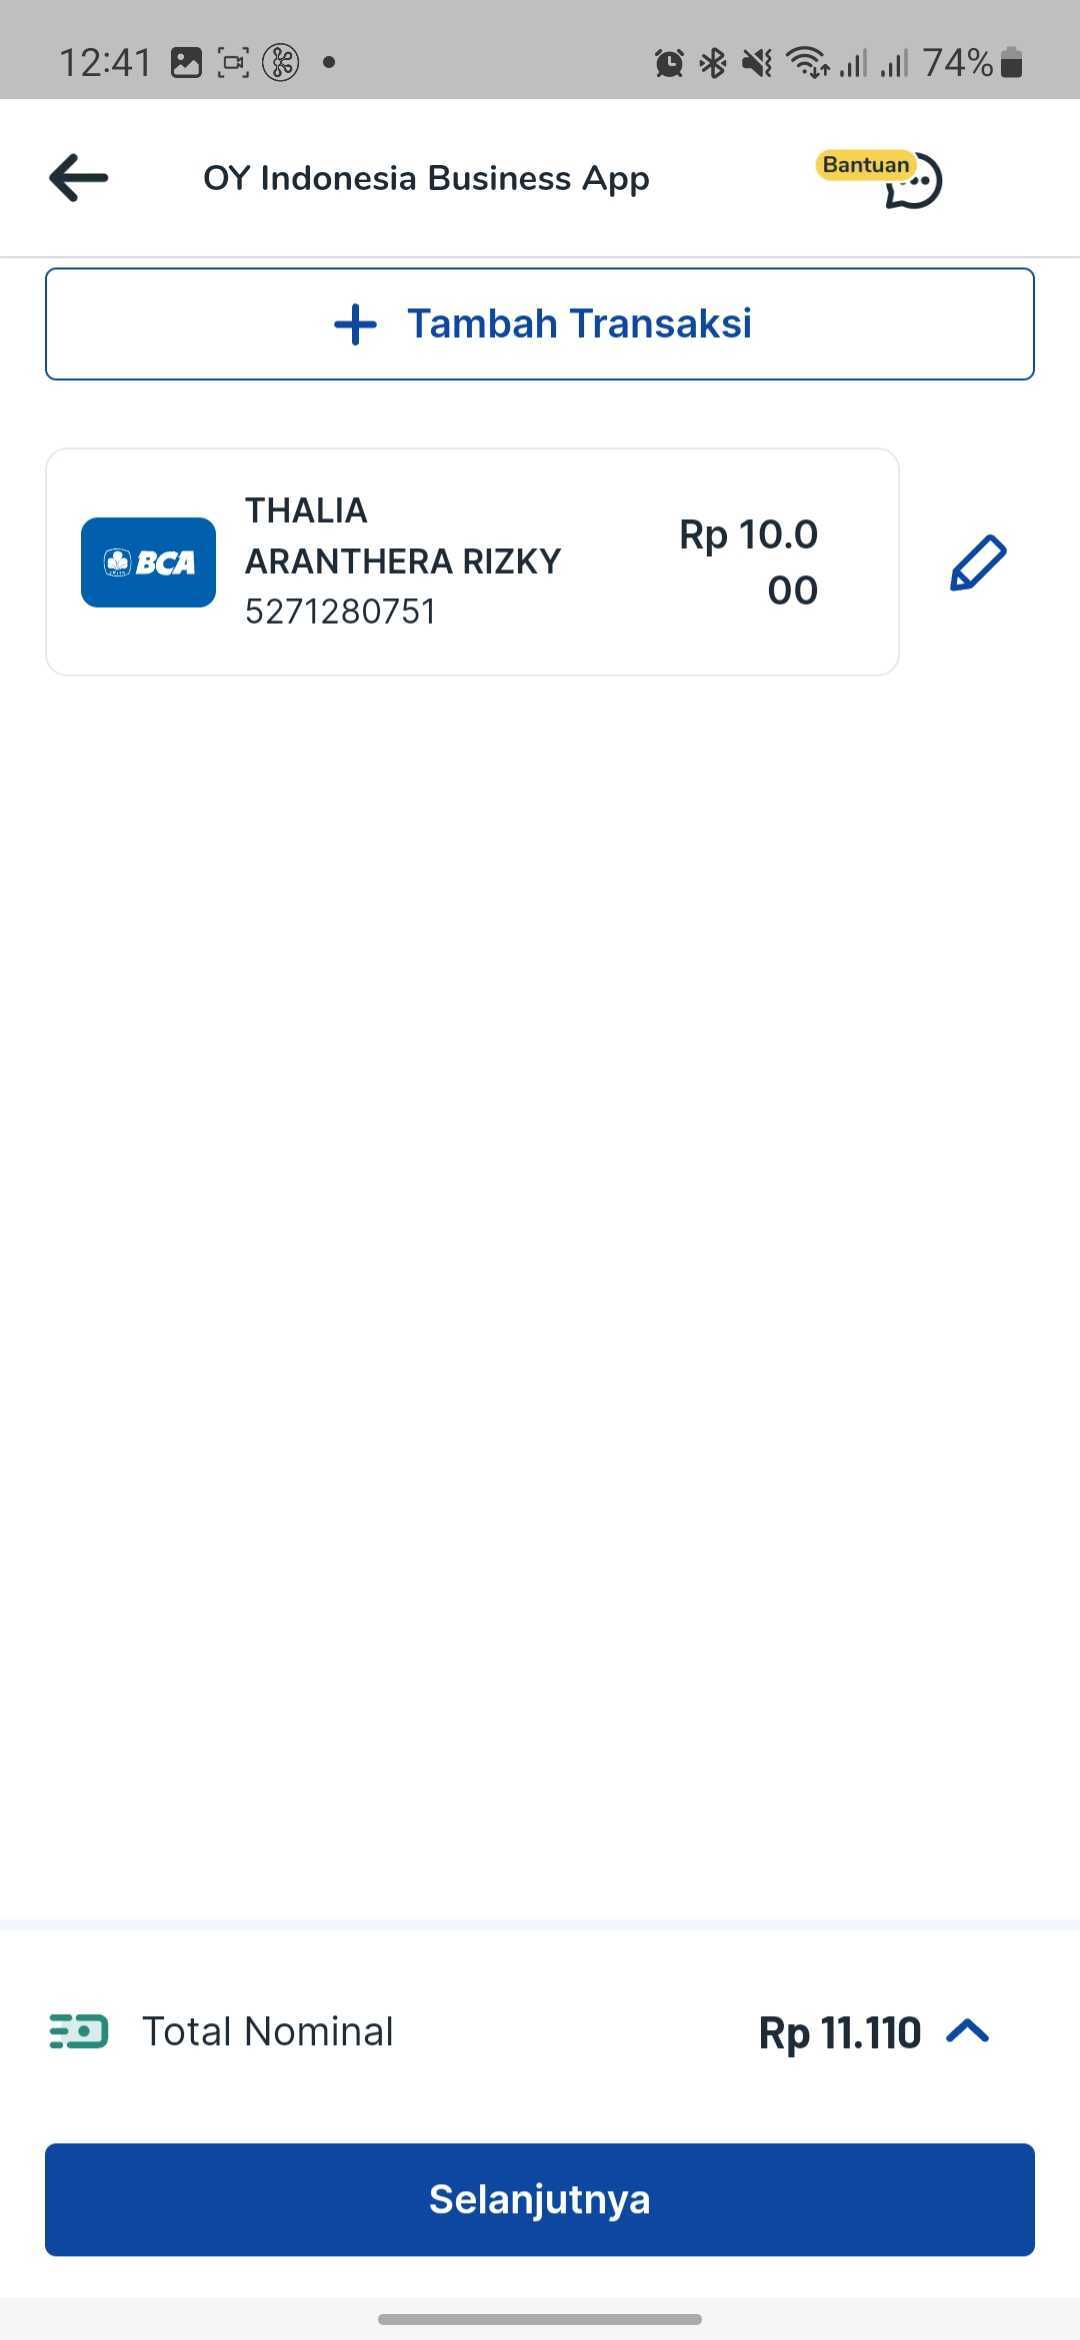
- Next, fill the recipient data (bank, bank account number, amount, recipient email, phone number, note).
- Next, check on your recipient list. If you want to add more recipient, click on "Tambah Transaksi" button.
- Confirm your bulk disursement campaign. In this page you can ensure your campaign detail and your recipient data are correct before submitting the campaign.

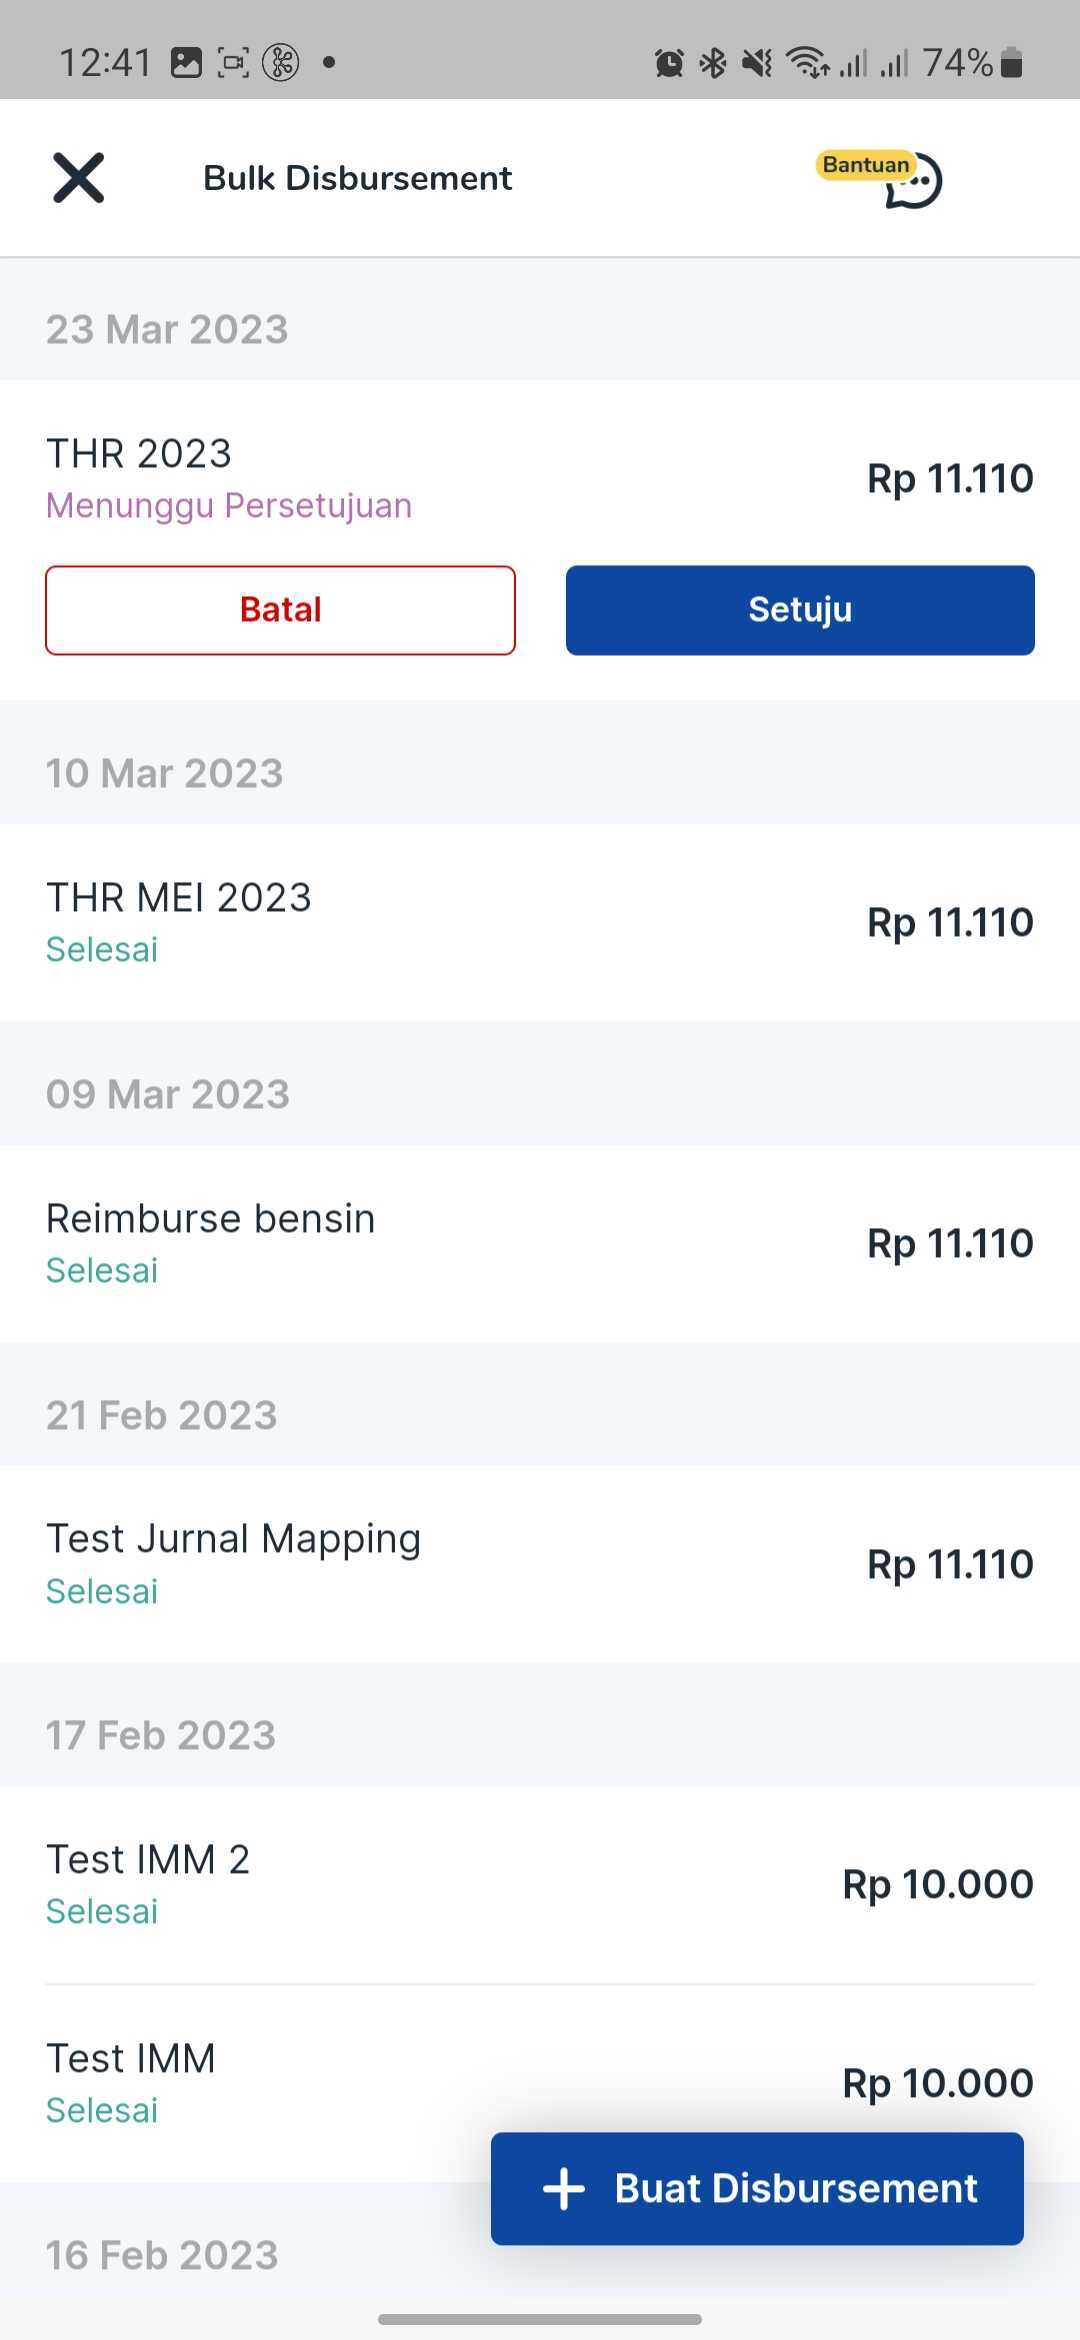
- Your Bulk Disbursement campaign has been created and will be displayed on the Bulk Disbursement campaign history page. You may wait for your approver to approve the bulk disbursement so we can execute the transaction.
Sending Payments
API Disbursement
API disbursement product provides the capability for you to disburse to 100+ banks in Indonesia via OY! at any time. The integration process to use the API disbursement product is straight forward and the details can be checked here.
Key Features
Overbooking OY! can use the funds directly from your Mandiri or CIMB bank accounts for your disbursement needs. You will only need to top up the admin fee needed to execute the disbursements instead of the full amount of your disbursement. Please contact our business representative for further details about this feature. Check Transaction Status and Callback
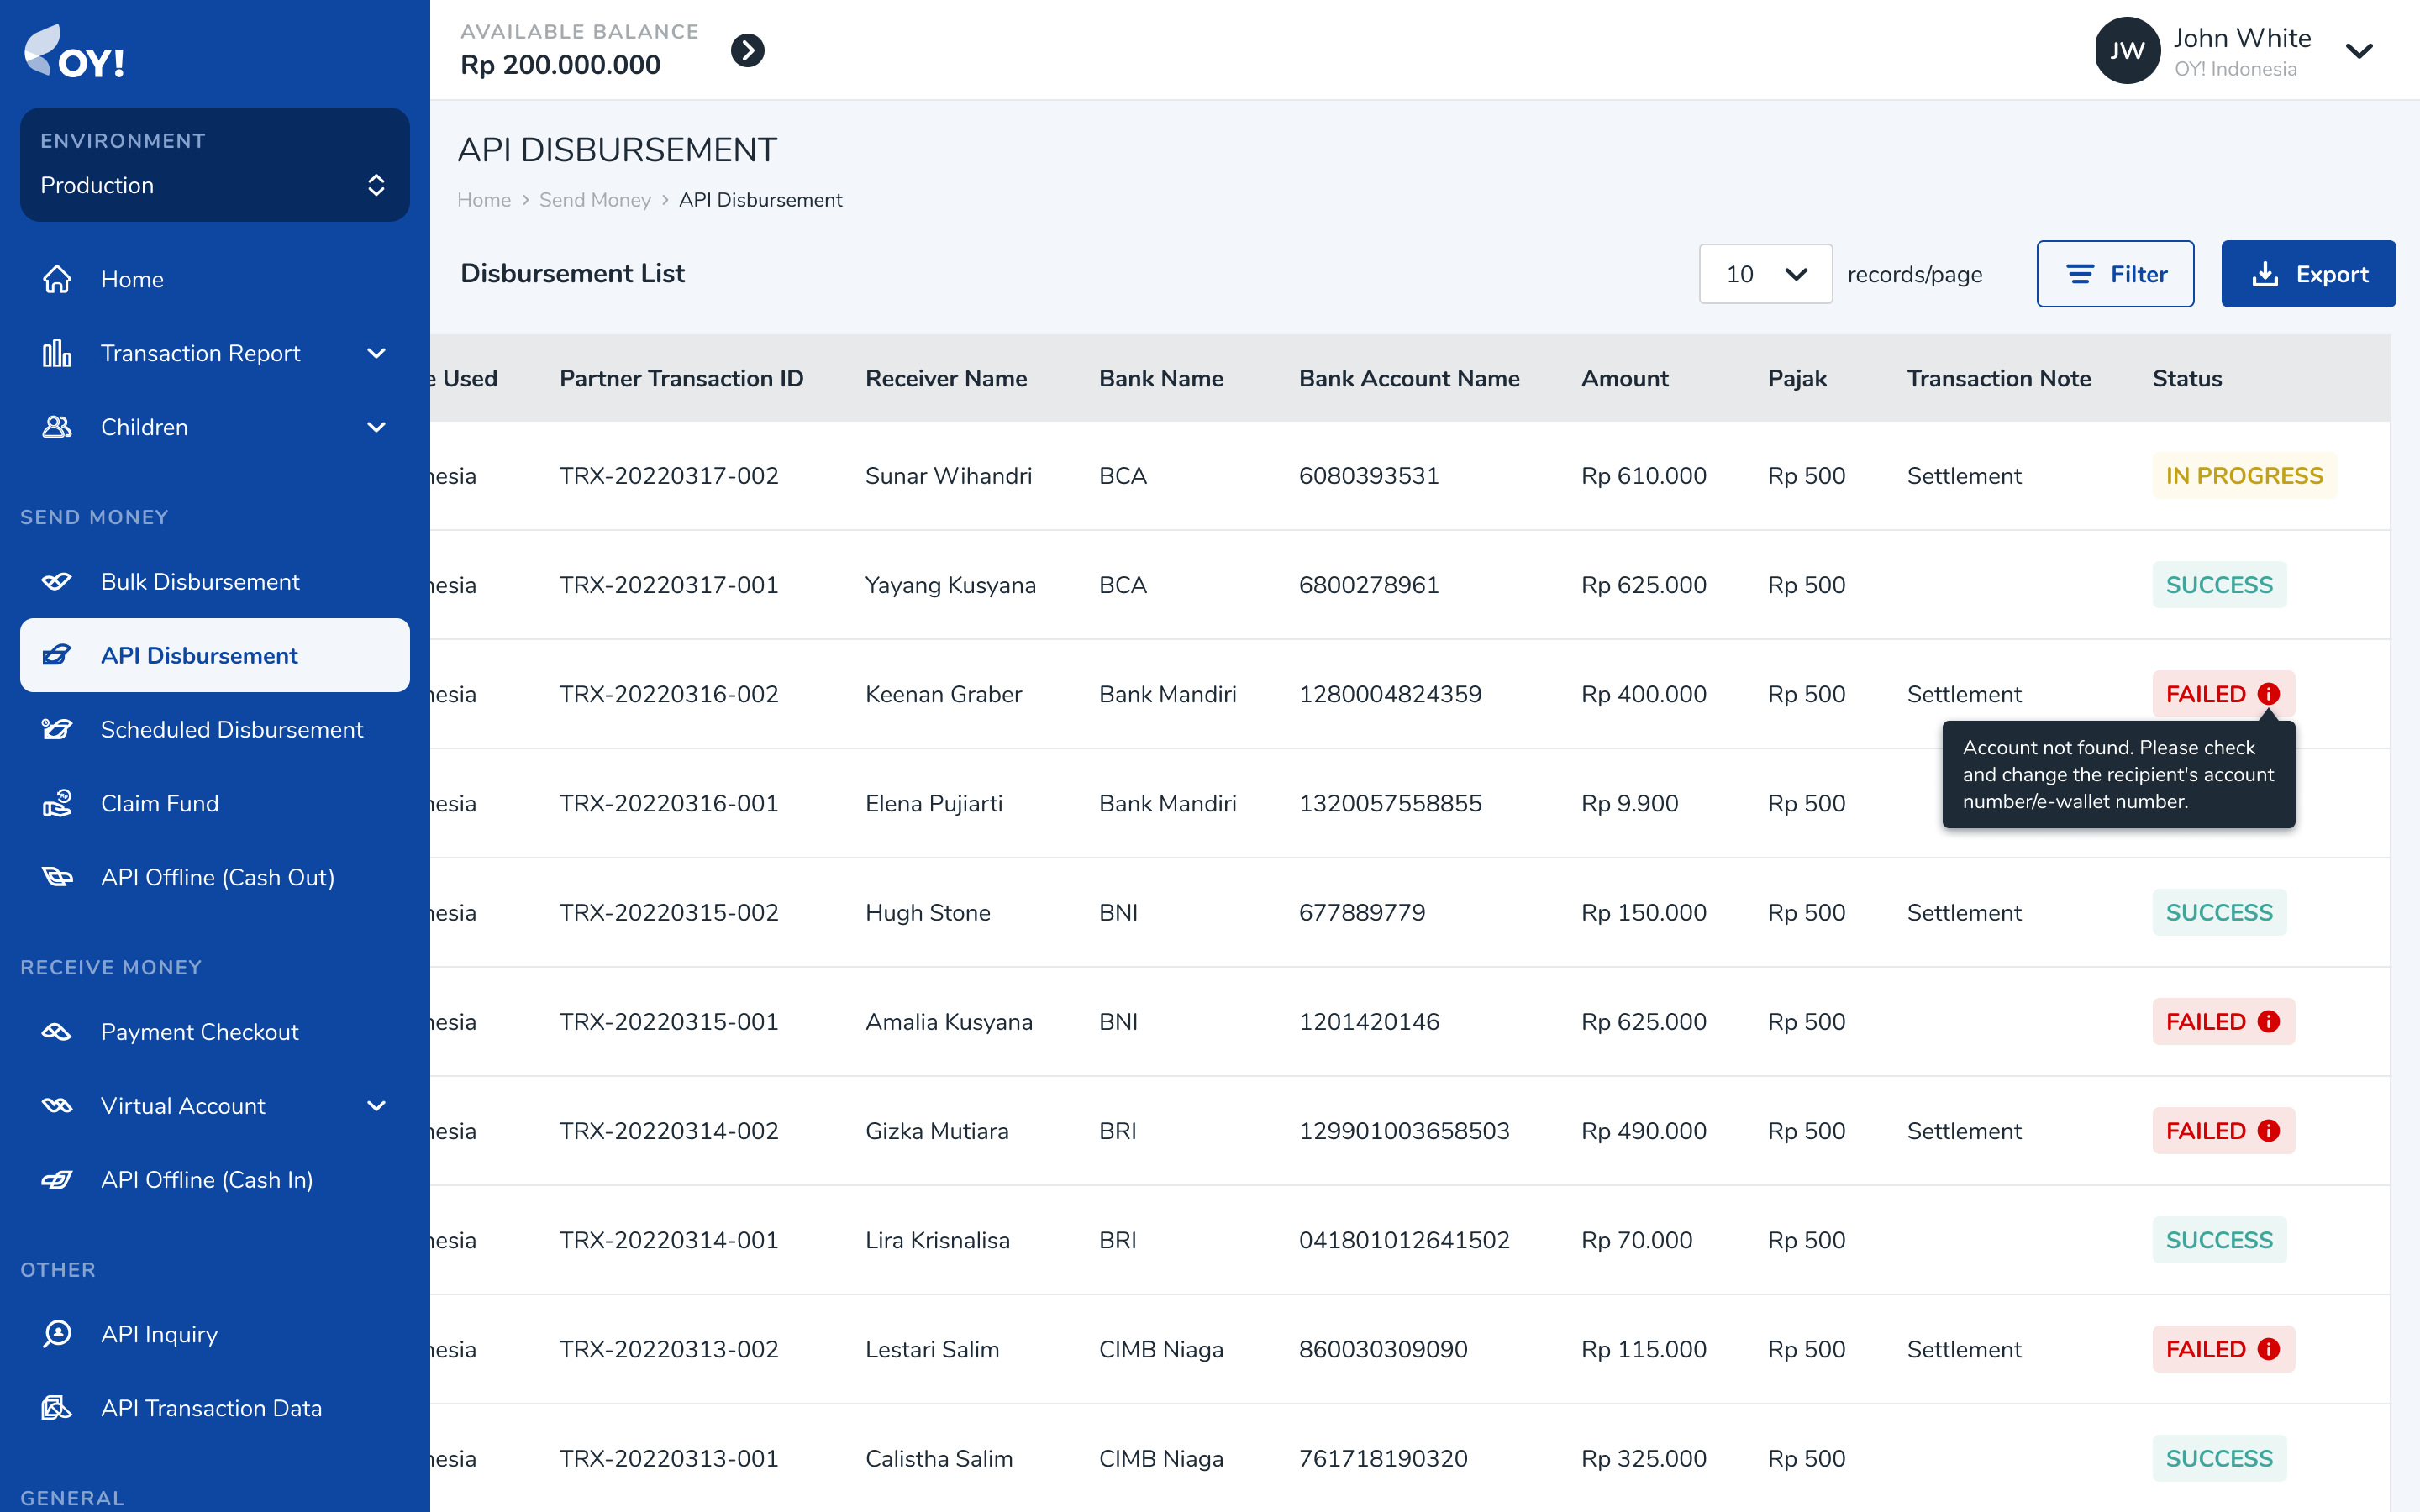
For all disbursements executed, you will receive notifications regarding your transaction whether it is successful, failed or pending. We also provide an API for you to check the transaction status manually. IP proxy is also available upon request to enhance the security and integrity of the callback you will receive.
Check Balance
You can check your available balance at anytime to ensure that you have sufficient balance to execute a disbursement.
Registration and Set Up
Prerequisites
Register an account on the OY! dashboard
Activate your account through the activation link sent via email
Upgrade your account
Upgrade request is approved
Provide IP to be whitelisted and callback link to our business team
Receive an API Key from us
Integrate with our API
Testing
Once you successfully create an OY! account, you can immediately simulate disbursement via API. Follow the below steps to test the flow:
- Create an account
- Login into the dashboard
- Change the environment to “staging”
- Once the environment changed to staging, there will be API key staging available on the bottom left corner of the page
- Before creating a disbursement transaction, check your available balance through API GET https://api-stg.oyindonesia.com/api/balance
- Create a disbursement by sending a ‘POST’ request to https://api-stg.oyindonesia.com/api/remit (https://api-stg.oyindonesia.com/api/remit) using your staging API key. Enter the required and optional fields, as referenced in the API reference docs (https://api-docs.oyindonesia.com/#disbursement-fund-disbursement)
- Fill in the amount, recipient bank, recipient account, and the partner transaction-id
- To get the status of a disbursement request, you can call the API https://api-stg.oyindonesia.com/api/remit-status, This API also offers the option for callback status under field send_callback
- If payment is successful or failed, we will send a callback to the registered staging callback URL destination. Callback URL can be registered via our business representative.
- The API disbursement transactions can be monitored through OY! dashboard from the “Send money - API disbursement” menu.
How to Use
In order to create disbursements, a sufficient available OY! balance is required in the account. More details and instructions about topping up to your OY! account coming soon.
Before you execute a disbursement, you can verify the beneficiary account information from our inquiry endpoint.
Below is an example of the request body for inquiry:
curl -X POST https://partner.oyindonesia.com/api/inquiry
-H 'content-type: application/json, accept: application/json, x-oy-username:myuser, x-api-key:987654'
-d '{
    "recipient_bank": "022",
    "recipient_account": "7823023345"
    }'
It will return an error message if the request is not valid. Otherwise, below is the sample response parameters that will be returned:
{
    "status":{
        "code":"000",
        "message":"Success"
    },
    "recipient_bank":"022",
    "recipient_account":"7823023345",
    "recipient_name":"Budi Budianto Budiman",
    "timestamp":"16-10-2021 09:55:31"
}
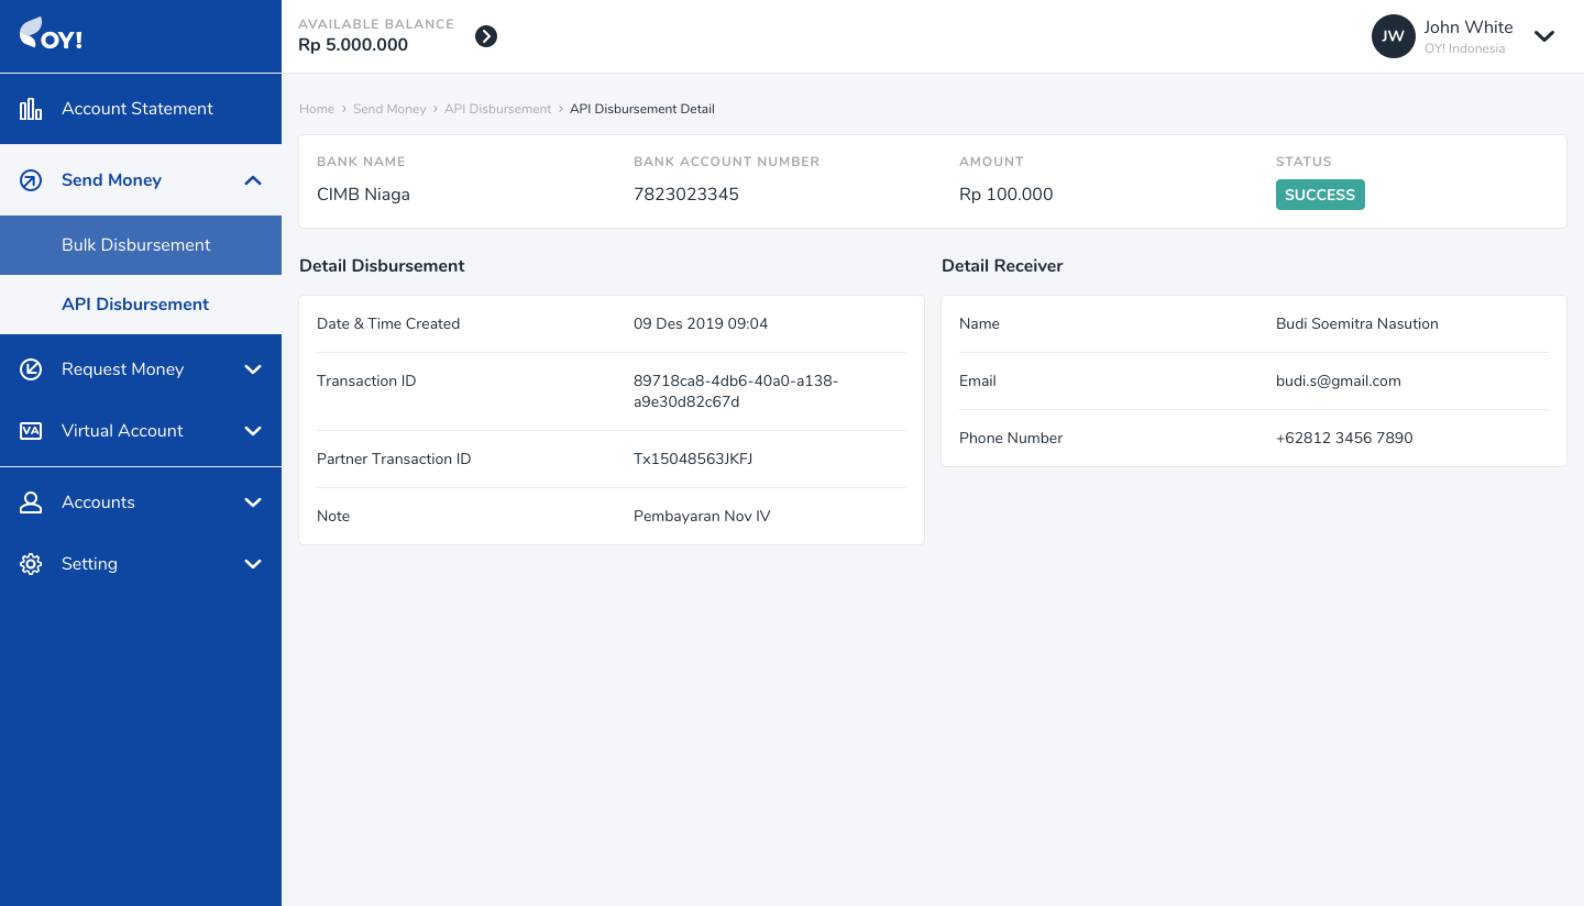
Next, send a request body to execute a disbursement request to be sent to our disbursement endpoint.
Below is an example of the request body for the remit:
curl -X POST https://partner.oyindonesia.com/api/remit
-H 'content-type: application/json, accept: application/json, x-oy-username:myuser, x-api-key:7654321'
-d '{
    "recipient_bank": "022",
    "recipient_account": "7823023345",
    "amount":100000, "note":"Pembayaran Nov IV",
    "partner_trx_id":"Tx15048563JKFJ",
    "email" :"budi.s@gmail.com"
    }'
Below is the sample response parameters that will be returned:
{
    "status":{
        "code":"101",
        "message":"Request is Processed"
    },
    "amount":100000,
    "recipient_bank":"022",
    "recipient_account":"7823023345",
    "trx_id":"89718ca8-4db6-40a0-a138-a9e30d82c67d",
    "partner_trx_id":"Tx15048563JKFJ",
    "timestamp":"16-10-2019 10:23:42"
}
An enpoint to check the transaction is also available and can be accessed at anytime.
Below is an example of the request body:
curl -X POST https://partner.oyindonesia.com/api/remit-status
-H 'content-type: application/json, accept: application/json, x-oy-username:myuser, x-api-key:7654321'
-d '{
    "partner_trx_id": "1234-asde",
    "send_callback": "true"
    }'
The above command returns a JSON structured similar like this:
{
  "status":{
    "code":"000",
    "message":"Success"
  },
  "amount":125000,
  "recipient_name":"John Doe",
  "recipient_bank":"008",
  "recipient_account":"1234567890",
  "trx_id":"ABC-456",
  "partner_trx_id":"1234-asde",
  "timestamp":"16-10-2020 10:34:23",
  "created_date": "24-01-2020 06:48:08",
  "last_updated_date": "24-01-2020 06:48:39"
}
A callback with the following information will be sent to the callback endpoint that you can register with us.
Below is an example of the request body:
curl -X POST https://partner.oyindonesia.com/api/remit-status
-H 'content-type: application/json, accept: application/json, x-oy-username:myuser, x-api-key:7654321'
-d '{
    "partner_trx_id": "Tx15048563JKFJ"
    }'
Below is the sample response parameters that will be returned:
{
    "status":{
        "code":"000",
        "message":"Success"
    },
    "amount":100000,
    "recipient_name":"Budi Soemitra Nasution",
    "recipient_bank":"022",
    "recipient_account":"7823023345",
    "trx_id":"89718ca8-4db6-40a0-a138-a9e30d82c67d",
    "partner_trx_id":"Tx15048563JKFJ",
    "timestamp":"16-10-2019 10:40:23",
    "created_date": "16-10-2019 10:23:42",
    "last_updated_date": "16-10-2019 10:34:23"
}
You can also check your balance anytime to ensure you have sufficient balance from our endpoint.
Below is an example of a request body to check the balance:
curl -X GET 'https://partner.oyindonesia.com/api/balance'
-H 'Content-Type: application/json'
-H 'Accept: application/json'
-H 'X-OY-Username: janedoe'
-H 'X-Api-Key: 7654321'
Below is the sample response parameters that will be returned:
{
    "status":{
        "code":"000",
        "message":"Success"
    },
    "balance":100000000.0000,
    "pendingBalance":2000000.0000,
    "availableBalance":98500000.0000,
    "overbookingBalance":98500000.0000,
    "timestamp":"10-12-2019 12:15:37"
}
Lastly, all transactions can be monitored from the OY! dashboard which includes all the transaction details.
For further details on the parameters definition and proper usage, please refer to our API Documentation.
Bulk Disbursement
Our Bulk disbursement product provides the capability to execute disbursements to multiple beneficiaries with a single xlsx or csv file upload ("Campaign") up to 25,000 transactions. Bulk disbursement is made through the OY! dashboard, where details regarding the disbursement campaign can be found. No technical integration is required to use this product.
Key Features
Overbooking OY! can use the funds directly from your Mandiri or CIMB bank accounts for your disbursement needs. You will only need to top up the admin fee needed to execute the disbursements instead of the full amount of your disbursement. Please contact our business representative for further details about this feature.
Account Management
When you first create an account, your account will be assigned as a Super Admin role. As a Super Admin, you have the ability to create new sub-accounts and assign different roles to your team such as Admin, Maker and Approver that are applicable for bulk disbursement. The Super Admin and Admin can also edit or delete created sub-accounts.
Note: it is not necessary to create new sub-accounts in order to use bulk disbursement. The Super Admin and Admin roles allows you to directly create and approve bulk disbursements.
Detailed step-by-step instructions on setting up user management and the different role types coming soon.
Multi-Layer Approval
Multi-layer Approval will improve your control over your bulk disburse transaction especially for big amount of money. You can setup up to 3 layers of approver before the transaction instruction is executed. By assigning proper approver and amount limitation, you can avoid a huge trouble on your business operational caused by incorrect transfer amount.
Overall Campaign Summary
Keep track of all the details of the entire campaign such as the total amount of disbursement, total number of transactions, and the maker and approver related information of a campaign.
Transaction Details
Itemized details of each individual transaction, including their respective statuses: success, pending, or failed.
Registration and Set Up
Prerequisites
Register an account on the OY! dashboard
Activate your account through the activation link sent via email
Upgrade your account
Upgrade request is approved
Testing
- Log on your OY! dashboard
- Choose "Staging" environment
- Click "Send Money" menu, and choose "Bulk disbursement"
- Click "Create Disbursement"
- Fill in the necessary details by following the steps explained in the “How to Use” section
How to Use
In order to create disbursement campaigns, a sufficient available OY! balance is required in the account. If there is an insufficient available balance in the account, campaigns can still be created but not approved.
1. Create Disbursement: On the OY! dashboard, navigate to Send Payments > Bulk Disburse on your left menu bar. Click “Create Disbursement” on the far righthand side of that page to create a new bulk disbursement campaign.
2. Create Campaign Details: Fill in the campaign details with 2 options:

a. upload an xlsx or csv file
Please upload an xlsx or csv file with each individual transaction’s details of your bulk disbursement campaign. An example template for both file types are available for download on the OY! dashboard. The following list of items are required in your CSV file.
| Column | Description | Example |
|---|---|---|
| Name | Recipient Name | Budy |
| Recipient Email (can contain up to 5 emails with a total maximum of 255 characters, incoming transaction notifications will be sent to these emails) | Budi@email.com | |
| Amount | Amount in IDR (only numbers) | 100000 |
| Bank Code | Destination Bank | 014 |
| Bank Account Number | Recipient Bank Account Number | 12341234 |
| Phone Number | Recipient Phone Number | 62812341234 |
| Notes (Optional) | Transaction Notes |
b. add disbursement detail manually. : choose ‘add disbursement detail manually’ and fill out a campaign name and campaign description in the provided spaces. These details are strictly used as your tracking information only and will not be shared to the transaction recipients.
c. [Staging only] You can replicate failed status on individual transaction within the campaign by fill in Bank Account Number value with 3000000. Another value will be processed normally.
3. Re-verify all the Information and Submit: Once your xlsx or csv file is uploaded or filled out manually, you can verify all of the information uploaded from the file from the table displayed. If there is any incorrect submission such as invalid entry due to special characters, a red box will appear to highlight the entry that should be corrected. Issues must be resolved before a campaign can be submitted

4. Validate Name Matching After all the issue has been resolved, user able to click submit and there will be popup shown to validate each recipient name *with their *Bank Account Name as shown below:

if you choose YES: if there is a name difference, a popup name validation with details of mismatched transactions will be displayed. if the information inputted is invalid, you could edit the information and choose the ‘ validate’ button to revalidate the data, or you could click the ‘ignore mismatch’ button to ignore the name matching validation and to process the disbursement.

If there is no issue with the details uploaded, a validate and submit button will be available at the bottom of the list of transactions, indicating that all information is valid. Click “Submit” to complete creating the bulk disbursement campaign.

5. Approve/Cancel Campaign*: Once the bulk disbursement campaign is created, a new status of waiting approval will appear. Approve the campaign by clicking the “Approve” button. If you want to cancel a campaign, click the “...” button and select “Cancel”.
Once the bulk disbursement campaign is approved, details regarding the campaign can no long er be changed. This includes changes made to individual transactions and their respective recipient information.
The balances will also immediately reflect changes. For more information about the different types of balances, click here. You will also receive an email with the campaign information summary (“Outgoing Transfer Alert”) when transactions are executed.
Note:
- Depend on the approval layer that you configured, this transaction should be approved by all layer before it can be executed by the system.
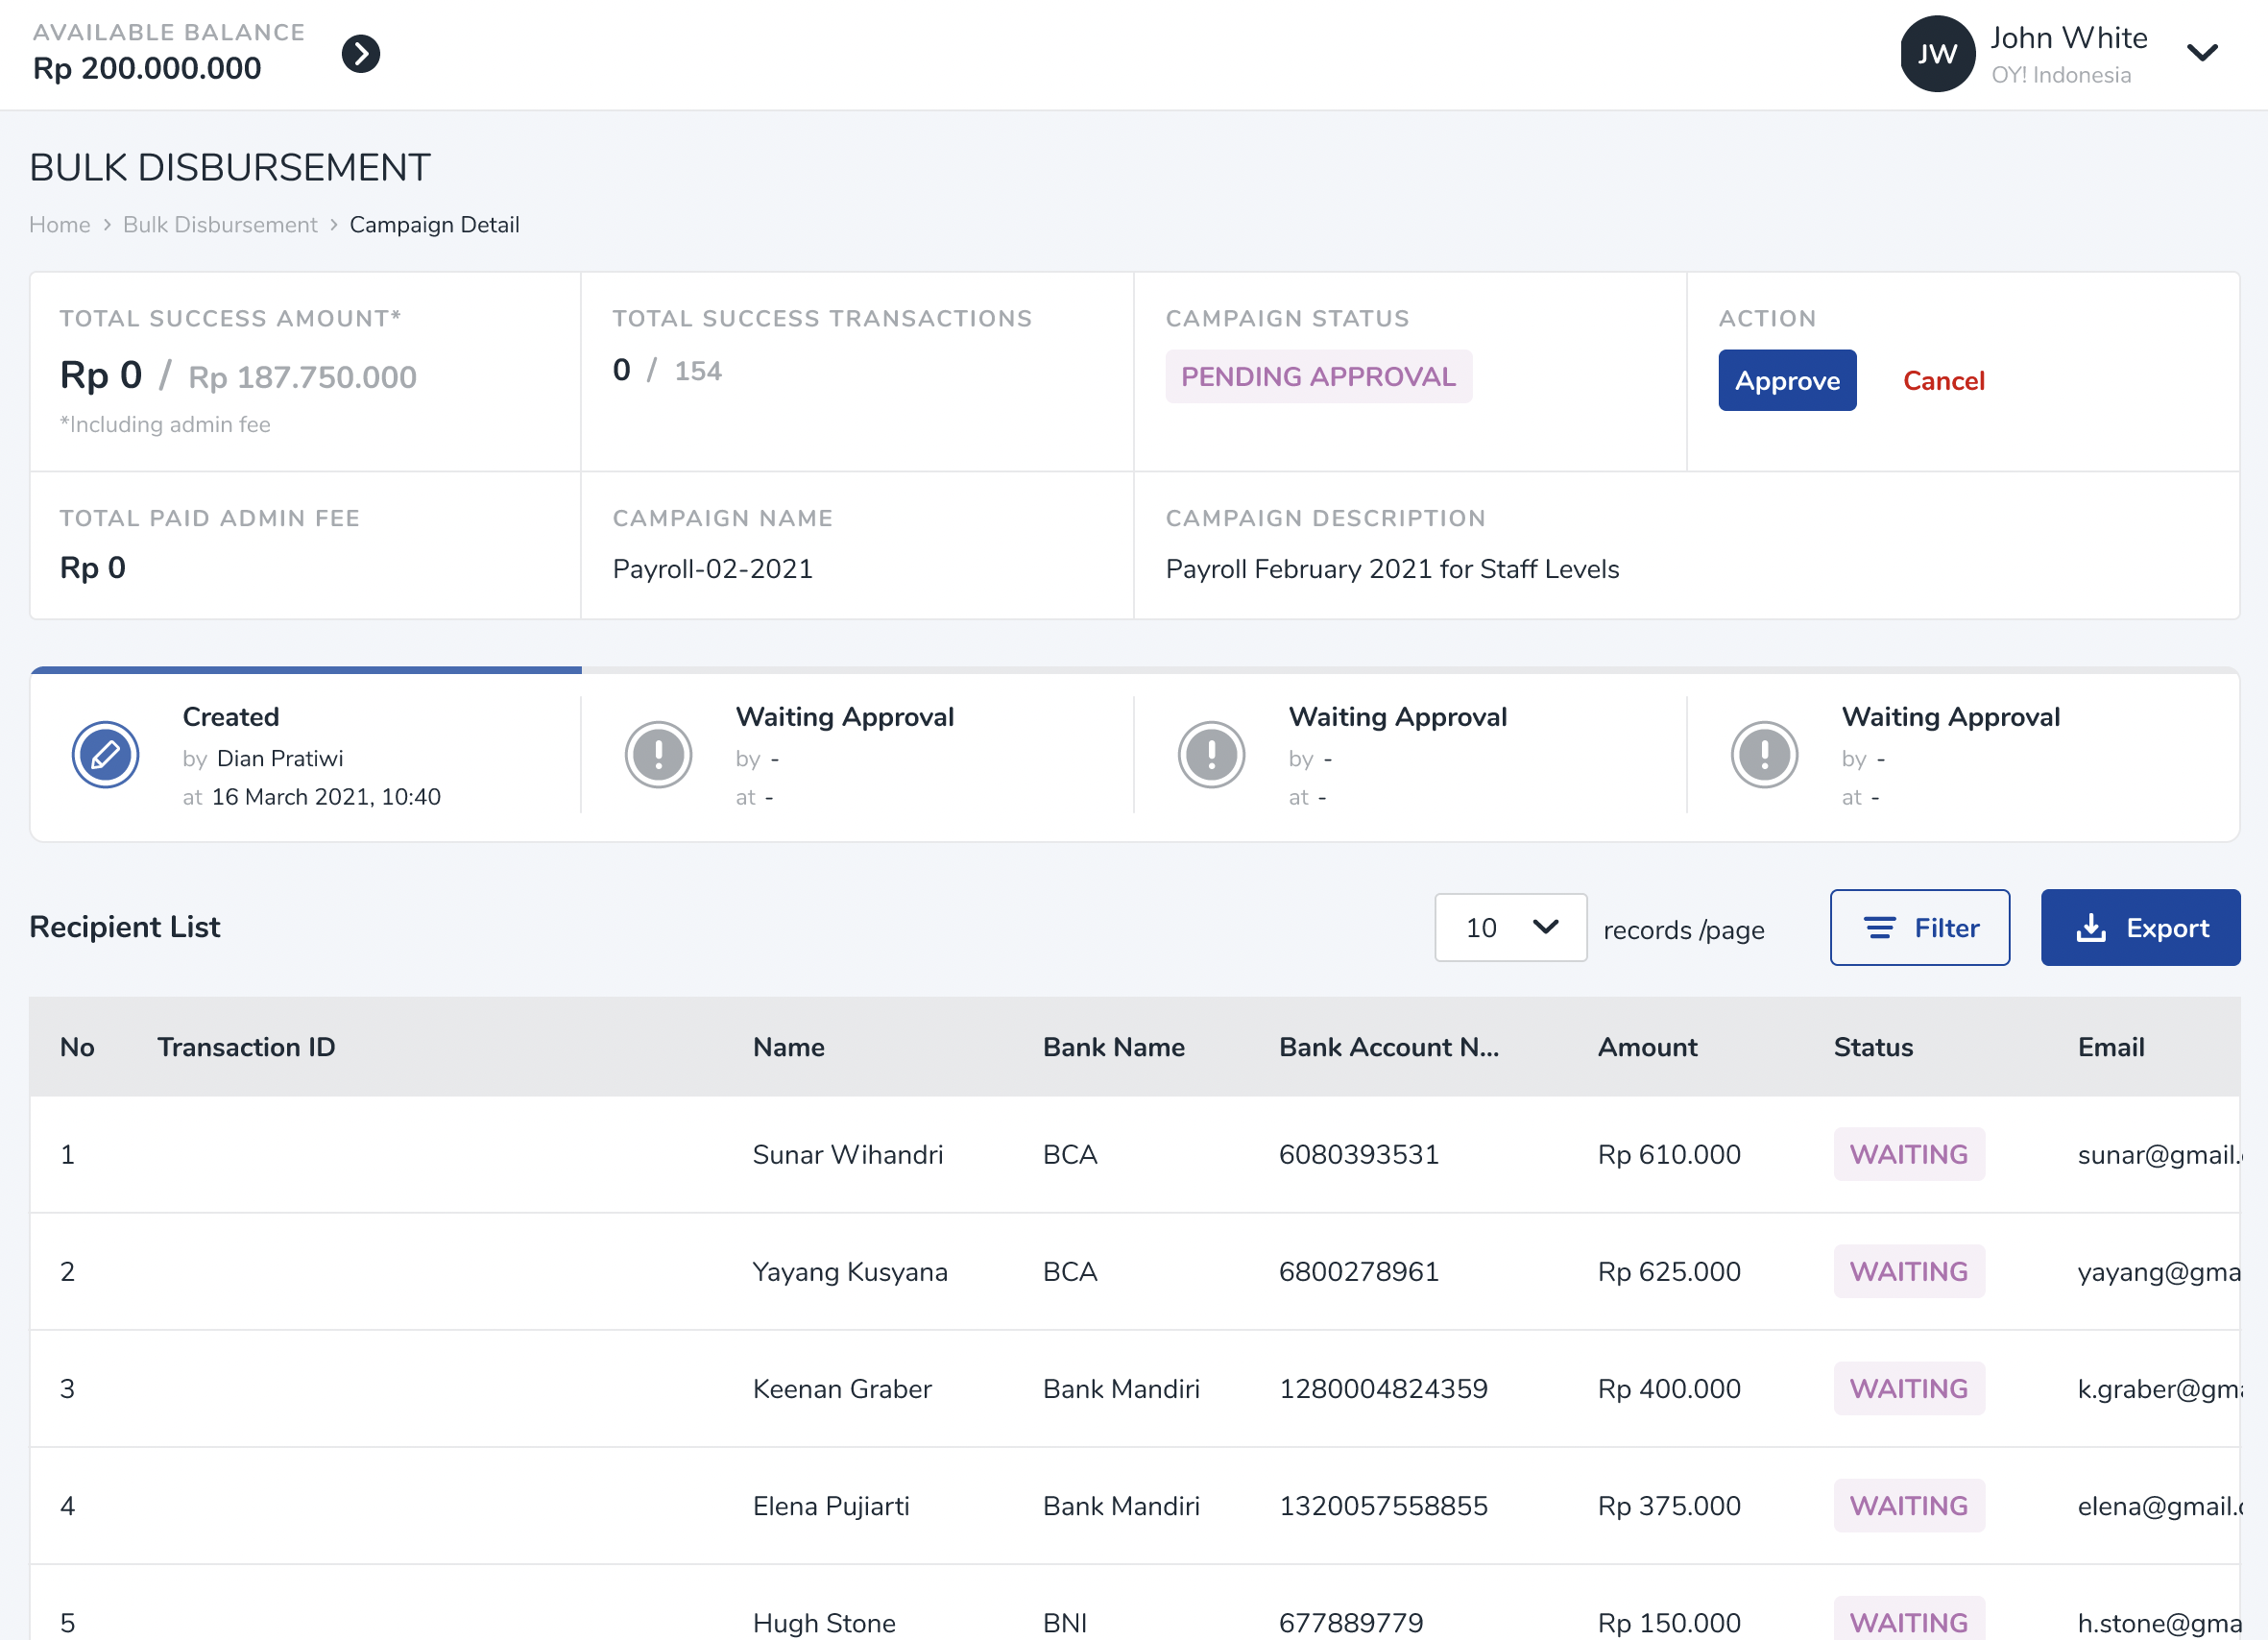
- Multiple campaigns can be approved at a time as long as there is sufficient available balance to complete campaigns that have already been approved but are still in queue to be processed.
6. Keep Track of Campaign Details*: To check the details of the bulk disbursement campaign, click on the campaign name to find the campaign summary and its recipient list. Keep track of the both the overall campaign status and the status of individual transactions through the page.
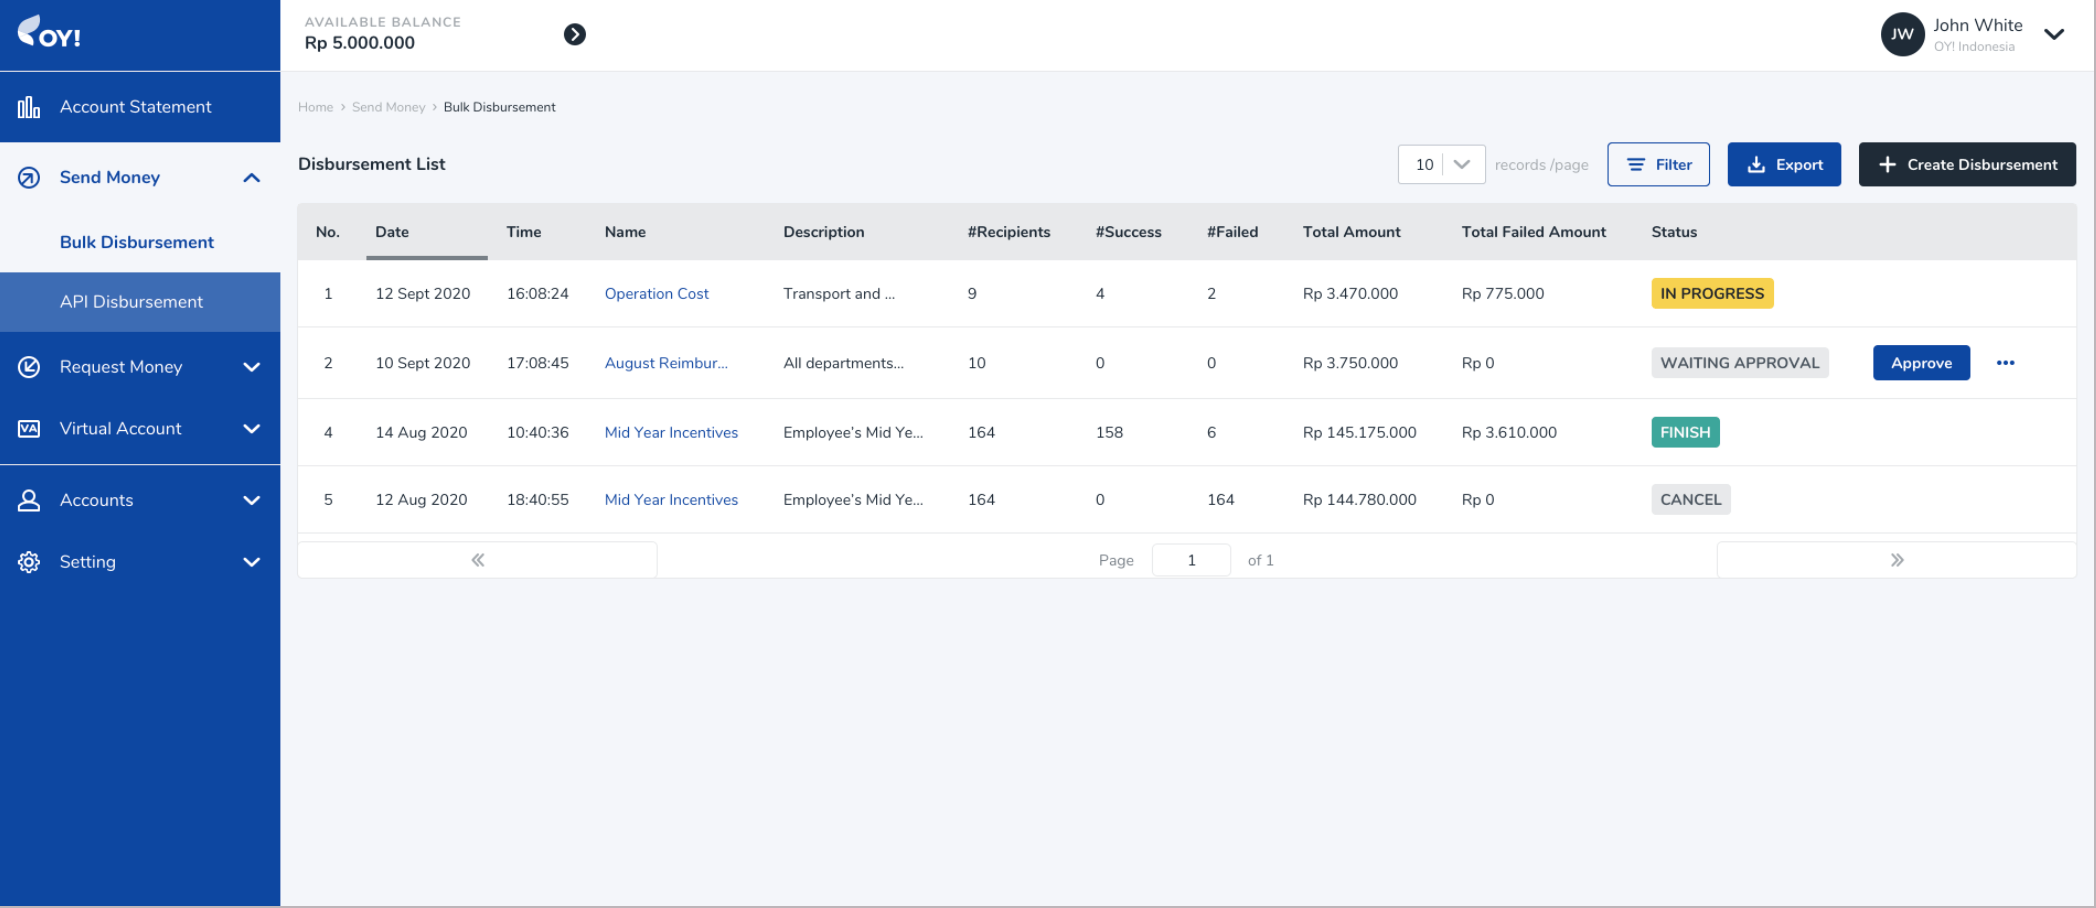
7. Status: In-Progress, Finish, and Cancel*: Congratulations! You just made your first bulk disbursement with OY! Below are a list of statuses you will find on the OY! dashboard.
In-Progress
As your individual disbursements are executed, the status of your bulk disbursement campaign will indicate an in-progress status.
Incomplete
The status of your bulk disbursement will change to incomplete once all of the listed transactions have been executed and the relevant final statuses of Failed or partially Failed have been assigned. The failed transactions will be shown the failed reason and can be retried.
Finish
Once all of the listed transactions have been completed and the final status of success for all transactions has been achieved, the status of your bulk disbursement campaign will change to Finish. The recipients should have all received an email detailing an “Incoming Transfer Alert.” You can also download a report of the campaign details directly through the OY! dashboard.
Cancel
If you choose not to approve your disbursement campaign, the status of your bulk disbursement campaign will indicate a cancelled status.
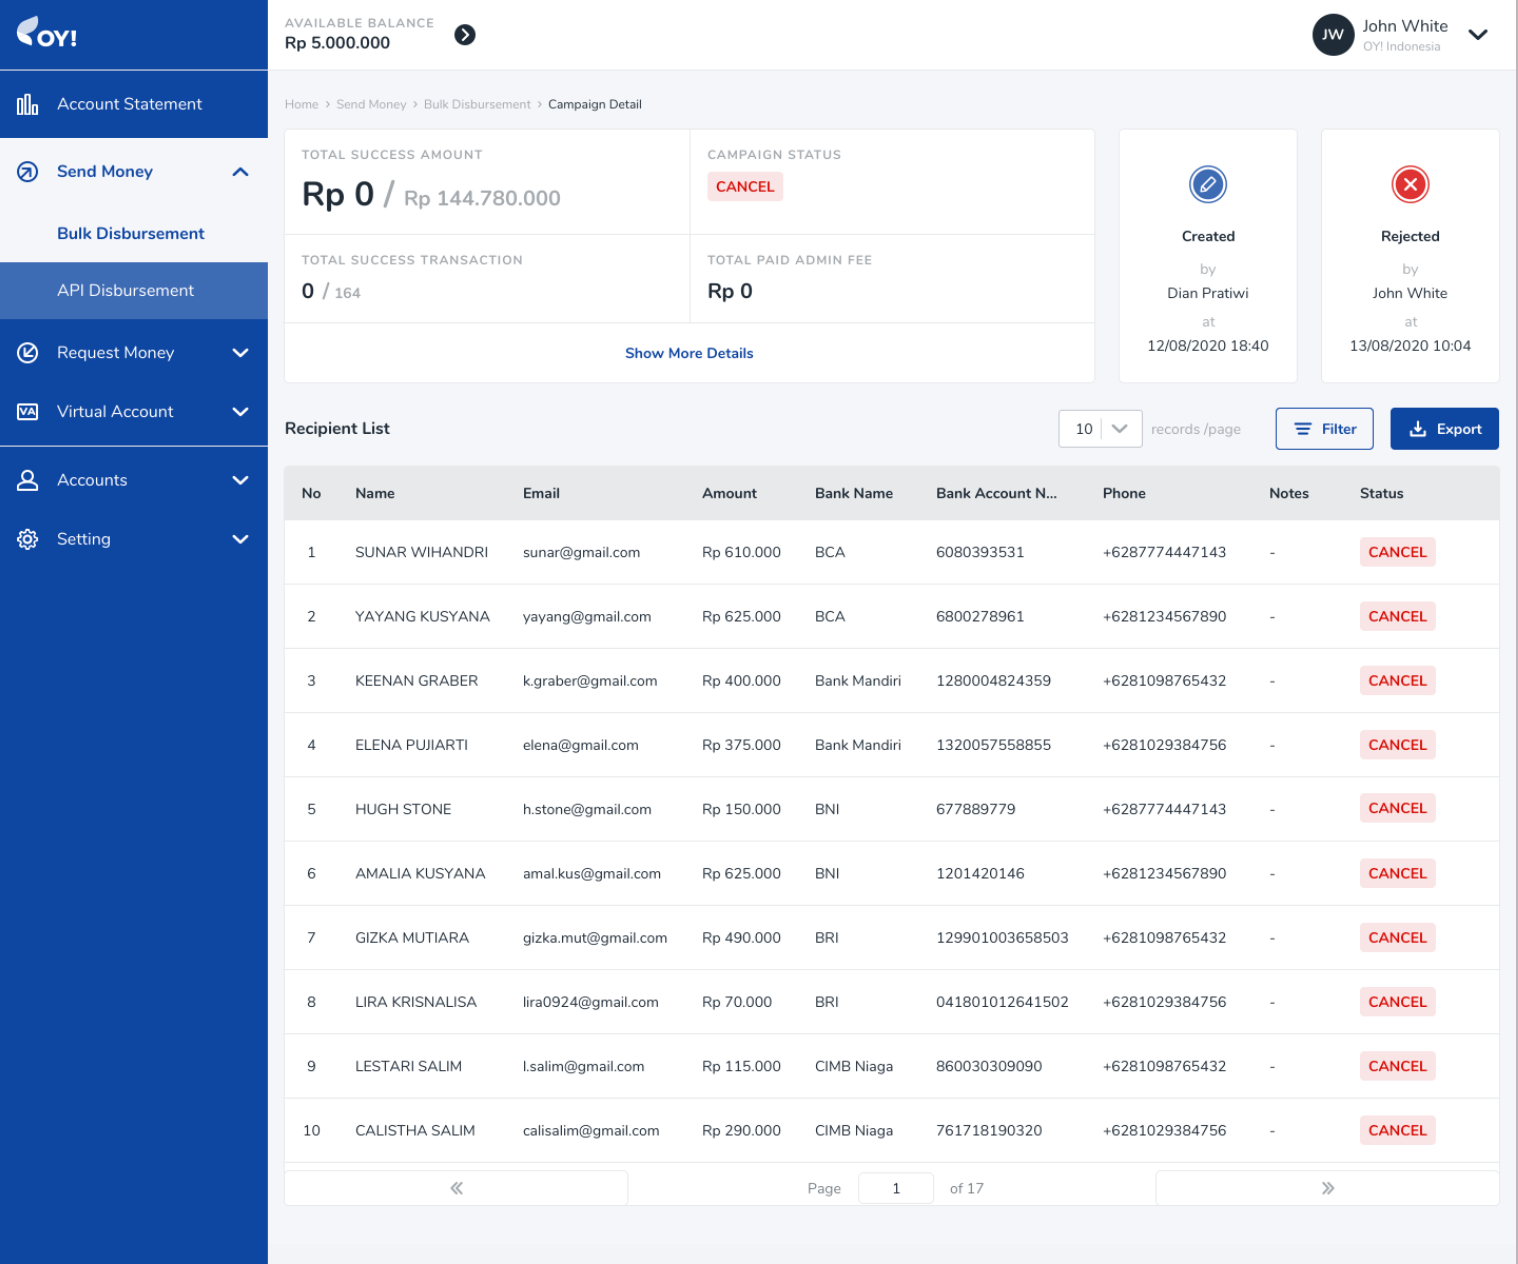
You can also double check each of your transactions by navigating to the account statement page on the OY! dashboard.
Claim Fund
Claim Fund product enable you to do disbursement without knowing your recipient bank account at first. You will simply create a link for them to fill-out bank account information and the payment will be processed by our system. This feature will remove you from the hassle of collecting your customer information manually then doing multiple bank transfer. Best use of this feature is : refunds, reimbursement claim, any disburse transaction in which the destination is not your regular partner.
At the moment, Claim Fund product is available only on OY! Business Dashboard.
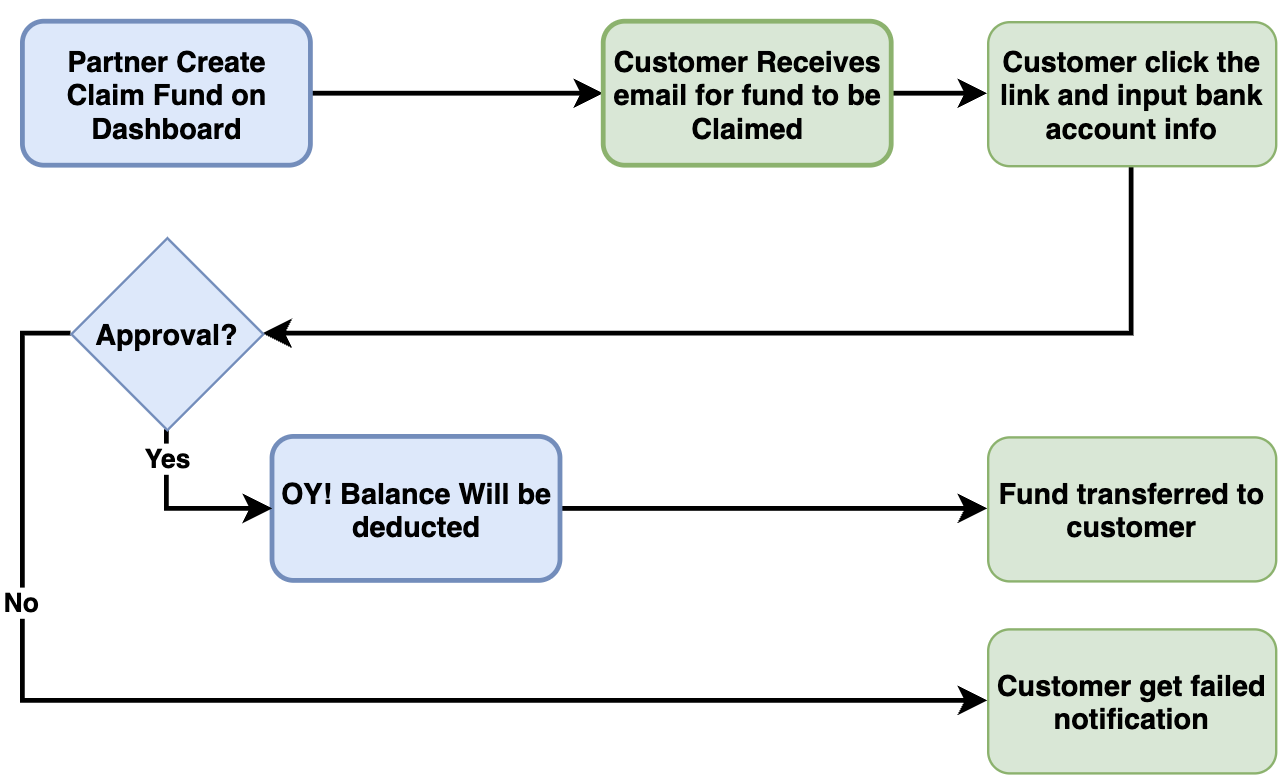
Transaction Flow
Use Case
- Refund for purchase transaction
- Any money transfer transaction where you don't have recipient bank information
Registration and Set Up
Prerequisites
- Register an account on the OY! dashboard (https://business.oyindonesia.com/register?)
- Activate your account through the activation link sent via email
- Upgrade your account
- Upgrade request is approved
Testing
- Log on your OY! dashboard
- Choose "Staging" environment
- Click "Send Money" menu, and choose "Claim Fund"
- Click "Create Claim Fund"
- Fill in the necessary details by following the steps explained in the “How to Use” section
How to Use
In order to execute claim fund transaction successfully, a sufficient available OY! balance is required in the account. However, if there is an insufficient available balance, claim fund transaction can still be created but the approval will failed.
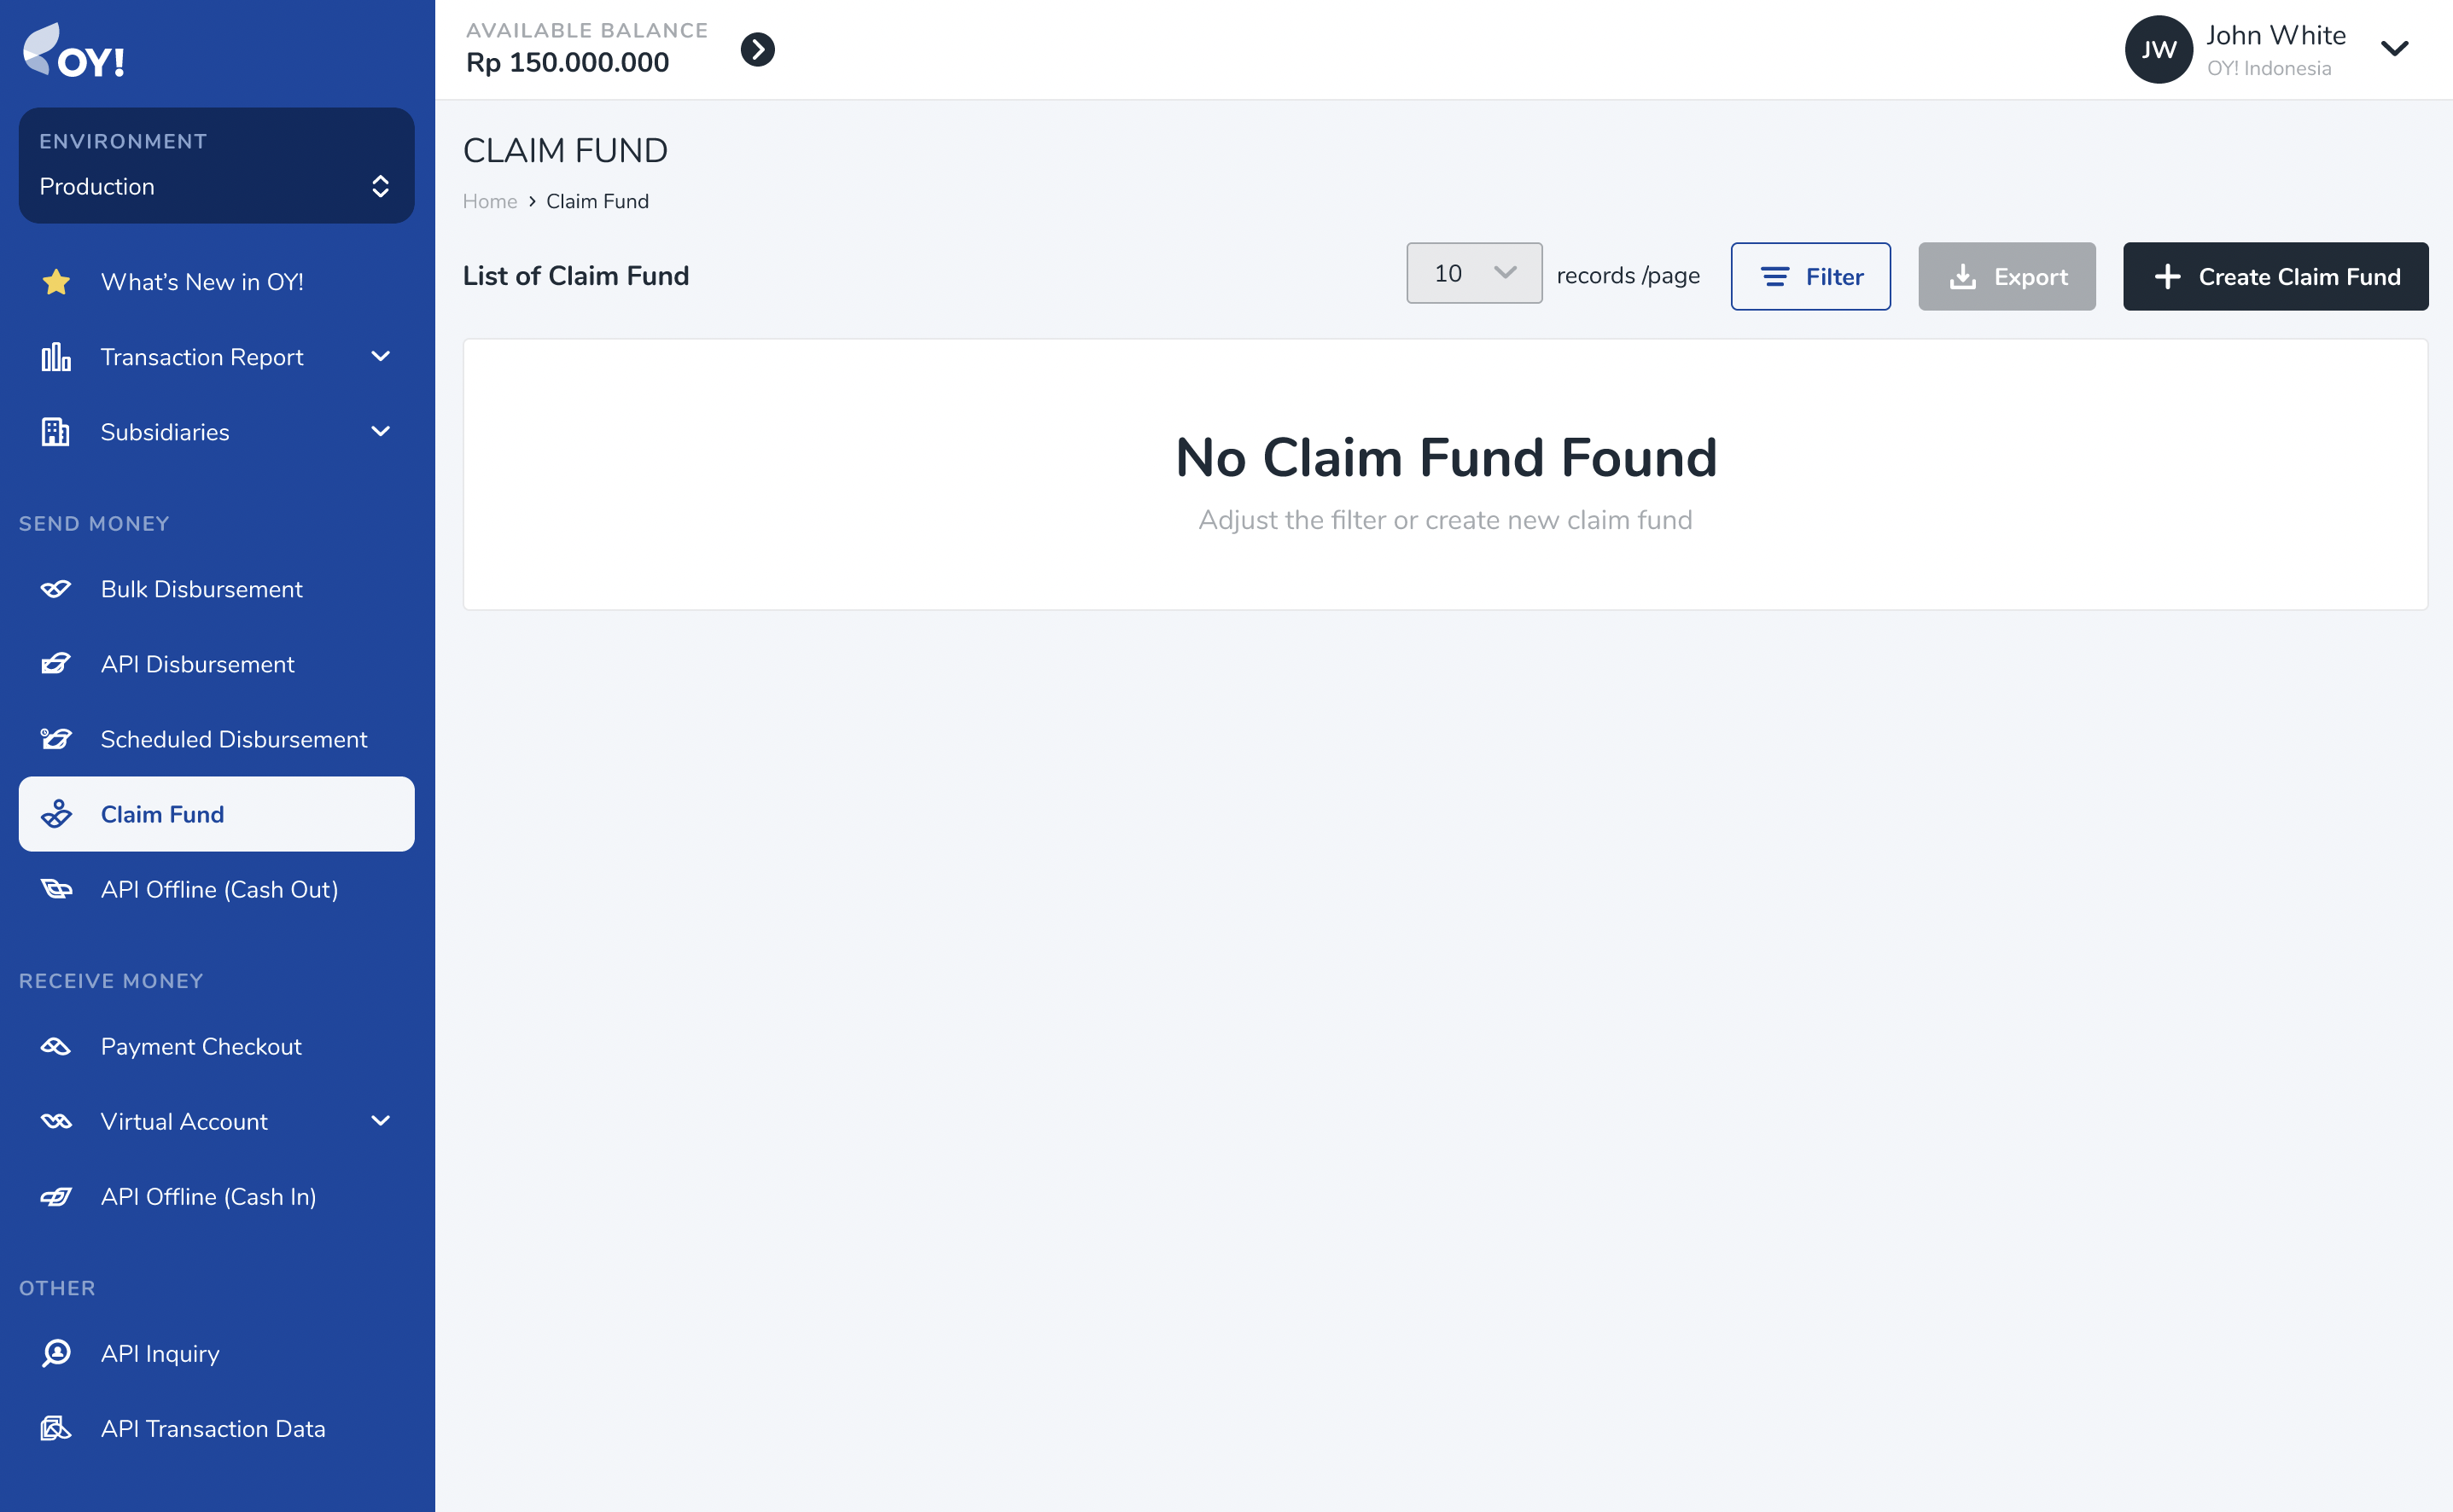
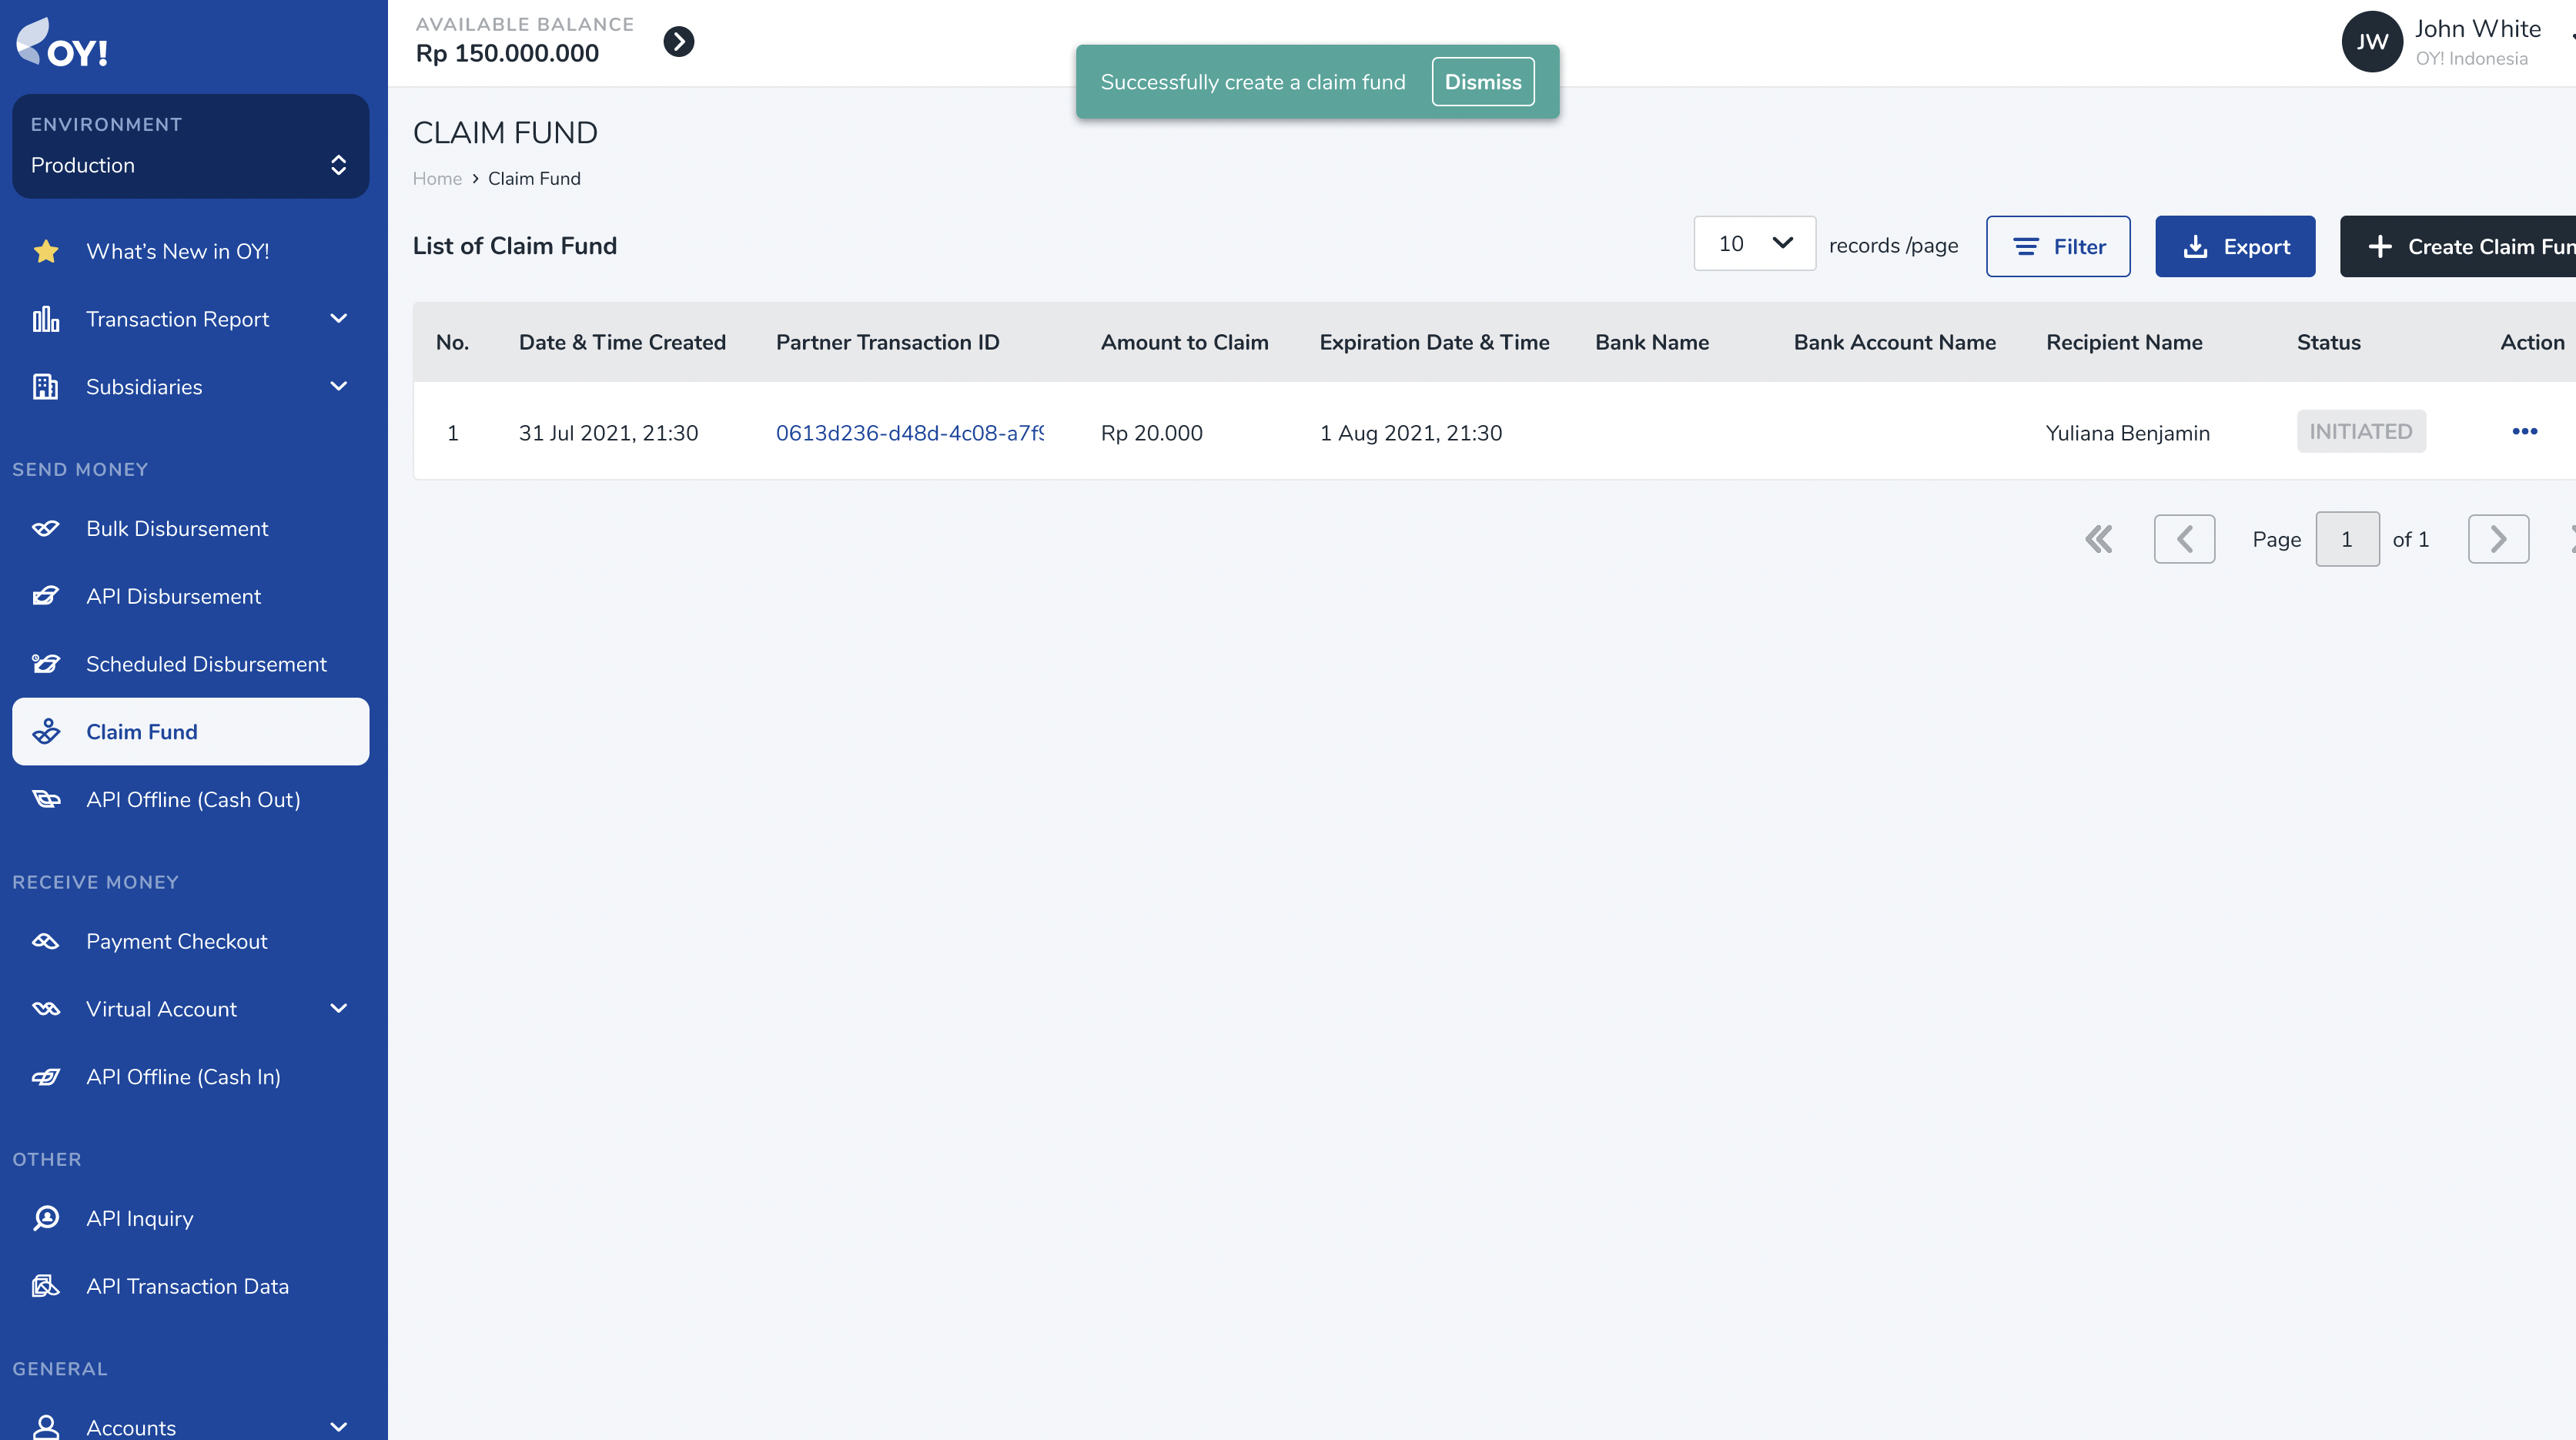
1. Business Dashboard - Create Claim Fund
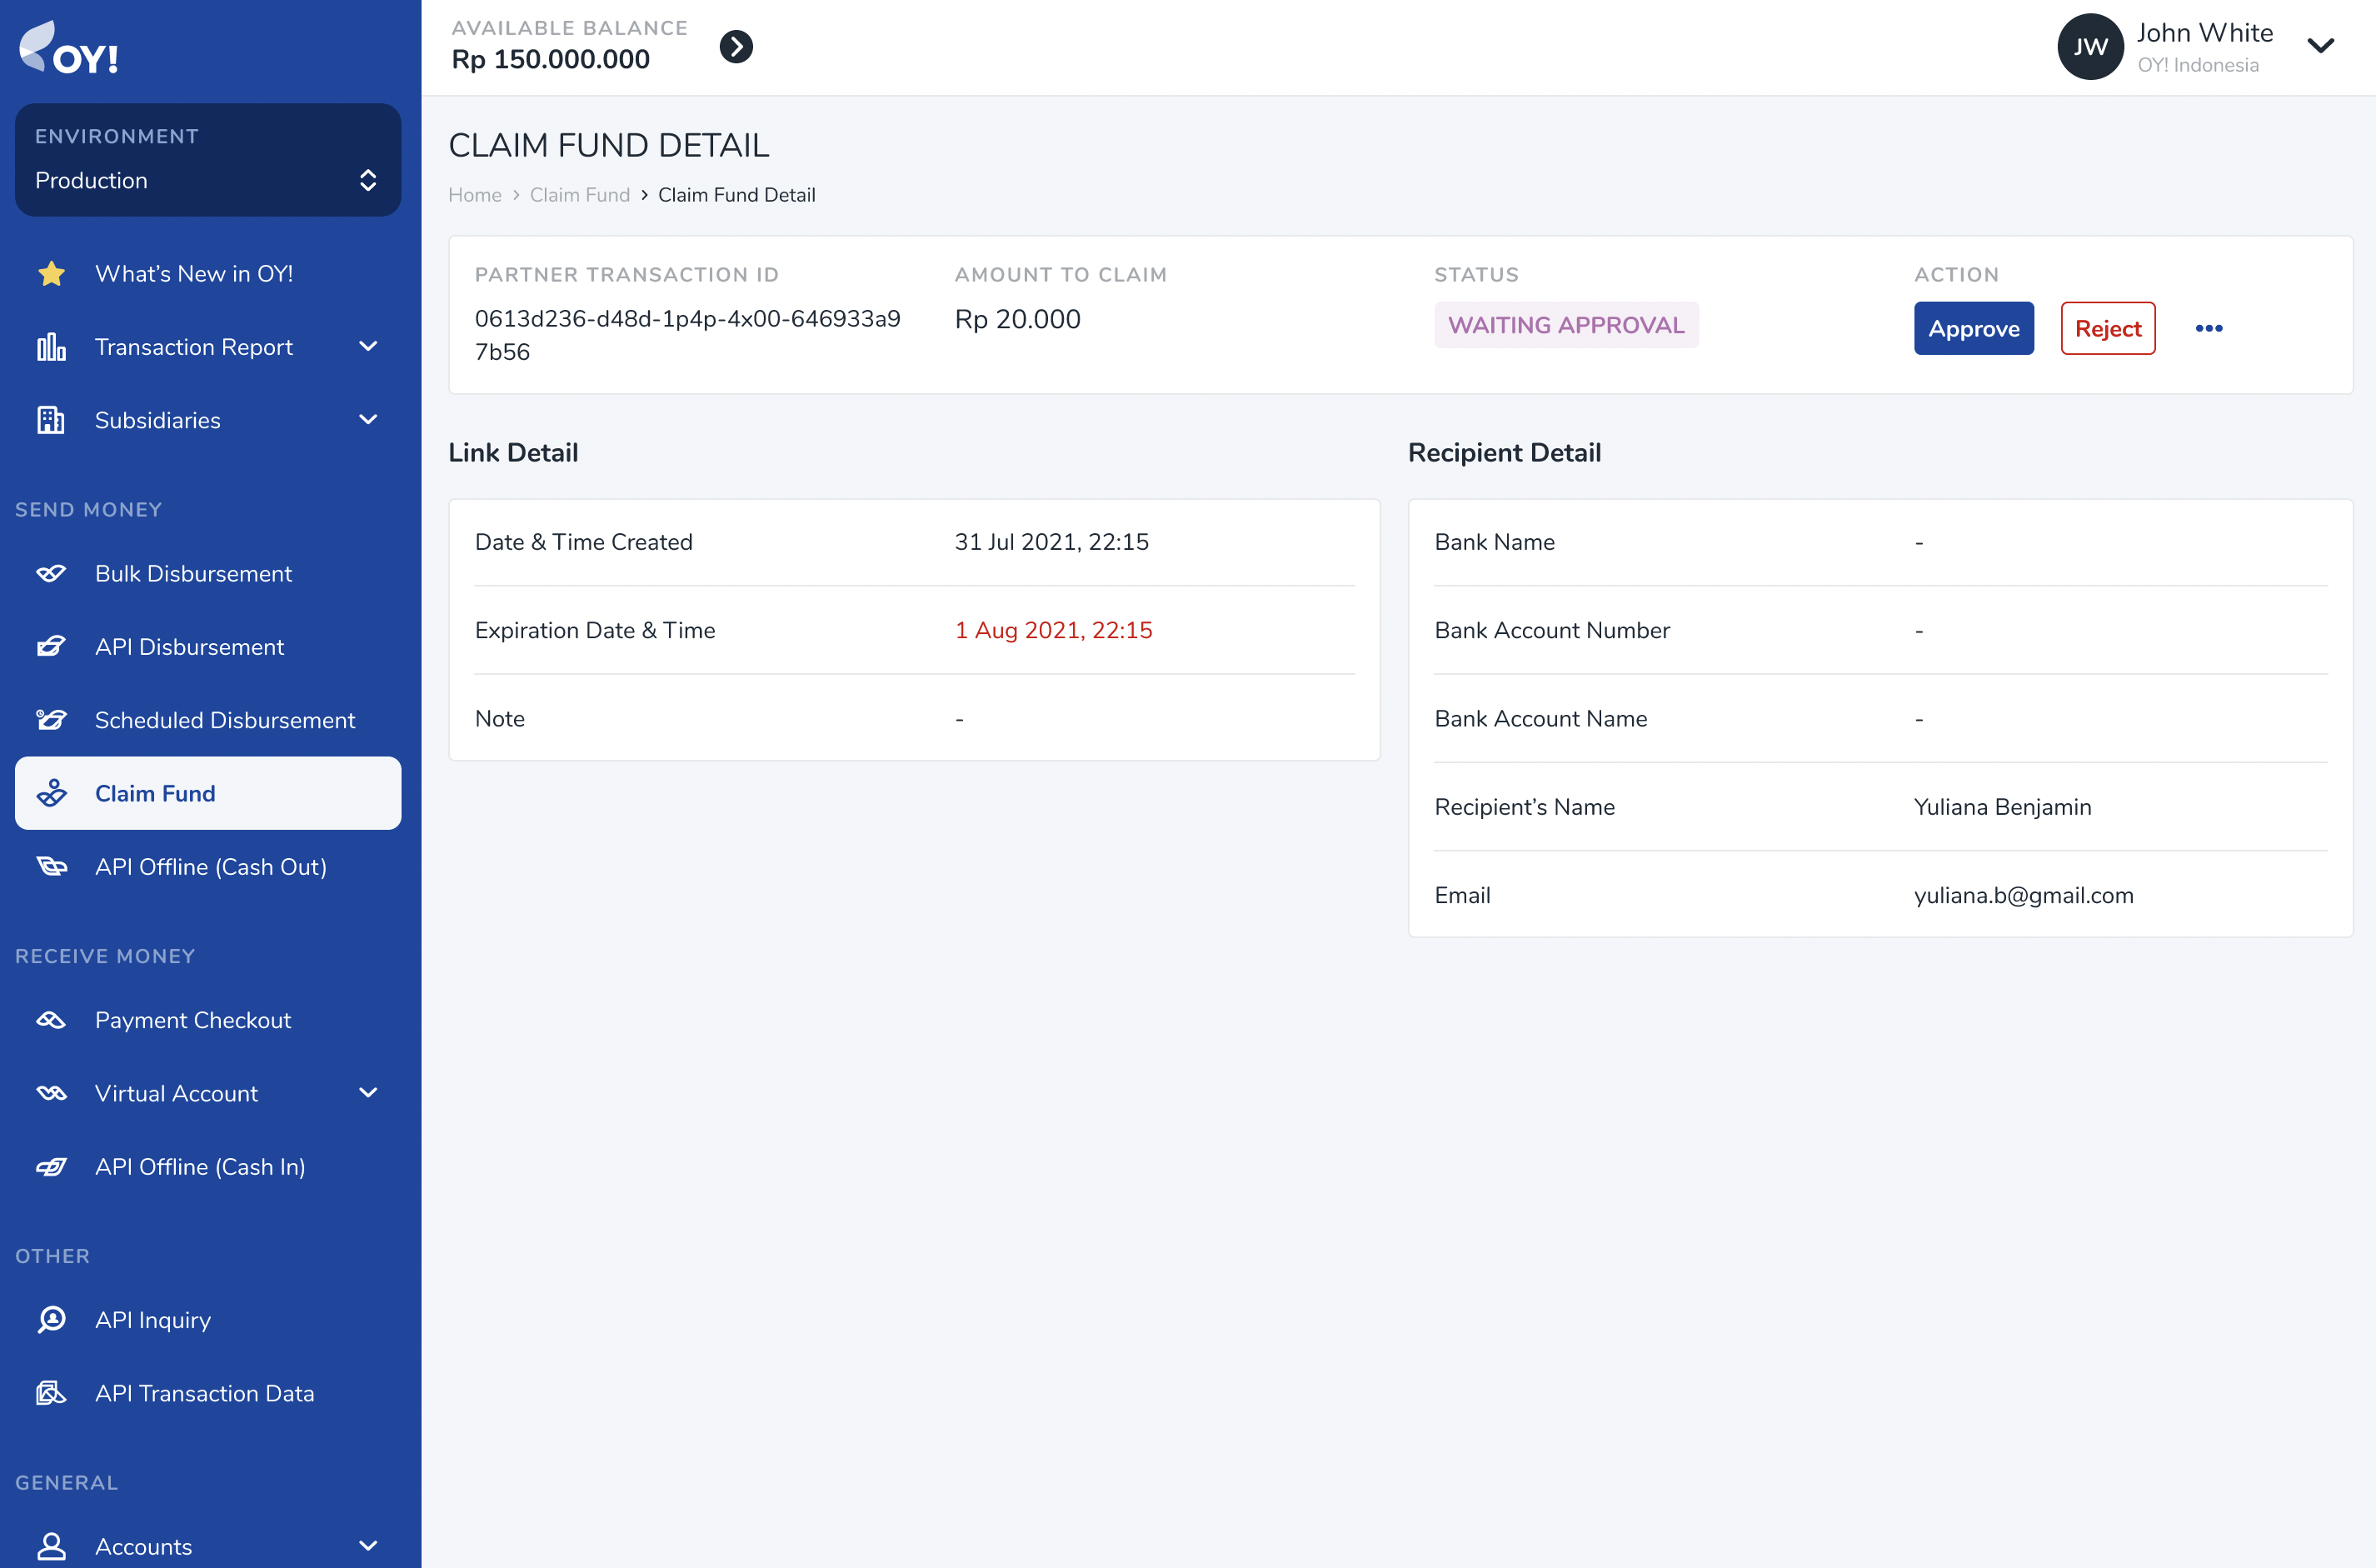
Create Claim Fund: On the OY! dashboard, navigate to Send Money > Claim Fund on your left menu bar. Click
Create Claim Fundbutton on the far righthand side of that page to create a new claim fund transaction.
Please fill-out the information accordingly. Below table is the description of each fields:
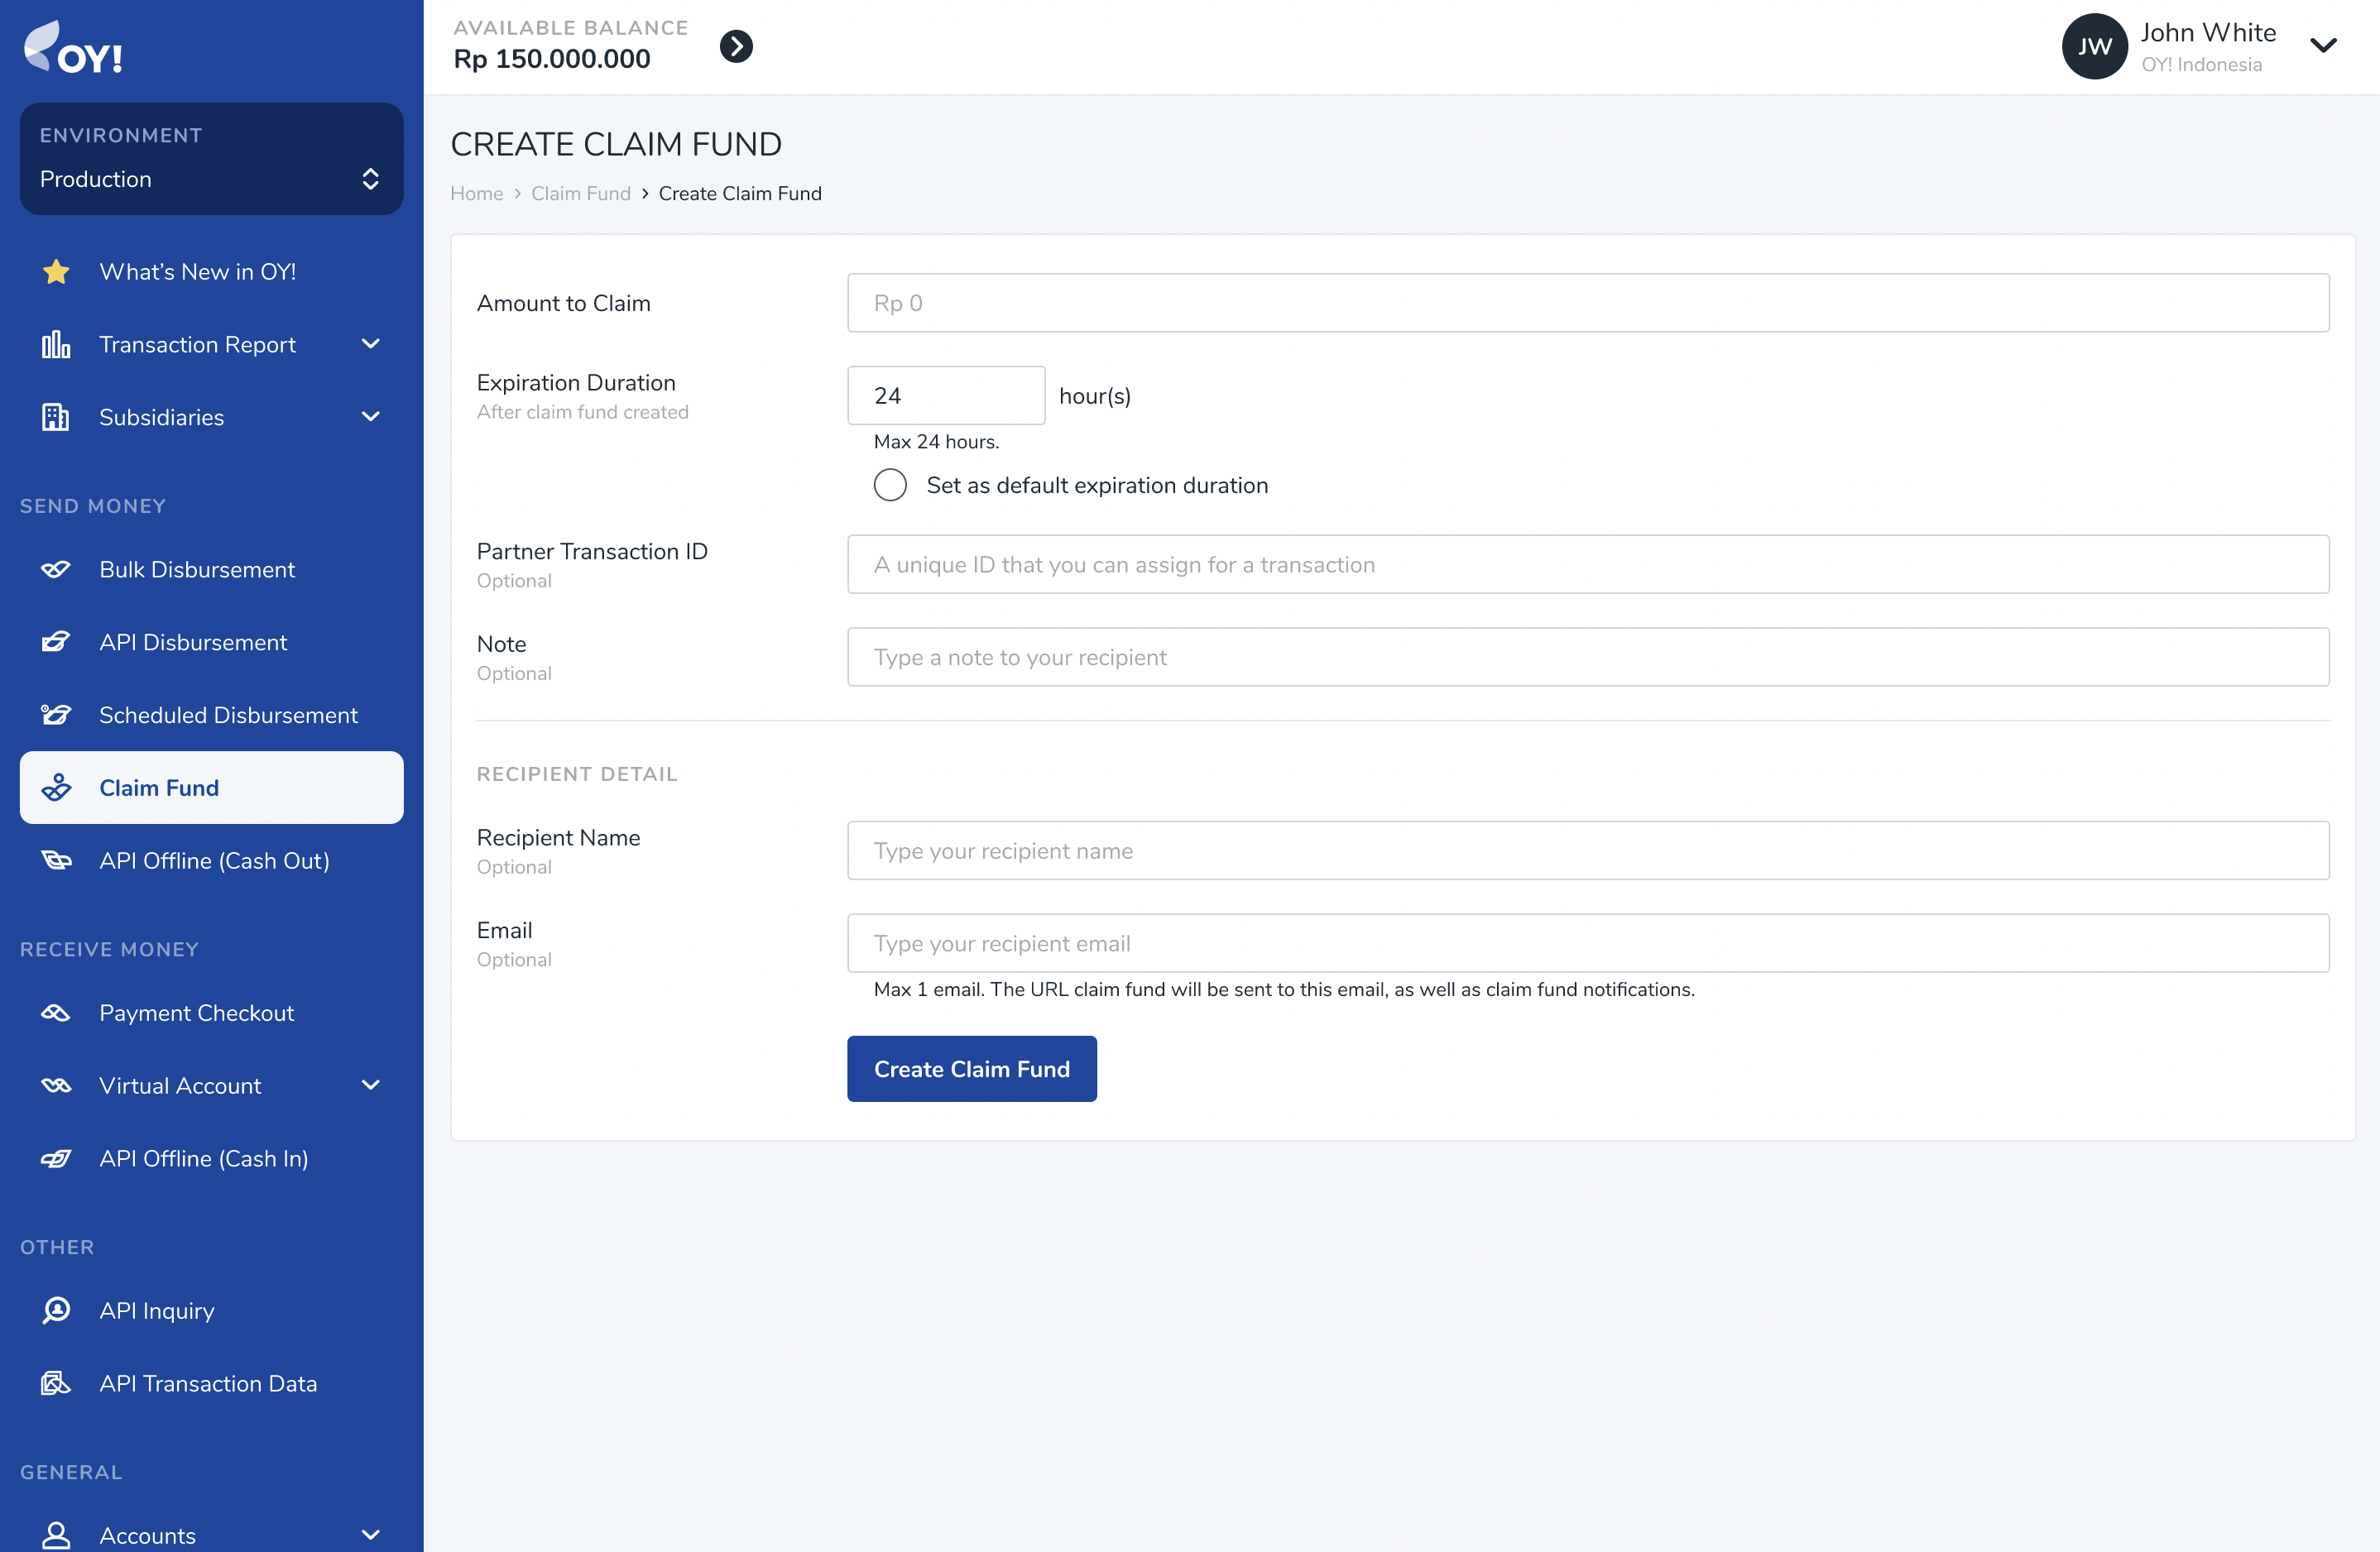
| Column | Description | Example |
|---|---|---|
| Amount to Claim | Amount of money to be sent | 1000000 |
| Expiration Duration | How long does this claim link be active. After expiration time, customer will not be able to submit their information then new claim fund link has to be created. | 12 Hours |
| Set as default expiration duration | Select this option to make it default expiration time for the next claim fund transaction. | - |
| Partner Transaction ID | Unique identifier for the recipient. | CF00001 |
| Note | additional remarks for recipient | Refund transaction |
| Recipient Name | Recipient Name | Dwiki Dermawan |
| Recipient Email | dwiki@gmail.com |
Click
Create Claim Fundbutton to submit the transaction. Your recipient will get notified of this claim fund transaction through email. Transaction link will be attached on this email.Successful claim fund transaction will be listed on the claim fund transaction listing with INITIATED status.
Please be noted that this transaction still need account detail to be filled-out by the recipient.
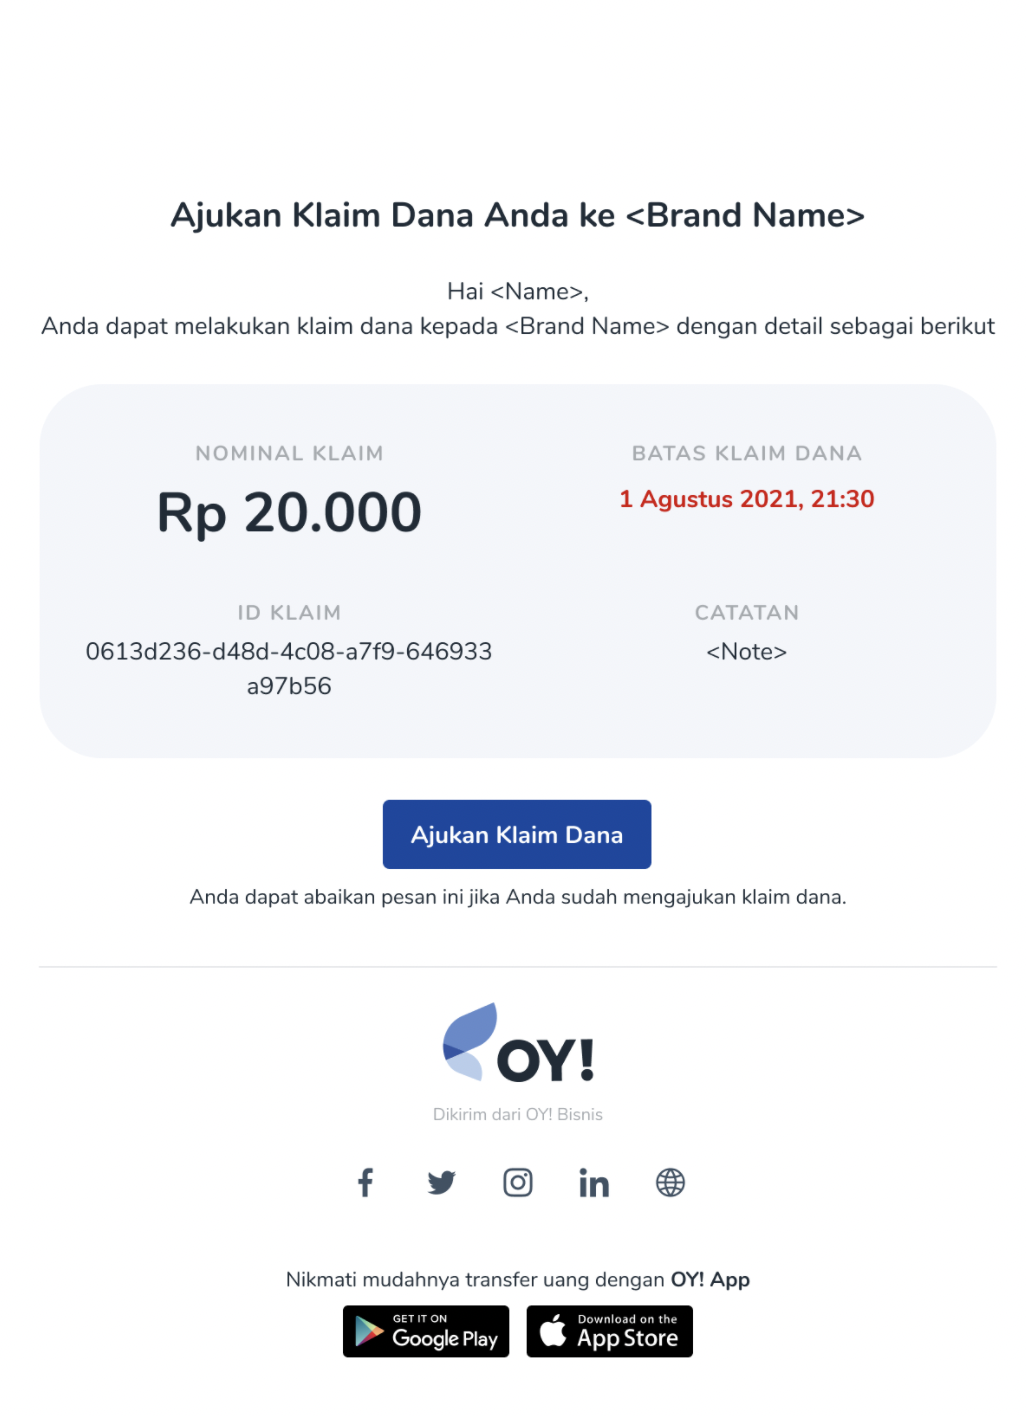
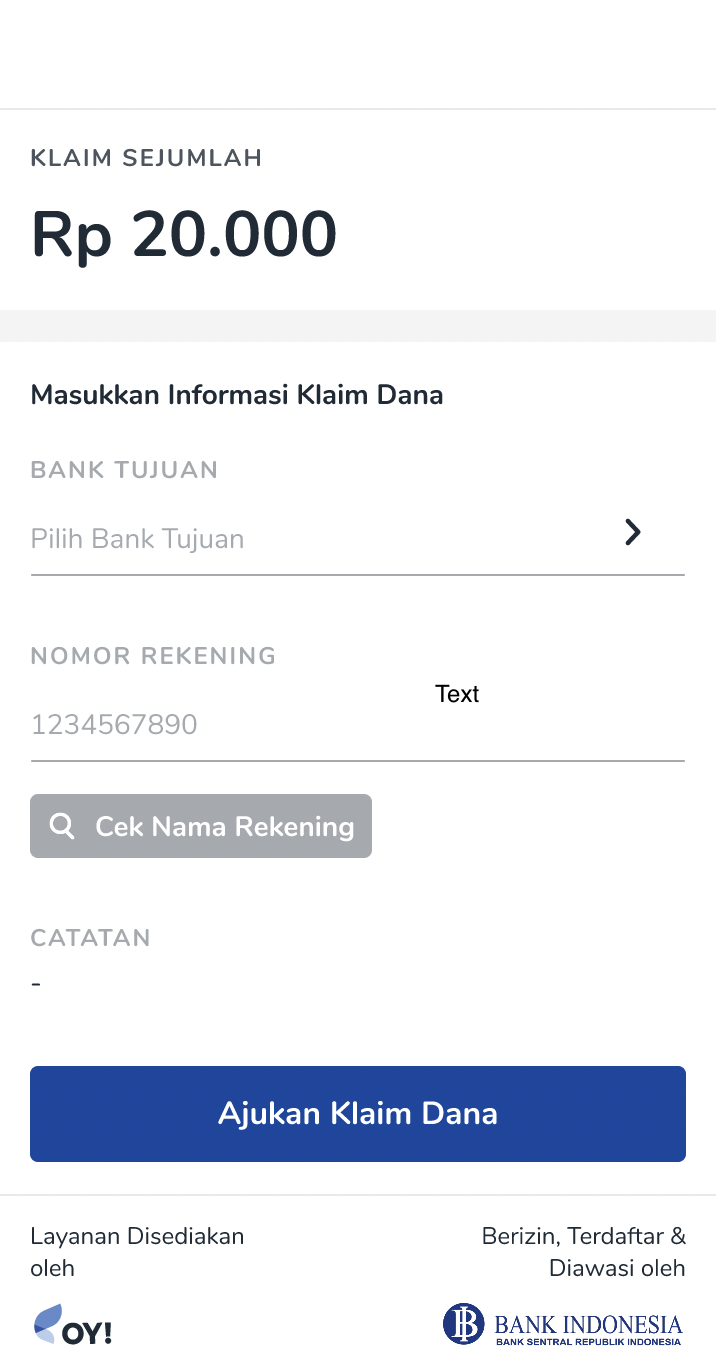
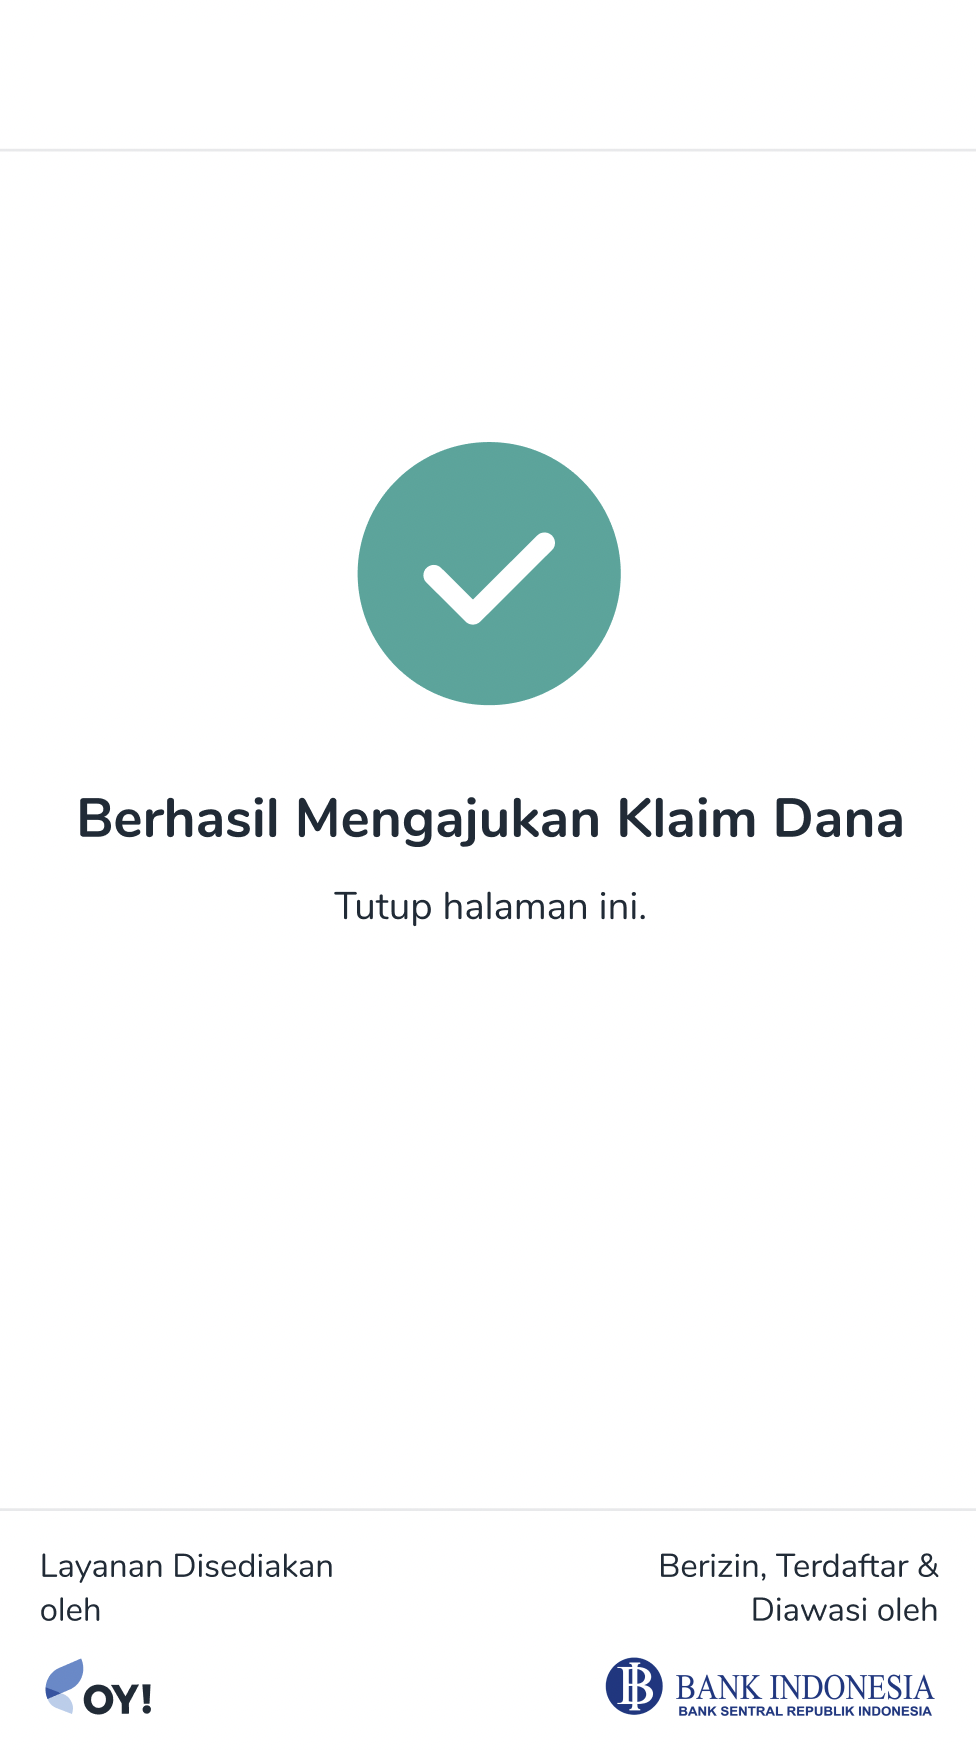
2. Fund Recipient - Input Account Information
On the notification email, user click the
Ajukan Klaim Danalink to get into claim fund input page.User should fill-out the detail information so that OY! system can continue with the approval process.
3. Business Dashboard - Approve Transaction
Transaction need to go through approval process to ensure that the money will be delivered to correct recipient and sufficient amount is available.
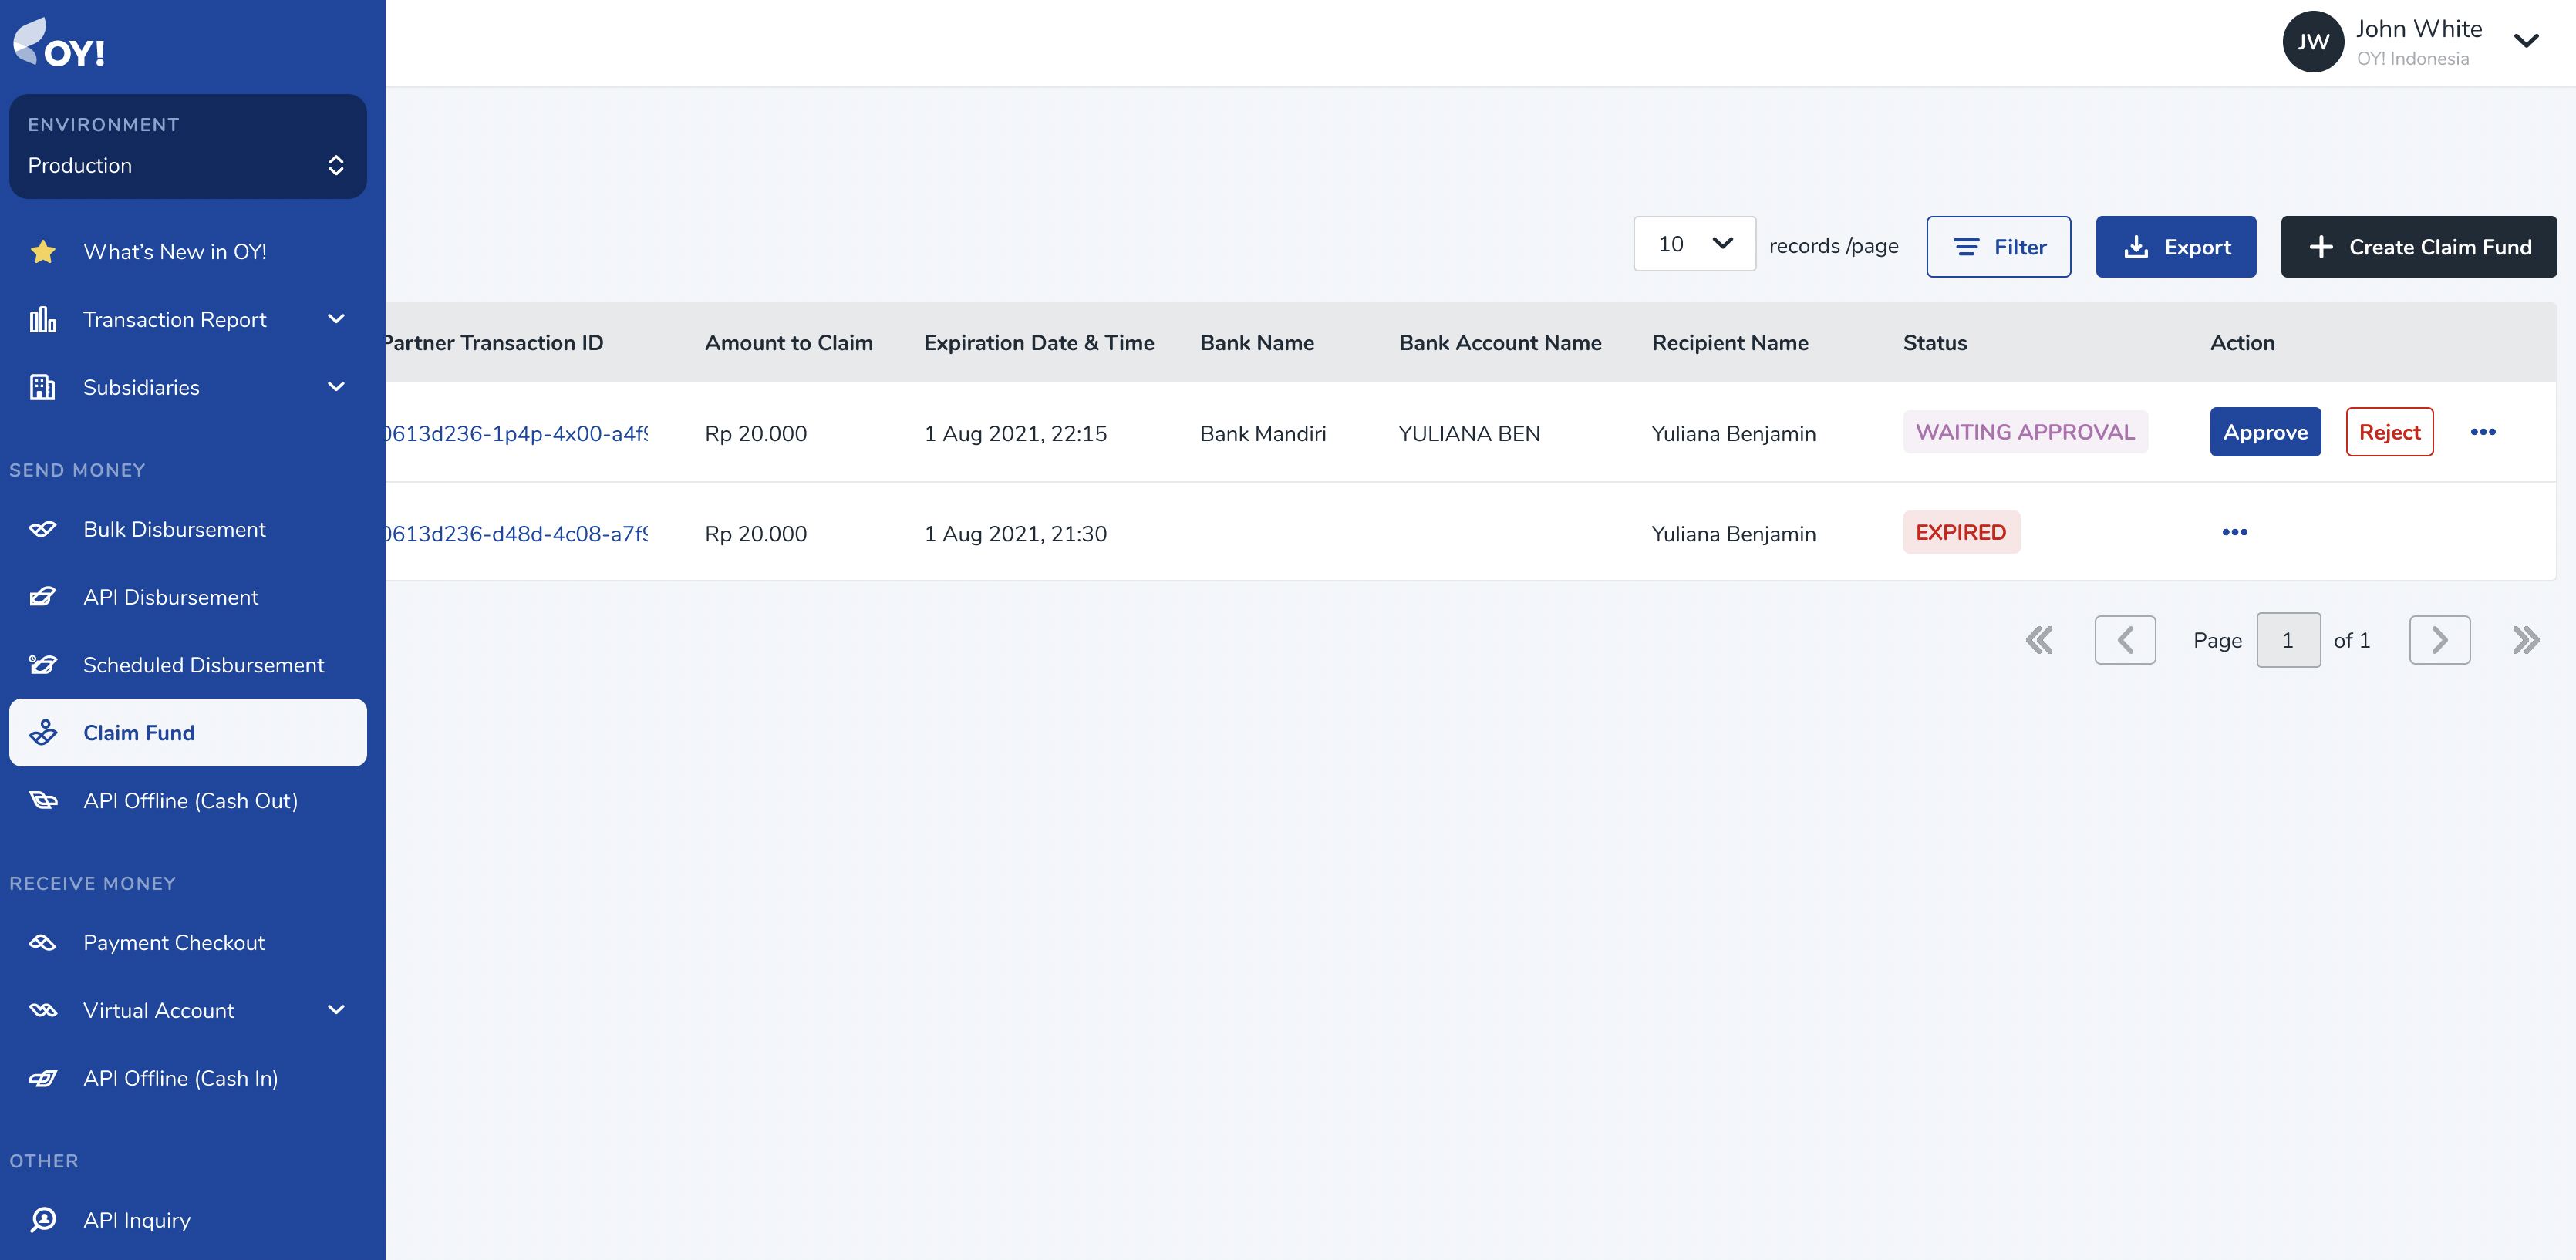
Approve claim fund transaction: On the OY! dashboard, navigate to Send Money > Claim Fund on your left menu bar. Transactions that already have user detail will be marked with
WAITING APPROVALstatus.You can approve the transaction directly from this screen by clicking Approve button, or go to detail transaction to see more information before approve.
Click approve button to release the transaction to user.
The transaction is now marked as
IN PROGRESSYour recipient should get the money delivered to their account immediately.
In parallel, your customer will also get email notification about successful claim fund transaction.
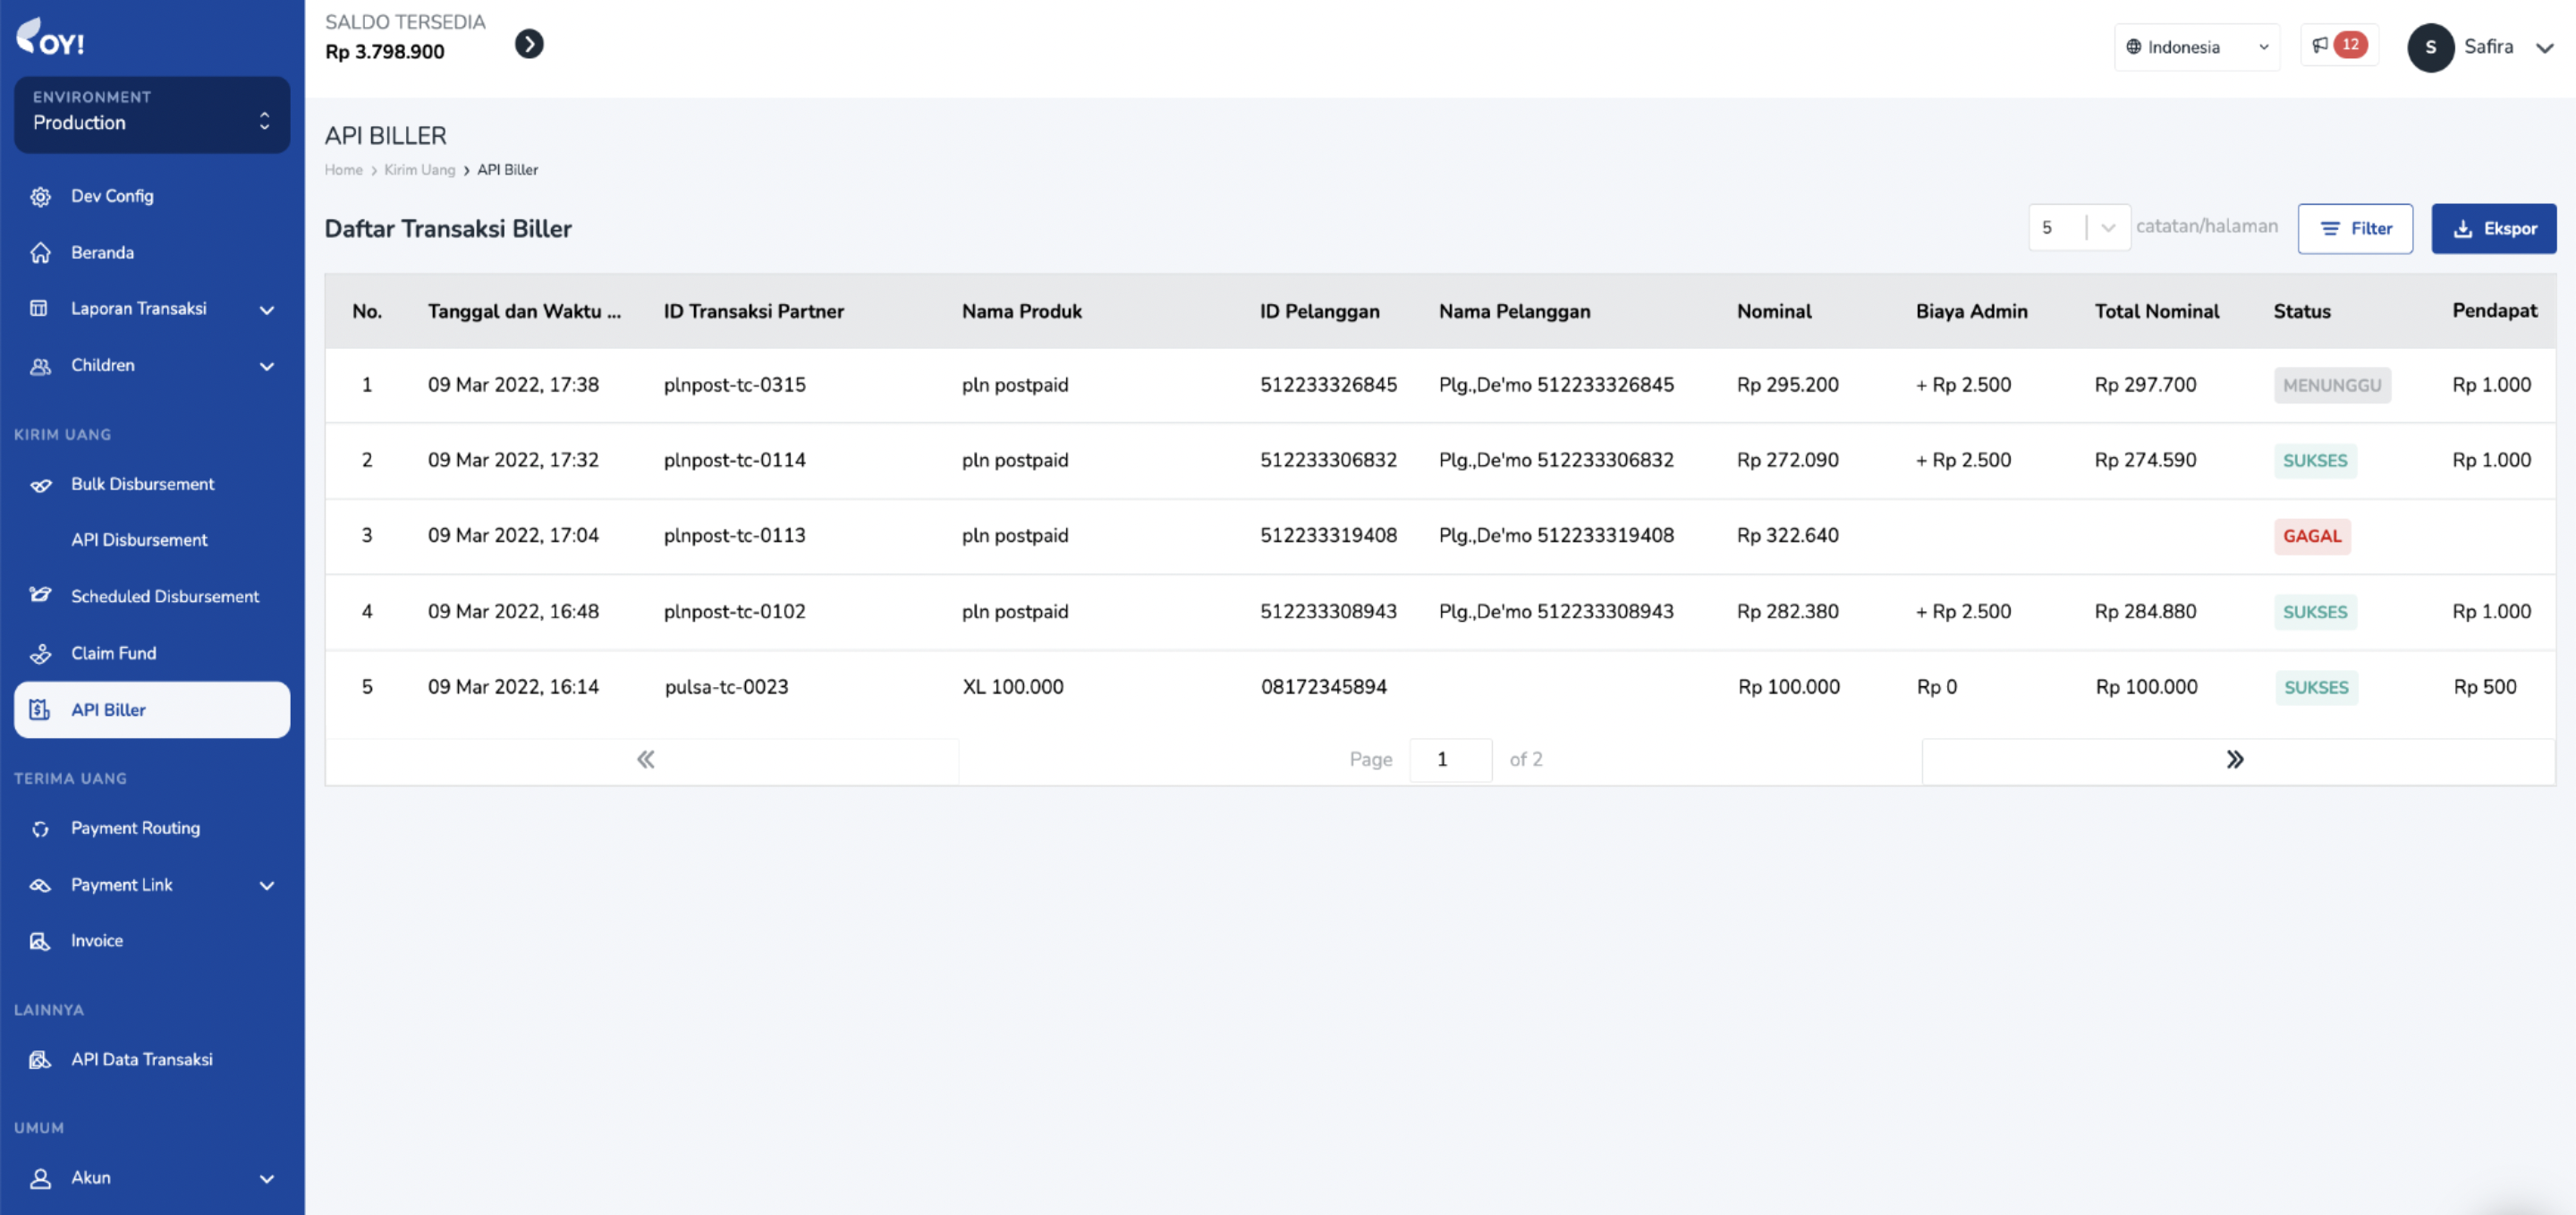
API Biller
API biller product provides the capability for you to pay the bill products. With 130+ types of billing products, you can provide numerous bill payment options with ease and in real-time. The integration process to use the API biller product is straight forward and the details can be checked here.
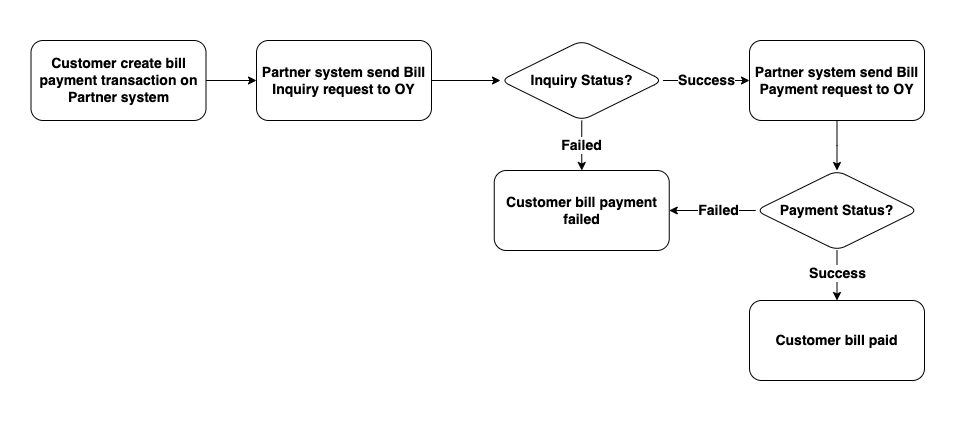
Transaction Flow
Key Features
Overbooking OY! can use the funds directly from your Mandiri or CIMB bank accounts for your bill payment needs. Please contact our business representative for further details about this feature.
Check Transaction Status and Callback
For all bill inquiry & bill payment executed, you will receive notifications regarding your transaction whether it is successful, failed or pending. We also provide an API for you to check the transaction status manually. IP proxy is also available upon request to enhance the security and integrity of the callback you will receive.
Check Balance
You can check your available balance at anytime to ensure that you have sufficient balance to execute a bill payment.
Registration and Set Up
Prerequisites
Register an account on the OY! dashboard
Activate your account through the activation link sent via email
Upgrade your account
Upgrade request is approved
Provide IP to be whitelisted and callback link to our business team
Receive an API Key from us
Integrate with our API
Testing
Once you successfully create an OY! account, you can immediately simulate bill payment via API. Follow the below steps to test the flow:
- Create an account
- Login into the dashboard
- Change the environment to “demo”
- Once the environment changed to demo, there will be API key demo available on the bottom left corner of the page
- Before creating a bill payment transaction, check your available balance through API GET https://api-stg.oyindonesia.com/api/balance
- Request inquiry for the bill you want to pay by sending a ‘POST’ request to https://api-stg.oyindonesia.com/api/v2/bill using your staging API key. Enter the required and optional fields, as referenced in the API reference docs (https://api-docs.oyindonesia.com/#bill-inquiry-biller-api)
- Fill in the customer-id, product-id, and the partner transaction-id. You will get the detail information about the bill that you want to pay.
- After successful inquiry, you should do the payment process by sending a ‘POST’ request to https://api-stg.oyindonesia.com/api/v2/bill/payment. Enter the required and optional fields, as referenced in the API reference docs (https://api-docs.oyindonesia.com/#pay-bill-biller-api)
- To get the status of a bill payment request, you can call the API https://api-stg.oyindonesia.com/api/v2/bill/status
- If payment is successful or failed, we will send a callback to the registered staging callback URL destination. Callback URL can be registered via our business representative.
- The API biller transactions can be monitored through OY! dashboard from the “Send money - API biller" menu.
How to Use
In order to create API biller transaction, a sufficient available OY! balance is required in the account. More details and instructions about topping up to your OY! account can you see here https://docs.oyindonesia.com/#top-up-oy-dashboard-tutorial.
Before you execute the bill payment, you have to verify the bill information from our bill inquiry endpoint.
Below is an example of the request body for inquiry:
curl -X POST https://partner.oyindonesia.com/api/v2/bill
-H 'content-type: application/json, accept: application/json, x-oy-username:myuser, x-api-key:987654'
-d '{
    "customer_id": "512233308943",
    "product_id": "plnpost",
    "partner_tx_id": "Tx15048563JKFJ"
    }'
It will return an error message if the request is not valid. Otherwise, below is the sample response parameters that will be returned:
{
    "status":{
        "code":"000",
        "message":"Success"
    },
    "data": {
        "tx_id": "a3d87877-e579-4378-844b-c06294fc9564",
        "partner_tx_id": "Tx15048563JKFJ",
        "product_id": "plnpost",
        "customer_id": "512233308943",
        "customer_name": "Plg.,De'mo 512233308943",
        "amount": 282380,
        "additional_data": "{\"customer_id\":\"512233308943\",\"customer_name\":\"Plg.,De'mo 512233308943\",\"admin_fee\":\"2.500\"}"
    }
}
Next, send a request body to execute a bill payment request to be sent to our bill payment endpoint.
Below is an example of the request body for the bill payment:
curl -X POST https://partner.oyindonesia.com/api/v2/bill/payment
-H 'content-type: application/json, accept: application/json, x-oy-username:myuser, x-api-key:7654321'
-d '{
    "partner_trx_id":"Tx15048563JKFJ",
    "note" :"biller transaction test"
    }'
Below is the sample response parameters that will be returned:
{
    "status":{
        "code": "102",
        "message": "Request is In progress"
    },
    "data": {
        "tx_id": "a3d87877-e579-4378-844b-c06294fc9564",
        "partner_tx_id": "Tx15048563JKFJ",
        "product_id": "plnpost",
        "customer_id": "512233308943",
        "customer_name": "Plg.,De'mo 512233308943",
        "amount": 282380,
        "note": "biller transaction test"
    },
}
An endpoint to check the transaction is also available and can be accessed at anytime.
Below is an example of the request body:
curl -X POST https://partner.oyindonesia.com/api/b2/bill/status
-H 'content-type: application/json, accept: application/json, x-oy-username:myuser, x-api-key:7654321'
-d '{
    "partner_trx_id": "Tx15048563JKFJ"
    }'
The above command returns a JSON structured similar like this:
{
    "status":{
        "code": "000",
        "message": "Success"
    },
    "data": {
        "tx_id": "a3d87877-e579-4378-844b-c06294fc9564",
        "partner_tx_id": "Tx15048563JKFJ",
        "product_id": "plnpost",
        "customer_id": "512233308943",
        "customer_name": "Plg.,De'mo 512233308943",
        "amount": 282380,
        "additional_data": "\"{\\\"bill_period\\\":\\\"FEB2022\\\",\\\"total_amount\\\":\\\"282.380\\\",\\\"customer_id\\\":\\\"512233308943\\\",\\\"customer_name\\\":\\\"Plg.,De'mo 512233308943\\\",\\\"admin_fee\\\":\\\"2.500\\\",\\\"settlement_date\\\":\\\"09/03/2022 16:49\\\"}\"",
        "status": "SUCCESS"
    },
}
A callback with the following information will be sent to the callback endpoint that you can register with us.
You can also check your balance anytime to ensure you have sufficient balance from our endpoint.
Below is an example of a request body to check the balance:
curl -X GET 'https://partner.oyindonesia.com/api/balance'
-H 'Content-Type: application/json'
-H 'Accept: application/json'
-H 'X-OY-Username: janedoe'
-H 'X-Api-Key: 7654321'
Below is the sample response parameters that will be returned:
{
    "status":{
        "code":"000",
        "message":"Success"
    },
    "balance":100000000.0000,
    "pendingBalance":2000000.0000,
    "availableBalance":98500000.0000,
    "overbookingBalance":98500000.0000,
    "timestamp":"10-12-2019 12:15:37"
}
Lastly, all transactions can be monitored from the OY! dashboard which includes all the transaction details.
For further details on the parameters definition and proper usage, please refer to our API Documentation.
Feature: Resend Callback
Key Features
Retry Callback allows you to resend a callback of your transaction to your system. Initially, OY! will send a callback to your system after your transaction status has been updated. If your system failed to receive the callback, this feature can help you to retry the callback process. The process can be done in two ways
Automated retry callback If the callback is not successfully received on the first try, the system will automatically retry the callback delivery. If that callback is still not received by the client's system, the system will automatically retry until 5 occurrences. The interval of the sending process will be detailed in the Callback Interval section. If all automated Retry Callbacks have been sent but still returned failed, the system will send an email notification to the email address set in the configuration.
Manual retry callback Besides the automated process, you can manually request a callback via the dashboard.
Registration and Set Up
Follow the instruction below to activate retry callback
- Login to your account in OY! Dashboard
- Open “Settings” and choose “Developer Option”. Choose “Callback Configuration”
- Fill your callback URL in the related product that you want to activate. Make sure the format is right. You can click URL String Validation button to validate the URL format.
- If you want to activate automated retry callback, check the Enable Automatic Retry Callback and fill in the email. The email will be used to receive a notification if all the automatic callback attempts have been made but still fail
- Click "Save Changes". The configuration will not able to be saved if the callback URL or/and email format are not valid.
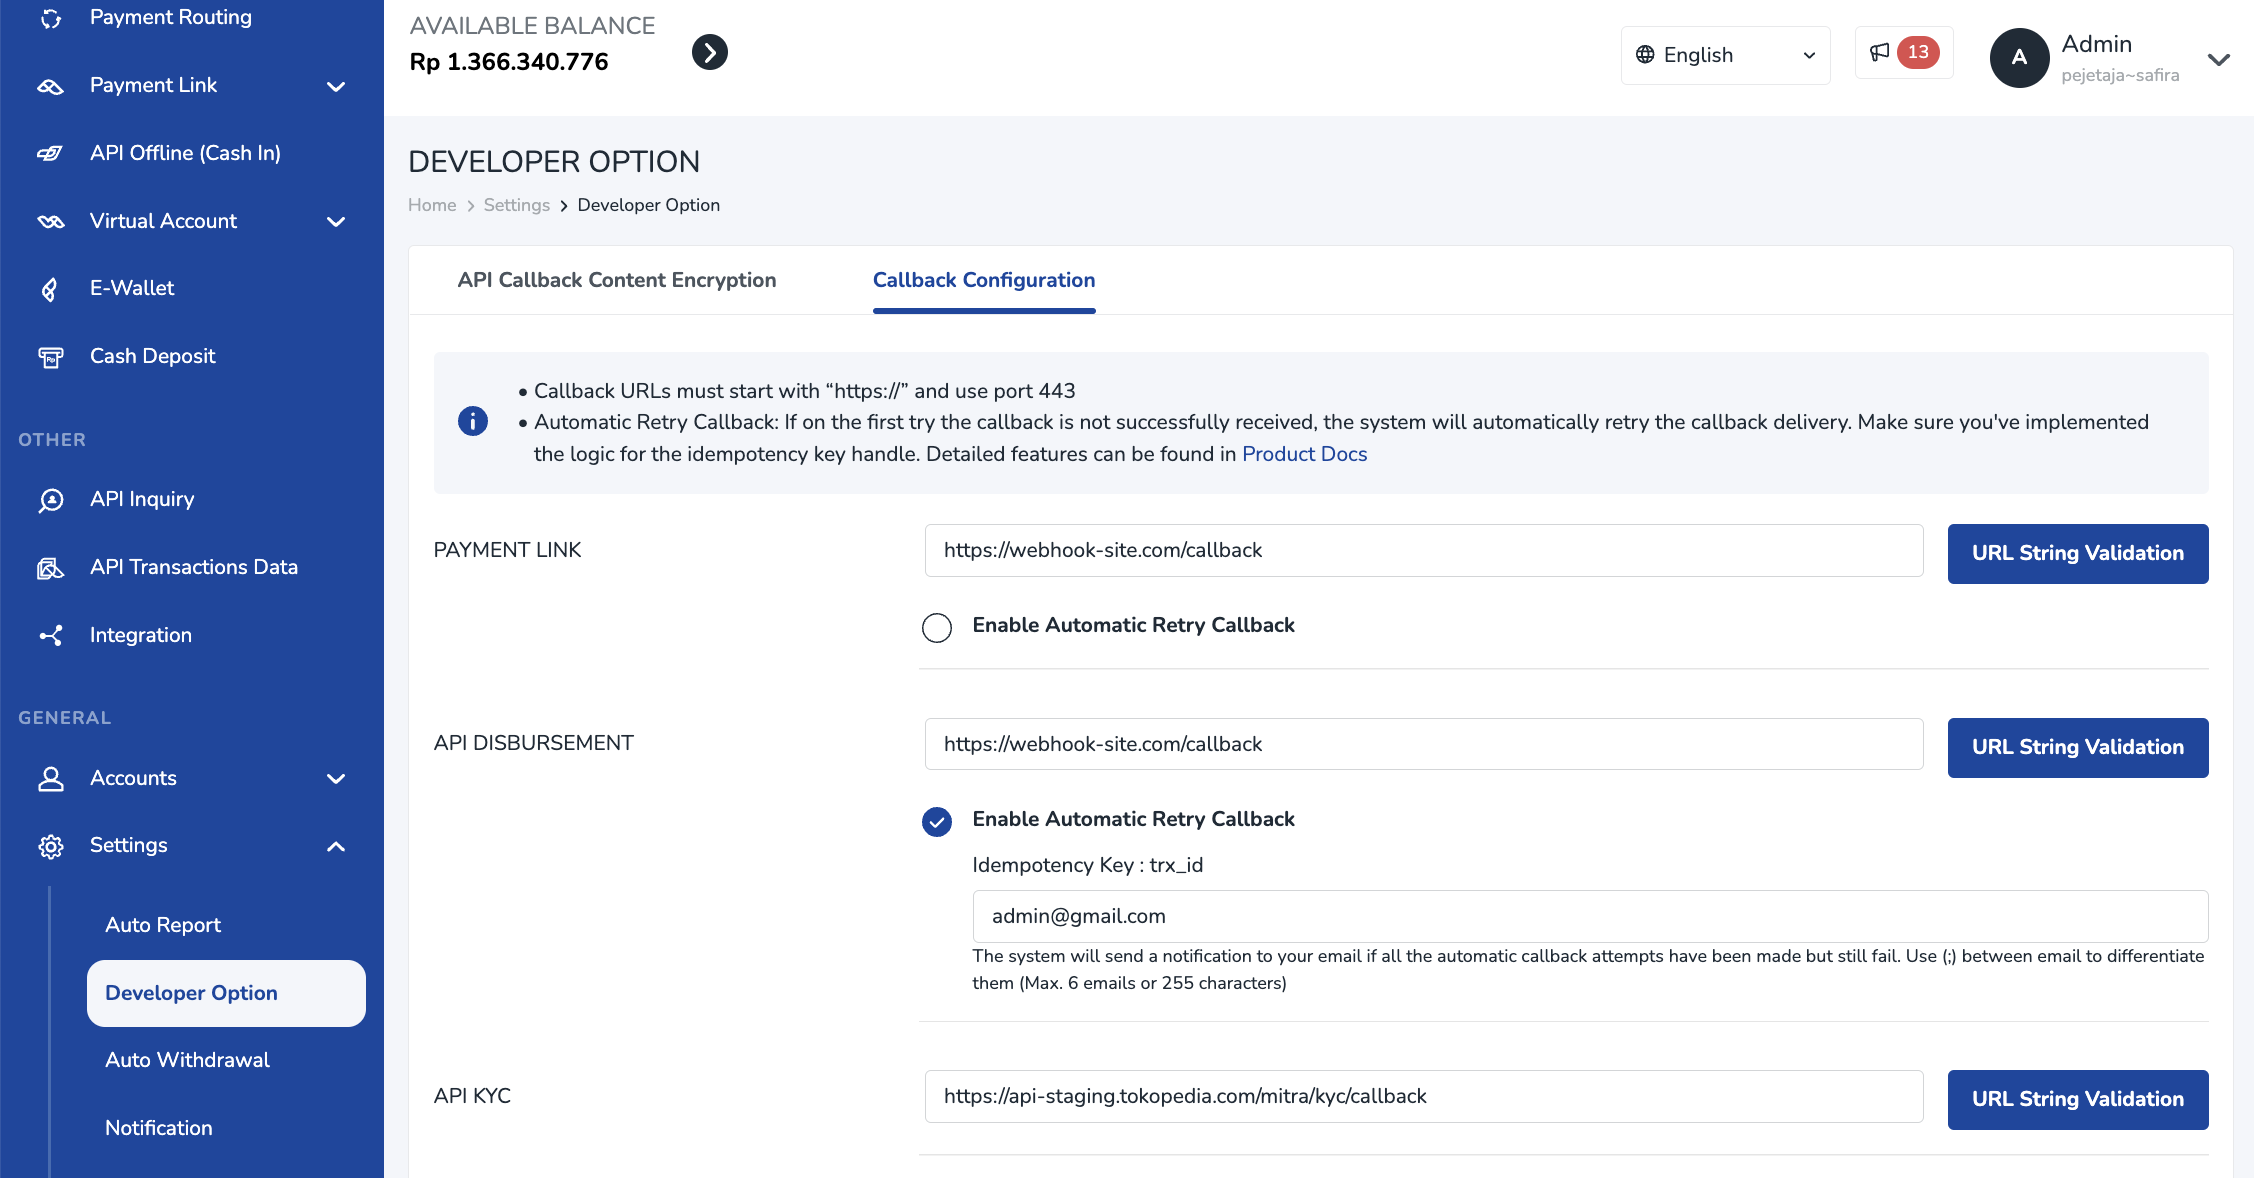
Don't forget to whitelist these IPs in order to be able to receive callback from OY: 54.151.191.85 and 54.179.86.72
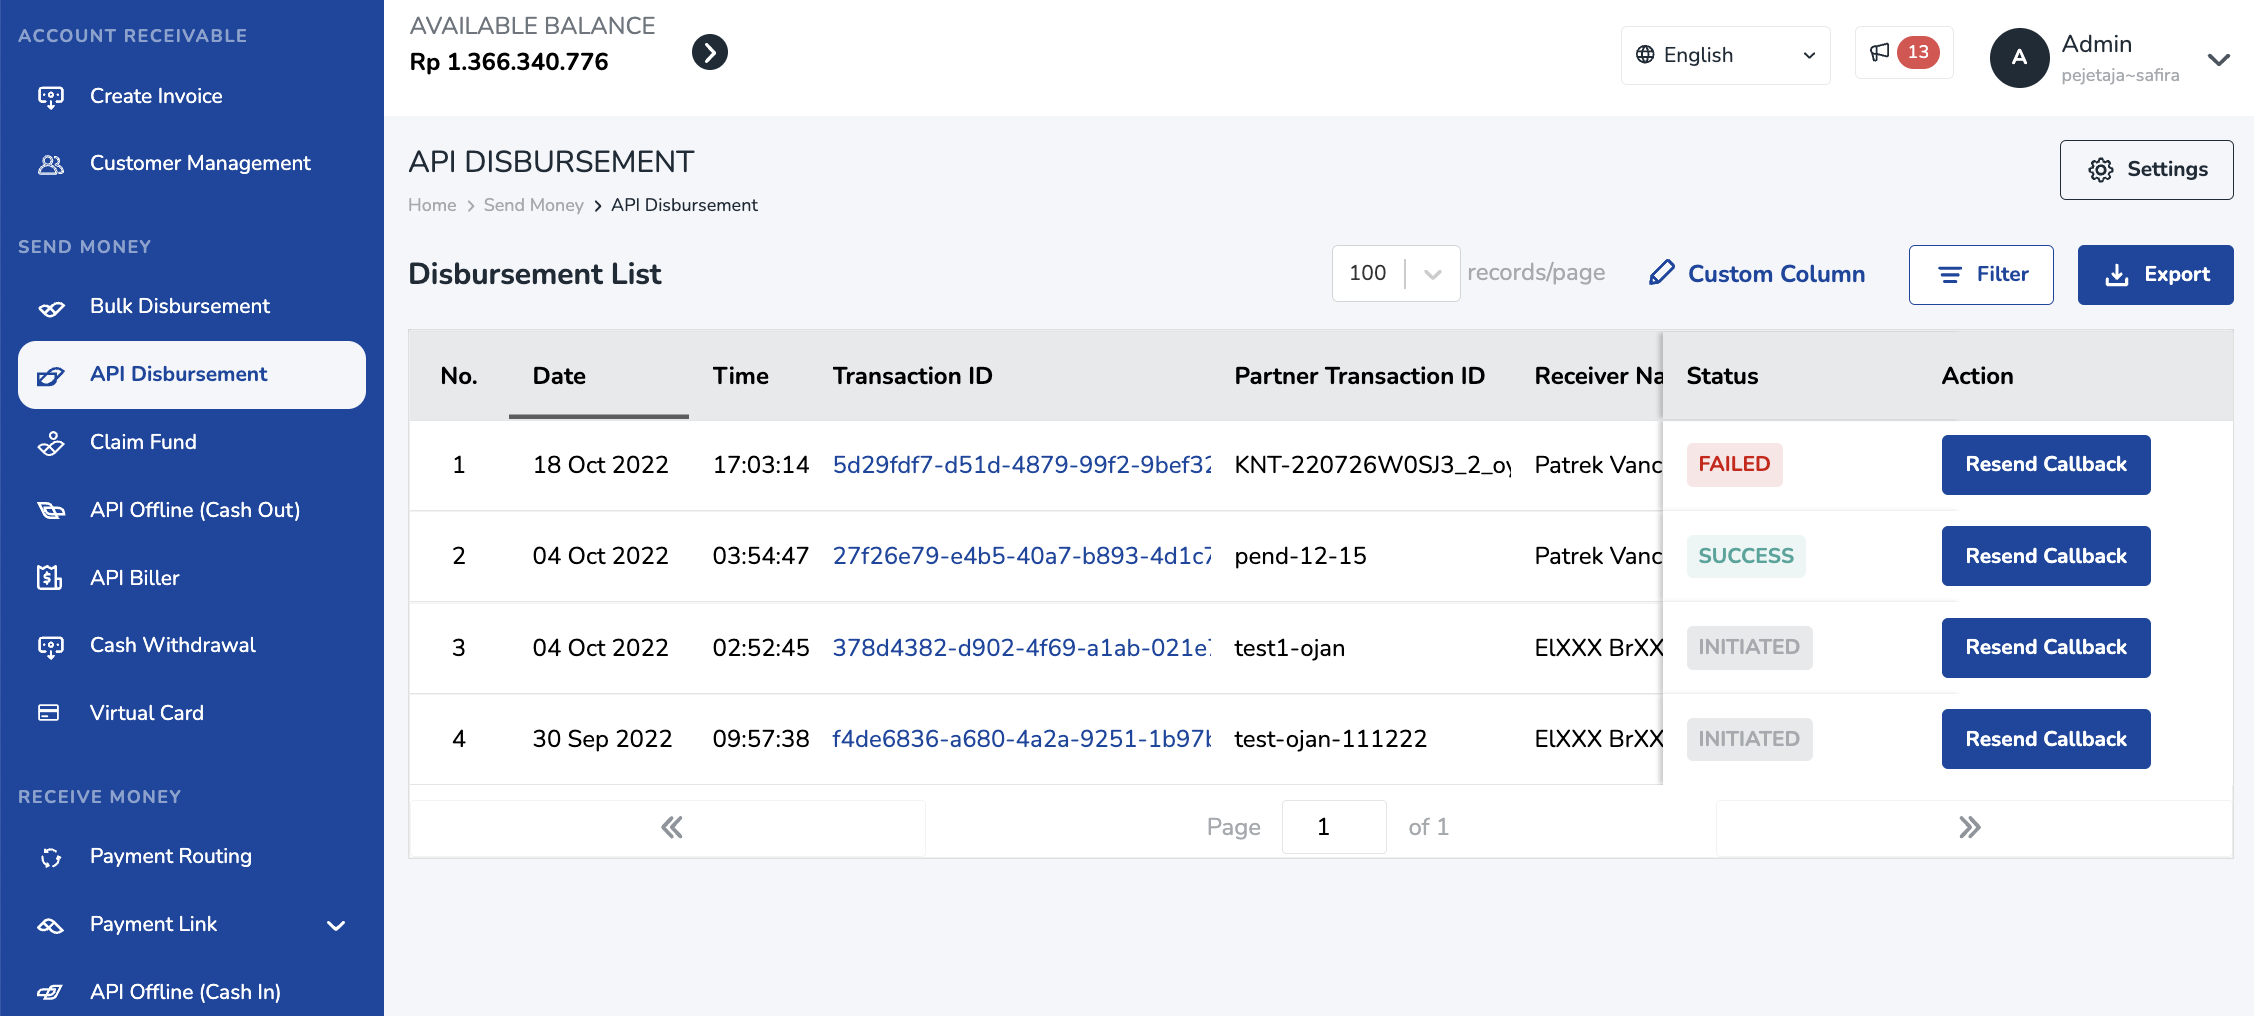
If you want to manually resend a callback, you can follow the instruction below
- Login to your account in OY! Dashboard
- Open the API Disbursement menu
- Click the "Resend Callback" button in the related transaction
Callback Interval
1st retry: realtime (after the first failed log received) 2nd retry: 1 min (after callback failed log for the 1st retry is received) 3rd retry: 2 mins (after callback failed log for the 2nd retry is received) 4th retry: 13 mins (after callback failed log for the 3rd retry is received) 5th retry: 47 mins (after callback failed log for the 4th retry is received)
If all automated Retry Callback (all the 5 attempts) has been sent but we still get a Failed response from your end, our system will send an automated email notification to the email address that has been set in the configuration earlier
Idempotency Key
To implement automated retry callback, you need to handle the idempotency logic in your system using the below key:
API Disburse: trx_id
Account Payable
OY! Account Payable allows you to pay your vendor’s billings. This feature offers record transactions, creates approval layers, and schedules payment for invoice payables without hassle. Account Payable is made through the OY! dashboard, so no technical integration is required to use this product.
Key Features
| Parameter | Description |
|---|---|
| Multi-layer Approval | By default, OY!’s account payable can be created and approved by the super admin or admin. However, you can configure additional approval layers to enhance security. |
| OCR enabled | OY! provides you with OCR for automatic input of payable invoices. You only need to upload the invoice then let OY!’s OCR do the job. |
| International Transfer | You can make overseas payments with OY!'s account payable. There's no need to visit the bank or convert your IDR money first—handle it anytime, anywhere with OY!'s account payable. |
Registration and Set Up
Follow the below check-list to ensure you're all set up to use the service:
- Create an account for OY! business
- Verify your account by submitting the required documentations
- Have your upgrade request approved
- Set up your receiving bank account information (note: ensure that the receiving bank account information is accurate as it cannot be changed via OY! dashboard for security reasons)
- Once your account is approved, you can start using Account Payable product
Testing
Account Payable in IDR
- Log on to your OY! dashboard
- Choose "Demo" environment
- Create vendor data first by following the steps in How to Manage Vendor Data
- After create the vendor data, you can start create Account Payable, please follow steps in How to Use Account Payable for IDR
- You’ll see your created transaction in Account Payable table
Account Payable for International Payment
- Log on to your OY! dashboard
- Choose "Demo" environment
- Create vendor data first by following the steps in How to Manage Vendor Data
- After create the vendor data, you can start create account payable, please follow steps in How to Use Account Payable for International Payment
- You’ll see your created transaction in Account Payable table
How to Use Account Payable via Dashboard
You can create new invoice to be paid and set up payment by following this step:
- Log on to your OY! dashboard
- Choose "Production" environment
- Click "Pay Invoice" under Account Payable menu
- Click "Invoice List"
- Click "Create New Invoice" on top right
- Choose “Send IDR”
- Upload your invoice document to help you easier record the invoice by click "Browse to Upload" or Drag & drop to the invoice area
Fill the payable invoice data. You can choose between these 2 options for input data:
- By Automatic OCR
- Click the toggle auto-fill on top left corner page
- Choose vendor that this invoice belongs to
- Click “Process”
- Your invoice will have status “Auto-Filling” until the OCR has successfully completed the extraction process
- Manual Input necessary details of payable invoice
Parameter Description Purchase Type You can choose between purchase order, service fee, bill, subscription fee, and reimbursement. Invoice Number The number of the invoice that you get from your vendor/supplier. Invoice Date The date of the invoice. Due Date Due date of a transaction as mentioned in the invoice. Your approver will be reminded to approve on D-7, D-3, and D-1 from the invoice due date. PO/PR Number (optional) The reference PO/PR number from your company to track this invoice. Note The note for this invoice. Vendor The name of the vendor that this invoice belongs to. You can choose the name of the vendor from the dropdown menu. To create a new vendor, follow the instructions here. Product Description The name and/or description of the product. Quantity The quantity of the product. Price Unit price of the product. Total Total price of the product (Total = Quantity x Price). Subtotal The total price of all the products PPn PPn that should be paid to the vendor. PPn is calculated from subtotal amount. You can set up the tax during vendor addition or edit in the "Vendor Management" menu under Account Payable. PPh PPh that should be deducted from the vendor. PPh is calculated from subtotal amount.You can set up the tax during vendor addition or edit in "Vendor Management" menu under Account Payable. Total Pay to Vendor Total amount that will be paid to vendor on scheduled date, post approval. Reference Documents (Upload document) The supporting documents that you want to record related to this invoice. Accept PDF files only. Up to 7 documents, each with a maximum file size of 2.5MB. Note: Maximum 20 rows for line item detail
- By Automatic OCR
If you’re using OCR, these following steps will be taken before setting your payment.
- If your invoice has been successfully processed by the OCR, then the status will be “Unconfirmed”. Click the invoice data to proceed the invoice
- Check whether the data is correct and choose the “Purchase Type” then click “Next”
Continue to set up '”Invoice Payment Details”. You can set up the payment to one time payment (i.e. lump sum) by choosing “Full Payment” or multiple times payment by choosing “Partial Payment”.
Parameter Description Payment Amount Amount that will be automatically paid to vendor on scheduled date Due Date The due date of the payment. The due date should be from today onward and not exceed the previously entered due date from the invoice. Reminder notification will be sent for approval D-7, D-3, and D-1 if the status is waiting approval. Status Status of the invoice payment. You can choose “Paid” to record the invoice as documentation only, meaning no payment will be processed by the system. For invoices that require payment, choose “Unpaid”. Scheduled Payment Time of the payment based on your preference. Please note that every payment will only be executed after approval and when your OY! balance is sufficient. Remaining Amount Total pay to vendor - subtotal. This amount should be 0 to continue the process. After Account Payable creation, you will be redirected to this table that shows all payable invoices you’ve made. Status: Waiting Payment, Partially Paid, Complete and Canceled. Below are the list of statuses you will find on “Invoice List”.
| Parameter | Description |
|---|---|
| Auto-Filling | Created invoice using OCR is still in process. |
| Unconfirmed | Invoice created using the OCR system is finished and needs to be processed to schedule the payment. |
| Incomplete | Invoice has been canceled. |
| Unpaid | Waiting for approval or balance is not enough. |
| Partially Paid | Multi time payment or partially paid that is not finished yet. You can click the invoice number to find the partial payment details in the 'Payment Transaction' tab. |
| Paid | All payment of the invoice is complete. |
- For managing your transaction, you can see the table below. This table will show you all transactions you should pay/have paid. Status: Waiting Approval, Insufficient Balance, Failed, Canceled and Paid. Below is the list of statuses you will find on “Invoice Transaction” page. This page intended to process your payable invoice transactions.
| Parameter | Description |
|---|---|
| Waiting Approval | Waiting for approval. |
| Insufficient Balance | The payable invoice is approved and scheduled for payment but the balance is insufficient when the system tries to pay the balance at the scheduled date. |
| Failed | The payable invoice is approved and ready to be paid but due to insufficient balance the payment is failed. |
| Canceled | Invoice has been canceled. |
| Paid | The payable invoice already paid either full payment or partial payment. |
Note: Please allow up to 1 business day for the OCR extraction process
- Create IDR Account Payable page
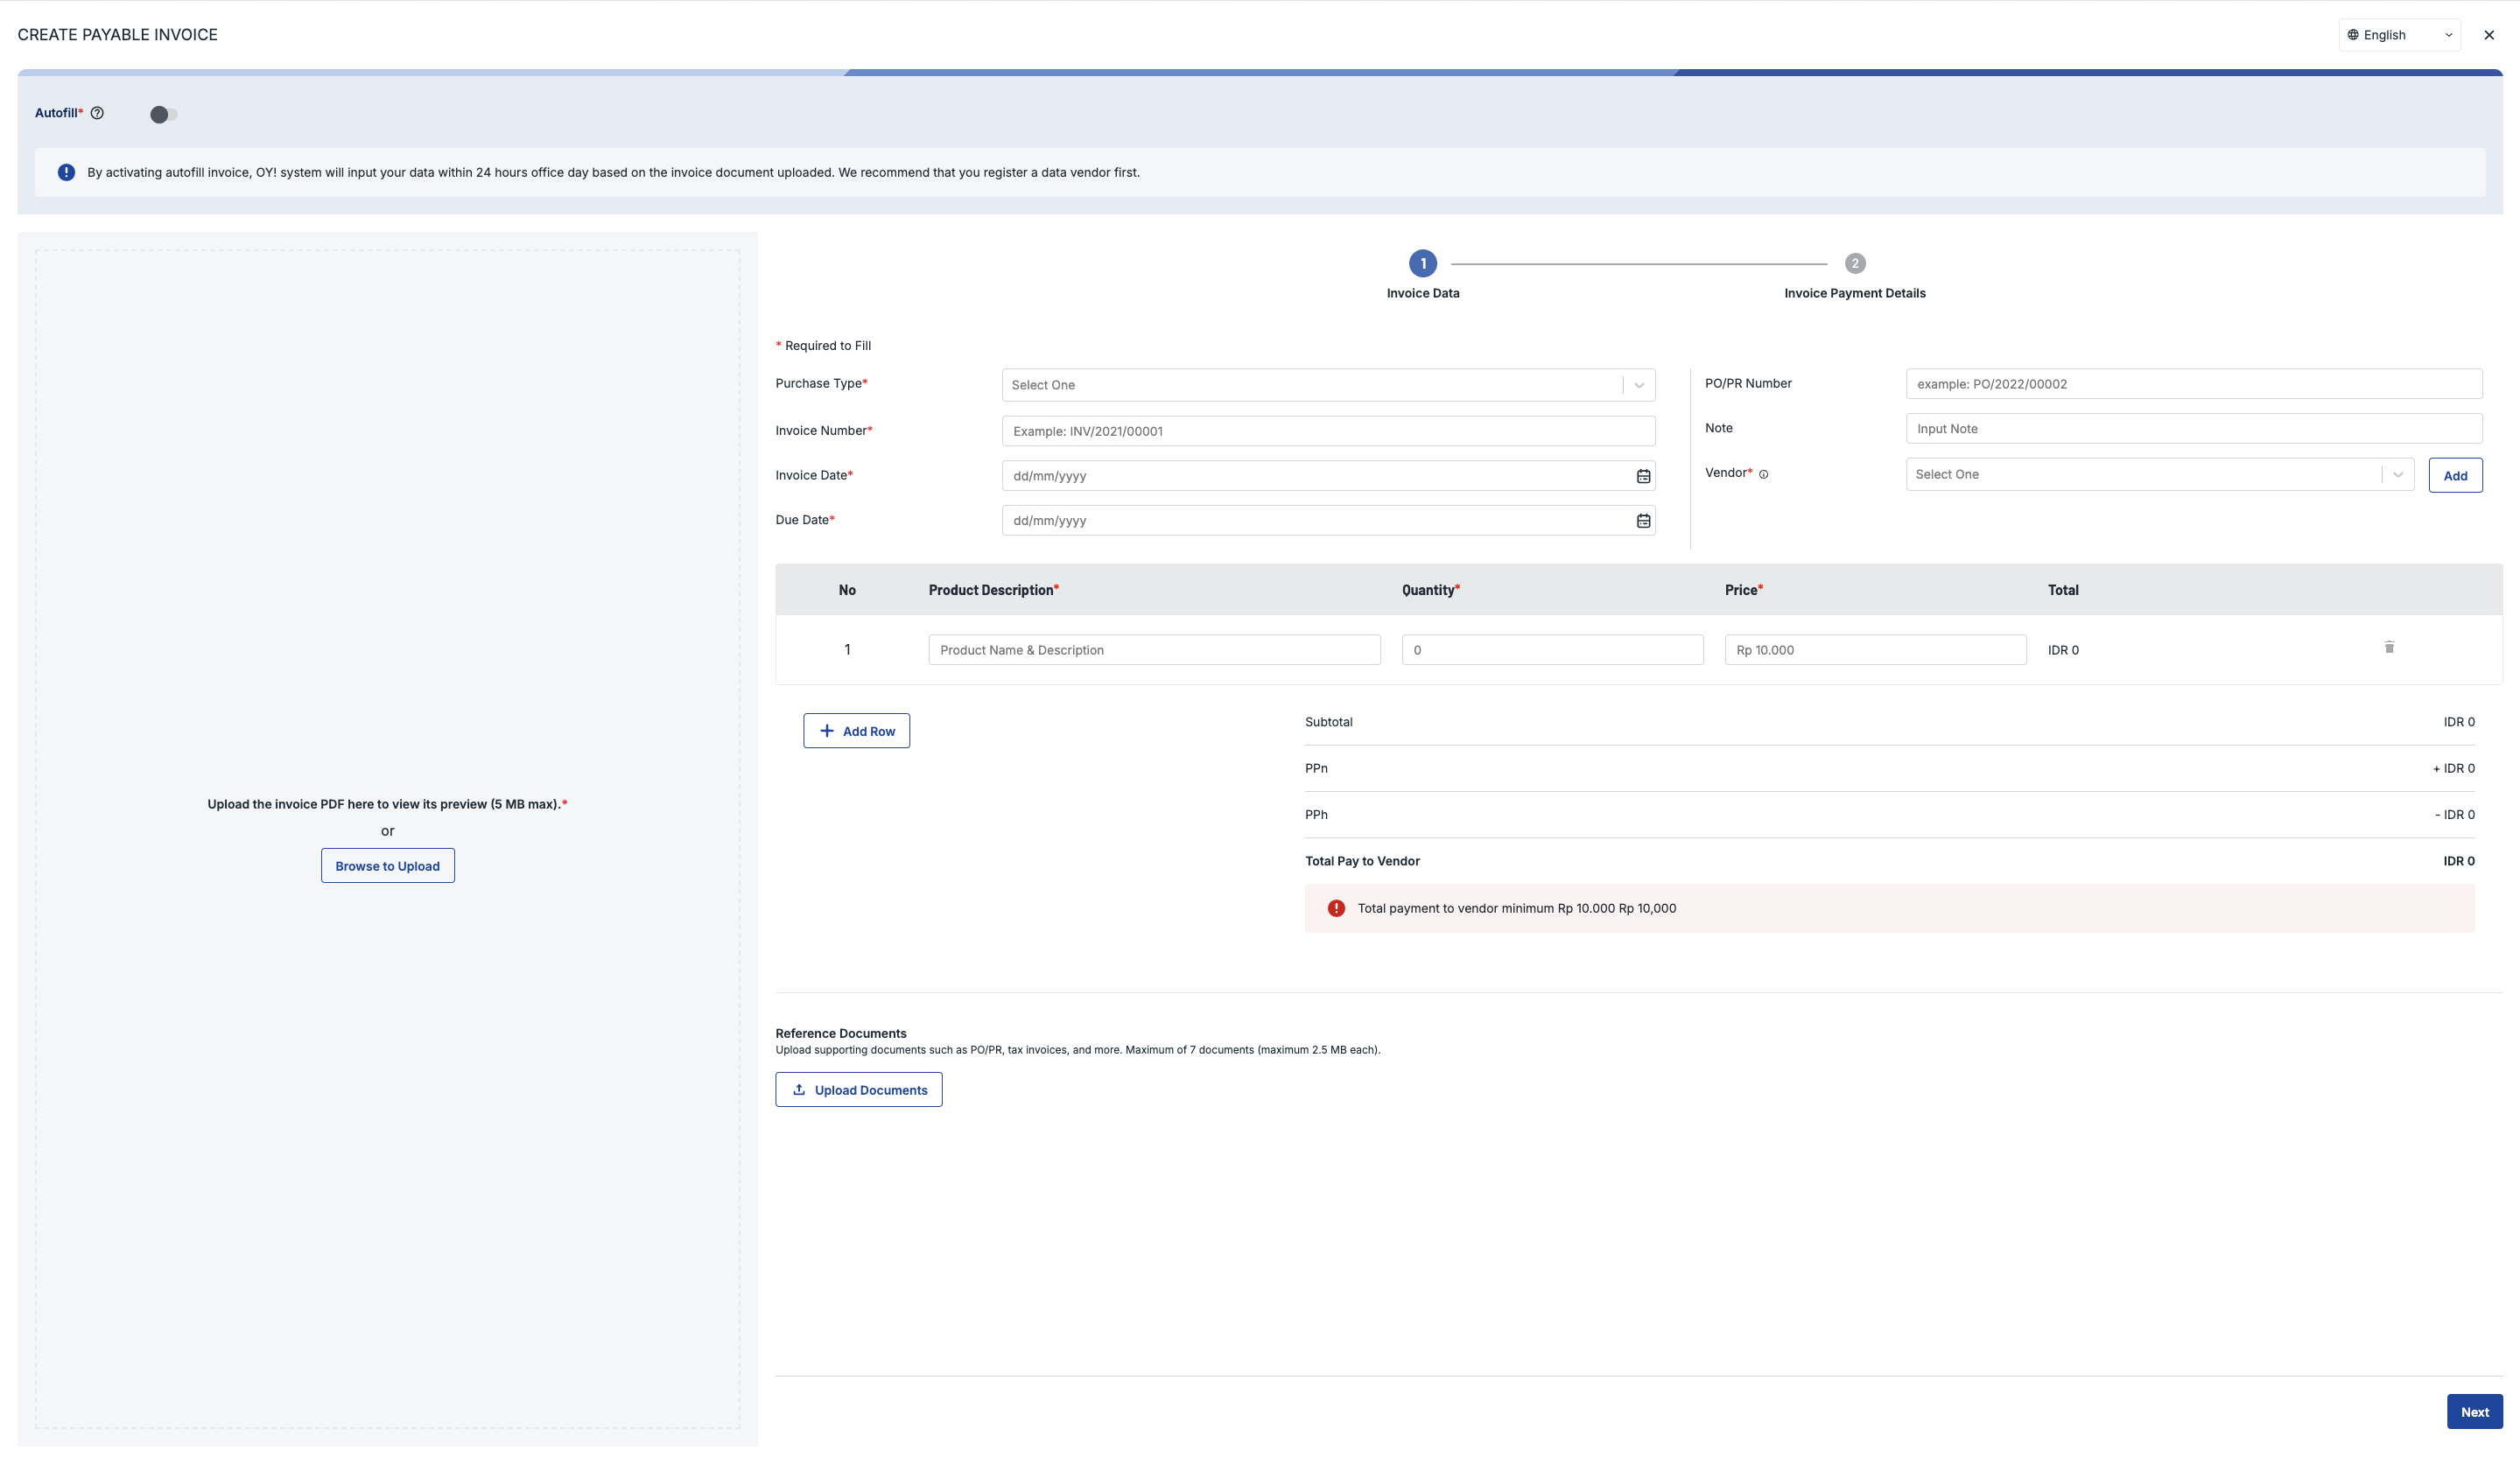
- Create Account Payable with OCR page
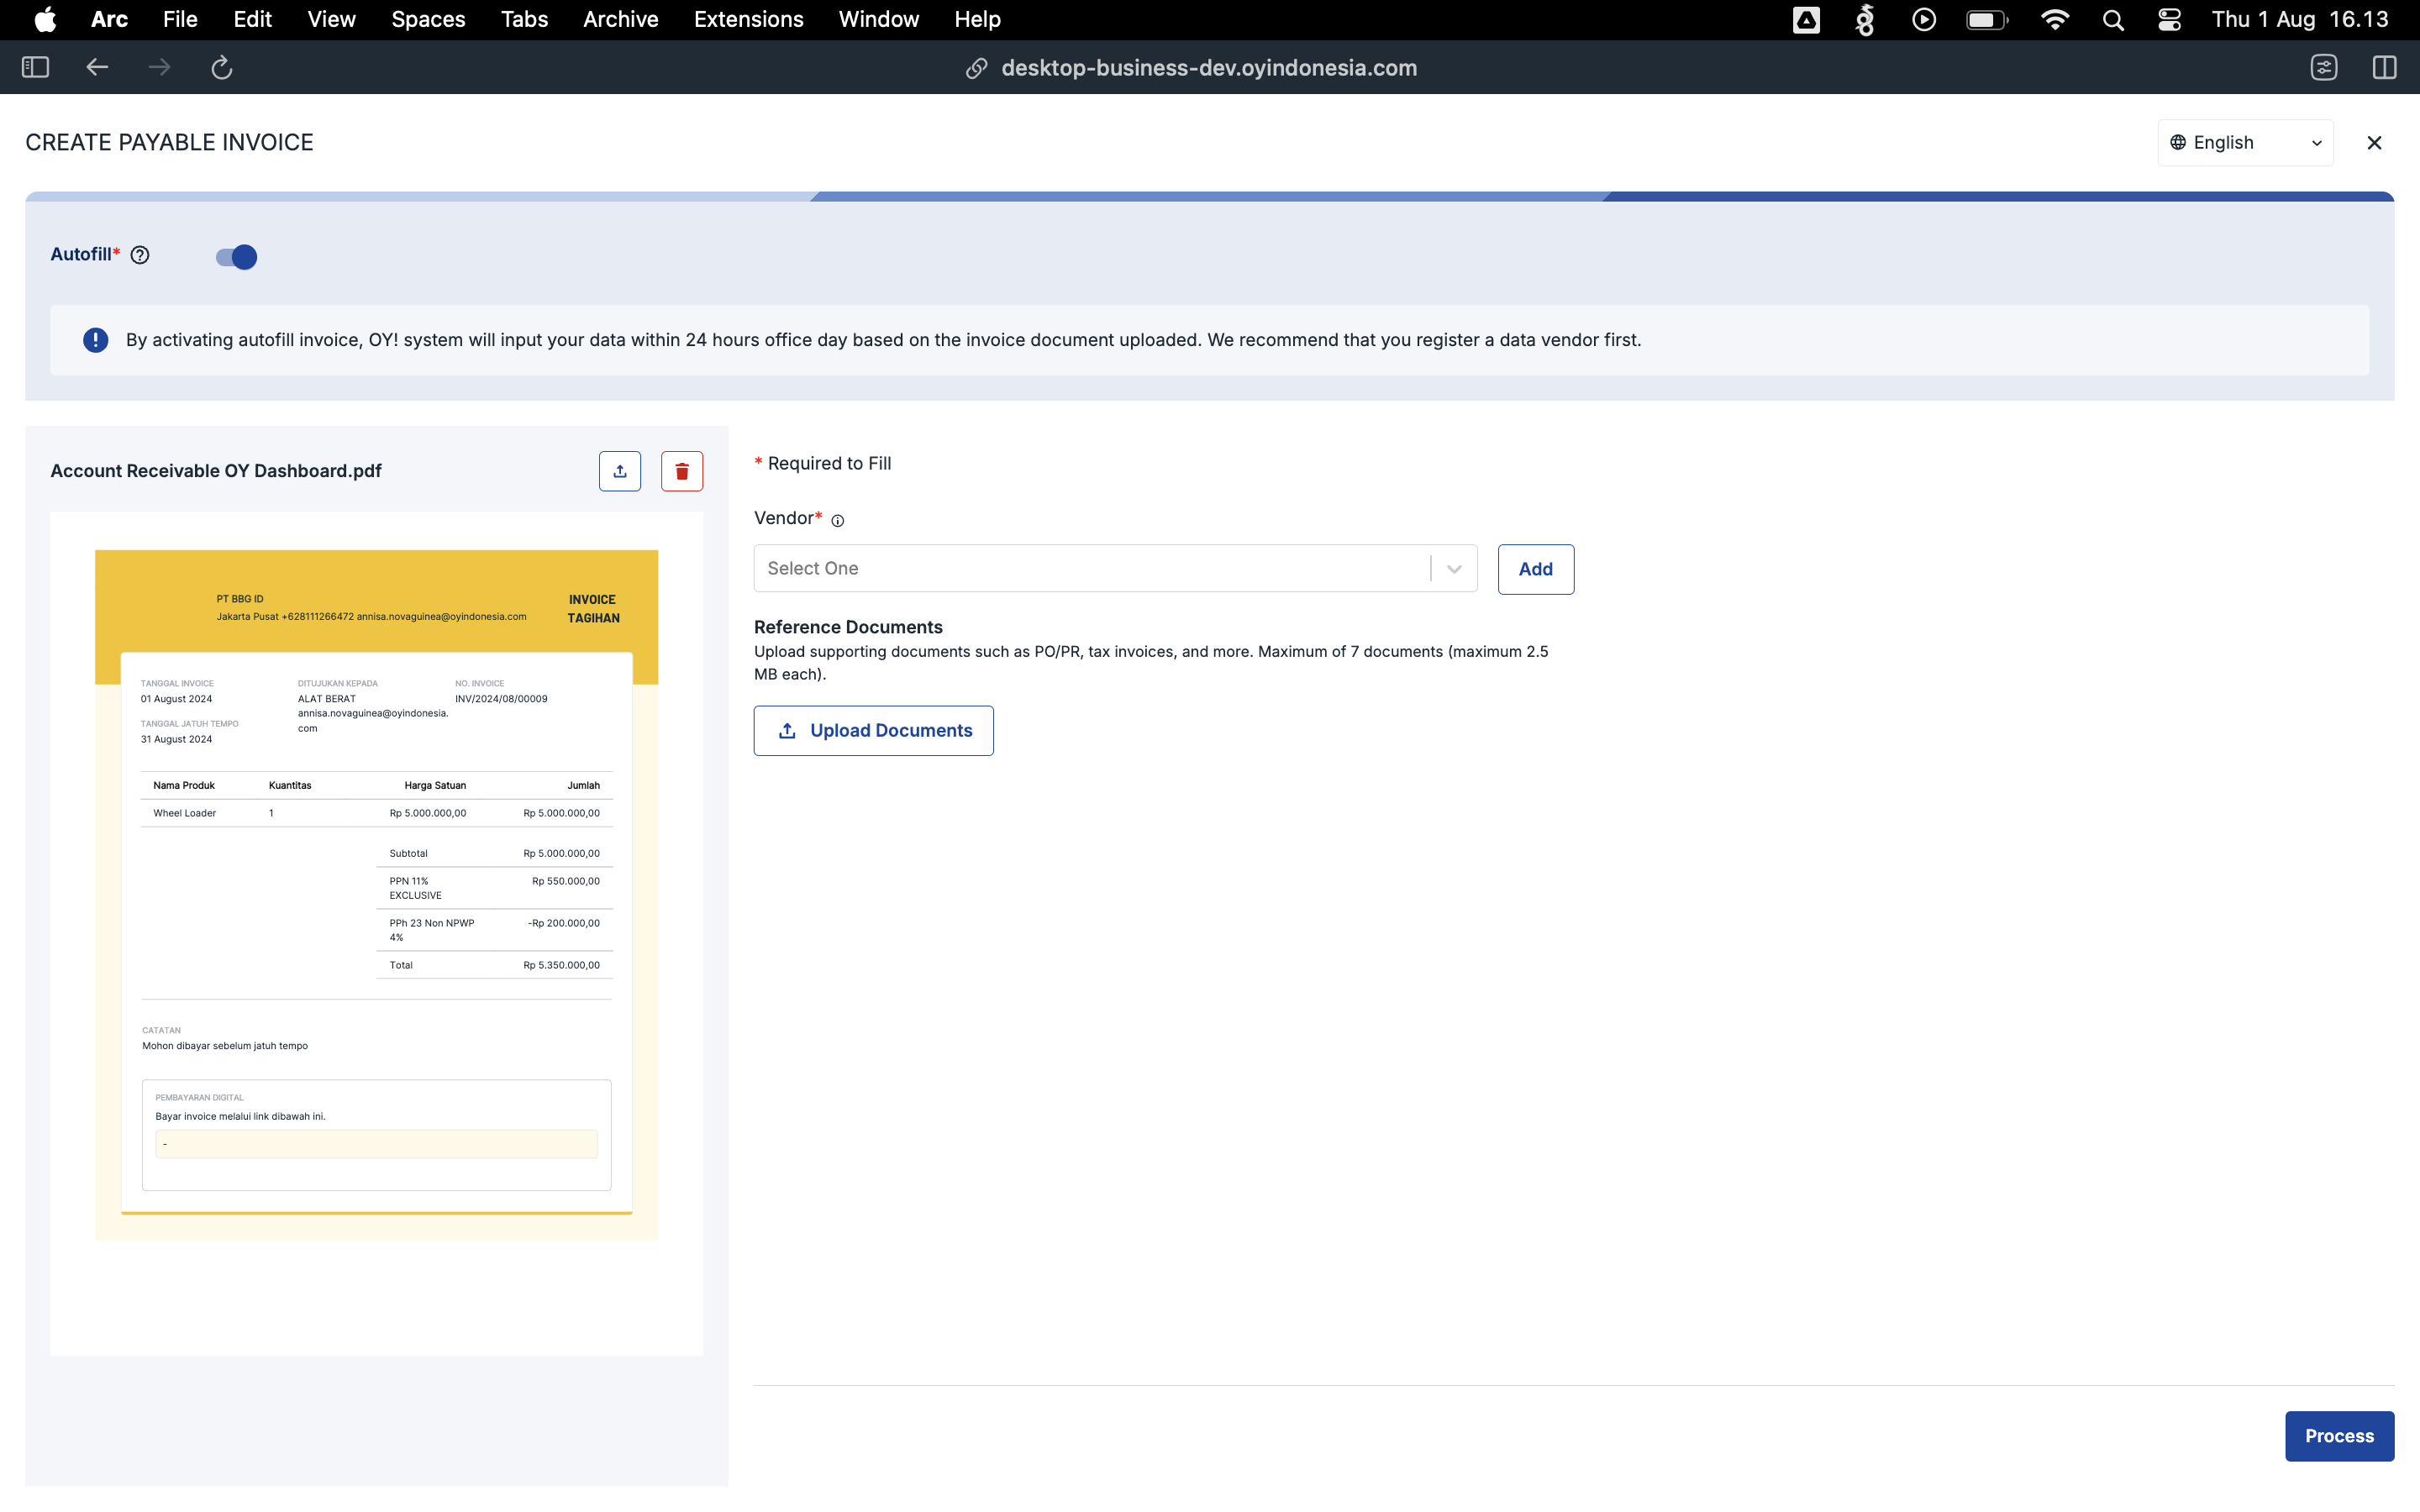
- Filled Payable Invoice with OCR page
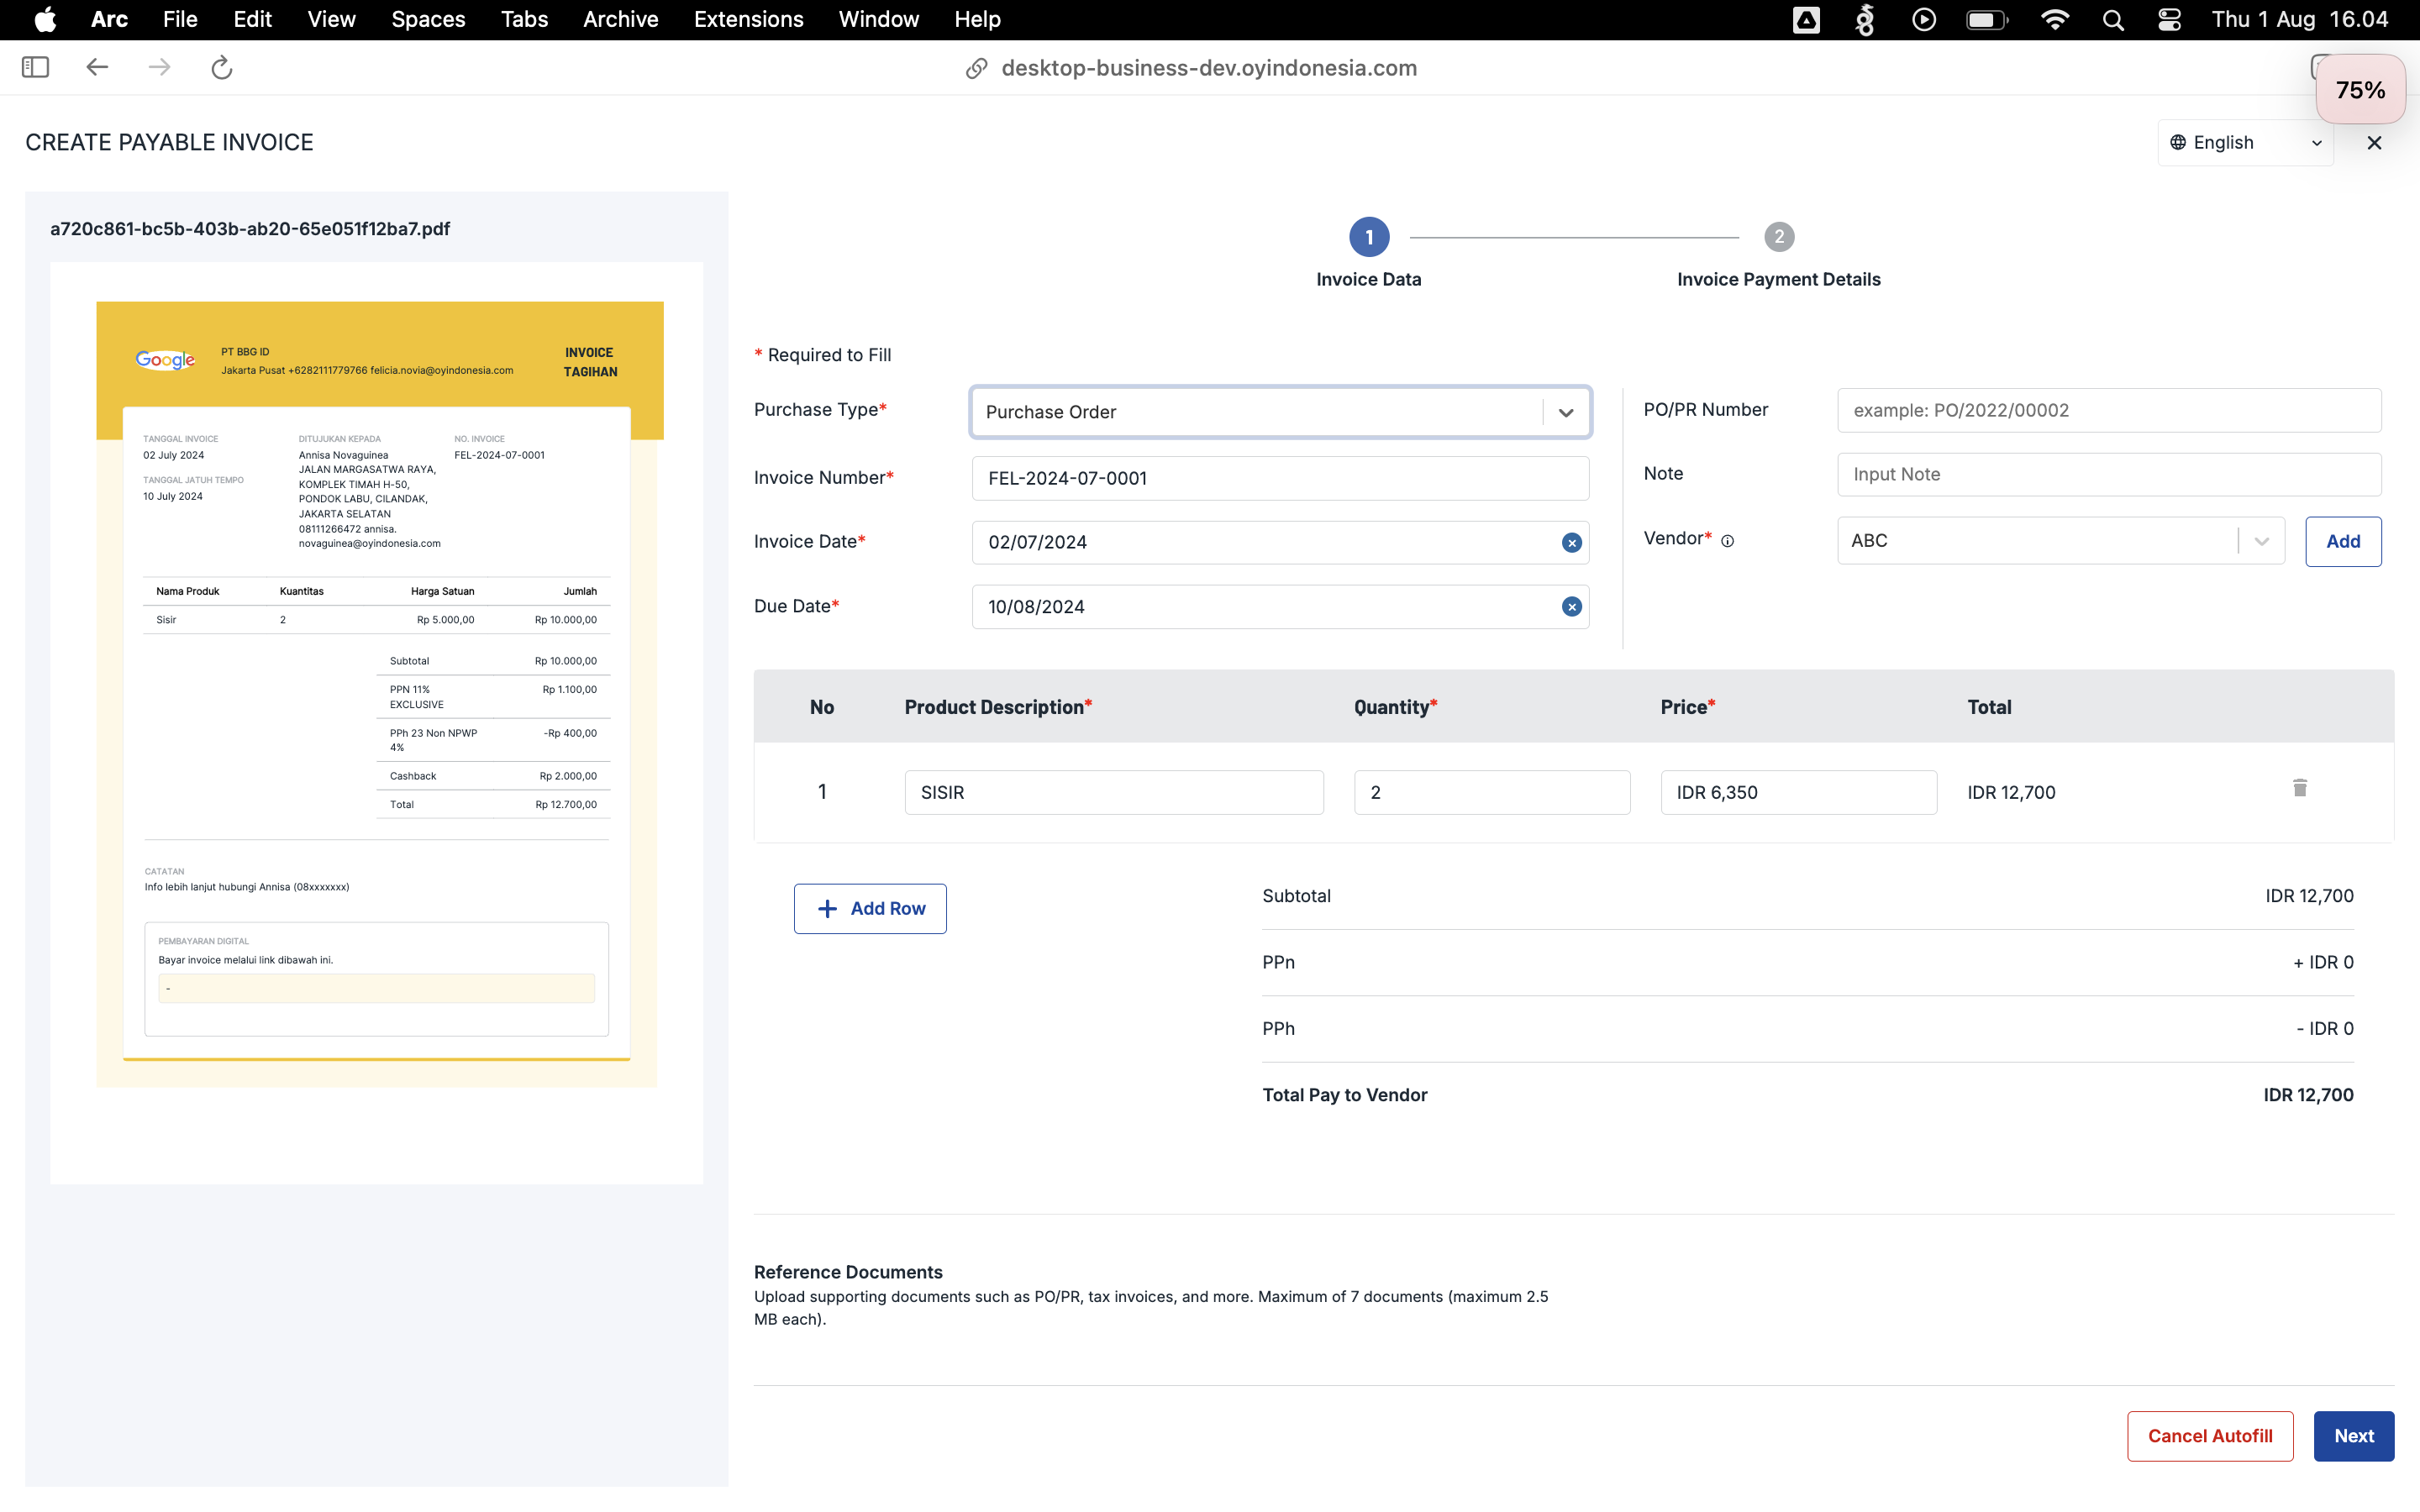
- Payment Option page
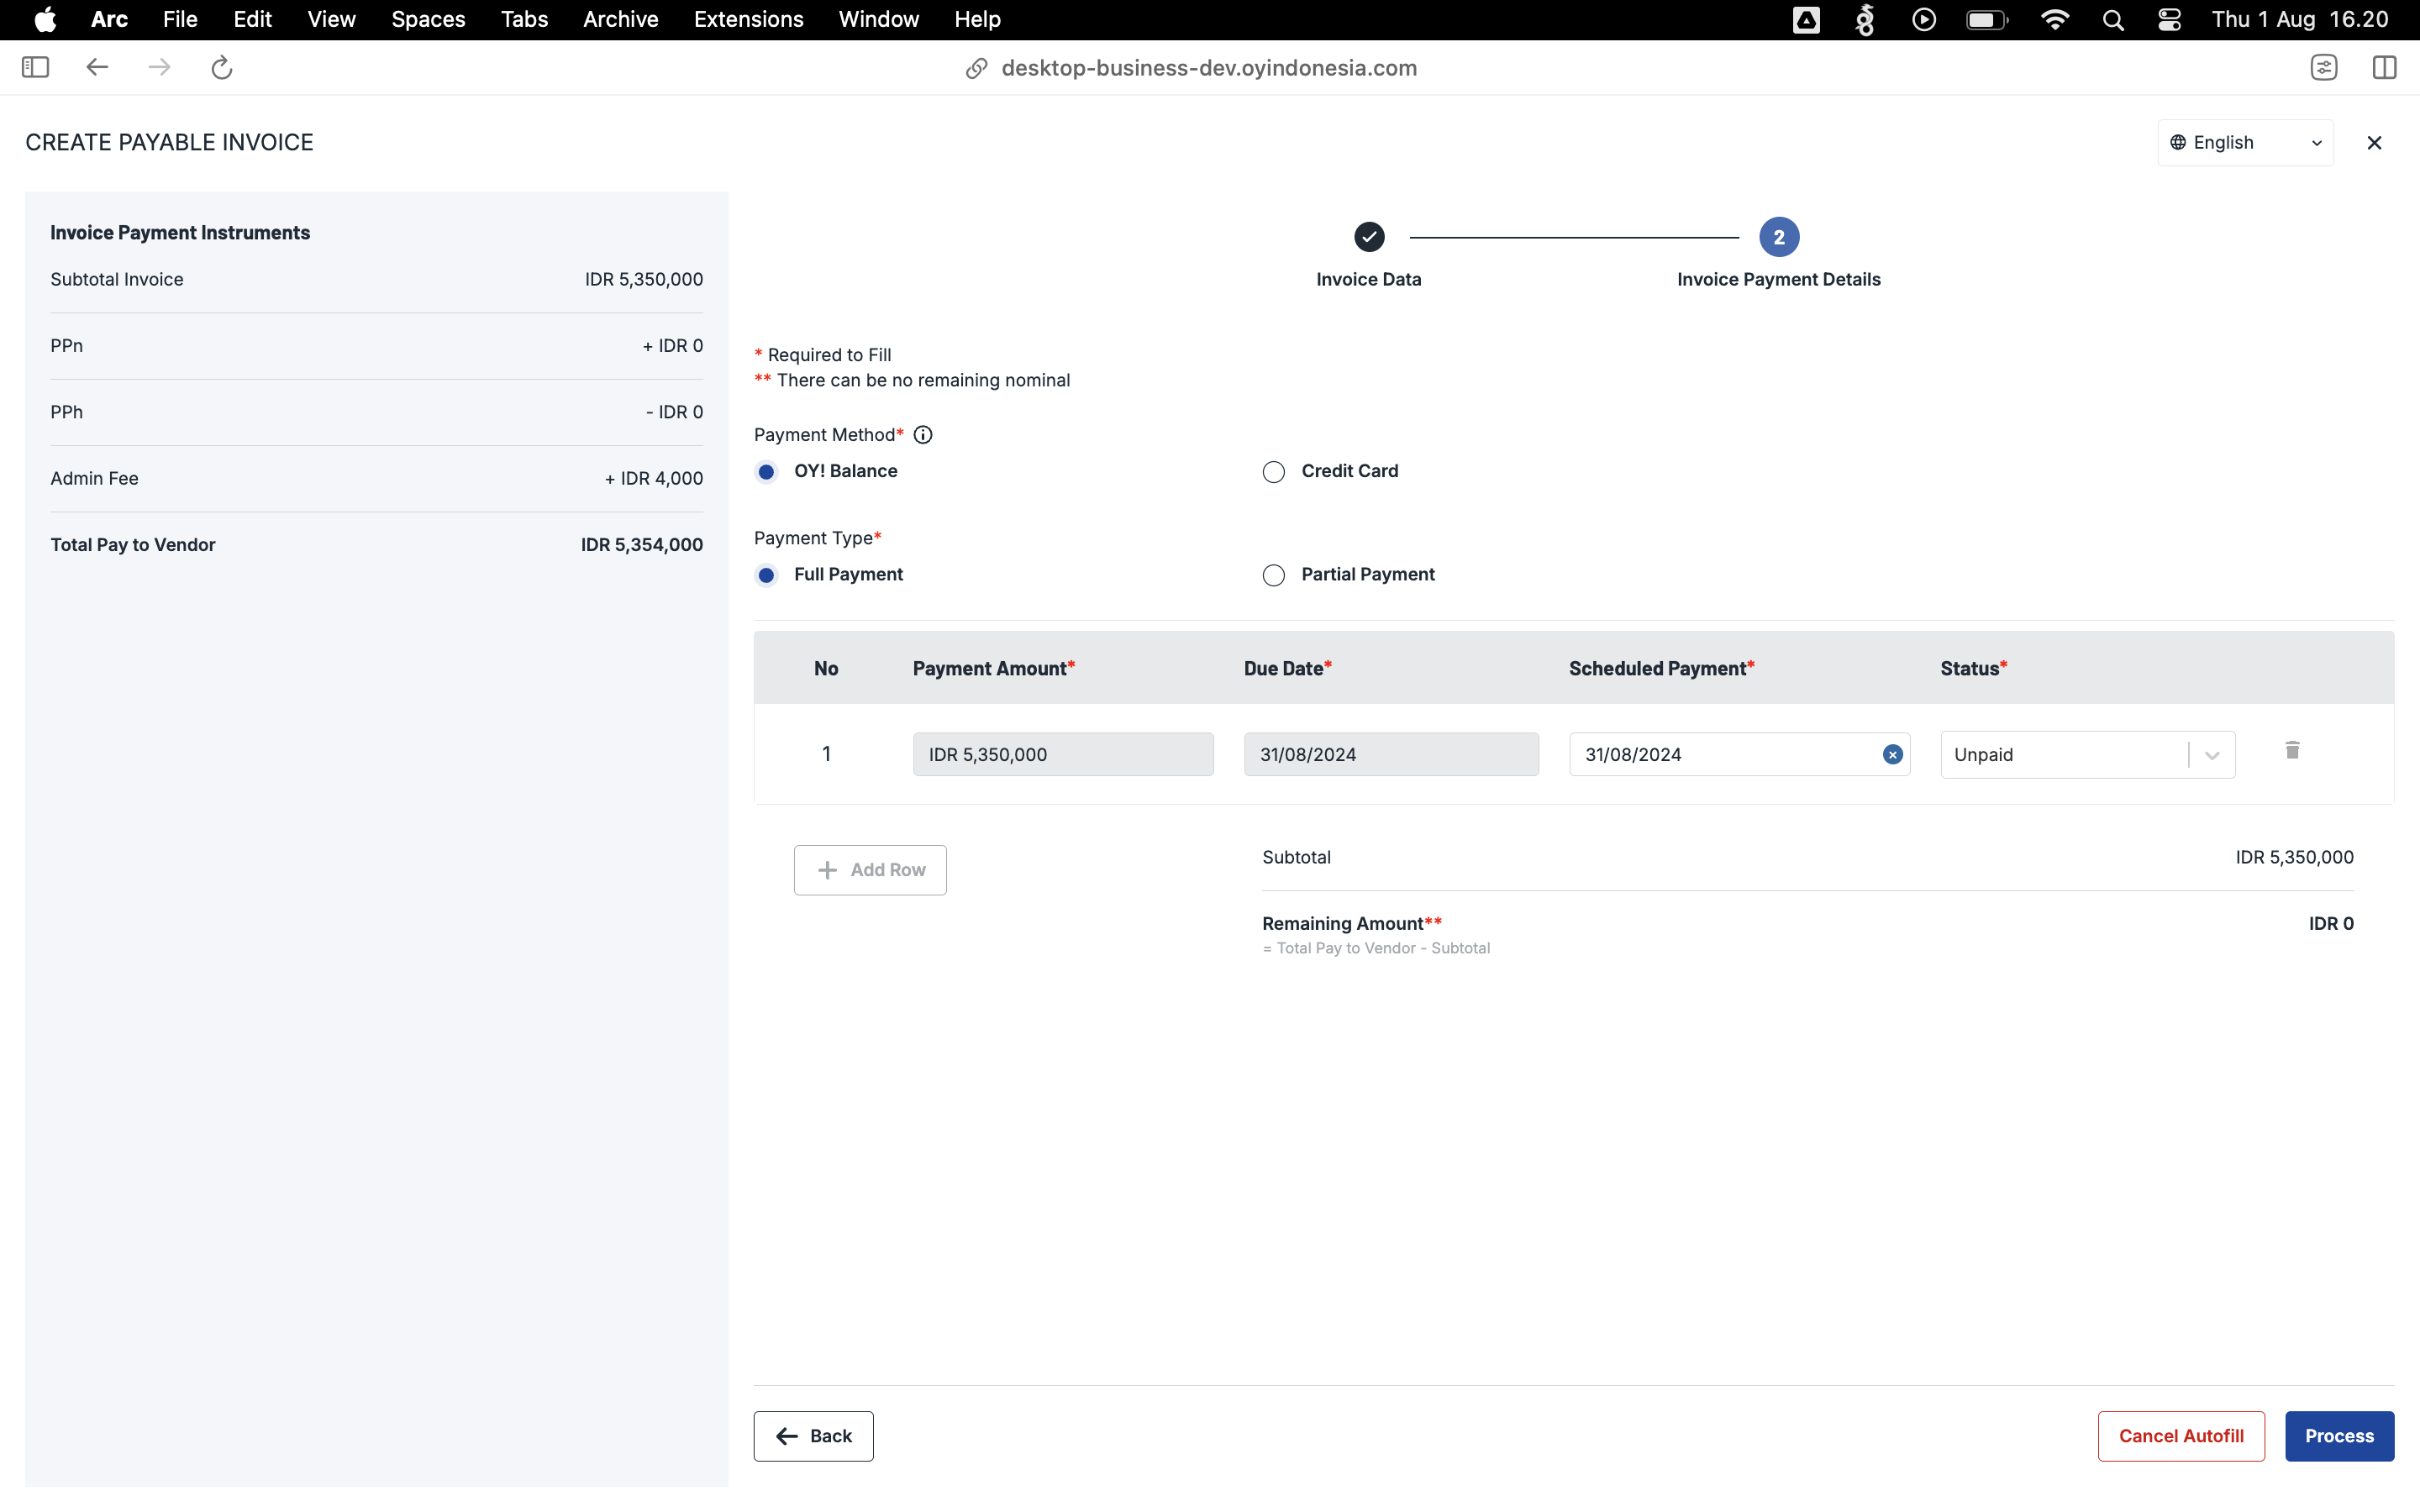
- List of Invoice Payable
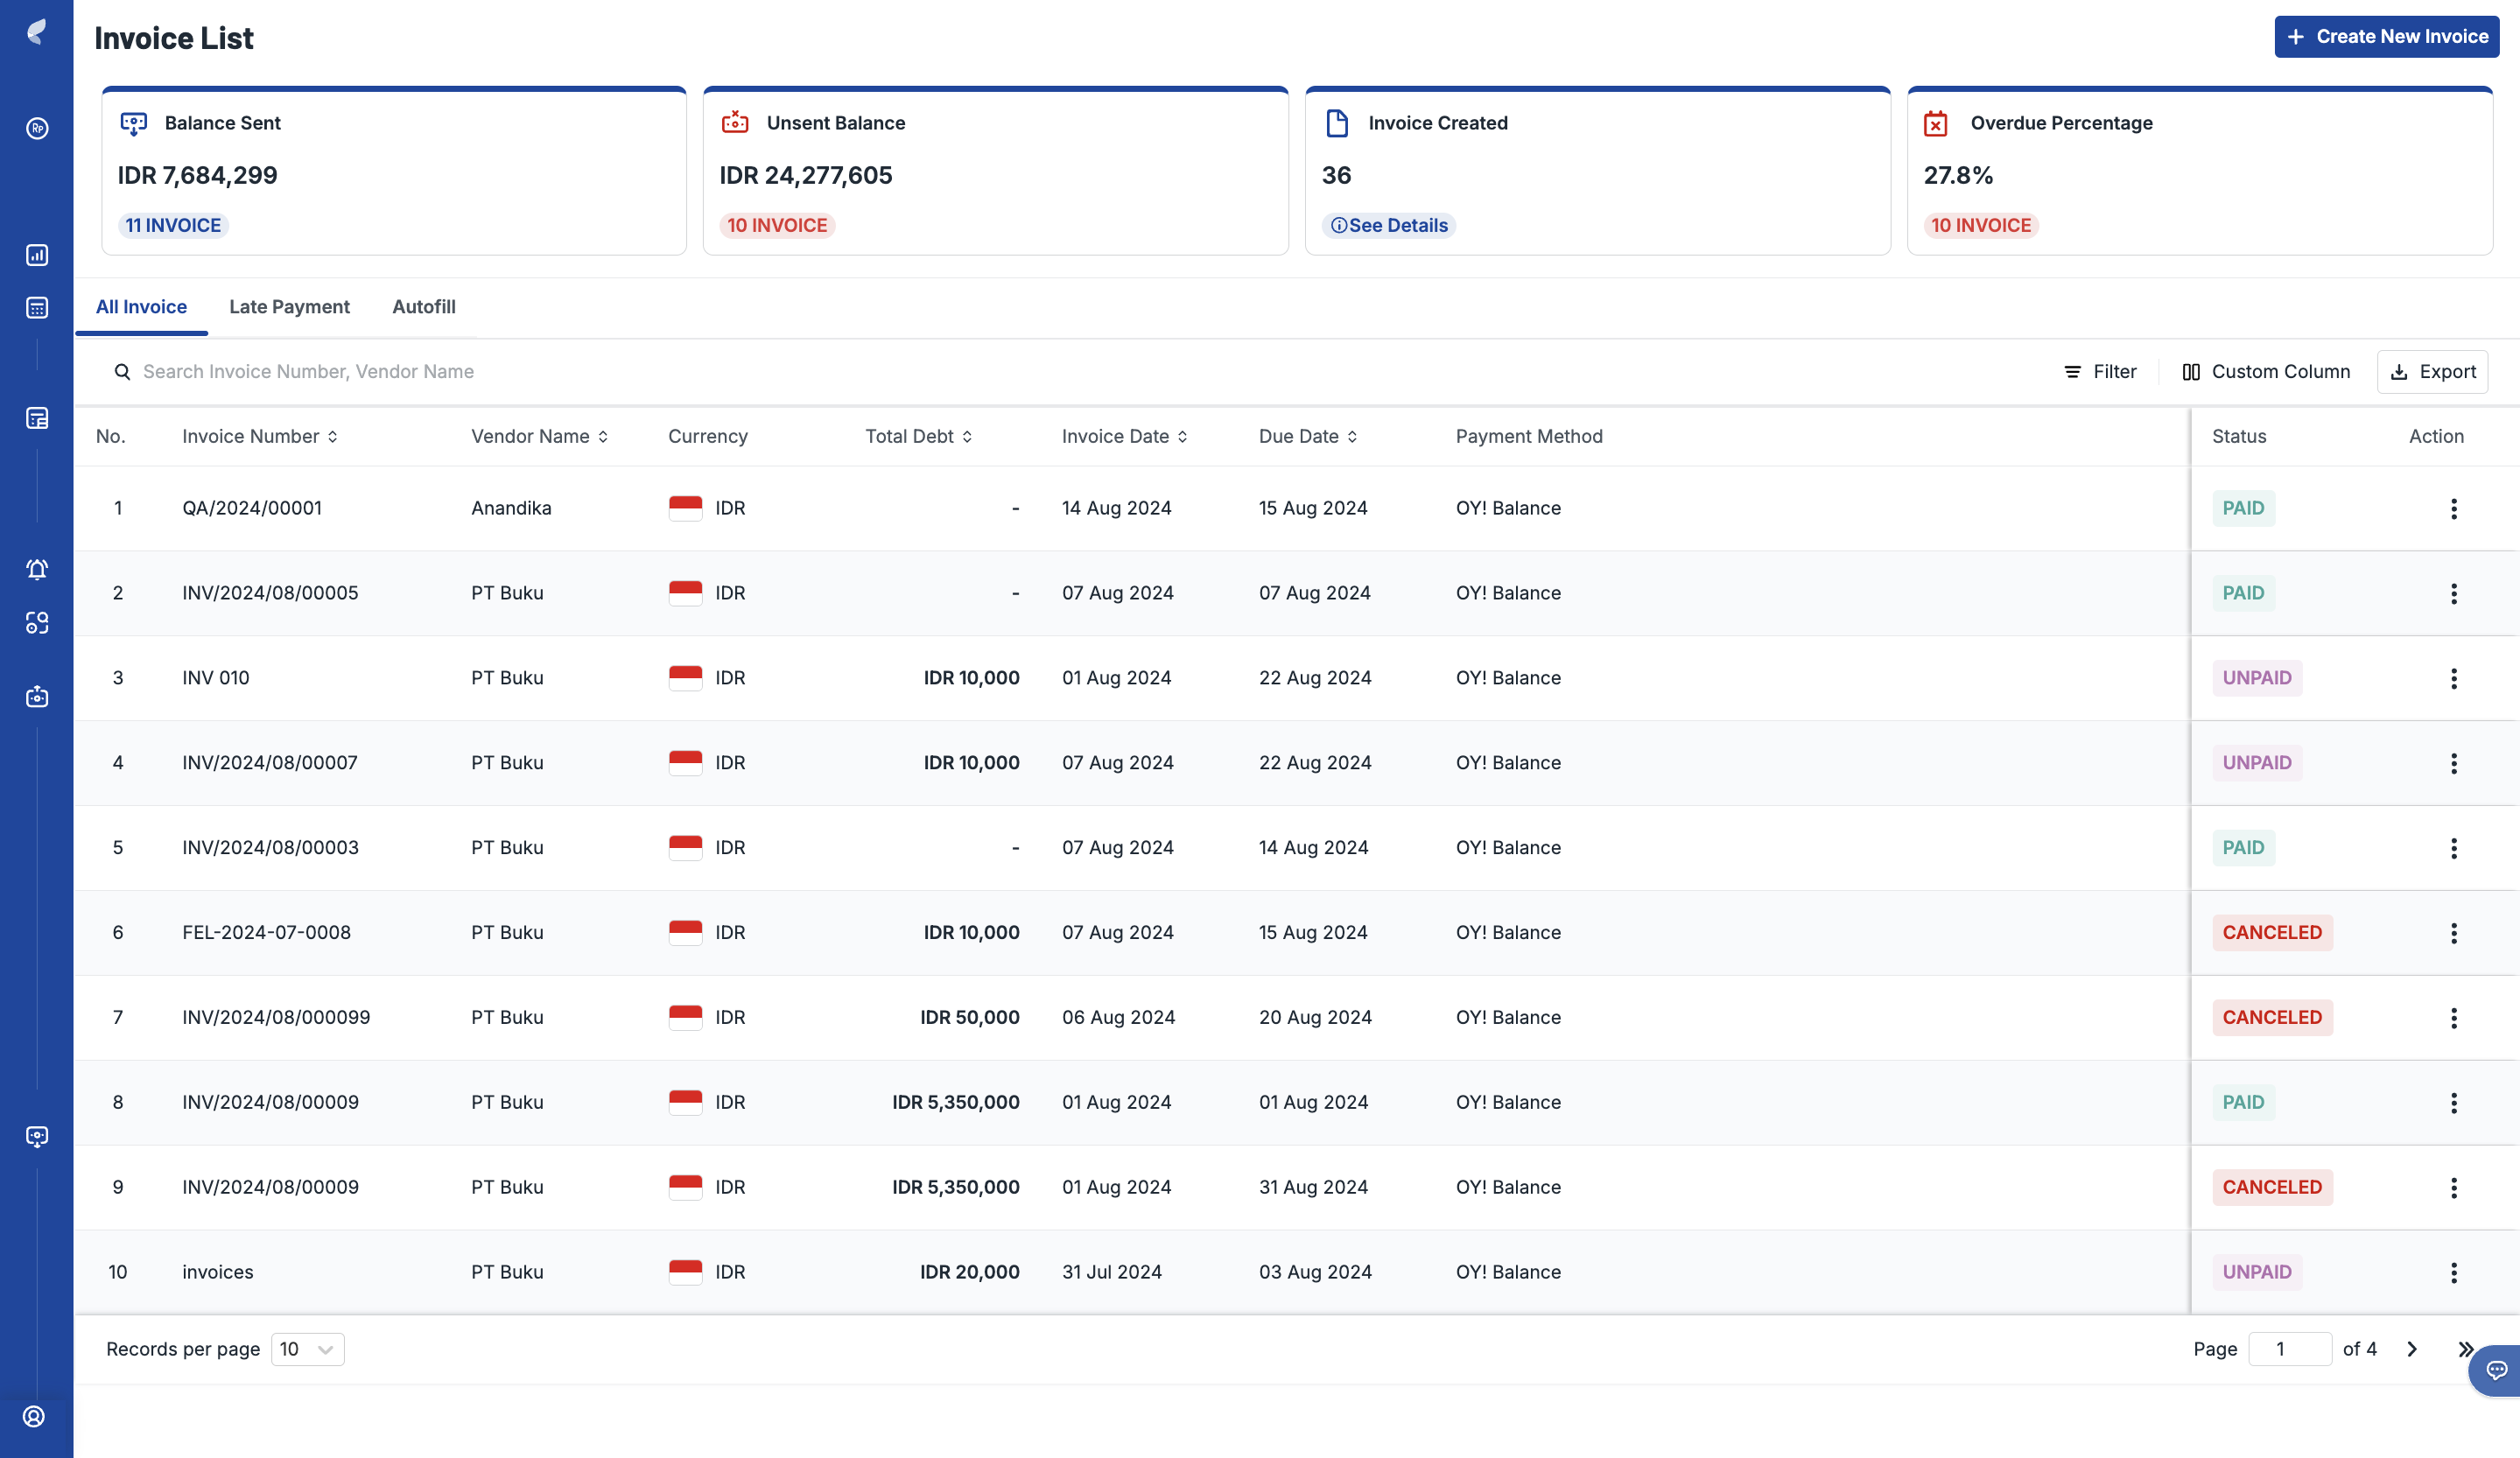
How to Use Account Payable via Dashboard (for International Payment)
1. Log on to your OY! dashboard
2. Choose "Production" environment
3. Click "Pay Invoice" under Account Payable menu
4. Click "Invoice List"
5. Click "Create New Invoice" on top right
6. Choose “Send Other Currency”
7. Choose the currency you want to send; currently OY! available for these currencies :
a. SGD
b. HKD
c. CNH
d. USD
8. If you select USD as the currency, choose the destination country. Other currencies, such as HKD or CNH, can only be used in their origin country. For example, if you choose HKD, you can only make payments to Hong Kong; currently we accept these countries for international payment in USD :
a. Singapore
b. China
c. Hong Kong
9. Upload your invoice document to help you record the invoice easier by clicking "Browse to Upload" or Drag & drop to the invoice area 10. Fill in the necessary details. Please input the total payment amount between IDR 200.000 - IDR 35.000.000 and make sure your OY! balance is enough to process the transaction or our system will restrict users from proceeding.
Note: Maximum 20 rows for line item detail
| Parameter | Description |
|---|---|
| Purchase Type | You can choose between purchase order, service fee, bill, subscription fee, and reimbursement. |
| Invoice Number | The number of the invoice that you get from your vendor/supplier. |
| Invoice Date | The date of the invoice. |
| Due Date | Due date of a transaction as mentioned in the invoice. Your approver will be reminded to approve on D-7, D-3, and D-1 from the invoice due date. |
| PO/PR Number (optional) | The reference PO/PR number from your company to track this invoice. |
| Note | The note for this invoice. |
| Vendor | The name of the vendor that this invoice belongs to. You can choose the name of the vendor from the dropdown menu. To create a new vendor, follow the instructions here. |
| Product Description | The name and/or description of the product. |
| Quantity | The quantity of the product. |
| Price | Unit price of the product. |
| Total | Total price of the product (Total = Quantity x Price). |
| Subtotal | The total price of all the products. |
| Total Pay to Vendor | Total amount that will be paid to vendor on scheduled date, post approval. |
| Reference Documents (Upload document) | The supporting documents that you want to record related to this invoice. Accept PDF files only. Maximum 7 documents (maximum 2.5MB each). |
11. Click “Next” to move to the next process
12. We will show the calculation of exchange rate and fee to process the payment, also we will inform you about required documents to support this process. Please click “Next” to continue the process
13. Choose saved sender data or create new sender data (please follow this instruction for create new sender data) then click “Next”
14. Choose saved receipt data or create new receipt data (please follow this instruction for create new receipt data) then click “Next”
15. Input supporting information regarding “Source of Fund” and “Transfer Reason”, also attach supporting documents related to the transaction then click “Next”
16. You’ll see the summary of transactions, about the sender, receipt, and amount of money that will be deducted to your OY! Balance. Make sure all the data is correct.
17. After careful review of the transaction, you may click “Send”
18. The money will arrive to your recipient’s bank account no later than 3 business days
- Create Account Payable International Transaction page
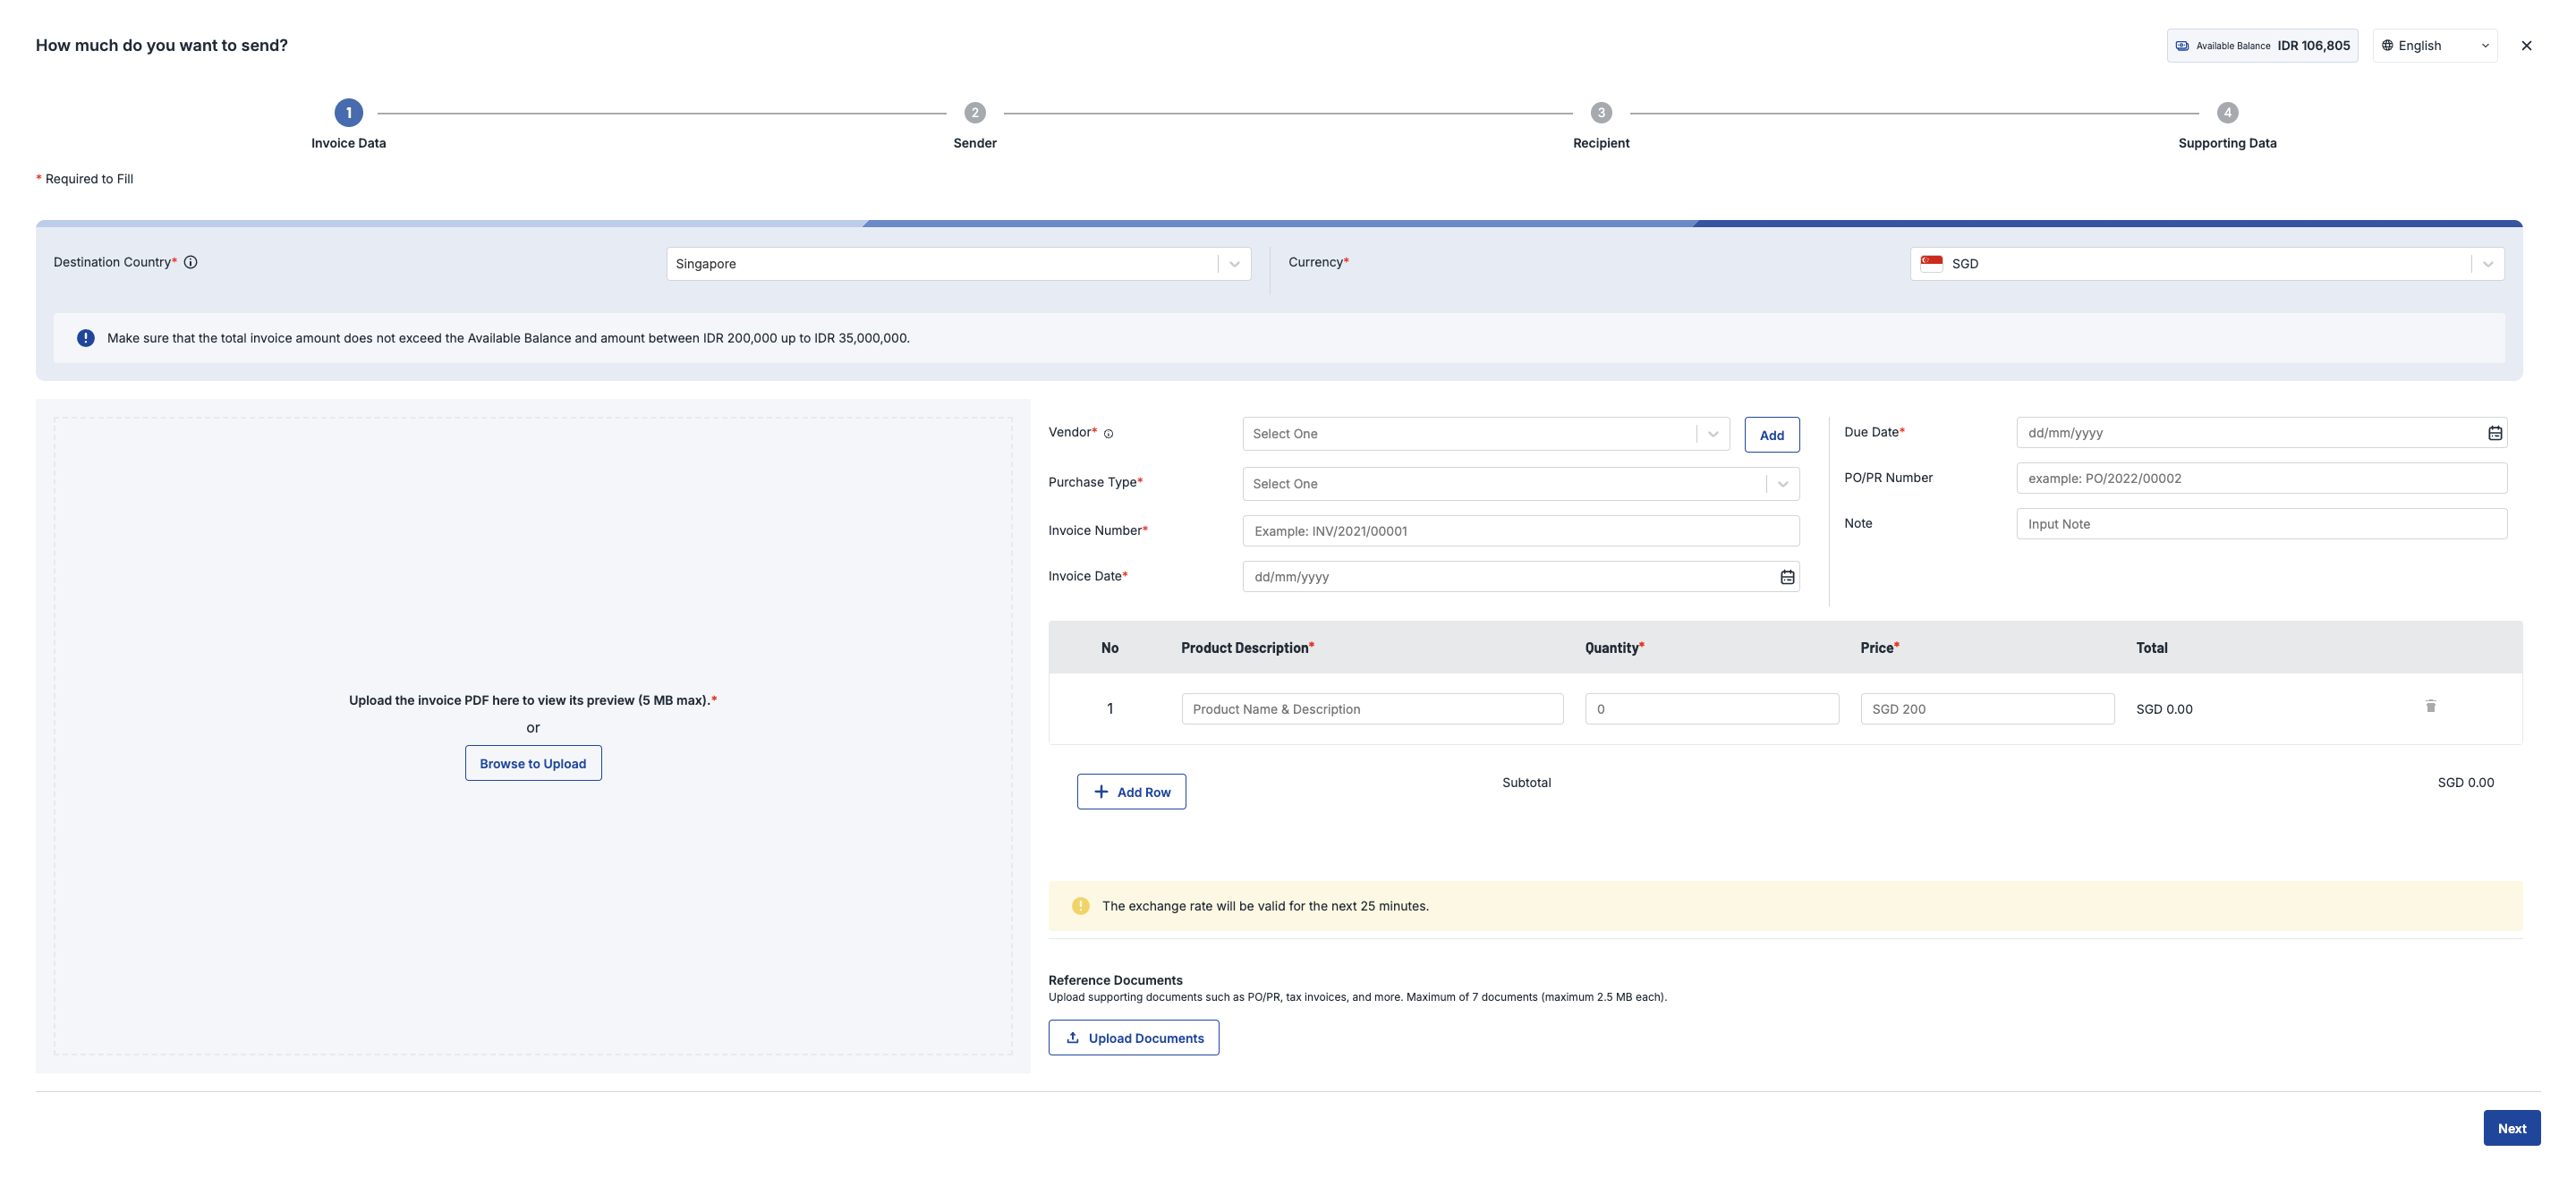
- Supporting Document page
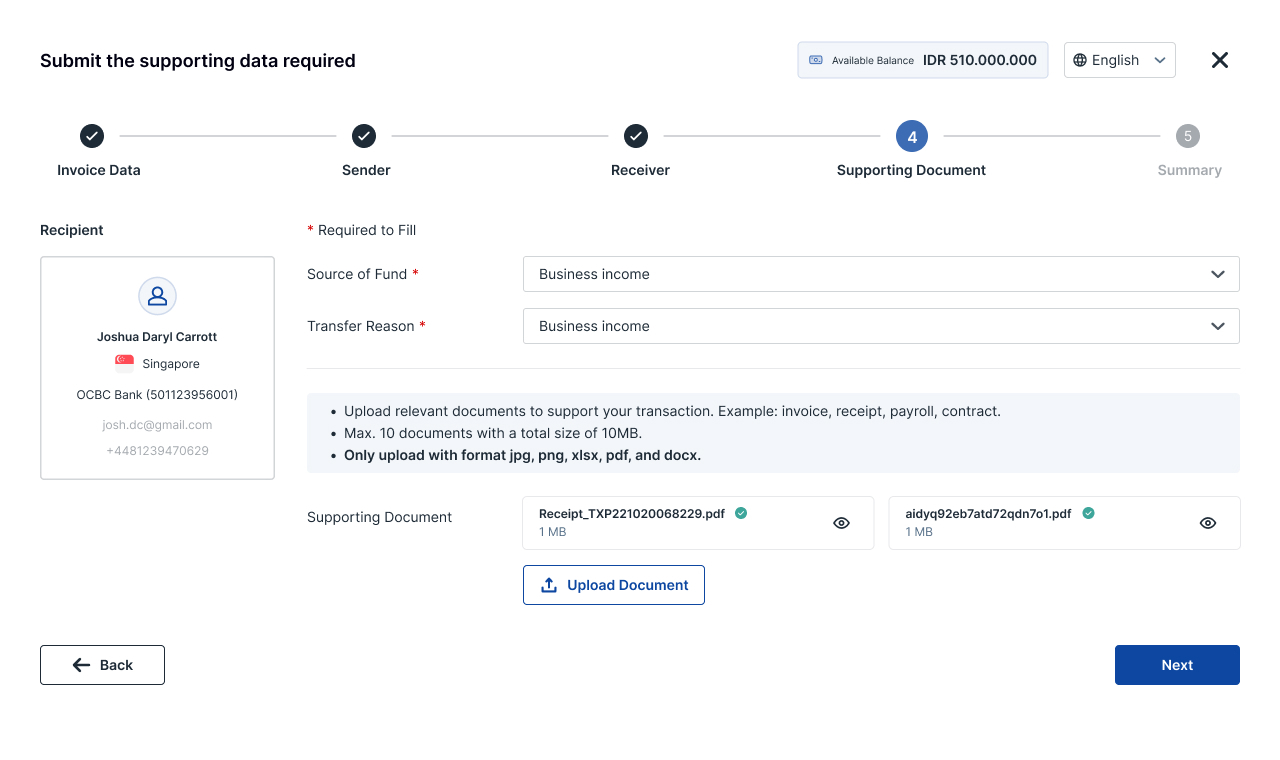
- Summary Transaction page
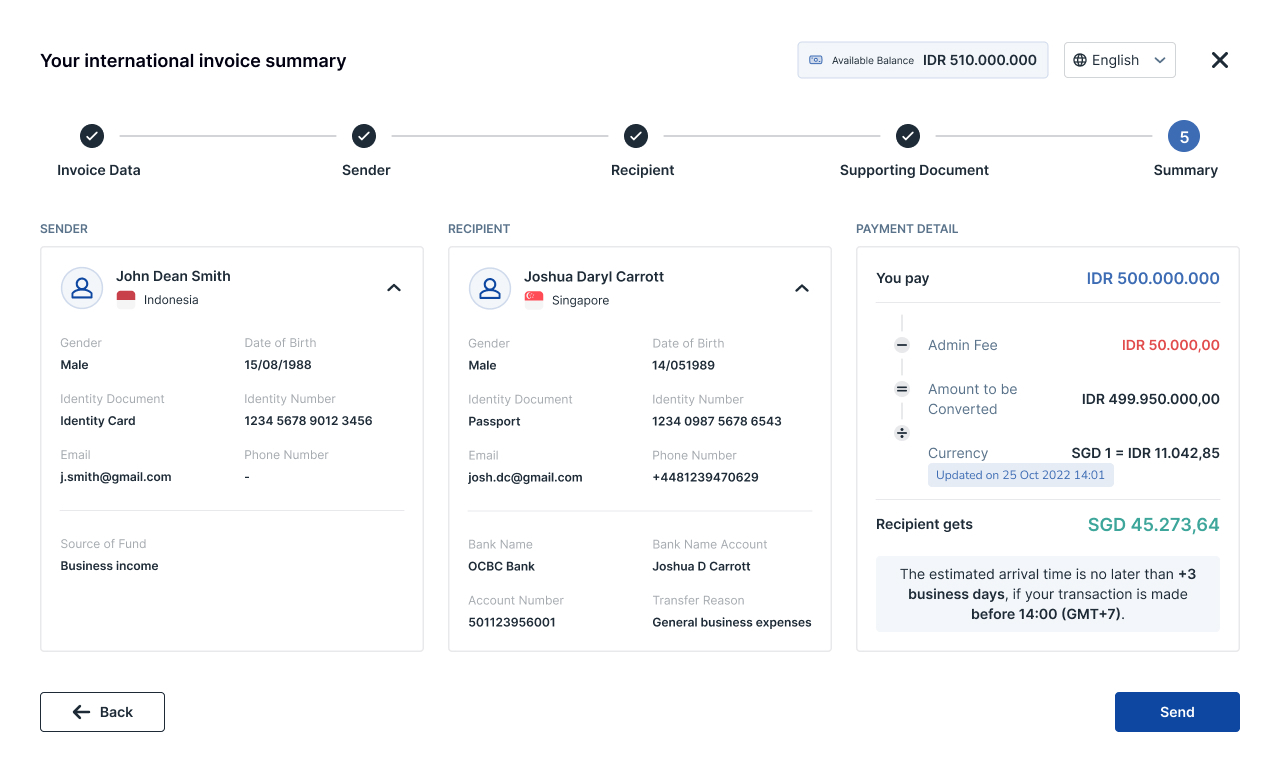
19. After Account Payable creation, you will be redirected to this table that shows all payable invoices you’ve made. Status: Waiting Payment, Partially Paid, Complete and Canceled. Below are the list of statuses you will find on “Invoice List”.
| Parameter | Description |
|---|---|
| Auto-Filling | Created invoice using OCR is still in process. |
| Unconfirmed | Invoice created using the OCR system is finished and needs to be processed to schedule the payment. |
| Incomplete | Invoice has been canceled. |
| Unpaid | Waiting for approval or balance is not enough. |
| Partially Paid | Multi time payment or partially paid that is not finished yet. You can click the invoice number to find the partial payment details in the 'Payment Transaction' tab. |
| Paid | All payment of the invoice is complete. |
20. For managing your transaction, you can see the table below. This table will show you all transactions you should pay/have paid. Status: Waiting Approval, Insufficient Balance, Failed, Canceled and Paid. Below is the list of statuses you will find on “Invoice Transaction” page. This page intended to process your payable invoice transactions.
| Parameter | Description |
|---|---|
| Waiting Approval | Waiting for approval. |
| Insufficient Balance | The payable invoice is approved and scheduled for payment but the balance is insufficient when the system tries to pay the balance at the scheduled date. |
| Failed | The payable invoice is approved and ready to be paid but due to insufficient balance the payment is failed. |
| Canceled | Invoice has been canceled. |
| Paid | The payable invoice already paid either full payment or partial payment. |
- List of Invoice Payable
How to Manage Vendor Data
Add New Vendor for Account Payable in IDR :
- Click “Vendor Data” under “Send Money” menu
- Click “Add New Vendor”
- Choose “Domestic Vendor”
- Fill in the necessary details
- Click “Add Vendor” after complete registration of new vendor
| Parameter | Description |
|---|---|
| Vendor ID | Unique ID of the vendor from your company. This is not mandatory. |
| Vendor Name | The company/vendor name. Make sure the vendor name matches the vendor’s NPWP (if any) to help your company with the tax record. |
| Vendor Address | Vendor address to be recorded. This is not mandatory. |
| Bank Name | Recipient bank name. We already provide the list of bank names in the form of a dropdown menu that you can select according to your needs. |
| Account Number | Recipient bank account number. You can check the inquiry by clicking “Get Account Name” after filling the account number. |
| PIC Name | The PIC name of this vendor. |
| PIC Email | The PIC or recipient active email. Payment/transfer receipt will be sent automatically to this email after payment is completed. |
| PIC WhatsApp | The PIC WhatsApp number for your record. This is not mandatory. |
| PPh | PPh type from this vendor. Default of the setting is Not Subject to PPh. There are several types of PPh you can choose as needed. |
| Vendor NPWP | The vendor NPWP number record that can be used for company reference to generate “Faktur Pajak”. |
| NPWP Document | Vendor NPWP document to be record. Accept PDF and JPG format. Maximum 10 MB |
| PPn | PPn type of this vendor. Default of the setting is not Subject to PPn. There are several types of PPn you can choose (i.e. PPn Inclusive means that subtotal is included the tax, PPn Exclusive means that subtotal is exclude the subtotal and will be added according to subtotal value) |
| SKB Document | Vendor SKB Document to be recorded. Accept PDF and JPG format. Maximum 10 MB. |
Note: Each vendor only has 1 type of PPh setting and 1 type of PPn setting. There will be a PPh email sent on the 1st day of each month that contains all the PPh from your vendors in the previous month. This report can help companies with tax payment, reporting, and “Faktur Pajak” generation to your vendor.
- Create New Vendor
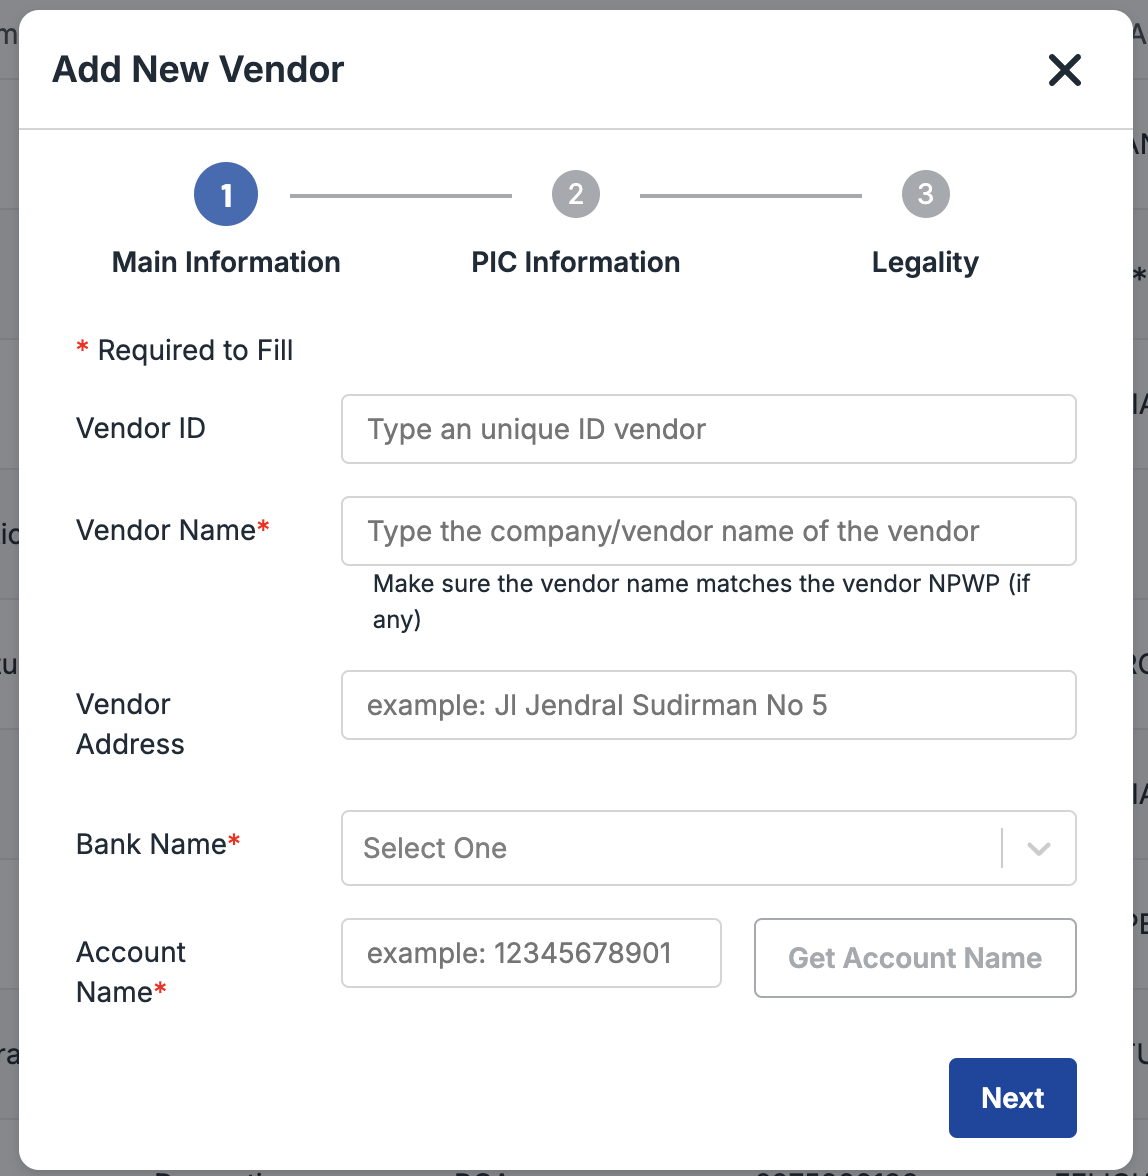
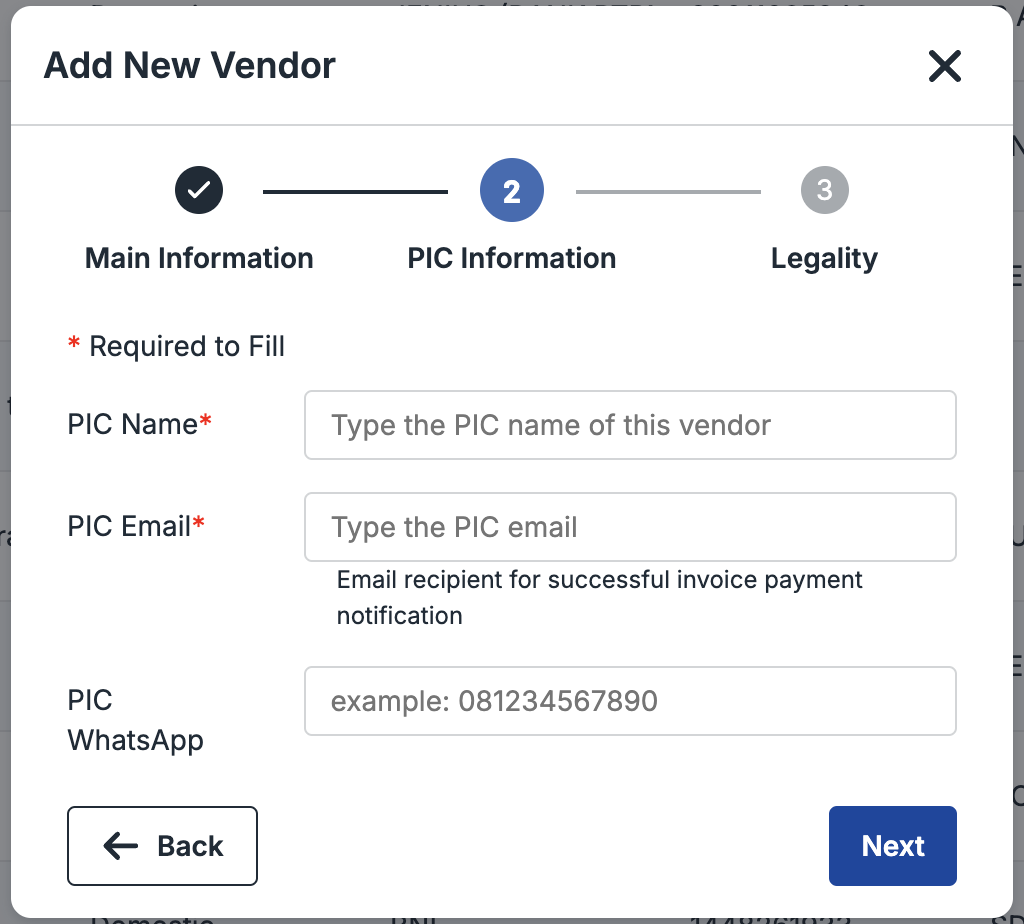
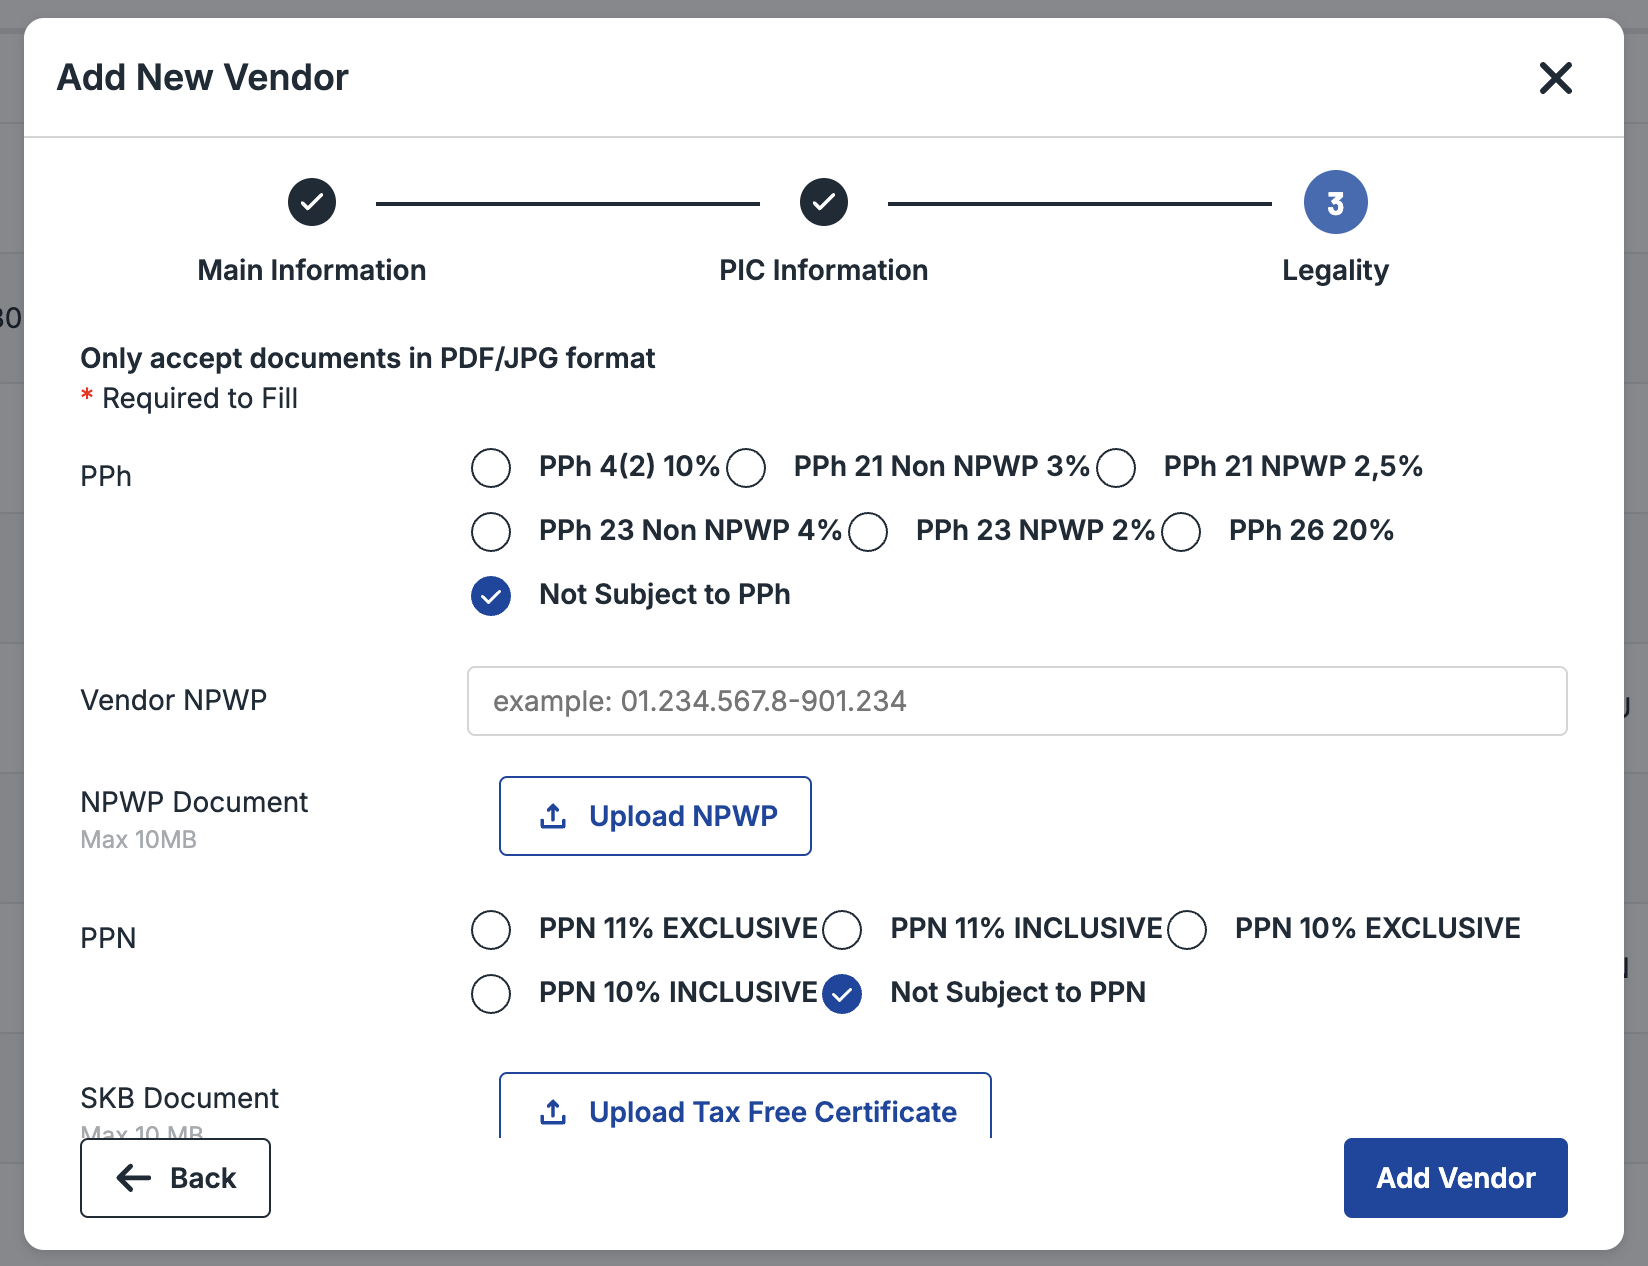
- List of Vendor
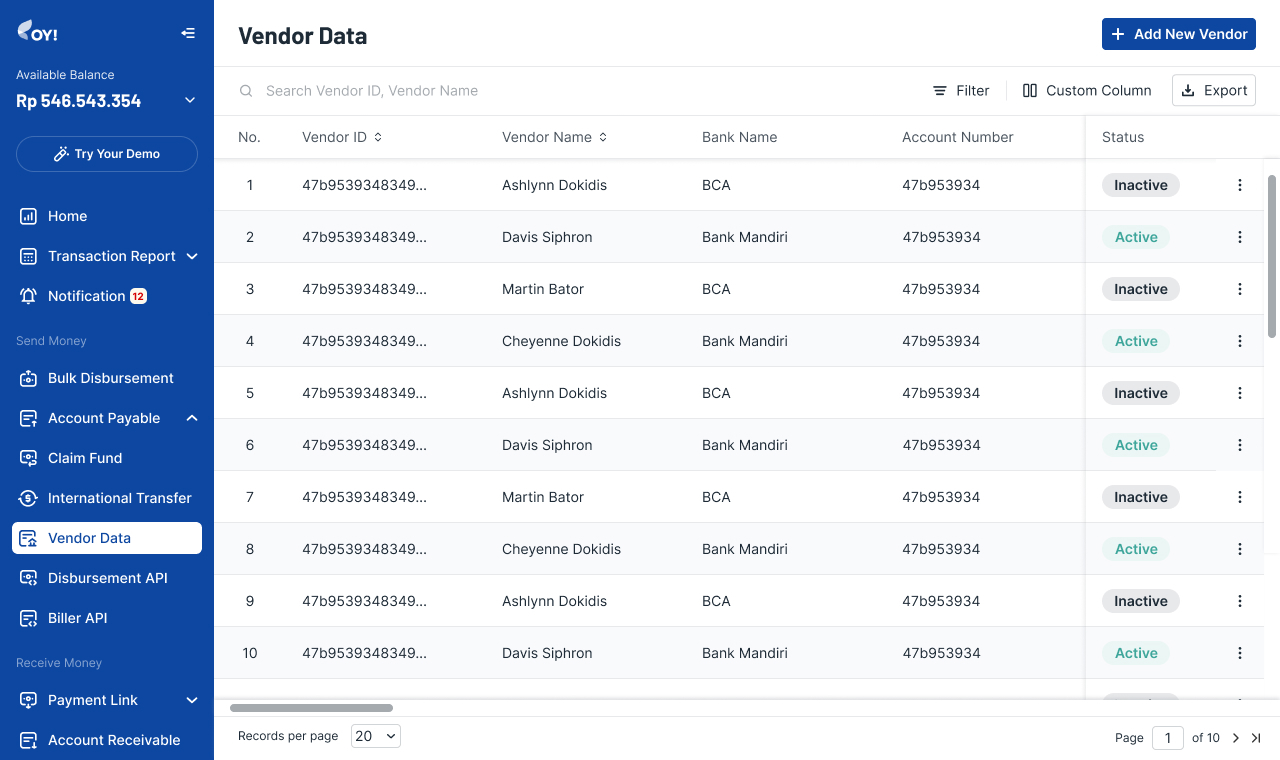
- Vendor Details
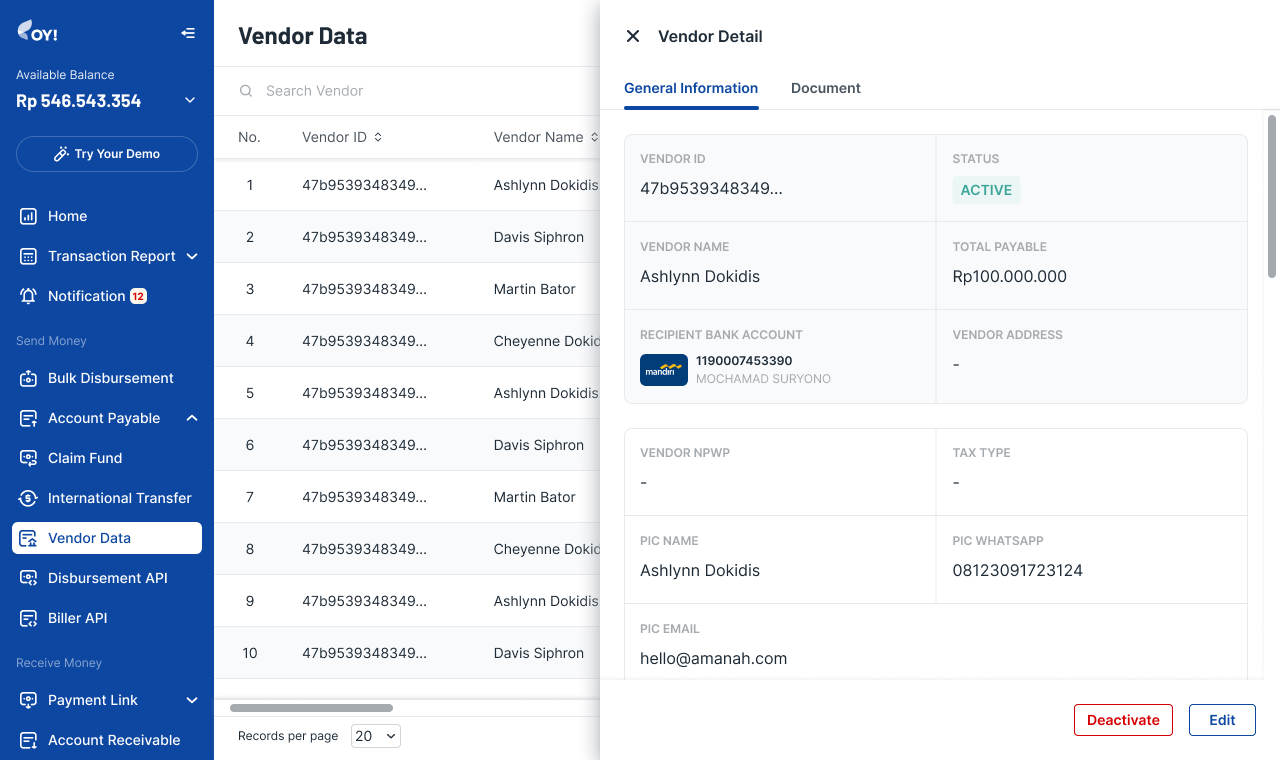
Add New Vendor for Account Payable for International Payment :
- Click “Vendor Data” under “Send Money” menu
- Click “Add New Vendor”
- Choose “International Vendor”
- Fill in the necessary details
- Click “Save” after complete registration of new vendor
| Parameter | Description |
|---|---|
| Vendor ID | Unique ID of the vendor from your company. This is not mandatory. |
| Vendor Name | The company/vendor name. Make sure the vendor name matches the vendor’s NPWP (if any) to help your company with the tax record. |
| Vendor Address | Vendor address to be recorded. This is not mandatory. |
| PIC Name | The PIC name of this vendor. |
| PIC Email | The PIC or recipient active email. Payment/transfer receipt will be sent automatically to this email after payment is completed. |
| PIC WhatsApp | The PIC WhatsApp number for your record. This is not mandatory. |
How to Set Up Invoice Payable Approval
You can set up multi level approval from OY's users. There will be 4 type of users: Super Admin, Admin, Approver, and Maker
Approval Layer Set Up
By the first time you create your account, your account will be assigned as Super Admin. You have the ability to create, edit, and delete sub-account. Sub-account itself can be utilized as Maker only, Approver only, or Admin account. Please follow steps here for user management in OY! dashboard. It is not necessary to create new sub-accounts in order to use Account Payable. The Super Admin and Admin roles allows you to directly create and approve Account Payable. If you want to create multi-layer approval please follow the steps in the Multi-Layer Approval section.
Multi-Layer Approval
By default admin is the one who approves the payable invoices but you can create a multi-layer approval to enhance security of your account payable transactions. You can assign up to 3 sub-accounts with role Admin or Approver also the limit amount of transaction by follow the steps below:
- Log in to your OY! Account
- Open “Multi Approval” under “Settings” menu
- You’ll see 3 levels of approval, the first level (default) minimum amount is IDR 0 you can choose to have multiple approvals by selecting approver level to “All Accounts” or “Choosen Accounts”
- If you want to create another level approval, please fill the minimum amount and choose approver for this level
- If you’re done, please click “Save Changes”
- Multi Approval page

By setting the multi-layer approval, every transaction will not be transferred to vendor without approval from all approvers.
Default approval: Super Admin, Admin, and Approval.
How to Add Sender Data for International Payment
- Log on to your OY! dashboard
- Choose "Production" environment
- Click "Pay Invoice" under Account Payable menu
- Click "Invoice List"
- Click "Create New Invoice" on top right
- Choose “Send Other Currency”
- Fill all required fields
- Click “Next” to move to the next process
- We will show the calculation of exchange rate and fee to proceed the payment, also we will inform you about required documents to support this process. Please click “Next” to continue the process
- OY! will show you the current saved sender data and option for creating a new sender
- If you decide to create a new sender, choose type of sender (Individual or Business)
- Fill these fields then click “Save and Next”, this process will automatically save the sender data
Fields for Individual Sender
| Parameter | Description |
|---|---|
| First Name | Sender’s first name (optional) |
| Middle Name | Sender’s middle name (optional) |
| Last Name | Sender’s last name |
| Other Name | Sender’s other name if any (Chinese name, religious name, etc) |
| Gender | Gender of the sender |
| Occupation | Sender’s current job title |
| Date of Birth | Sender’s date of birth |
| Country of Birth | Sender’s origin country of birth |
| Nationality | Sender’s current nationality |
| Identity Document | Identity document that is used to input identity number |
| Identity Number | Identity number from the inputted identity document |
| Phone Number | Sender’s active phone number |
| Sender’s active email | |
| Residential Status | Current residential status of sender in Indonesia |
| Address Line | Sender’s origin address |
| City | City from the address |
| State/Province | State/province from the address |
| Country | Country from the address |
| Postal Code | Postal code of address |
Fields for Business Sender
| Parameter | Description |
|---|---|
| Business Name | Name of business (e.g. PT Dompet Harapan Bangsa) |
| Business Registration Number | A unique identifier assigned to a business by a government authority when it is officially registered. (NIB, Nomor Induk Berusaha) |
| Date of Incorporation | Date when the business was launched or registered |
| Website | Company profile website of the business |
| Country of Incorporation | Country where the business is incorporated in |
| Operate in | Country where the business is operating |
| Phone Number | Business sender active phone number |
| Business sender active email/PIC for the business sender active email | |
| Address Line | Business sender’s origin address |
| City | City from the address |
| State/Province | State/province from the address |
| Country | Country from the address |
| Postal Code | Postal code from the address |
- Sender form page for individual
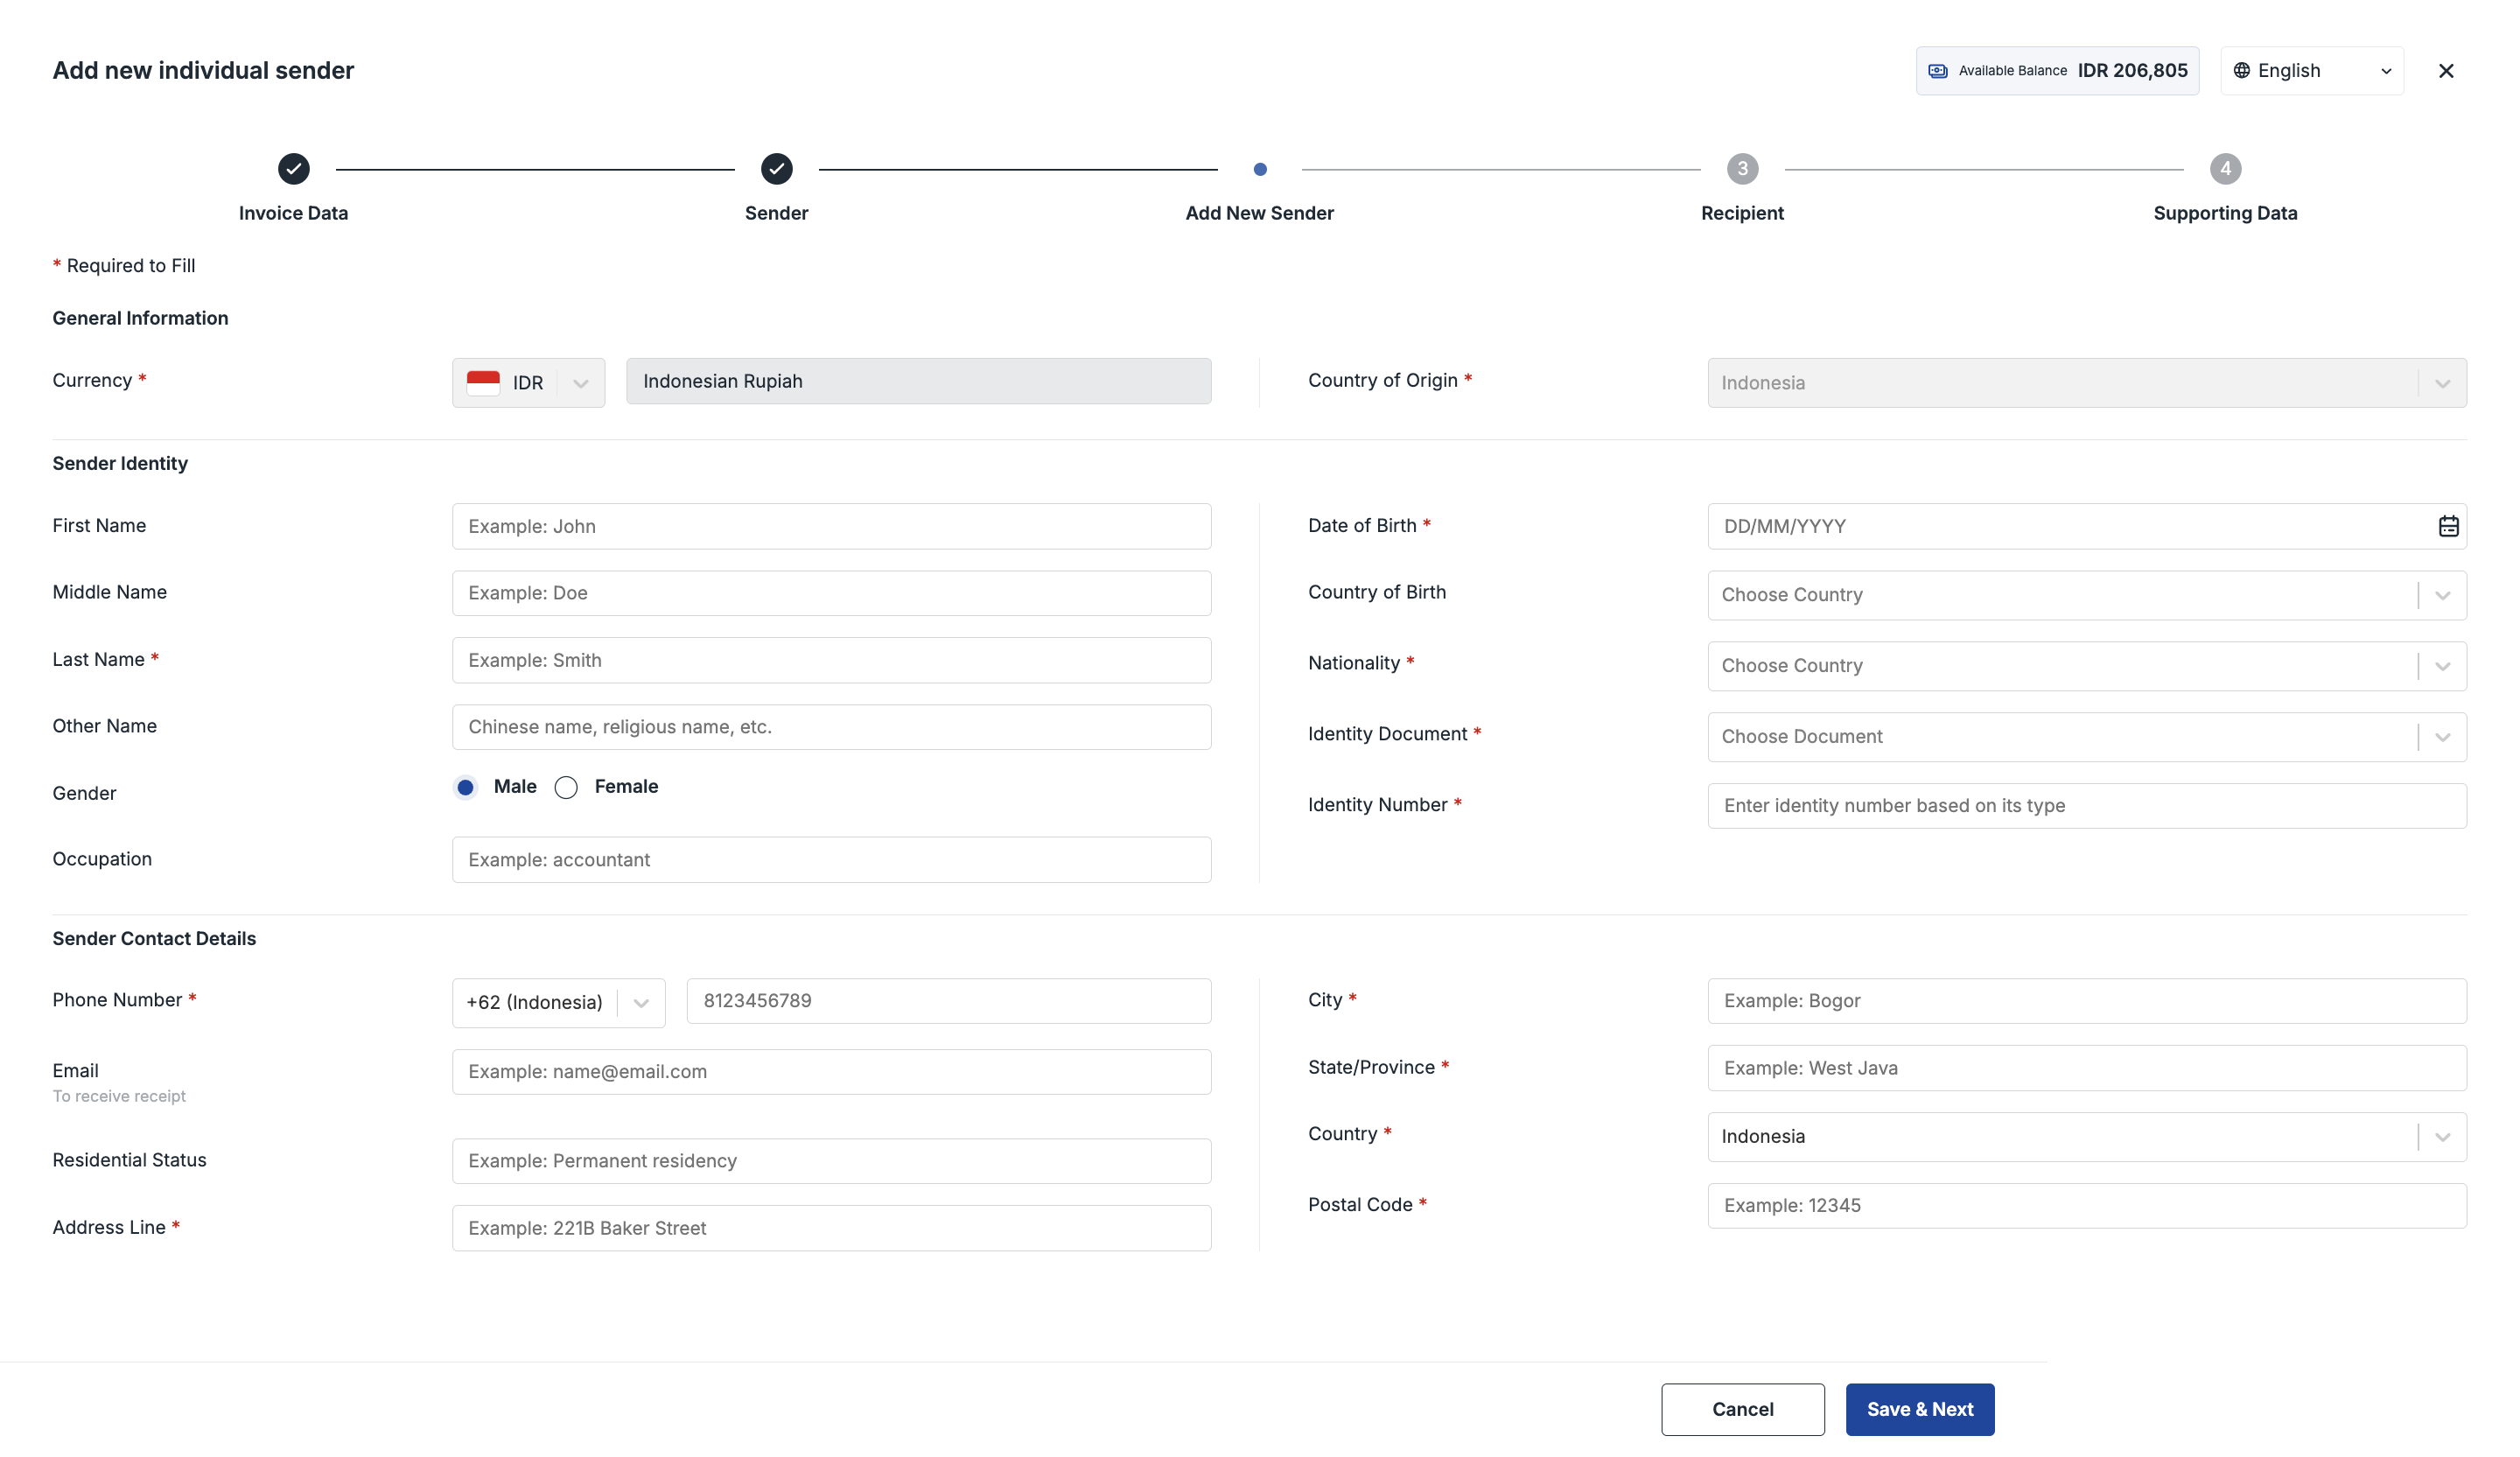
- Sender form page for business
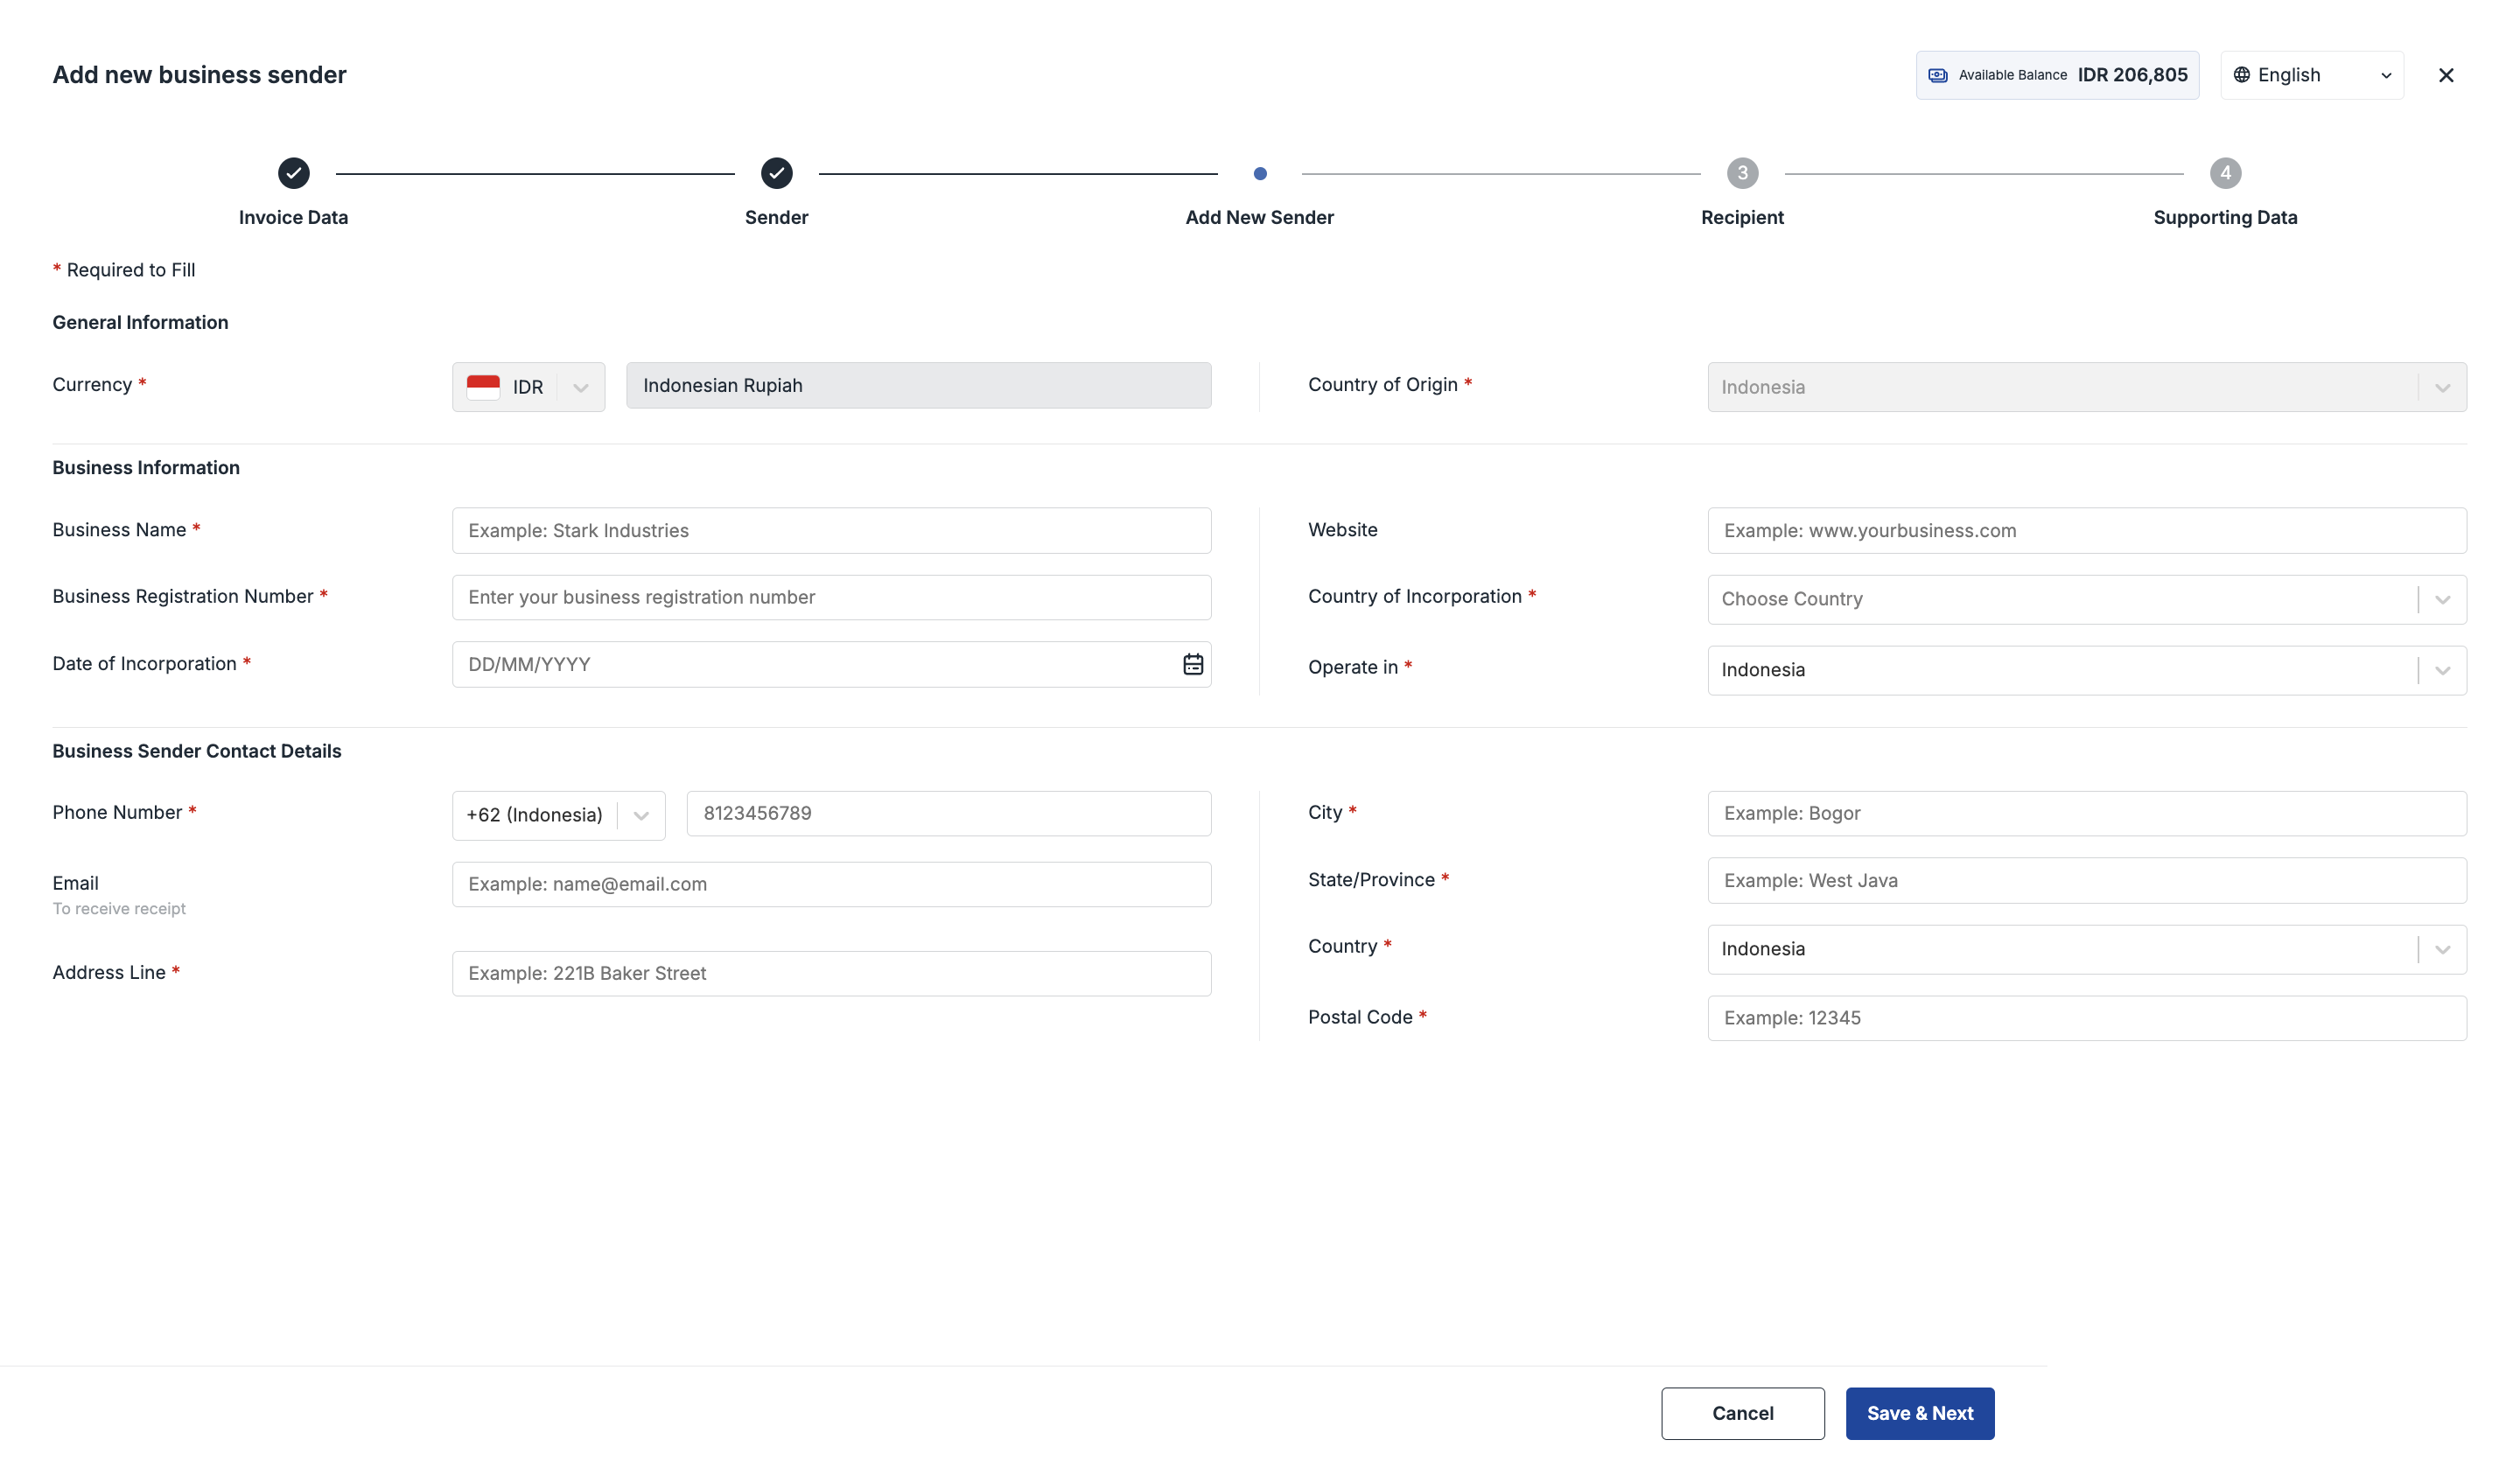
How to Add Receipt Data for International Payment
- Log on to your OY! dashboard
- Choose "Production" environment
- Click "Pay Invoice" under Account Payable menu
- Click "Invoice List"
- Click "Create New Invoice" on top right
- Choose “Send Other Currency”
- Fill all required fields
- Click “Next” to move to the next process
- We will show the calculation of exchange rate and fee to proceed the payment, also we will inform you about required documents to support this process. Please click “Next” to continue the process
- Choose saved sender data or create new sender data (please follow this instruction).
- OY! will show you the current saved receipt data and option for creating a new receipt.
- If you decided to create new receipt, click type of receipt (Individual or Business)
- Fill these fields then click “Save and Next”, this process will automatically save the sender data
Fields for Individual Receipt
| Parameter | Description |
|---|---|
| First Name | Receipt’s first name (optional) |
| Middle Name | Receipt’s middle name (optional) |
| Last Name | Receipt’s last name |
| Other Name | Receipt’s other name if any (Chinese name, religious name, etc) |
| Gender | Gender of the receipt |
| Occupation | Receipt’s current job title |
| Date of Birth | Receipt’s date of birth |
| Country of Birth | Receipt’s origin country of birth |
| Nationality | Receipt’s current nationality |
| Identity Document | Identity document that is used to input identity number |
| Identity Number | Identity number from the inputted identity document |
| Phone Number | Receipt’s active phone number |
| Receipt’s active email | |
| Residential Status | Current residential status of receipt in Indonesia |
| Address Line | Receipt’s origin address |
| City | City from the address |
| State/Province | State/province from the address |
| Country | Country from the address |
| Postal Code | Postal code of address |
| Bank Name | Registered bank name |
| Bank Address | Registered bank address |
| SWIFT/BIC Code | SWIFT/BIC code of the bank |
| Account Holder Name | Account holder name from the registered account number |
| Account Number | Account number that will receive funds |
Fields for Business Receipt
| Parameter | Description |
|---|---|
| Business Name | Name of business (e.g. PT Dompet Harapan Bangsa) |
| Business Registration Number | A unique identifier assigned to a business by a government authority when it is officially registered. (NIB, Nomor Induk Berusaha) |
| Date of Incorporation | Date when the business was launched or registered |
| Website | Company profile website of the business |
| Country of Incorporation | Country where the business is incorporated in |
| Operate in | Country where the business is operating |
| Phone Number | Business receipt active phone number |
| Business receipt active email/PIC for the business receipt active email | |
| Address Line | Business receipt’s origin address |
| City | City from the address |
| State/Province | State/province from the address |
| Country | Country from the address |
| Postal Code | Postal code from the address |
| Bank Name | Registered bank name |
| Bank Address | Registered bank address |
| SWIFT/BIC Code | SWIFT/BIC code of the bank |
| Account Holder Name | Account holder name from the registered account number |
| Account Number | Account number that will receive funds |
- Receipt form page for individual

- Receipt form page for business
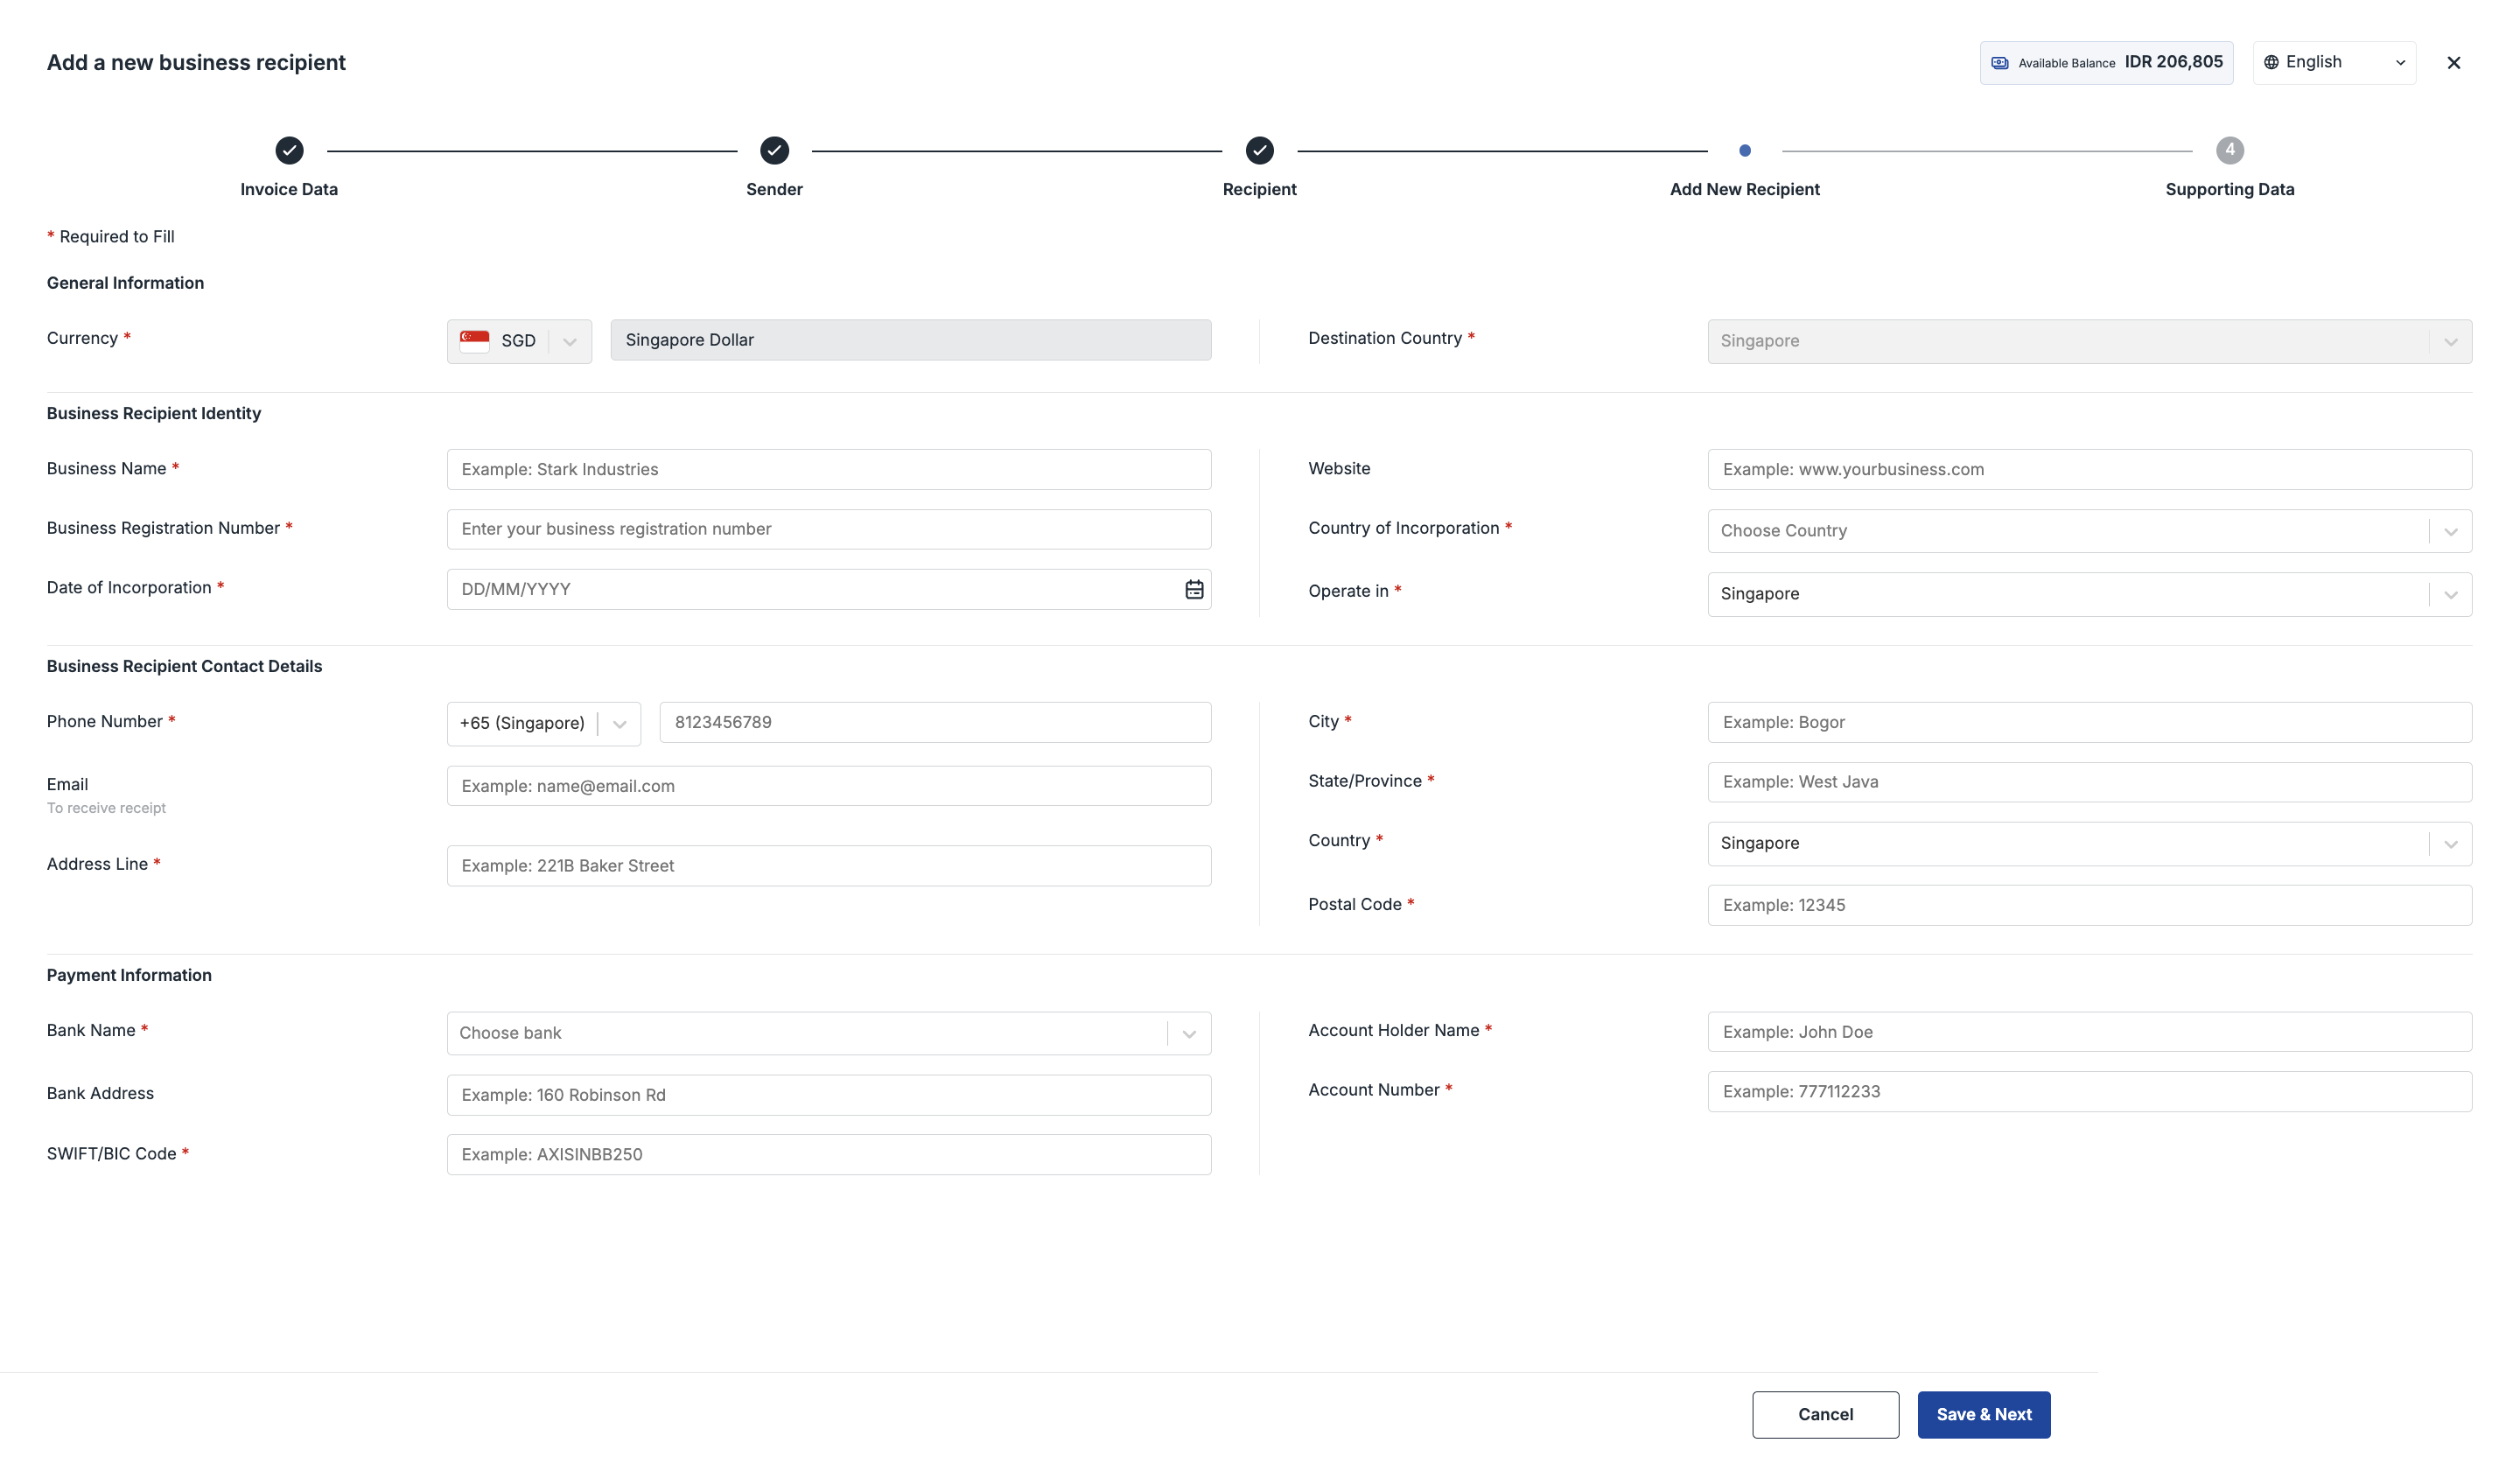
International Transfer
International Transfer product provides the capability for users to transfer across countries from Indonesia at any time. You may create a transaction within OY! dashboard without the need for any technical integration.
Key Features
Account Management
When you first create an account, your account will be assigned as a Super Admin role. As a Super Admin, you have the ability to create new sub-accounts and and assign different roles to your team such as Admin, Maker and Approver that are applicable for international transfers. The Super Admin and Admin can also edit or delete created sub-accounts.\
Note: it is not necessary to create new sub-accounts in order to use international transfer. The Super Admin and Admin roles allows you to directly create and approve transactions.
Roles & Accessibility
Only Super Admin and Admin roles are available to create transactions. However, if an approval flow is set up, Maker roles are allowed to create transaction with the approval of Super Admin, Admin or Approver roles. All other roles are only allowed to view transaction list, transaction details, filter, export and edit custom column in dashboard.
Available Destinations
Current list of countries supported: Singapore, Hong Kong and China.
Current list of currencies supported: Singapore Dollars (SGD), Hong Kong Dollars (HKD), Chinese Yuan (CNY) and US Dollars (USD).
More countries such as Australia, Malaysia, South Korea and United States will be available soon.
Sender / Recipient Contacts
Suppose that you want to create an international transfer on behalf of another entity, you may create an individual / business sender or recipient and input all required information about the sender or recipient. All sender and recipient information will be saved in contacts and may be reused in the future.
Additional Documents
We provide a placeholder for you to upload invoice and other supporting documents for the purpose of transfer and source of funds.
Transaction Details
Once a transaction is successfully created, all transaction details and updates will be recorded in OY! dashboard.
Single-layer Approval
Approval flow is designed to elevate your user experience and streamline the process of managing international transactions. The feature empowers our partners by allowing them to customize the approval process for transactions. Now, partners have the ability to assign Maker roles, responsible for initiating transaction creation, and Approver roles, ensuring each transaction undergoes a thorough review before execution. This not only adds an extra layer of security to your international remittances but also provides you with greater control over the entire process.
Registration and Set Up
Prerequisites
Register an account on the OY! dashboard
Activate your account through the activation link sent via email
Upgrade your account
Upgrade request is approved
Testing
- Log in to your OY! dashboard
- Choose "Staging" environment
- Click "Send Money" menu, and choose "International Transfer"
- Click "Create New Transaction"
- Fill in the necessary details by following the steps explained in the “How to Use” section
- Note: To reproduce a failed transaction in staging environment, you may fill the recipient account number as 1234567891. All other account numbers will result in a successful transaction.
How to Use
In order to create international transfers, you need to have sufficient available OY! balance is required in the account. If there is an insufficient available balance in the account, international transfers cannot be created * Create new transaction*: On the OY! dashboard, navigate to Send Payments > International Transfer on your left menu bar. Click “Create New Transaction” on the far righthand side of that page to create a new transfer.
- Input transfer amount details: You may fill out the amount of transfer in two ways:
- Fill in the send amount (in Rupiah) you would like to transfer, along with the destination currency and country. Our system will automatically convert according to the foreign exchange rate at that time.
- Fill in the recipient amount (in SGD/USD) you would like to transfer, along with the destination currency and country. Our system will automatically convert according to the foreign exchange rate at that time.
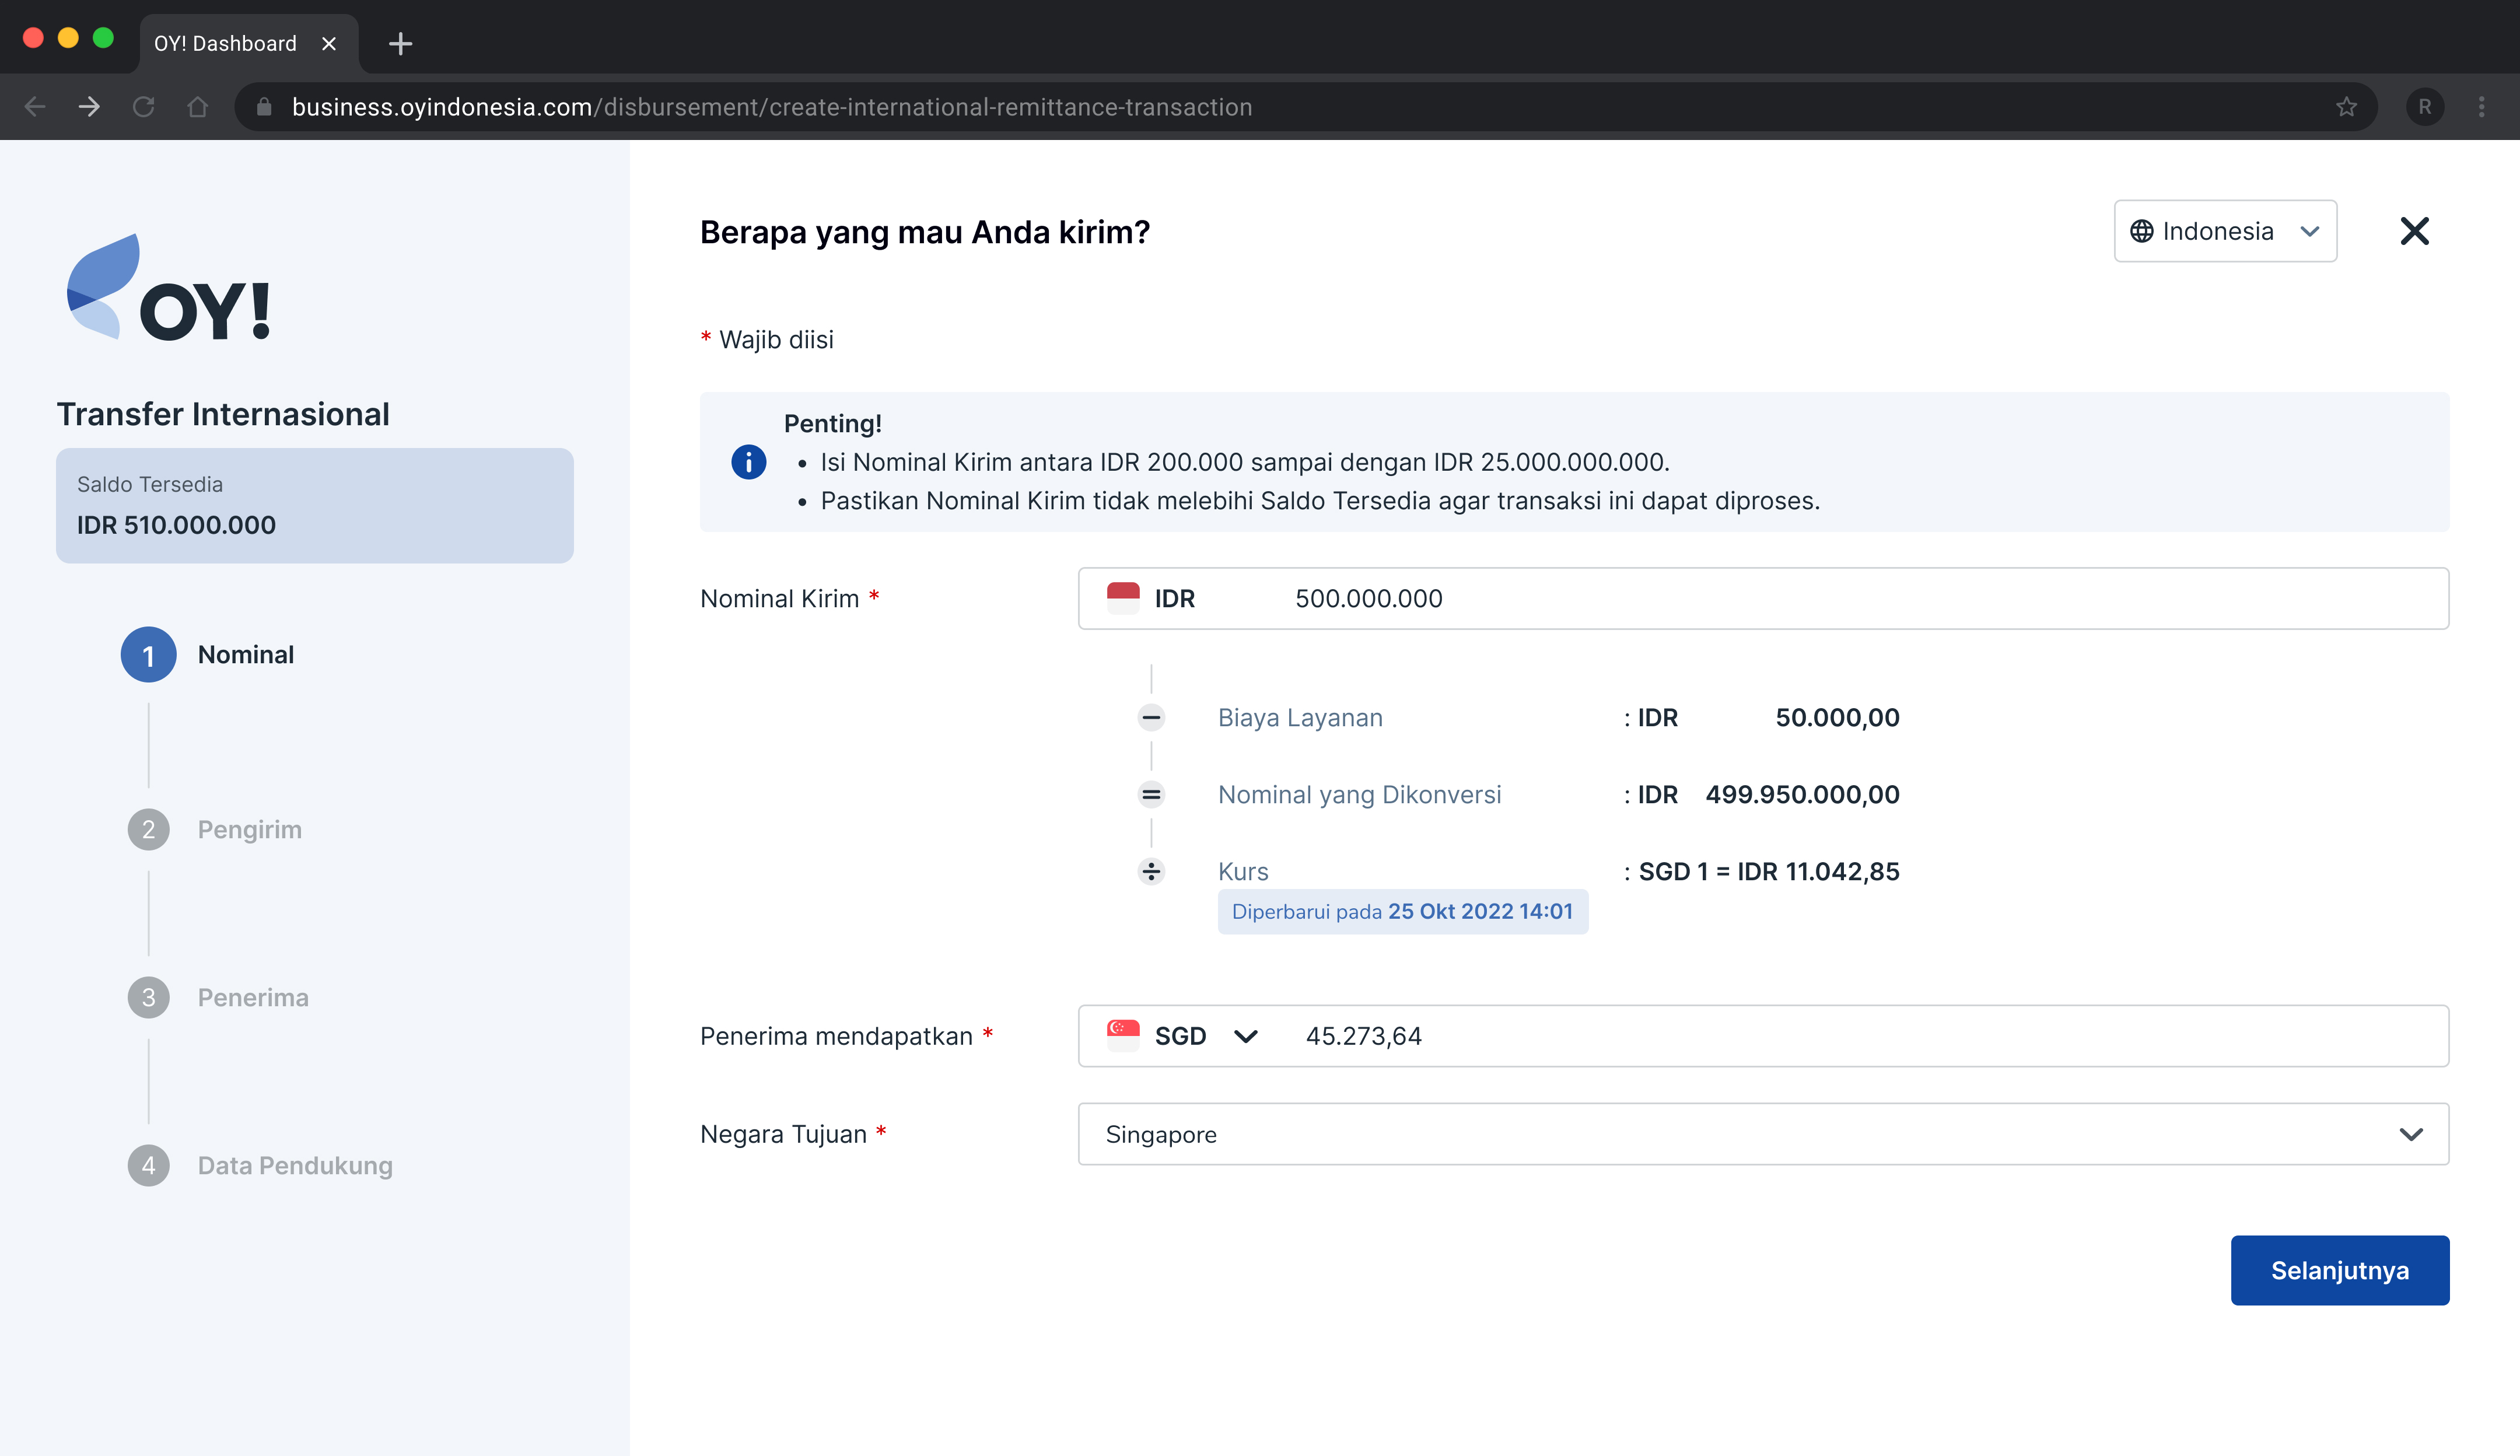
Note: If the nominal amount greater than the available balance, then our system will restrict users from proceeding
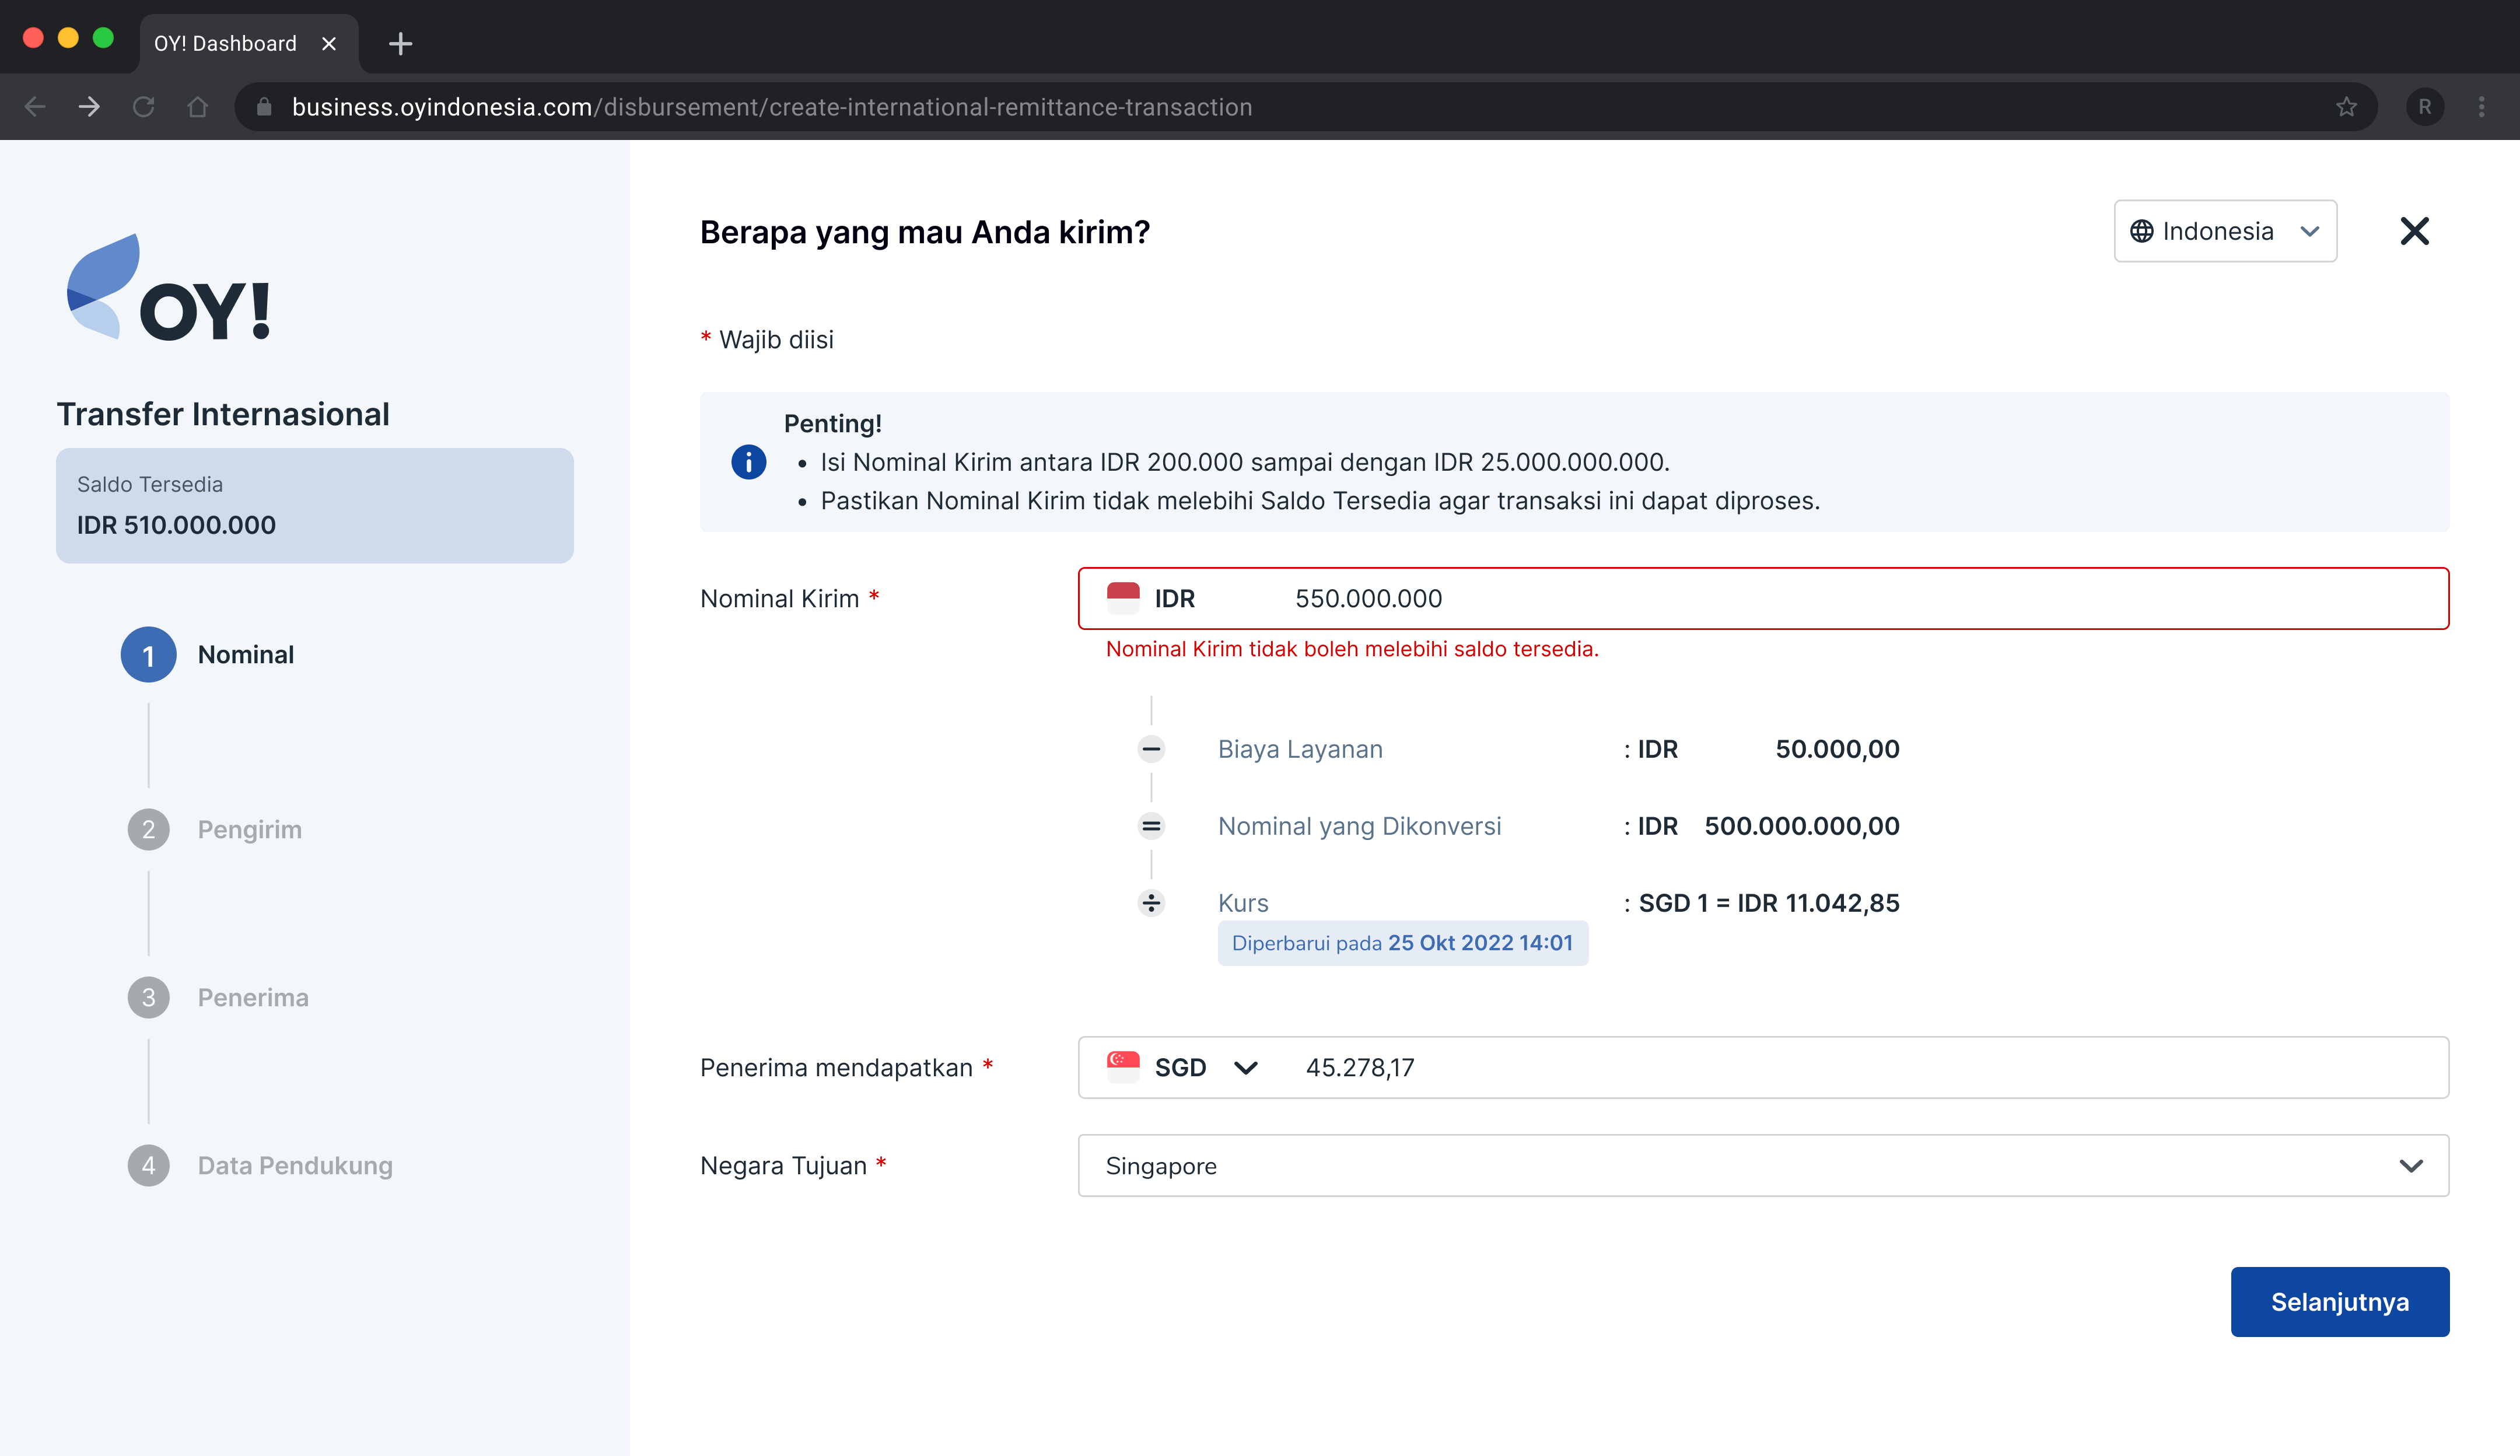
- Input sender details: Decide whether sender is an individual or business entity, and you will see the corresponding details to fill out for each. Previously saved sender contacts will be displayed at the bottom of this page.

Create a new individual sender by filling out this form
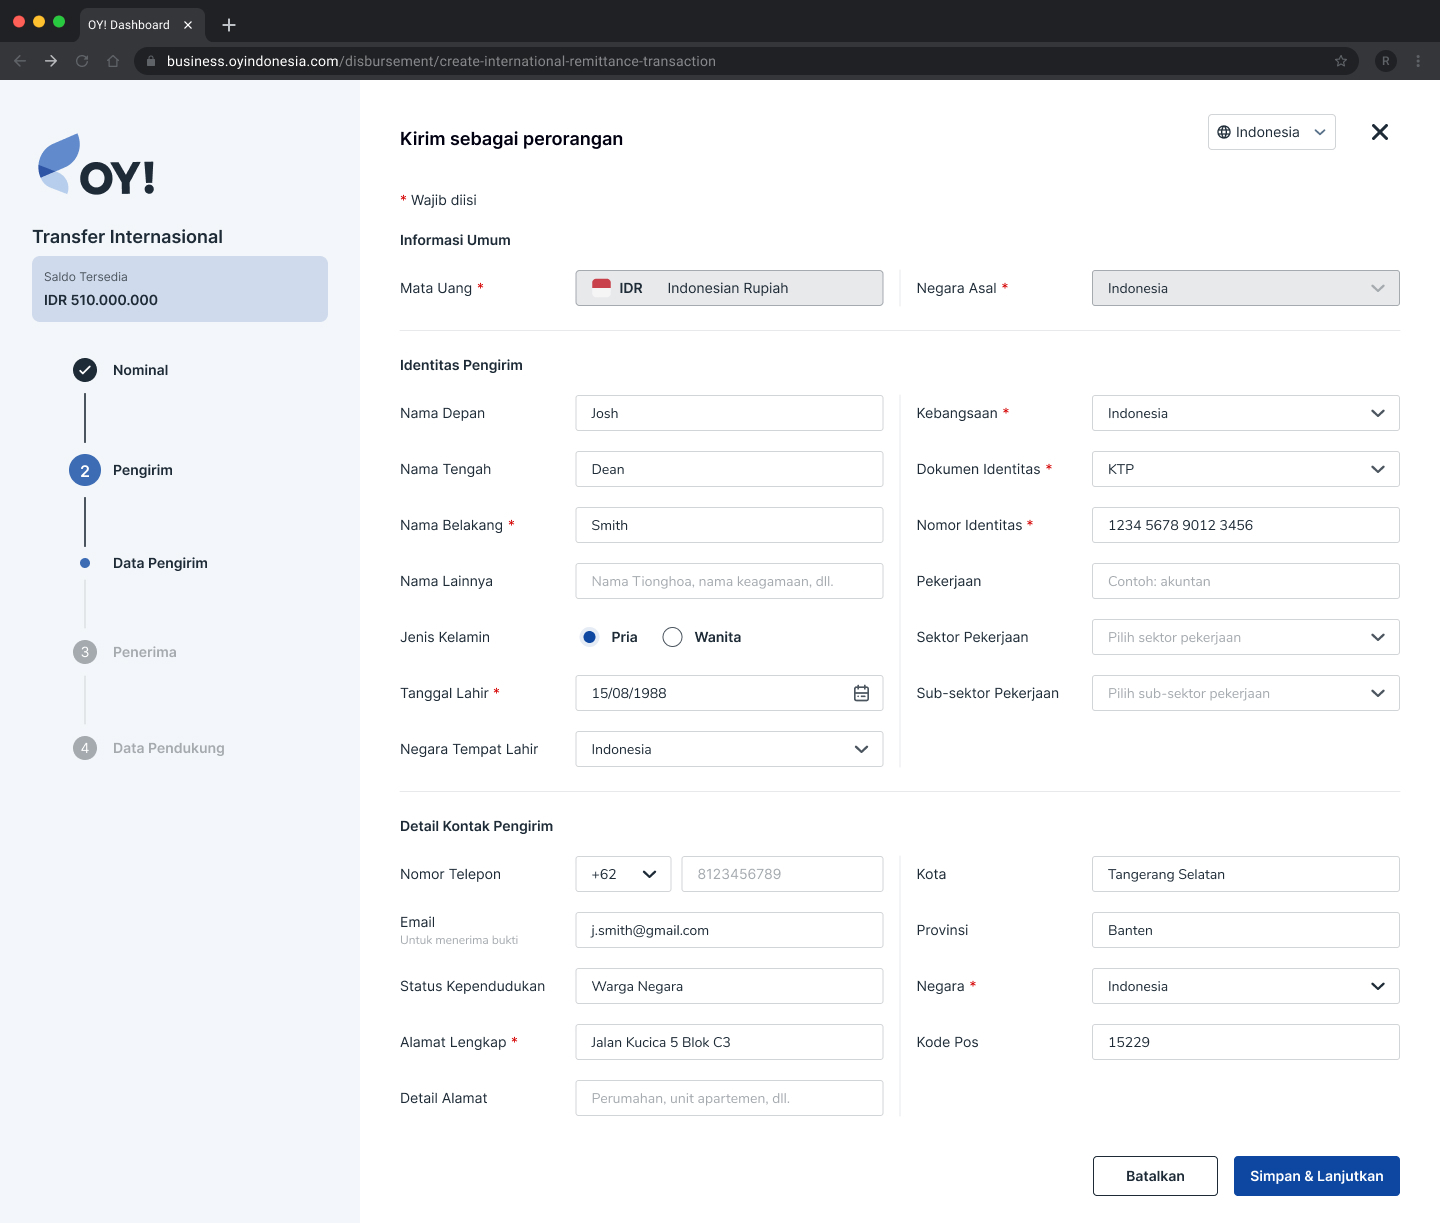
Create a new business sender by filling out this form
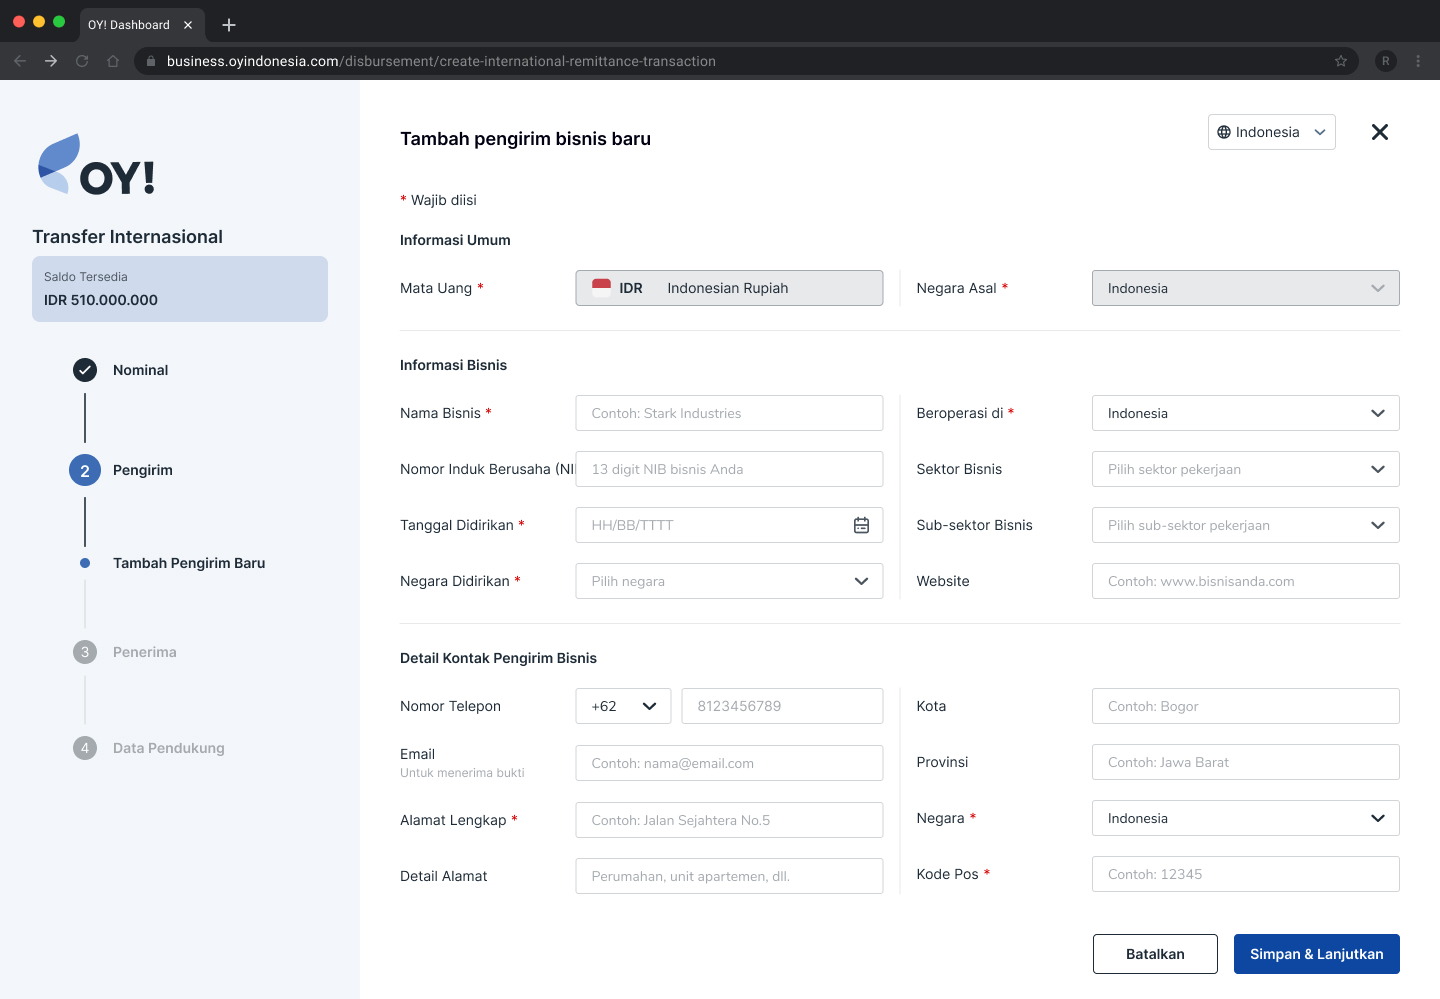
- Input recipient details: Decide whether recipient is an individual or business entity, and you will see the corresponding details to fill out for each. Previously saved recipient contacts will be displayed at the bottom of this page.
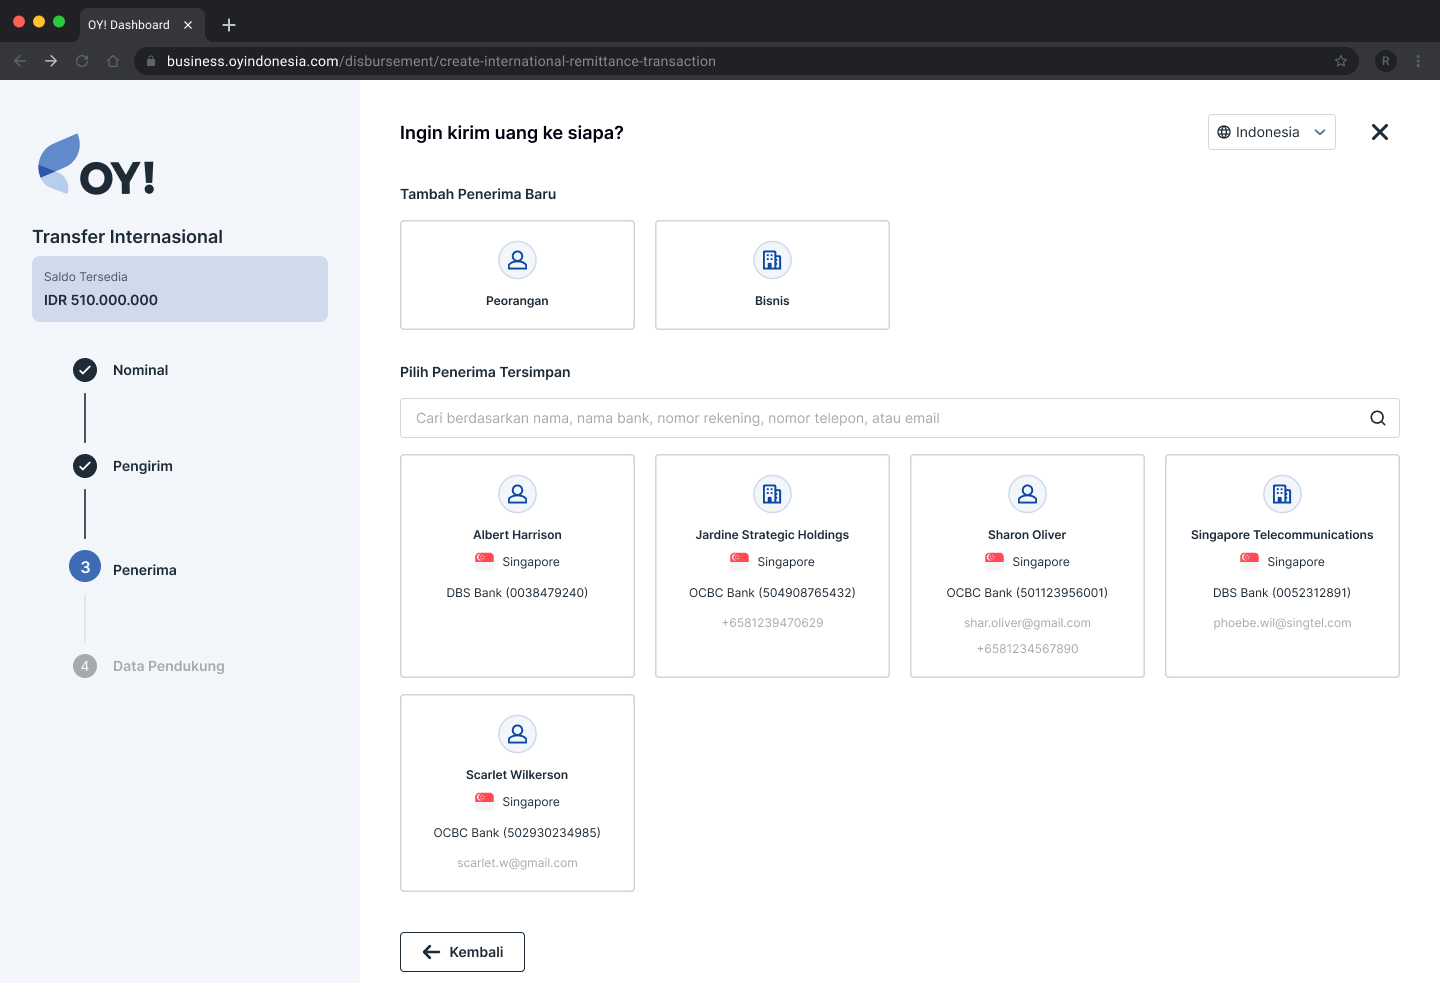
This will be the form you will need to fill out for individual recipient
Create a new individual recipient by filling out this form
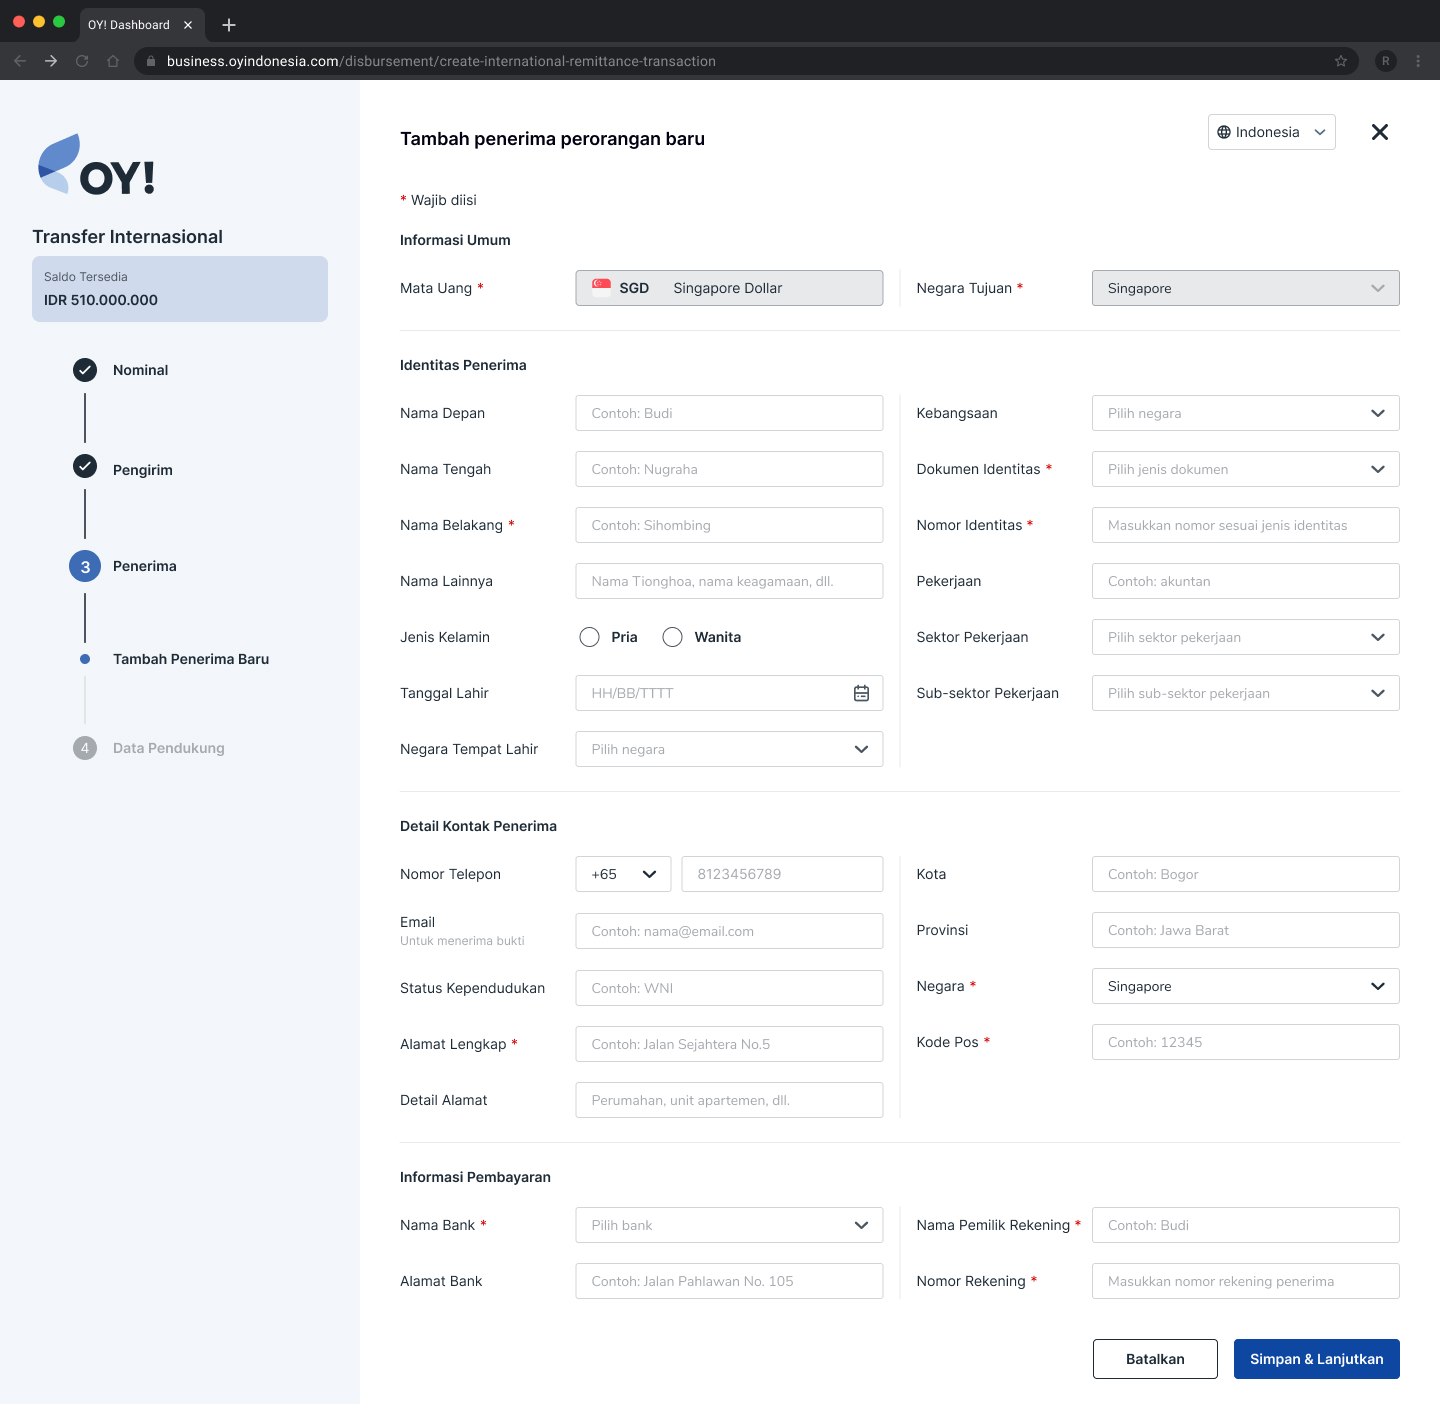
Create a new business contact by filling out this form
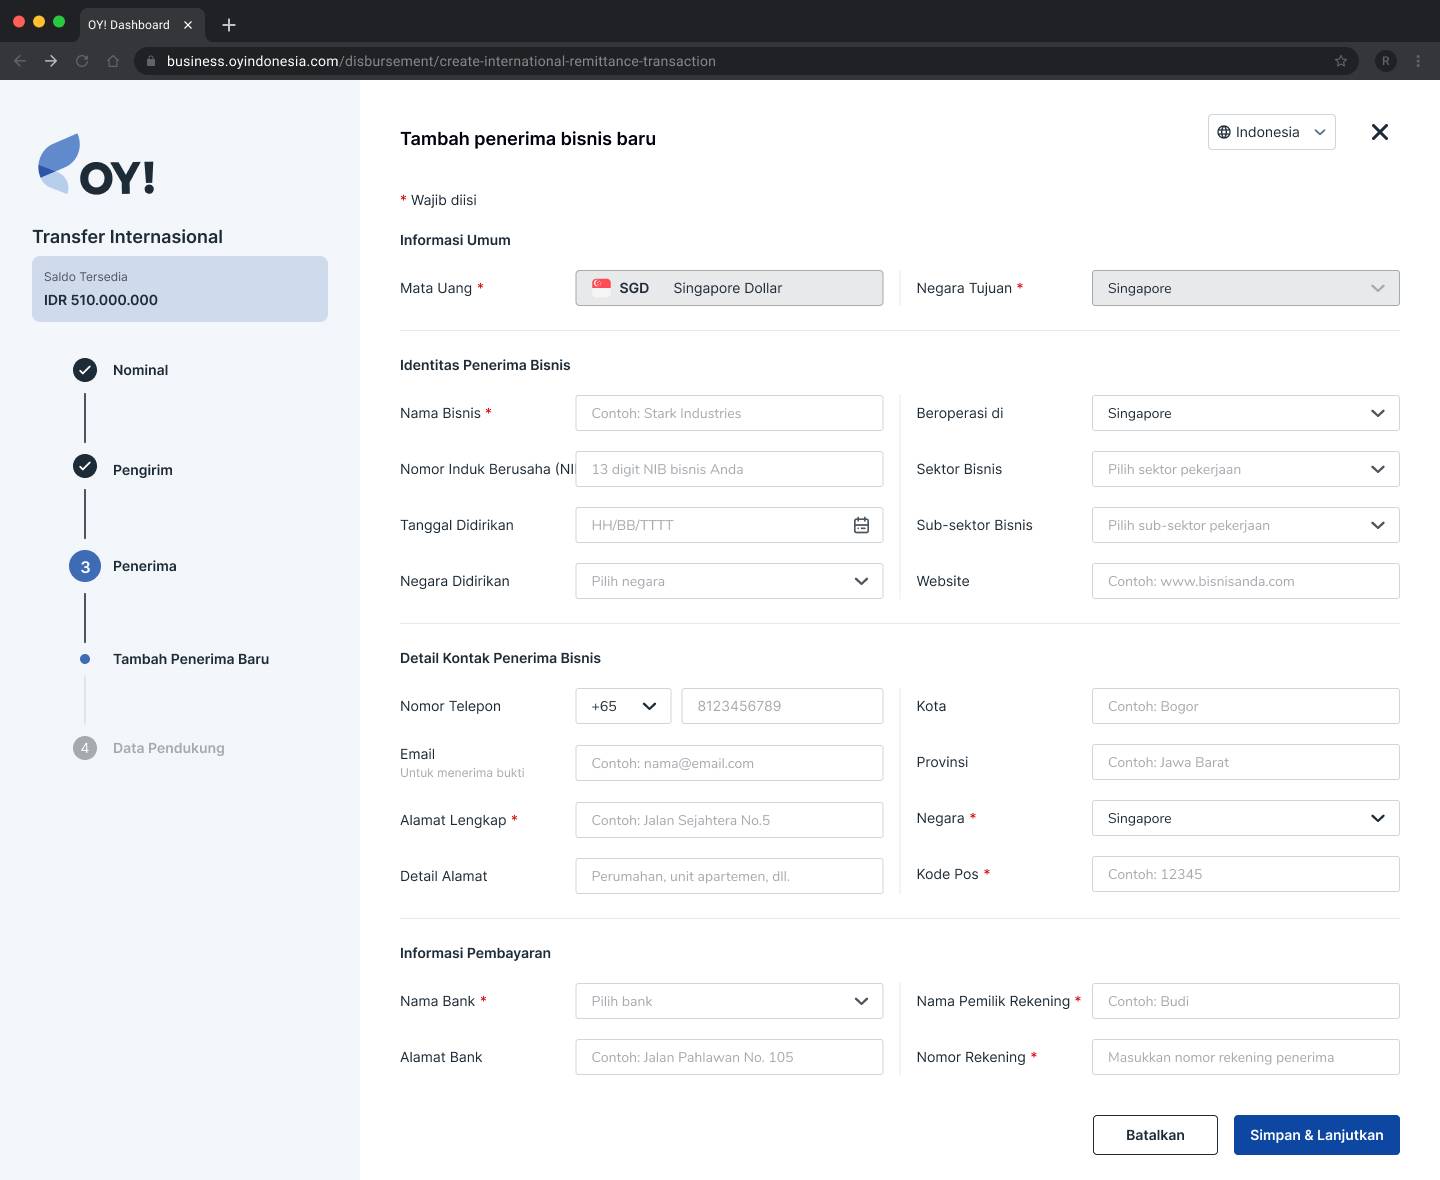
- Add supporting information: In this step, we need to record source of funds, purpose of transfer for the transaction. You may also attach supporting documents to aid the compliance requirements for your transaction.
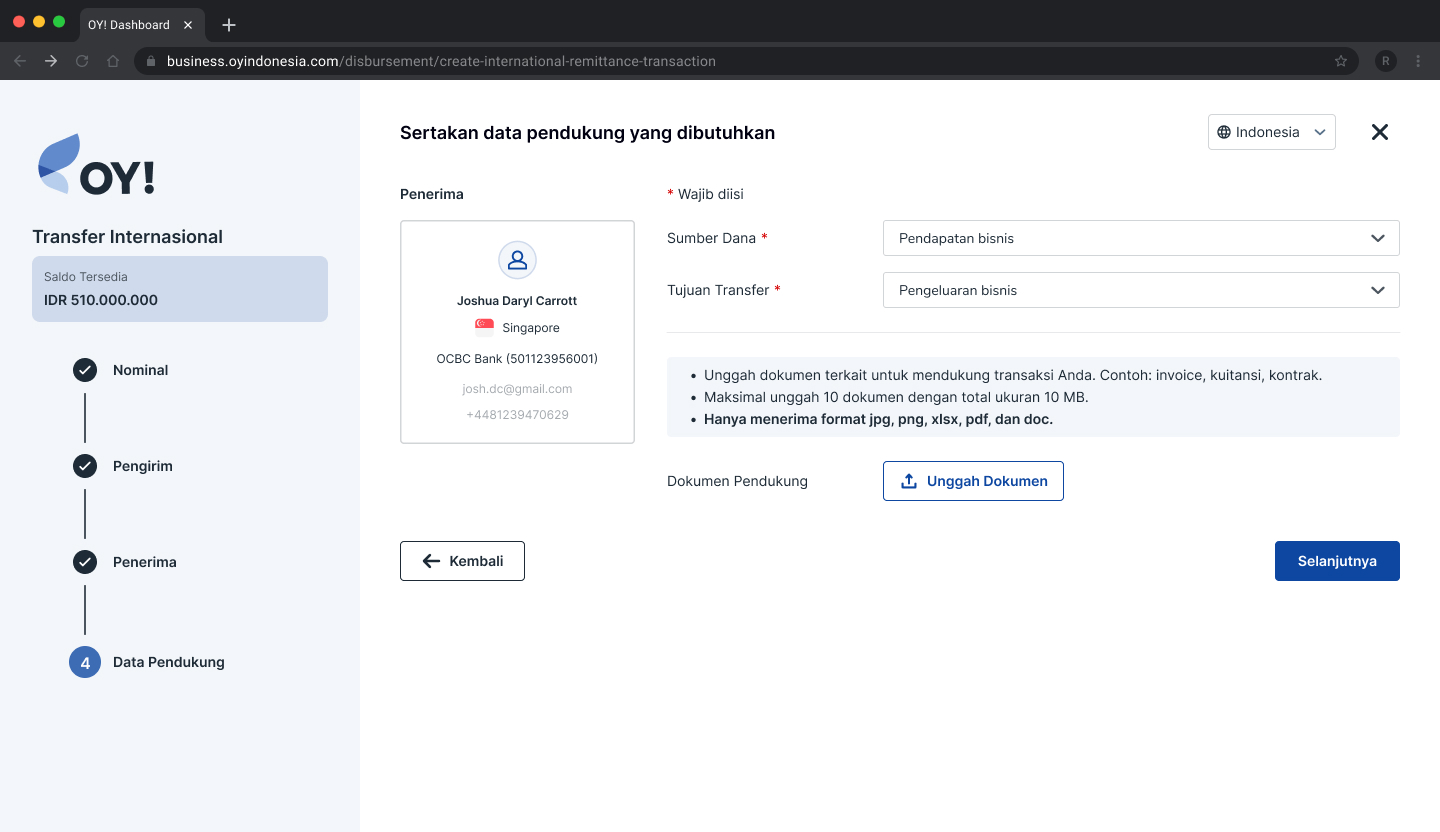
- Summary: The summary of your transaction will be shown. If all the information is correct, you may click the Submit button at the bottom right hand corner of the screen.
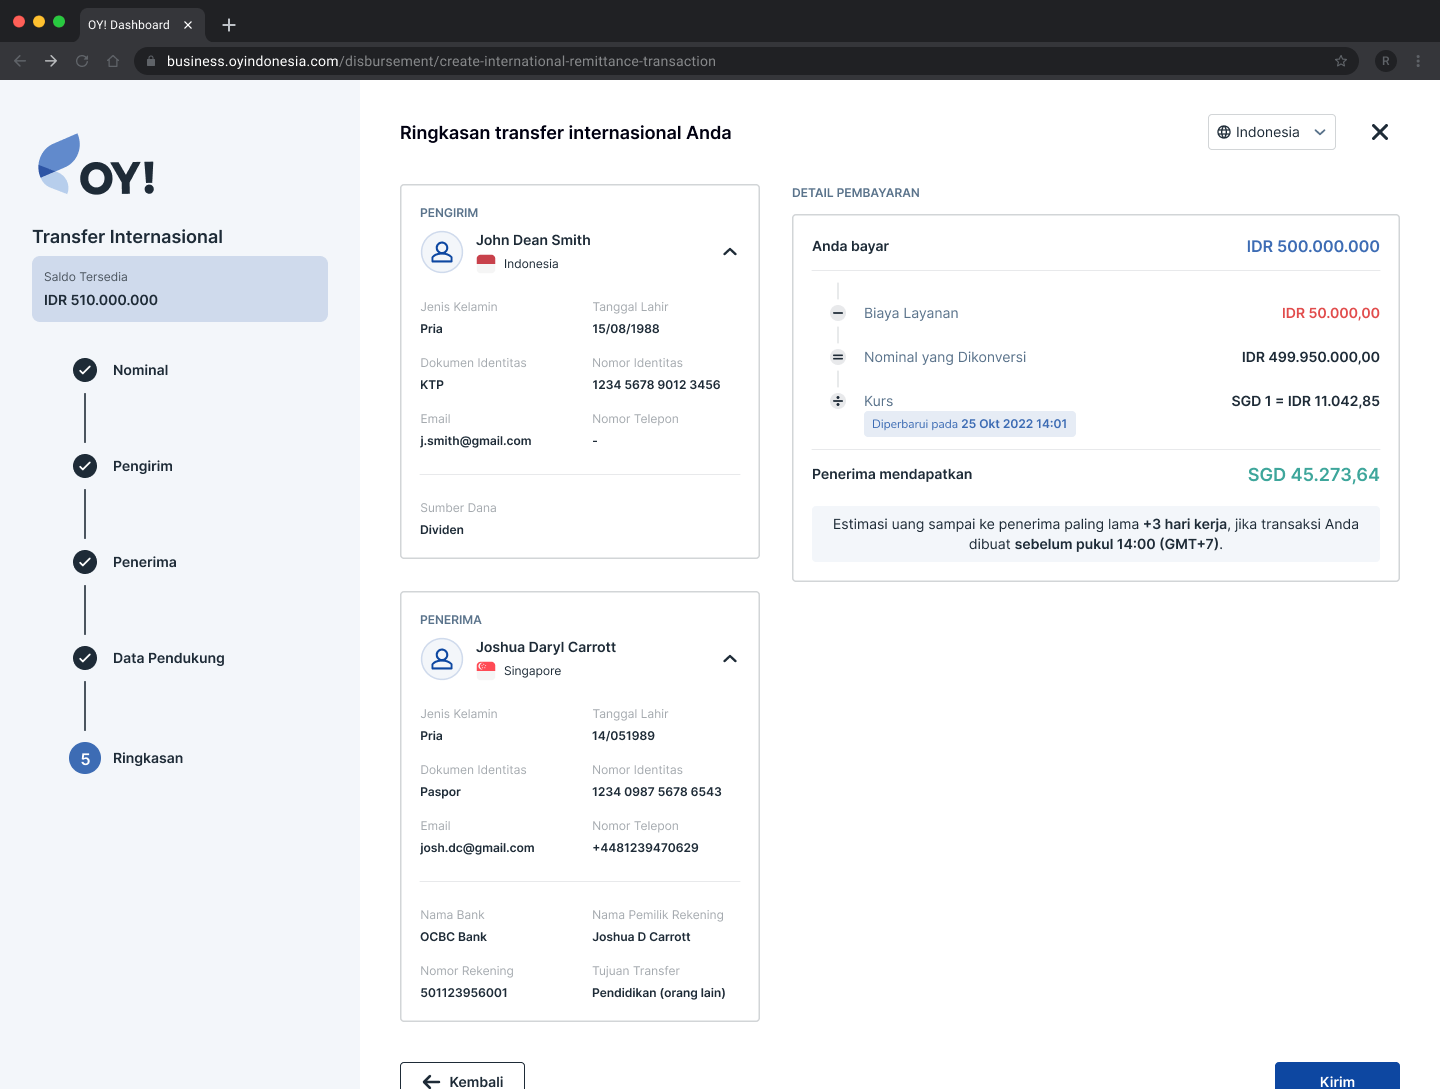
Note: A fixed quotation rate is created since Input sender details and will be refreshed every 30 minutes. In the case when the quotation expires, a pop up will show to fetch the latest exchange rate and a new quotation is created.
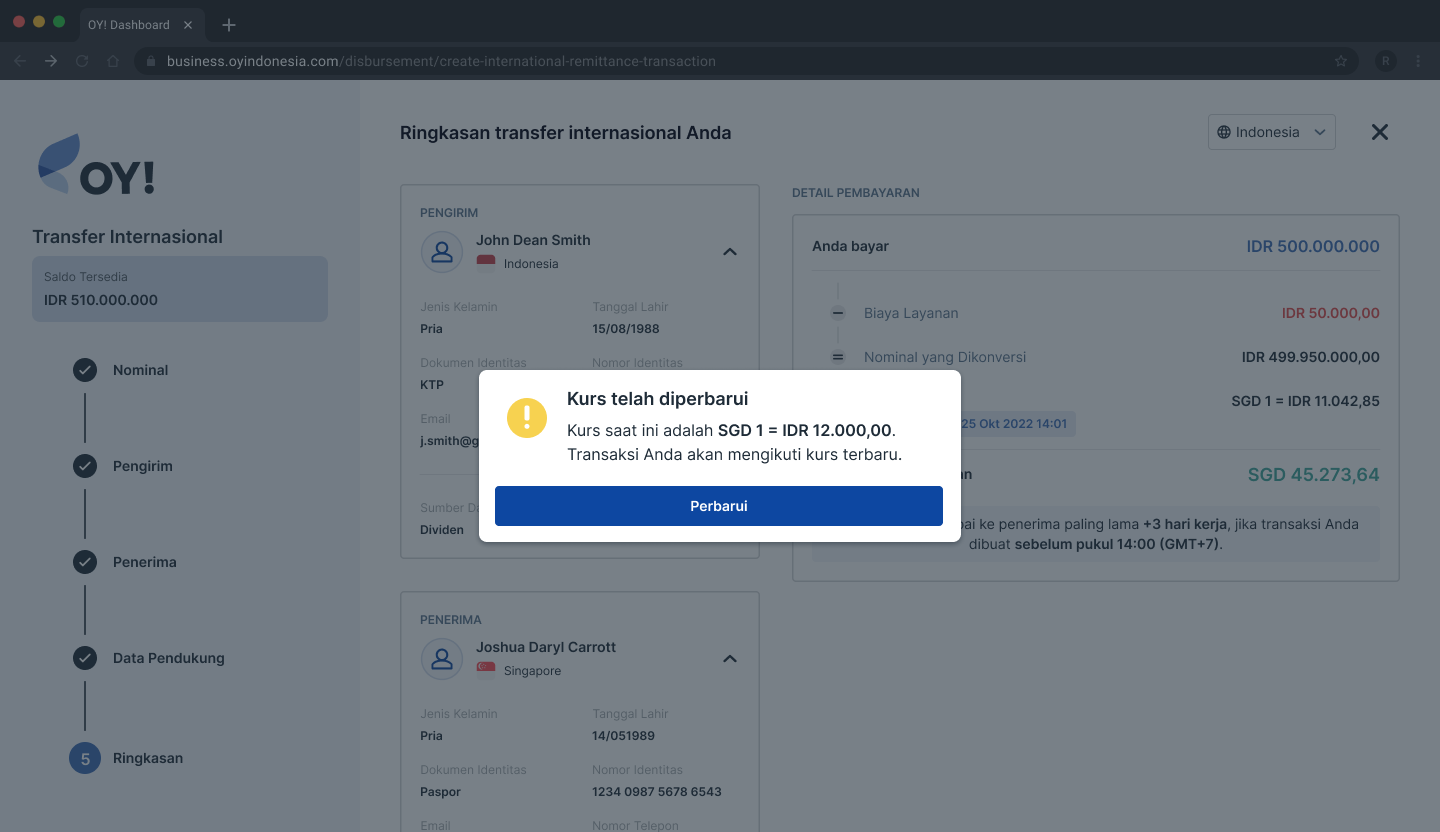
If the available balance is insufficient for the new quotation amount, then you will be prompted to change the transfer amount or top up balance.
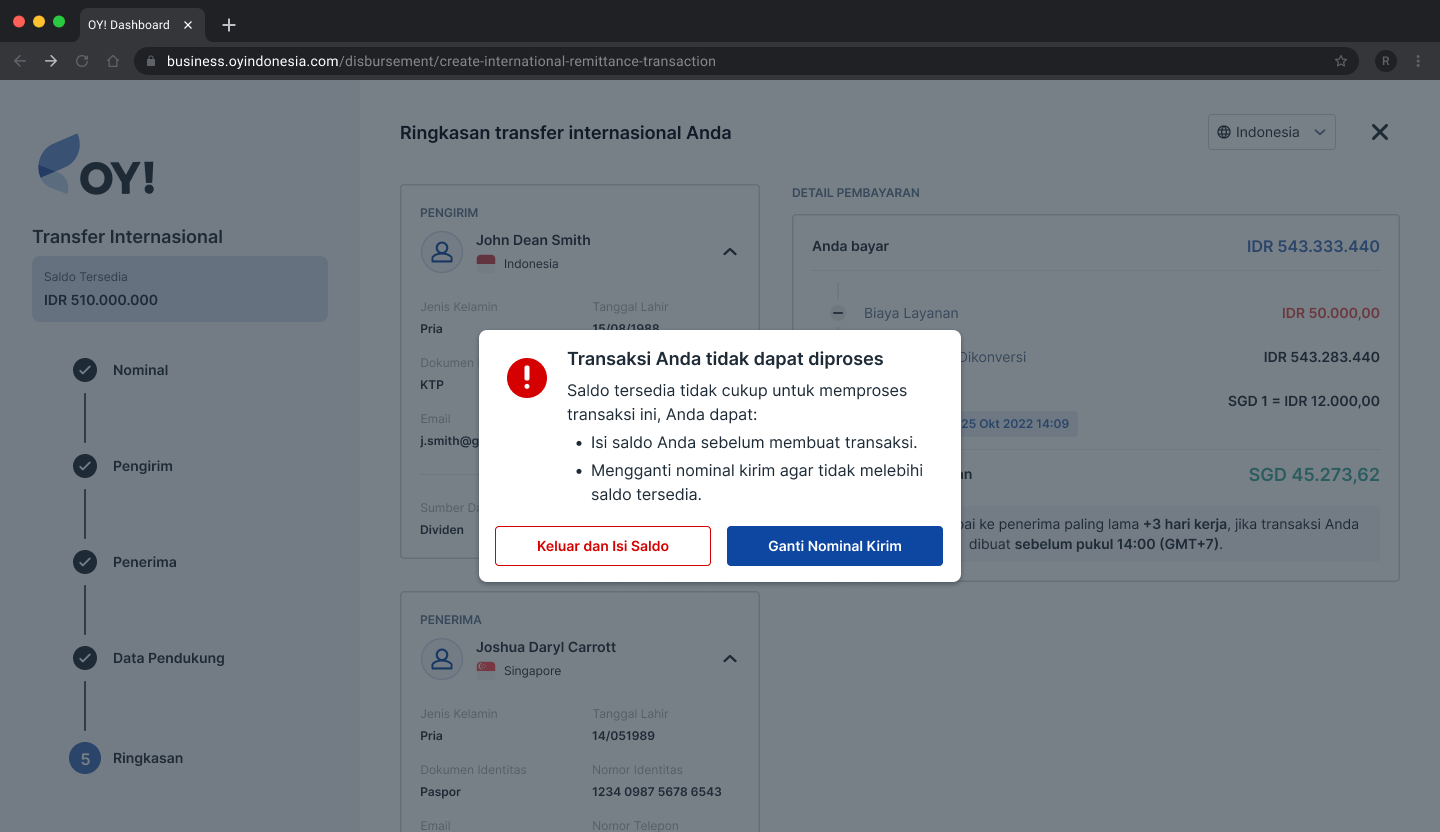
- Input Password: For security reasons, OY! will prompt clients to input their password prior to every transaction.

Each client has 5 chances to input the correct password. If you failed to input the correct password 5 times, then the transaction will automatically be cancelled.
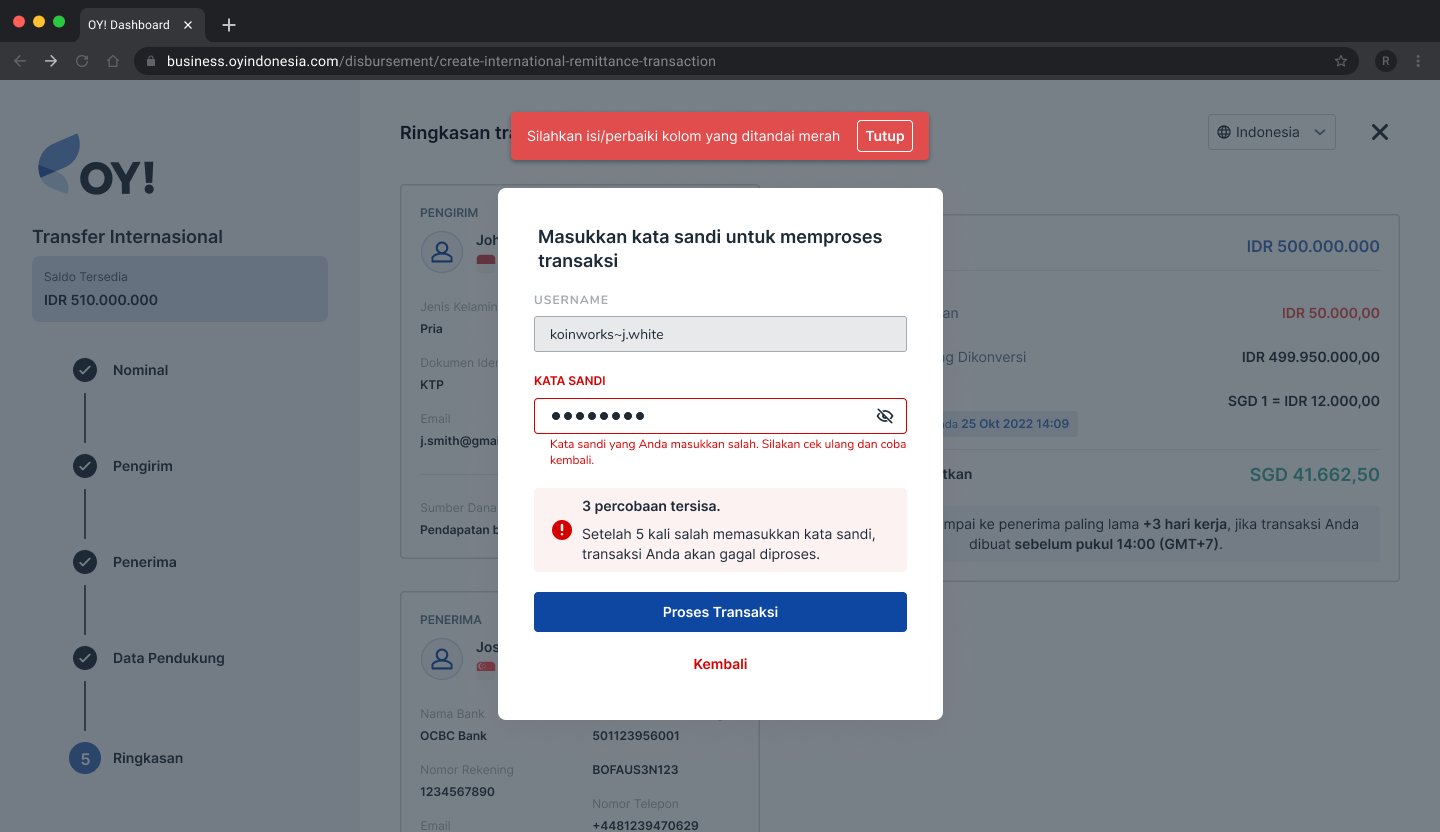
- Transaction Status: In Progress, Success, Failed.
In Progress
Once a transaction is successfully created, it will appear in your dashboard the status column will be set as In Progress.
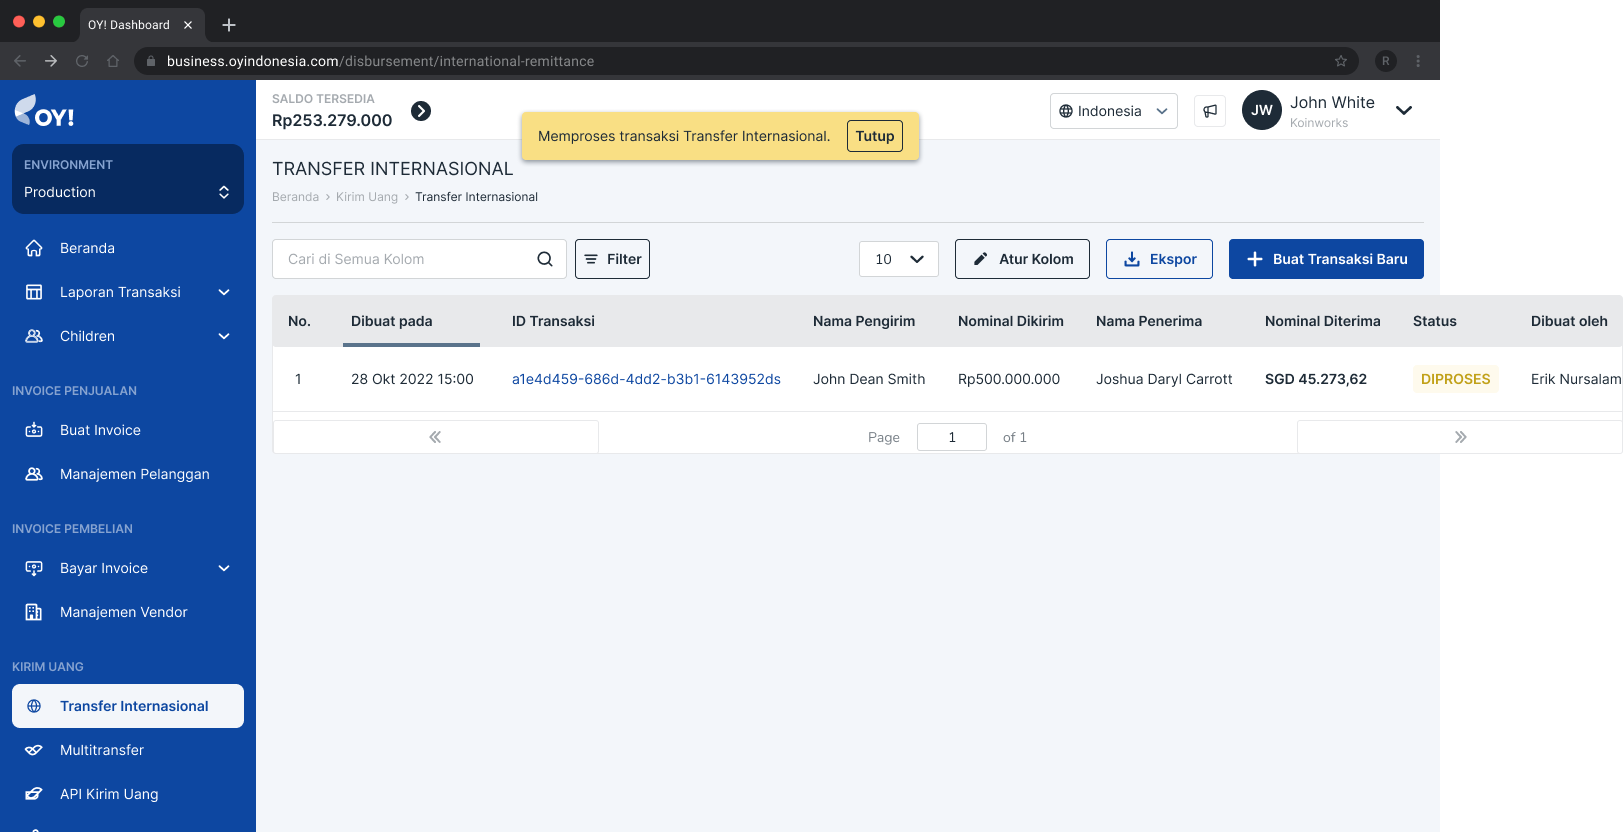
Success
Once your transaction is processed successfully, the status column will be updated as Success. Both sender and recipient should have received an email detailing a “Successful Transfer.”
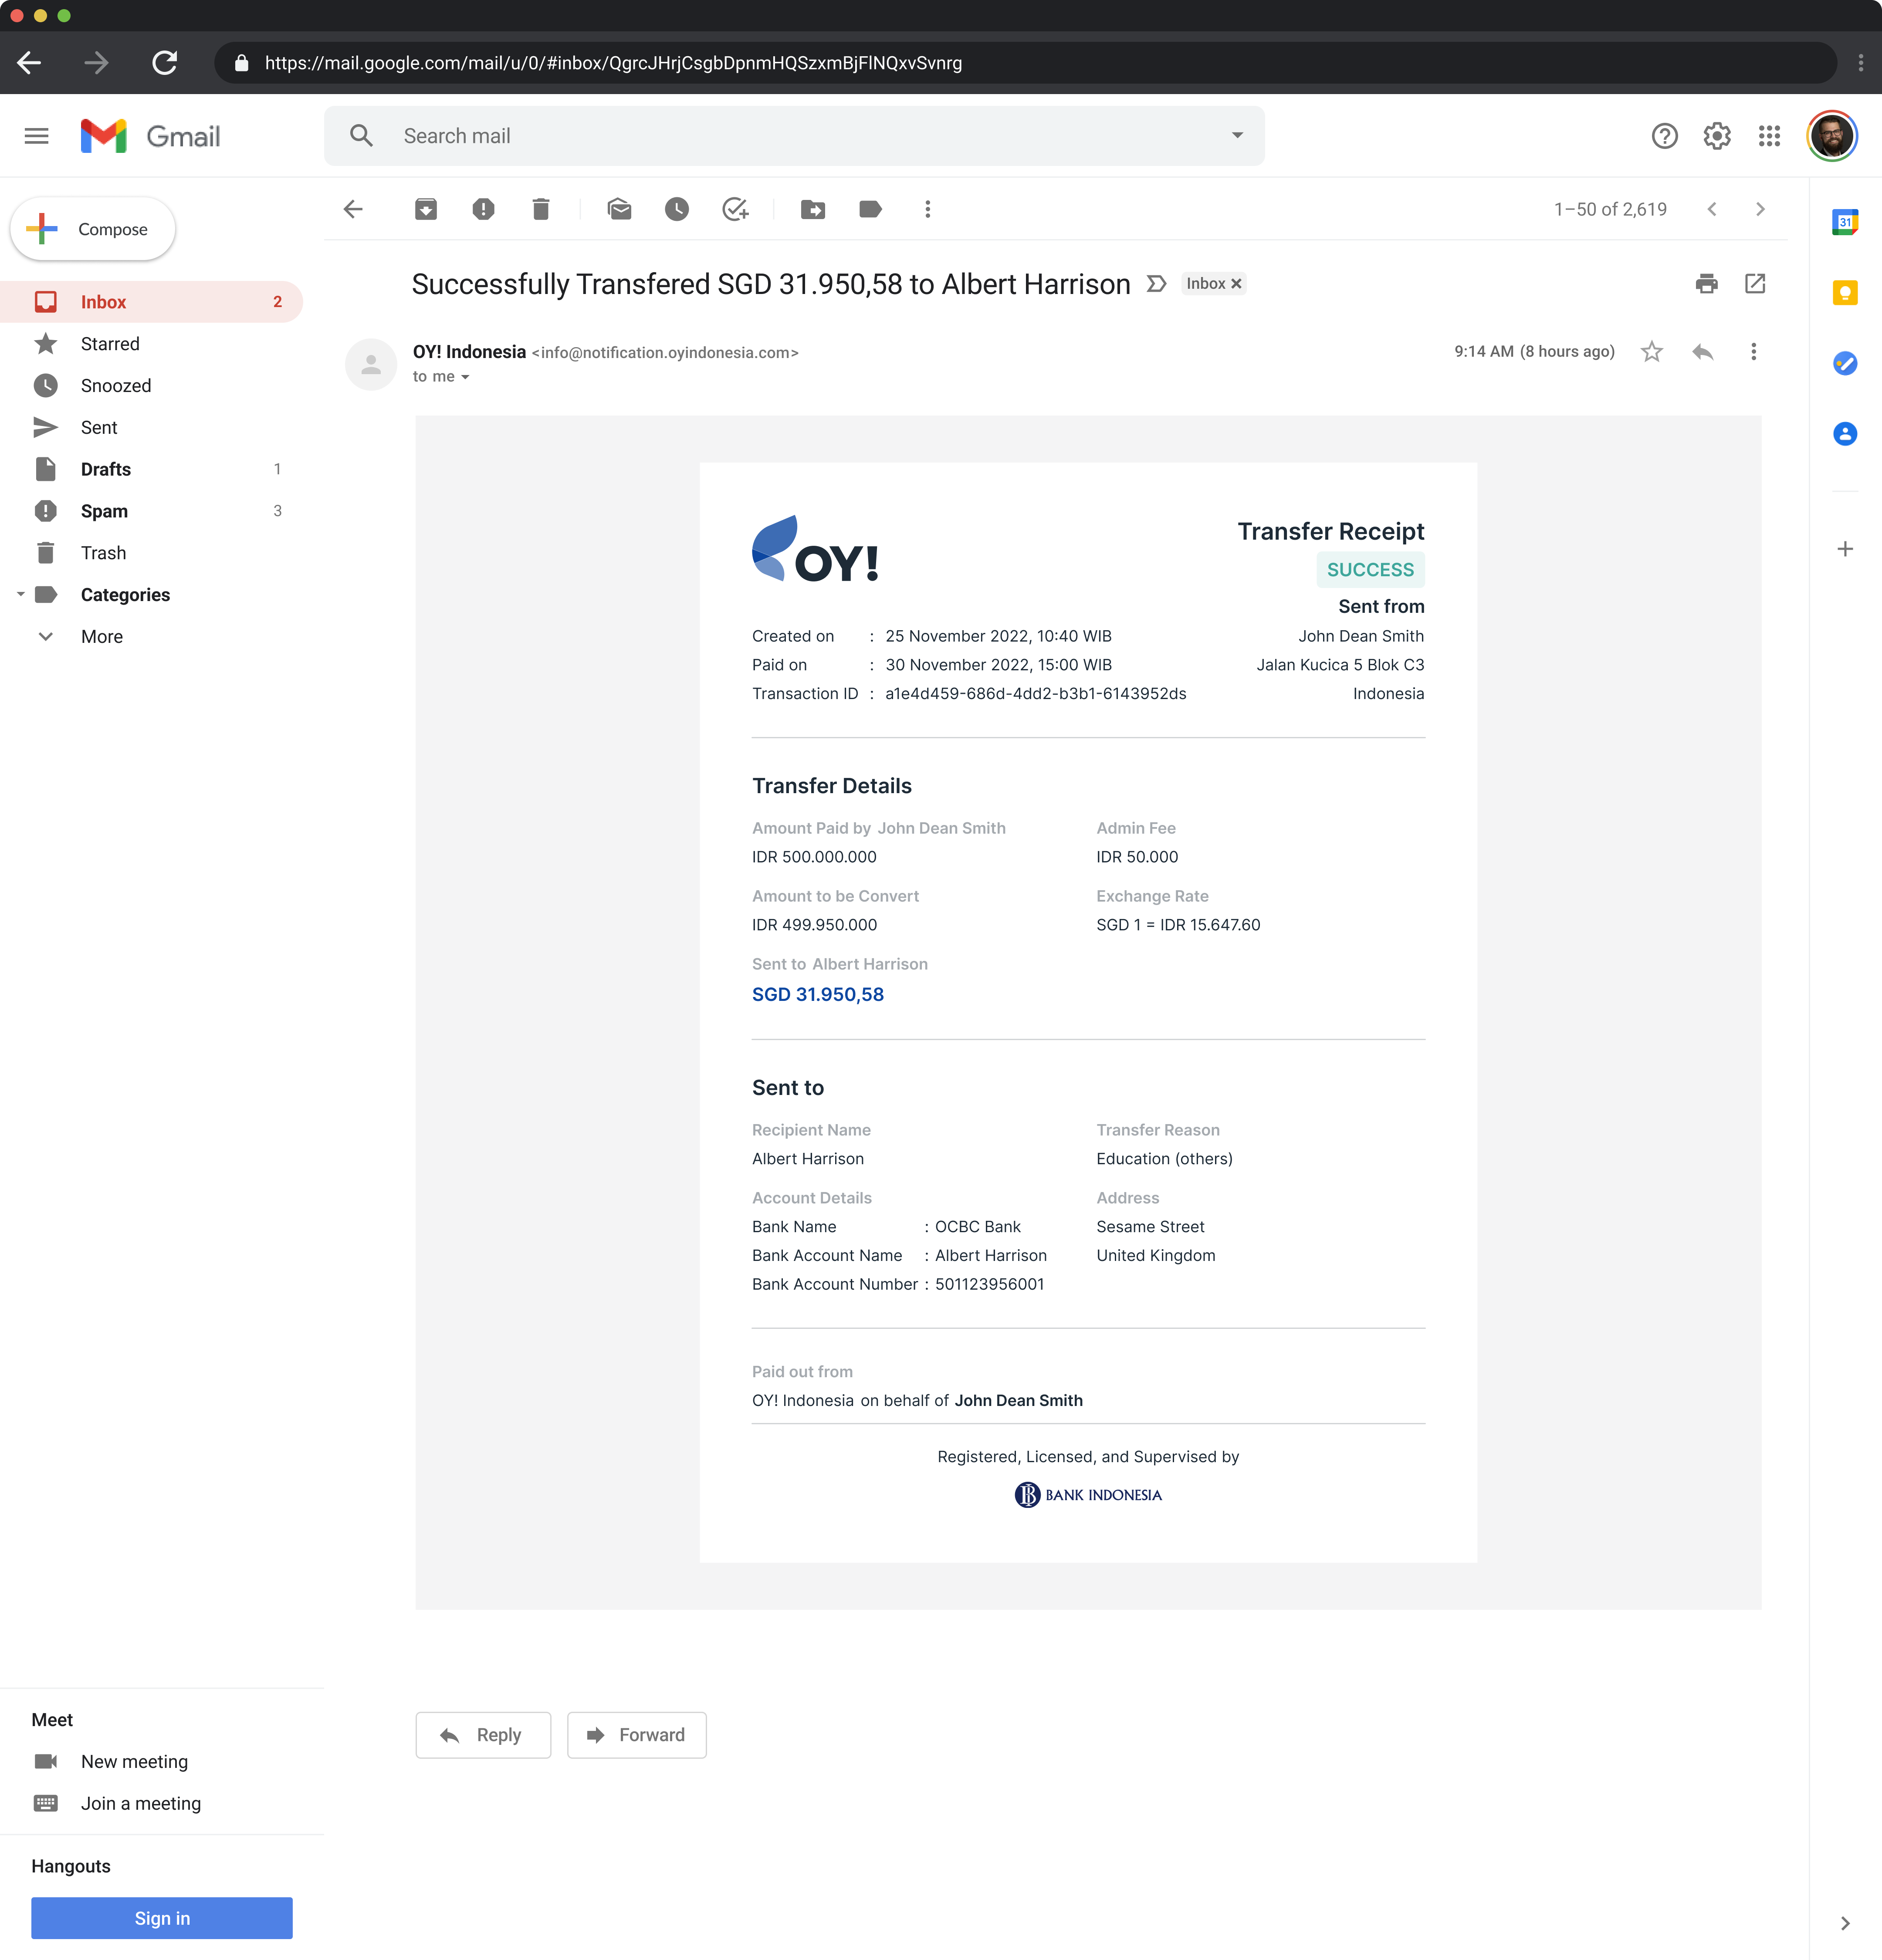
Failed
If your transaction has failed to process, the status column will be updated as Failed. Both sender and recipient should have received an email detailing a “Failed Transfer.”
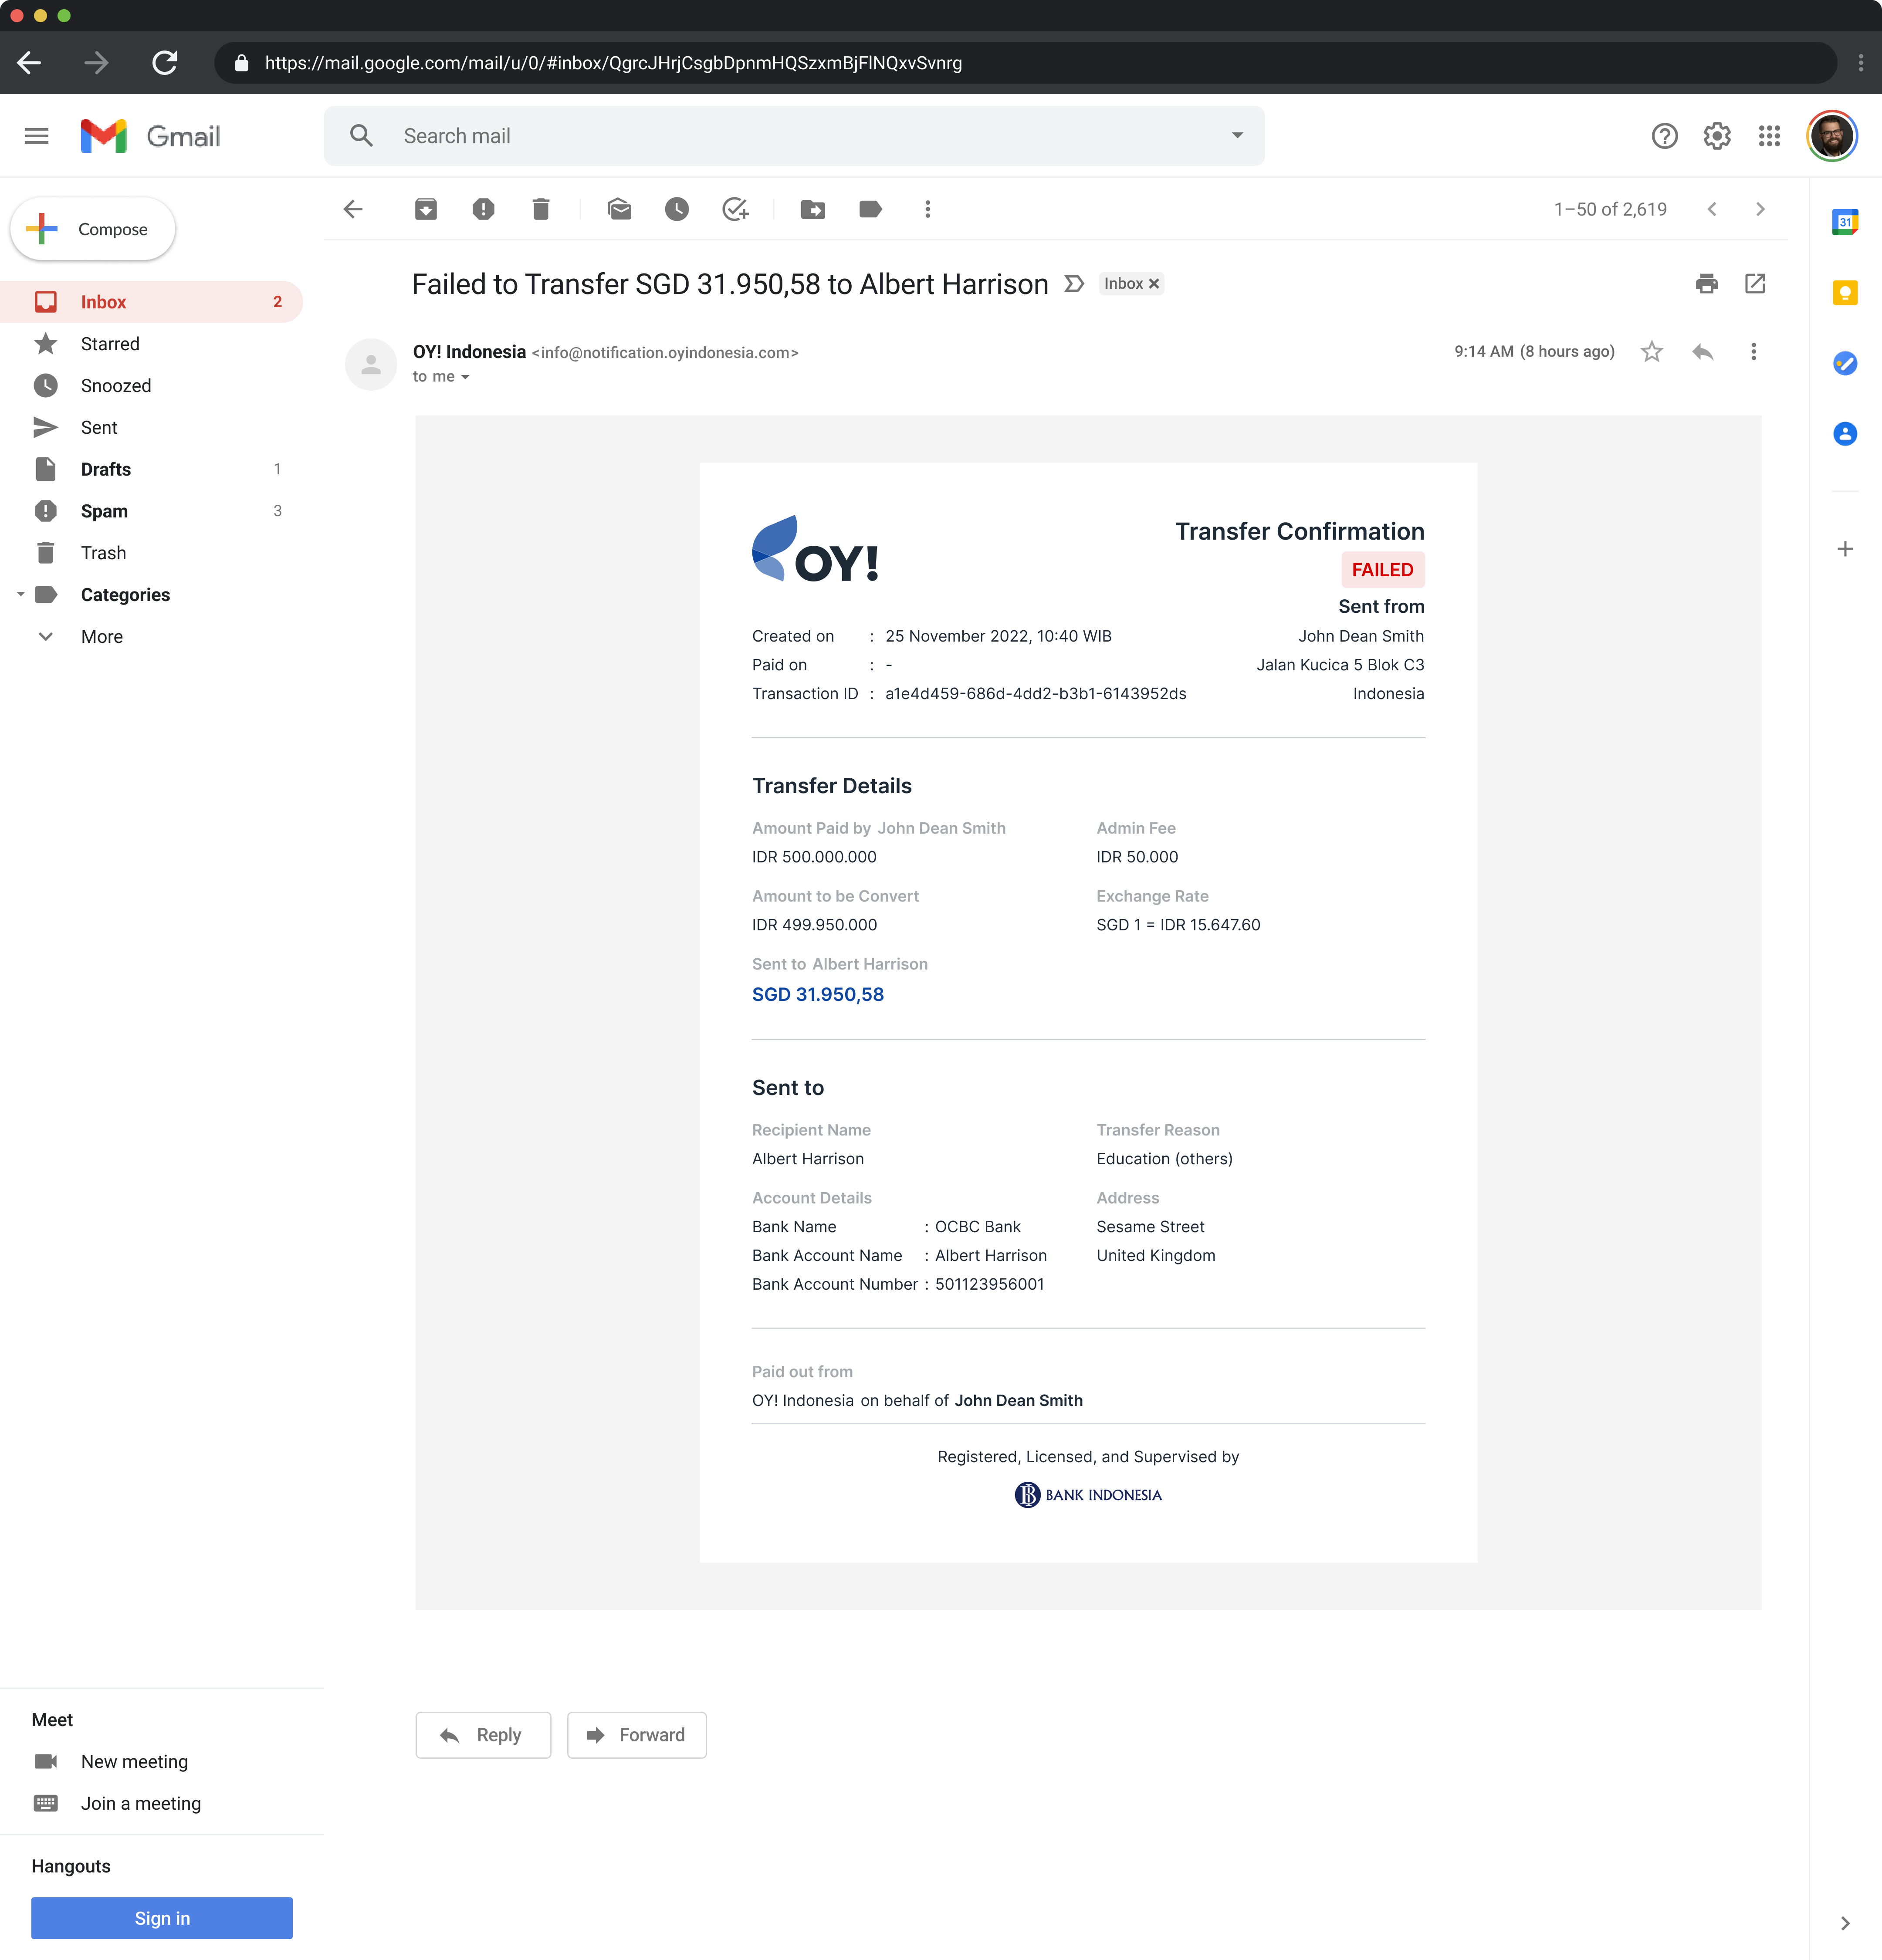
- Check transaction details: You may check transaction details by clicking on the transaction id on the list of transaction details on dashboard
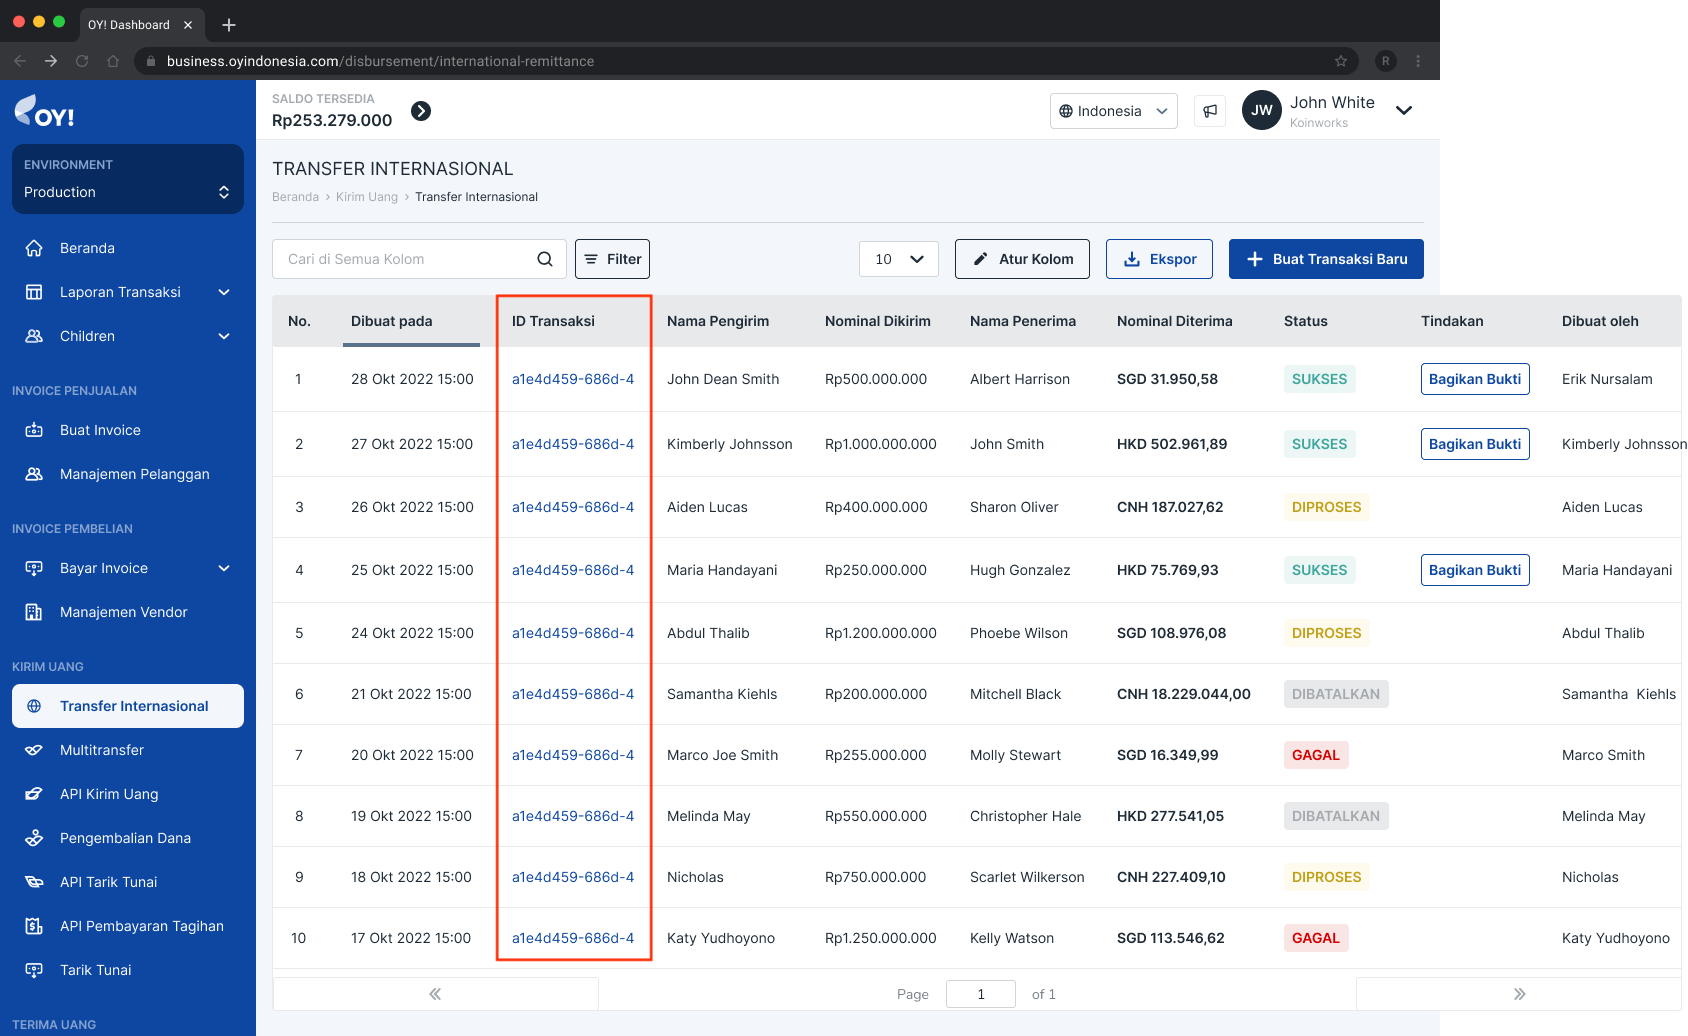
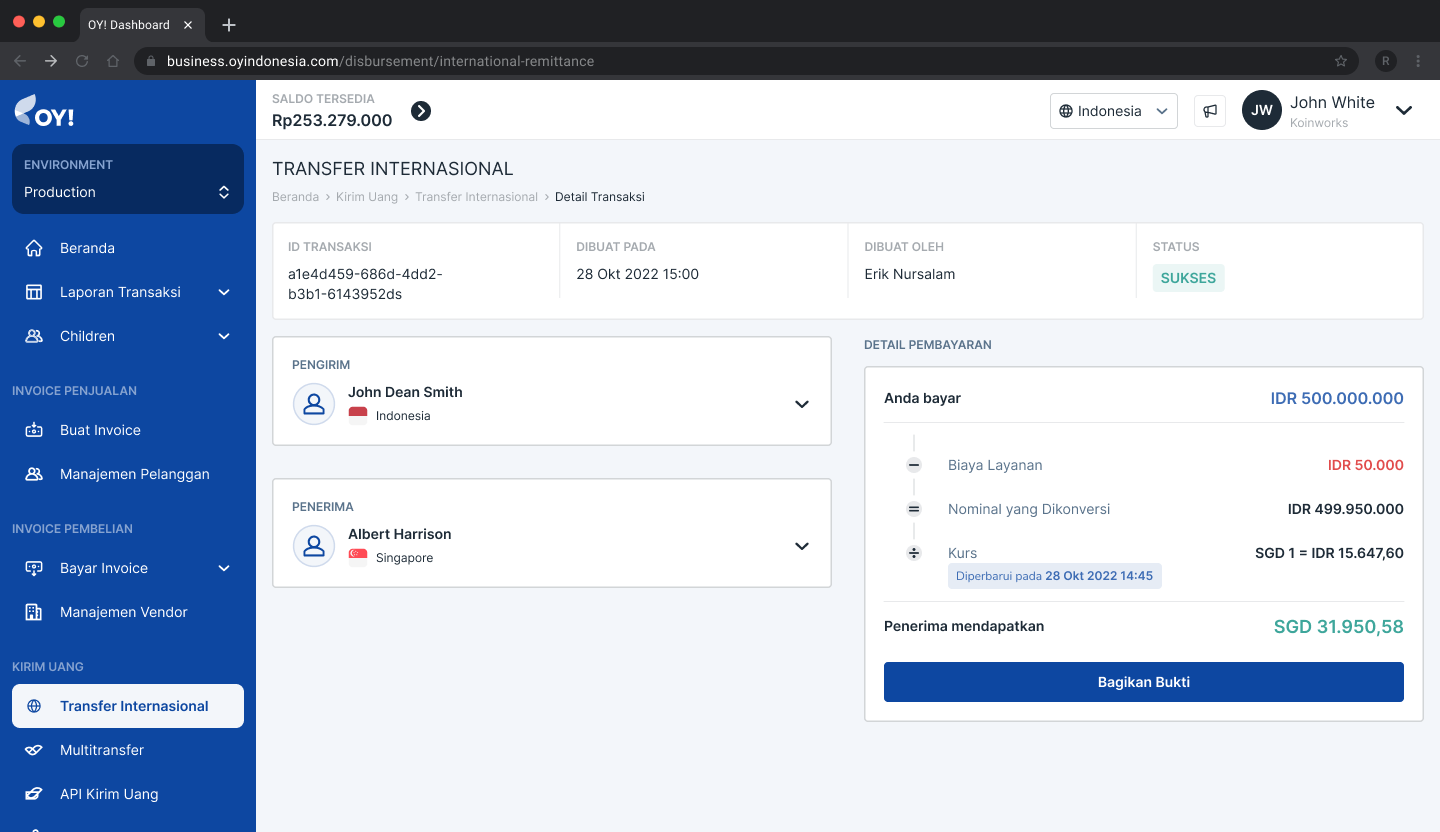
How to setup approval flow
- Log in to your OY! dashboard.
- Select the "Production" environment.
- Navigate to "Multi Approval" product under the Settings menu.
- Click on "Your International Transfer" tab.
By default the approval flow for international transfer is disabled.
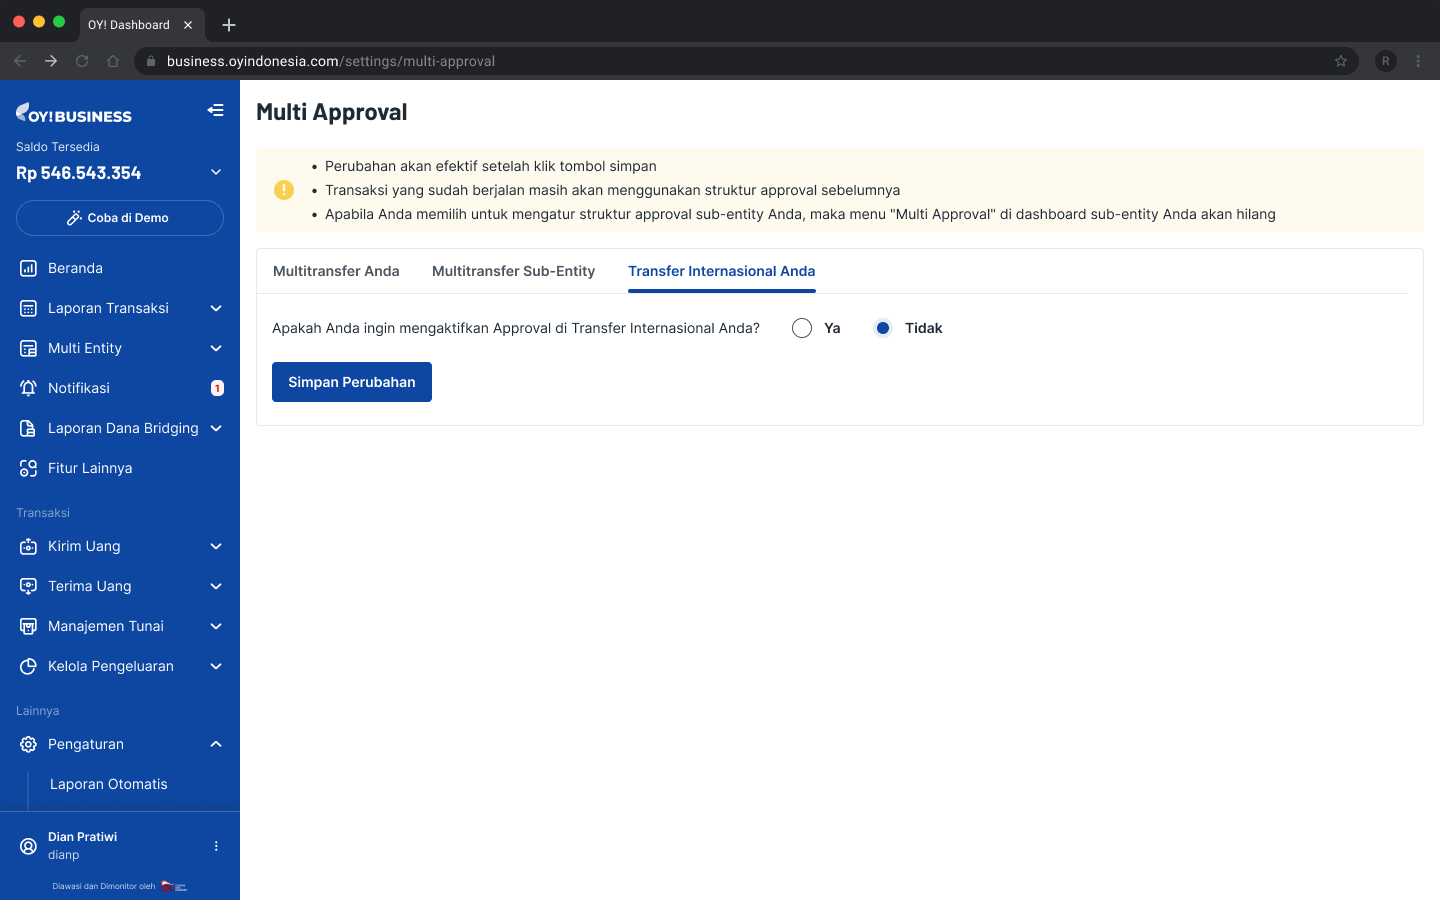
When the approval flow is enabled, one approver is necessary to approve for all future transfers. You have the option to select specific username(s) or all usernames as approvers.
Note: Only usernames with roles superadmin, admin and approver may approve future transactions
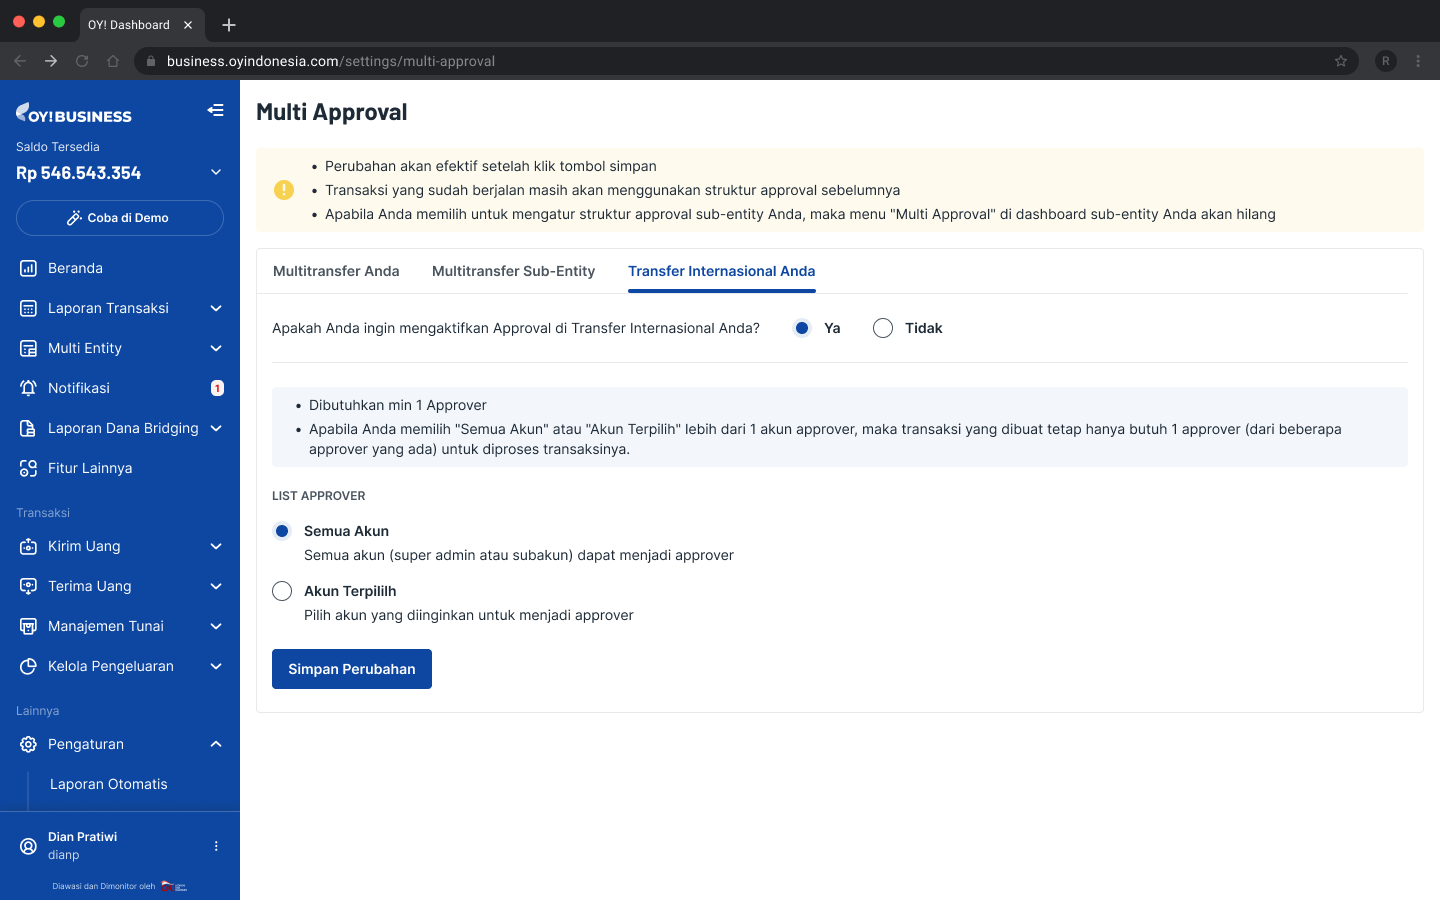
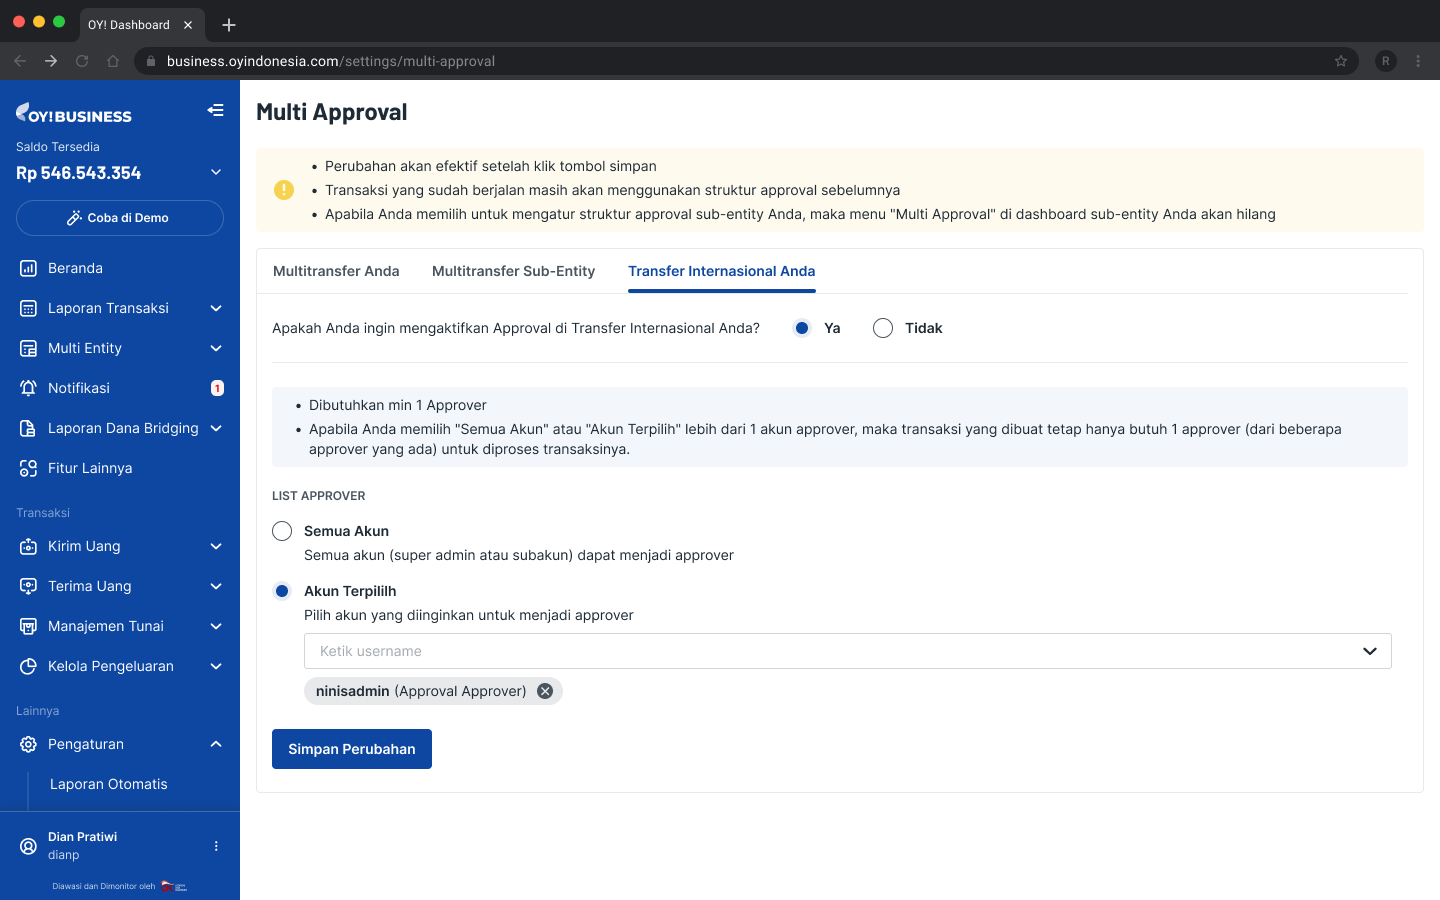
Since the initiation of the approval flow, every transaction must undergo approval before execution.
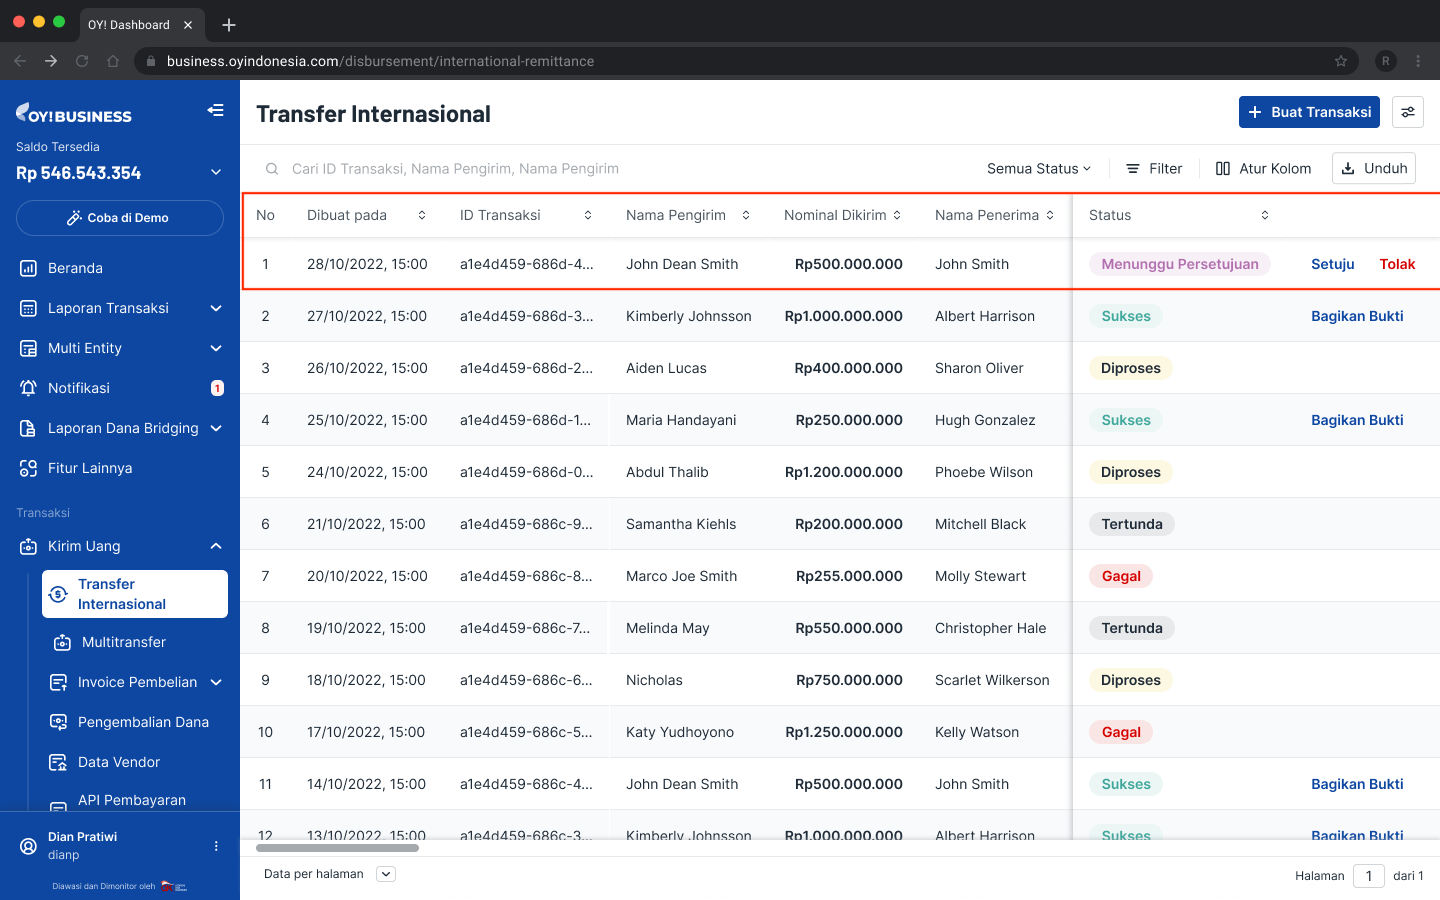
In the current state, the designated approver(s) will receive individual email notifications regarding pending approval transfers.

Upon clicking the "Review the transaction" button, you will be redirected to the dashboard, where you can choose to either approve or reject the transaction.
Note: Once a transaction is approved by any one approver, it will be executed immediately.

Accepting Payments
Payment Methods
Bank Transfer - Virtual Account
Introduction
To receive payments digitally from your customers, you can create a virtual account (VA) number for your transactions. Your customers can directly transfer the payment to the generated VA number and you will receive a notification (i.e. callback) from OY! once the transaction is considered complete.
Currently, we offer VA service for 8 banks:
- Bank Central Asia (BCA)
- Bank Rakyat Indonesia (BRI)
- Bank Mandiri
- Bank Negara Indonesia (BNI)
- Bank CIMB & CIMB Syariah
- Bank SMBC
- Bank Syariah Indonesia (BSI)
- Bank Permata & Permata Syariah
Main Features Availability
| VA Features | Payment Link | VA Aggregator | E-Wallet Aggregator | Payment Routing |
|---|---|---|---|---|
| Open Amount | ❌ | ✅ | ❌ | ❌ |
| Closed Amount | ✅ | ✅ | ❌ | ✅ |
| Multiple Use VA Number | ❌ | ✅ | ❌ | ✅ |
| Single Use VA Number | ✅ | ✅ | ❌ | ✅ |
| Static (Lifetime) | ❌ | ✅ | ❌ | ✅ |
| Dynamic | ✅(set to 24 hours after VA number is generated) | ✅ | ❌ | ✅ |
| Customizable Number | ❌ | ✅ | ❌ | ❌ |
Regardless of the parameters of the Payment Link (e.g. open amount payment link, lifetime payment link, etc), your customers need to input the specific amount in the link to be able to choose a payment method successfully and proceed to payment. This is why if your customers choose to pay via VA - Payment Link, then the VA number generated can only accept the specified amount (i.e. closed amount) and can only be used for that particular transaction only (i.e. single use VA number). The expiry time for the VA generated via Payment Link is 24 hours after payment method confirmation from your customers.
If you want to add a personal touch to your customer’s VA payment journey, you may do so by creating a customized VA number. With this feature, you can custom the suffix of the VA number according to your customer’s billing number or phone number. For example, if you customer’s phone number is 08123456789, then when you create a customized VA number, the VA number result will be 23088123456789.
To create customized VA numbers, you need to hit a different URL endpoint than the usual VA creation endpoint, the API Create Customized VA. The API endpoints to update and deactivate the customized VA number are also different from the non-customized VA number. In general, the customized VA numbers can receive multiple payments and have lifetime validity. Currently, this feature is only supported for BRI and CIMB. To activate this feature, you may contact your business representative for assistance.
Transaction Amount Details
Minimum amount per transaction
| Product Type | Min. VA Transaction Amount |
|---|---|
| Payment Link (non CIMB, Mandiri, Permata, BNI, BRI) | Rp 10,000 |
| Payment Link (VA CIMB, Mandiri, Permata, BNI, BRI) | Rp 15,000 |
| Payment Routing | Rp 10,000 |
| VA Aggregator (Closed Amount) | Rp 10,000 |
| VA Aggregator (Open Amount) | No minimum amount |
Maximum amount per transaction
| Banks | Max. Amount per transaction |
|---|---|
| Bank Central Asia (BCA) | Rp 50,000,000 |
| Bank Negara Indonesia (BNI) | Rp 50,000,000 |
| Bank Rakyat Indonesia (BRI) | Rp 500,000,000 |
| Bank Mandiri | Rp 500,000,000 |
| Bank CIMB | Rp 500,000,000 |
| Bank SMBC | Rp 100,000,000 |
| Bank Syariah Indonesia (BSI) | Rp 50,000,000 |
| Bank Permata | Rp 500,000,000 |
Product Availability
| Payment Link | VA Aggregator | E-Wallet Aggregator | Payment Routing |
|---|---|---|---|
| ✅ | ✅ | ❌ | ✅ |
Payment Flow
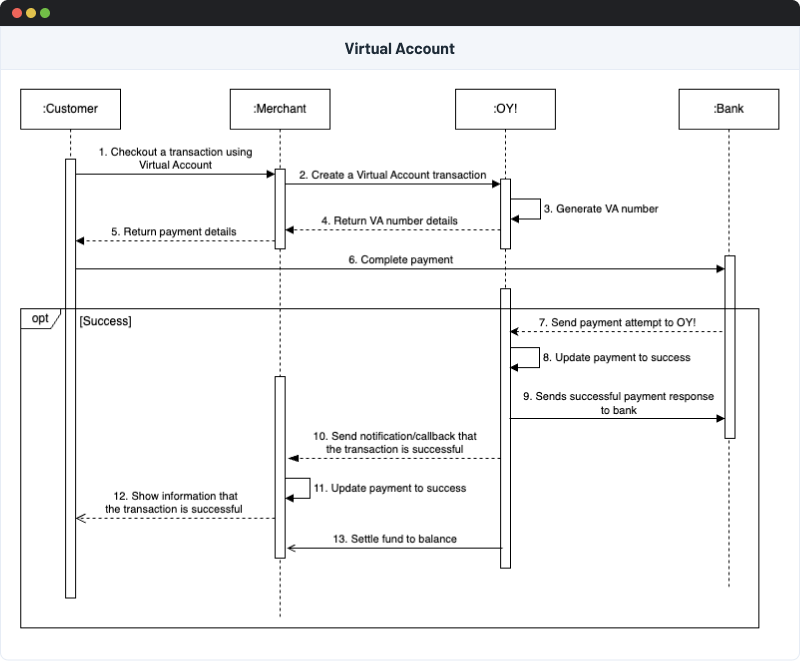
Activation
- Banks non BCA
- Generally, you do not need extra onboarding steps to activate VAs for each bank (non-BCA). Once you are allowed to use Receive Money products, you should be able to use the VAs without additional documents required. Kindly let your business representative know about the banks that you will need
- BCA
- In addition to your onboarding documents, you also need to submit additional documents to be able to use VA for BCA (including, but not limited to, Taxpayer Registration Number (NPWP), and Nationality ID)
- Onboarding process to the bank will take around 14 to 30 working days, depending on the document completion and assessment from the bank
Available Payment Channels for VA
Your end-users may use the below payment channels to pay for their bills via VA
| Bank (Virtual Account) | SKN | RTGS | ATMs | Intrabank Mobile Banking & Internet Banking | Interbank Internet Banking | Interbank Mobile Banking |
|---|---|---|---|---|---|---|
| Bank Mandiri | Yes | Yes | Yes | Yes | Yes | Yes |
| BRI | Yes | Yes | Yes | Yes | No | Yes |
| BNI | Yes | Yes | Yes | Yes | No | Yes |
| Permata | Yes | Yes | Yes | Yes | No | Yes |
| CIMB Niaga / CIMB Niaga Syariah | Yes | Yes | Yes | Yes (Mobile Banking), No (Internet Banking) | No | Yes |
| BCA | No | No | Yes | Yes | No | No |
| SMBC | Yes | No | Yes | Yes (Mobile Banking), No (Internet Banking) | No | Yes |
| BSI | No | No | Yes | Yes | Yes | Yes |
Simulating Callback
- To simulate a successful payment, ensure that you are in our staging environment. Click “Try in Demo” button that will redirect you to our staging environment
- Scroll down to “Settings” tab → Callback Bank Transfer
- Choose the “Virtual Account” as the Transaction Type
- Select the Bank Name of the VA number that you have previously created
- Enter the VA number and amount. For Closed VA, you need to enter the exact amount of the VA as created
- Enter the payment date and time. Ensure that payment date and time are greater than created but less than expiration time
- You may use this feature for all your VA transactions across all of OY! Receive Money products (VA Aggregator, Payment Link, and Payment Routing)
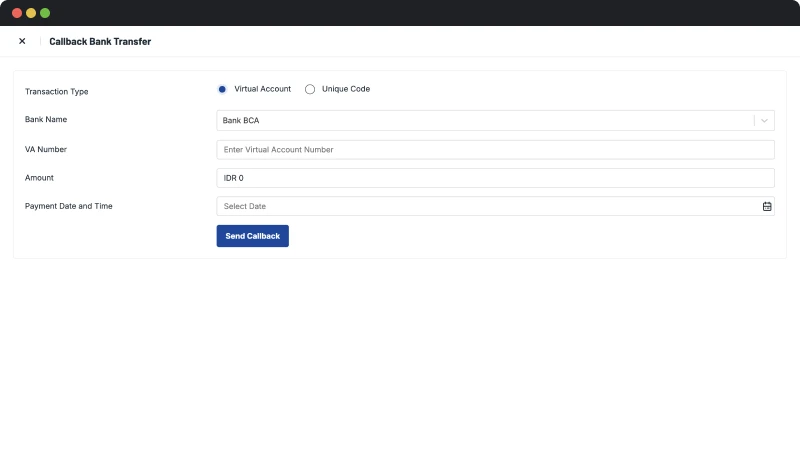
Bank Transfer - Unique Code
Intro
Unique Code is a type of bank transfer payment that adds/subtracts a unique amount (between Rp 1-999) to your billed amount. The unique amount acts as an identifier to complete transactions. Unlike virtual accounts where each customer gets a different account number, unique code always uses the same account number for all transactions. The destination account is under OY! Indonesia’s name (PT. Dompet Harapan Bangsa) and you can not modify the destination account with your account. Unique code also has operational hours where you can only create unique code transactions between 3 AM - 8.30 PM GMT+7.
There are two approaches that you can use on unique code transactions: addition or subtraction approach.
- Addition Approach
- By using the addition approach, the unique amount is added to your billed amount, meaning your customer will pay Rp 1-999 more than the billed amount. The additional amount will not be settled to your balance.
- Subtration Approach
- By using the subtraction approach, the billed amount is subtracted by the unique amount. In this case, your customer will pay Rp 1-999 less than the billed amount. However, worry not, as the amount settled to your balance is not deducted by the unique amount. The default approach is addition, but you can request to change the approach via your business representative.
As an example, if you create a unique code transaction with an amount of Rp 100.000, then OY! will generate a unique amount for that transaction. Let’s assume the unique amount generated for that transaction is Rp 100. If you use the addition approach, then your customer pays a total of Rp 100.100. However, if you use the subtraction approach, your customer pays a total of Rp 99.900. Using either approach, the amount settled to your balance is Rp 100.000.
Unique Code Payment Details
| Banks | Bank Code | Open Amount | Closed Amount | Max. Expiration Time | Operational Hours |
|---|---|---|---|---|---|
| Bank Central Asia (BCA) | 014 | No | Yes | 3 hours | 03.00 - 20.30 GMT + 7 |
Feature Availability
| Banks | Refund Feature |
|---|---|
| BCA | No |
Product Availability
| Bank | Payment Link | VA Aggregator | E-Wallet Aggregator | Payment Routing |
|---|---|---|---|---|
| BCA | ✅ | ❌ | ❌ | ✅ |
Transaction Amount Details
| Approach Type | Min. Transaction Amount | Max. Transaction Amount |
|---|---|---|
| Subtraction | Rp 11,000 | Rp 500,000,000 |
| Addition | Rp 10,000 | Rp 499,999,000 |
Payment Flow
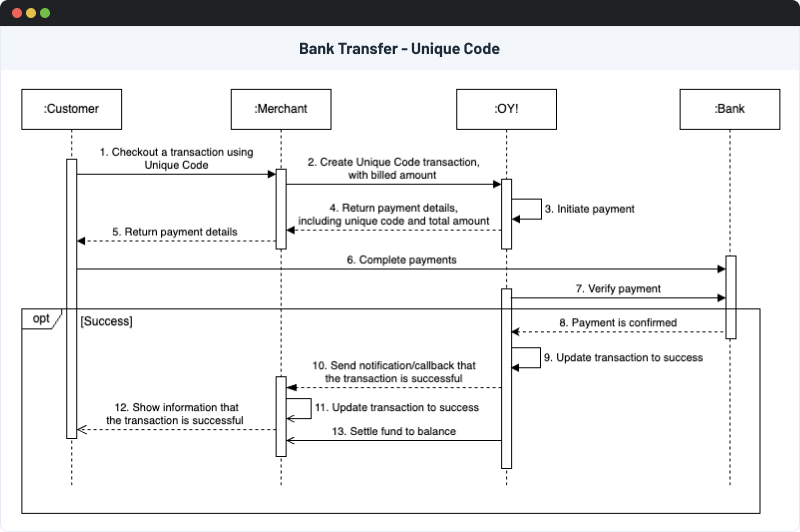
Activation
You can only use one type of bank transfer (virtual account / unique code) per bank. By default, all banks use virtual accounts. In order to accept payments using unique code, you need to submit a request to OY! via your business representative or our business support.
Payment
Click here to see the payment journey
Simulate Payments
To get more understanding of unique code transactions behavior, you can simulate unique code transactions that are created in the Demo environment. Here are the steps to simulate unique code payments via OY! Dashboard:
- Open OY! Dashboard and navigate to the Demo environment
- Open the “Settings” menu and click “Callback Bank Transfer”.
- Insert the payment detail of the transaction you want to simulate:
- Transaction Type: Choose “Unique Code”
- Bank: Choose the destination bank.
- Account Number: Insert OY! Indonesia’s bank account number that you receive during creation
- Amount: Insert the billed amount and the unique amount that you receive during creation
- Payment Date and Time: Choose the date & time that you want the payment to occur
- Once you input all the fields, you can simulate the payment by clicking “Send Callback”. If the payment is successful, a success notification will be shown inside the dashboard. OY! will also send the callback to your specified callback URL. If for some reason you did not receive any callback, please contact the customer service to help you solve the problem.
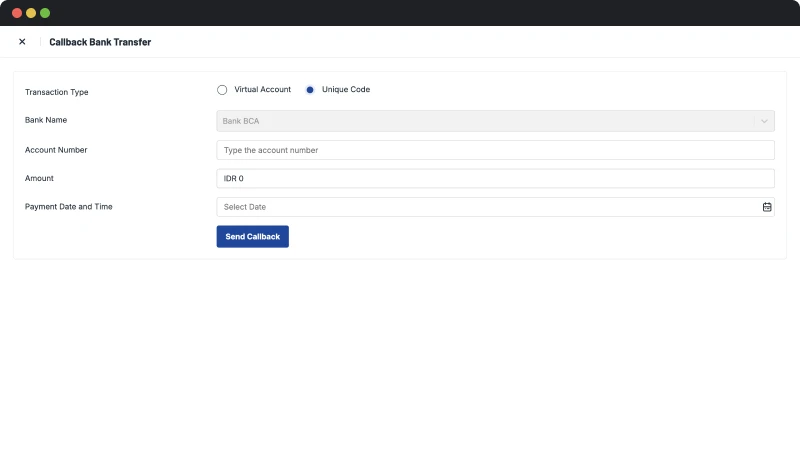
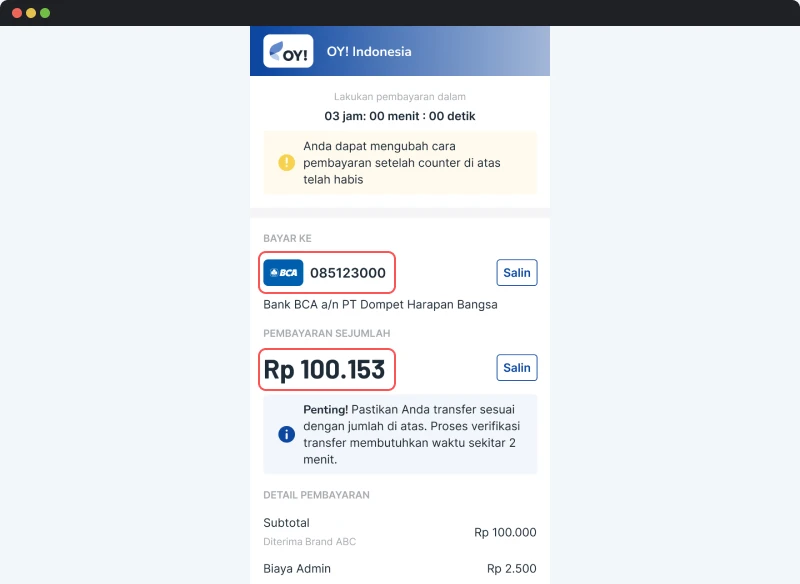
QR Code (QRIS)
Intro
Quick Response Code Indonesian Standard (QRIS) is a standardized QR payments in Indonesia that are developed by Bank Indonesia. Payments are performed by the customers scanning the QR on their m-banking/e-wallet application. QR payments are highly suitable for low-value transactions since they offer an affordable price (0.7% per transaction).
Feature Availability
| QRIS Provider | Refund Feature |
|---|---|
| QRIS | No |
Product Availability
| QRIS Provider | Payment Link | VA Aggregator | API E-Wallet Aggregator | Payment Routing |
|---|---|---|---|---|
| QRIS | Yes | No | No | Yes |
Transaction Amount Details
The maximum amount per transaction for QRIS is Rp 10,000,000. The minimum amount per transaction is Rp 10,000, both in Payment Link and Payment Routing. Should you have any request to receive payments below Rp 10,000, please contact your Business Representative
Payment Flow

Activation
In order to accept payments using QRIS, you need to register your merchant to the QRIS providers first. You can do the registration via OY! Dashboard by opening the Payment Method page and clicking the Payment Method tab. OY! offers real time registration, so you can directly accept payments once you finish submitting your application.
Here are the requirements that must be fulfilled in order to submit a registration:
|
Requirement |
QRIS | |
|---|---|---|
| Business Ownership | ✅ | |
| Owner/Shareholder ID Card | ID Card Number | ✅ |
| Full Name | ✅ | |
| Date of Birth | ✅ | |
| Occupation | ✅ | |
| Gender | ✅ | |
| Province | ✅ | |
| City | ✅ | |
| District | ✅ | |
| Village | ✅ | |
| Postal Code | ✅ | |
| Full Address | ✅ | |
| Owner/Shareholder Email Address | ✅ | |
| Owner/Shareholder Phone Number | ✅ | |
| NPWP | NPWP Number | ✅ |
| Document (in .jpg or .png) | ✅ | |
| Person in Charge (PIC) - Director | Full Name | ✅ |
|
Position |
✅ | |
| Person in Charge (PIC) - Non Director | Full Name | ✅ |
|
Position |
✅ | |
| Email Address | ✅ | |
| Phone Number | ✅ | |
| Payment Flow | ✅ | |
| Business Logo (in Google Drive URL format) | ✅ | |
| Website URL | ✅ | |
| Business Permit Number (According to the legality document) | ✅ | |
| Date of Business Establishment (According to the legality document) | ✅ | |
| Place of Business Establishment (According to the legality document) | ✅ | |
| Projected turnover per month using QRIS | ✅ | |
| Projected number of transactions per month using QRIS | ✅ | |
Payments
Click here to see the payment journey
Simulate Payments
Simulating QRIS payments for demo transactions is currently not available.
E-Wallet
Intro
E-wallet is a type of electronic payment that allows you to pay for goods and services without requiring bank accounts or cash. E-wallet plays a significant role in the rapid growth of e-commerce since it enables users to make payments easily without having to interact with banks or other third parties. OY! currently supports payment from several top e-wallets in Indonesia, including OVO, DANA, ShopeePay, and LinkAja.
E-wallet Payment Details
| E-wallet Provider | E-wallet Code | Allowed Expiration Time | Flow Type | Payments via desktop | Payments via mobile browser | Payments via provider’s mobile app |
|---|---|---|---|---|---|---|
| ShopeePay | shopeepay_ewallet | 1 - 60 minute(s) | Redirection (JumpApp) | ❌ | ❌ | ✅ |
| OVO | ovo_ewallet | 55 seconds | Push notification | ❌ | ❌ | ✅ |
| DANA | dana_ewallet | 1 - 60 minute(s) | Redirection (JumpApp) | ✅ | ✅ | ✅ |
| LinkAja | linkaja_ewallet | 5 minutes | Redirection (JumpApp) | ❌ | ❌ | ✅ |
The maximum amount per transaction for all e-wallet providers is Rp 10,000,000 for customers who have performed KYC on the provider’s app and Rp 2,000,000 for customers who have not.
Feature Availability
| E-wallet Provider | Refund Feature | Account Linking Feature | Linking Expiry Time | Linking Renewal |
|---|---|---|---|---|
| ShopeePay | Full | Supported | 5 Years | After Expiry Time |
| OVO | Not Supported | Not supported | - | - |
| DANA | Full, Partial | Supported | 10 Years | After Expiry Time |
| LinkAja | Full | Not supported | - | - |
Product Availability
| E-Wallet Provider | Payment Link | VA Aggregator | API E-Wallet Aggregator | Payment Routing | |
|---|---|---|---|---|---|
| Single Payment | - | Single Payment | Single Payment | Direct Payment | |
| ShopeePay | ✅ | ❌ | ✅ | ✅ | ✅ |
| OVO | ✅ | ❌ | ✅ | ❌ | ❌ |
| DANA | ✅ | ❌ | ✅ | ✅ | ❌ |
| LinkAja | ✅ | ❌ | ✅ | ✅ | ❌ |
Payment Type & Flow
Single Payment
Single payment is a type of payment that allows your customer to complete payments using e-wallet easily.
There are two types of payment flow for Single Payment: Redirection (JumpApp) or Push Notification.
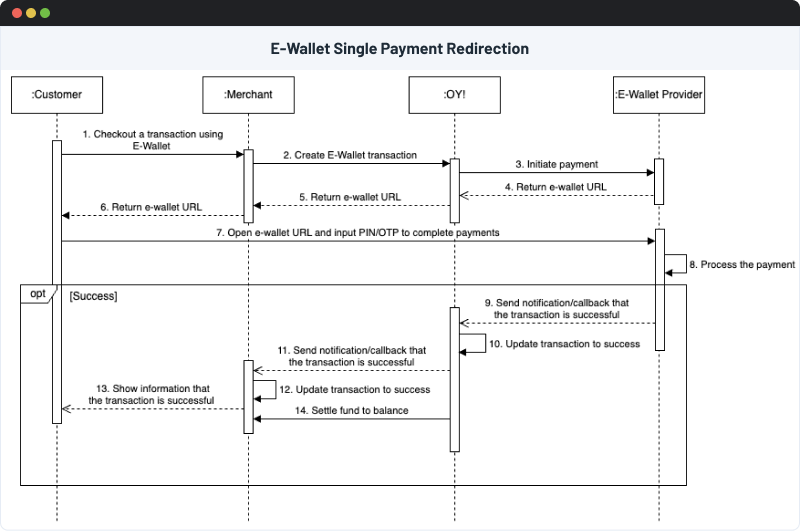
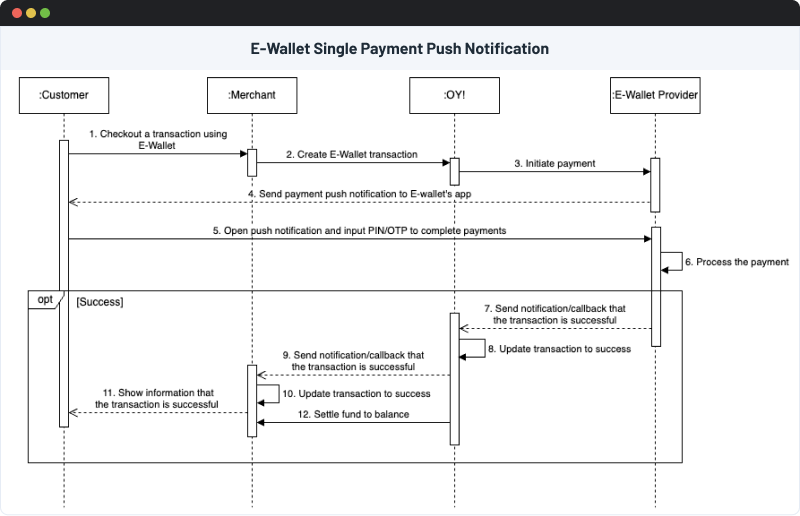
Direct Payment
Direct payment requires account linking, meaning that your customer must connect their e-wallet account to your system before completing payments. Direct payments offer a more seamless payment experience, as your customer does not need to open or get redirected to the e-wallet provider application to complete payments.
Direct Payments offers both payment with and without authorization (auto-debit). Direct Payment with authorization requires the customer to input a PIN or OTP on every transaction, while Direct Payment without authorization allows your system to deduct your customers balance without the need to enter a PIN or OTP. Direct payment without authorization is suitable for subscription use cases.
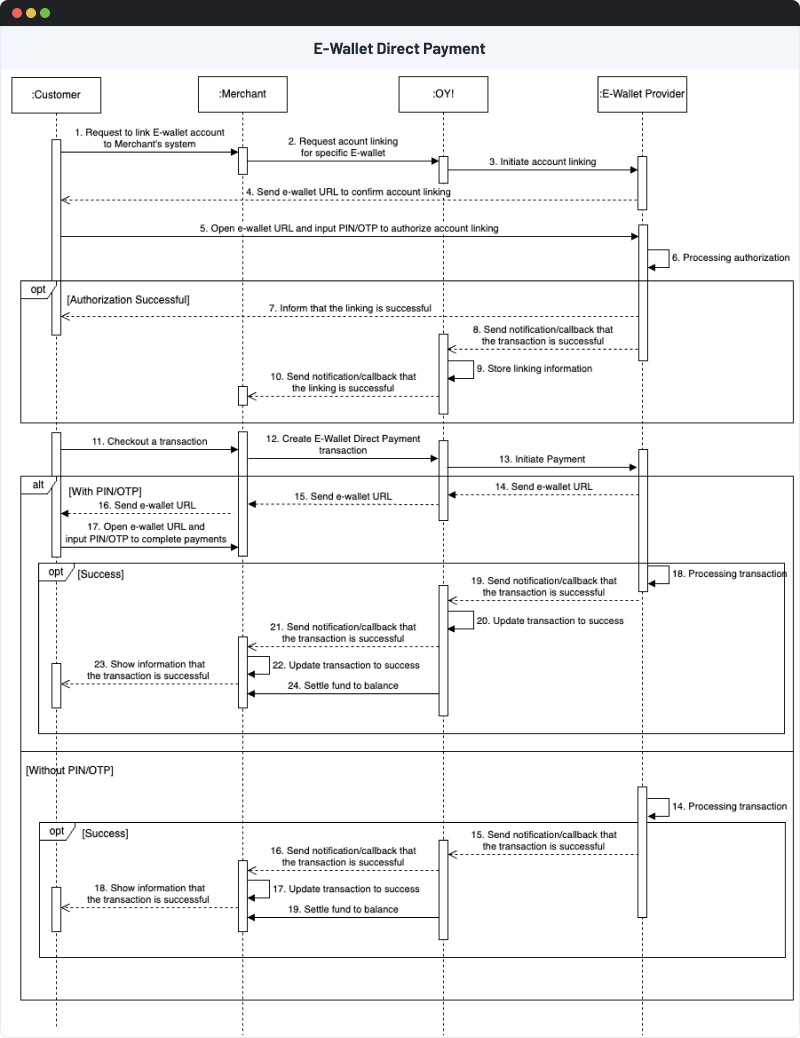
Activation
In order to accept payments using e-wallets, you need to register your merchant to the e-wallet providers first. You can do the registration via OY! Dashboard by opening the Payment Method page, Payment Method - OY! Dashboard. OY! offers real time registration, so you can directly accept payments once you finish submitting your application.
Here are the requirements that must be fulfilled in order to submit a registration:
|
Requirement |
E-wallet Provider | ||||
|---|---|---|---|---|---|
| ShopeePay | LinkAja | DANA | OVO | ||
| Owner/Shareholder ID Card | ID Card Number | ✅ | ✅ | ✅ | ✅ |
| Full Name | ✅ | ✅ | ✅ | ✅ | |
| Date of Birth | ✅ | ✅ | ✅ | ✅ | |
| Occupation | ✅ | ✅ | ✅ | ✅ | |
| Gender | ✅ | ✅ | ✅ | ✅ | |
| Province | ✅ | ✅ | ✅ | ✅ | |
| City | ✅ | ✅ | ✅ | ✅ | |
| District | ✅ | ✅ | ✅ | ✅ | |
| Village | ✅ | ✅ | ✅ | ✅ | |
| Postal Code | ✅ | ✅ | ✅ | ✅ | |
| Full Address | ✅ | ✅ | ✅ | ✅ | |
| Owner/Shareholder Email Address | ✅ | ✅ | ✅ | ✅ | |
| Owner/Shareholder Phone Number | ✅ | ✅ | ✅ | ✅ | |
| NPWP | NPWP Owner Type | ❌ | ❌ | ✅ | ❌ |
| NPWP Number | ✅ | ✅ | ✅ | ✅ | |
| Document (in .jpg or .png) | ✅ | ✅ | ✅ | ✅ | |
| Province | ❌ | ❌ | ✅ | ❌ | |
| City | ❌ | ❌ | ✅ | ❌ | |
| District | ❌ | ❌ | ✅ | ❌ | |
| Village | ❌ | ❌ | ✅ | ❌ | |
| Postal Code | ❌ | ❌ | ✅ | ❌ | |
| Full Address | ❌ | ❌ | ✅ | ❌ | |
| Person in Charge (PIC) - Non Director | Full Name | ✅ | ✅ | ✅ | ✅ |
|
Position |
✅ | ✅ | ✅ | ✅ | |
| Email Address | ✅ | ✅ | ✅ | ✅ | |
| Phone Number | ✅ | ✅ | ✅ | ✅ | |
| Does your business license have a validity? | ❌ | ✅ | ❌ | ✅ | |
| Payment Flow | ✅ | ✅ | ✅ | ✅ | |
| Business Logo (in Google Drive URL format) | ✅ | ✅ | ✅ | ✅ | |
| Website URL | ✅ | ✅ | ✅ | ✅ | |
| Business Permit Number (According to the legality document) | ✅ | ✅ | ✅ | ✅ | |
| Business Identification Number / Company Registration Certificate | ❌ | ❌ | ✅ | ✅ | |
| Date of Business Establishment (According to the legality document) | ✅ | ✅ | ✅ | ✅ | |
| Place of Business Establishment (According to the legality document) | ✅ | ✅ | ✅ | ✅ | |
| Projected turnover per month using E-Wallet | ✅ | ✅ | ✅ | ✅ | |
| Projected number of transactions per month using E-Wallet | ✅ | ✅ | ✅ | ✅ | |
Payments
ShopeePay (Single Payment)
Click here to see the payment journey
DANA
Click here to see the payment journey
LinkAja
Click here to see the payment journey
OVO
Click here to see the payment journey
Simulate Payments
To get more understanding of e-wallet transactions behavior, you can simulate e-wallet Demo transactions that are created in the Demo environment. Here are the steps to simulate e-wallet payments via OY! Dashboard:
- Open OY! Dashboard and navigate to the Demo environment
- Open the “Settings” menu and click “E-wallet Callback”.
- Insert the payment detail of the transaction you want to simulate:
- Choose the e-wallet provider: Shopeepay, DANA, LinkAja, or OVO.
- Insert the Transaction Reference Number. For e-wallet transactions that are created via API E-wallet, you can find the Ref Number inside “E-Wallet API menu”. Please look at the image below to guide you
- Input the amount of transaction
- Once you input all the fields, you can simulate the payment by clicking “Send Callback”. If the payment is successful, a success notification will be shown inside the dashboard. OY! will also send the callback to your specified callback URL. If for some reason you did not receive any callback, please contact our customer service to help you solve the problem.
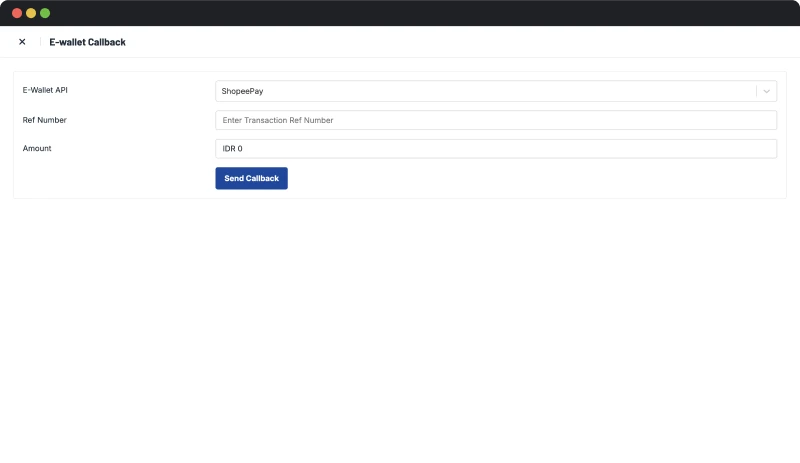
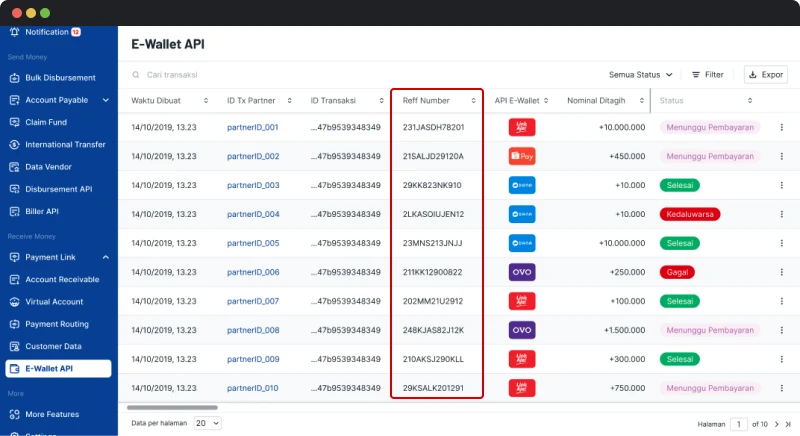
Specifically for Payment Link transactions, you can directly simulate the payment on the Payment Link by clicking “Bayar Tagihan''.
Cards
Introduction
OY! offers both debit and credit cards as a payment method for your customers. We currently accept VISA, Mastercard, and JCB.
Feature Details
- Transactions are protected by 3DS – protecting you and your customers from fraudulent transactions
- Support multiple global network (Visa, Mastercard, JCB) – enabling you to process local and overseas transactions
To increase the chance of successful transactions, please ensure that your customers:
- Have enabled 3DS as an authentication method for each transaction made on their card
- Have sufficient balance or credit limit for each transaction
- (Especially for overseas transactions) Have notified their card issuer (i.e. the bank or entity that issues the card) of their intention to conduct overseas transactions
Minimum transaction amount with cards is Rp 15.000. There is no maximum transaction limit for each transaction. The limit depends on the availability of balance or credit limit for each card.
Understanding Overseas Transactions
Your customers may use credit and/or debit cards issued locally or internationally. If you plan to conduct overseas transactions, it is important to note that OY! can only create the transactions in IDR. This means that your customers can still use their overseas cards for payment, however the card will still be charged in IDR and settlement to your OY! balance will also be done in IDR. The cardholder's billing statement, however, will show the transaction amount in their local currency with foreign exchange rate & extra fees (if any) as applied by their issuer (i.e. the bank or entity that issues the card).
Some card issuers might not allow overseas transactions. Therefore, it is recommended for your customers to check with their issuing bank regarding country restrictions to reduce the chance of the transaction being declined by the issuer.
Transactions Declined by Issuer
When a transaction attempt is submitted to your customer’s issuer (i.e. the bank or entity that issues the card), they usually have an automated system and parameters that help them in deciding whether or not to authorize the transaction. The parameters may include, but not limited to, behavior from past transactions, card details such as expiration date and CVV, and availability of funds.
Even though all of the card details seem correct, the funds are available and 3DS has been enabled for the card, it is possible that the transaction is declined by the issuer. Unfortunately, sometimes the decline reason provided by the issuer is too “generic”. If that’s the case, you may ask your customers to either use alternative cards or payment methods or to contact their issuer directly for more information on the decline reason. Due to privacy & security concerns, issuers can only discuss the specific reason why a transaction is declined to the respective cardholder. This means that issuer will most likely not entertain decline explanation requests via OY!.
Payment Flow
Flow via Payment Link
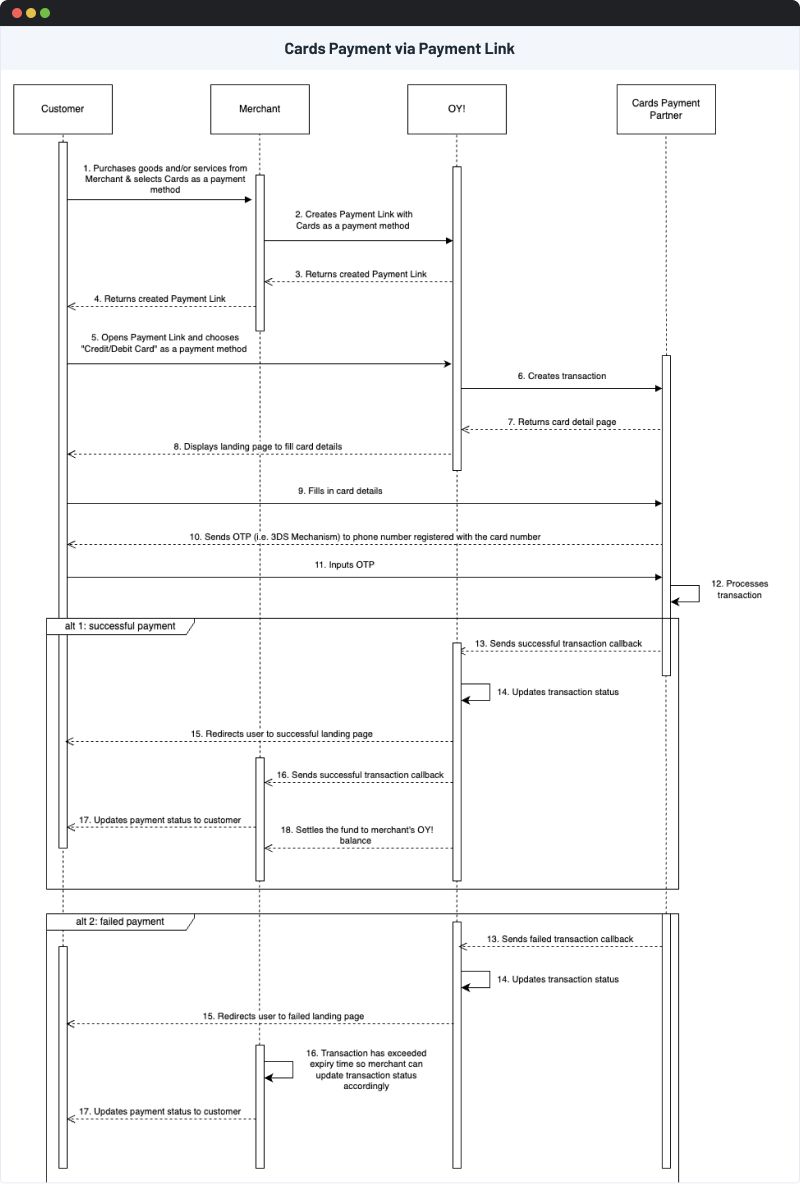
Flow via Payment Routing

Activation
If you need to accept payments from your end-users via debit and/or credit cards, you may contact your Business Representative for more information and assistance on the activation process.
| Requirement | Credit and Debit Cards |
|---|---|
| Partner Eligibility Form | ✅ |
| Partner Request Form to Acquiring Bank | ✅ |
| Partner and OY! Service Agreement | ✅ |
| Company Profile | ✅ |
| Operational license (if applicable) | ✅ |
| KYC Flow | ✅ |
| List of users | ✅ |
Simulate Payments
- Open OY! Dashboard and and navigate to the Demo environment
- Create a Payment Link transaction. Make sure you select “Cards” as one of the available payment method options
- Open the payment link URL on your browser
- Choose and confirm “Credit/Debit Card” as your payment method. You will then automatically be redirected to a page to fill your card details. If you are not automatically redirected, then click “Payment with Cards” button
- Fill the card details as follow
- Card Number: 2223000000000007
- Card Expiry Time: 01/39
- Card CVN: 100
- Cardholder Name: Testing
- Fill the email and phone number accordingly
- Click to pay
- You will be directed to a page to mock the 3DS step (i.e. in the actual payment in production environment, you will receive an OTP sent to the phone number registered to your card by your issuing bank). Choose from the dropdown menu to successfully authenticate the transaction (note: you may also choose to simulate rejected transactions by selecting unsuccessful authentication from the dropdown).
- Transaction will be successful
Payment Link
Payment Link is a pre-built checkout page that allows your business to easily and securely accept payments online. You can share the link to your customers and they can choose various payment methods that OY! supports inside the Payment Link. OY! supports up to 17 payment methods– including Bank Transfer, E-Wallet, QR Code (QRIS), Credit and Debit cards. Payment Links can be created without using any code/integration. However, if you need to create Payment Links from your website/application, OY! also provides Payment Link API.
There are two types of Payment Link:
| Payment Link Type | Characteristic | Use Case |
|---|---|---|
| One Time | One link to accept single payment | One-Time payments |
| Reusable | One link to accept multiple payments and support lifetime payments | Top Up, Donation |
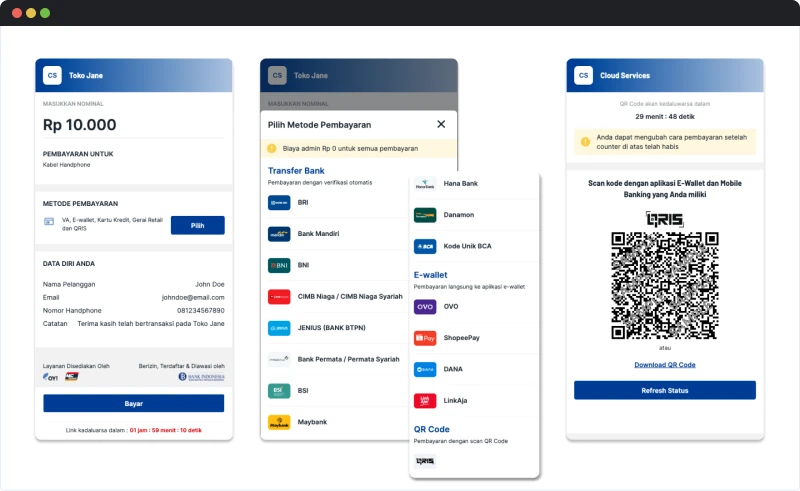
Flow
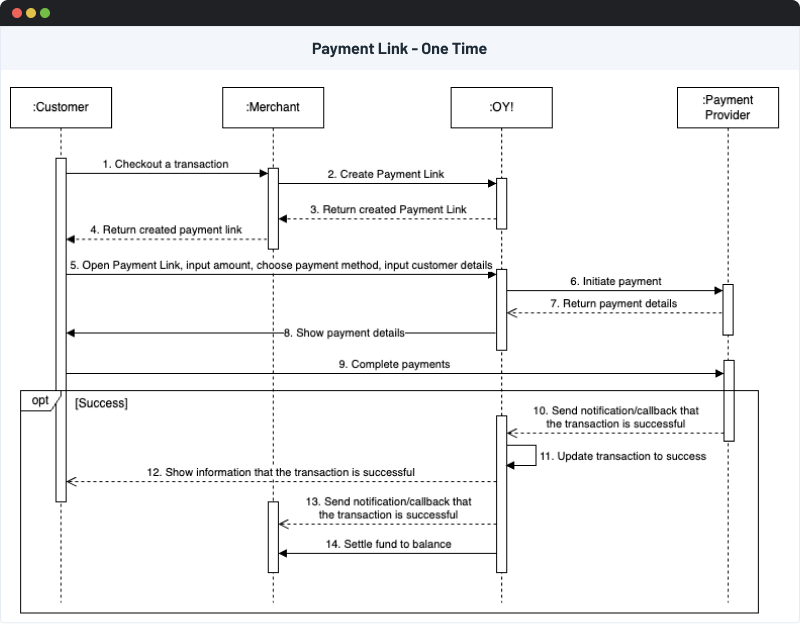
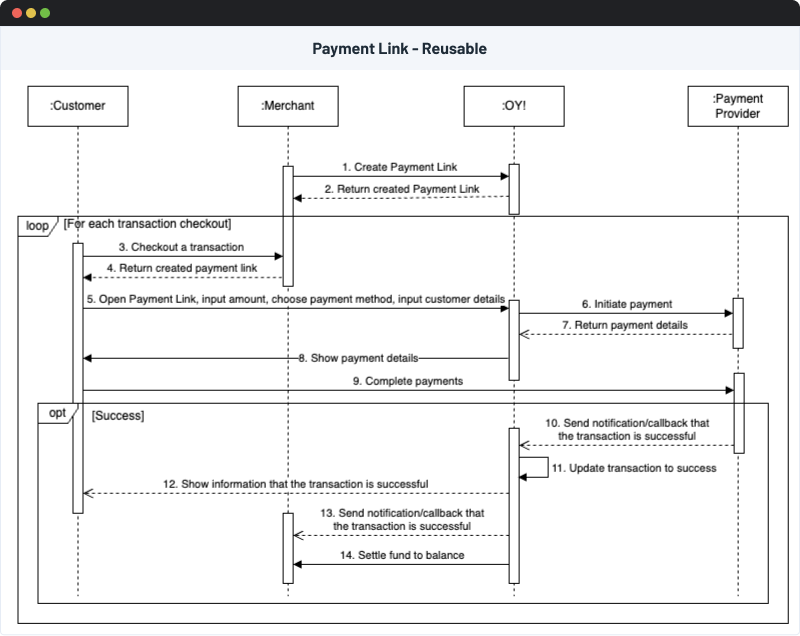
Features
Customize Payment Link transaction configuration
Set your Payment Link configurations depending on the use case of your transactions. There are several things that you can configure:
- List of Available Payment Methods
- Set up the list of available payment methods that you allow for your customers. The payment methods available are Bank Transfer (via Virtual Account and Unique Code), Cards (Credit Card/Debit Card), E-Wallet, and QRIS
- Amount type
- Open Amount: Accept payments of any amount, or up to specified amount
- Closed Amount: Only accept payments of the specified amount
- Admin Fee type:
- Include Admin Fee: Admin fee will be deducted from the amount once the fund is settled to your balance. Admin fee borne by merchant.
- Excluded from total amount: Admin fee will be added to the customer's total payment. Admin fee borne by the customer. Total amount to be paid by the customer = Specified Amount + Admin Fee.
- Payment Link Expiration Time
- By default, Payment Link Expiration Time is 24 hours. You can customize the Payment Link Expiration Time by days and/or hours. The maximum expiration time is 31 days + 23 hours.
- Specifically for Reusable Payment Link, you can set the expiration time to “Lifetime”, meaning that the link does not have an expiration time and can accept payments any time unless the Payment Link is manually deactivated.
You can define your default configuration, so you will no longer need to fill in these fields again the next time you create a payment link. Save your default configuration by ticking "Use this configuration for future transaction(s)” option when creating Payment Links.
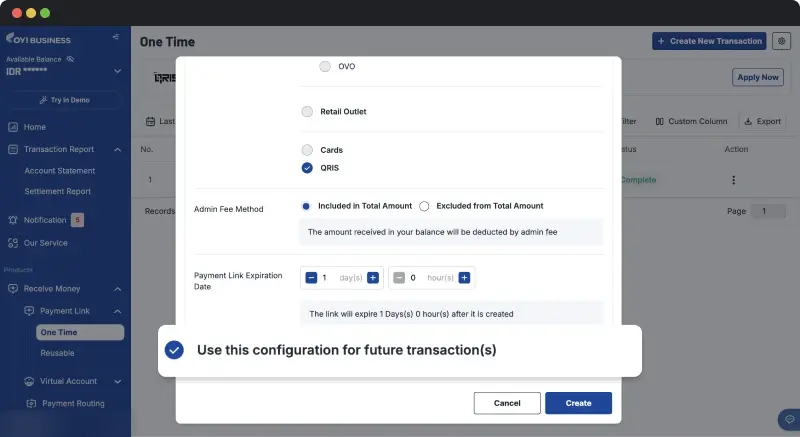
Monitoring transactions via OY! Dashboard
All created Payment Link transactions are shown in the OY! Dashboard. Navigate to “Payment Link” → “One Time”/”Reusable” to see the list of created transactions. Inside the dashboard, you can see the details of the transactions, including all the transaction information inputted during creation, the status of transactions, and the payment reference number*. The dashboard also has a feature to search, filter, and export the list of transactions in various formats: Excel (.xlsx), PDF (.pdf), and CSV(.csv)
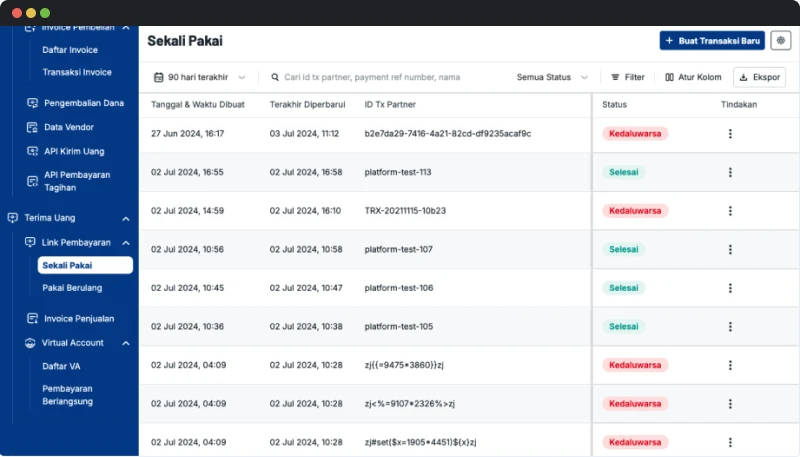
*Payment Reference Number is an identifier of a payment attempt when the customer successfully completes a QRIS payment. The reference number is also stated in the customer’s receipt/proof of transaction. Only available for QRIS transactions.
Customize theme
By default, Payment Link uses OY’s default theme. However, the default theme might not suit your brand personality. In order to maintain a consistent brand experience for your users, you can customize the look and feel of your Payment Link, where you can do the following things:
- Upload a custom logo
- Choose the theme colors
- Choose the button colors
If you use OY’s Account Receivable product, the customization of Payment Link also applies to the Account Receivable, and vice versa.
You can customize the theme for Payment Link through OY! Dashboard. Here are the steps to guide you in doing so:
- Log onto OY! Dashboard via Desktop (https://www.desktop-business.oyindonesia.com). The menu is currently unavailable in the mobile web version and OY! Business App.
- Go to the “Settings” menu and click “Payment Link Display”.
- To customize the logo in the Payment Link, you must input the logo in a URL format (https://example.com/image.jpg).
- If you do not have the URL for your logo, you can use online tools like snipboard.io or imgbb.
- Once you convert your logo to URL, the correct URL should look like this:
- Snipboard.io: https://i.snipboard.io/image.jpg
- Ibbmg: https://i.ibb.co/abcdef/image.jpg
- To change the header color in the Payment Link, you can choose a color from the Color Picker or you can type the HEX color code in “Header Color” (e.g. #FFFFFF).
- You can choose a different color for the buttons inside the Payment Link. Choose a color from the Color Picker or type the HEX color code in “Button & Link Color”.
- Save the changes. The changes will be applied to all payment links created in real-time. You can see when the last Payment Link Display was modified.
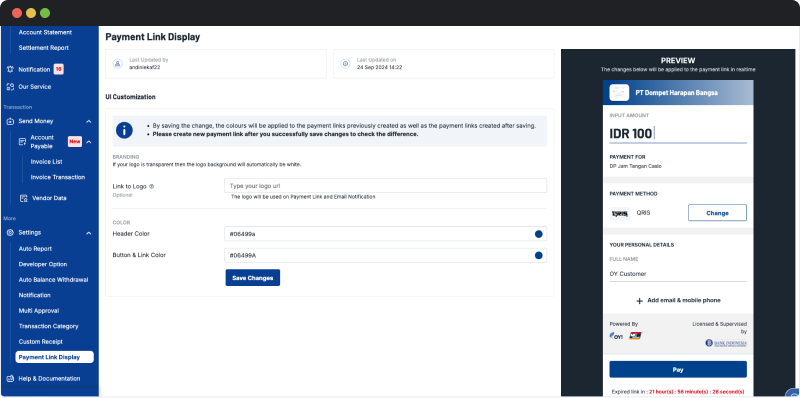
Here is the example of the Payment Link before and after it is customized. The header’s color is customized using brown color and the button’s color uses green color.
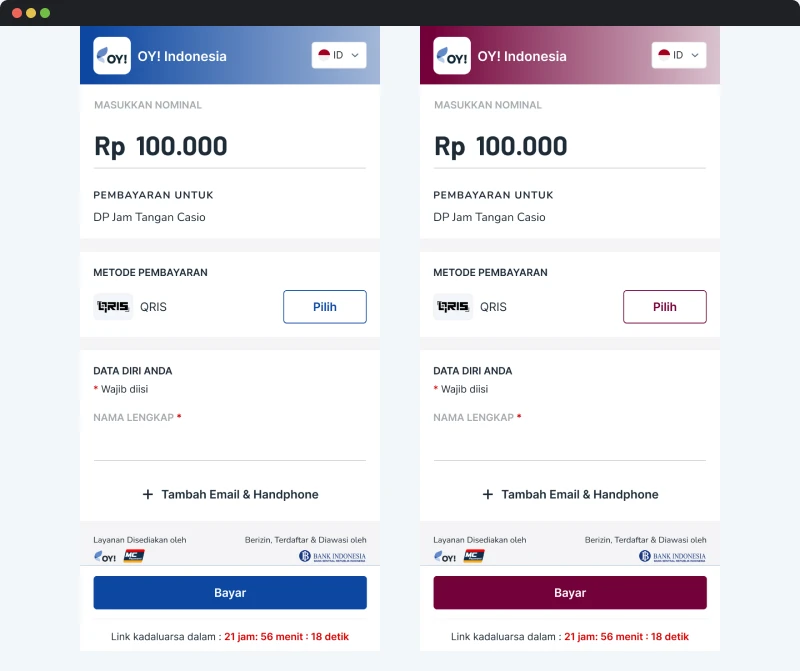
Share Payment Link to multiple channels
You can share created Payment Link directly to your customers through multiple channels, including email, WhatsApp message, and copy link
Email
Send created Payment Link up to 6 email recipients per Payment Link. This feature is supported for creation via OY! Dashboard and API. Sending Payment Links via email is free of charge.
You can fill the email recipients in the “Email(s)” field under “Customer Detail” section when creating Payment Links via OY! Dashboard. Separate multiple emails using semicolon (;) characters. Example: email1@company.com;email2@company.com;email3@company.com
If you use Payment Link API, you can insert the email recipients under the “customer_email” parameter when creating Payment Links. Please refer to the Payment Link Creation section in the API Docs for further details.
WhatsApp
Send Payment Link to unlimited WhatsApp account per Payment Link. This feature is supported for creation via API only, and not supported for creation via OY! Dashboard. By default, this feature is not automatically activated after registration. Please contact your business representative to activate this feature
Once you successfully create Payment Links, hit our API Send WhatsApp to send created Payment Links to your customers. Please refer to API Send WhatsApp section for further details
Your customers will receive a WhatsApp message from OY’s WhatsApp account using this format:
Hi {{Customer Name}},
Anda memiliki transaksi di {{Your Brand Name}} yang sedang menunggu pembayaran. Lakukan pembayaran sebelum {{Payment Link Expiration Time}}.
Silakan klik link berikut untuk membayar: {{Payment Link URL}}
Mohon untuk tidak membalas pesan ini.
Example:
Hi John Doe,
Anda memiliki transaksi di Jane’s Store yang sedang menunggu pembayaran. Lakukan pembayaran sebelum 1-Feb-2022, 13.28.
Silakan klik link berikut untuk membayar: https://pay.oyindonesia.com/123
Mohon untuk tidak membalas pesan ini.
Copy Link
After creating Payment Links, you will receive a URL link that can be copied and shared to your customers
If you create the Payment Link via OY! Business App, you can use the built-in share feature from your mobile device when sharing Payment Link.
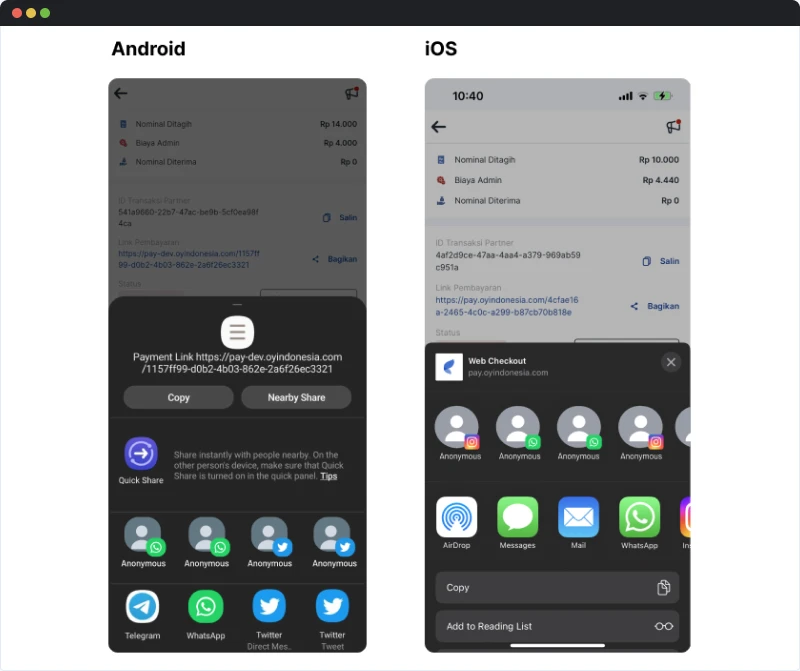
Receipt for successful payments
Customers can directly see the receipt of payments inside the Payment Link once payment is made. Customers can also receive the receipt via email(s) that you provided during Payment Link creation. Configure sending receipt via emails to your customers by going through this steps:
- Log in to your OY! Dashboard account
- Go to “Settings” → “Notifications”
- Click “Receive Money (To Sender)”
- Choose “Enable Success Notification” for Payment Link and/or Invoice Link
- Input your logo to be put on the email in URL format (https://example.com/image.jpg)
- If you do not have the URL for your logo, you can use online tools like snipboard.io or imgbb.
- Once you convert your logo to URL, the correct URL should look like this:
- Snipboard.io: https://i.snipboard.io/image.jpg
- Ibbmg: https://i.ibb.co/abcdef/image.jpg
- Save the changes by clicking “Save”
- Create a Payment Link transaction and input the customer’s email address in the “Email(s)” field under “Customer Detail” section when creating Payment Links via OY! Dashboard. Separate multiple emails using semicolon (;) characters. Example: email1@company.com;email2@company.com;email3@company.com
- Your customer will receive successful receipt to the emails once payment is made
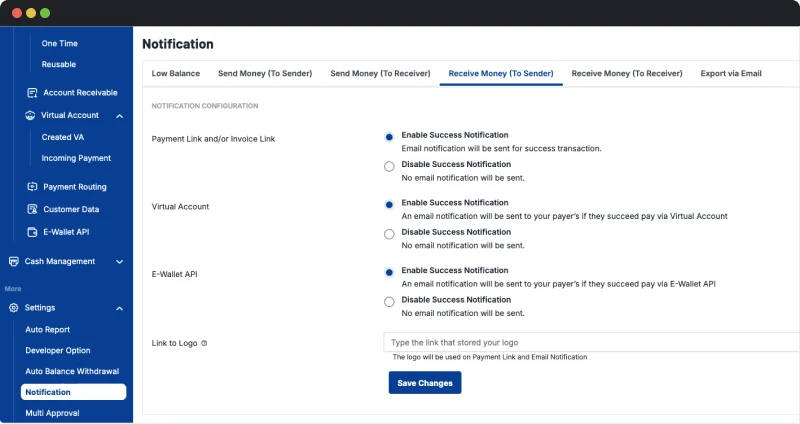
Note: If you do not put any of your customer’s email during Payment Link creation, OY! will not send any receipt via email even though you enabled the notification configuration
You can also receive the receipt to your email once payment is made by the customer. Configure sending receipt via emails to your customers by going through this steps:
- Log in to your OY! Dashboard account
- Go to “Settings” → “Notifications”
- Click “Receive Money (To Receiver)”
- Choose “Enable Success Notification” for Payment Link and/or Invoice Link
- You can fill up to 3 email recipients. Separate the emails using semicolon (;) characters. Example: email1@company.com;email2@company.com;email3@company.com
- Save the changes by clicking “Save Changes”
- You will receive an email for every successful Payment Link payments made by your customers
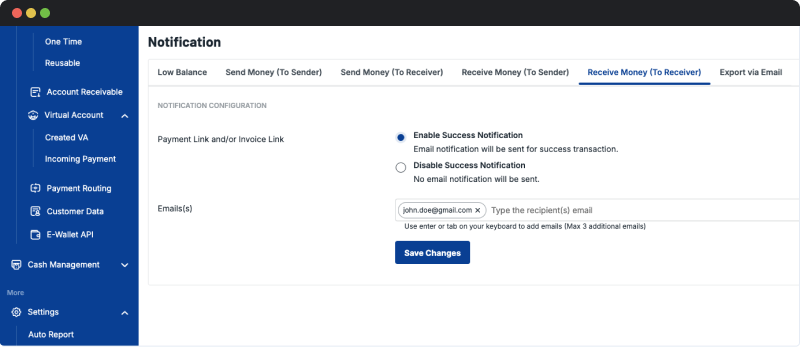
Embedding Payment Link to your website/application
Create a seamless payment experience for your customers by inserting a created Payment Link to your website or application. Customers can stay on your page without being redirected to another page to complete the payments. There are many ways that you can show a Payment Link inside your page, and here are several suggestions that you can use: Pop Up - Center, Pop Up - Right, Pop Up - Left, and Slide - Right. Please refer to Embed Payment Link in the API Docs to see detailed implementation of inserting Payment Link to your application.
Refund payments to customer
When your customer receives a defective product or the product is not delivered, they might request to refund the payment. You can directly refund payments to your customer’s account via OY! Dashboard. A refund can either be full or partial. A full refund gives your customers the entire amount back (100%). A partial refund returns the amount partially.
Refunds are free of charge. However, the admin fee charged for the original payment is not refunded by OY! to your balance.
There are several requirements that must be met to issue a refund:
- Refunds can only be issued up to 7 calendar days after the transaction is marked as successful.
- You have enough balance that allows us to deduct the amount of the transaction that should be refunded.
- A refund can only be issued once for each successful transaction, whether it is a full or partial refund.
- Refunds must be issued during operational hours, depending on the payment method. Refer to the table below.
Currently, refunds are only available for e-wallet payments.
| Payment Method | Refund Feature | Operational Hours |
|---|---|---|
DANA |
Full Refund, Partial Refund | 00.00 - 23.59 GMT+7 |
| ShopeePay | Full Refund | 05.00 - 23.59 GMT+7 |
| LinkAja | Full Refund | 00.00 - 23.59 GMT+7 |
| OVO | Not supported | - |
Here are the steps to do refunds for Payment Link transactions:
- Log in to your OY! Dashboard with your username and password that you registered with.
- Open “Payment Link” menu and choose “One Time”/“Reusable”, depending on your transactions
- Search record of the transaction that wants to be refunded. Under the “Action” column, you can click the three-dots button and click “Refund E-Wallet” to issue a refund.
- If the refund does not meet the requirement above, an error message will show up and you can not continue the refund process.
- However, if the transaction is eligible for a refund, a pop up will be shown to continue the refund process
- For partial refund, you can fill the amount to be refunded
- Make sure that you have enough balance to issue a refund. If you do not have enough balance, an error message will show up. You can top up your OY’s balance first.
- Once you successfully issue a refund, the transaction status changes to “Refunded”.
- You can see the refunded transaction in the “Account Statement” page by clicking “Transaction Report” → “Account Statement”.
Retry notification/callback for successful payments
If you use Payment Link API, OY! sends a notification/callback to your system once a transaction is marked successful. Therefore, you will be notified if the customer has already completed the payment. There might be a case where your system does not receive the notification successfully.
By enabling Retry Callback, OY! will try to resend another callback to your system if your system does not receive the callback successfully. You can request to resend a callback using Manual Retry Callback or Automatic Retry Callback.
Manual Retry Callback
Manual Retry Callback allows you to manually send callbacks for each transaction from OY! Dashboard. Here are the steps to do so:
- Login to your account in OY! Dashboard
- Open “Payment Link” and choose "One Time"/"Reusable" depending on the transaction
- Search the record of the transaction and click 3 dots button under “Action” column
- Make sure that you have set up your Callback URL via “Settings” → “Developer Option” → “Callback Configuration”
- Make sure to whitelist OY’s IP to receive callbacks from OY!
- 54.151.191.85
- 54.179.86.72
- Click “Resend Callback” to resend a callback and repeat as you need
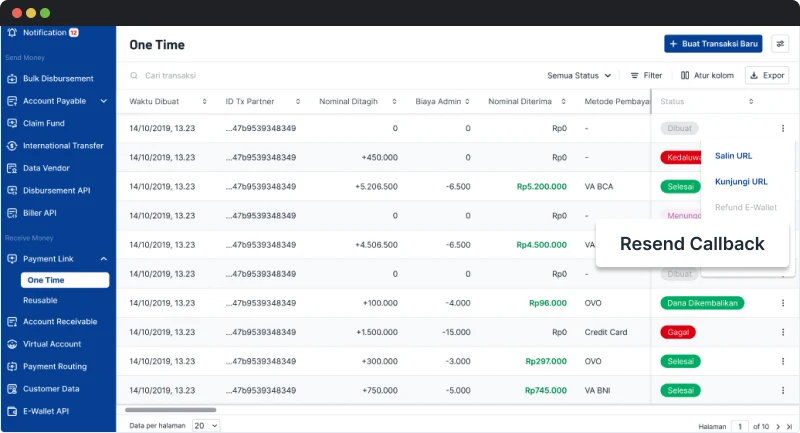
Automatic Retry Callback
Automatic Retry Callback allows you to receive another callback within a certain interval if the previous callback that OY! sent is not received successfully on your system. OY! will try to resend other callbacks up to 5 times. If your system still does not receive any callbacks after 5 retry attempts from OY, OY! will notify you via email. You can input up to 6 email recipients and it is configurable via OY! Dashboard.
Callback Interval: Realtime → 1 minute (after the initial attempt)→ 2 minutes (after the first retry attempt)→ 13 minutes (after the second retry attempt) → 47 mins (after the third retry attempt)
OY! sends the first callback to your system once the transaction is successful on OY!’s side. If your system fails to receive the callback, OY! will send the first retry callback attempt to your system immediately. If your system still fails to receive the callback, OY! will send the second retry callback attempt 1 minute after timeout or getting a failed response from your side. The process goes on until you successfully receive the callback or all retry callback attempts have been sent.
Automatic Retry Callback is not activated by default. You can see the guideline below to enable Automatic Retry Callback:
- Login to your account in OY! Dashboard
- Go to “Settings” and choose “Developer Option".
- Choose “Callback Configuration” tab
- Input your callback URL in the related product that you want to activate. Make sure you input the correct URL format. Please validate your callback URL by clicking “URL String Validation”
- If you want to activate automated retry callback, tick the Enable Automatic Retry Callback for related products. You must input the email recipient(s) to receive a notification if all the callback attempts have been made but still failed in the end.
- Make sure to whitelist OY’s IP to receive callbacks from OY
- 54.151.191.85
- 54.179.86.72
- Make sure to implement the idempotency logic in your system. Use “tx_ref_number” parameter as idempotency key to ensure that multiple callbacks under “tx_ref_number” key should not be treated as multiple different payments.
- Save the changes
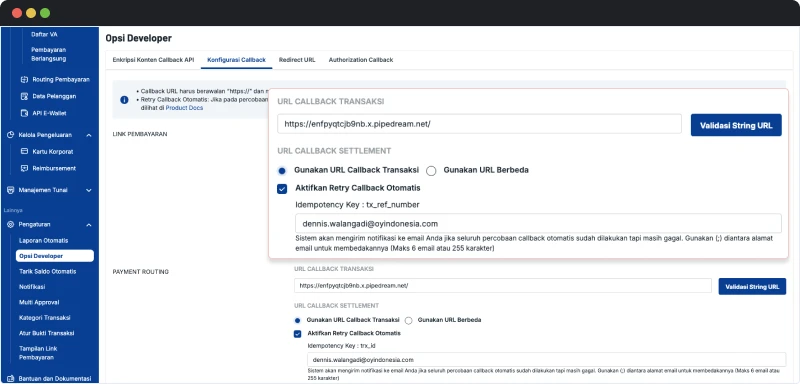
Multi Entity Management
Multi Entity Management is a feature that can help you handle multiple OY! accounts under one entity. The account that acts as an admin is called a Main Entity and the accounts that can be controlled by the admin are called Sub Entity.
Using this feature, you are able to accept payments from your customers through Payment Link that is created on behalf of a Sub Entity. When your users make a successful transaction, the transaction will be recorded in the Sub Entity’s balance. As a Main Entity, you are equipped with the ability to view the Sub Entities' balance and transaction list anytime through Multi Entity → Sub Entity Statement.
Please refer to the Multi Entity Management section in this documentation for detailed information
Registration and Setup
Here are the steps to guide you through registration and set up for creating Payment Link transactions.
- Create an account at OY! Dashboard
- Do account verification by submitting the verification form. Ensure to tick the “Receive Money” product since Payment Link is a part of Receive Money products.
- OY! team will review and verify the form and documents submitted
- Once verification is approved, set up your receiving bank account information. Important Note: Ensure that the receiving bank account information is accurate as you can only set it up once via OY! Dashboard for security reasons
- By default, you get several payment methods on the get go, including all Bank Transfers (excl. BCA)
- Other payment methods like QRIS, Ewallets, and BCA need additional onboarding to be available to use. Please refer to this section for detail guidelines:
If you use Payment Link API, then you need to do additional steps, including:
- Submit your IP address(es) & callback URL to your business representative or send an email to business.support@oyindonesia.com
- OY! will send the Production API Key as an API authorization through your business representative. Note: Staging/Demo API Key can be accessed via OY! Dashboard by going to the “Demo” environment and the key can be found on the bottom left menu.
- Integrate Payment Link API to your system. Please follow the API documentation to guide you through. Payment Link - API Docs
Once you completed all the steps above, you are ready to create your Payment Links
Creating Payment Links
You can create Payment Links via OY! Dashboard. Another way to create a Payment Link is through API, however it is only supported for One Time Payment Link. Here are the guidelines to create Payment Links code-free via OY! Dashboard:
- Log in to your OY! Dashboard account
- To create a real transaction, choose the “Production” environment on the sidebar. However, to create a demo transaction for testing purposes, choose the “Try in Demo” environment.
- Navigate to “Receive Money” and choose “Payment Link”. Click “One Time”/”Reusable” depending on the type of Payment Link you want to create
- Click "Create Payment Link"
- A pop up will be shown for you to fill in the details of the Payment Link. Please refer to the table below to know the explanation of each field.
- Click “Save”
- Once a creation is successful, you can see the created Payment Link and share it to your customers.
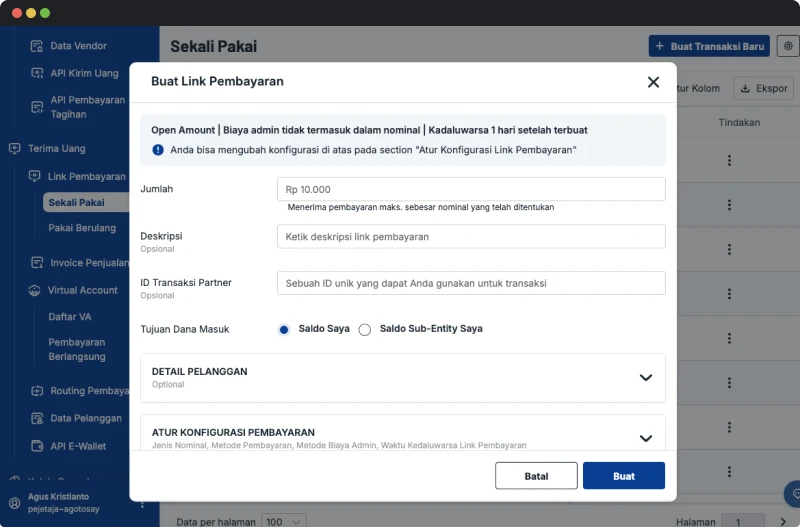
| Field | Description |
|---|---|
| Amount | The amount that will be displayed in the payment link. You must fill this field if you use a closed amount. |
| Description (Optional) | You can describe the payment context to customers through the description. |
| Partner Transaction ID | A unique transaction ID that you can assign to a transaction |
| Balance Destination | Only available if you use Multi Entity Management. You can choose between “My Balance” or “My Sub Entity’s Balance” My Balance: Once a transaction is successful, the fund will be settled to your balance account My Sub Entity’s Balance: Once a transaction is successful, the fund will be settled to your selected Sub Entity’s balance account. |
| Customer Detail | Customer details that can be specified (optional): Customer Name, Phone Number, Email, and Notes. We will send the payment link to the specified email address (if email address is filled in) |
| Amount Type | You can choose between “Open Amount” and “Closed Amount”. Open Amount: Accept payments of any amount, OR up to specified amount (if Amount is filled during creation ). Closed Amount: Only accept payments of the specified amount |
| Payment Method | The payment method that you can choose to enable/disable for your customers. The payment methods available are Bank Transfer (via Virtual Account and Unique Code), Cards (Credit Card/Debit Card), E-Wallet, and QRIS |
| Admin Fee Method | You can choose between "Included in total amount" or "Excluded from total amount". Included in total amount: Admin fee will be deducted from the amount Excluded from total amount: Admin fee will be added to the customer's total payment. Total Amount = Specified Amount + Admin Fee |
| Payment Link Expiration Time | The expiry time of a Payment Link. Once expired, customers can not open the link anymore. By default, Payment Link Expiration Time is 24 hours. You can customize the Payment Link Expiration Time by days and/or hours Specifically for Payment Link Reusable, you can set the expiry time as “Lifetime”, meaning that the link does not have an expiration time and can accept payments any time unless the Payment Link is manually deactivated. |
Completing payments
Once you successfully create a Payment Link, you may share the link to your customers. Customers can open the link via desktop or mobile browsers. Here are the steps for your customers to complete a payment via Payment Link:
- Fill or change the amount of transaction (only available for open amount transactions)
- Choose the desired payment method
- Fill the customer detail section, including Customer Name, Email, Phone Number, and Notes. All fields are optional except for Customer Name
- Confirm the payment method to be used by clicking “Pay”
- OY! will show the payment information for your end users to complete the payment based on the payment method chosen.
- For Bank Transfer transactions, Account Number and the Amount to be transferred will be shown
- For QRIS Transactions, the QR generated from OY! will be shown in the page and can be downloaded or your customer may also directly scan the QR there
- For e-wallet Transactions, the customers can be automatically redirected to the e-wallet’s app (DANA, LinkAja, ShopeePay) or receive notification from the e-wallet’s app (OVO)
- For Credit & Debit Cards, customers will be redirected to fill the card number, card expiry date, and CVV
- You have to be aware that each Payment Method has a different expiry time to complete payments. Please refer to the table below for information
- To simulate demo transactions, please refer to these sections:
- Simulate Virtual Account payments
- Simulate Unique Code payments
- Simulate E-wallet payments
- Simulate Cards payments
- Note: Simulate QRIS transactions is currently not available
- The status on the Payment Link will change to successful once the payment is made. Customers can do a check status on the Payment Link page in case the transaction status is not automatically updated
| Payment Method | Expiry Time* | |
|---|---|---|
| Bank Transfer | Virtual Account | Up to 24 hours |
| Unique Code | Up to 3 hours | |
| E-Wallet | ShopeePay | Up to 60 minutes |
| LinkAja | 5 minutes | |
| DANA | Up to 60 minutes | |
| OVO | Up to 55 seconds | |
| QRIS | Up to 30 minutes | |
| Credit and Debit Cards | 60 minutes | |
*Payment method expiration time is different from Payment Link expiration time. Payment method expiration is counted from when the customer confirms a payment method, meanwhile Payment Link expiration time is counted from when the Payment Link is created. You can only customize Payment Link expiration time.
Example: You create a Payment Link that accepts Virtual Account (VA) and QRIS as Payment Method and set the Payment Link expiration time to 2 hours. Your customer opens the Payment Link and chooses QRIS as the payment method. OY! will generate the QR and the QR can be paid within the next 30 minutes. After 30 minutes, the QR expires and your customer must choose another payment method. This time, your customer chooses VA as payment method. OY! will generate the VA number and the VA validity is 1 hour and 30 minutes because the remaining Payment Link expiry time is 1 hour and 30 minutes. After 2 hours, your customer is not able to open the Payment Link since the Payment Link has expired.
Checking transaction status
All created Payment Link transactions are shown in OY! Dashboard. Navigate to “Payment Link” → “One Time”/”Reusable” to see the list of created transactions. Inside the dashboard, you can see the details of the transactions, including all the transaction information inputted during creation, status of transactions, and the payment reference number. The dashboard also has a feature to search, filter, and export the list of transactions in various formats: Excel (.xlsx), PDF (.pdf), and CSV(.csv)
There might be times that your customer already completed the payments but the transaction status is not updated to success. In this case, there are several ways to check the status of a transaction:
- Customers can directly check the status of the transaction by clicking “Check Status” button on the Payment Link page
- You can check the status of the transaction by hitting API Check Status. Please refer to this section in the API Docs. Check Status Payment Link - API Docs.
Receiving fund to balance
Once a transaction is paid by the customer, OY! updates the transaction status and sends notification to your system indicating that the transaction has been paid, and settles the funds to your OY! balance. Each payment method has a different settlement time, varying from real-time to D+2 Working Days.
VA Aggregator
Businesses are struggling to manage hundreds or even thousands of physical bank accounts that are used for different purposes. It causes significant overhead costs in terms of the amount of account maintenance and manhours needed for reporting and reconciliation purposes, combining different information from different accounts.
Virtual Account (VA) is essentially a dummy account that is linked to a physical account and has all the physical account characteristics that enable a much easier reporting and reconciliation process by centralizing the money flow into the physical account. By issuing VAs, you can assign each VA for a specific person and/or purposes.
Virtual Account (VA) Aggregator is a feature that is specifically designed to generate Virtual Account that enable you to receive payments from your end-users via virtual account (VA) bank transfer. If you intend to use multiple payment methods to receive payment for one transaction, you should consider Payment Link and Payment Routing instead.
Generally, you may create a VA number for your customers via API VA Aggregator. However, if you prefer to create VA without API integration, then you may do so via OY! Dashboard by clicking the Virtual Account (Created VA) tab under the “Receive Money” section.
Flow
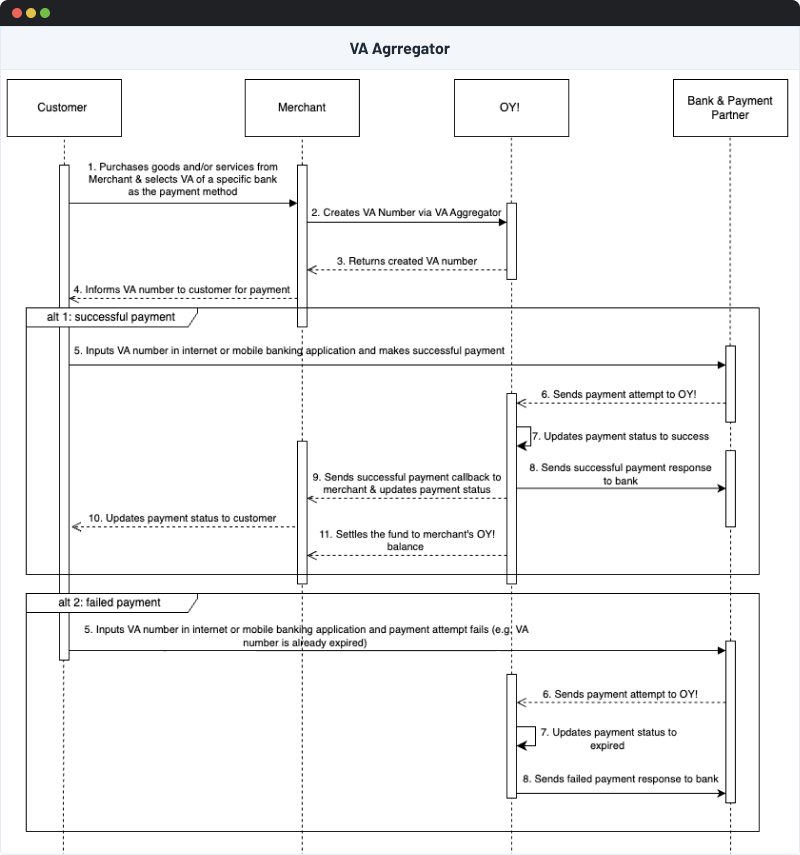
Features
- Flexible creation – either via Dashboard or API
- You can create the VA number either by OY! Dashboard or API. Don’t worry if you don’t have the resources to conduct API integration since you can still create VA number and receive payment from your customers through OY! Dashboard
- Support VA payments from multiple banks. Currently we support VA payments from 8 banks:
- Bank Central Asia (BCA)
- Bank Rakyat Indonesia (BRI)
- Bank Mandiri
- Bank Negara Indonesia (BNI)
- Bank CIMB & CIMB Syariah
- Bank SMBC
- Bank Syariah Indonesia (BSI)
- Bank Permata & Permata Syariah
- Quick settlement for majority of the banks
- We understand that you need the funds to be as quickly as possible to be settled to you. We offer real-time settlement for majority of the banks listed so you should not worry about your cashflow.
- Customizable VA types
| Category | Feature | Description |
|---|---|---|
| Validity Period | Static (Lifetime) | VA that has a lifetime validity. It will always be active and available to receive payment until it is manually deactivated. |
| Dynamic | VA that has a specific validity period. It will always be active until it is expired or manually deactivated. | |
| Usage Frequency | Single Use | VA that expires after a single payment. A single-use configuration can only be set up for a dynamic VA. |
| Multiple Use | VA that only expires when the expiration date is reached or when it is manually deactivated. You may also customize the limit of maximum payment. VA Multiple Use with customized maximum payment number will expire after the payment number limit is exceeded even if it has not reached the expiration time yet. | |
| Amount | Closed Amount | VA that only accepts payment of a specific amount as set when you create the VA number. |
| Open Amount | VA that accepts payment of any amount. You do not need to specify the amount when creating the VA number. | |
| VA Number | Customizable | You may personalize the VA suffix using the numbers you want (e.g. your end-users' phone number or billing number). To enable VA number customization, please contact your business representative. You may refer to the API Docs - Create Customized VA Number Specifically for this feature, we currently only support BRI and CIMB. |
| Predetermined | OY! will create the VA number combination on your behalf. You may refer to the API Docs - Create VA Number |
- Capability to Update VA
- After you have created the VA number, you are still able to modify the parameters below:
- VA Amount (amount)
- Multiple Use / Single Use (is_single_use) → you may update a single use VA to be a multiple use VA and vice versa
- Email (email)
- Transaction Counter (trx_counter) → you may update the number of payments a VA number can accept
- Transaction Expired Time (trx_expired_time) → the expiration time of a transaction of a VA number
- Expired Time (expired_time) → the expiration time of a VA number. The VA expiration time must be at least equal or greater than the transaction expiration time
- Username Display (username_display) → the VA name that is displayed when your customer inputs the VA number in their mobile/internet banking application
- Once a VA is updated, the new set of configuration will apply for that VA and the previous configuration is no longer applicable
- After you have created the VA number, you are still able to modify the parameters below:
- Automatic Callback & Retry Callback
- You will get a callback for each successful VA payment from your customers via API. In addition, you may activate our “Enable Automatic Retry Callback” via OY! Dashboard (Settings → Developer Option → Callback Configuration tab). By activating this feature, if on the first try the callback is not successfully received by your system, then OY! system will automatically retry the callback delivery until 5 attempts. If all callback attempts still returned failed, OY! system will send email notification to email address that has been set in your configuration.
- You will also get a callback for each successful transaction fund settlement to your OY! balance
- Minimum & Maximum Amount
- Minimum amount for each VA transaction is Rp 10,000 (for closed amount)
- Maximum amount for VA transactions depends on the banks:
| Banks | Max. Amount per transaction |
|---|---|
| Bank Central Asia (BCA) | Rp 50,000,000 |
| Bank Negara Indonesia (BNI) | Rp 50,000,000 |
| Bank Rakyat Indonesia (BRI) | Rp 500,000,000 |
| Bank Mandiri | Rp 500,000,000 |
| Bank CIMB | Rp 500,000,000 |
| Bank SMBC | Rp 100,000,000 |
| Bank Syariah Indonesia (BSI) | Rp 50,000,000 |
| Bank Permata | Rp 500,000,000 |
Use Cases
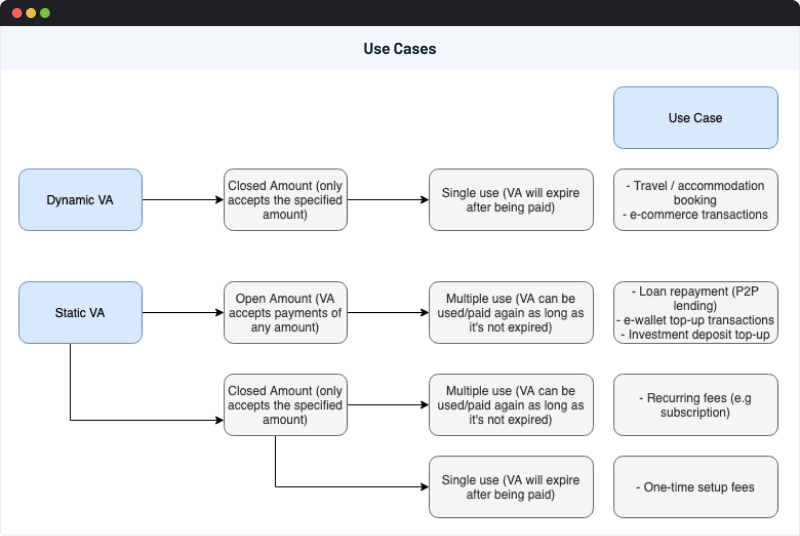
Registration and Set Up
Here are the procedures to activate VA Aggregator feature:
- Create an OY! account
- Do account verification by submitting the verification form. Ensure to tick the “Receive Money” product since VA Aggregator is a part of Receive Money products.
- OY! team will review and verify the form and documents submitted
- Once verification is approved, set up your receiving bank account information. Important Note: Ensure that the receiving bank account information is accurate as you can only set it up once via OY! Dashboard for security reasons
- You may need to submit additional documents to be able to use VA for BCA (including, but not limited to, Taxpayer Registration Number (NPWP), and Nationality ID)
- If you have any questions or concerns during this process, feel free to contact your business representative or email business.support@oyindonesia.com
If you plan to use VA Aggregator by API, then you need to do additional steps:
- Submit your IP address(es) & callback URL to your business representative or send an email to business.support@oyindonesia.com. The maximum number of IP addresses that can be registered are 5 addresses.
- OY! will send the Production API Key as an API authorization through your business representative. Note: Staging/Demo API Key can be accessed via OY! Dashboard by going to the “Demo” environment and the key can be found on the bottom left menu.
- Integrate API VA Aggregator to your system. Please follow the API documentation to guide you through API Docs - VA Aggregator
Testing
- Create VA Number via API
- After creating an account, log on to OY! Dashboard and click “Try in Demo” button that will redirect you to our staging environment
- Scroll down to the bottom left of the navigation bar and copy the API staging key for your perusal
- Using the API staging key, create a VA number by sending a POST request to https://api-stg.oyindonesia.com/api/generate-static-va. Enter the required parameters stated in the API Docs
- OY! system will respond to your request with a created VA number
- Create VA via Dashboard
- After creating an account, log on to OY! Dashboard and click “Try in Demo” button that will redirect you to our staging environment
- Scroll down to “Receive Money” tab → Virtual Account → Created VA
- Click the top right button “Create Virtual Account”
- You may choose to create the VA number(s) by uploading an Excel file (with the format as the template) or by inputting the VA number manually (in this case, you may click the “Add Virtual Account Details Manually” button)
- After you have successfully uploaded the file or filled in the fields (if manual), click “Validate” button on the bottom right corner
- After you have successfully validated your entries, click “Submit” button on the bottom right corner
- Once you have successfully submitted your request, you will be redirected to Created VA page where you can see your newly created VA numbers
- Your created VA numbers should be ready to use
- Simulating Successful Callback
- To simulate a successful payment, ensure that you are in our staging environment. Click “Try in Demo” button that will redirect you to our staging environment
- Scroll down to “Settings” tab → Callback Bank Transfer
- Choose the “Virtual Account” as the Transaction Type
- Select the Bank Name of the VA number that you have previously created
- Enter the VA number and amount. For Closed VA, you need to enter the exact amount of the VA as created
- Enter the payment date and time. Ensure that payment date and time are greater than created but less than expiration time
How to Use
- Viewing list of Created VA
- You can monitor your created VA numbers through the “Receive Money” tab → Virtual Account → Created VA
- You can also see their payment status, amount, VA type, and count of completed transactions. You may also click to export these details to your device as PDF, Excel or CSV
- Viewing list of VA Payment
- For all successful VA transactions, you can monitor them through the “Receive Money” tab → Virtual Account → Incoming Payment
- You can also see the transaction timestamp, status, amount, admin fee and other information. You may also click to export these details to your device as PDF, Excel or CSV
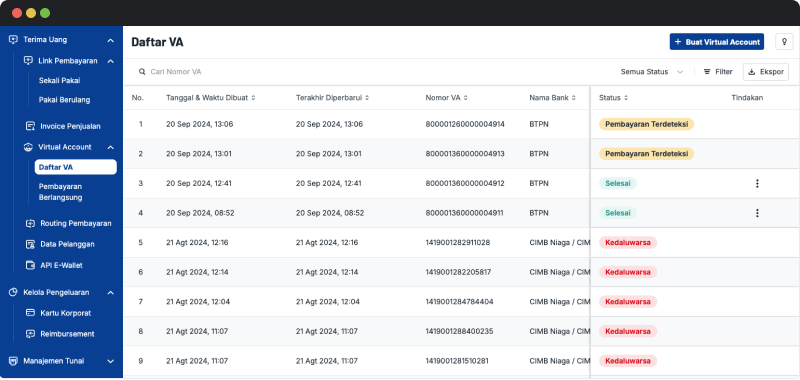
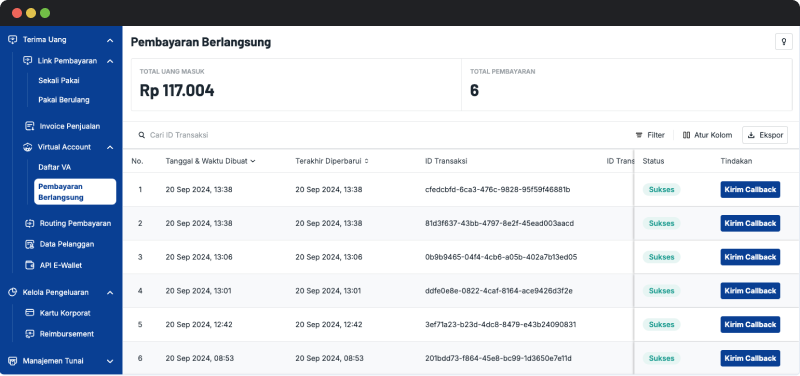
VA Bank Details
Capabilities
| Banks | Bank Code | Open Amount | Closed Amount | Max. Expiration Time |
|---|---|---|---|---|
| Bank Central Asia (BCA) | 014 | Yes | Yes | Lifetime |
| Bank Negara Indonesia (BNI) | 009 | Partial* | Yes | Lifetime |
| Bank Rakyat Indonesia (BRI) | 002 | Yes | Yes | Lifetime |
| Bank Mandiri | 008 | Yes | Yes | Lifetime |
| Bank CIMB | 022 | Yes | Yes | Lifetime |
| Bank SMBC | 213 | Yes | Yes | Lifetime |
| Bank Syariah Indonesia (BSI) | 451 | No | Yes | 70 days after creation |
| Bank Permata | 013 | Yes | Yes | Lifetime |
*contact our business representative for further information
Note: there is no minimum expiration time for VAs. However, you are recommended to set a reasonable expiration time, enabling your customers to complete their payments conveniently.
Available Payment Channels for VA
Your end-users may use the below payment channels to pay for their bills via VA
| Bank (Virtual Account) | SKN | RTGS | ATMs | Intrabank Mobile Banking & Internet Banking | Interbank Internet Banking | Interbank Mobile Banking |
|---|---|---|---|---|---|---|
| Bank Mandiri | Yes | Yes | Yes | Yes | Yes | Yes |
| BRI | Yes | Yes | Yes | Yes | No | Yes |
| BNI | Yes | Yes | Yes | Yes | No | Yes |
| Permata | Yes | Yes | Yes | Yes | No | Yes |
| CIMB Niaga / CIMB Niaga Syariah | Yes | Yes | Yes | Yes (Mobile Banking), No (Internet Banking) | No | Yes |
| BCA | No | No | Yes | Yes | No | No |
| SMBC | Yes | No | Yes | Yes (Mobile Banking), No (Internet Banking) | No | Yes |
| BSI | No | No | Yes | Yes | Yes | Yes |
API E-Wallet Aggregator
E-Wallet API allows clients to charge and receive payments directly from Indonesia's top e-wallet providers. With one integration, they are able to get access to all of OY’s available e-wallets.
Flow
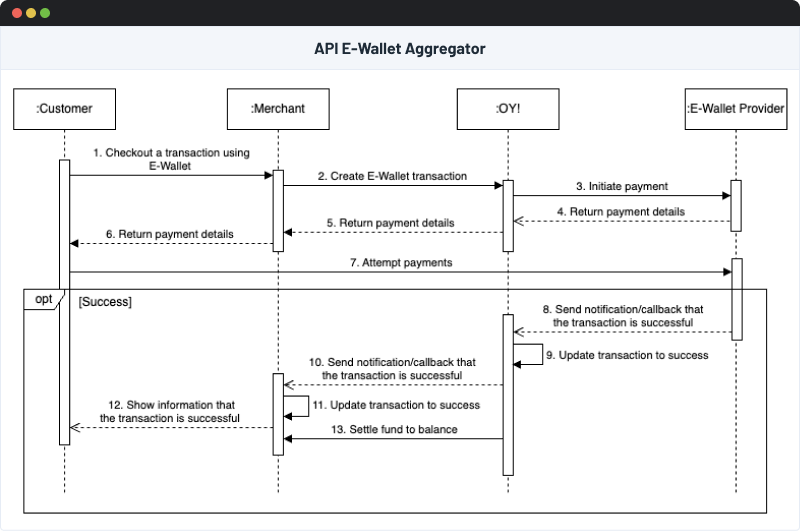
Features
Support multiple E-wallets
Our E-wallet Aggregator product support e-wallet transactions from these issuers:
- ShopeePay
- LinkAja
- DANA
- OVO
Monitor transactions via OY! Dashboard
All created e-wallet transactions are shown in OY! Dashboard. Navigate to “E-Wallet” to see the list of transactions. Inside the dashboard, you can see the details of the transactions, including all the transaction information inputted during creation, status of transactions, and the payment reference number. The dashboard also has a feature to search, filter, and export the list of transactions in various formats: Excel (.xlsx), PDF (.pdf), and CSV (.csv)
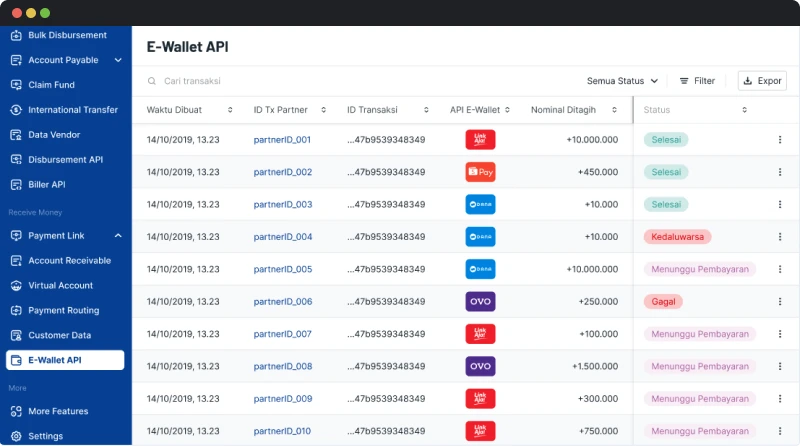
Receipt for successful payments
Customers can receive receipt of successful payments via email(s) that you provided during the creation process. Configure sending receipt via emails to your customers by going through these steps:
- Log in to your OY! Dashboard account
- Go to “Settings” → “Notifications”
- Click “Receive Money (To Sender)”
- Choose “Enable Success Notification” for E-Wallet API
- Input your logo to be put on the email in URL format (https://example.com/image.jpg)
- If you do not have the URL for your logo, you can use online tools like snipboard.io or imgbb.
- Once you convert your logo to a URL, the correct URL should look like this:
- Snipboard.io: https://i.snipboard.io/image.jpg
- Ibbmg: https://i.ibb.co/abcdef/image.jpg
- Save the changes by clicking “Save”
- Create an E-Wallet transaction via API and input the customer’s email address in the “email” parameter.
- Your customer will receive successful receipt to the emails once payment is made
Note: If you do not put any of your customer’s email during transaction creation, OY! will not send any receipt via email even though you enabled the notification configuration
Retry notification/callback for successful payments
OY! will send a notification/callback to your system once a transaction is marked successful. Therefore, you will be notified if the customer has already completed the payment. There might be a case where your system does not receive the notification successfully.
By enabling Retry Callback, OY! will try to resend another callback to your system if your system does not receive the callback successfully. You can request to resend a callback using Manual Retry Callback or Automatic Retry Callback.
Manual Retry Callback
Manual Retry Callback allows you to manually send callbacks for each transaction from OY! Dashboard. Here are the steps to do so:
- Log in to your account in OY! Dashboard
- Navigate to “E-Wallet API ”
- Search the record of the transaction and click 3 dots button under “Action” column
- Make sure that you have set up your Callback URL via “Settings” → “Developer Option” → “Callback Configuration”
- Make sure to whitelist OY’s IP to receive callbacks from OY!
- 54.151.191.85
- 54.179.86.72
- Click “Resend Callback” to resend a callback and repeat as you need
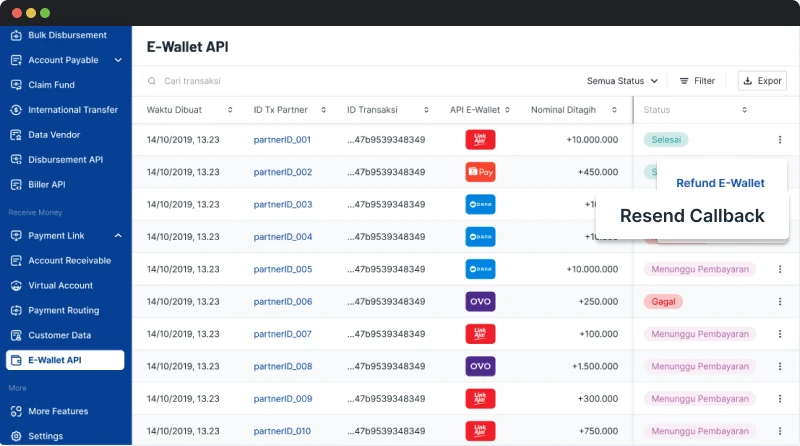
Automatic Retry Callback
Automatic Retry Callback allows you to receive another callback within a certain interval if the previous callback that OY! sent is not received successfully on your system. OY! will try to resend other callbacks up to 5 times. If your system still does not receive any callbacks after 5 retry attempts from OY, OY! will notify you via email. You can input up to 6 email recipients and it is configurable via OY! Dashboard.
Callback Interval: Realtime → 1 minute (after the initial attempt)→ 2 minutes (after the first retry attempt)→ 13 minutes (after the second retry attempt) → 47 mins (after the third retry attempt)
OY! sends the first callback to your system once the transaction is successful on OY!’s side. If your system fails to receive the callback, OY! will send the first retry callback attempt to your system immediately. If your system still fails to receive the callback, OY! will send the second retry callback attempt 1 minute after timeout or getting a failed response from your side. The process goes on until you successfully receive the callback or all retry callback attempts have been sent.
Automatic Retry Callback is not activated by default. You can see the guideline below to enable Automatic Retry Callback:
- Login to your account in OY! Dashboard
- Go to “Settings” and choose “Developer Option".
- Choose “Callback Configuration” tab
- Input your callback URL in the related product that you want to activate. Make sure you input the correct URL format. Please validate your callback URL by clicking “URL String Validation”
- If you want to activate automated retry callback, tick the Enable Automatic Retry Callback for related products. You must input the email recipient(s) to receive a notification if all the callback attempts have been made but still failed in the end.
- Make sure to whitelist OY’s IP to receive callbacks from OY
- 54.151.191.85
- 54.179.86.72
- Make sure to implement the idempotency logic in your system. Use “tx_ref_number” parameter as the idempotency key to ensure that multiple callbacks under “tx_ref_number” key should not be treated as multiple different payments.
- Save the changes
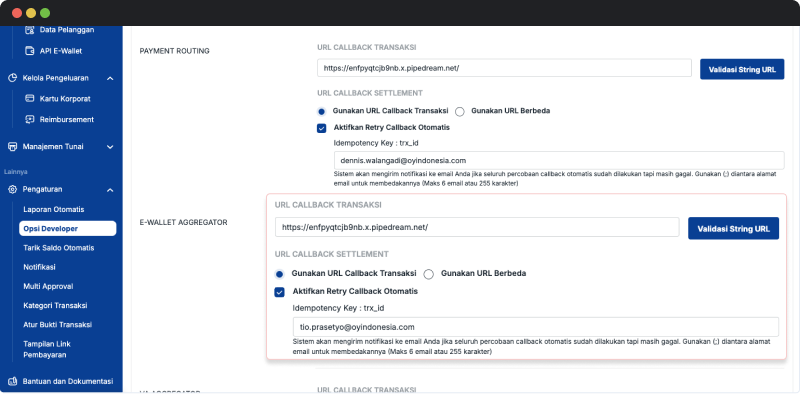
Refund transactions to customer
When your customer receives a defective product or the product is not delivered, they might request to refund the transaction. You can directly refund transactions to your customer’s account via OY! Dashboard. A refund can either be full or partial. A full refund gives your customers the entire amount back (100%). A partial refund returns the amount partially.
Refunds are free of charge. However, the admin fee charged for the original transaction is not refunded by OY! to your balance.
There are several requirements that must be met to issue a refund:
- Refunds can only be issued up to 7 calendar days after the transaction is marked as successful.
- You have enough balance that allows us to deduct the amount of the transaction that should be refunded.
- A refund can only be issued once for each successful transaction, whether it is a full or partial refund.
- Refunds must be issued during operational hours, depending on the payment method. Refer to the table below.
Currently, refunds are only available for DANA, ShopeePay, and LinkAja.
| Payment Method | Refund Feature | Operational Hours |
|---|---|---|
| DANA | Full Refund, Partial Refund | 00.00 - 23.59 GMT+7 |
| ShopeePay | Full Refund | 05.00 - 23.59 GMT+7 |
| LinkAja | Full Refund | 00.00 - 23.59 GMT+7 |
| OVO | Not supported | - |
If you use Refund API, OY! will send a notification to your system via callback once a transaction is successfully refunded Refund Callback - API Docs. You can also check the status of your refund request via API Refund Check Status. Refund Check Status - API Docs
Registration and Setup
Here are the steps to guide you through registration and setup for creating E-wallet Aggregator transactions.
- Create an account at OY! Dashboard
- Do account verification by submitting the verification form. Ensure to tick the “Receive Money” product since E-wallet Aggregator is a part of Receive Money products.
- OY! team will review and verify the form and documents submitted
- Once verification is approved, set up your receiving bank account information. Important Note: Ensure that the receiving bank account information is accurate as you can only set it up once via OY! Dashboard for security reasons
- Follow the registration process for each e-wallet that you want to use. Please refer to this section for detailed guidelines: e-wallet Activation
- Submit your IP address(es) & callback URL to your business representative or send an email to our support team, business.support@oyindonesia.com .
- OY! will send the Production API Key as an API authorization through your business representative. Note: Staging/Demo API Key can be accessed via OY! Dashboard by going to the “Demo” environment and the key can be found on the bottom left menu.
- Integrate E-wallet API to your system. Please follow the API documentation to guide you through. E-wallet - API Docs
Creating E-wallet transactions
Create E-wallet Transactions: Use this API to create an E-wallet transaction for your user
You can create E-Wallet transactions via API only. Here are the guidelines to create E-wallet transactions via API:
- Integrate API Create E-wallet transactions to your system. Create E-wallet - API Docs
- Hit OY!’s API to Create E-wallet transaction.
- OY! will return the information to complete the payment
- For e-wallets that use the redirection method (i.e. ShopeePay, DANA, LinkAja), OY! will return the e-wallet URL to complete the payment. You can share the URL to your customer.
- For e-wallets that use the push notification method (i.e. OVO), the e-wallet provider will send a notification to your customer’s e-wallet app to complete the payment
Note: When you hit Create E-Wallet Transaction endpoint in Staging/Demo environment, it will always return the same ewallet_url & success_redirect URL in the response: https://pay-dev.shareitpay.in/aggregate-pay-gate. You cannot simulate payment by clicking this URL.
In order to be able to simulate payment, please refer to this section: Simulate E-Wallet Payments - Product Docs
Completing transaction
Each e-wallet provider has a different method to complete the transaction, redirection or push notification method. ShopeePay, LinkAja, and DANA use a redirection method. Meanwhile, OVO uses a push notification method. Please refer to these guidelines for completing transactions based on each provider:
- Complete e-wallet transactions via ShopeePay ShopeePay Payment Journey
- Complete e-wallet transactions via LinkAja LinkAja Payment Journey
- Complete e-wallet transactions via DANA DANA Payment Journey
- Complete e-wallet transactions via OVO OVO Payment Journey
To simulate demo transactions, please refer to this section: Simulate E-Wallet Payments - Product Docs
Checking transaction status
All created E-wallet transactions are shown in OY! Dashboard. Navigate to “E-Wallet” to see the list of transactions. Inside the dashboard, you can see the details of the transactions, including all the transaction information inputted during creation, status of transactions, and the payment reference number. The dashboard also has a feature to search, filter, and export the list of transactions in various formats: Excel (.xlsx), PDF (.pdf), and CSV(.csv)
There might be times when your customer already completed the payments but the transaction status is not updated to success. Therefore, we also recommend you to check the transaction status periodically via the Check Status E-wallet API. Check Status E-Wallet - API Docs
Receiving fund to balance
Once a transaction is paid by the customer, OY! updates the transaction status and sends callback to your system that the transaction has been paid. OY! also sends/settles the funds to your OY! balance. Each provider has a different settlement time, varying from D+1 to D+2 working days.
API Payment Routing
Payment Routing API is a service that allows you to receive payments & send money in one integrated API. It enables you to automatically send money to several recipients once you receive payments from your customers. You can save development time by integrating with Payment Routing API as it provides two services at once
| Payment Routing Type | Features | |
|---|---|---|
| Transaction Type | Payment Aggregator | Receive payments only All-in-one API to receive payments via bank transfers, e-wallets, QRIS, and cards. |
| Payment Routing | Receive payments and automatically send the money to several recipients | |
| Receive Money Type | Without UI |
You have your own checkout page and OY! provides the payment details OY! provides the payment details information after creation (e.g. VA number, e-wallet URL, QR code URL, etc) Support one payment method only (Single Payment & Direct Payment) |
| With UI |
Use OY! built-in checkout page (Payment Link) OY! provides the Payment Link after creation Support multiple payment methods in one transaction |
|
Use Cases
Payment Aggregator
- Single Payments
- Single payment is a type of payment that allows your customer to complete payments easily. Available for Bank Transfer (Virtual Account & Unique Code), E-Wallet, QRIS, and Cards.
- Direct Payments
- Direct payment requires account linking, meaning that your customer must connect their payment account to your system before completing payments. You can do this by using our API Account Linking. Direct payments offer a more seamless payment experience. After successful linkage, your customer does not need to open or get redirected to the payment provider application to complete payments. This feature is currently only available for e-wallet ShopeePay.
Payment Routing
- Investment
- OJK regulation does not allow investment applications to keep users balance. Use payment routing to receive funds from investors and directly send the funds to custodian banks.
- E-Commerce
- Receive goods payments from customers and directly send the merchant’s share to the merchant’s bank account.
- Education
- Receive tuition payments from parents and directly send the admin fee to the school’s bank account
- Loan Application
- Receive loan repayments from the borrower and directly disburse the money to the lender’s pooling account or the borrower’s pooling account.
Flow
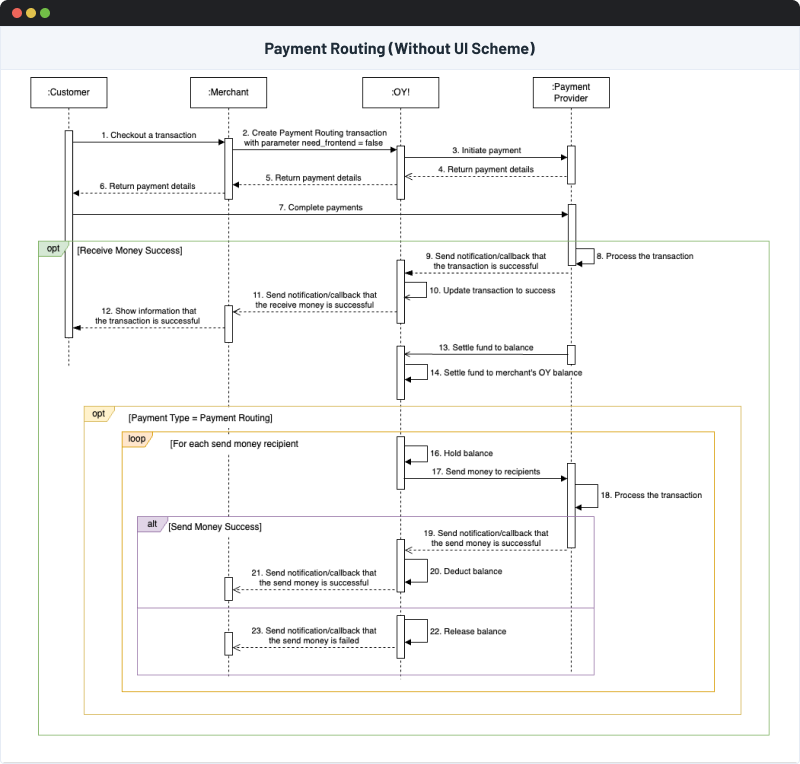
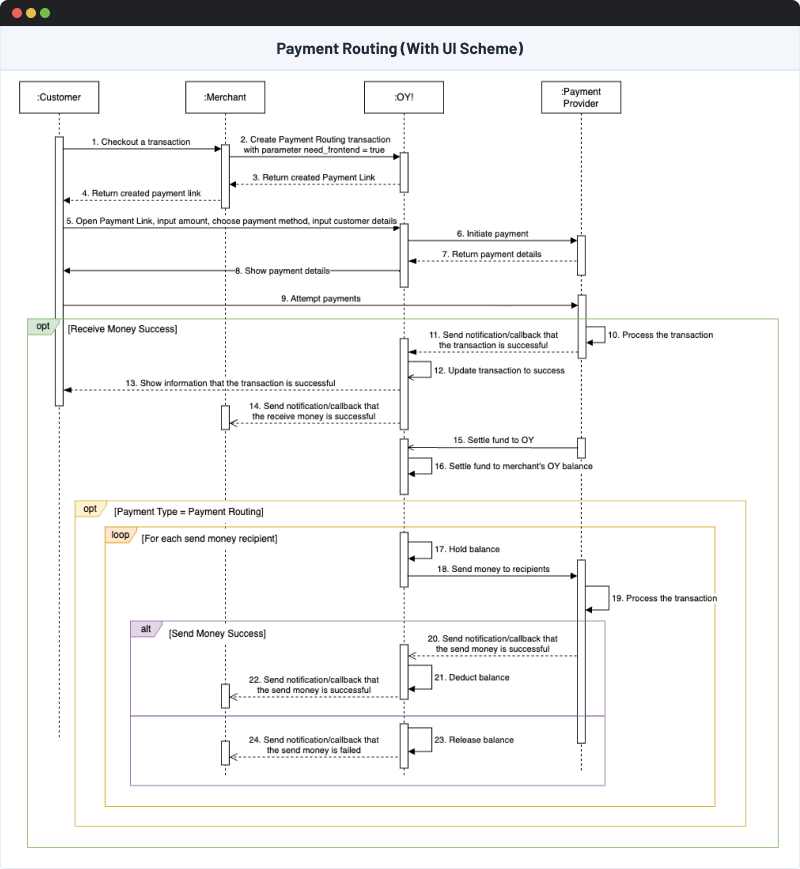
Features
Support multiple payment methods
OY! supports various payment methods in the Payment Routing API, including:
- Bank Transfer
- Virtual Account: BCA, BNI, BRI, Mandiri, CIMB, SMBC, BSI, Permata
- Unique Code: BCA
- E-wallet
- Single Payments: ShopeePay, DANA, LinkAja
- Direct Payments: ShopeePay
- Cards: Visa, Mastercard, JCB
- QRIS
Send money to multiple recipients in a real-time manner
Once you receive payments from the customer, OY! can directly send the money up to 10 recipients without waiting for the settlement, as long as you have enough balance in your OY! account. Depending on the payment methods used, some transactions might not be settled real-time to your balance (e.g. QRIS, e-wallet). Therefore, you must keep enough balance to cater the sending money process.
Use Payment Links to receive money
There are two types of receiving money: With UI and Without UI. The Without UI scheme can be used if you have your own checkout page and you only need the payment details information to complete the payments. Here are the payment information you will receive after successful transaction creation:
- Bank Transfer - Virtual Account: destination bank, VA number, and amount of transaction
- Bank Transfer - Unique Code: destination bank, bank account number, bank account name, billed amount (original amount), unique amount, and total amount (final amount)
- QRIS: URL to access the QR code
- E-wallets: link to redirect your customer to the respective e-wallet selected
- Cards: link to redirect your customer to fill in card details and proceed to payment
However, if you do not have your own checkout page, no need to worry as you can use OY’s checkout page (Payment Link) for Payment Routing transactions. You can do so by filling the “need_frontend” parameter with “TRUE” in the creation API.
Read more about payment link in Payment Link - Product Docs.
Create E-Wallet Direct Payment transactions
Payment Routing API supports Direct Payment transactions where your customer is not redirected to an external payment provider’s application/website to complete payments, resulting in a more seamless transaction and better payment experience. This feature is currently only supported for e-Wallet ShopeePay
Refer to this section to understand how e-Wallet One-Time payments differs from Direct Payments: E-Wallet Payment Type
Transaction tracking and monitoring capability
All created Payment Routing transactions are shown in the OY! Dashboard. Navigate to “Payment Routing” to see the list of created transactions. Inside the dashboard, you can see the details of the transactions, including all the transaction information inputted during creation, the transaction status , and the payment reference number*. The dashboard also has a feature to search, filter, and export the list of transactions in various formats: Excel (.xlsx), PDF (.pdf), and CSV (.csv)
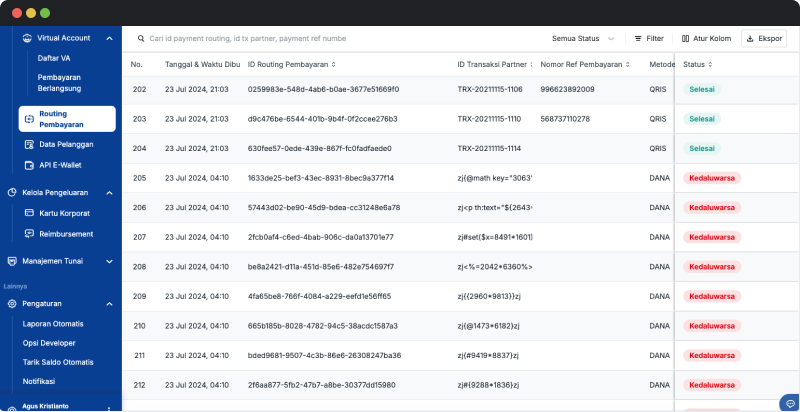
*Payment Reference Number is an identifier of a payment attempt when the customer successfully completes a QRIS payment. The reference number is also displayed in the customer’s receipt/proof of transaction. Only available for QRIS transactions.
Use the same Virtual Account number for different transactions
One customer might do payments for multiple transactions and use the same bank each time. By generating the same VA number for different transactions, it makes the payment easier for your customer as they can save the VA number on their mobile banking application. You can only use the same VA number for one active transaction at a time.
Registration and Setup
Here are the steps to guide you through registration and set up for creating Payment Routing transactions.
- Create an account at OY! Dashboard
- Do account verification by submitting the verification form. Ensure to tick the “Receive Money” and “Send Money” products since Payment Routing is a part of Receive Money & Send Money products.
- OY! team will review and verify the form and documents submitted
- Once verification is approved, set up your receiving bank account information. Important Note: Ensure that the receiving bank account information is accurate as you can only set it up once via OY! Dashboard for security reasons
- By default, you get several payment methods on the get go, including all Bank Transfers (excl. BCA)
- Other payment methods like QRIS, E-wallets, Cards, and BCA need additional onboarding to be available to use. Please refer to this section for detail guidelines:
- Submit your IP address(es) & callback URL to your business representative or send an email to business.support@oyindonesia.com
- OY! will send the Production API Key as an API authorization through your business representative. Note: Staging/Demo API Key can be accessed via OY! Dashboard by going to the “Demo” environment and the key can be found on the bottom left menu.
- Integrate Payment Routing API to your system. Please follow the API documentation to guide you through. Payment Routing - API Docs
Creating Payment Routing transactions
Once you successfully complete the registration process, you can immediately create Payment Routing transactions (via API only). You can create a transaction using the Without UI scheme or With UI scheme, depending on the use case.
Without UI Scheme
- Integrate API Create Payment Routing transactions to your system. Create Payment Routing - API Docs
- Hit OY!’s API Create Payment Routing transaction
- Insert parameter “need_frontend” with "FALSE"
- Choose one payment method to accept the payment. You can choose between BANK_TRANSFER, EWALLET, QRIS, or CARDS.
- Insert the chosen payment method into the “list_enable_payment_method” parameter. Note: Ensure that you only input one payment method since you use the Without UI scheme, otherwise you will get an error message
- Choose one bank/payment provider (SOF) based on the payment method.
- BANK_TRANSFER: 014, 009, 002, 008, 022, 213, 011, 016, 484, 451, 013. Refer to this section to see all supported banks and the bank_code: Bank Transfer - Payment Method
- EWALLET: shopeepay_ewallet, dana_ewallet, linkaja_ewallet
- QRIS: QRIS
- CARDS: CARDS
- Insert the chosen SOF into the “list_enable_sof” parameter. Note: Ensure that you only input one SOF since you use the Without UI scheme, otherwise you will get an error message
- If you want to use e-wallet Direct Payment, fill “use_linked_account” with “TRUE”, otherwise fill the parameter with “FALSE”. Only available for ShopeePay. You must do Account Linking prior to creating direct payment transactions. Refer to this section to understand about Account Linking.
- If you want to send the money once you receive payments, fill in the destination bank account number and the amount of each recipient under the “payment_routing” object.
- OY! will return the information to complete the payment based on the requested payment method
- Bank Transfer - Virtual Account: destination bank, VA number, and amount of transaction
- Bank Transfer - Unique Code: destination bank, bank account number, bank account name, billed amount (original amount), unique amount, and total amount (final amount)
- QRIS: URL to access the QR code
- E-wallets: link to redirect your customer to the respective e-wallet selected
- Cards: link to redirect your customer to fill in card details and proceed to payment
- Show the payment details to your customer inside your application
With UI Scheme
- Integrate API Create Payment Routing transactions to your system. Create Payment Routing - API Docs
- Hit OY!’s API Create Payment Routing transaction
- Insert parameter “need_frontend” with "TRUE"
- Choose the list of payment methods to accept the payment. You can choose to insert BANK_TRANSFER, EWALLET, QRIS, and CARDS.
- Insert the list of chosen payment methods into the “list_enable_payment_method” parameter. You can insert multiple payment methods to let your customer choose the preferred payment method
- Choose banks/payment providers (SOF) for each payment method.
- BANK_TRANSFER: 014, 009, 002, 008, 022, 213, 011, 016, 484, 451, 013
- EWALLET: shopeepay_ewallet, dana_ewallet, linkaja_ewallet
- QRIS: QRIS
- CARDS: CARDS
- Insert the list of chosen SOFs into the “list_enable_sof” parameter. You can insert multiple banks/payment providers to let your customer choose the preferred payment method
- If you want to send the money once you receive payments, fill in the destination bank account number and the amount of each recipient under the “payment_routing” object.
- OY! will return the Payment Link URL and you can share this to your customer.
Completing payments
Without UI Scheme
Each payment method has a different flow to complete the transaction, depending on the nature of each payment method. Please refer to these guidelines for completing transactions based on each payment method:
- Complete Bank Transfer - Virtual Account transactions
- Complete Bank Transfer - Unique Code transactions
- Complete QRIS transactions
- Complete E-wallet transactions
- Complete Cards transactions
To simulate demo/staging transactions, please refer to this section:
- Simulate Bank Transfer - Virtual Account payments
- Simulate Bank Transfer - Unique Code payments
- Simulate QRIS payments*
- Simulate E-wallet payments
- Simulate Cards payments
*currently not available
With UI Scheme
Once you successfully create a Payment Routing using With UI scheme, you may share the link to your customers. The steps for your customers to complete a transaction using With UI scheme is the same as completing a Payment Link transaction. Please refer to this section: Completing Payment Link transactions - Product Docs
Checking transaction status
All created Payment Routing transactions are shown in OY! Dashboard. Navigate to “Payment Routing” to see the list of created transactions. Inside the dashboard, you can see the details of the transactions, including all the transaction information inputted during creation, transaction status, and the payment reference number*. The dashboard also has a feature to search, filter, and export the list of transactions in various formats: Excel (.xlsx), PDF (.pdf), and CSV (.csv)
If for some reason you do not receive our transaction callbacks successfully, you may use our API Check Status to get the latest transaction status. Check Status Payment Routing - API Docs.
*Payment Reference Number is an identifier of a payment attempt when the customer successfully completes a QRIS payment. The reference number is also displayed in the customer’s receipt/proof of transaction. Only available for QRIS transactions.
Receiving fund to balance
Once a transaction is paid by the customer, OY! updates the transaction status and sends notification to your system indicating that the transaction has been paid, and settles the funds to your OY! balance. Each payment method has a different settlement time, varying from real-time to D+2 working days.
Sending funds to recipients
Payment Routing allows you to disburse funds automatically once the transaction is paid by the customer. OY! automatically sends the funds to the recipient(s) stated in the creation process once the payment is received. You need to make sure that you have enough balance to carry out the disbursement process, especially for payment methods that have non-real time settlement; otherwise, the disbursement process fails due to insufficient balance.
QRIS Aggregator
Quick Response Code Indonesian Standard (QRIS) is a standardized QR payments in Indonesia that are developed by Bank Indonesia. Payments are performed by the customers scanning the QR on their m-banking/e-wallet application. QR payments are highly suitable for low-value transactions since they offer an affordable price (0.7% per transaction). QRIS aggregator allows you to create QRIS transactions as a payment method to be displayed to your customer.
Note: QRIS Aggregator is implemented using existing Payment Routing API. This section highlights only the features, flow, etc. that relevant for QRIS Aggregator transaction. All transactions will be displayed in OY! Dashboard under Payment Routing menu.
Flow

Features
The maximum amount per transaction for QRIS is Rp 10,000,000. The minimum amount per transaction is Rp 10,000. Should you have any request to receive payments below Rp 10,000, please contact your Business Representative.
Registration and Setup
Here are the steps to guide you through registration and set up for creating QRIS Aggregator transactions.
- Create an account at OY! Dashboard
- Do account verification by submitting the verification form. Ensure to tick the “Receive Money” and “Send Money” products since Payment Routing is a part of Receive Money & Send Money products.
- OY! team will review and verify the form and documents submitted
- Once verification is approved, set up your receiving bank account information. Important Note: Ensure that the receiving bank account information is accurate as you can only set it up once via OY! Dashboard for security reasons
- Refer to this section for detailed guidelines on how to activate QRIS Payment Method
- Submit your IP address(es) & callback URL to your business representative or send an email to business.support@oyindonesia.com
- OY! will send the Production API Key as an API authorization through your business representative. Note: Staging/Demo API Key can be accessed via OY! Dashboard by going to the “Demo” environment and the key can be found on the bottom left menu.
- Integrate QRIS Aggregator via Payment Routing API to your system. Please follow the API documentation to guide you through QRIS Aggregator - API Docs.
Creating QRIS Aggregator Transaction
Once you successfully complete the registration process for QRIS payment method, you can immediately create QRIS Aggregator transaction via Payment Routing (via API only). You will use Payment Routing Without UI when implementing QRIS Aggregator scheme.
- Integrate API QRIS Aggregator via Payment Routing.
- Hit OY!’s API Create QRIS transaction
- Insert parameter “need_frontend” with "false"
- Choose QRIS as Payment Method by
- Filling QRIS in list_enable_payment_method parameter
- Filling QRIS in list_enable_sof
- OY! will return url to access the QR code to complete the payment
- Show the QR code to your customer inside your application
Completing Payment
Please refer to this section.
Checking Transaction Status
All created QRIS Aggregator transactions are shown in OY! Dashboard. Navigate to “Payment Routing” to see the list of created transactions. Inside the dashboard, you can see the details of the transactions, including all the transaction information inputted during creation, transaction status, and the payment reference number*. The dashboard also has a feature to search, filter, and export the list of transactions in various formats: Excel (.xlsx), PDF (.pdf), and CSV (.csv)
If for some reason you do not receive our transaction callbacks successfully, you may use our API Check Status to get the latest transaction status. Check Status QRIS Transaction - API Docs.
*Payment Reference Number is an identifier of a payment attempt when the customer successfully completes a QRIS payment. The reference number is also displayed in the customer’s receipt/proof of transaction.
Receiving Fund to Balance
Once a transaction is paid by the customer, OY! updates the transaction status and sends notification to your system indicating that the transaction has been paid, and settles the funds to your OY! balance. Each payment method has a different settlement time, varying from real-time to D+2 working days.
API Account Linking
Account Linking is a feature that allows your customer's payment account to be linked to your system using tokenization. By linking the customer’s account upfront, your customer can see their account balance inside your application and later on can complete payments without being prompted for any card details or e-wallet phone number. The feature is currently supported for e-wallet ShopeePay & DANA.
Account linking feature is free of charge.
Flow
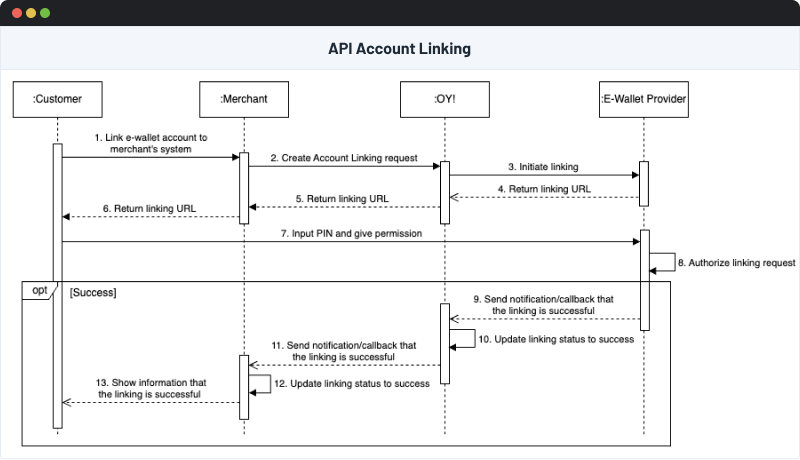
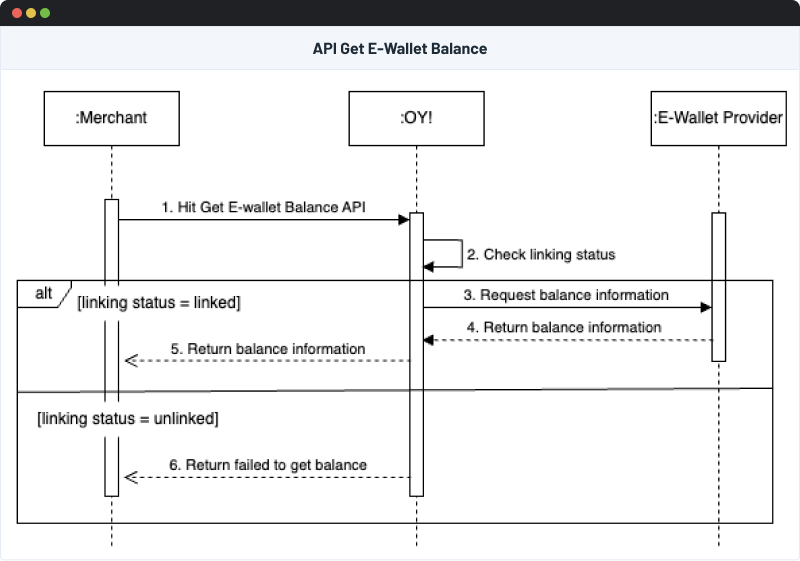
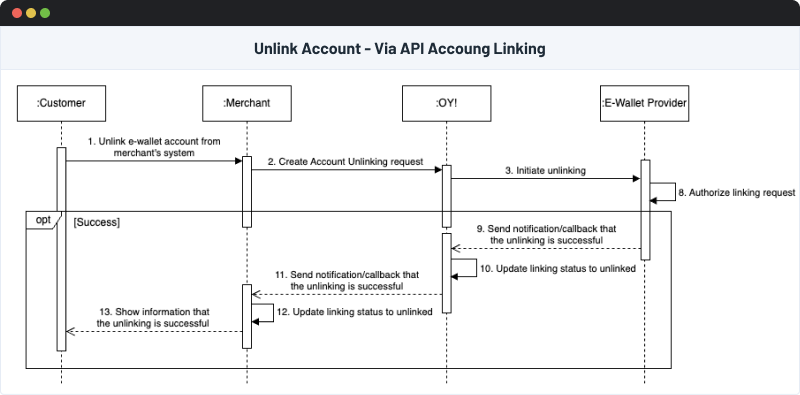
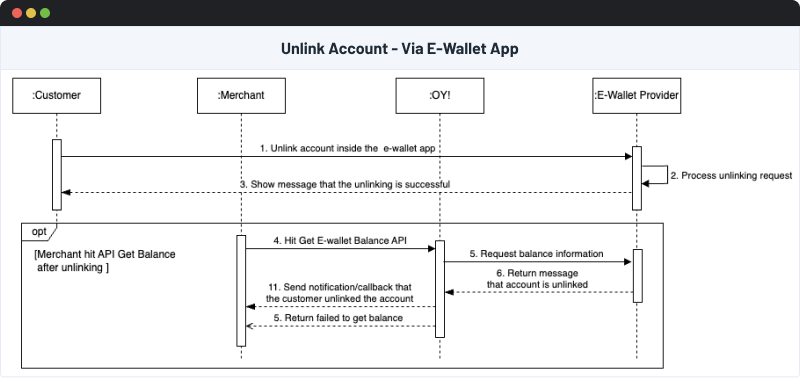
Registration and Setup
Here are the steps to guide you through registration and set up for doing Account Linking.
- Create an account at OY! Dashboard
- Do account verification by submitting the verification form. Ensure to tick the “Receive Money” since Account Linking is a part of Receive Money.
- OY! team will review and verify the form and documents submitted.
- Once verification is approved, set up your receiving bank account information.
- Important Note: Ensure that the receiving bank account information is accurate as you can only set it up once via OY! Dashboard for security reasons
- Submit your IP address(es), callback URL, and redirect URL to your business representative or send an email to business.support@oyindonesia.com
- OY! will send the Production API Key as an API authorization through your business representative. Note: Staging/Demo API Key can be accessed via OY! Dashboard by going to the “Demo” environment and the key can be found on the bottom left menu.
- Integrate Account Linking API to your system. Please follow the API documentation to guide you through.Account Linking - API Docs
Link customer’s payment account to your application
Customers can link their payment account to your application by hitting the API Account Linking. Here are the steps to guide you and your customer when doing account linking:
- Integrate API Account Linking to your system. Account Linking - API Docs
- Hit OY!’s API Get Linking URL . You will receive a linking URL as a response. The linking URL is used for the customer to authorize the linking request by giving a permission.
- Customer gives a permission and inputs PIN to authorize the request
- Payment provider will process the request and OY! will send you a callback to notify that the account is successfully linked
- Customer is redirected to the redirect URL you specified when hitting the Get Linking URL API
Check customer’s payment account balance
Once the customer linked their payment account, you can get the information of the customer's account balance by hitting the API Get E-wallet balance. You can show the balance inside your application. For instance, show the balance during the checkout process so the customer can know their balance before choosing a payment method. Please refer to the API Docs for more details: Get Account Balance API - API Docs
Unlink customer’s payment account from your application
Customers who have linked their payment account can unlink their account anytime. They can do so via API Account Unlinking or via Payment Provider Application. Using the API Account Unlinking allows your customers to unlink their account inside your application. Another option that the customer can do is to unlink their account via the payment provider’s application.
Here are the steps to guide you and your customer when unlinking an account:
API Account Unlinking
- Integrate API Account Unlinking to your system. Account Unlinking - API Docs
- Hit OY!’s API Account Unlinking. Once you hit our API, OY! will hit the provider’s system to unlink the customer’s account
- OY! will send a callback to let you know that the unlinking is successful
Payment Provider Application
ShopeePay
- Open Shopee app
- Navigate to Setting → Apps Linked to ShopeePay
- Click unlink account for your merchant
DANA
- Open DANA app
- Navigate to Account → Linked Accounts
- Click remove linking for your merchant
- If your customer's DANA account is frozen, then their account is temporarily unlinked. Once the account is unfrozen and the token has not expired, their account is automatically linked again.
Account Receivable
Payment Link Account Receivable product provides features to help you manage your invoices and payments. This product supports invoice customization and payment customization based on your customer needs. Creation for Account Receivable is available on OY! dashboard and/or API.
Disclaimer: the word “account receivable” is used interchangeably with “invoice” in this document
Payment Flow
- You create account receivable (i.e. invoice) for your customers and share it through email or WhatsApp
- Your customers can make payments either through the link attached to the invoice or directly via a Virtual Account (VA) number.
- OY! detects the payments and notifies you about the payments through callback and payment status update on your dashboard
- The payments received will be settled in your OY! dashboard
Key Features
Various options of creating account receivable
1. Creating account receivable through dashboard
- No integration needed
Offer easiest way to invoicing through dashboard without any technical development.
- Manage your customer data easily
You can edit or deactivate the customer data as you need. The customization includes taxes imposed and type of payment as explained below (with payment invoice link or fixed virtual account), so it can be customizable according to your needs.
- Various payment methods
We have various payment options that you can use to receive payments from your customer:
- Payment invoice link (Bank Transfer (via Virtual Account and Unique Code), Credit/Debit card, E-Wallet (ShopeePay, DANA, LinkAja, OVO), QRIS, and Retail outlets (Alfamart and Indomaret))
- Fixed Virtual Account. Fixed VA is a virtual account where your customer uses the same account number for every payment. This means they will pay the same virtual account for every invoice you send. However, you can’t send a new invoice to the customer until the previous one has been paid.
- Customizable Invoice to Personalize Your Business
Create invoice templates based on your business personalization. We provide a lot of invoice templates and are able to change the color and business logo that suits your business branding.
2. Creating account receivable through API
Seamless integration with your customer's purchase journey. Simply send us an API request and we will respond with an account receivable (i.e. invoice) link that you can embed to your system.
Added level of customization Below are the things that you can customize:
- Amount (specify the amount and choose between open amount vs closed amount)
- Admin fee (choose whether the admin fee will be paid by your customers or borne by you)
- Payment method (choose the payment methods displayed to your customers among Bank Transfer (via Virtual Account and Unique Code), Credit/Debit card, E-Wallet (ShopeePay, DANA, LinkAja, OVO), QRIS, and retail outlets (Alfamart and Indomaret). Additionally, you can choose which banks are enabled for Bank Transfer method.
- Payment invoice expiration date
- The customer data for invoicing
Various Payment Methods. Our payment invoice provides multiple payment options: Bank Transfer (via Virtual Account and Unique Code), Credit/Debit card, E-Wallet (ShopeePay, DANA, LinkAja, OVO), QRIS, and retail outlets (Alfamart and Indomaret).
Upload or Create a PDF for your Invoice Billing. We help you to generate your invoice using OY! PDF templates also you can attach your invoice supporting documents via our API.
Account Receivable Delivery by Email and/or WhatsApp. You can choose to send the created link to your customers through Email and/or WhatsApp for better payment conversion. By default, our system will send the invoice through email but if you want to share the invoice and payment invoice link through WhatsApp, follow the steps here.
Capability to monitor payment invoice/account receivable details on dashboard
Whether you create the account receivable through dashboard or API, you can check the list of transactions through dashboard easily.
Support Multi Entity Management
With this feature, you will be able to create invoices from your users through account receivable created on behalf of a Sub-Entity account. When your customers make a successful transaction, the transaction will be recorded in the Sub-Entity Account's balance. As a main account, you can view the Sub-Entity Account's balance and transaction list anytime under “Sub-Entity Statement” in the “Multi Entity” menu.
Click here for more information on this feature.
Registration and Set Up
For dashboard-generated invoices
Follow this check-list to ensure you're all set up to use the service:
- Create an account for OY! business
- Upgrade your account by submitting the required documentation
- Have your upgrade request approved
- Set up your receiving bank account information (note: ensure that the receiving bank account information is accurate as it cannot be changed via OY! dashboard for security reasons)
- Once your account is approved, you can start creating account receivable transactions
For API-generated invoices
- Create an account OY! business
- Upgrade your account by submitting the required documentation
- Have your upgrade request approved
- Set up your receiving bank account information (note: ensure that the receiving bank account information is accurate as it cannot be changed via OY! dashboard for security reasons)
- Submit your IPs to your business representative
- Set your callback URLs in “Developer Option” under the “Settings” menu. Please input your callback URLs in the Payment Link’s section
- Receive an API Key from us (note: it is required for API authorization purpose)
- Integrate with our Account Receivable API
Testing
Creating dashboard-generated dummy account receivable
- Log on to your OY! dashboard
- Choose "Demo" environment
- Click “Customer Data” under Receive Money menu
- Click “Create New Customer” on the top right corner
- Fill in the required fields regarding Customer Information then click “Next”
- Fill in the required fields regarding Tax and Payment Information then click “Save”
- Start to create a new invoice by choosing “Account Receivable” under the Receive Money menu
- Click "Create New Invoice" on the top right corner
- Fill in the necessary details
| Parameter | Description |
|---|---|
| Invoice Number | The number of the invoice to be created |
| Invoice Date | The date of the invoice |
| Due Date | Due date of a transaction. You can choose between 7, 14, 30, 45, or 60 days after the created date of the invoice OR you can also input a specific/custom date. Your customer will get reminders to pay on D-1, D-Day, and D+7 from the transaction due date through email. |
| Link Expiry Datetime | You can set your payment invoice link expiry date and time for your convenience. The expiry time selected will also appear on PDF documents. |
| Customer | The name of the customer whom the invoice is addressed to. You can choose the name of the customer from the dropdown. To create a new customer, follow the instructions here. |
| Product Description | The name and/or description of the product |
| Quantity | The quantity of the product |
| Unit Price | Unit price of the product |
| Amount | Total amount for the product (amount = quantity x unit price) |
| Notes | The note to be displayed in the automatically generated invoice file |
| Additional Documents | The supporting documents that will be attached in the email along with the invoice. Accept PDF & Excel files. Maximum of 4 documents (maximum 5MB each). |
| Invoice Payment | You can choose between "Payment Link" (the invoice will be embedded with a payment link that the customer can use to make a payment) or "Invoice Only" (the invoice will not be embedded with a payment link). For "Invoice Only", invoice status can be adjusted at any time for record purposes. |
| Payment Method | The payment method that you can choose to enable/disable for your customers only if you choose “Payment Link” as your invoice payment type above. The payment methods available are Bank Transfer (via Virtual Account and Unique Code), Credit/Debit card, E-Wallet (ShopeePay, DANA, LinkAja, OVO), QRIS, and retail outlets (Alfamart and Indomaret). |
| Admin Fee Method | You can choose between "Included in total amount" or "Excluded from total amount". "Included in total amount" means the admin fee will be deducted from the payment amount made by the customer. "Excluded from total amount" means the admin fee will be added to the customer's total payment (Total Amount = Specified Amount + Admin Fee) |
Creating API-generated dummy account receivable
- Create an OY! business account
- Send a request to activate API Payment Link product and obtain staging API Key to your business representative
- Create the customer data first by sending a request to https://api-stg.oyindonesia.com/api/account-receivable/customers. Enter the required and optional fields, as referenced in the API reference docs
- Then, you can try to create an account receivable by sending a request to https://api-stg.oyindonesia.com/api/account-receivable/invoices. Enter the required and optional fields, as referenced in the API reference docs
Accessing and monitoring the created test account receivable
Whether you create the link through dashboard or API, you can see the details of your link on the OY! Dashboard, you can check it on “Account Receivable” under the Receive Money menu.
Mock Credentials for Testing
- For payment via Credit Card or Debit Card, you may use the credentials below to simulate an end-to-end payment journey for a successful transaction in the staging environment:
| Card Details | Values |
|---|---|
| Card Number | 2223000000000007 |
| Card Expired Month/Year | 01/39 |
| Card CVN | 100 |
| Card Holder Name | John Doe |
- Click the payment invoice link
- You’ll be redirected to page to choose which transaction you want to proceed
- Choose your payment method (in this case please choose “Credit/Debit Card”) then click “Bayar”
- You’ll be redirected to the summary of the payment
- Please click “Bayar via CARDS”
- You’ll be redirected to page to process your payment
- Please fill in the credentials above, email, phone number, and also mark the box for terms and conditions then click “Pay”
- You’ll see loading page that informs you the system is processing your payment
- Congratulations! You’ve completed your (dummy) payment on account receivable using credit/debit card
- For bank transfer you can test process payment from payment invoice link and mock the transaction using callback from our OY! Dashboard with demo environment
- Click the payment invoice link
- You’ll be redirected to page to choose which transaction you want to proceed
- Choose your payment method (in this case please choose bank transfer BCA) then click “Bayar”
- You’ll see loading page that informs you the system is processing your payment
- Copy the VA number then open the OY! dashboard and choose demo environment
- Go to section “Callback Bank Transfer” under the “Settings” menu
- Select the Transaction Type (in this case please select “Virtual Account”), Bank Name, VA Number, Amount, and Payment Date and Time then click “Send Callback”
- Congratulations! You’ve completed your (dummy) payment on account receivable using bank transfer
- For e-wallet you can test to process payment from payment invoice link, specifically Shopeepay and LinkAja
- Click the payment invoice link
- You’ll be redirected to page to choose which transaction you want to proceed
- Choose your payment method (in this case please choose e-wallet category) then click “Bayar”
- You’ll see loading page that informs you the system is processing your payment
- Go to “One Time” on section “Payment Link”
- Copy the “Ref Number” on transaction you’ve created for Account Receivable (you can see the amount of transaction and customer name)
- Go to the “E-wallet Callback”
- Choose e-wallet type you’ve choose on the payment link
- Paste the “Ref Number” on the form Ref Number
- Put the amount of transaction
- Click “Send Callback”, you can check your transaction successfully paid on Account Receivable (demo) page
- Congratulations! You’ve completed your (dummy) payment on account receivable using e-wallet
Note: Currently we only provide dummy transactions using credit/debit card, bank transfer, and e-wallet. Please use only the mentioned payment method, otherwise your payment may not be processed successfully.
How to Use Account Receivable via Dashboard
- Log on to your OY! dashboard
- Choose "Production" environment
- Choose “Account Receivable” under Receive Money menu
- Click "Create New Invoice" on the top right corner
- Fill in the necessary details
| Parameter | Description |
|---|---|
| Invoice Number | The number of the invoice to be created |
| Invoice Date | The date of the invoice |
| Due Date | Due date of a transaction. You can choose between 7, 14, 30, 45, or 60 days after the created date of the invoice OR you can also input a specific/custom date. Your customer will get reminders to pay on D-1, D-Day, and D+7 from the transaction due date through email. |
| Link Expiry Datetime | You can set your payment invoice link expiry date and time for your convenience. The expiry time selected will also appear on PDF documents. |
| Customer | The name of the customer whom the invoice is addressed to. You can choose the name of the customer from the dropdown. To create a new customer, follow the instructions here. |
| Product Description | The name and/or description of the product |
| Quantity | The quantity of the product |
| Unit Price | Unit price of the product |
| Amount | Total amount for the product (amount = quantity x unit price) |
| Notes | The note to be displayed in the automatically generated invoice file |
| Additional Documents | The supporting documents that will be attached in the email along with the invoice. Accept PDF & Excel files. Maximum of 4 documents (maximum 5MB each). |
| Invoice Payment | You can choose between "Payment Link" (the invoice will be embedded with a payment link that the customer can use to make a payment) or "Invoice Only" (the invoice will not be embedded with a payment link). For "Invoice Only", invoice status can be adjusted at any time for record purposes. |
| Payment Method | The payment method that you can choose to enable/disable for your customers. The payment methods available are Bank Transfer (via Virtual Account and Unique Code), Cards (Credit Card/Debit Card), E-Wallet (ShopeePay, DANA, LinkAja, OVO), QRIS, and retail outlets (Alfamart and Indomaret). |
| Admin Fee Method | You can choose between "Included in total amount" or "Excluded from total amount". "Included in total amount" means the admin fee will be deducted from the payment amount made by the customer. "Excluded from total amount" means the admin fee will be added to the customer's total payment (Total Amount = Specified Amount + Admin Fee) |
Create Invoice form
Invoice details inside dashboard
Invoice preview inside the dashboard
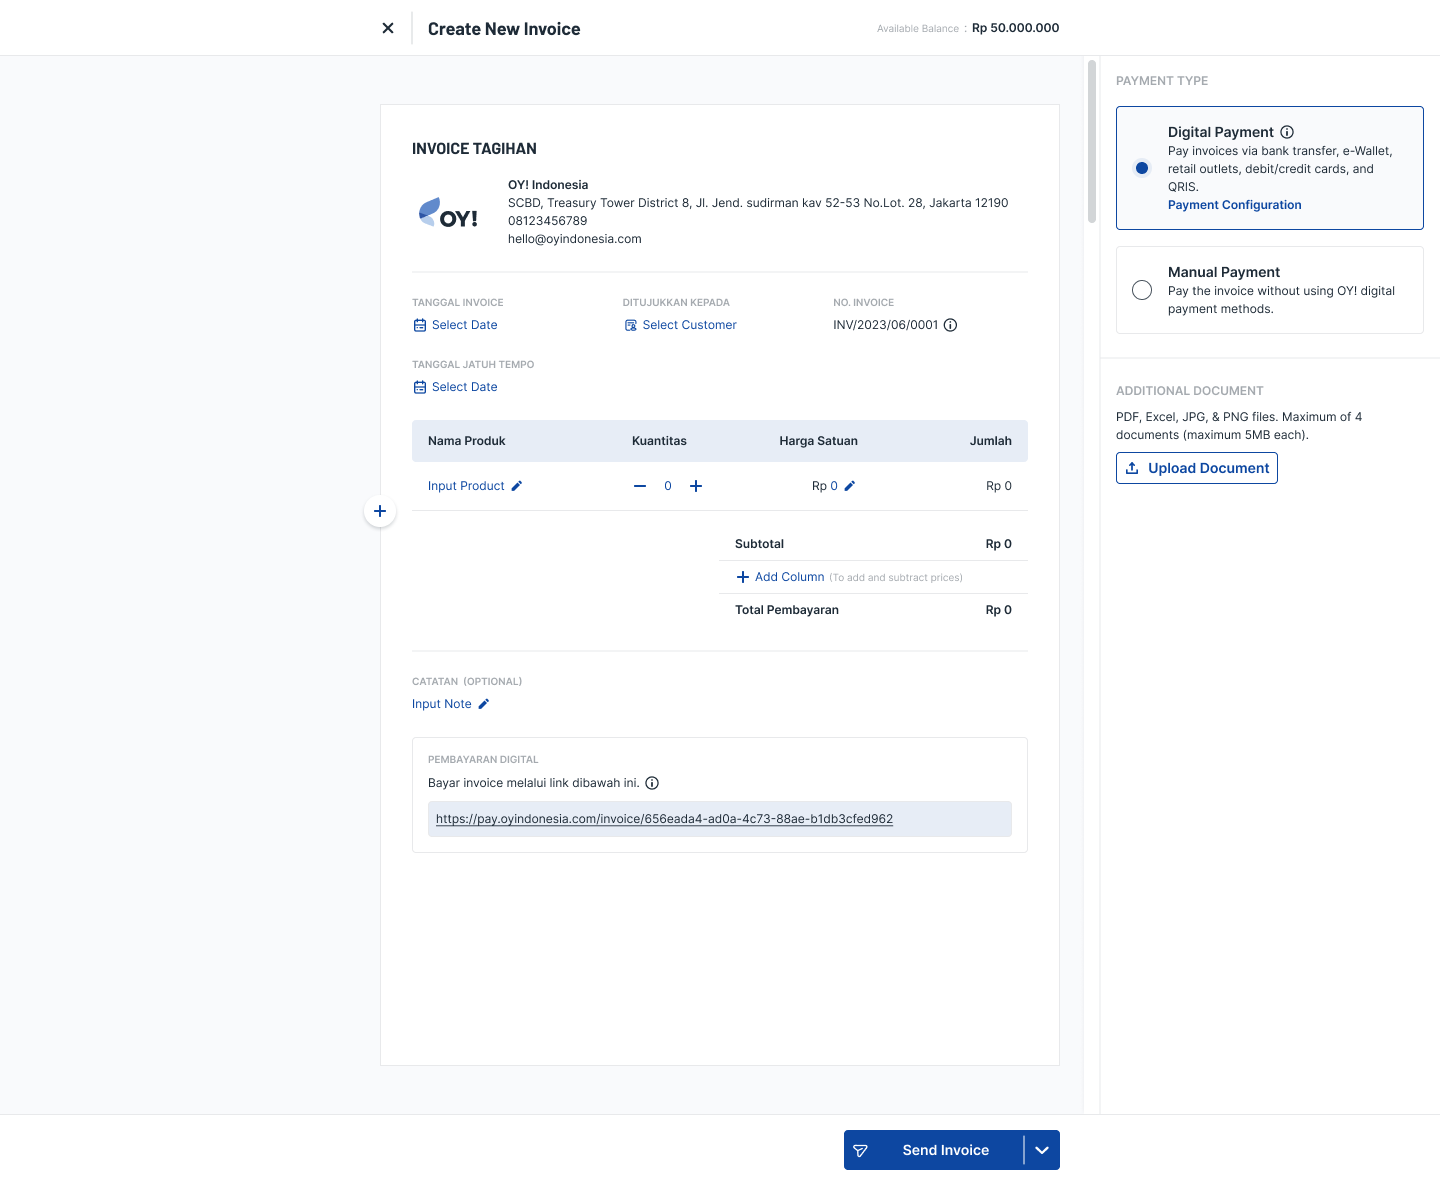
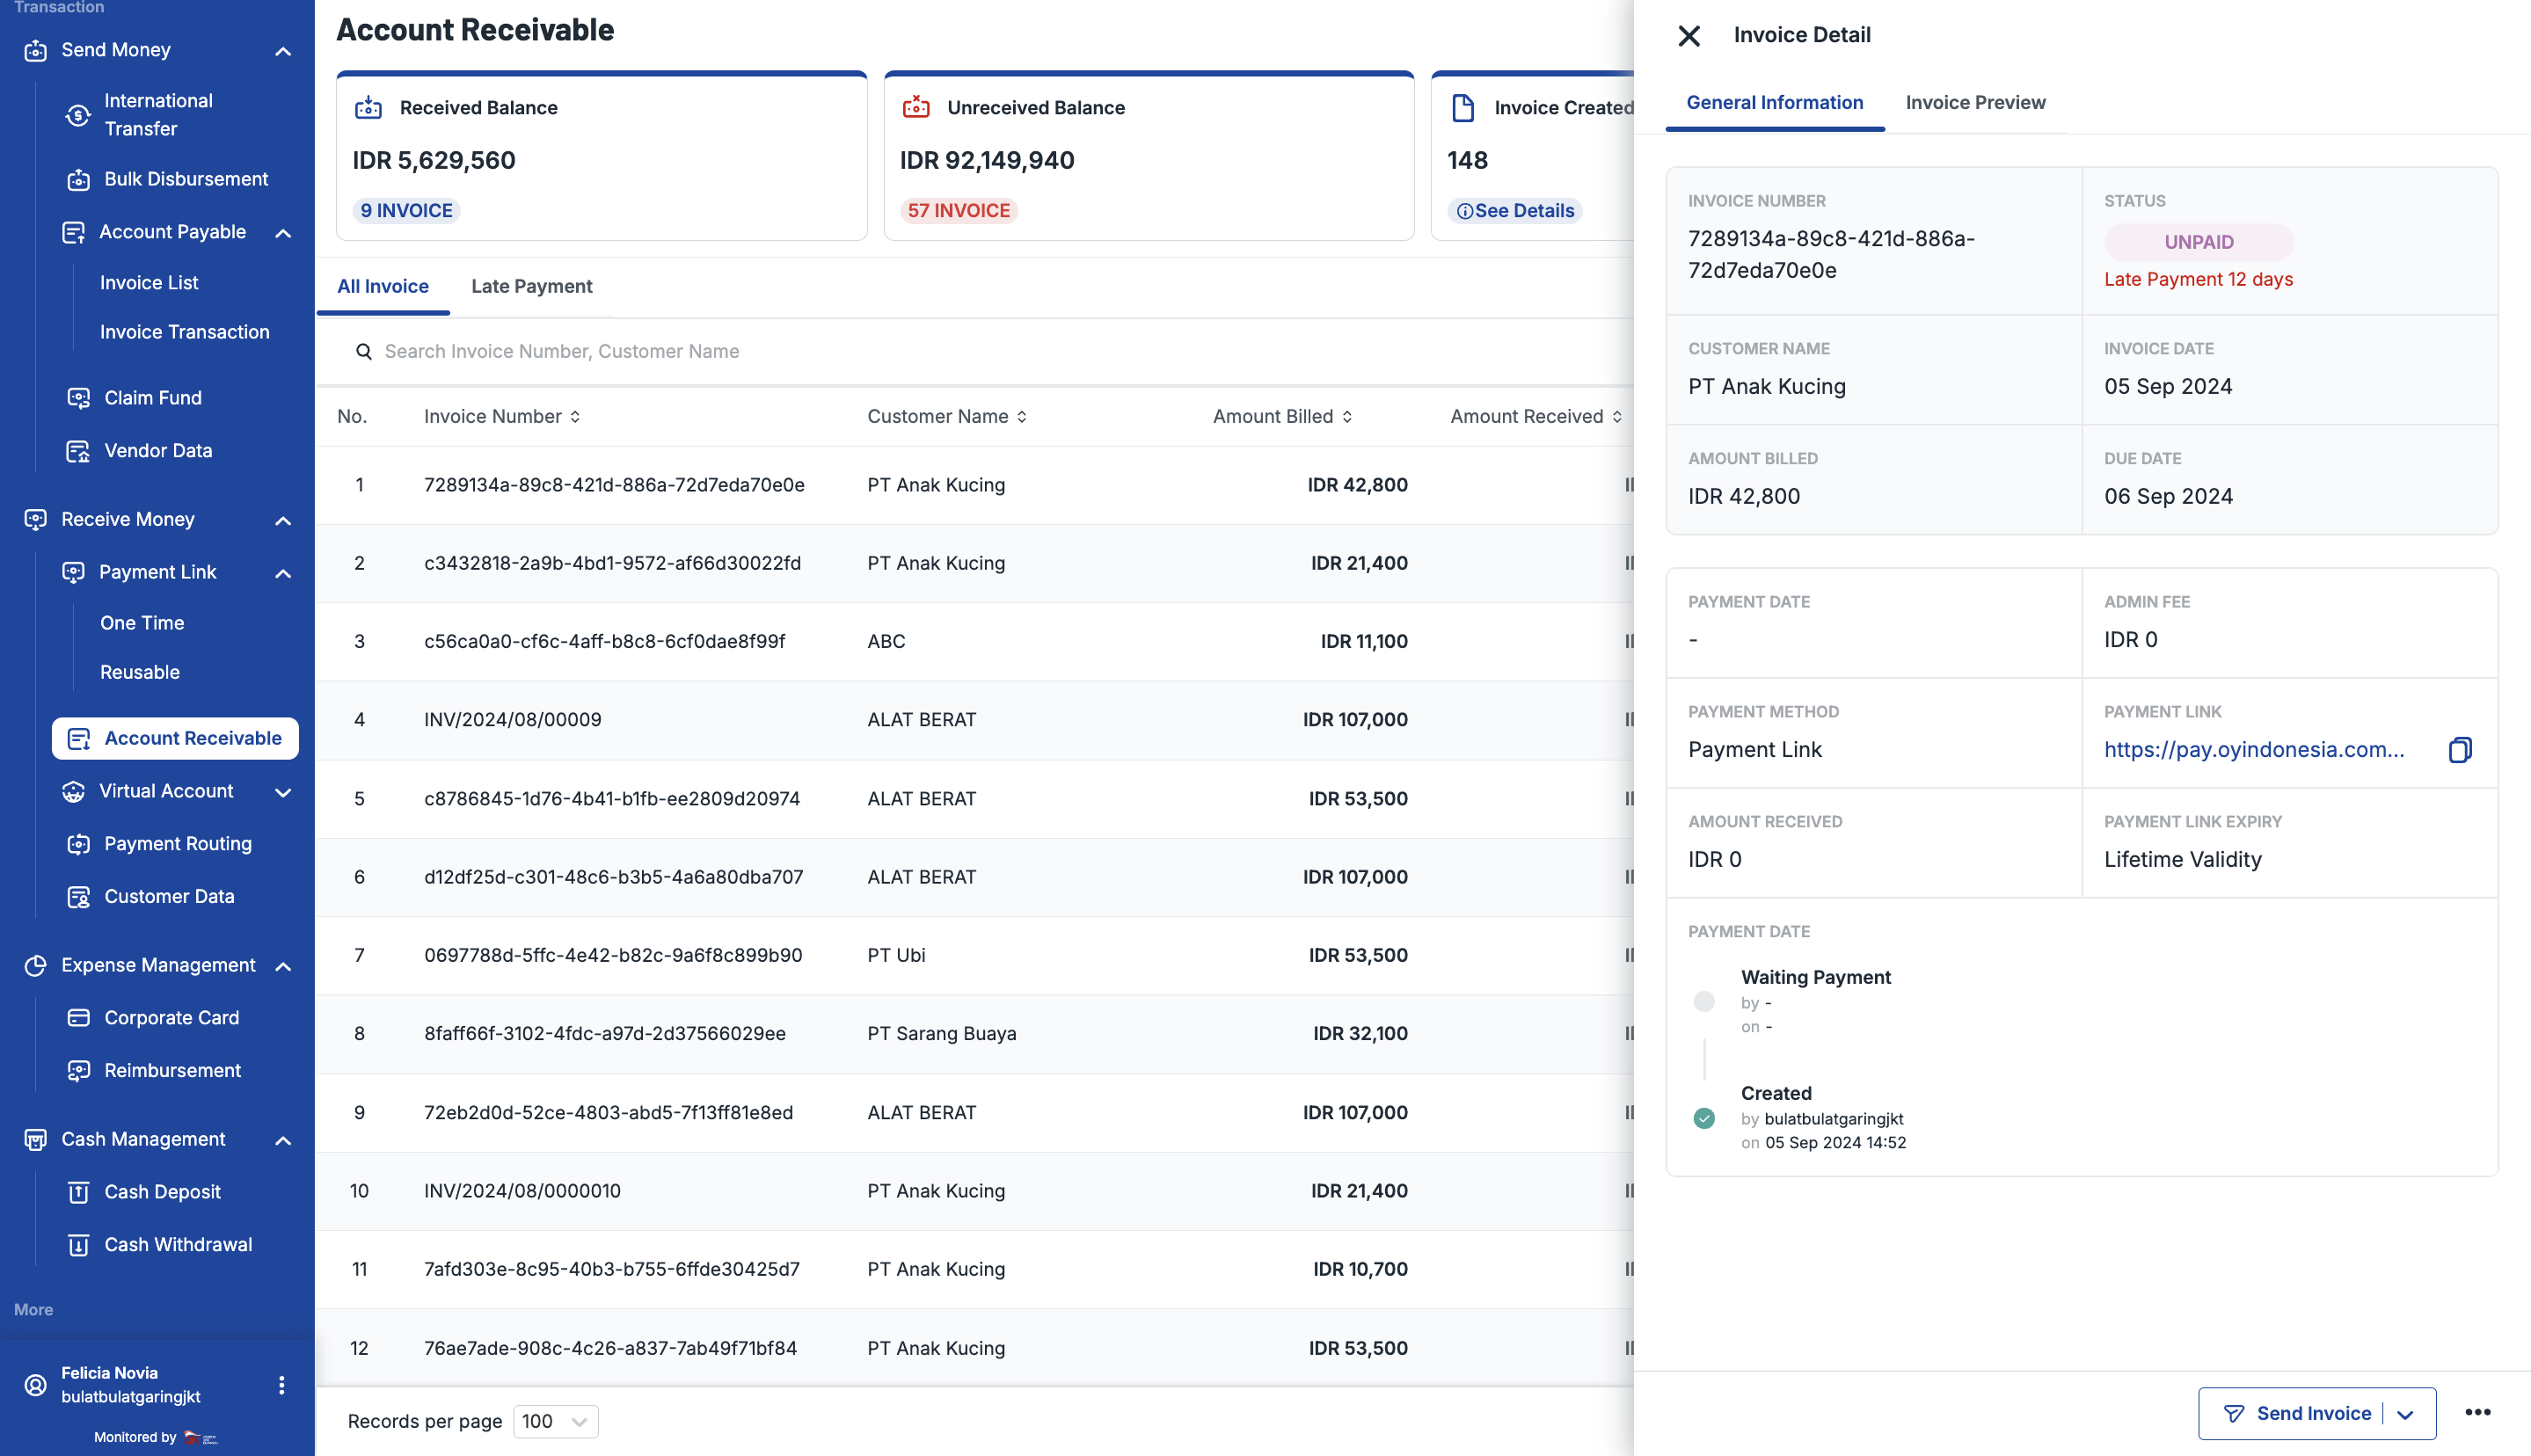
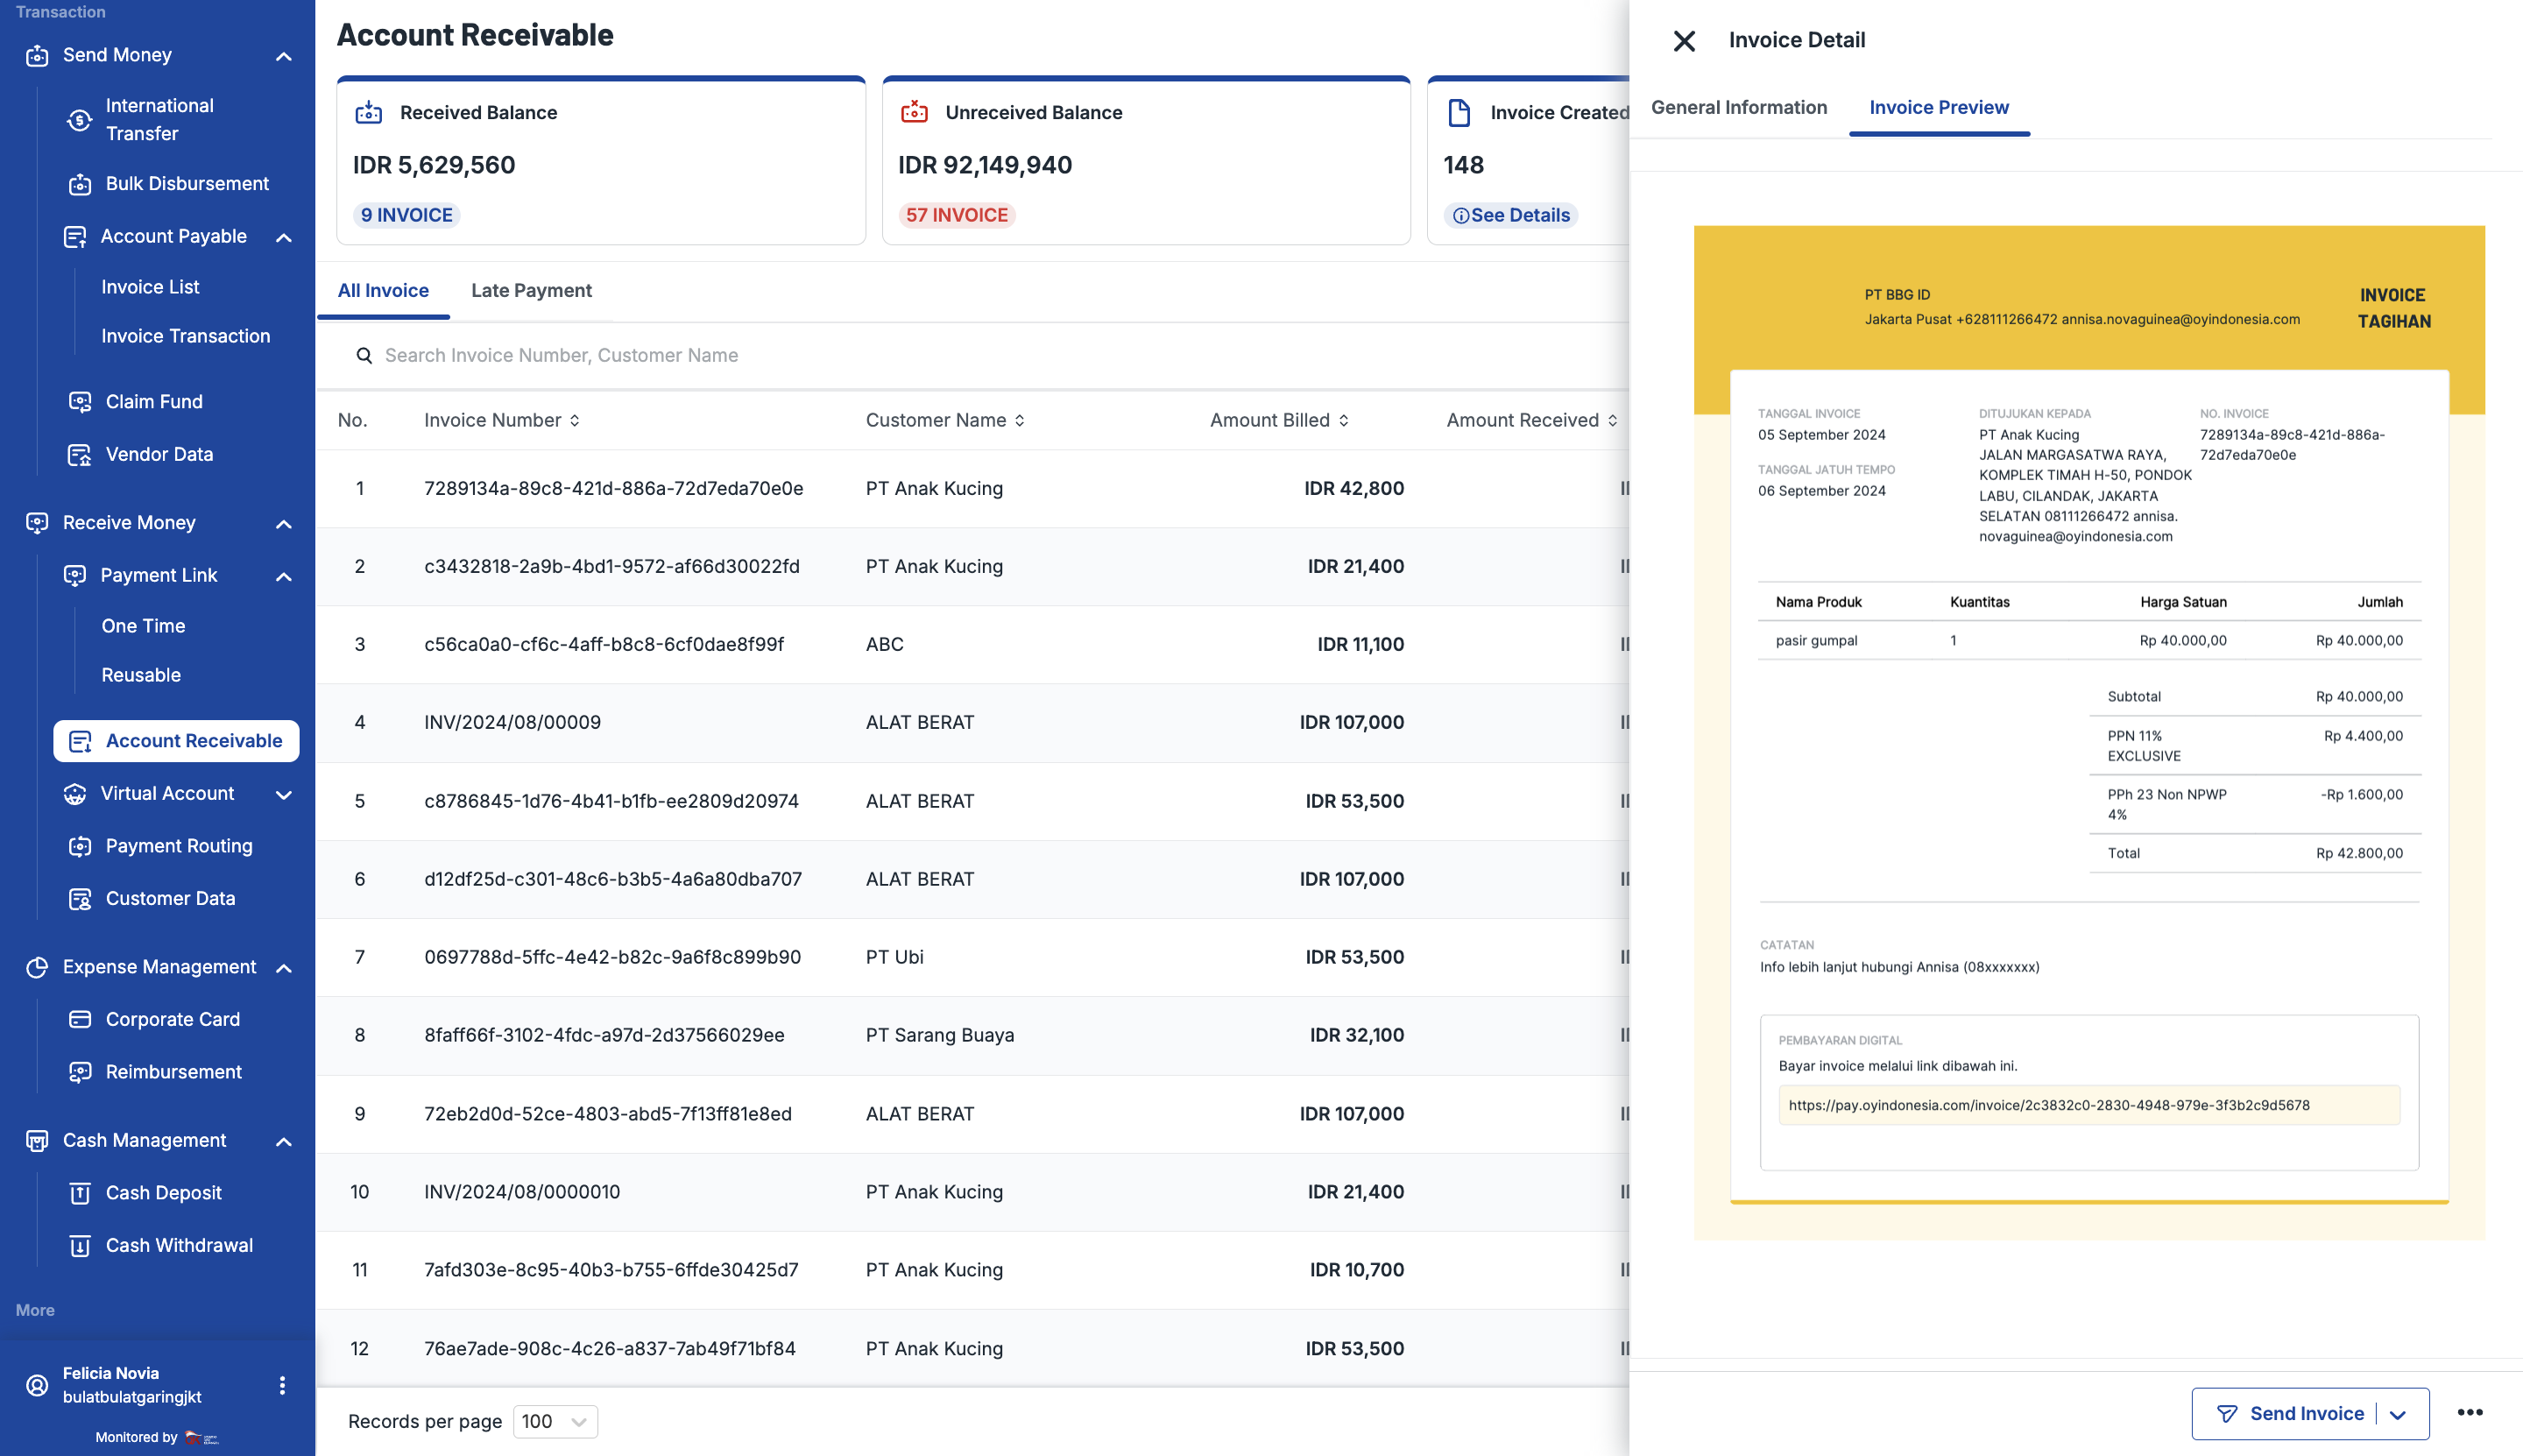
Monitoring the account receivable
All of the created invoices (via API or Dashboard) can be monitored through your dashboard (Invoice List).
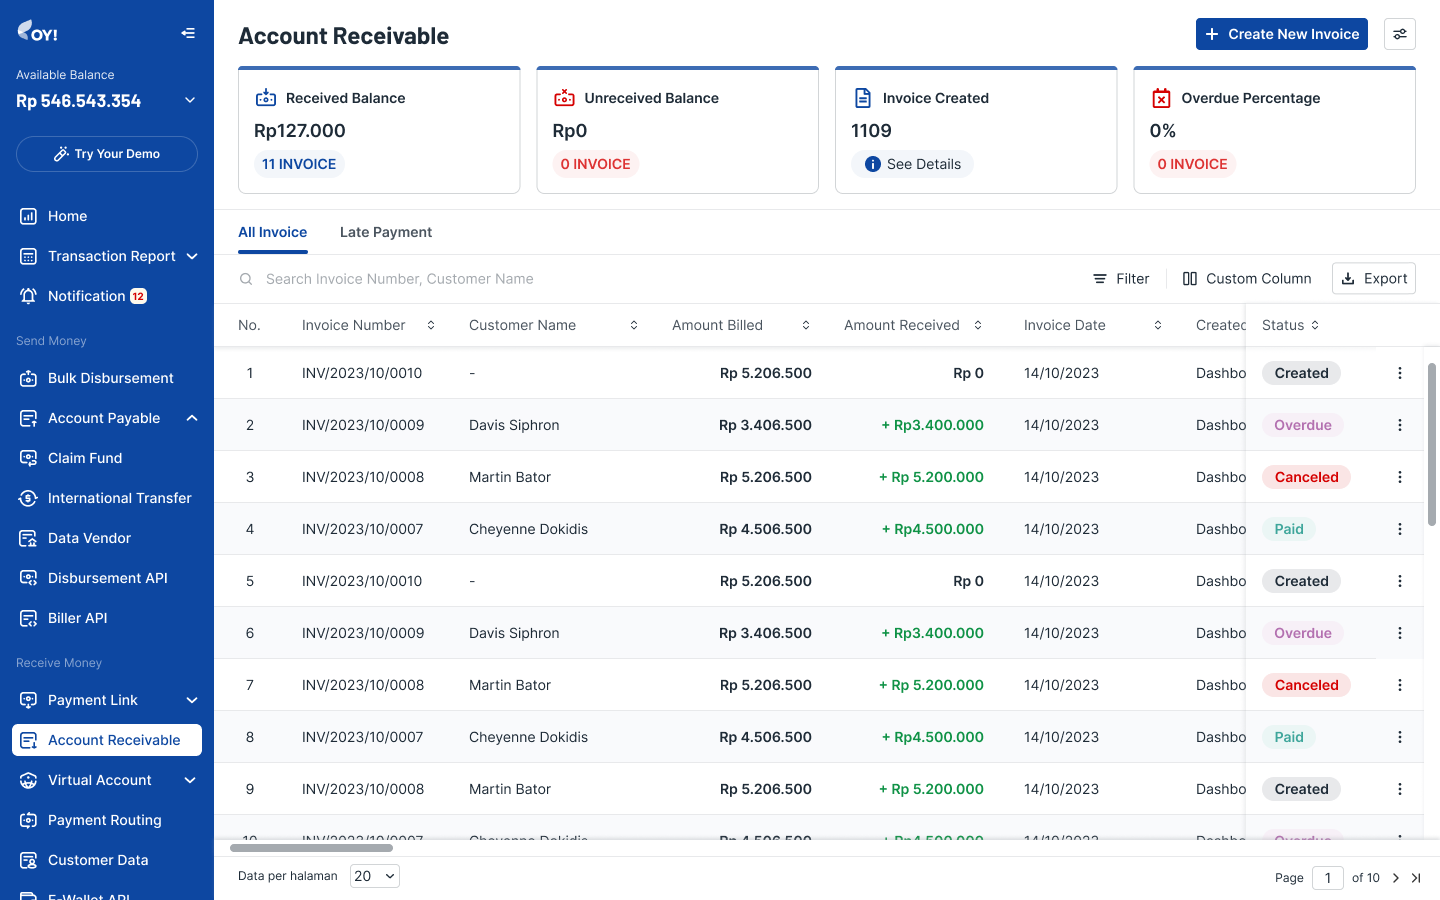
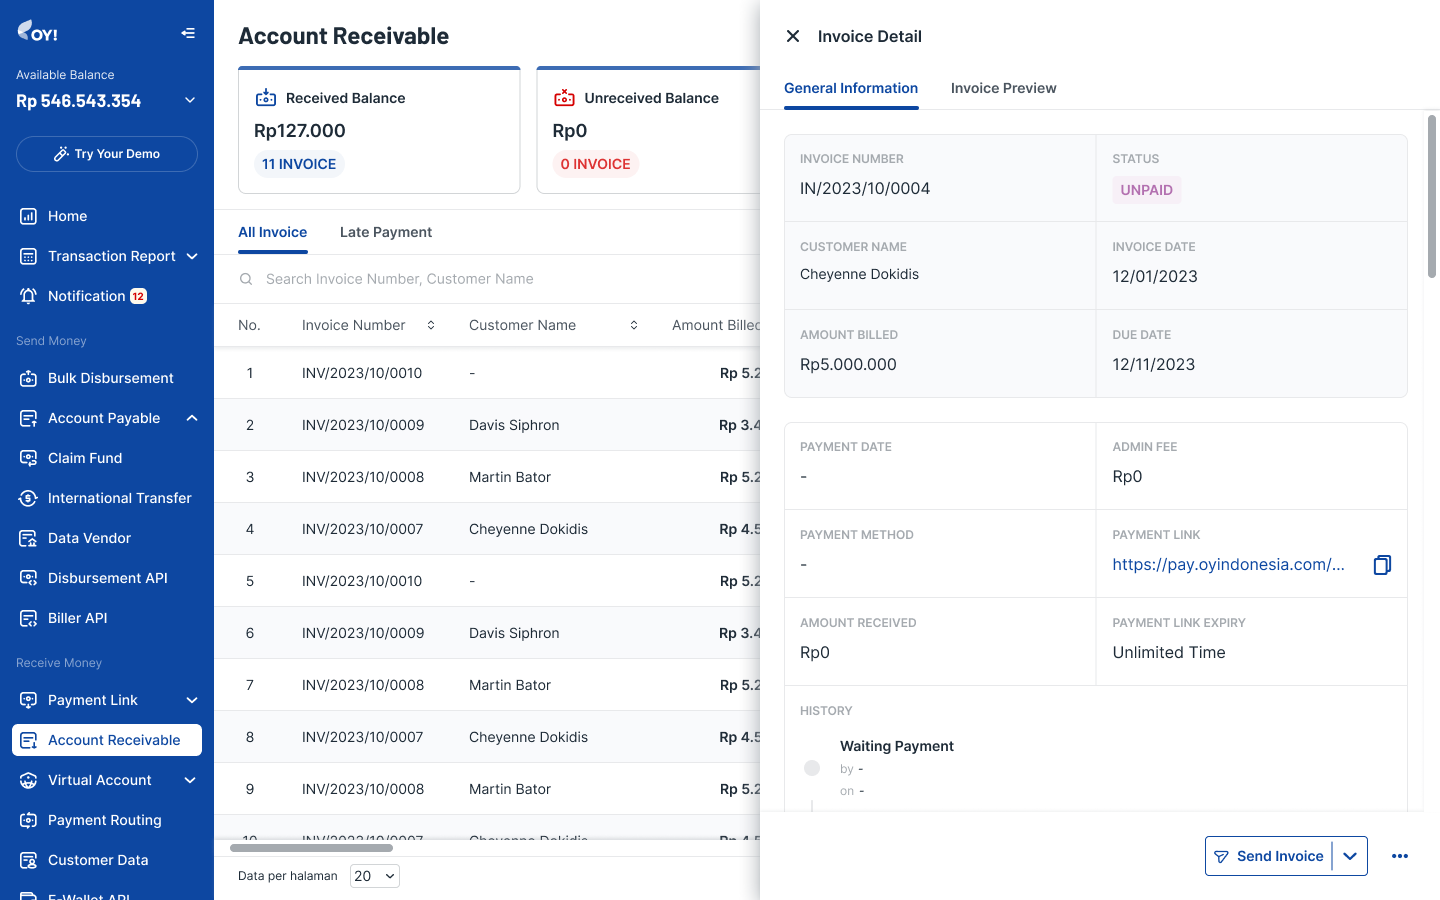
The transaction details that you can see are:
| Column Name | Definition |
|---|---|
| Invoice Number | The number of the invoice created |
| Customer Name | The name of the customer whom the invoice belongs to the amount billed for that particular transaction |
| Amount Billed | The amount billed for that particular transaction |
| Admin Fee | The admin fee charged for that particular transaction |
| Amount Received | The amount received / the amount of payment made by the customer. This will only be filled in after the customer has completed the payment |
| Invoice Date | The date of the invoice |
| Payment Date | The date of payment (if the invoice has been successfully paid by the customer) |
| Due Date | The invoice due date |
| Days Past Due | How many days an invoice has gone unpaid past the due date. For example, if the due date is 1 July and the invoice is not paid by 4 July, then Days Past Due will be filled in with “Late Payment 3 days”. |
| Payment Link Expiry | Maximum date and time that a payment link can stay valid for before expiring permanently. |
| Status | The transaction status. Possible values are CREATED, PAID, CANCELED, and OVERDUE |
In terms of status, below are the status mapping between API Invoice and status in dashboard
| API Invoice Status | Dashboard Status |
|---|---|
| CREATED, WAITING PAYMENT | UNPAID |
| PAID | PAID |
| CANCELLED | CANCELED |
| OVERDUE | UNPAID (with details under the Late Payment Tab on the Invoice Details page) |
Definition for each status
| API Invoice Status | Explanation |
|---|---|
| CREATED | You already created the account receivable invoice and the customer hasn't made any action. |
| WAITING PAYMENT | Your customer already chooses the payment method and needs to pay before the time limit ends. |
| PAID | Your customer has successfully paid the invoice. |
| CANCELLED | The invoice has already been deleted (this can be from OY! dashboard or API request). |
| OVERDUE | The invoice has passed the invoice payment deadline. |
There are several actions that you can take for the created invoice:
| Action | Definition |
|---|---|
| Send invoice | Send the invoice to the customer's defined email |
| Download invoice | Download the PDF file of the invoice |
| Delete | Delete the invoice. Only invoice with status CREATED can be deleted |
Creating a Customer for Account Receivable
There are 2 ways to create a Customer:
Option 1: through “Create Invoice” 1. Click “Select Customer” 1. Click "Add New Customer" 1. Fill in Customer ID, Customer Name (mandatory), PIC Name, Customer Phone Number, Customer Email, Address, and Tax Type (mandatory). 1. Click “Save”
Create Invoice page
Add Customer from Create Invoice
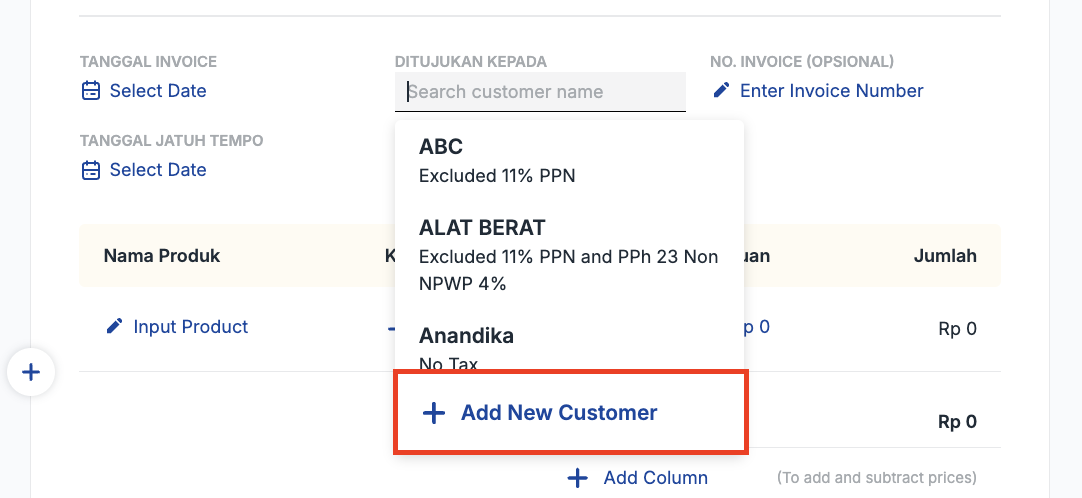
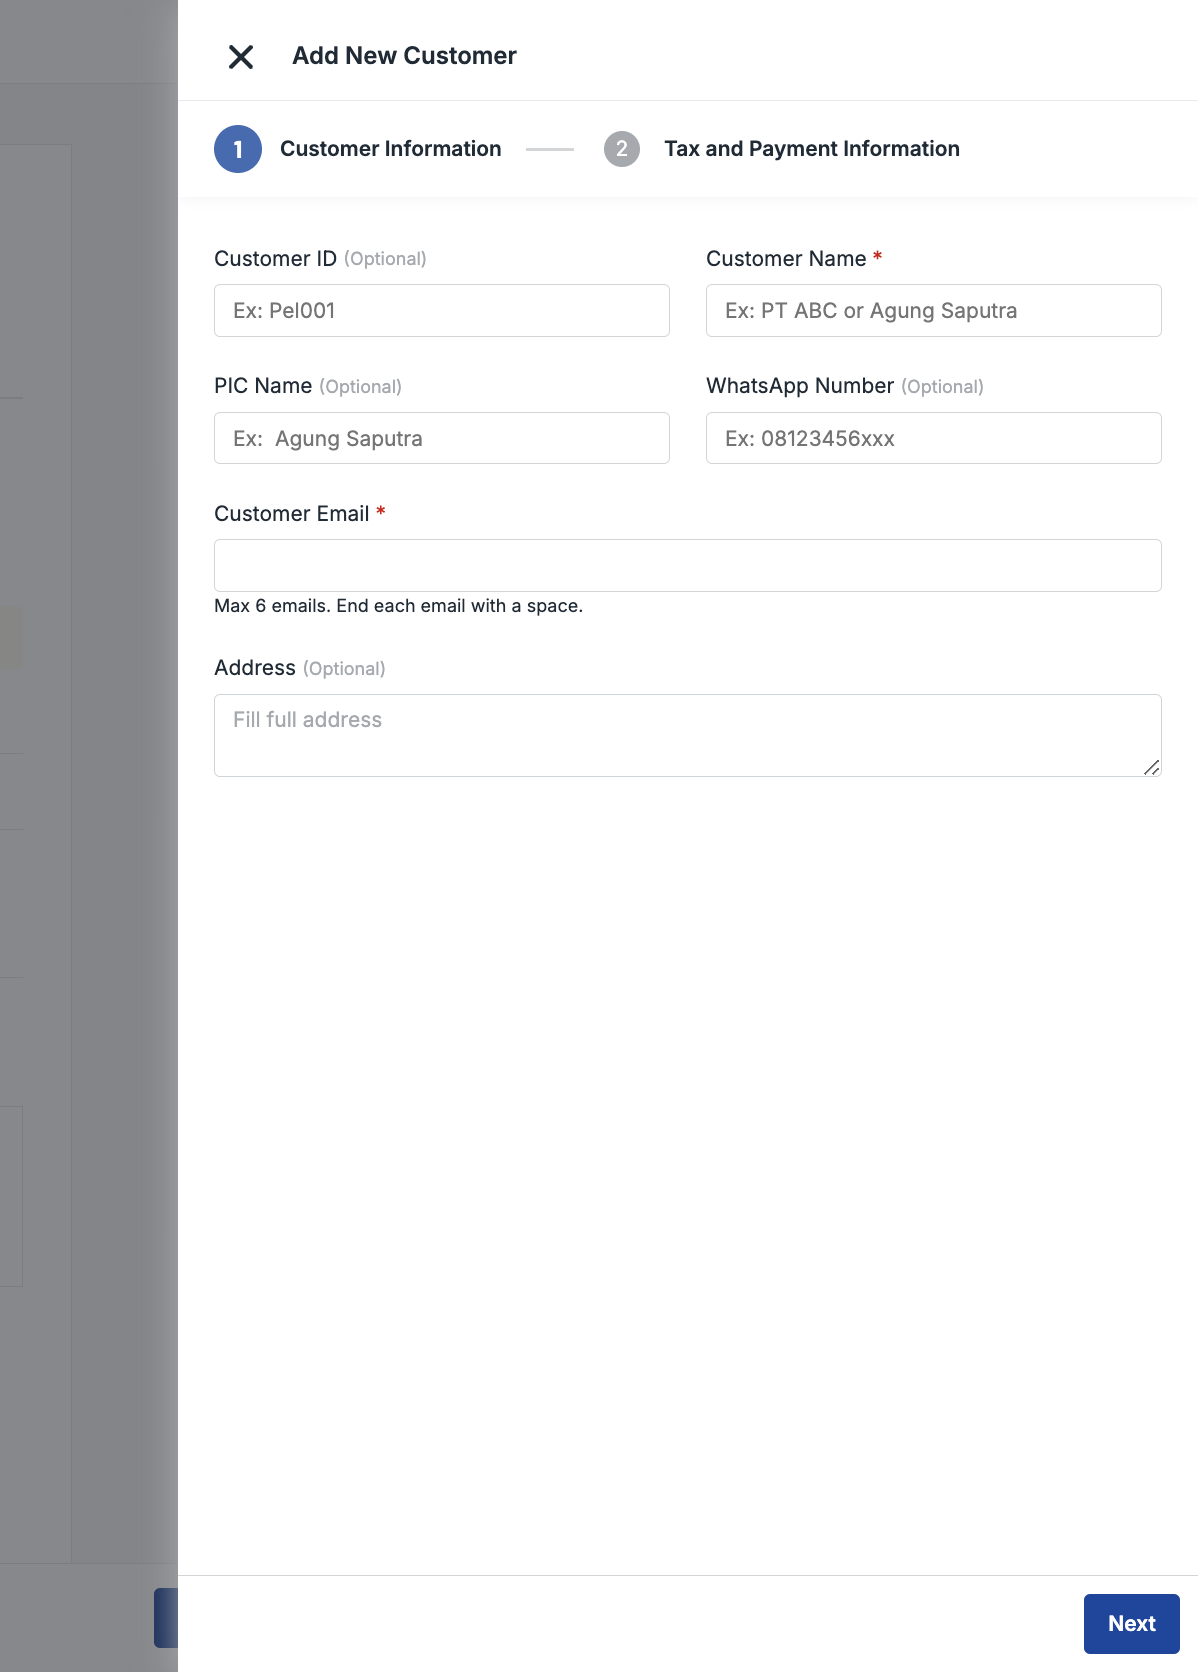
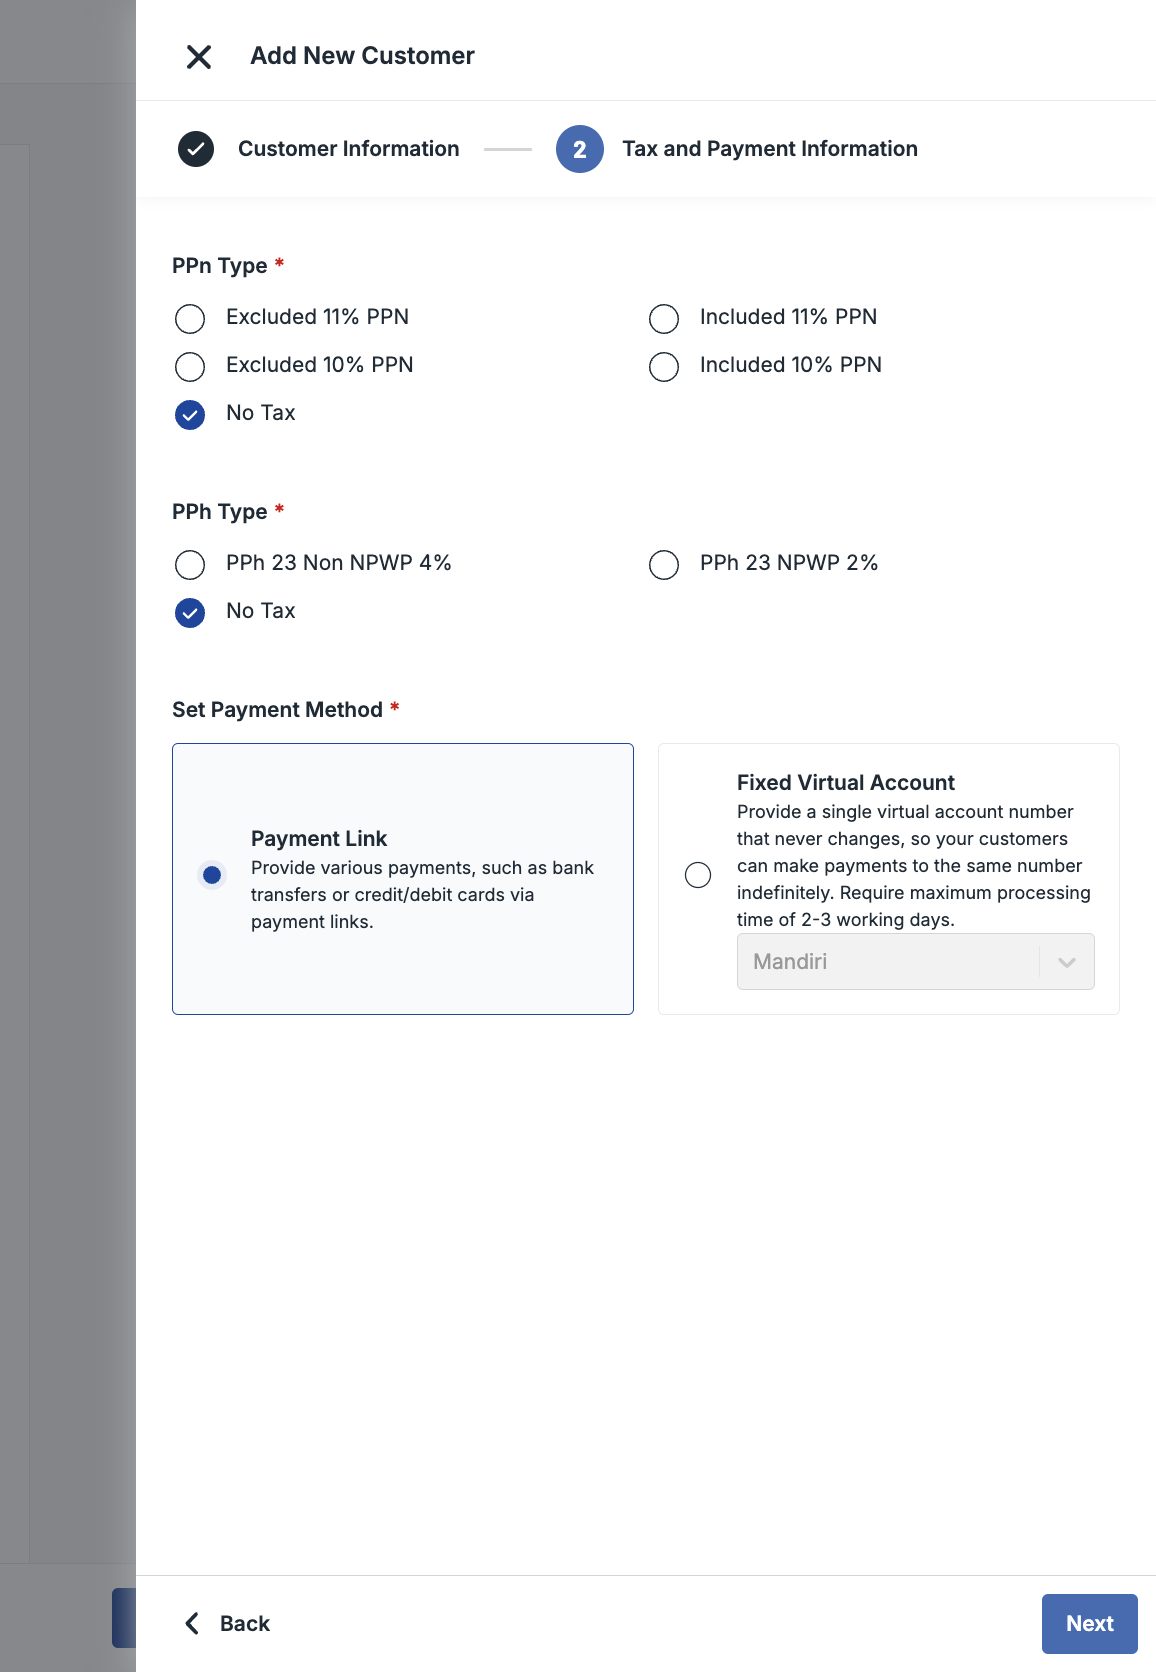
For tax type, explanation is as follows:
| Tax Type | Definition |
|---|---|
| No tax | Tax will not be added to the subtotal |
| PPN 10% Inclusive | Tax will not be added upon the subtotal because the subtotal is assumed to be tax inclusive. For transactions prior to April 2022, a 10% PPN applies. |
| PPN 10% Exclusive | Tax will be added separately to the subtotal. For transactions prior to April 2022, a 10% PPN applies. |
| PPN 11% Inclusive | Tax will not be added upon the subtotal because the subtotal is assumed to be tax inclusive. PPN 11% is applicable for transactions after April 2022. |
| PPN 11% Exclusive | Tax will be added separately to the subtotal. PPN 11% is applicable for transactions after April 2022. |
| PPh 23 Non NPWP 4% | Tax will be subtracted from the subtotal |
| PPh 23 NPWP 2% | Tax will be subtracted from the subtotal |
Option 2: Through "Customer Management" menu 1. Click "Customer Management" sidebar under the "Receive Money" menu 1. Click "Add new customer" 1. Fill in Customer ID, Customer Name (mandatory), PIC Name, Customer Phone Number, Customer Email, Address then click “Next” 1. Fill in Tax Type (mandatory) then click "Save"
Customer Management page
Create Customer page
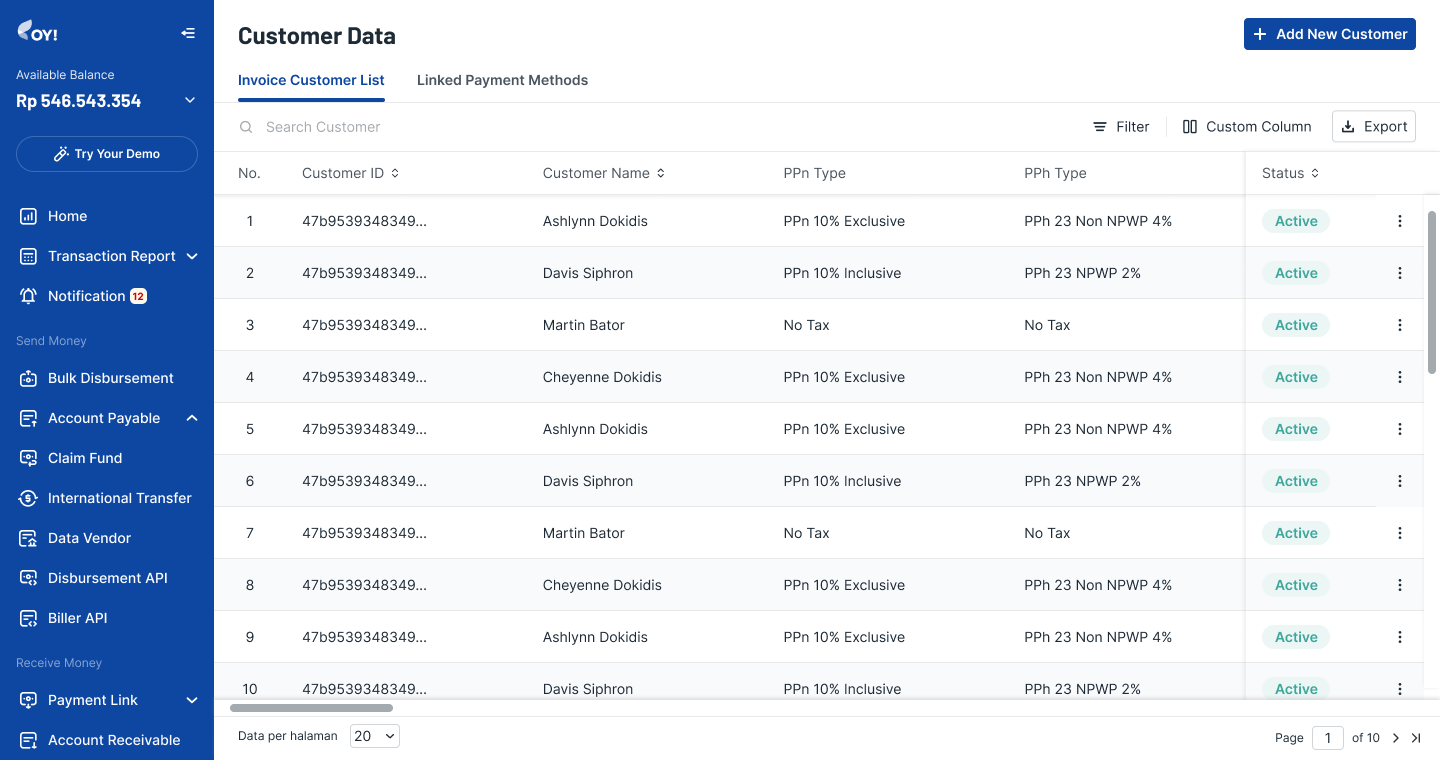
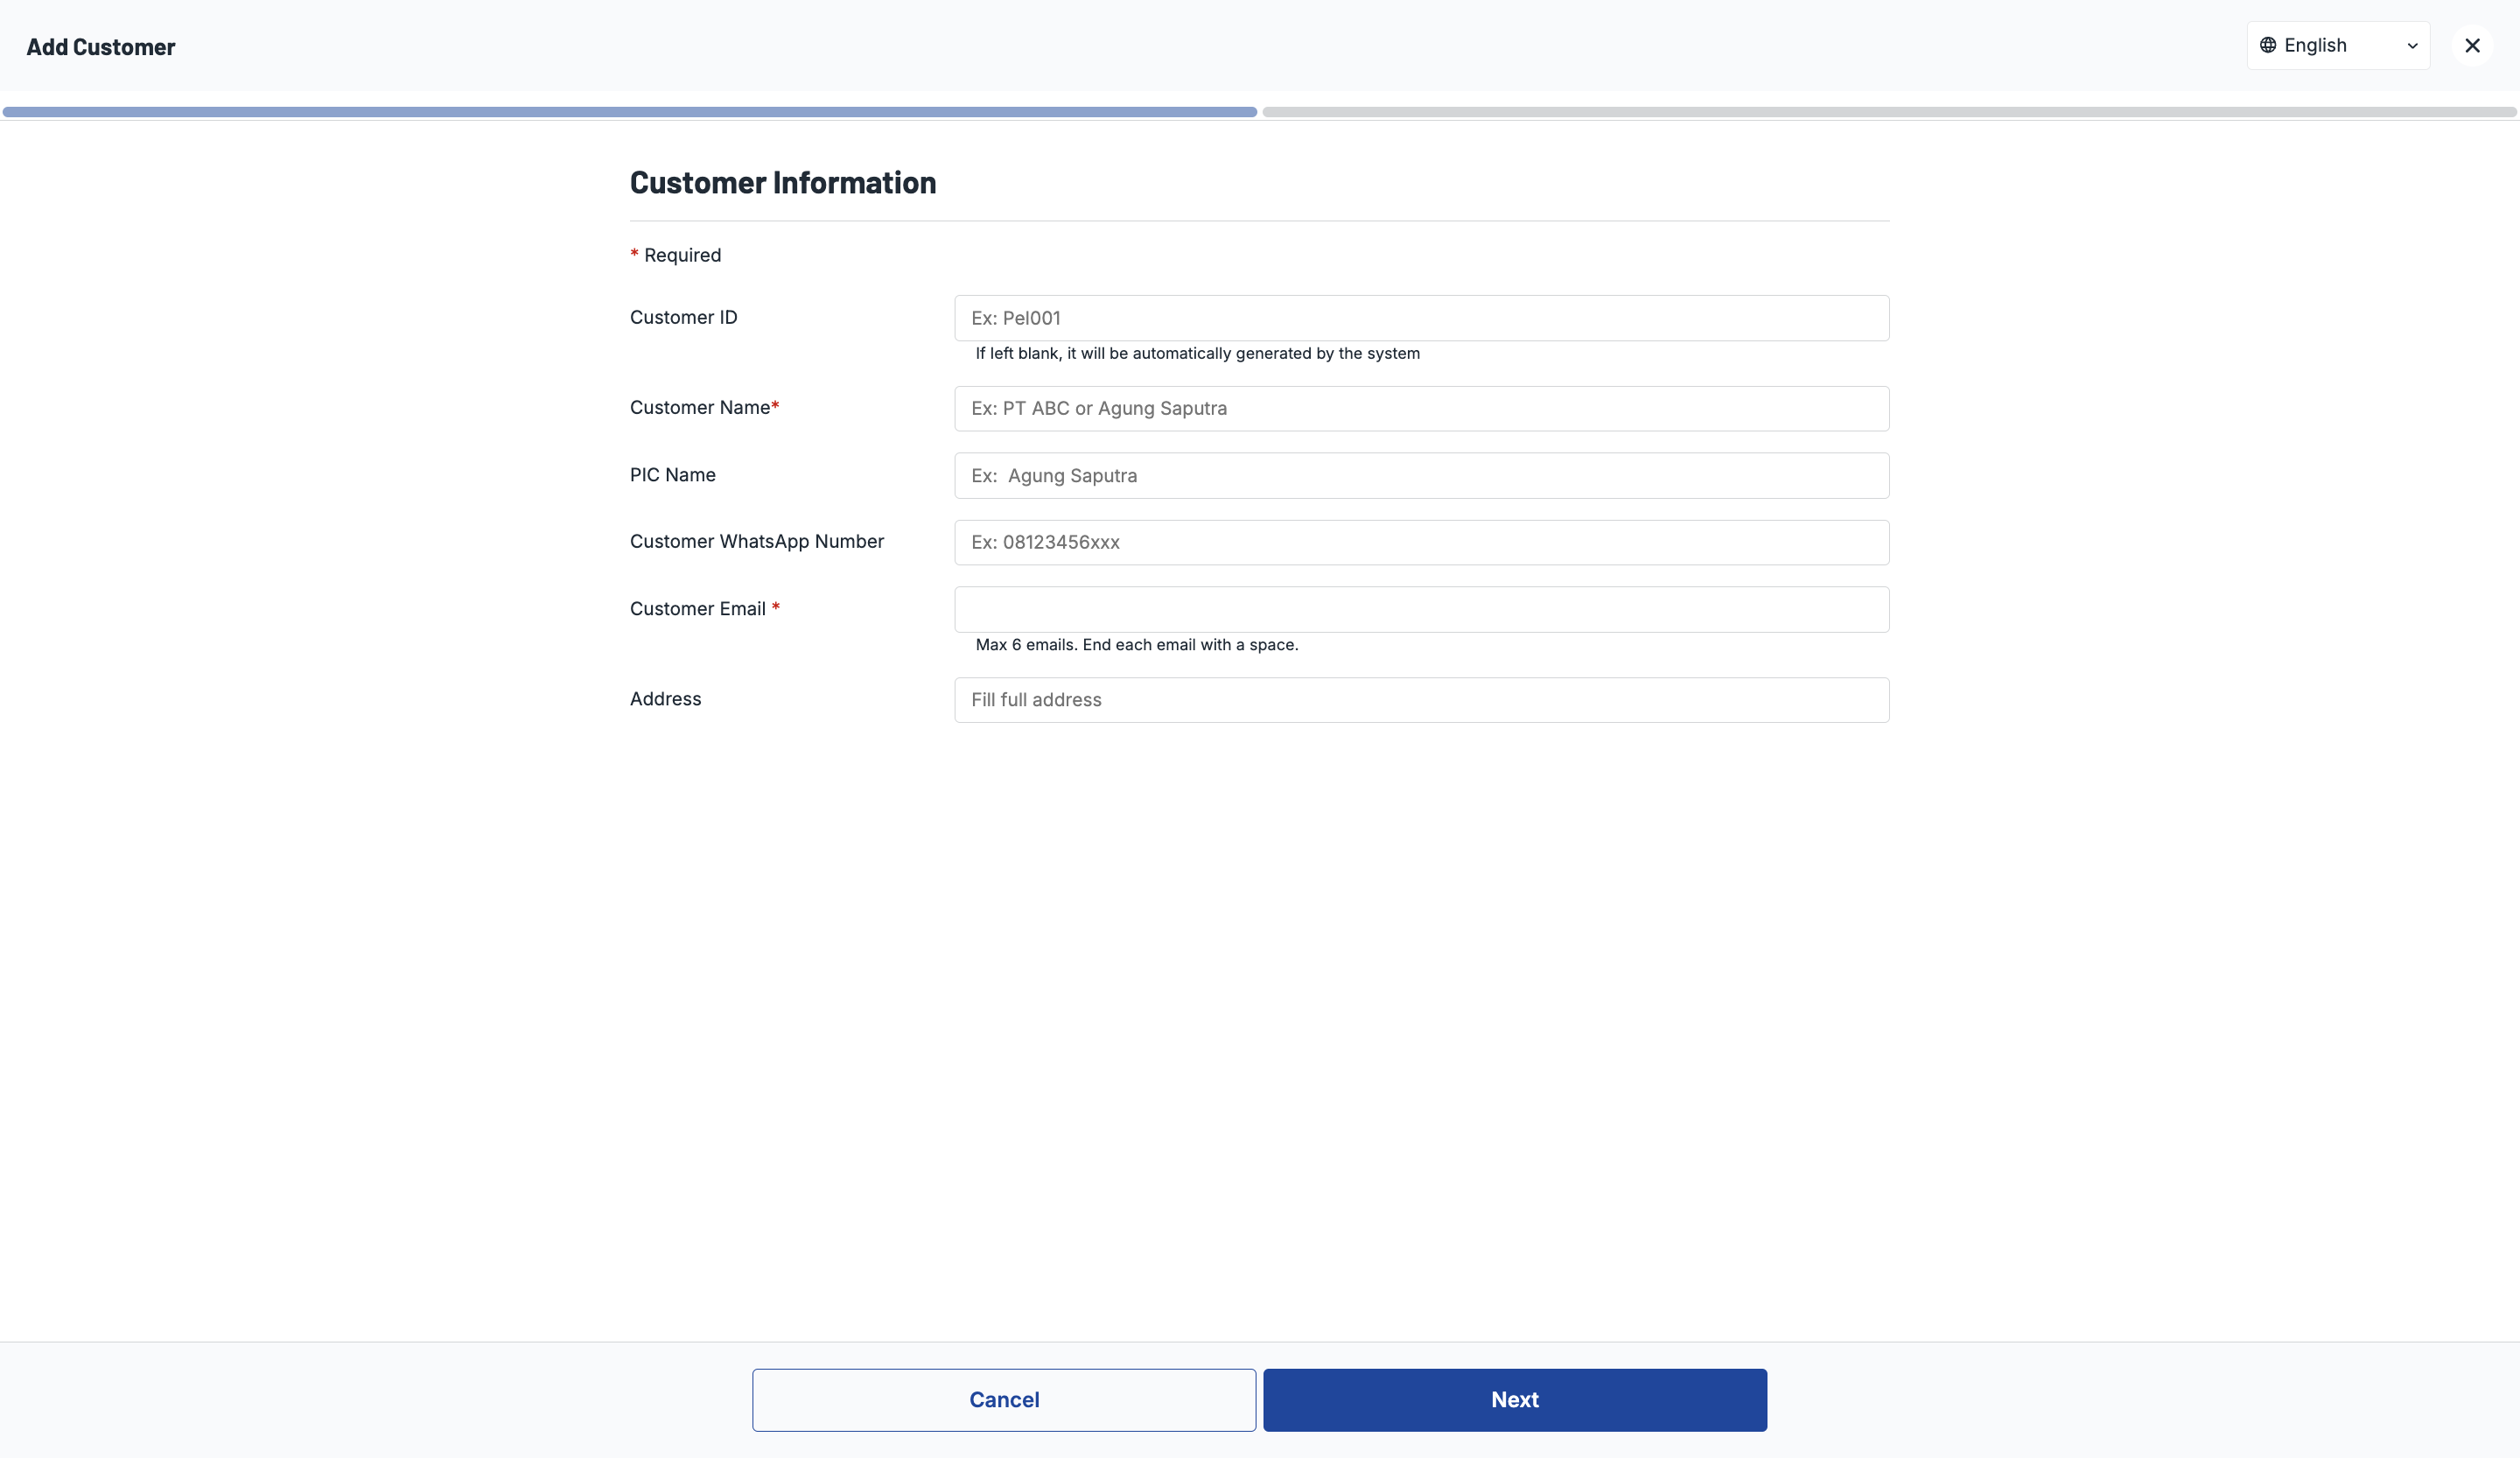
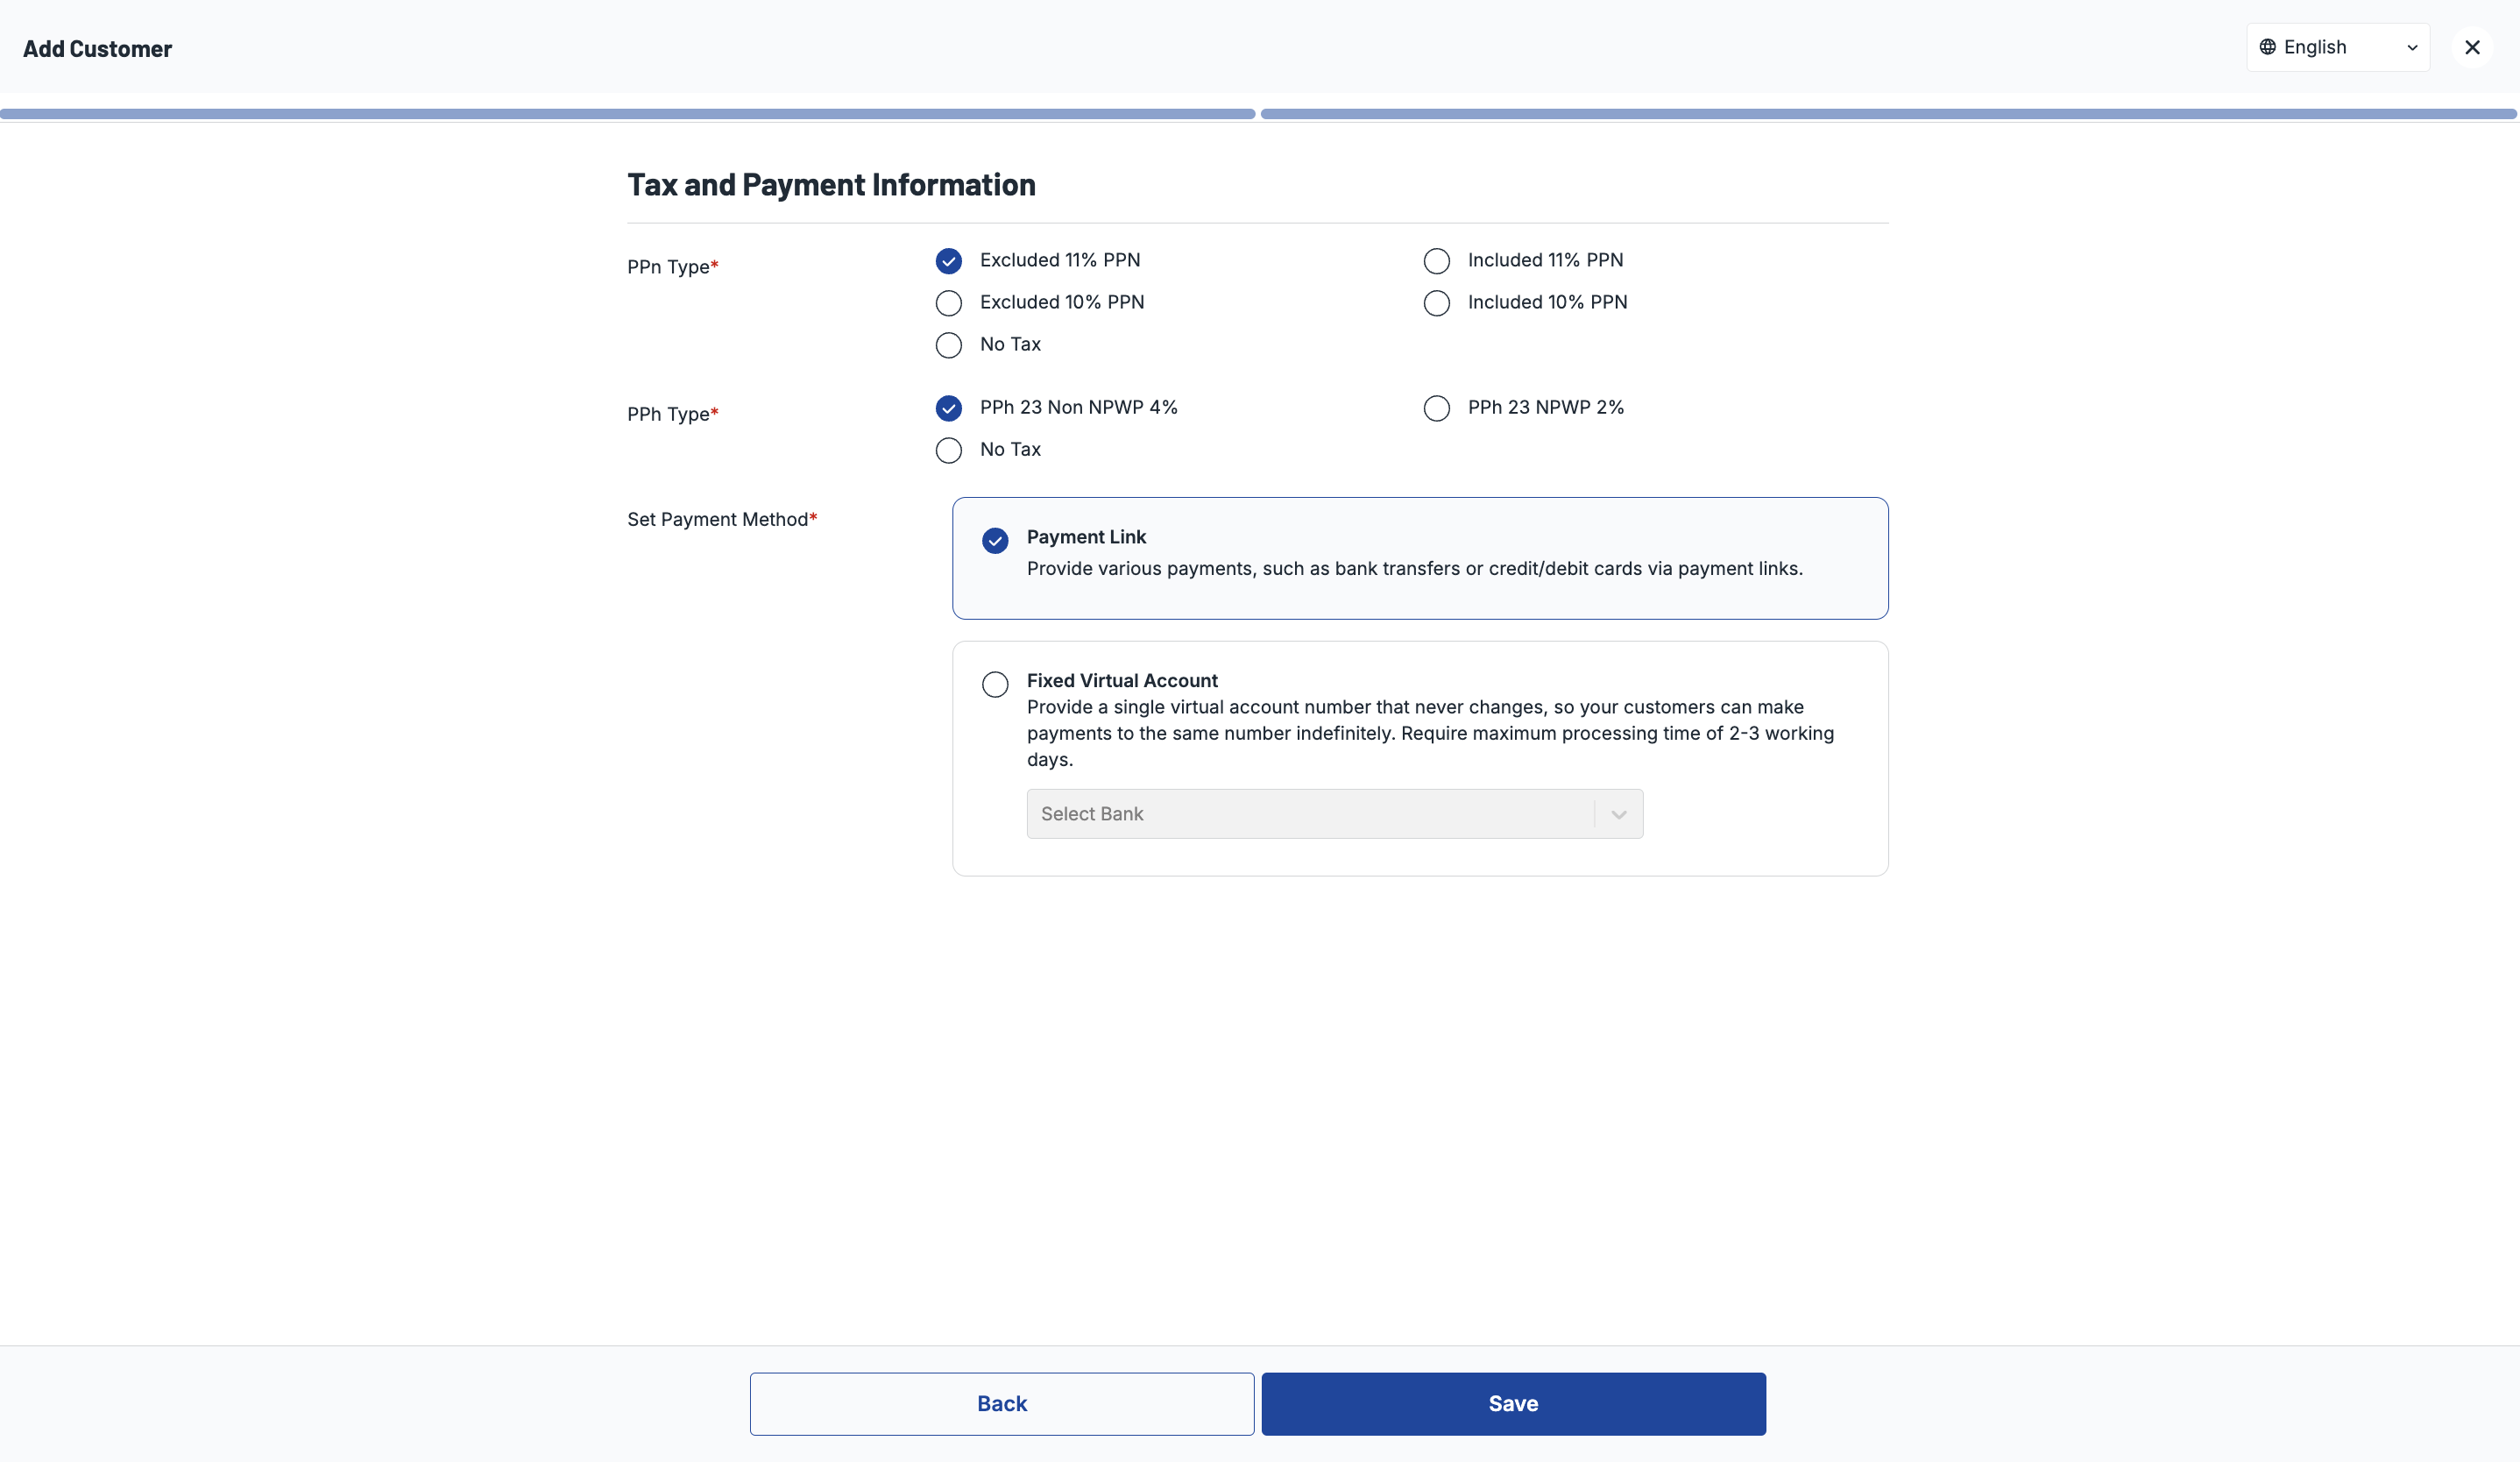
All of the created customers can be monitored through your dashboard (Customer List). There are several actions that you take for the customer data:
| Actions | Functions |
|---|---|
| Edit | To edit the data of the customer |
| Activate/Deactivate | To deactivate / reactivate the customer |
If you click on the row you selected, you will be able to see the detailed data of the customer, including the list of invoices belonging to that customer.
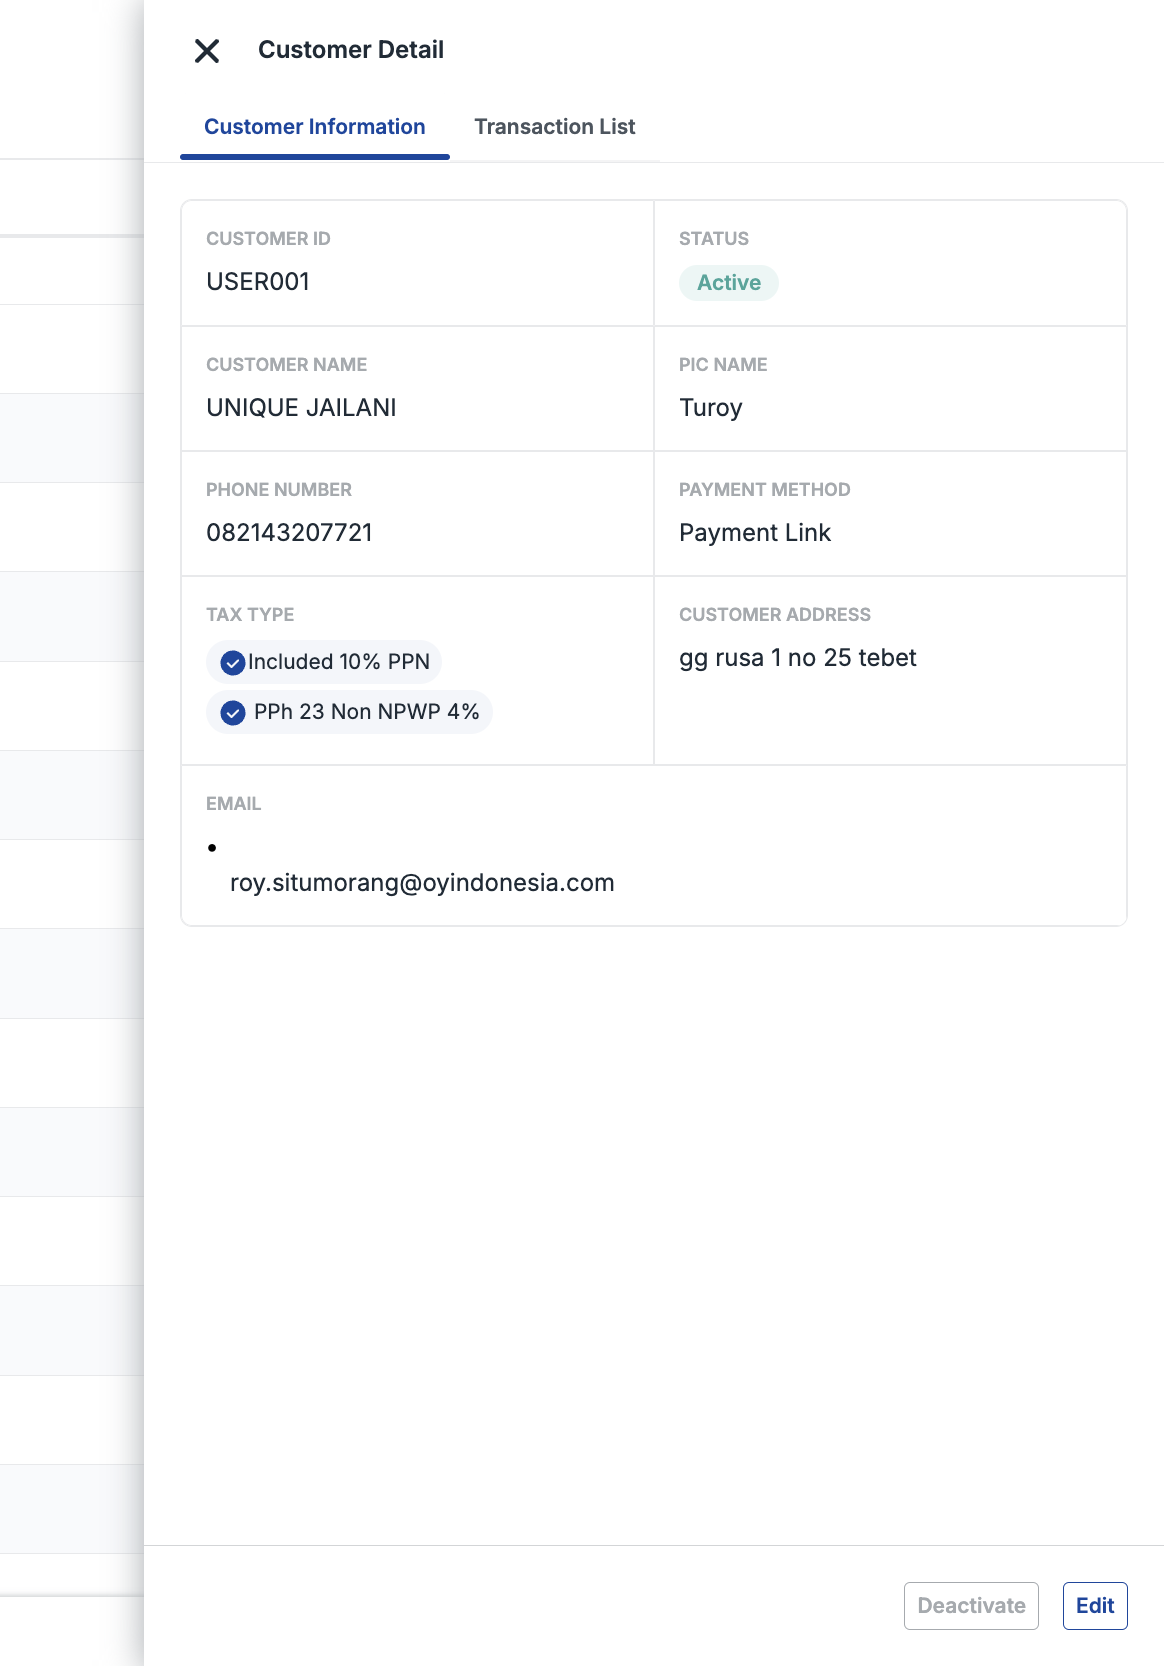
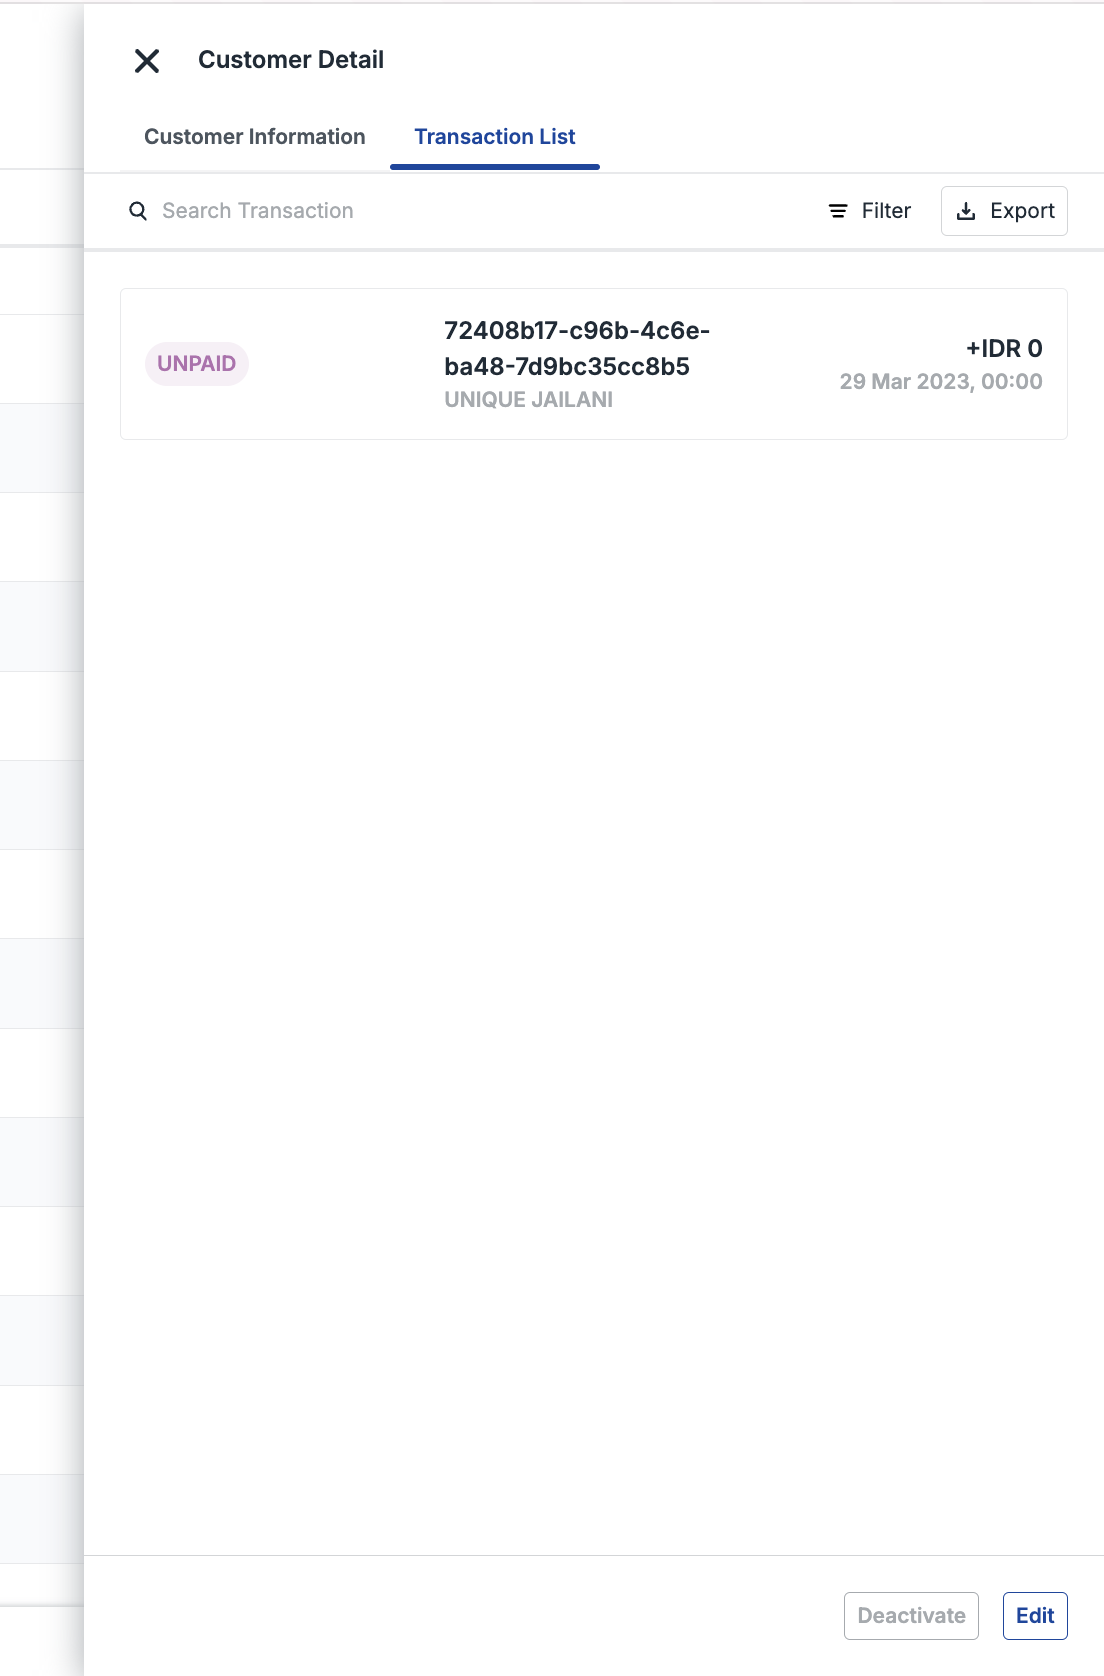
Amount Customization for Account Receivable
OY! has a feature that allows you to add the price of the subtotal (addition) and/or deduct the price from subtotal. For example, if you want to apply a discount for your customers, or if you want to add shipping fee,service fee, or any other charges that you would like to add or deduct from the subtotal of the invoice. You may refer to the steps below:
- Click "add column" below the subtotal
- Choose "addition" or "subtraction" from the dropdown
- Fill in the description
- Fill in the amount
Invoice Creation page
Add Column page
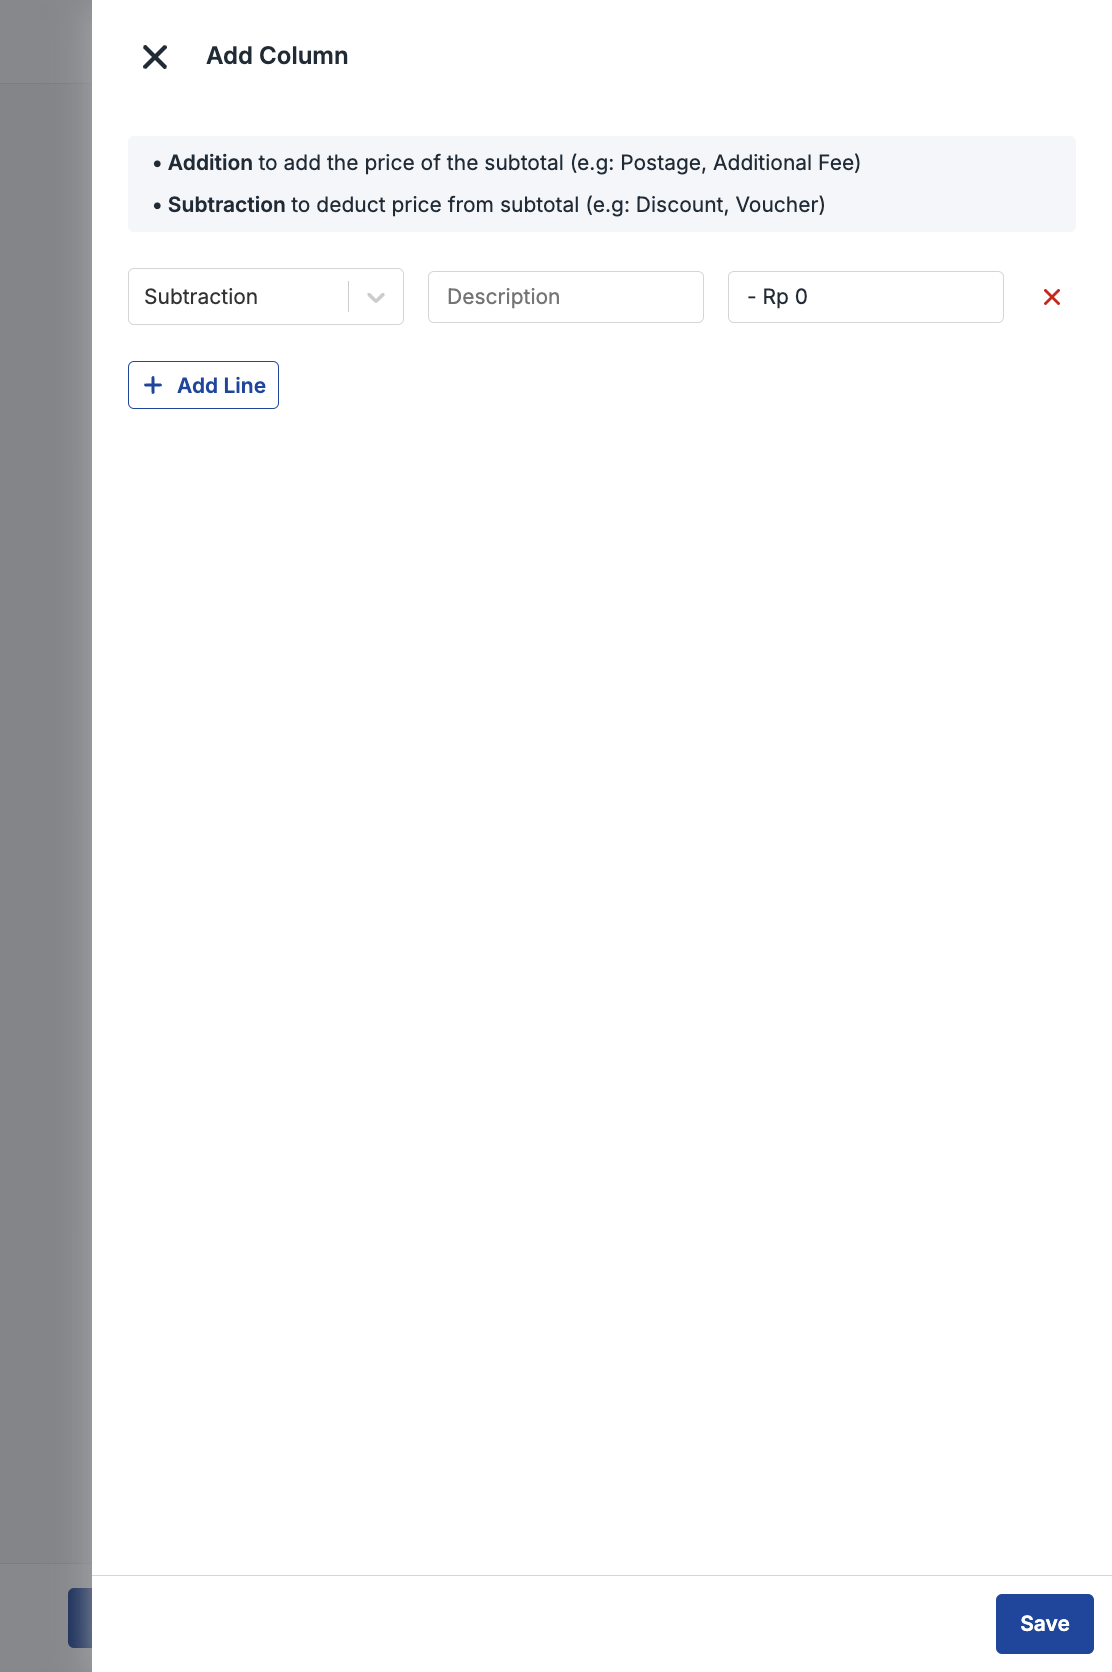
How to Use Account Receivable via API
OY! allows invoices creation via API. Here are the steps:
- Create the customer data first by sending a request to https://partner.oyindonesia.com/api/account-receivable/customers. Enter the required and optional fields, as referenced in the API reference docs
- Then, you can try to create an account receivable by sending a request to https://partner.oyindonesia.com/api/account-receivable/invoices. Enter the required and optional fields, as referenced in the API reference docs
- An endpoint to check your account receivable invoice data is also available and can be accessed at any time.
- Lastly, we provide an endpoint to cancel your account receivable invoice based on id (unique payment id). The invoice must still be active, a payment method must not have been selected, and status must still be in “WAITING_PAYMENT”.
Just like the account receivable creation from OY! dashboard you can see the transactions and their details from the OY! dashboard. This report will include all payment links generated both via OY! dashboard and API. Data can be differentiate by column “Created Via” on Account Receivable table, if your invoice is created via API then it will fills with “API”, otherwise it will fills with “Dashboard”.
Customizing the UI of Payment Link & Account Receivable
In order to maintain a consistent brand experience for your customers, you can customize the look and feel of both your Payment Link & Account Receivable in the Dashboard, where you can do the following things:
- Upload a link address to logo
- Choose the button color and the theme color of the payment link
The updated logo will be reflected in both products.
How to customize the UI via Payment Link or Account Receivable
- Log onto your OY! dashboard
- Go to “Account Receivable” section under “Receive Money” menu
- Click the “Settings" icon located at the top right of the page
- Click “Set Appearance” tab
- Click “Open Configuration” for “Payment Link Display”
- You will be redirected to the Settings page
- Input the URL for your logo (if you’re using snipboard.io [https://snipboard.io/], the correct URL should be in “https://i.snipboard.io/image.jpg” format. If you’re using imgbb.com [https://imgbb.com/], the correct URL should be in “https://i.ibb.co/abcdef/image.jpg” format)
- Select your header color (you can select from our available color picker tools or you can input the 6-digit #HEX code)
- Select your button and link color (you can select from our available color picker tools or you can input the 6-digit #HEX code)
- Click "Save"
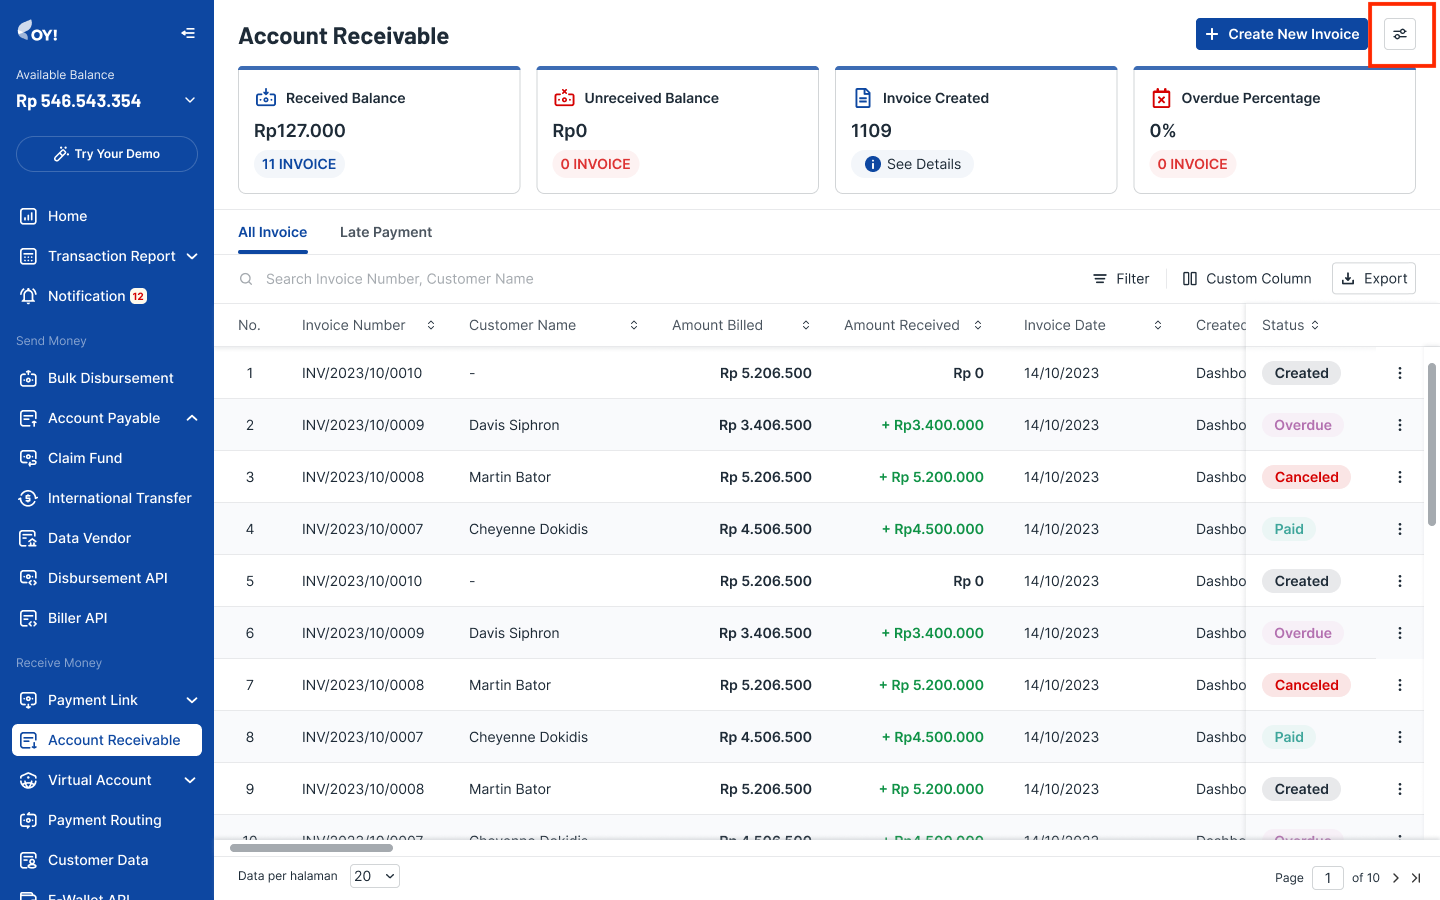
- Payment Link Display Settings
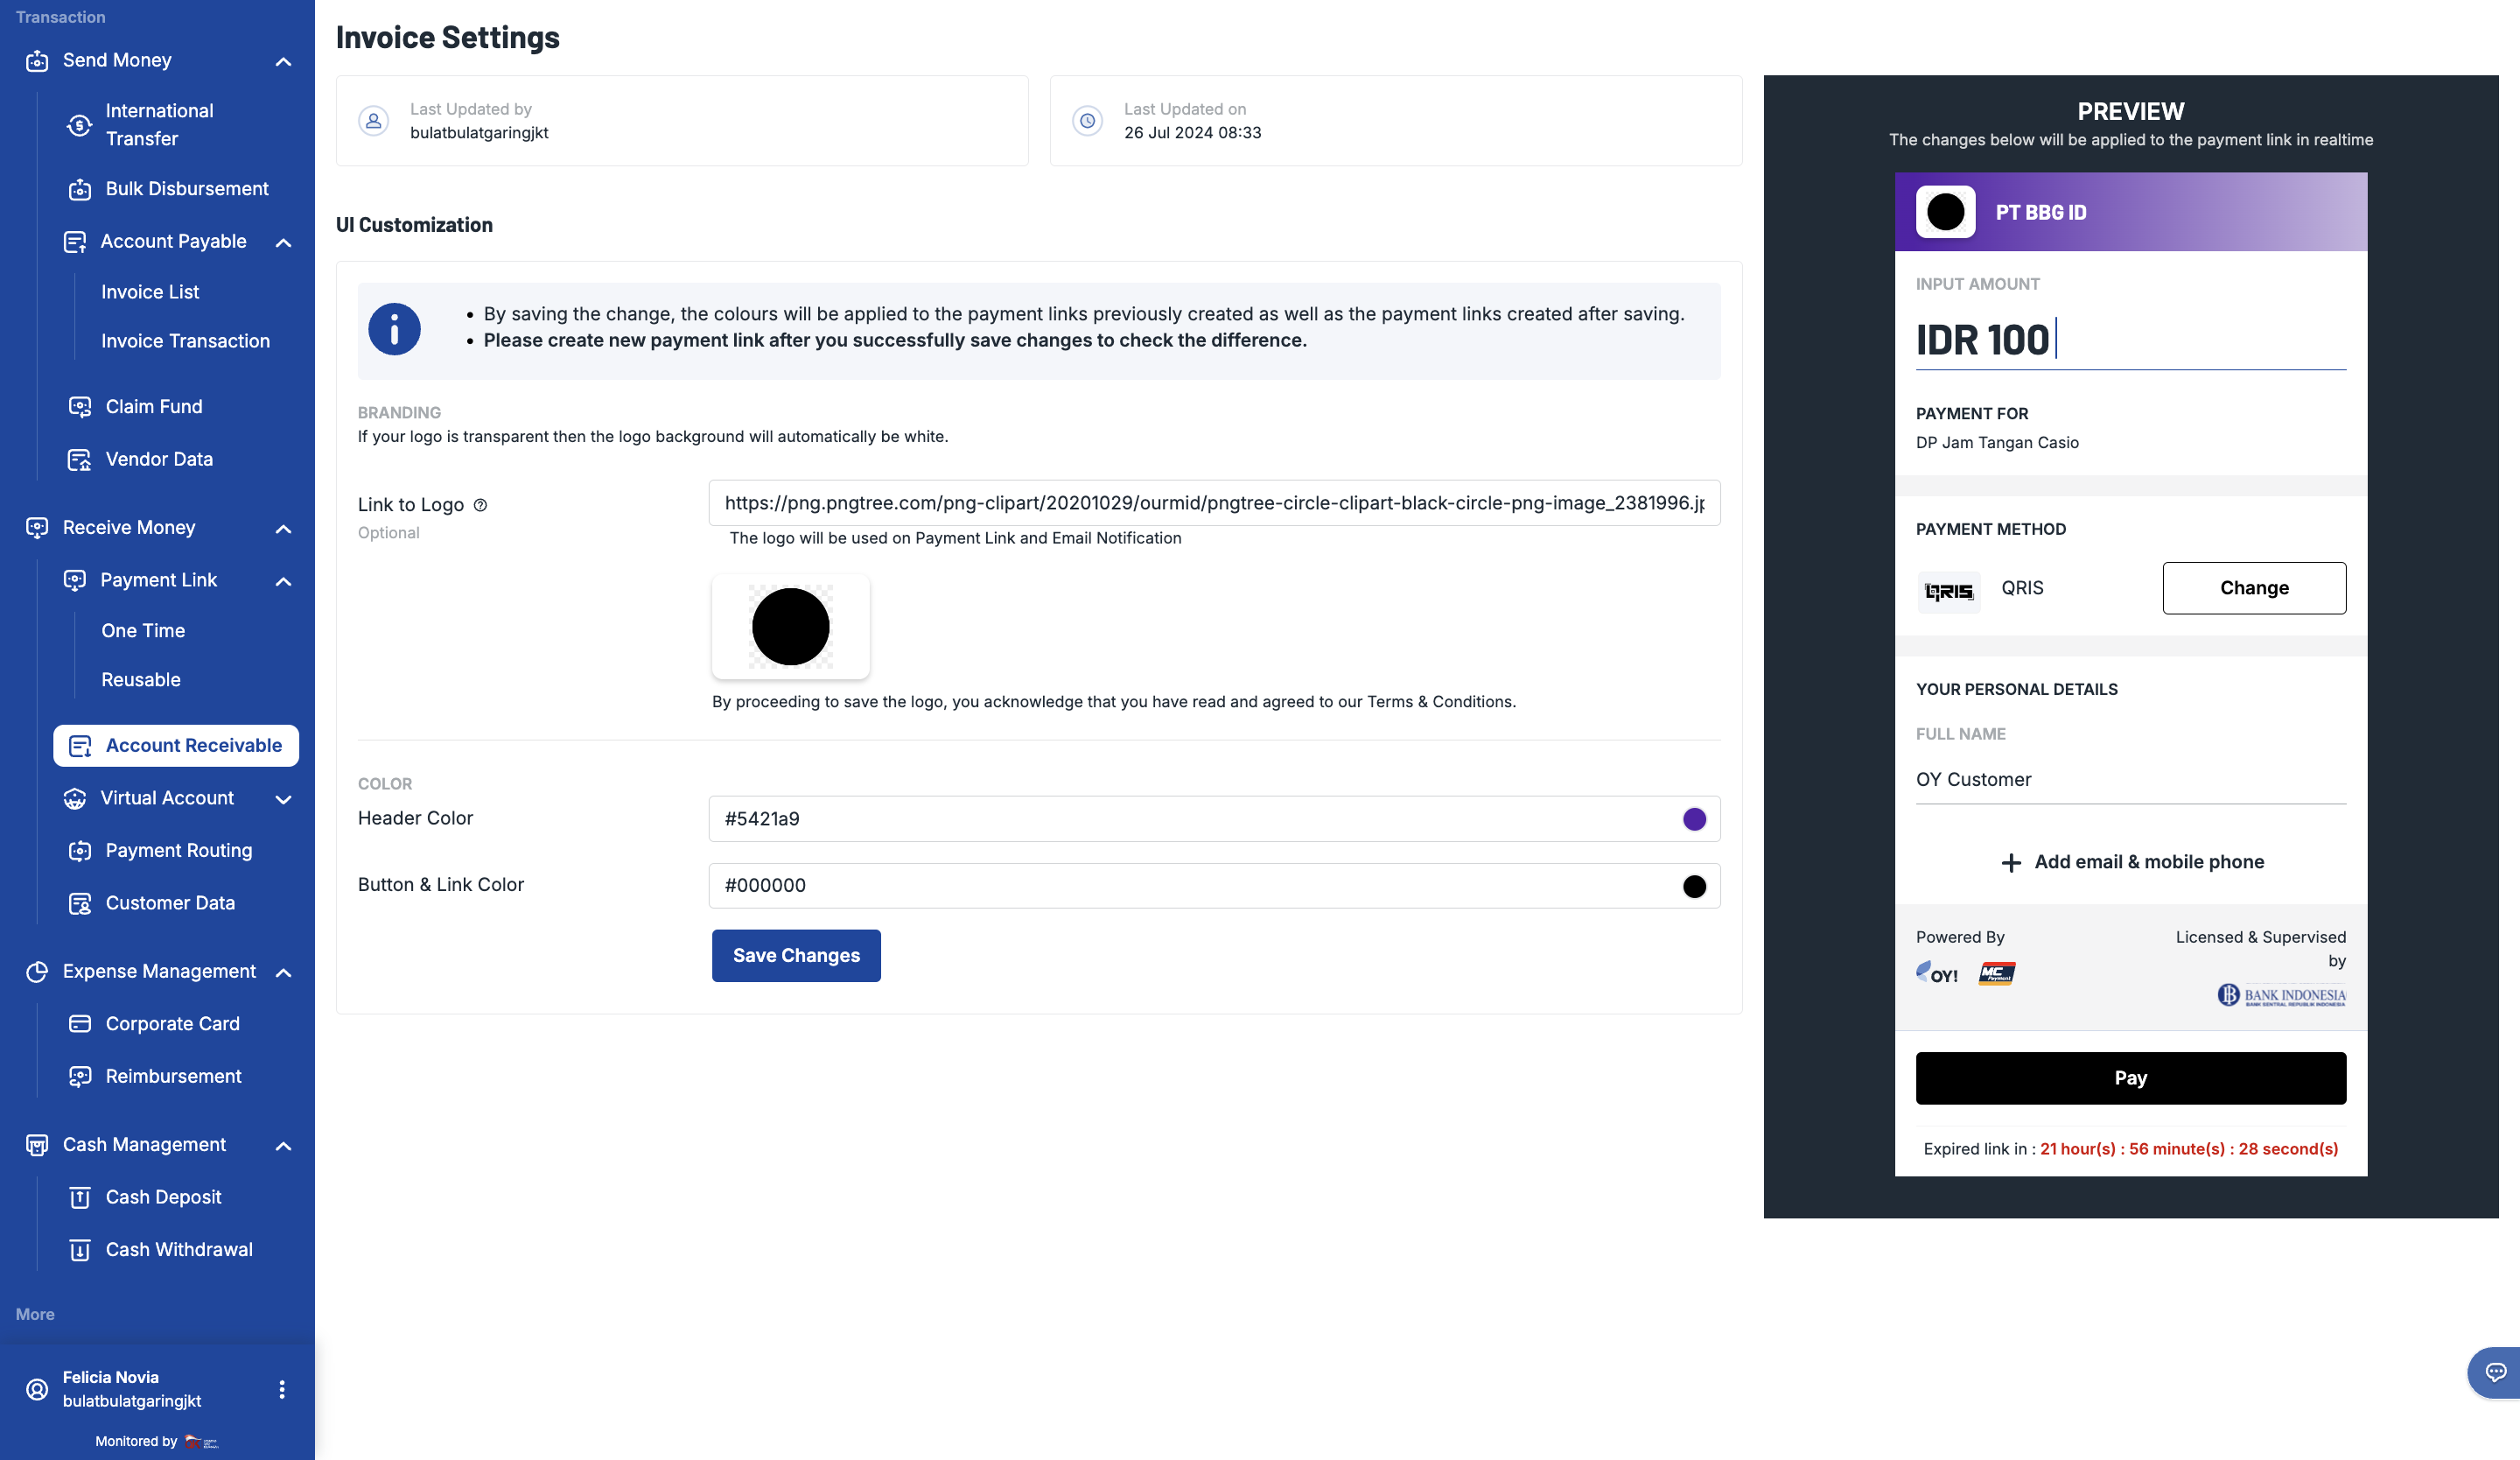
Note: * By saving the changes, the colors will be applied to the payment links previously created (before saving) as well as the payment links created after saving and also account receivable PDF documents. * Please check your existing payment link or create a new one. You will see that your changes have been successfully saved.
Customizing Account Receivable Invoice Template and Color
For a more personalized touch on the invoice, you can now customize your template look in the Dashboard, where you can do the following things: 1. Change invoice logo 1. Change Invoice template 1. Change Invoice color
How to customize the Account Receivable Invoice UI: 1. Log onto your OY! dashboard 1. Go to Account Receivable section in the dashboard 1. Click the “Settings" icon located at the top right next to “Create New Invoice” button 1. Click “Open Configuration” for “Invoice Template” 1. Input the URL of your logo. Changing the logo here will automatically update the logo in Payment Link, Invoice and 1.Email Notifications. 1. Select your color theme (you can select from our available color picker tools or you can input the 6-digit #HEX code). This color will be the main theme color in your invoice. 1. Select your template from our template selections. Changes will be reflected immediately in the preview area 1. Click “Save”
- Account Receivable Configuration page
- Invoice Template Configuration page

How to Set Automated Invoice Number
For your convenience, you have the option to auto-generate invoice numbers. No more worrying about the sequence of invoice numbers. The invoice number template has been pre-defined by OY!.
- Log onto your OY! dashboard
- Go to Payment Link or Account Receivable section in the dashboard
- Click the 'Settings" icon located at the top right next to “Create New Invoice” button
- Turn the toggle on. You can now adjust the automatic invoice number format
- Click “Save” to continue
- Account Receivable Configuration page
- Configuration Invoice Number page
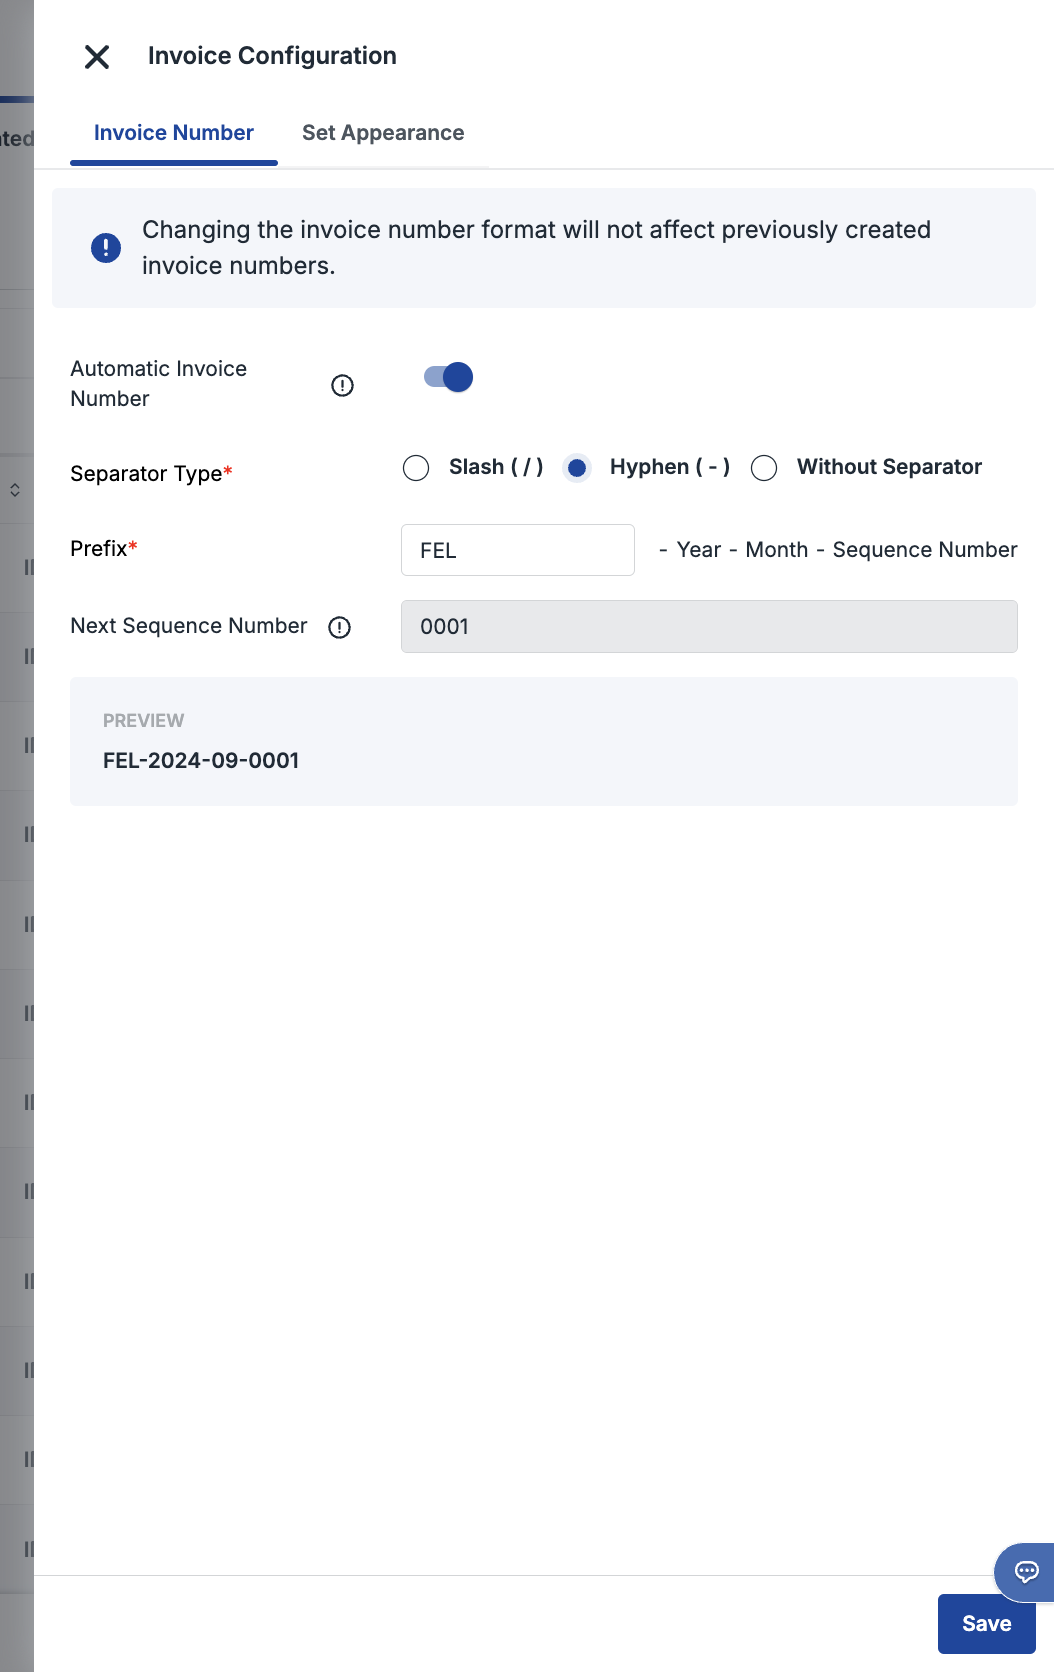
Note: this changes will not impact your previously created invoices
Sending Account Receivable Invoice with Payment Link via WhatsApp
For your convenience, you can now distribute invoices to your users via WhatsApp using the default message template. If you are interested in using this feature, please kindly contact our business representative or customer service team.
There will be 2 different ways to distribute the invoice via Whatsapp and there is a maximum of one Whatsapp message per unpaid invoice. When the status is paid, customers will get a payment confirmation from Whatsapp too.
- Option 1 - via Create New Invoice
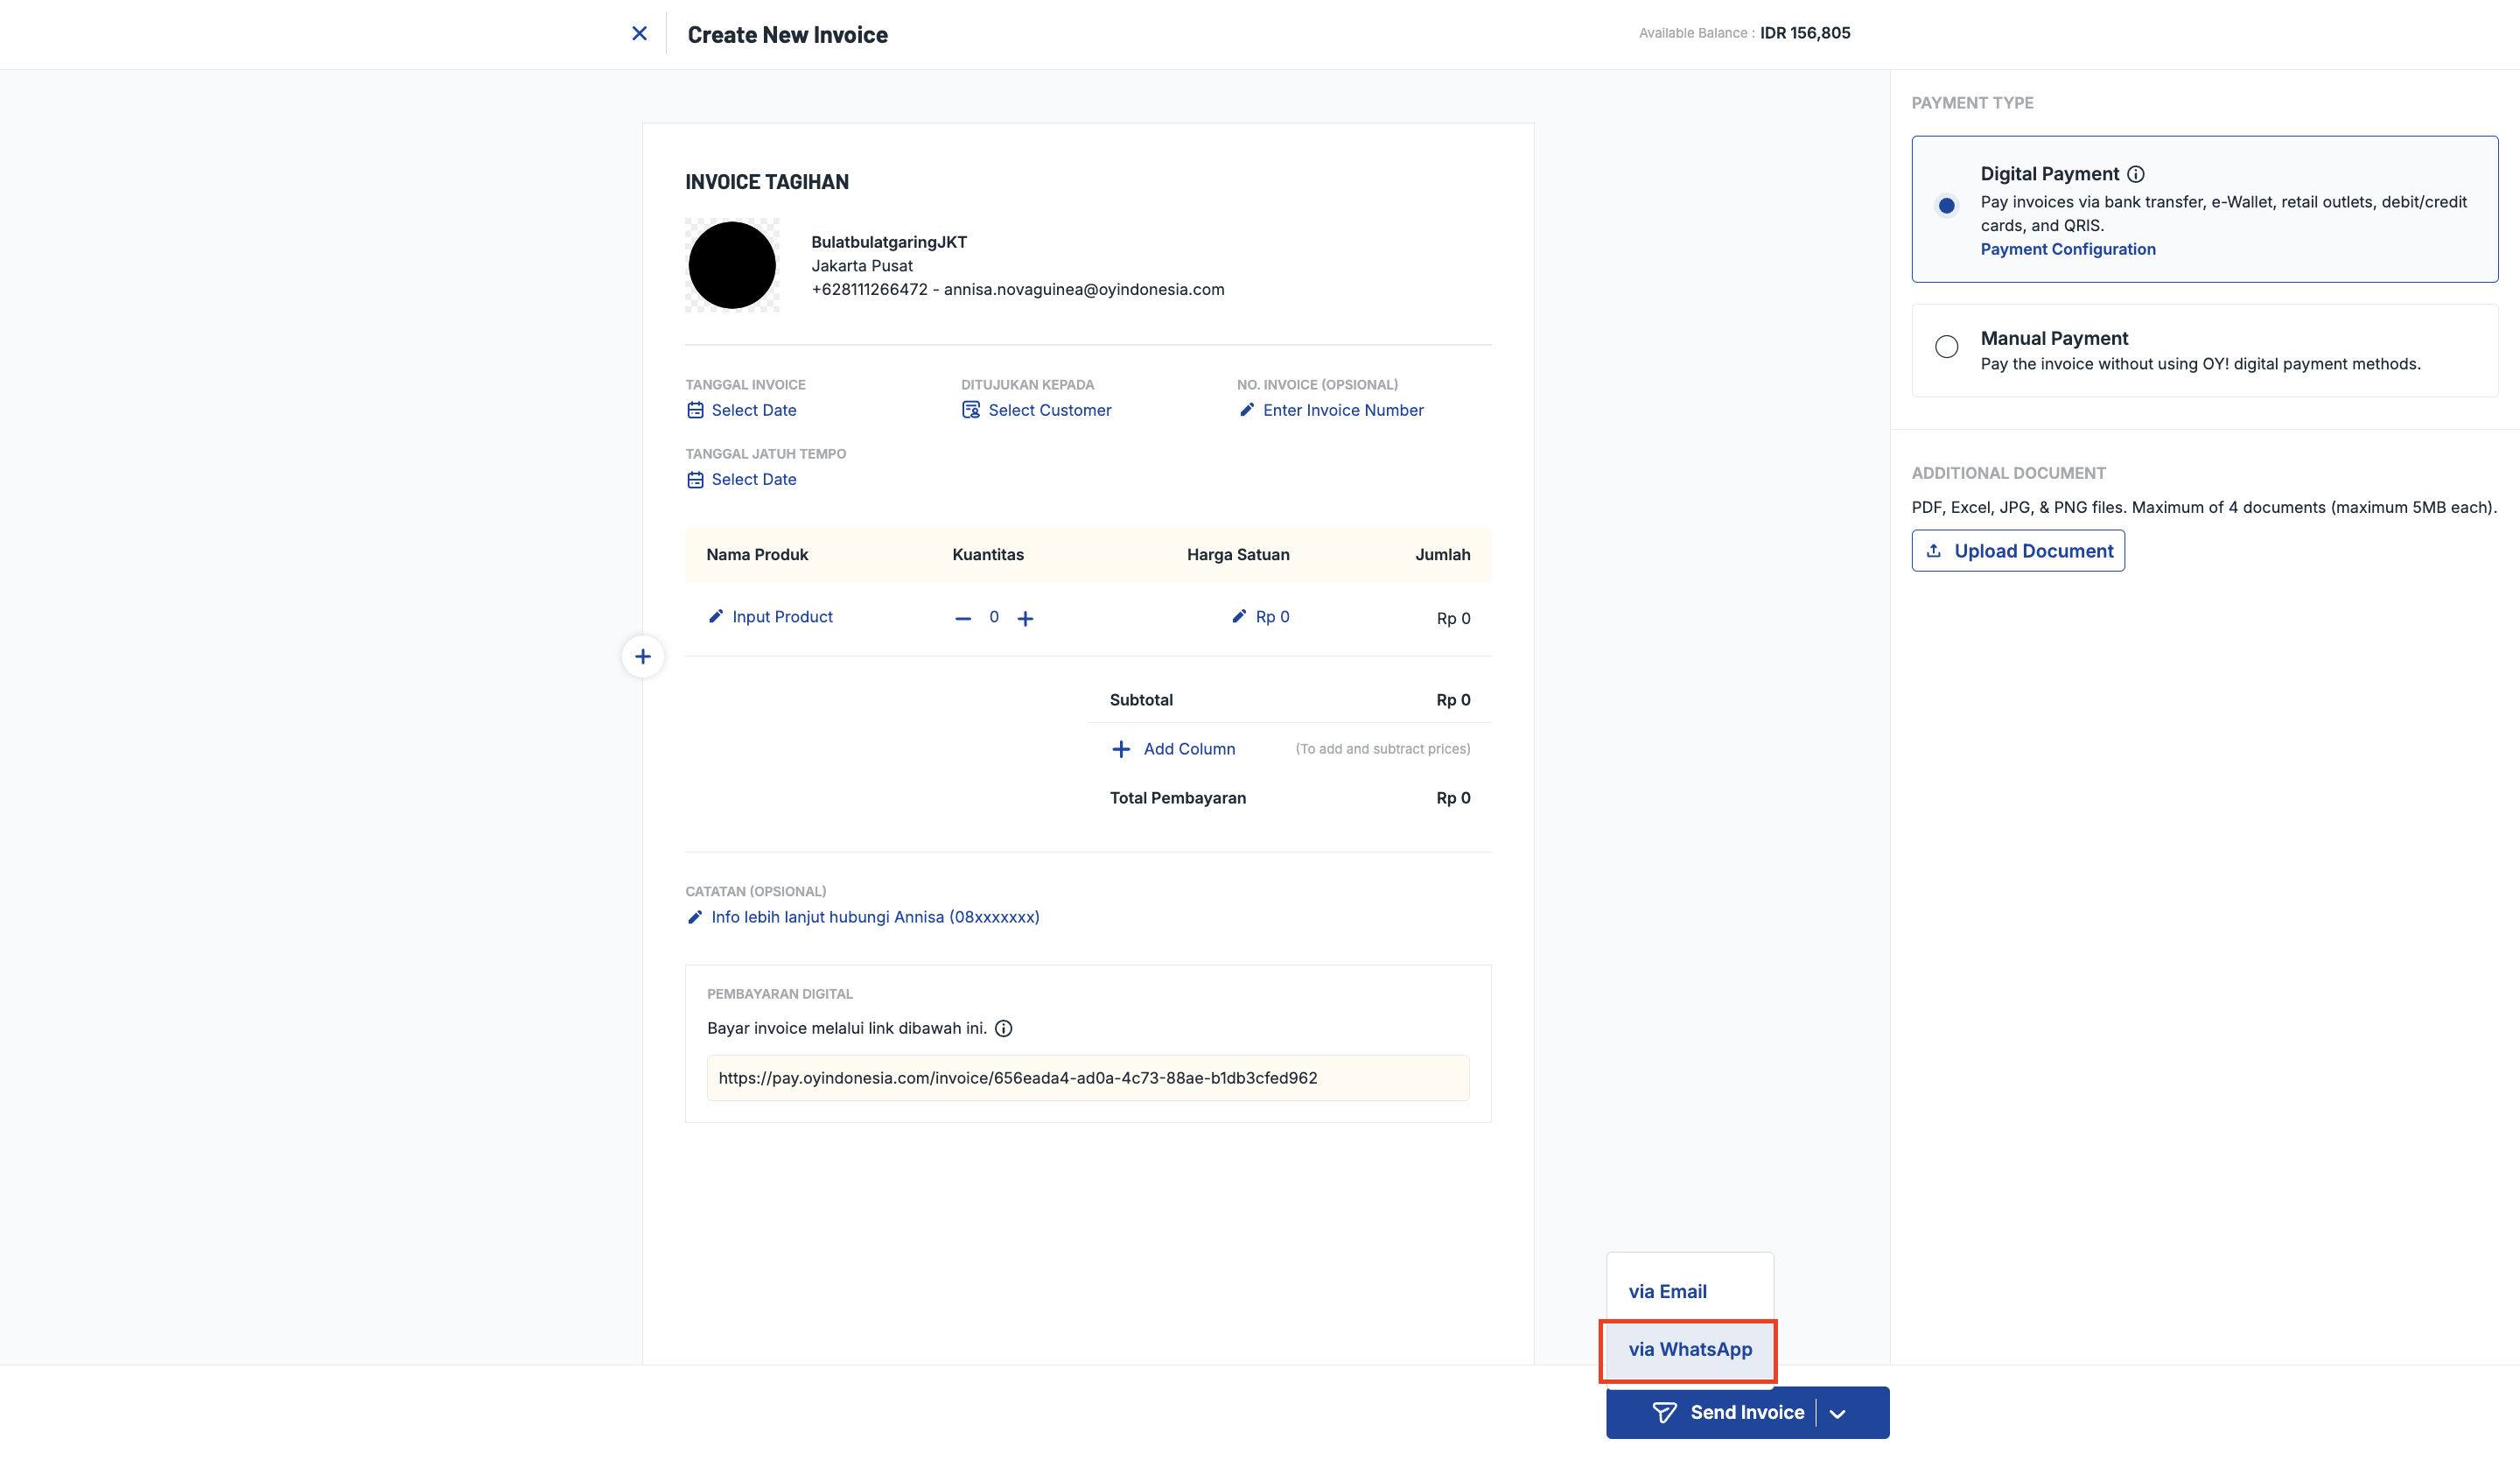
- Option 2 - via Invoice Table
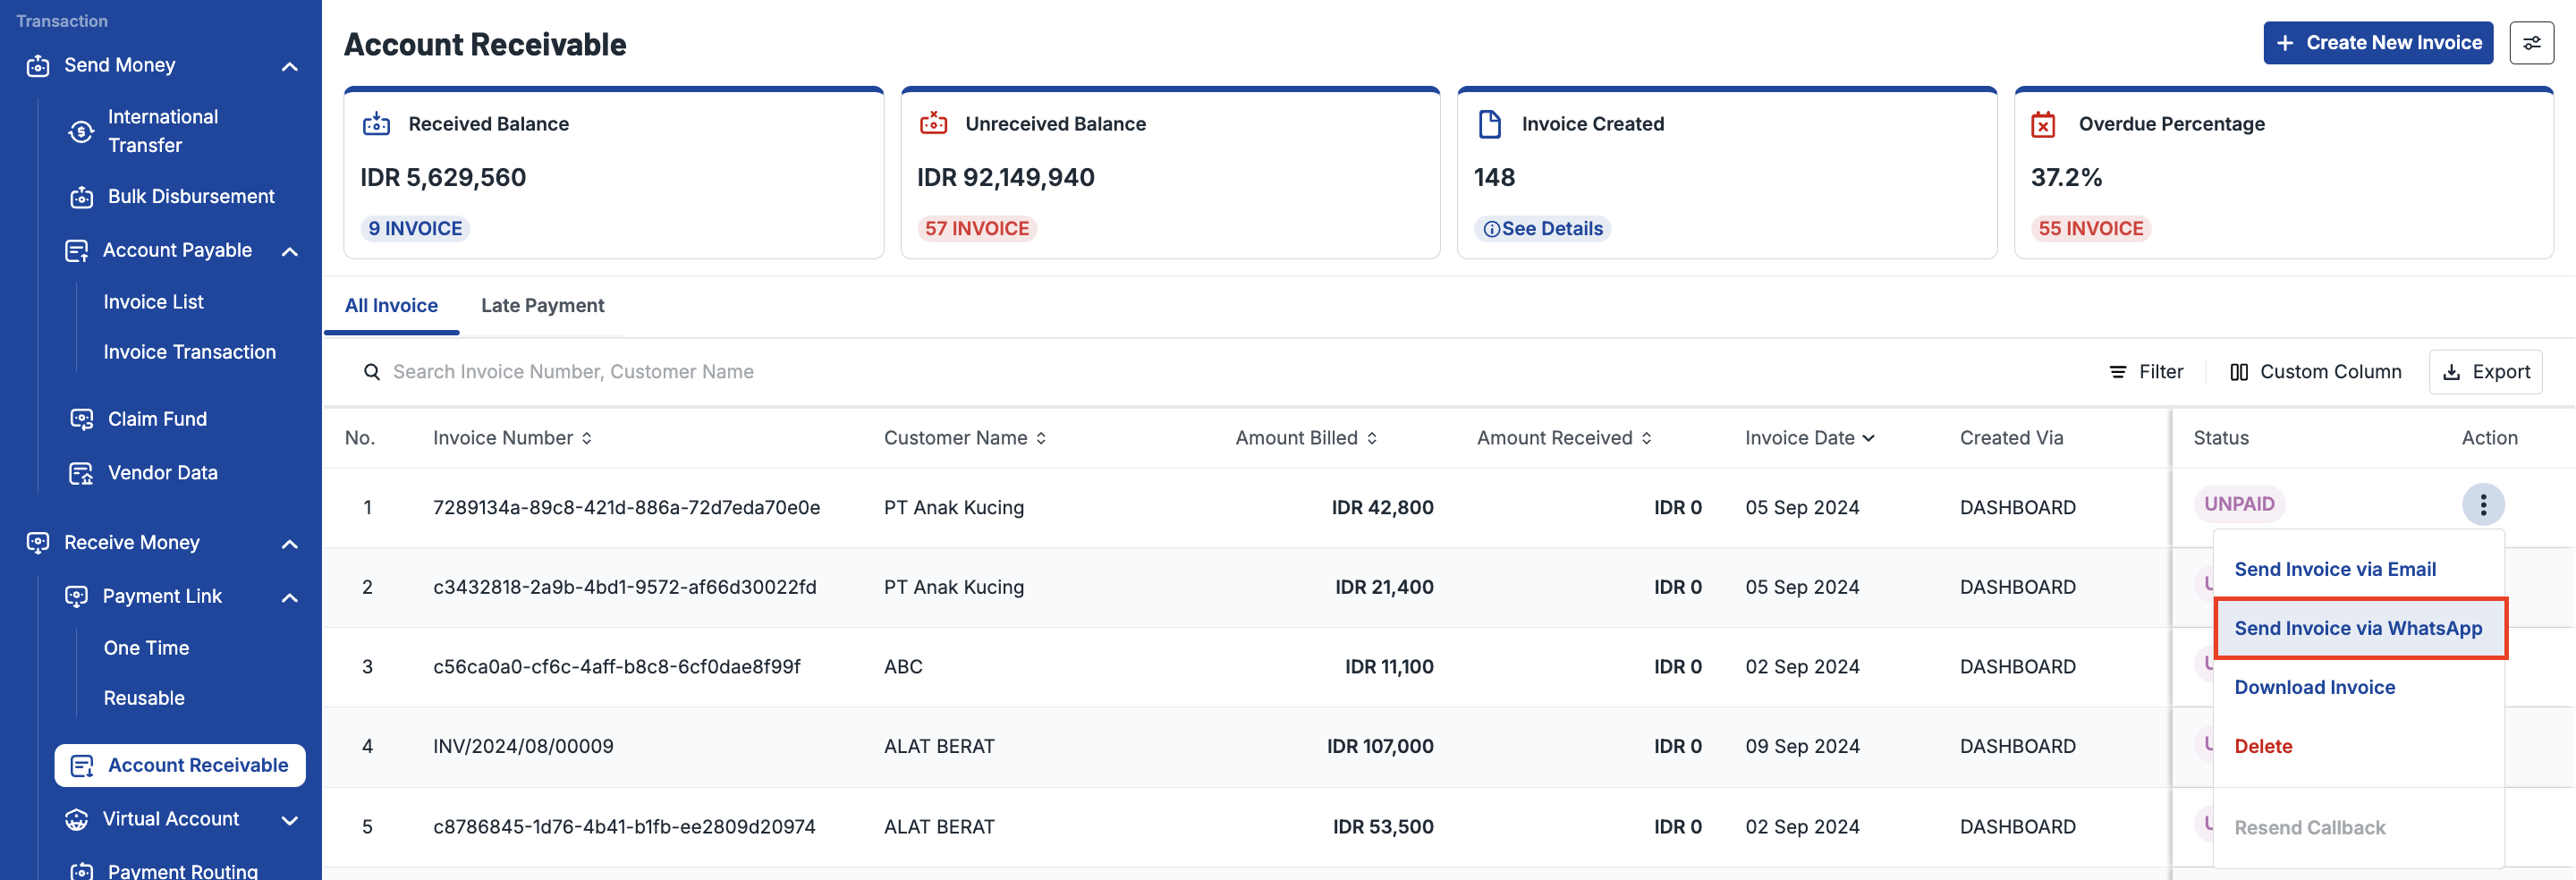
- Option 3 - via Invoice Details
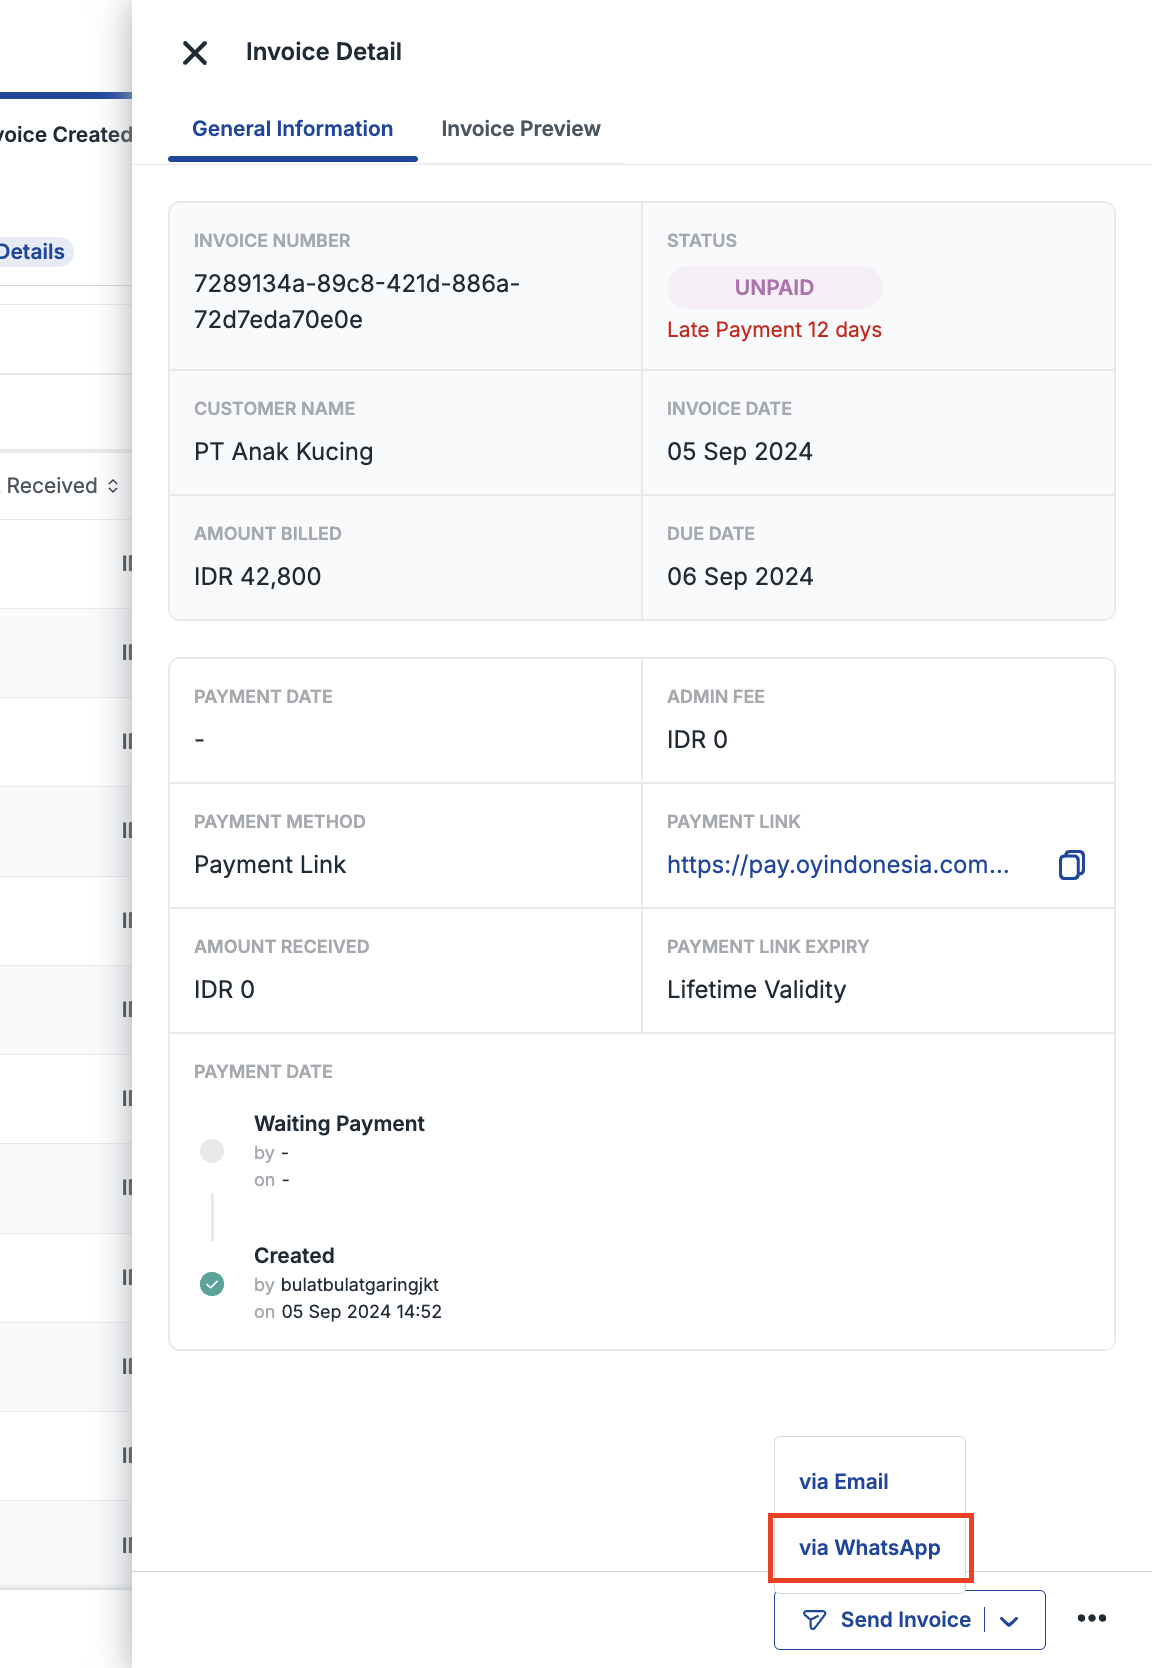
Expense Management
Corporate Card
OY! Corporate Card product provides the offer to create customized virtual corporate cards that can be used to manage online transactions (e.g. software subscriptions, corporate travel expenses, purchase of supplies, etc.) without hassle. Virtual Corporate Card can be created through the OY! dashboard, therefore no technical integration is required to use this product. Please contact our business representative for further details about this feature.
Key Features for Virtual Corporate Card
| Feature | Description |
|---|---|
| Card creation | You can use the funds directly from your OY! balance for corporate card needs. It is essential to top-up your OY! balance according to your desired card limit. |
| Card control | Create and control the card based on your requirements. You can set the limit amount (in Rupiah), validity period, card renewal frequency and even transaction limitations directly through OY! dashboard. Moreover, you can block and deactivate the card in real-time! Everything on your fingertips. |
| Real-time transaction | Transactions can be tracked easily through OY! dashboard and card holder’s page in real-time. There is no need to wait until the end of month for a full transaction statement. |
| Analytics dashboard | All transactions are recorded and reported in the analytics dashboard, helping companies easily manage and monitor their budgets. |
Registration and Set Up
Follow the below check-list to ensure you're all set up to use the service: 1. Create an account for OY! business 1. Upgrade your account by submitting the required documentations 1. Have your upgrade request approved 1. Set up your receiving bank account information (note: ensure that the receiving bank account information is accurate as it cannot be changed via OY! dashboard for security reasons) 1. Once your account is approved, you can start using Virtual Corporate Card product
Testing
- Log in to your OY! Dashboard.
- If you haven’t set approver, please follow steps in How to Set Approver for Virtual Card
- Select the "Demo" environment.
- Navigate to "Corporate Card" product under the Expense Management menu.
- Create a virtual corporate card by follow steps on How to Create Virtual Corporate Card
- Your approver will receive email regarding approval request to create virtual corporate card, ask them to approve or reject the card for testing purposes
- After your approver approves the request, the registered cardholder will receive email regarding dummy card information and virtual card status data on the demo OY! dashboard will be updated
How to Create Virtual Corporate Card
You can create new virtual corporate card by following these steps: 1. Log in to your OY! dashboard 1. Click “Corporate Card” under Expense Management menu 1. Click “Add New Card” 1. Choose "Virtual" for "Card Type" and usage frequency either single usage or multiple usage and click “Next” 1. Fill in Cardholder details and Card details 1. Once submitted, virtual card will be in “waiting for approval” state 1. After the approval step, the virtual card is ready to be used for transactions.
Notes: Once your OY! balance is transferred to a virtual corporate card, it can only be used for virtual card transactions.
- Corporate Card Dashboard
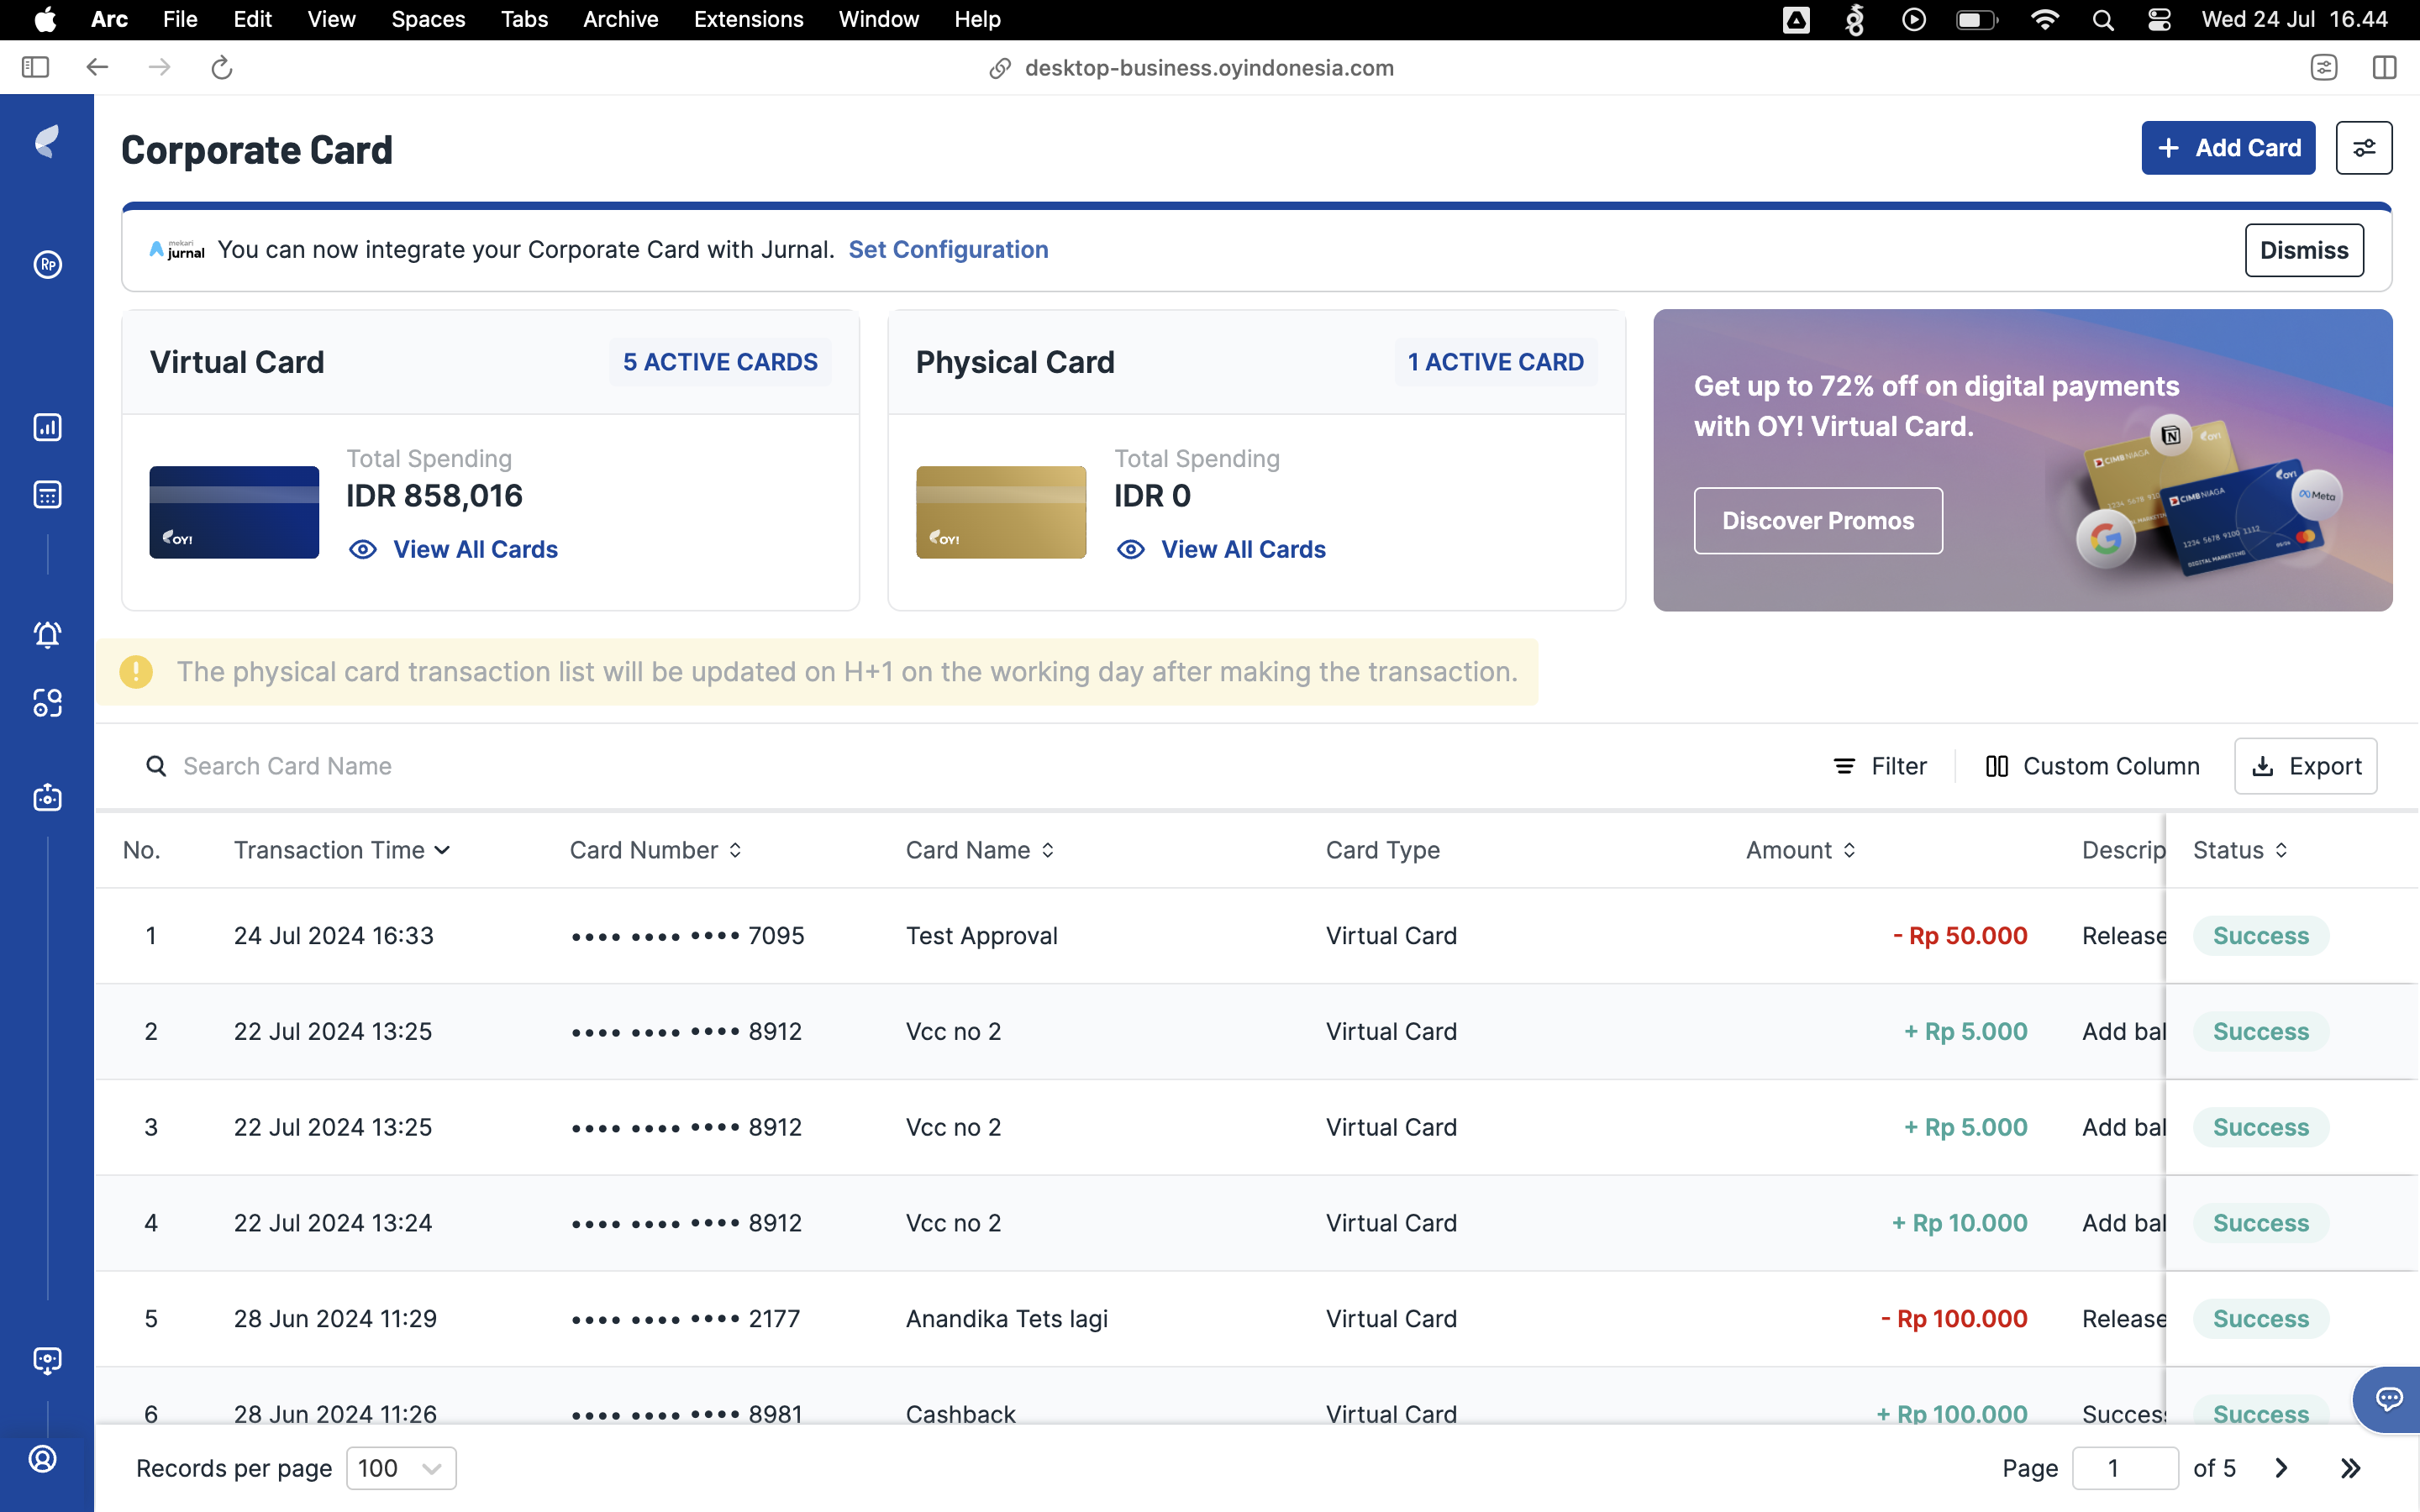
- Virtual Card Type
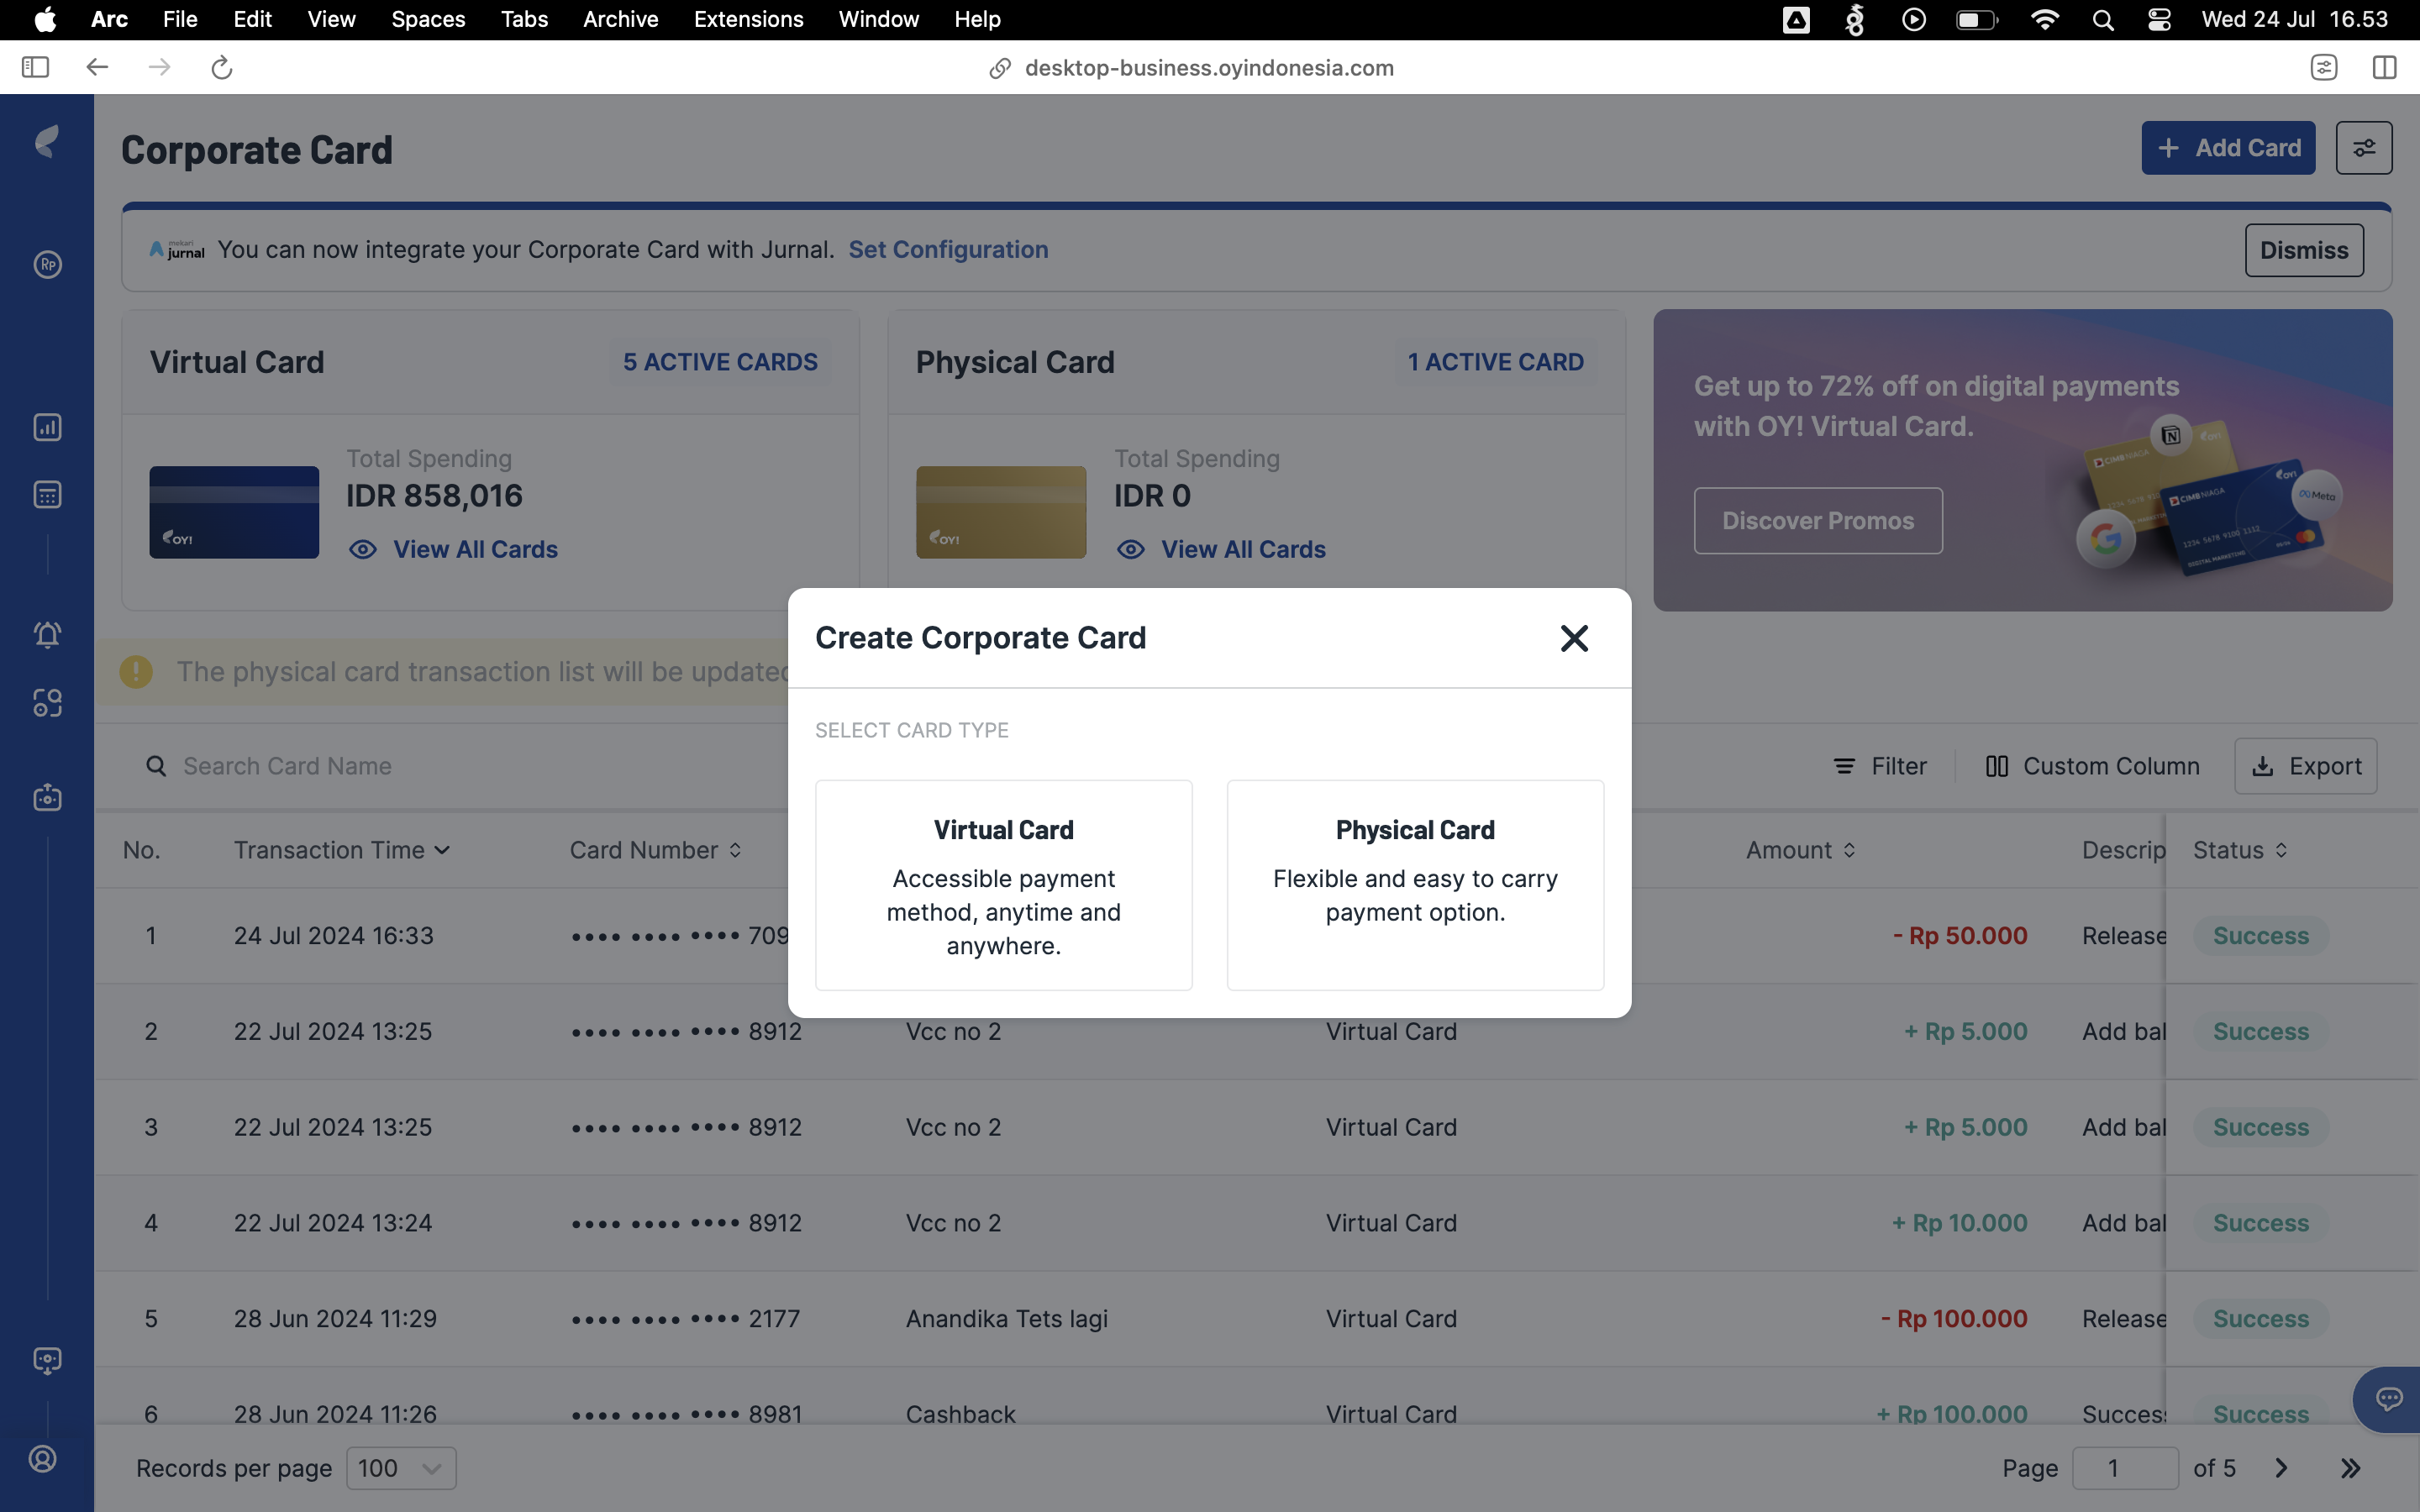
- Virtual Card Form
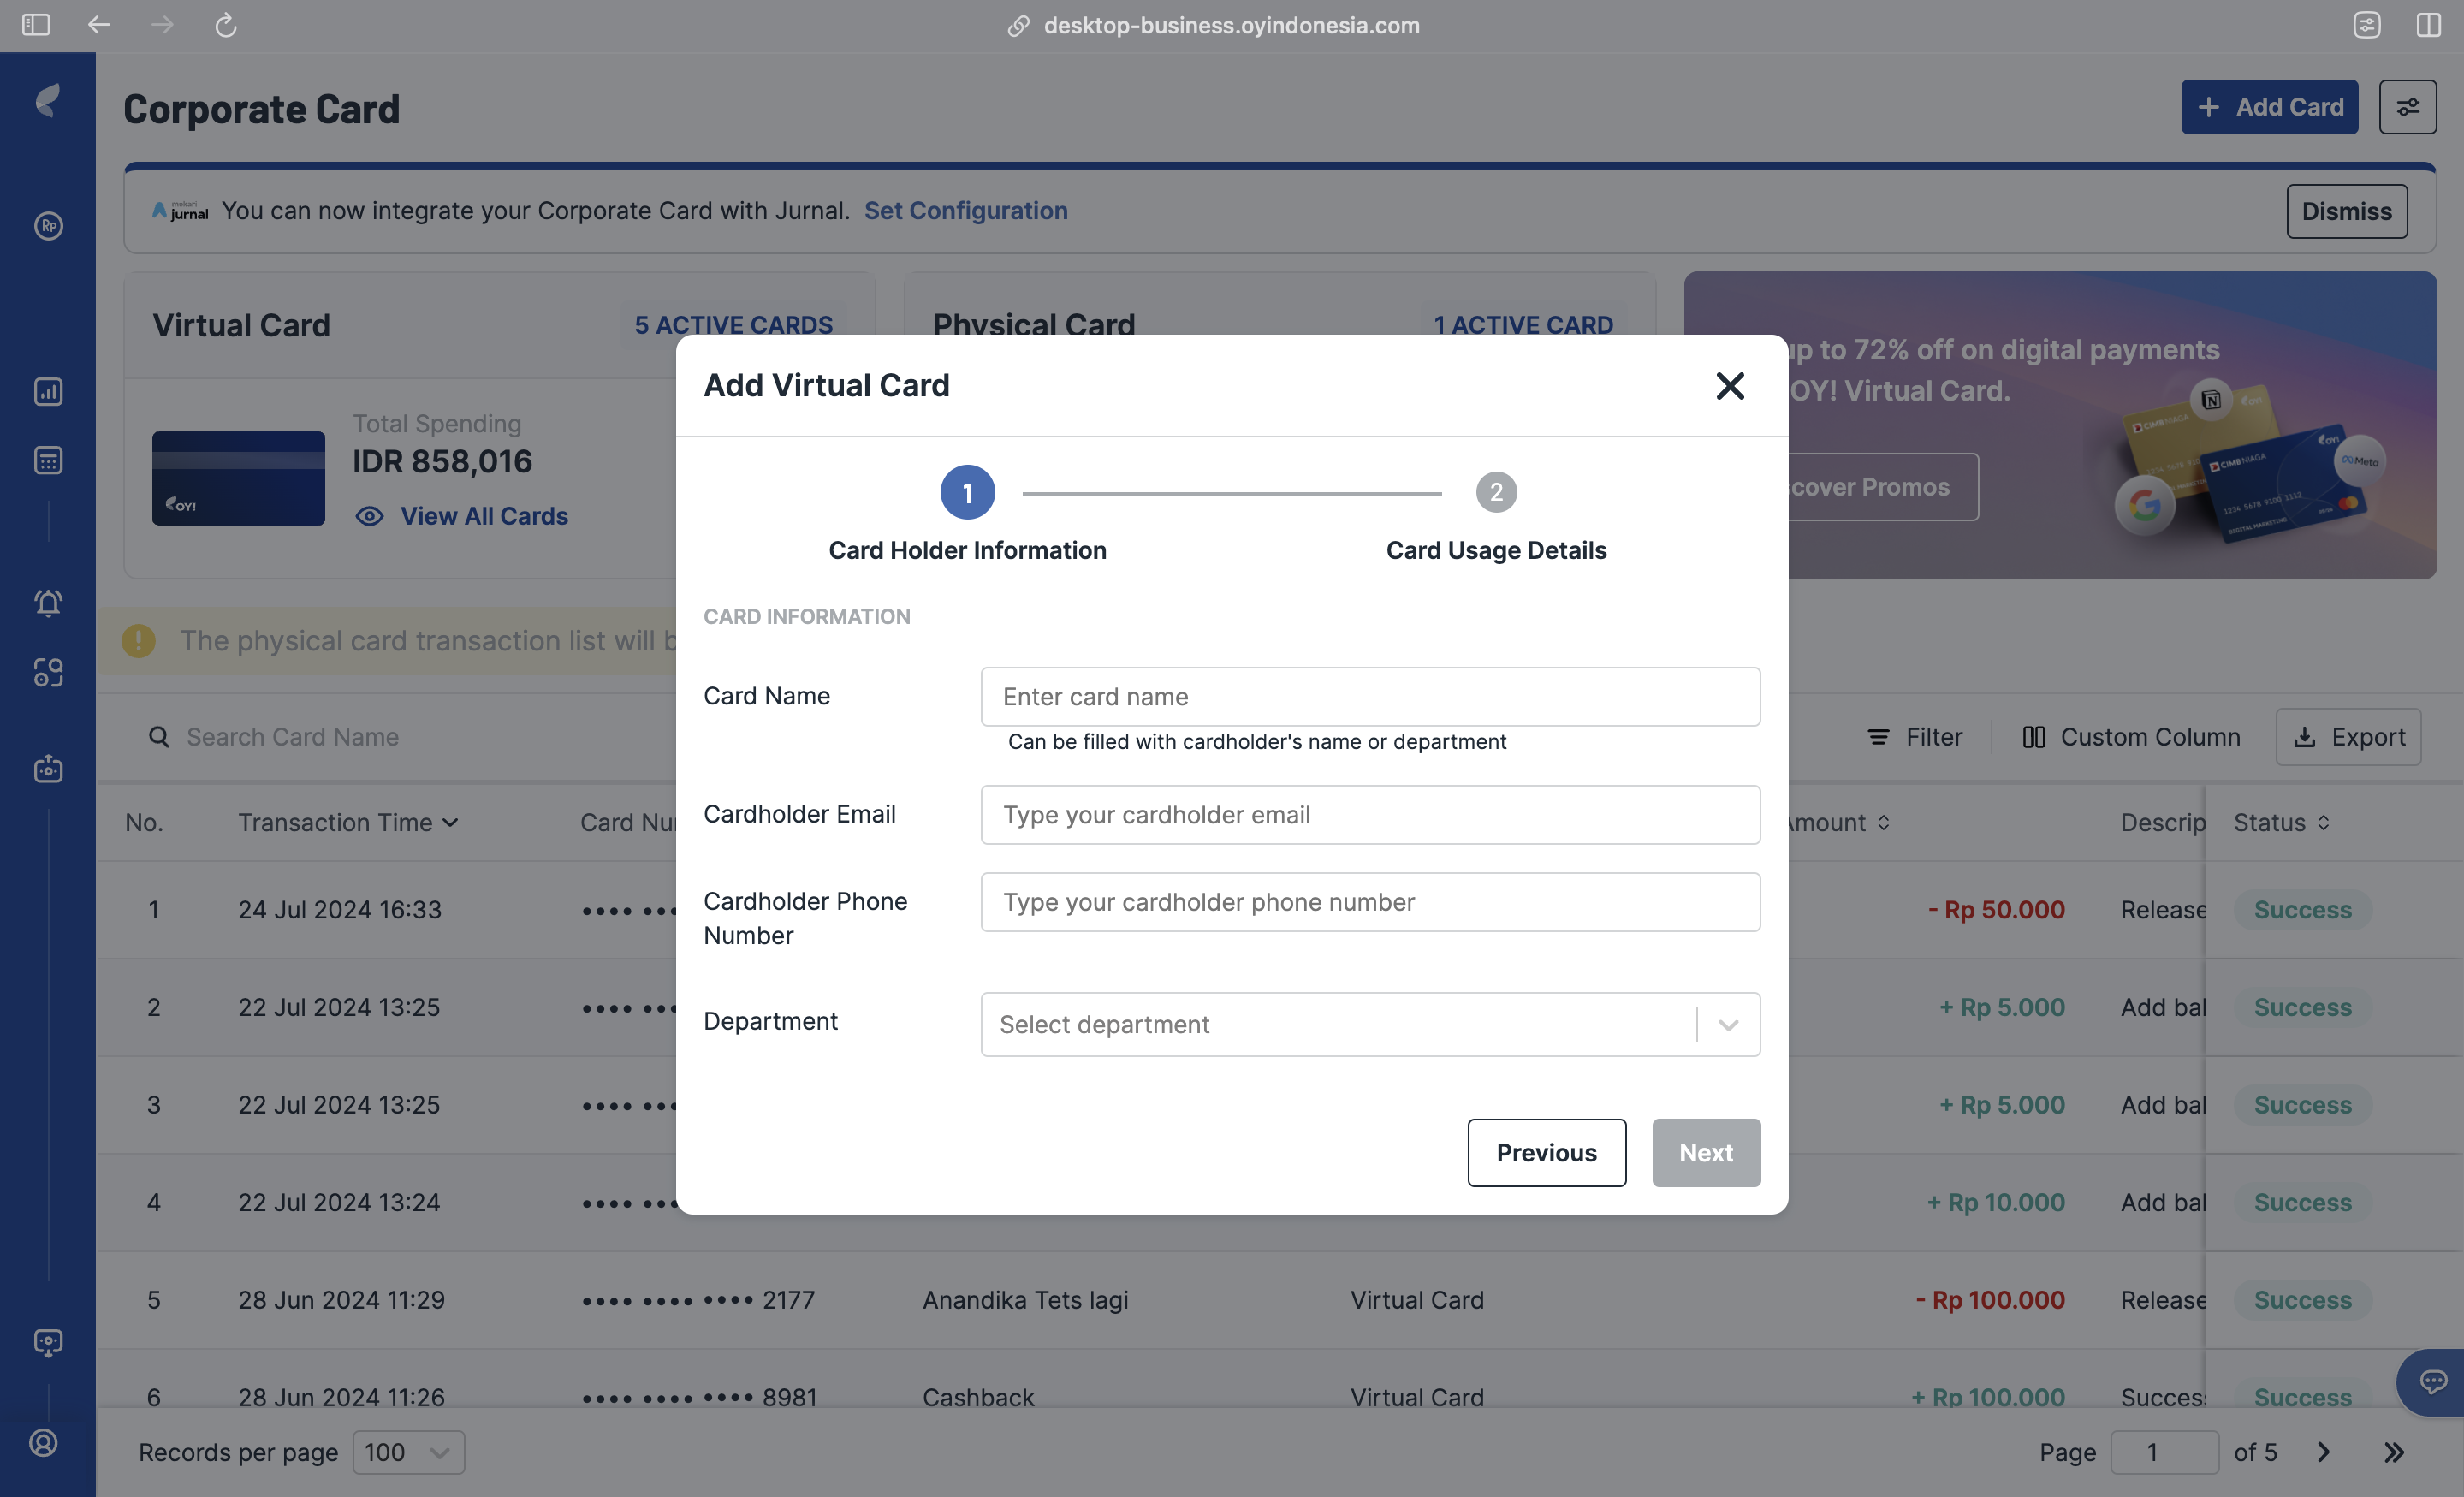
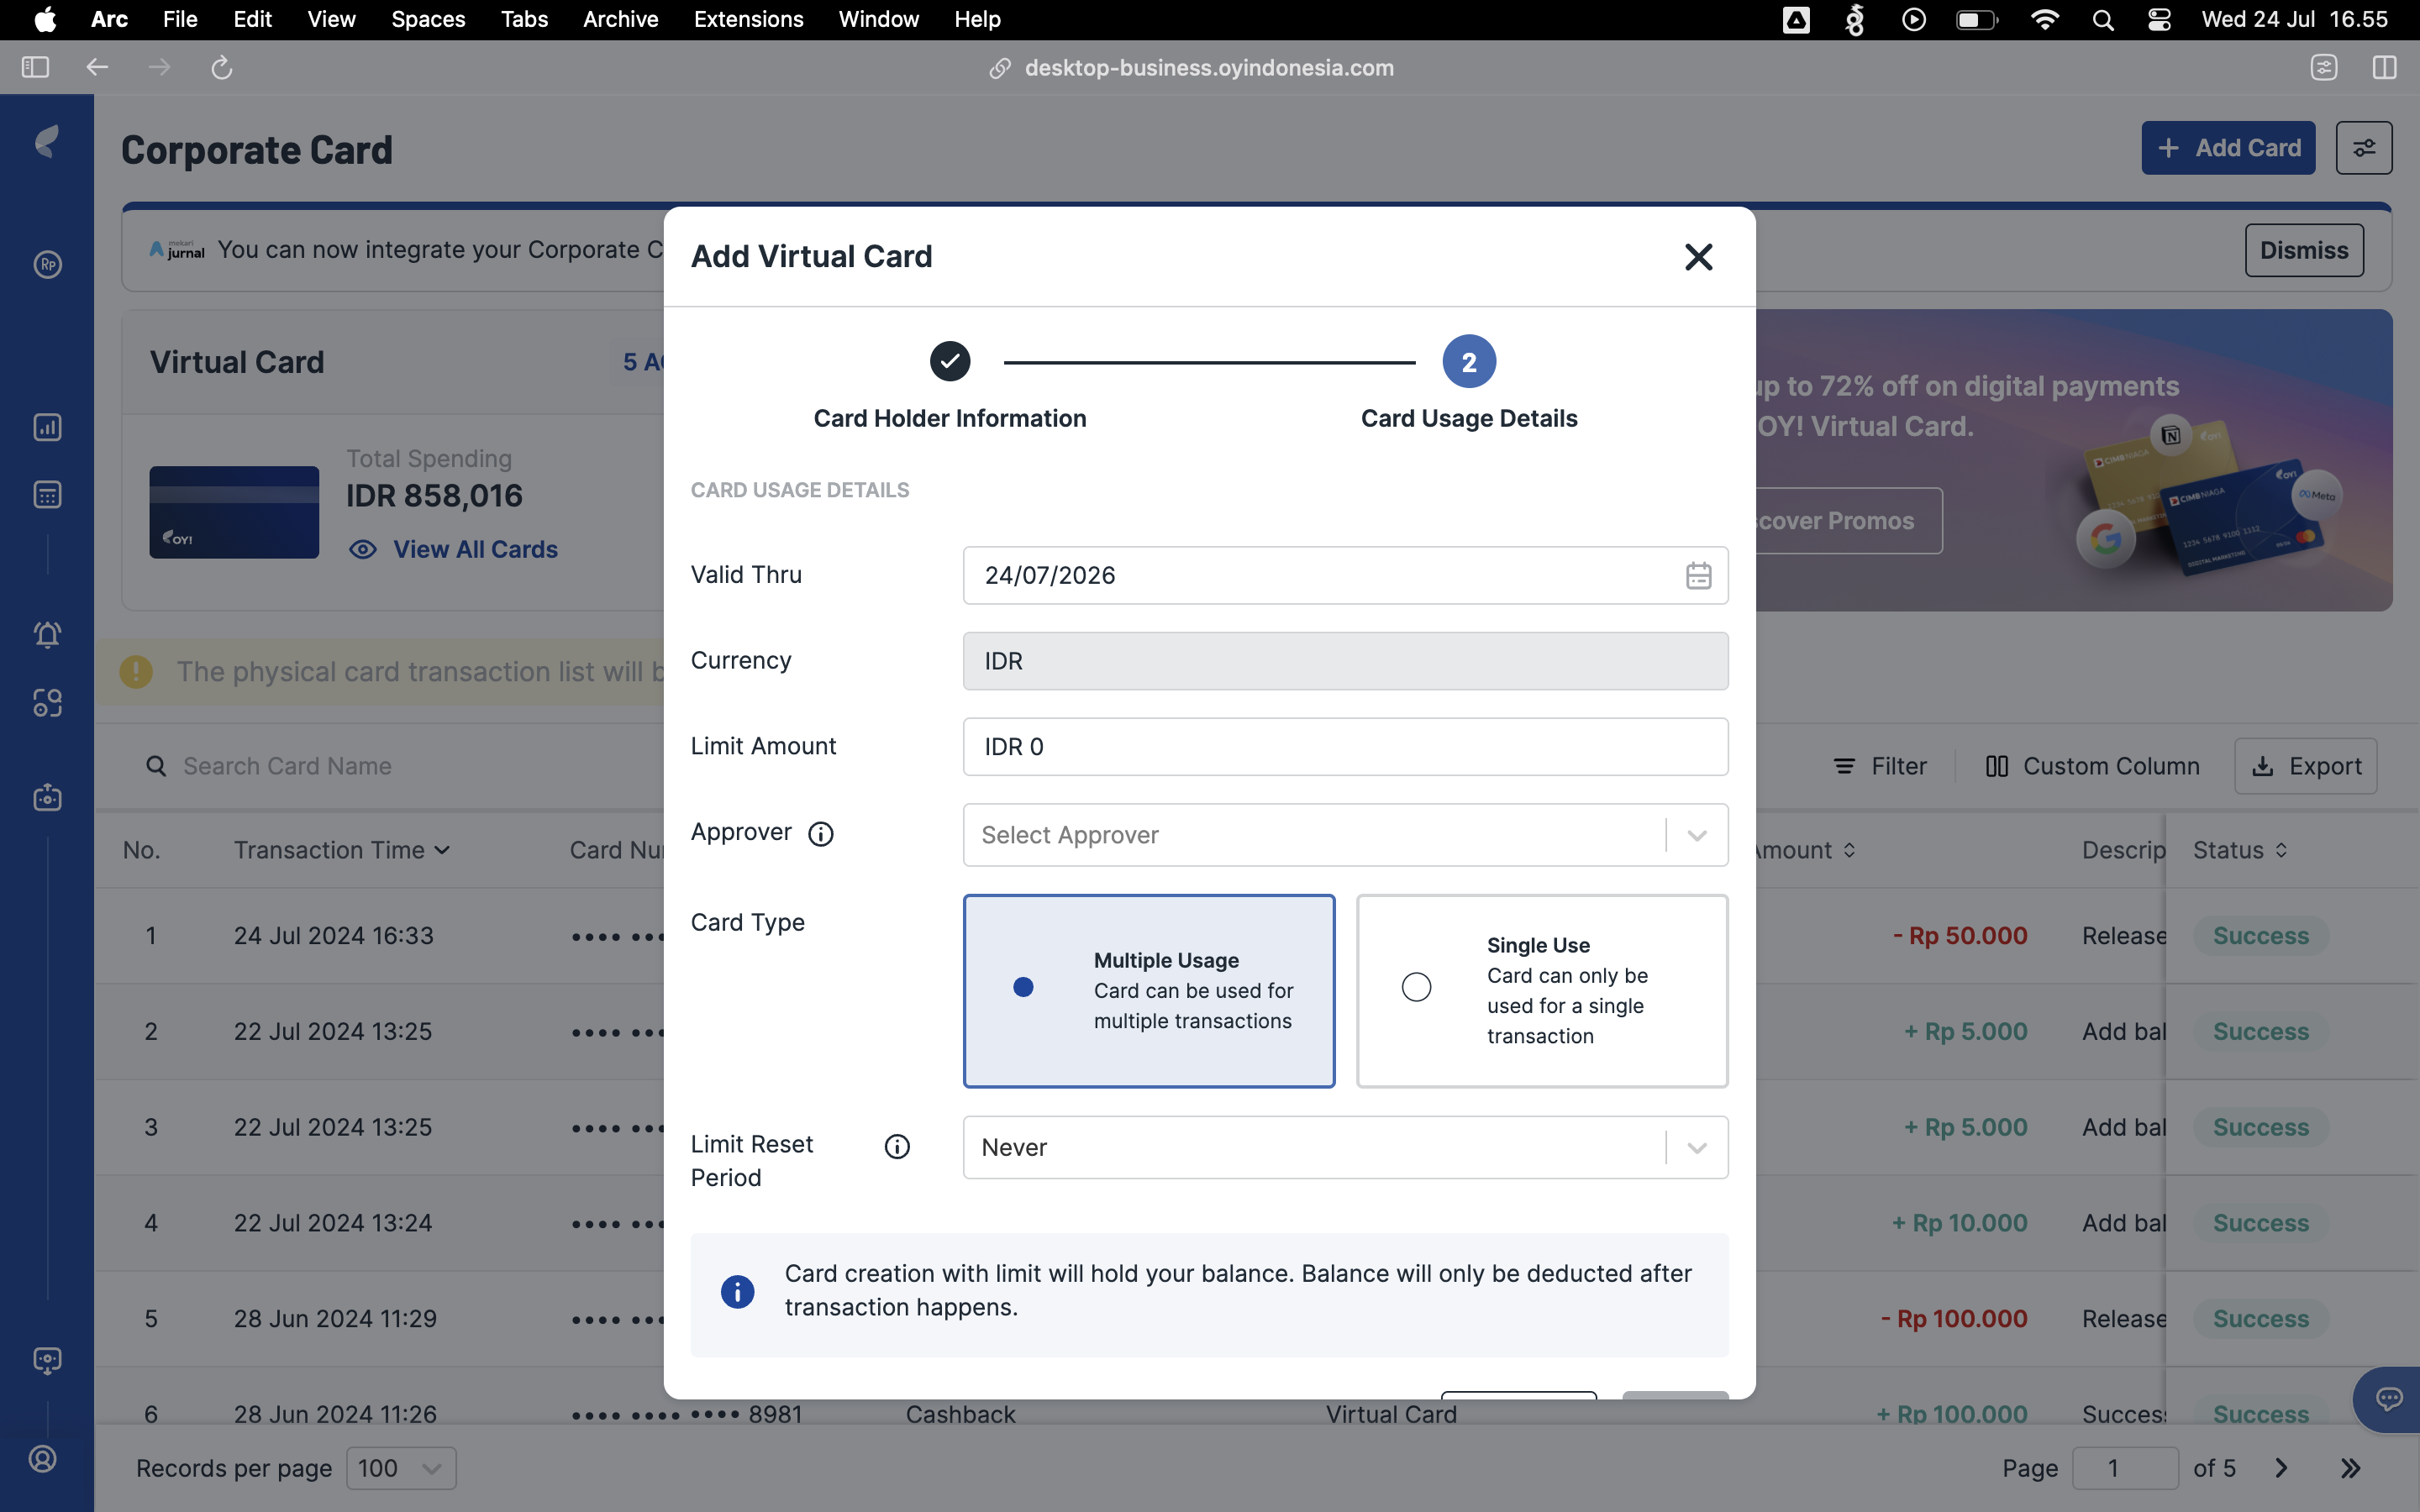
How to Transact with Virtual Card
Steps to use virtual card for online transaction: 1. Access your card information (including remaining balance & transaction) via email and enter OTP sent to the phone number registered. 1. Once accessed, input all of your card information into merchant side under “Credit / Debit Card” Option 1. Input 16 digit number, expiry date (MM/YY) and CVV 1. Submit the information and proceed with the transaction and the transaction should be successful. 1. For record purposes, you can upload the invoice for each transaction inside OY! dashboard.
- Virtual Card Information
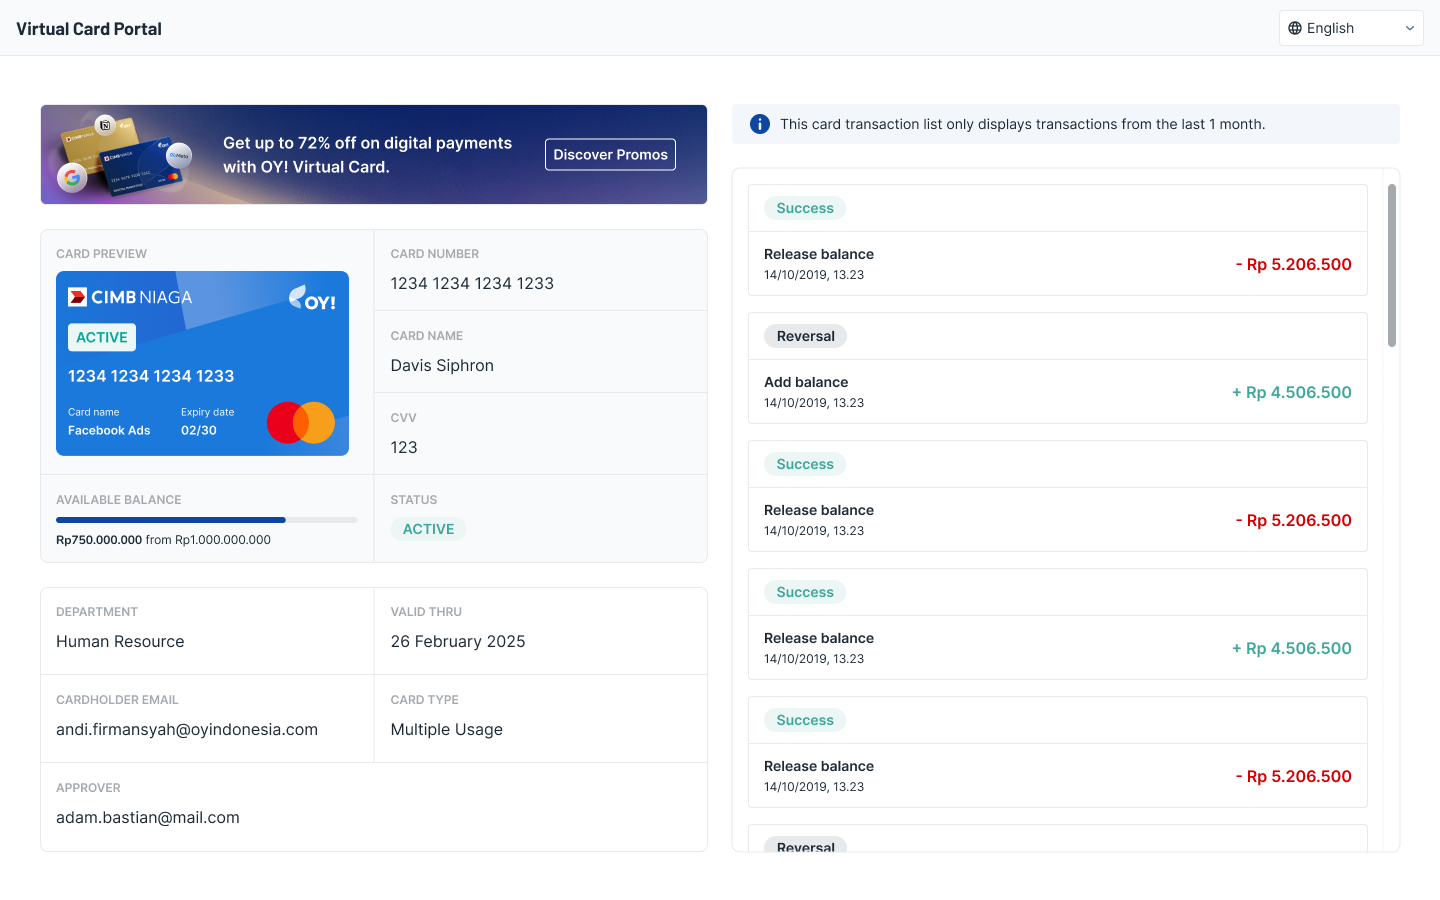
- Virtual Card Transaction Details
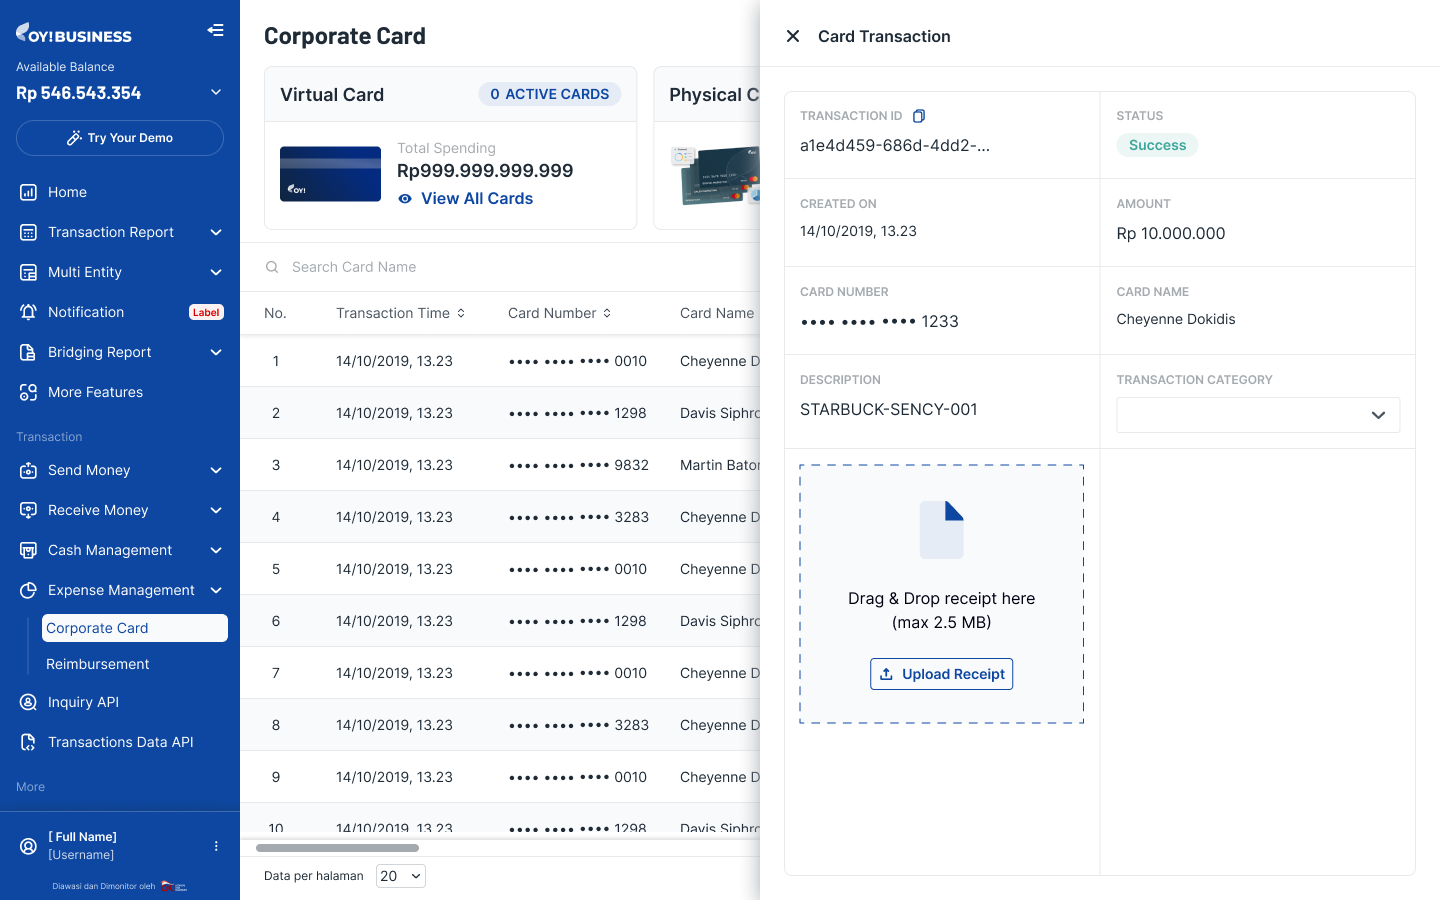
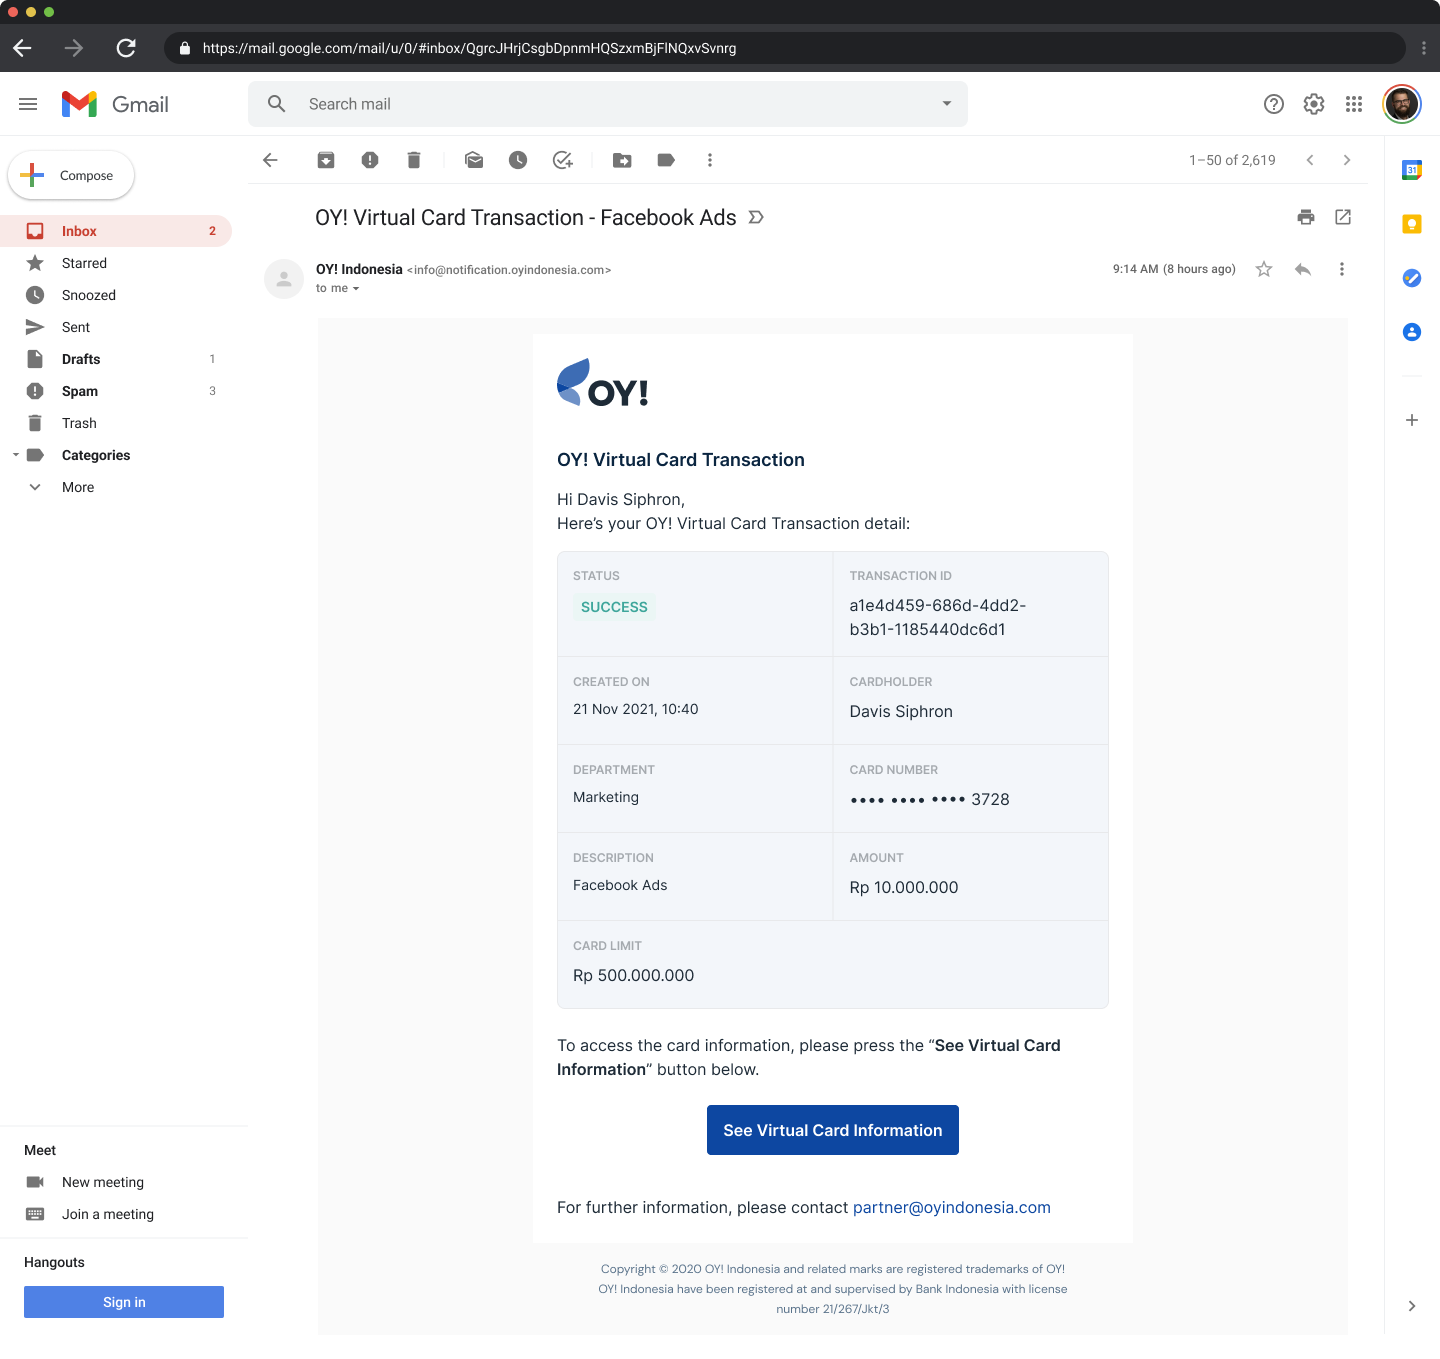
Virtual Card Status
| Status | Description |
|---|---|
| Pending Approval | Card has been requested but not yet approved. Requests are valid for 14 days. |
| Active | Card is ready to be used for transactions. |
| Active with Warning | Card is active with balance, but only <15% balance remaining. |
| Inactive | Card has been blocked. The card can be activated any time needed through OY! dashboard. |
| Need top-up | New card has been created but failed to top-up the card balance due to insufficient OY! balance, OR current card limit is 0 and passed renewal time due to insufficient OY! balance. |
| Expired | Card is expired or intentionally archived permanently. |
| Rejected | Card is rejected by approver. |
Transaction Status
| Transaction Status | Description |
|---|---|
| Successful | Transaction was successful. |
| Failed | Failed transaction issue that related to OY! balance (top-up card or create card). |
| Reversal | Transaction was canceled, and the amount was refunded due to errors, returns, or fraud. |
| Declined | Transaction was declined by the merchant. |
| Refund | Refund by merchant. |
How to Set Approver for Virtual Card
- Log in to your OY! dashboard
- Click “Corporate Card” under Expense Management menu
- During first time product activation, you are required to fill in approver data
- Fill in the approver details
- You are required to review and check the T&C, then confirm your approver details
- Approver will receive confirmation email
- Add New Approver
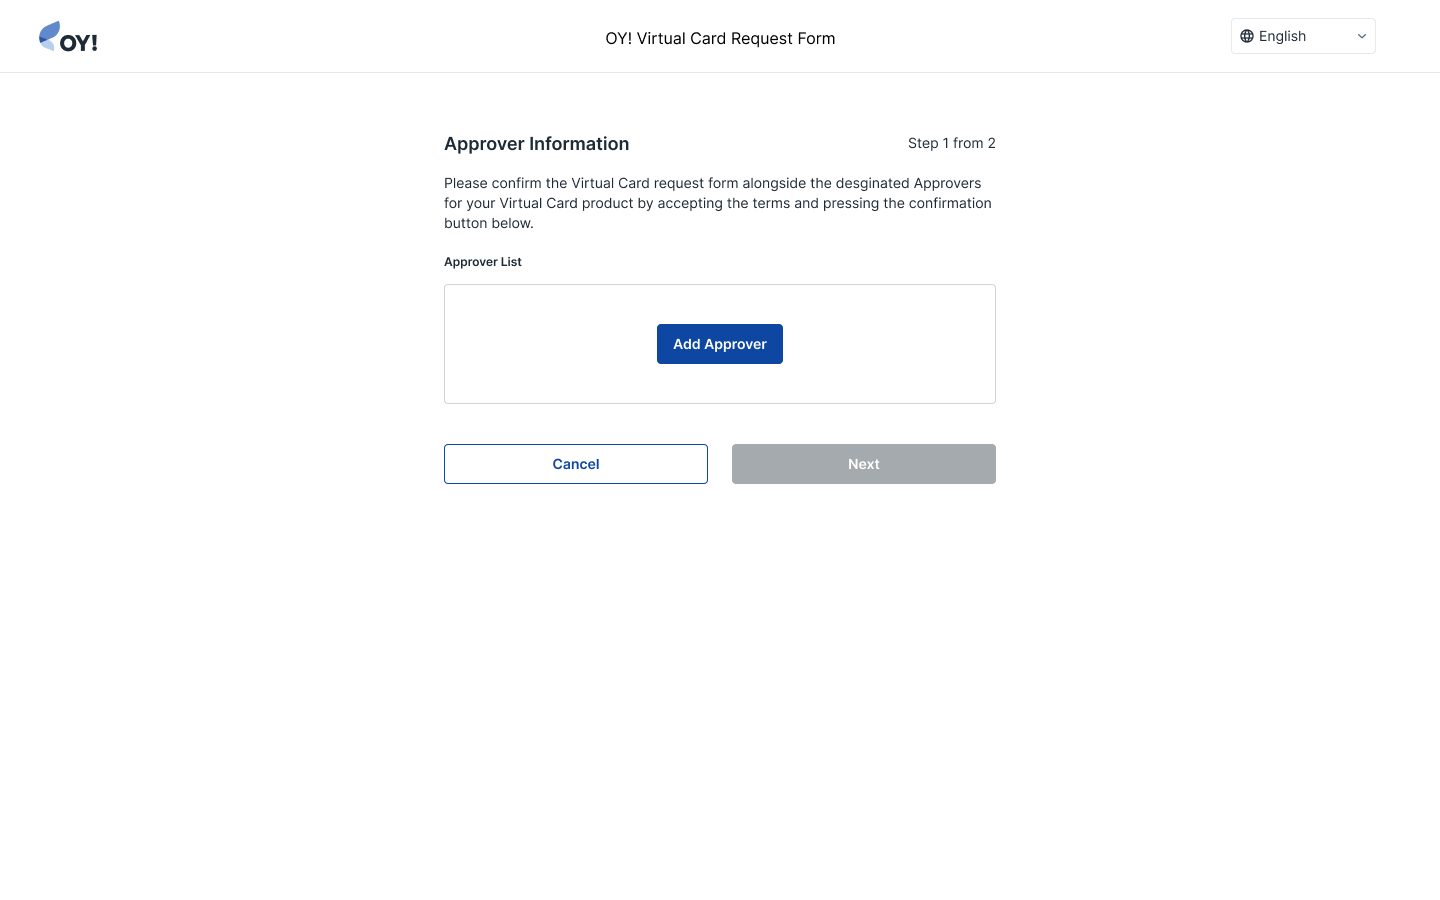
- Approver Form
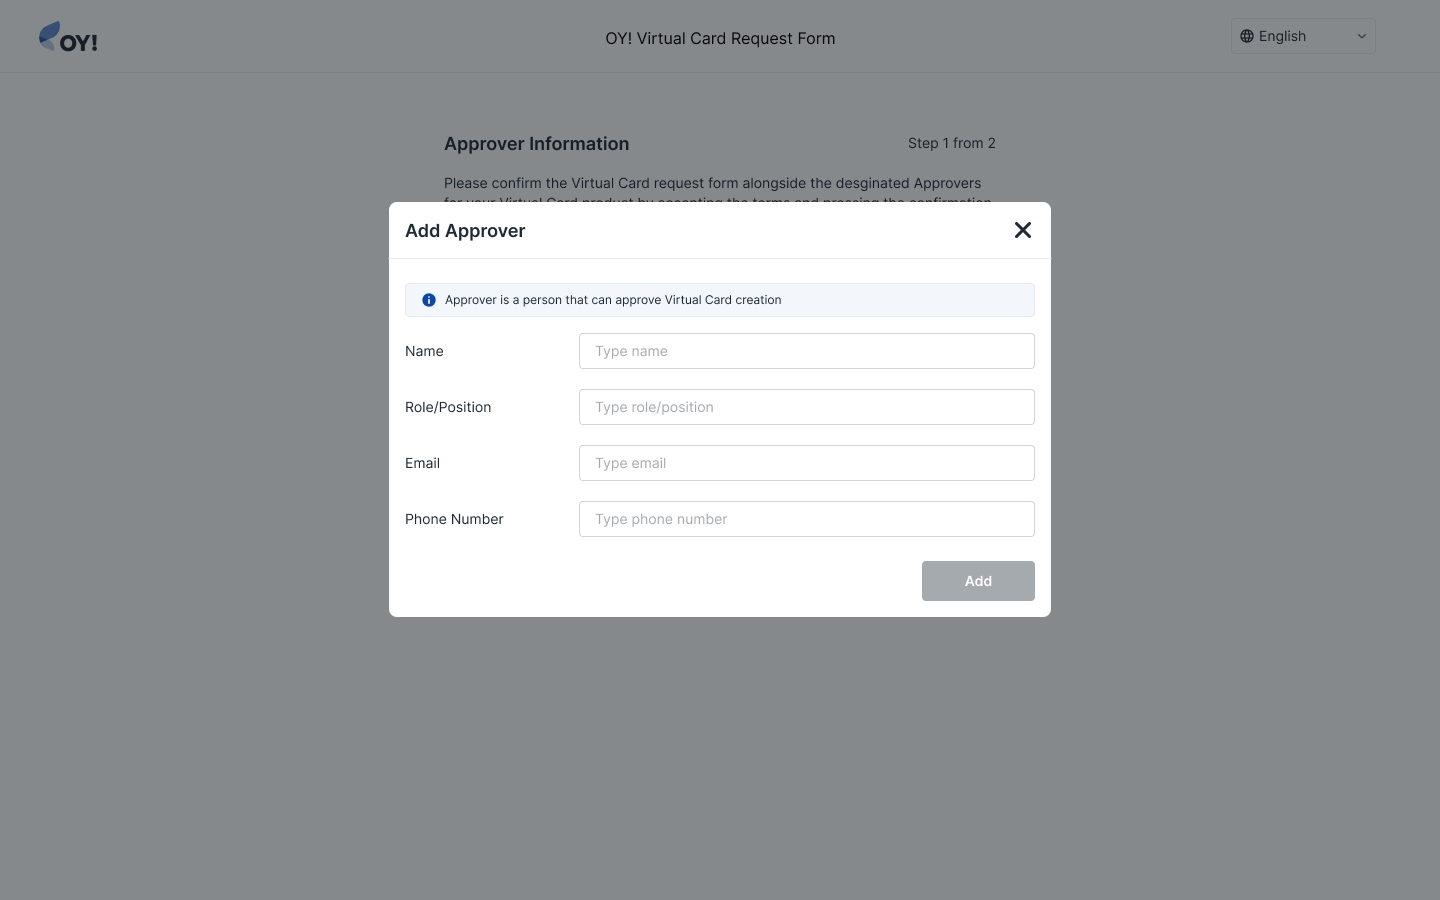
Notes: Approver data cannot be added or edited through OY! dashboard for security purposes. Please contact our business representative for help.
| Parameter | Description |
|---|---|
| Name | Approver Name |
| Position | Approver Role |
| Phone Number | Approver Phone Number |
| Approver email for card approval purposes |
How to Monitor and Manage Virtual Cards
- Log in to your OY! dashboard
- Click “Corporate Card” under Expense Management menu
- Click “See All Cards”
- Dashboard will show analytics dashboard (divided per department) and list of card to manage
- Click the card that needs to be managed
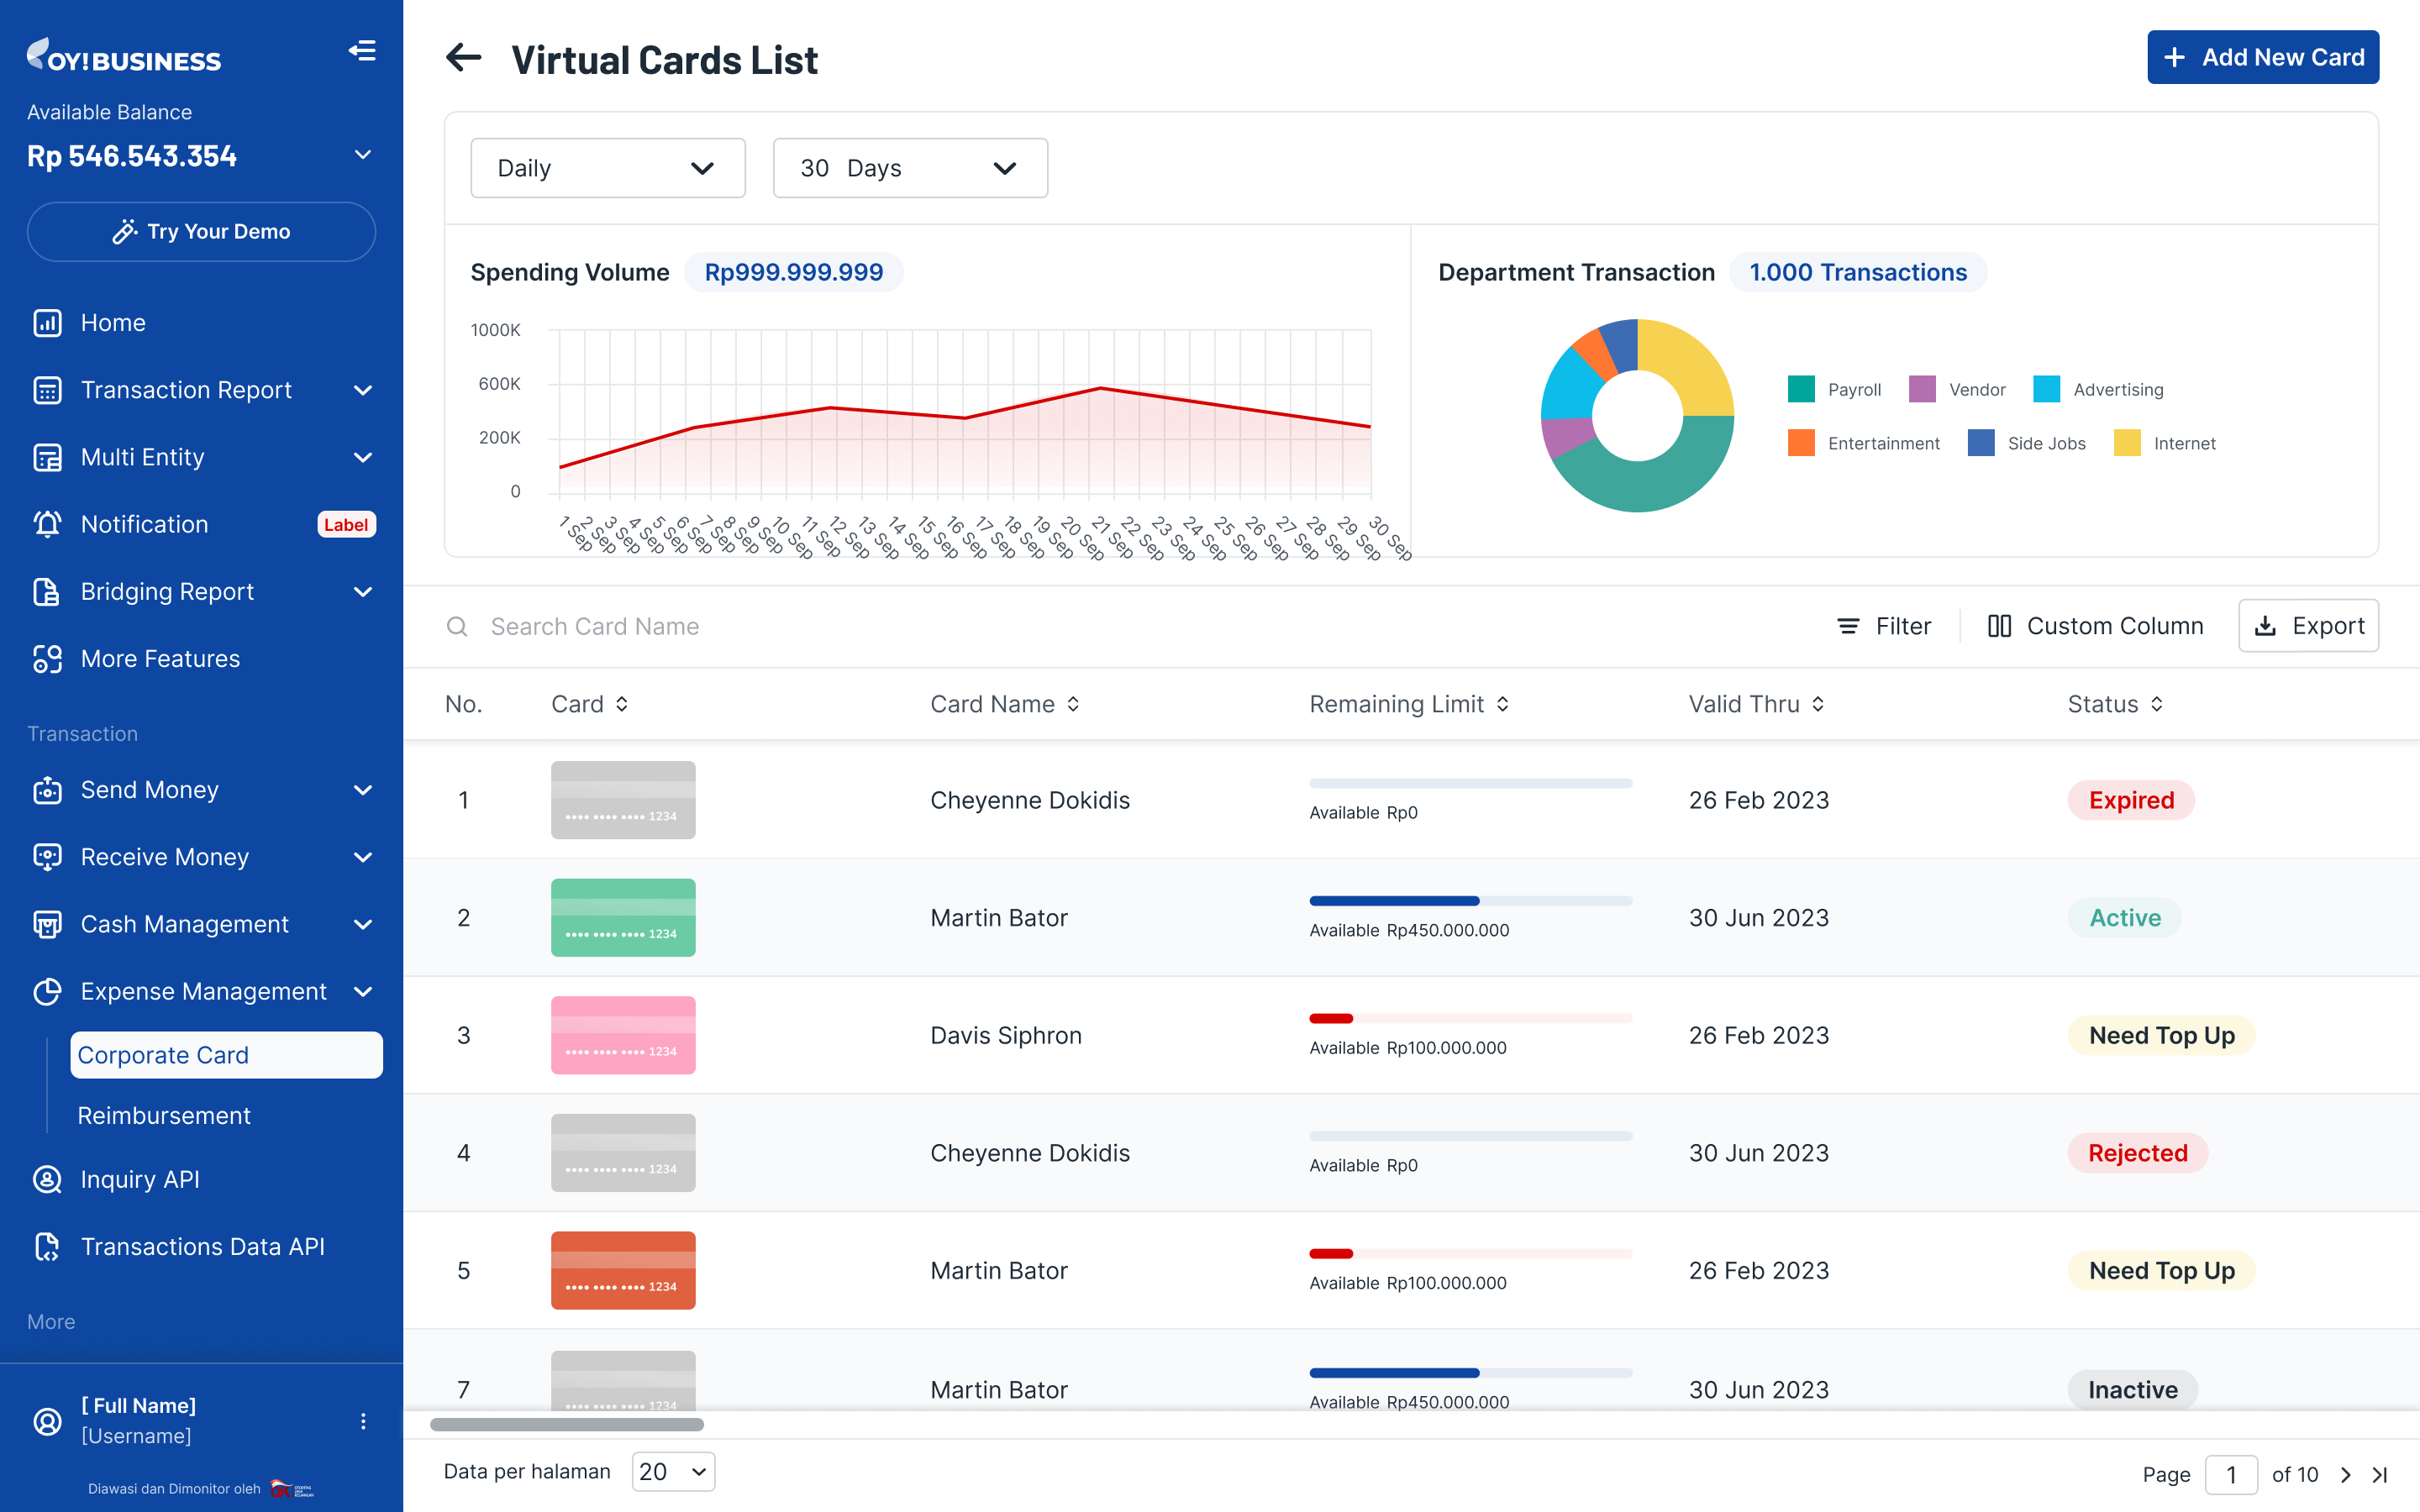
Card Actions
| Card Actions | Description |
|---|---|
| Resend Card Info | To resend card info to cardholders, in case of missing email. |
| Edit Information | To edit the card limit. Editing card limits will lead to card temporary blockage and require reapproval flow again. |
| Block | To temporarily lock the card, limit remains in the card and card’s status will be “Inactive” |
| Archive | To permanently lock the card, card limit will be reduced to 0 and remaining card limit will be returned to OY! balance. |
| Renew Limit | To renew the card limit with a desired amount using OY! balance. |
| Resend Approval Notification | To remind approver to approve the card request in case of missing email. |
| Delete | Only applicable for "Pending Approval" card. This will archive the card so the card is no longer used. |
How to Set Up Card Configuration
- Log in to your OY! dashboard
- Click “Corporate Card” under Expense Management menu
- Click “Corporate Card Configuration”
- Select Department / Category / Approver
- You can choose to whether add new, edit existing or delete
- Click "Save Changes"
- Department page prior to “Edit Department” button
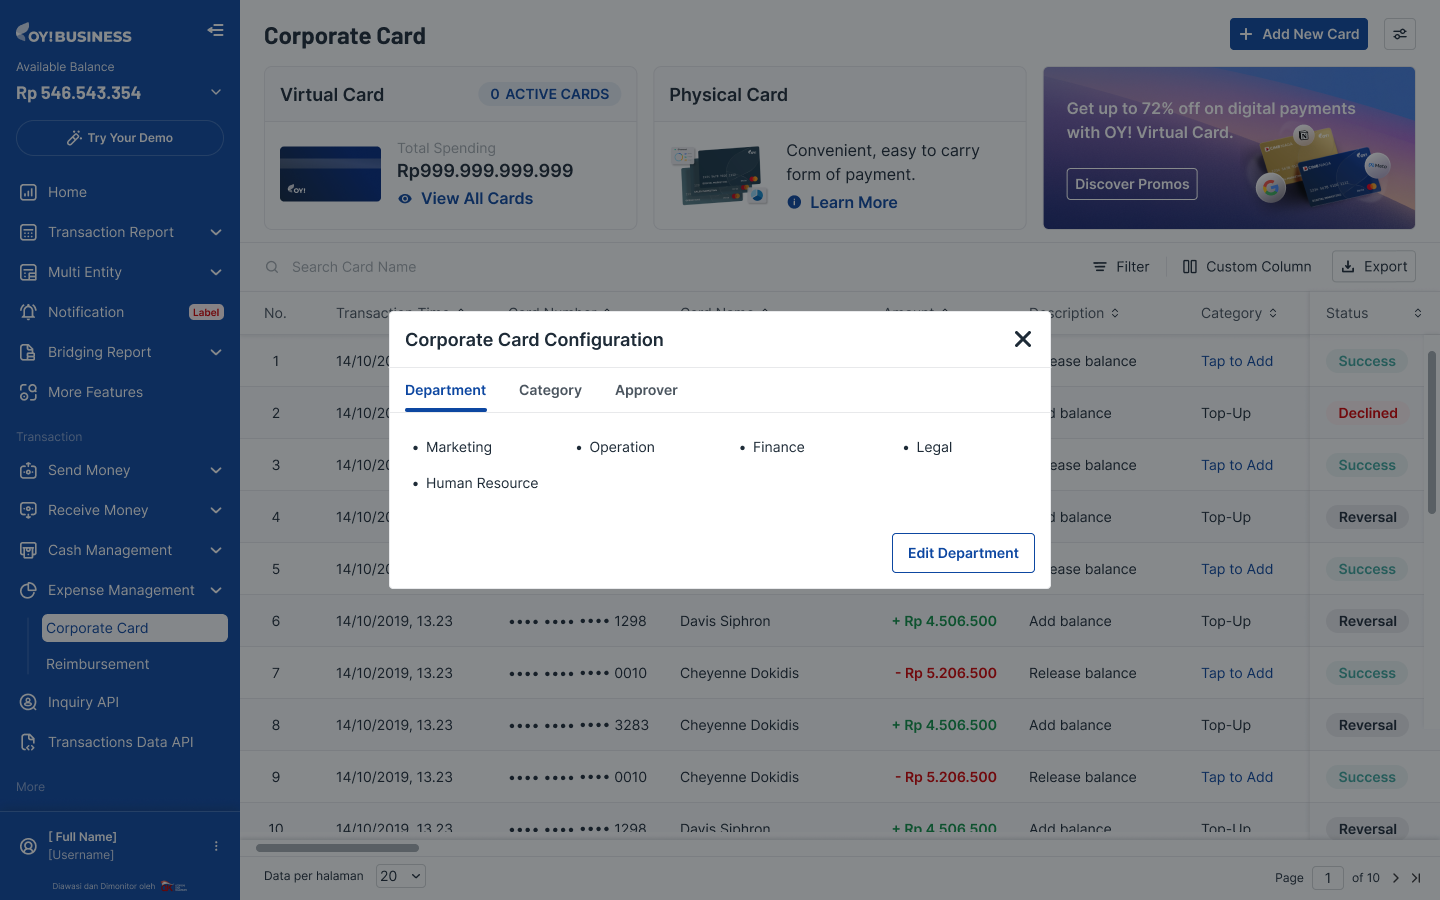

- Category page

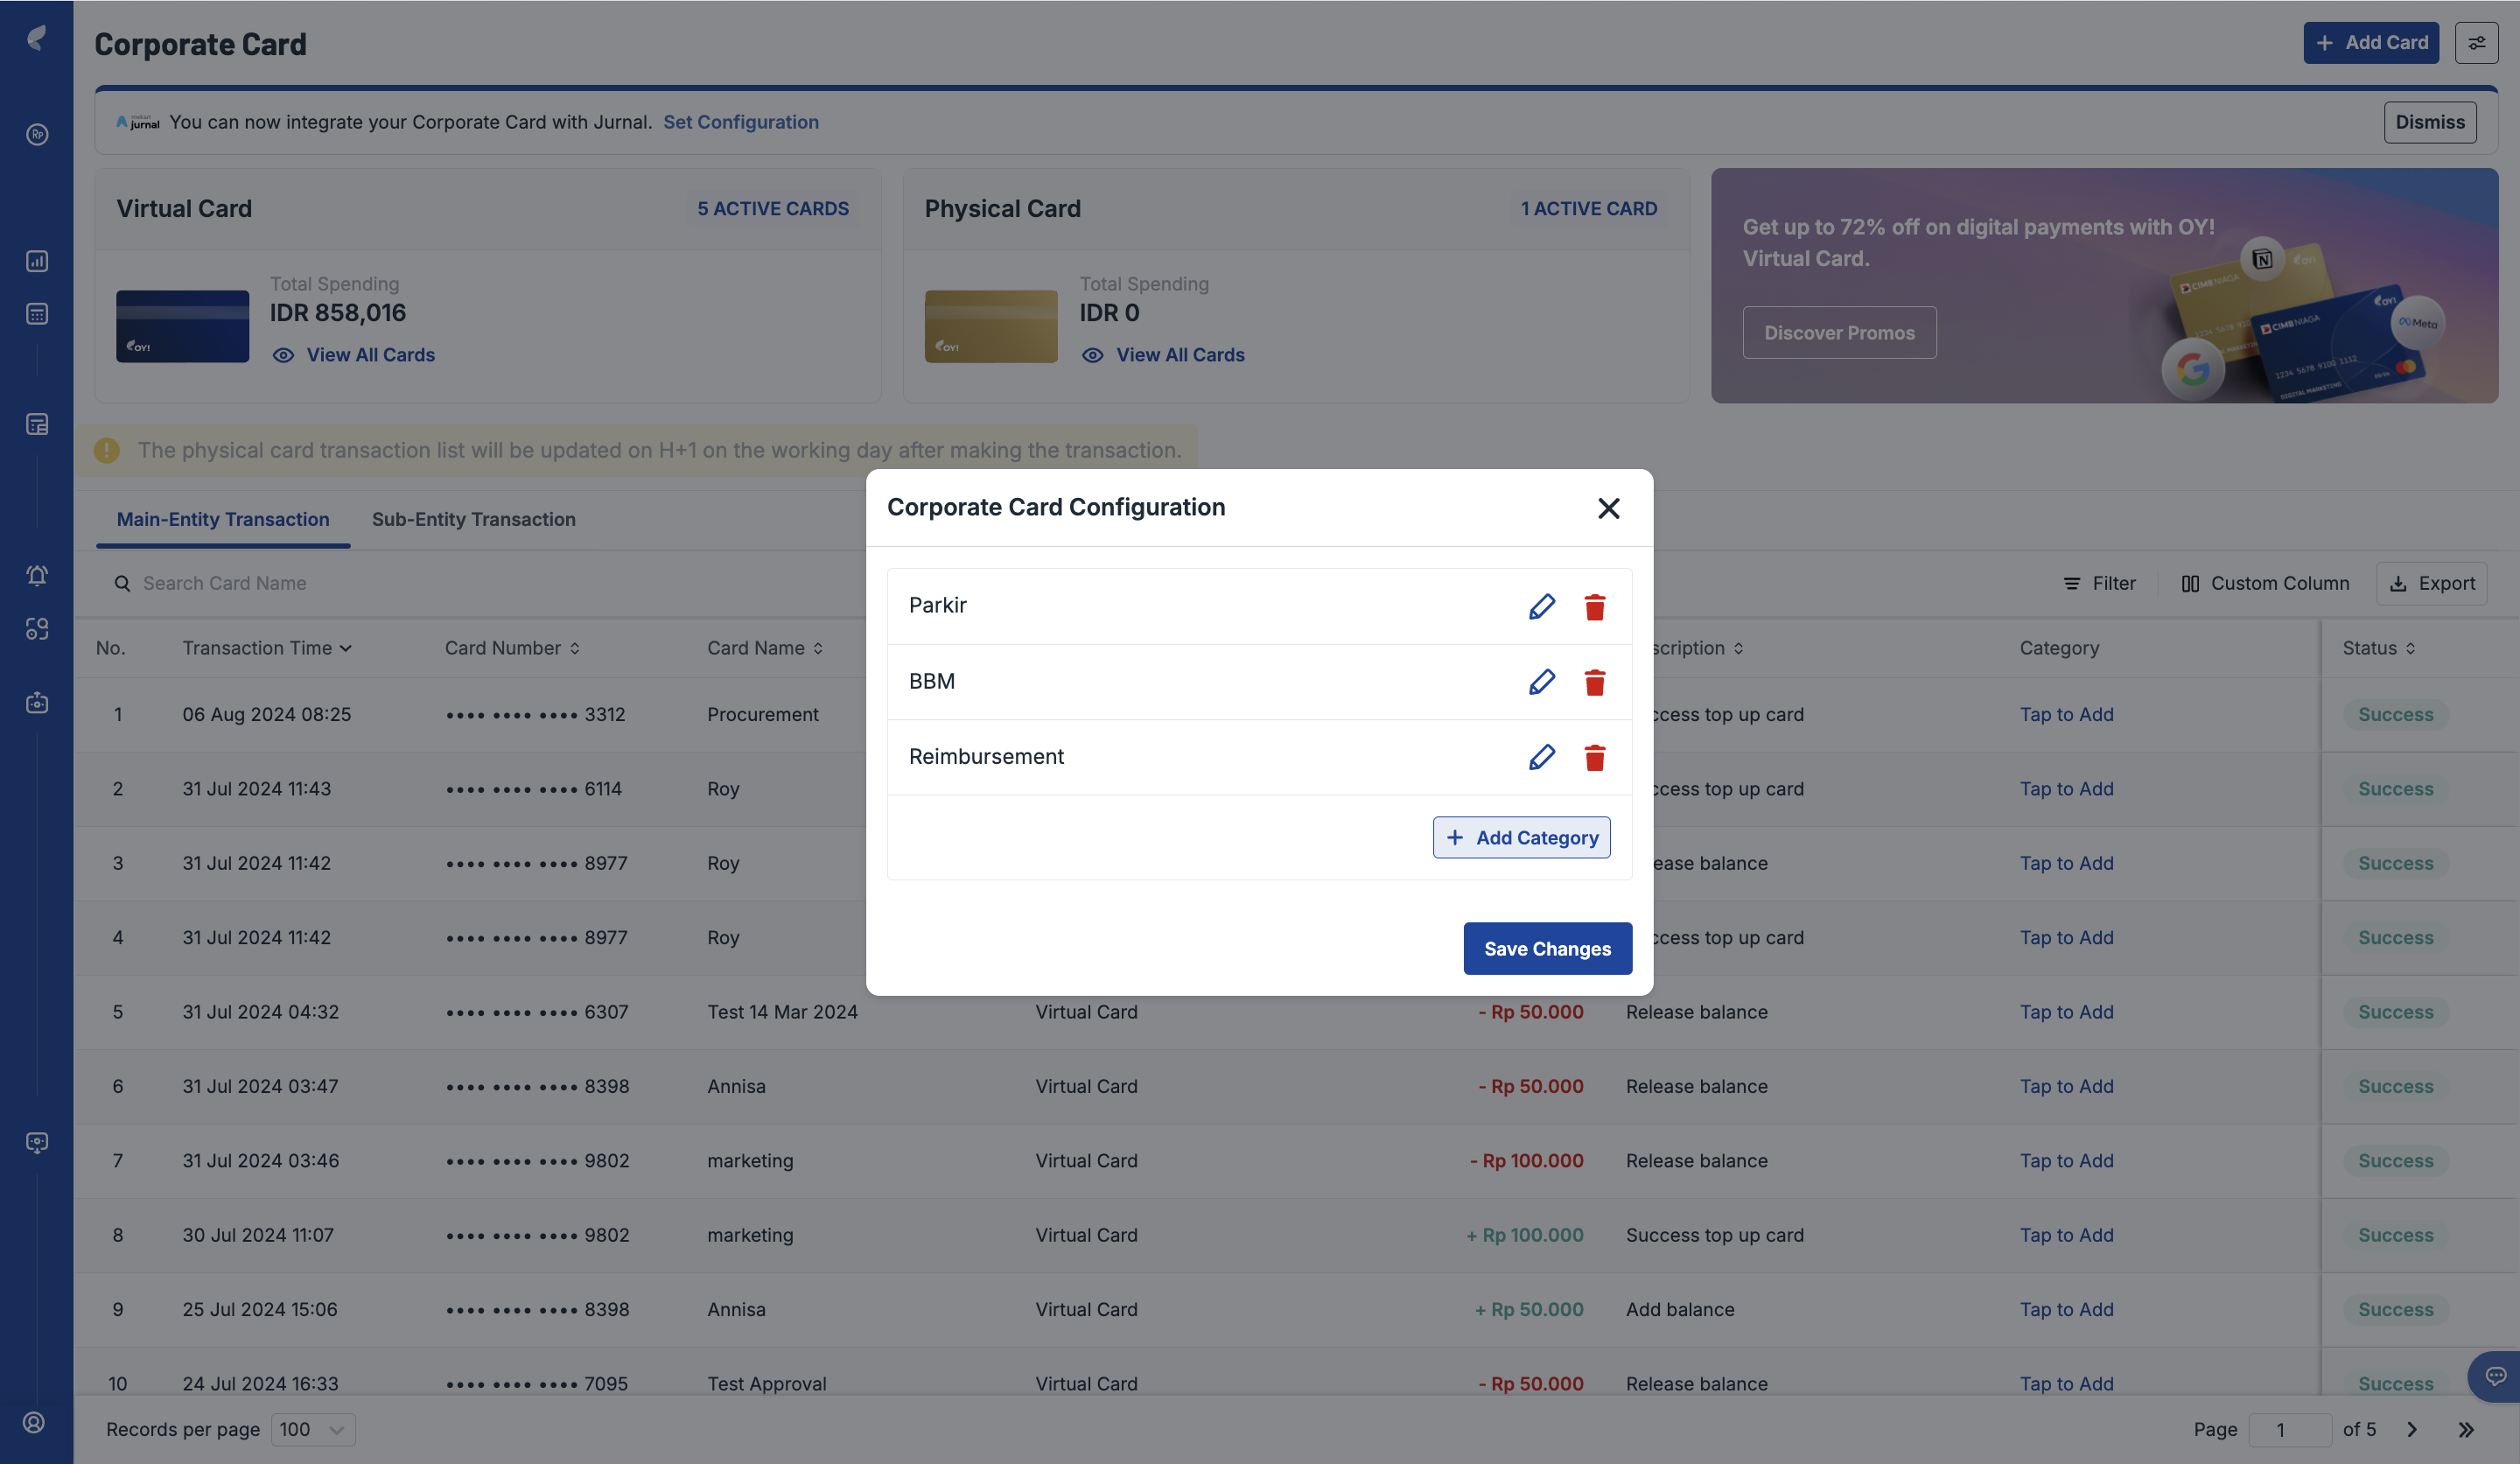
- Approver page
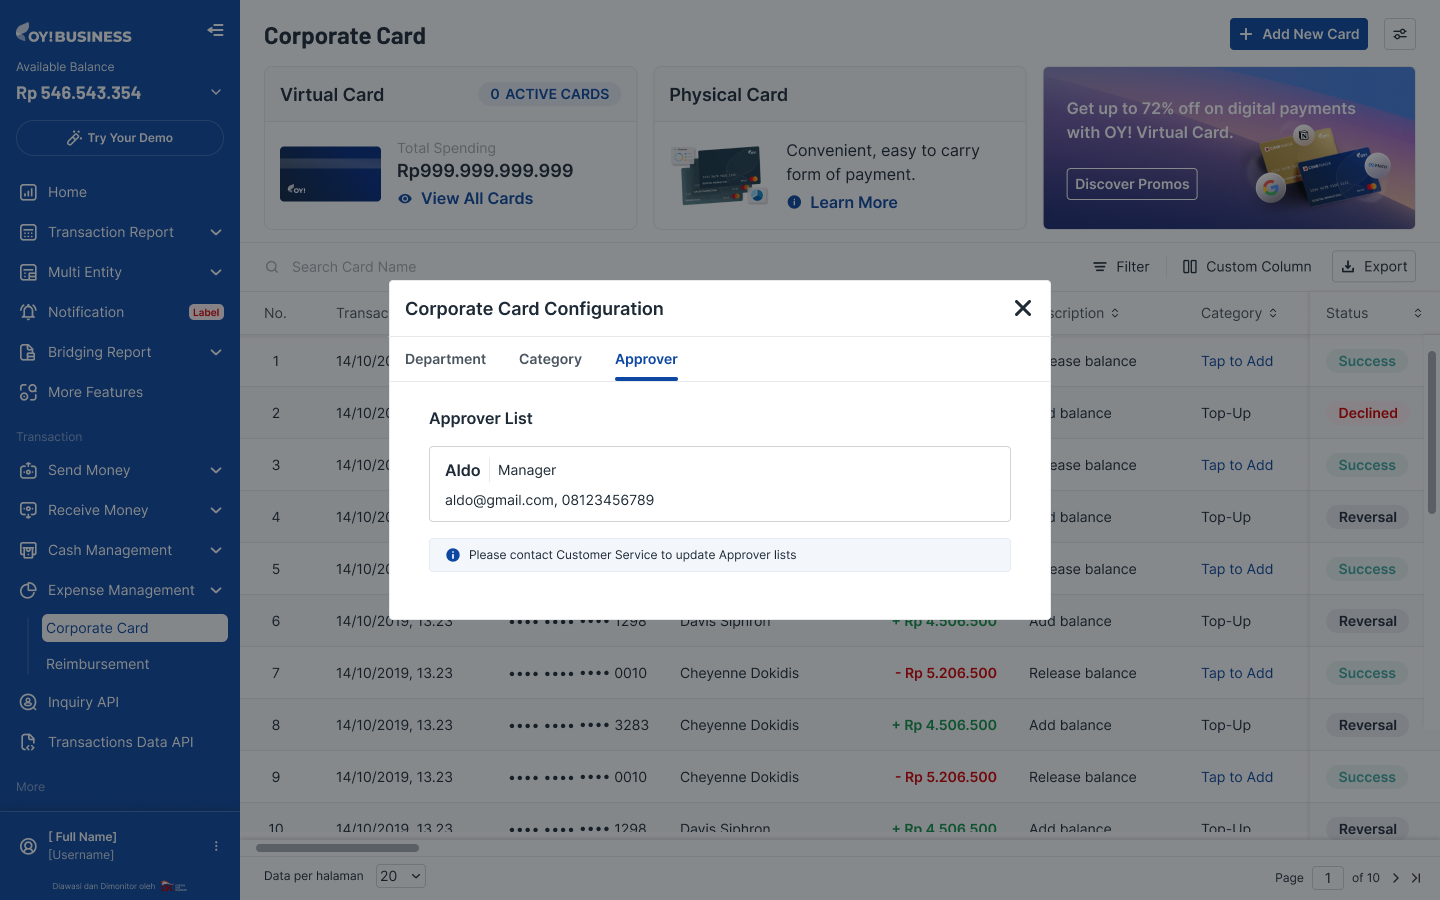
Decline Transaction Possible Reasons
| Issues | Explanations |
|---|---|
| Card utilization is more than requested | Admin requests a card for single use only, but it is being used for more than one transaction. Please request a multiple use card if you expect the card to process multiple transactions. |
| Insufficient balance on the card | The balance on the card is less than the transaction amount. In this case, the cardholder may need to ask the Admin to top up the card. For example: The card balance is Rp 300,000 but the transaction amount is Rp 302,000. Since the card balance is less than the transaction amount, the transaction will not be processed successfully |
| Card is inactive | The card is temporarily blocked by the Admin. Cardholder needs to ask the Admin to activate the card. |
| Card is expired | The virtual card is no longer valid because it has passed its expiration date. Admin or cardholder can check the expired date from dashboard or virtual card information page. |
| Invalid card number | Cardholder entered the card number incorrectly. Please input the 16 digit card number correctly. |
| Invalid expiry date | Cardholder made an error entering the card expiry date. Please enter the correct expiry date. |
| Invalid CVV | Cardholder made an error inputting the CVV number. Please enter the correct CVV. |
| Issuer network not supported | Not all overseas merchants can process transactions for certain reasons. If you experience a declined error, please check the merchant's capabilities; they might only accept physical cards, regional restrictions, or other reasons. |
Notes
- Transactions will be settled according to the bank’s instructions.
- Successful card transactions will directly reduce card limit.
- For refunds, please contact the merchant where you made the purchase. OY! is not responsible for processing refunds until we receive the funds back from the merchant.
- Refund duration will depend on the merchant and the bank.
- Once a refund has been issued, the balance will be returned back to your OY! balance.
- It is your responsibility to block card usage if you notice any suspicious transactions.
Reimbursement
OY! Reimbursement product offers an easy way to manage employee reimbursement requests and fund disbursements all in one platform. Employees can simply request reimbursement via the link sent to their email. No technical integration is required to utilize the product.
Key Features
| Feature | Description |
|---|---|
| Approval Capability | To ensure no fraudulent requests are made, a double approval mechanism exists in the product and is mandatory for the reimbursement process. The first layer is for the team manager via email, and the second layer applies to the admin via the dashboard. Our reimbursement product features a double approval mechanism to ensure integrity. |
| Disbursement Scheduling | Admin can also immediately schedule the disbursement time after approval from the team manager. Currently, the scheduled disbursement options are 1 day, 3 days, 7 days, and 14 days from the day of admin approval, allowing flexibility in managing cash flows. |
| Reimbursement Details | For admin, every reimbursement request from employees can be accessed through the OY! dashboard, including the uploaded file, to ensure it matches the requested amount. |
| Reimbursement Tracking | For employees, no more hassle in checking reimbursement progress with the admin. Your employee will receive a tracking email to check progress in real-time. |
Notes:
- First approval: Team Manager
- Second approval: Admin (it can be Finance Team or HR Team)
This ensures that each approval request is reviewed by at least two reviewers, providing an extra layer of oversight and security.
Registration and Set Up
Follow the below check-list to ensure you're all set up to use the service:
- Create an account for OY! business
- Upgrade your account by submitting the required documentations
- Have your upgrade request approved
- Set up your receiving bank account information (note: ensure that the receiving bank account information is accurate as it cannot be changed via OY! dashboard for security reasons)
- Once your account is approved, you can start using Reimbursement product
Testing
- Log in to your OY! Dashboard.
- If you haven’t set approver for team manager, please follow steps in How to Set Approver
- Select the "Demo" environment.
- Navigate to "Reimbursement" product under the Expense Management menu.
- Follow steps How to Distribute Reimbursement Link first to able open the reimbursement request page
- Then create reimbursement request by follow the step How to Fill Reimbursement
- Your reimbursement request will appear in Reimbursement table (in Demo environment) also sent to registered Team Manager’s email
- Ask your registered Team Manager to open the link that was sent to their email and approve it for testing purposes. Your team manager can follow steps in How to Approve Transaction.
- After your team manager approve or reject the transaction, it will reflect on your Demo OY! Dashboard. Afterward, as an admin you can approve or reject the transaction and schedule the disbursement as explained in How to Schedule Disbursement
How to Set Approver
By default, admin is the second approver for reimbursement requests. However, you need to register your Team Manager as the first approver for reimbursement requests. Setting up the approver will only occur once when the page is first opened.
- Log in to your OY! dashboard.
- Navigate to "Reimbursement" product under the Expense Management menu.
- Click on "Create Reimbursement Link."
- Choose "Register Approver."
- Fill in the approver's name, email address, and department.
- After registration, the approver will receive a notification via email.
- Approver registration page
Notes
- Approver emails are mapped based on department names, and duplicate department names are not allowed.
- After submission, addition, editing, or deletion of existing approvers can only be done via OY! Customer Service.
- Team managers will only receive notifications via email; no dashboard access is required.
- The approver list view is accessible in the dashboard under Reimbursement configuration.
How to Distribute Reimbursement Link
After Approver registration, you can start sharing the reimbursement link with employees through two methods:
- Via Bulk Upload:
- Download the sample file and input a list of employee emails in CSV or XLSX format.
- Upload the file for email distribution, then click “Submit”.
- Employees will receive the form link in their email and can use it to submit a reimbursement request.
- Via Link Distribution
- Copy the link and distribute it using any convenient method.
- Employees may fill the form and proceed to submit a reimbursement request.
- Bulk Upload and Link Distribution page from OY! Dashboard
How to Fill Reimbursement Request
- Click reimbursement link that has been shared from Admin.
- Fill the Employee Information and Reimbursement Request then click “Submit”.
- You will receive confirmation email regarding reimbursement request has been submitted
- Form Reimbursement Request page
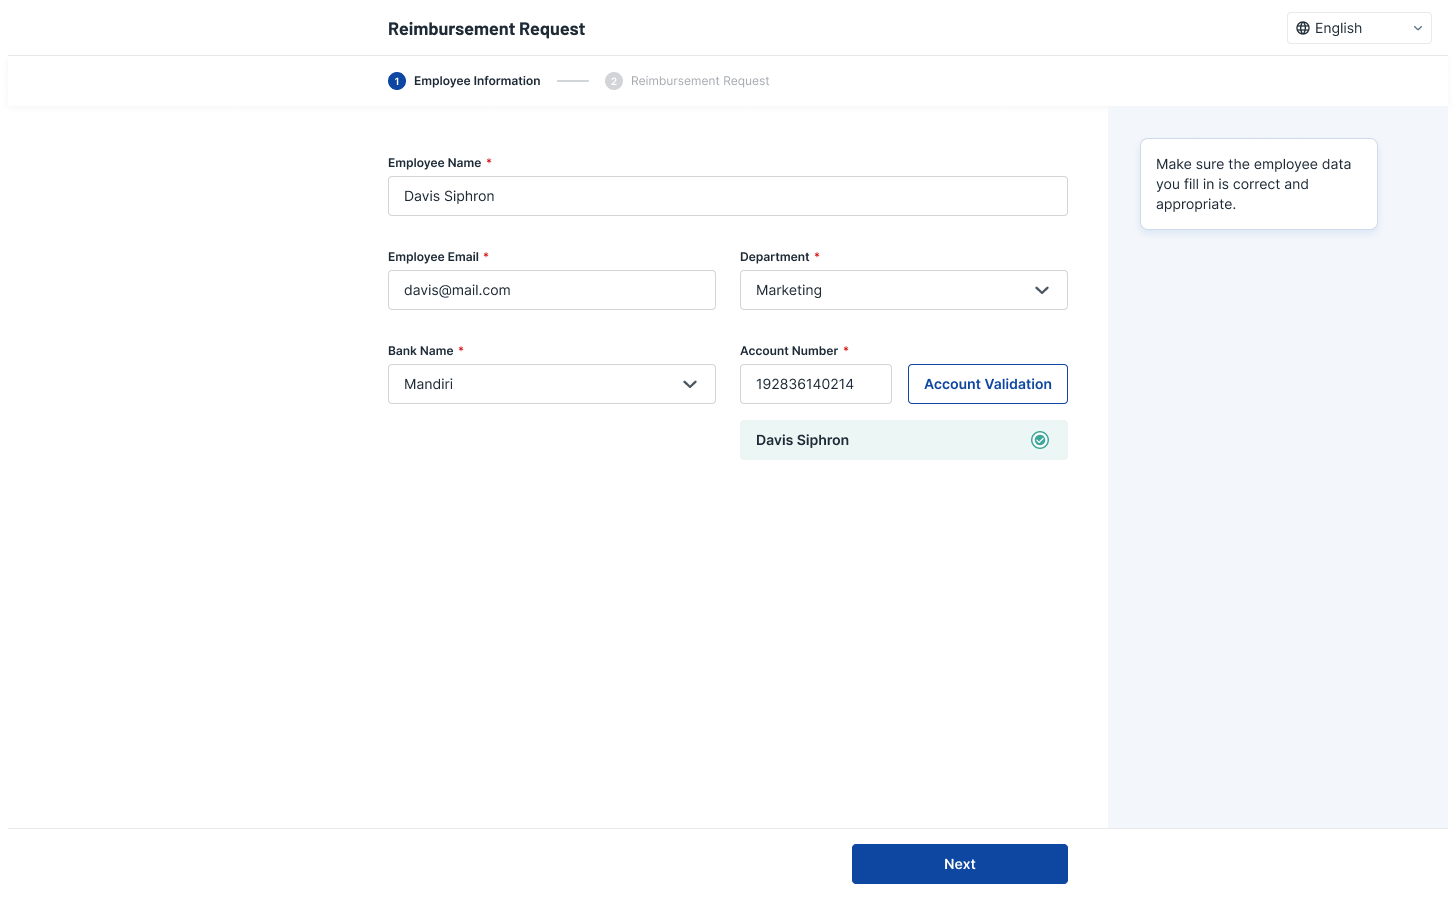
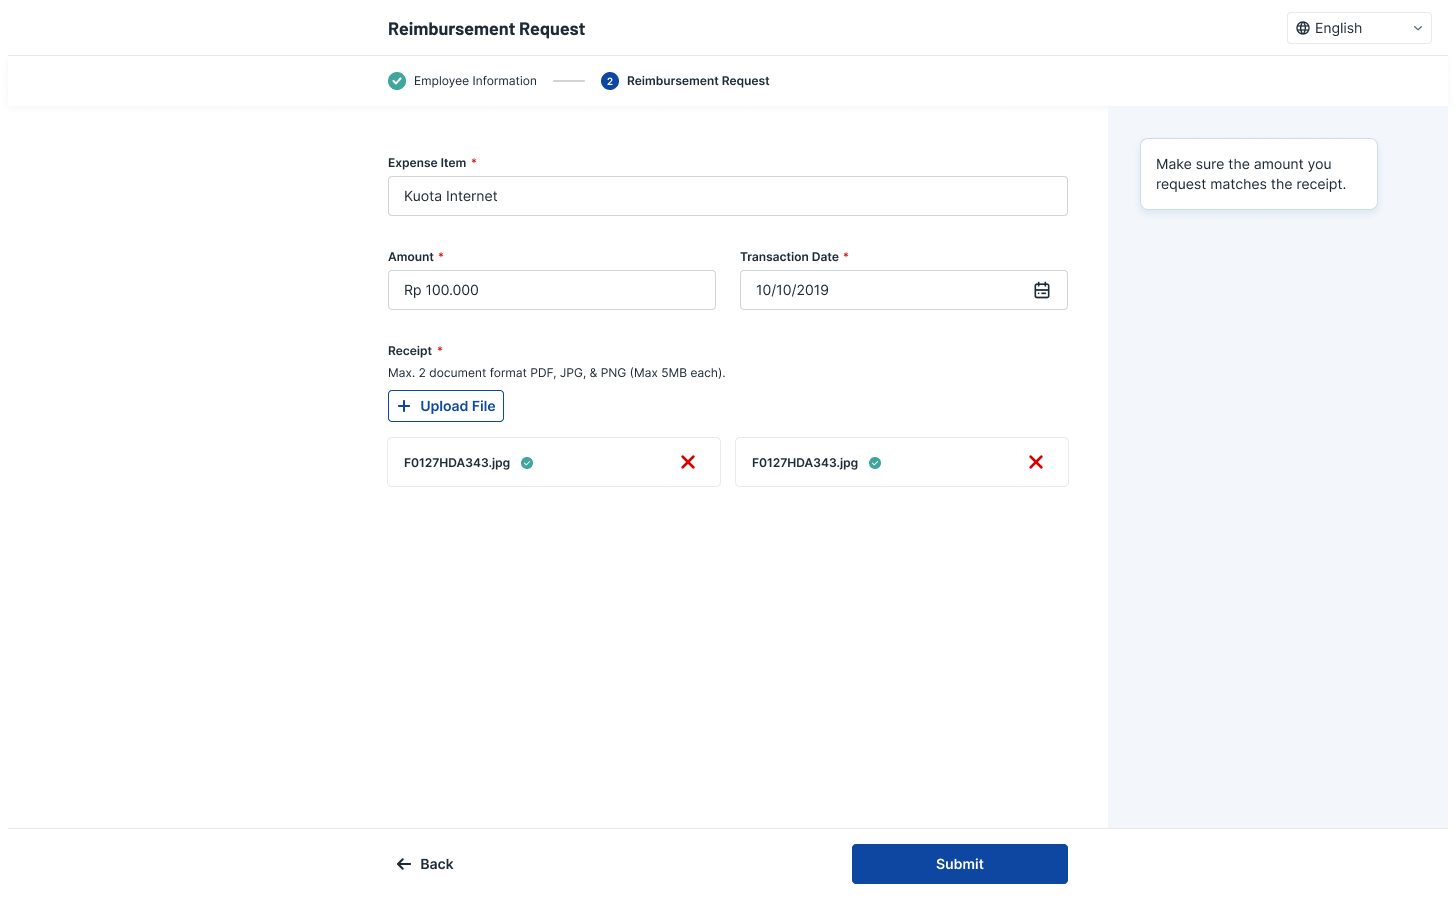
Mandatory Parameters in the Form
| Parameter | Description |
|---|---|
| Employee Name | Employee identification purposes |
| Employee Email | This will be used to trigger tracking to employee post-submission |
| Department | Department will be mapped to approver's email directly |
| Bank Name | Disbursement bank name |
| Account Number | Disbursement bank account number. Bank account validity can be checked prior reimbursement submission |
| Item | Reimbursement item name or description |
| Amount | Reimbursement total amount (in IDR). Minimum Rp 20.000 |
| Upload File | Placeholder to upload invoice document. Max 2 file with PDF, JPG, & PNG format (Each file max 5MB). |
| Transaction Date | Date of transaction printed on the invoice |
Notes: you can resend the link anytime in case employees do not receive the email.
How to Approve Transaction (Reporting Manager)
- When a new request is submitted by an employee, the respective team manager will receive a notification and an approver portal link via email.
- Inside the link, the team manager can find all reimbursement requests with certain statuses (rejected, approved, and need approval).
- The team manager can choose to either reject the request with a reason or simply approve.
- Approving the request will trigger an update inside the OY! Dashboard and employee tracker page.
- Approver portal (unique per approver)
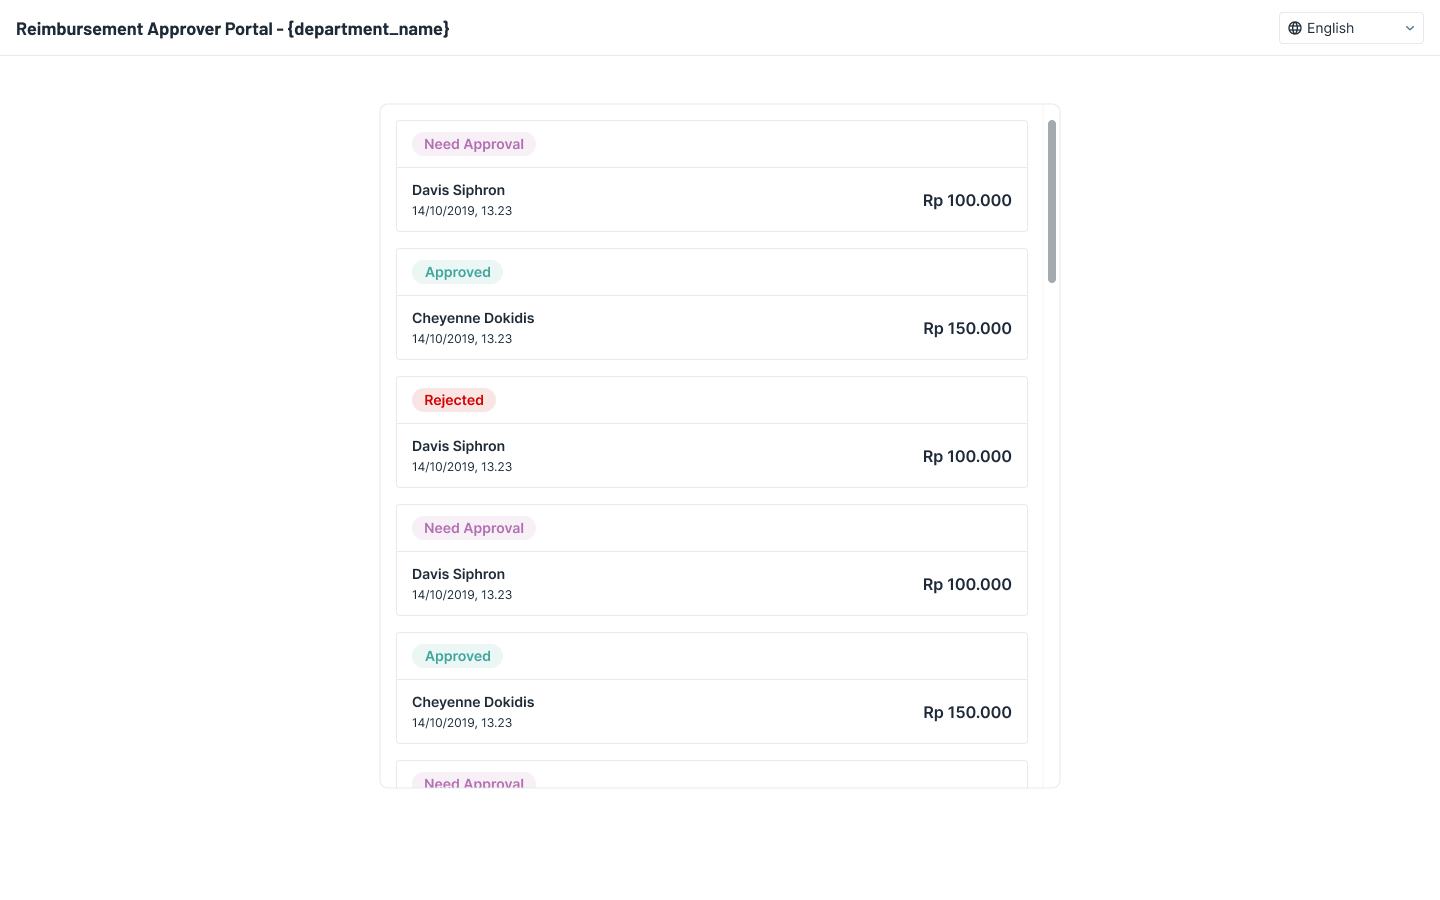
- Approver - request details with action buttons
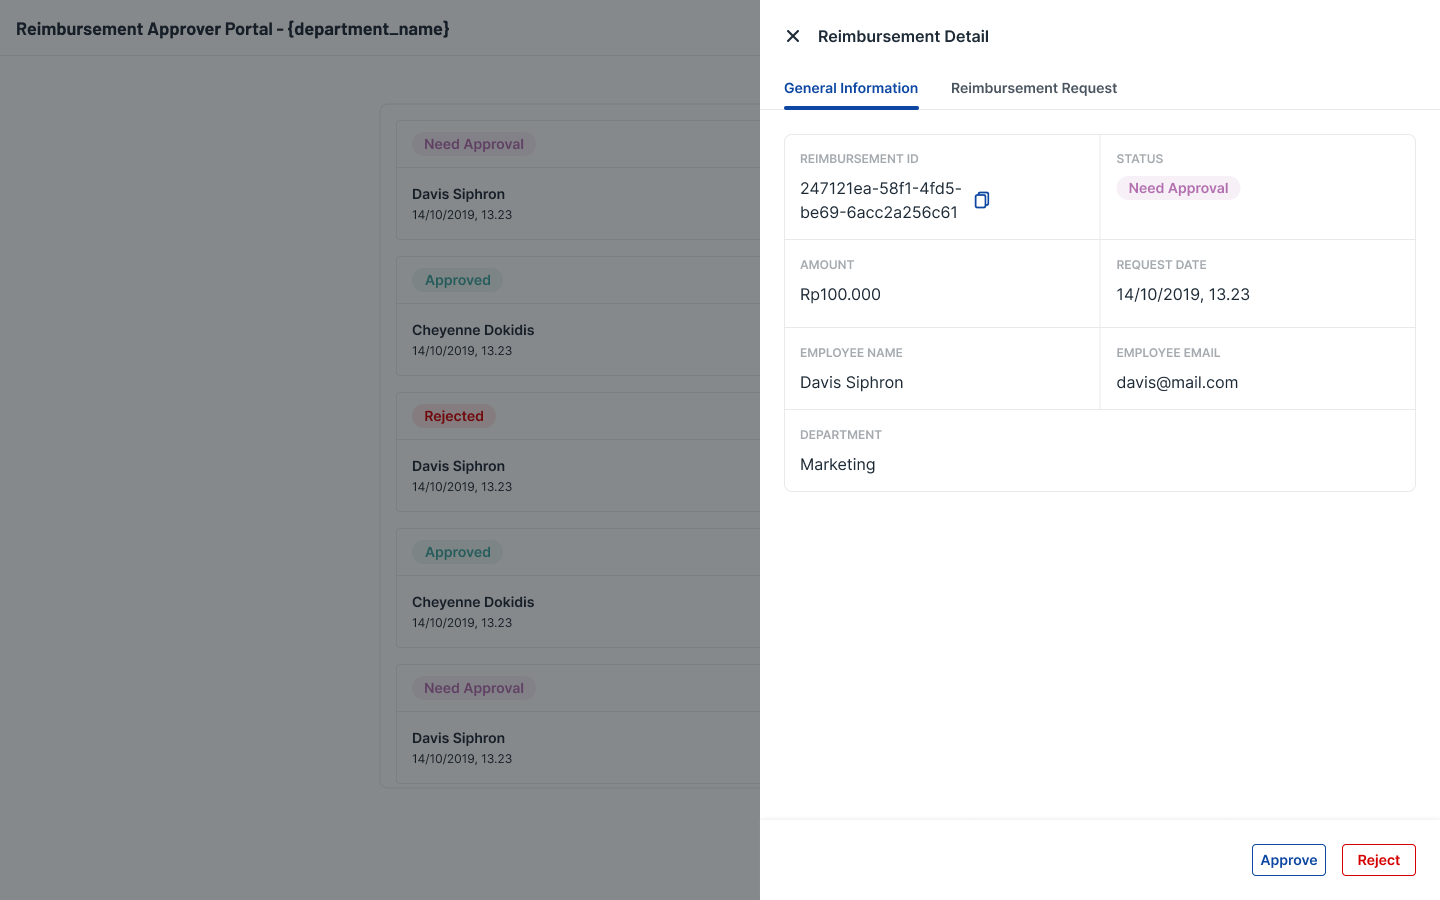
How to Schedule Disbursement
Scheduled disbursement can only be done if the team manager has approved the request, and the OY! dashboard admin agrees to schedule the disbursement.
- Open the OY! Dashboard and check the Reimbursement transaction list.
- Requests with "Need Approval" status mean that the team manager has approved the requests and will require further approval from the dashboard side.
- OY! dashboard admin can either reject with a reason or approve with a scheduled disbursement day.
- Request list in dashboard

- Request detail in dashboard
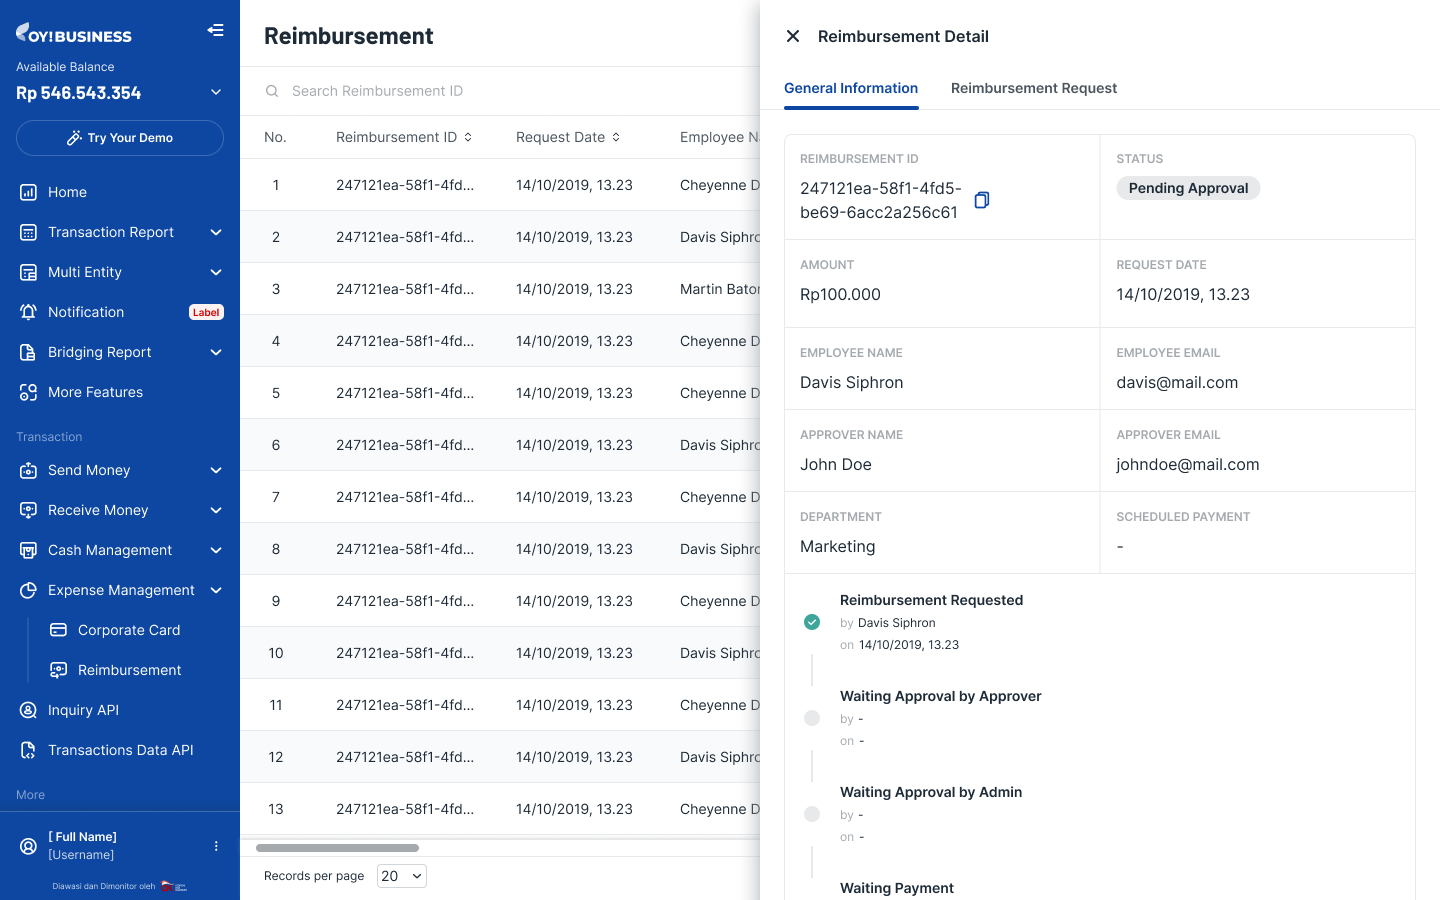
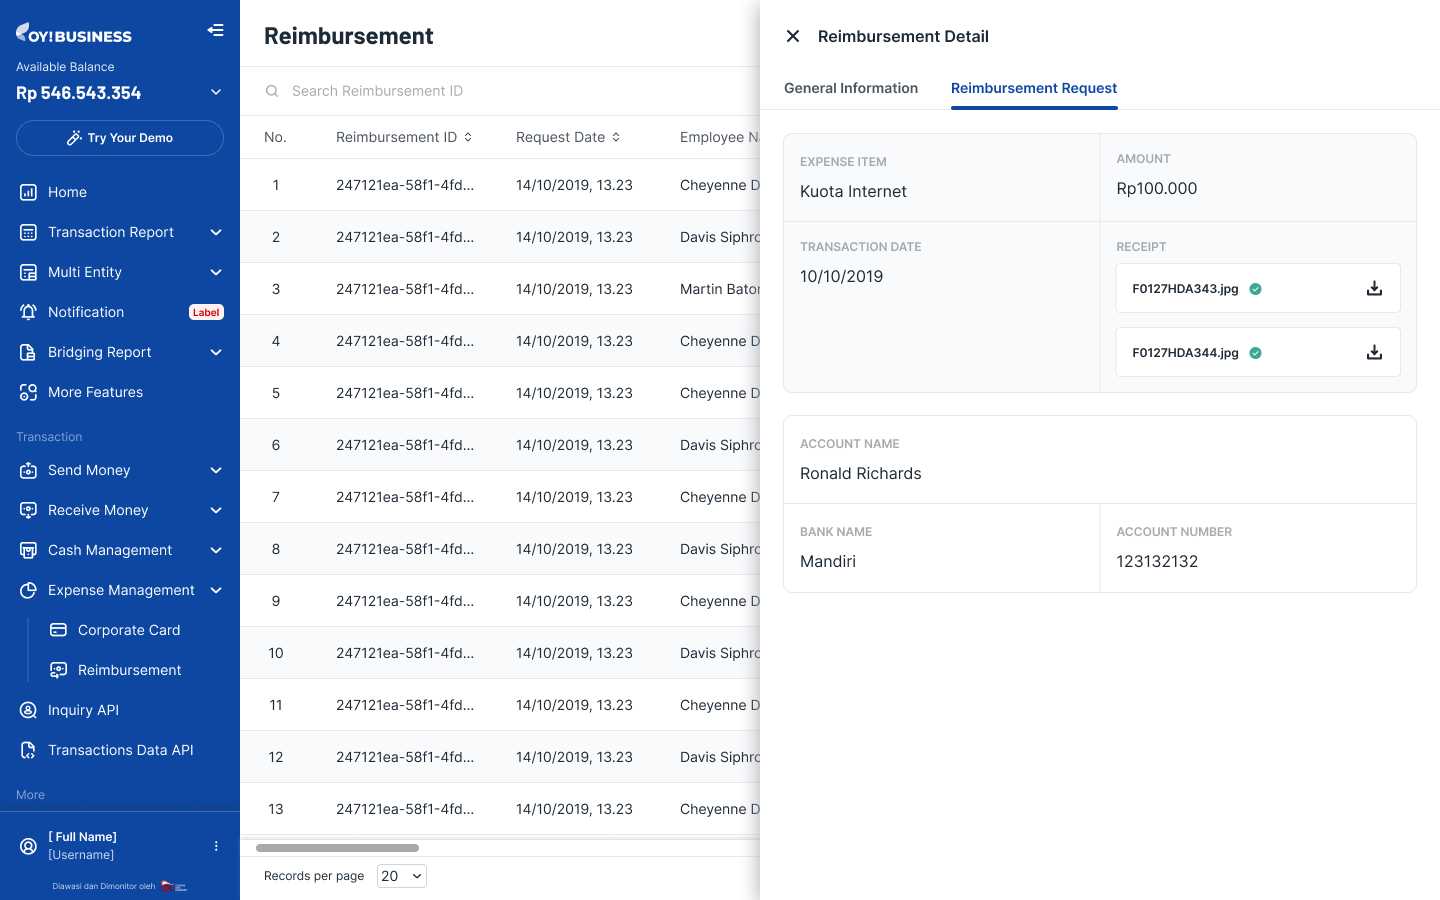
Note: If there is insufficient balance on the day of scheduled disbursement, you can retry the fund transfer manually after a successful OY! balance top up.
Dashboard Status
| Status | Description |
|---|---|
| Pending Approval | Submitted by employee but no action yet from Team Manager. |
| Need Approval | Approved by approver but no action yet from OY! dashboard admin. |
| Canceled | Cancellation can only be performed by the employee. No further action needed. |
| Completed | Money has been successfully disbursed to employee’s bank account. |
| Rejected | Rejected by OY! dashboard admin or Team Manager. |
| Scheduled Payment | Request has been successfully approved, waiting for scheduled disbursement time. |
| Failed | Disbursement failed due to technical failures. |
| Insufficient Balance | Fail to disburse due to insufficient OY! balance (OY! dashboard admin can retry payment manually from dashboard after a successful top up of OY! balance). |
How to Check Reimbursement Progress (Employee)
- Employees can fill in the reimbursement request form portal via email.
- Once submitted, the employee will receive a tracking email.
- Inside the link, employees can find real-time reimbursement progress, from the submission timestamp until disbursement timestamp.
- Employees can still cancel the request if the team manager has not yet approved.
- Employee Tracker page
![]()
- Employee Tracker page -- Transaction Detail
![]()
Tracker Status
| Status | Description |
|---|---|
| Pending Payment | Request approved but money not yet received |
| Scheduled Payment | Request has been successfully approved, waiting for scheduled disbursement time. |
| Rejected | Rejected by admin or Team Manager |
| Canceled | Canceled by employee |
| Waiting Approval | Submitted but no action yet from Team Manager or admin |
| Completed | Money has been disbursed successfully |
Note: The tracking email is applicable to each employee per reimbursement request.
FAQs
API and Bulk Disbursement
What are bank maintenance schedules? Will partners be informed?
Banks often have regular maintenance schedules which differ from one bank to another. These regular maintenance schedules prevent the execution of transactions to the respective recipient bank during the set period of time. To ensure your convenience, we will queue any transaction requests submitted during the maintenance hours and automatically disburse them once the maintenance is over.
What are the amount limits for disbursements?
e-wallet: Since each e-wallet provide limits to the amount each user can hold at a time, disbursements made to e-wallet accounts have their respective limits.
| Wallet | Account Type | Maximum Amount |
|---|---|---|
| OVO | OVO Club | Rp 2.000.000 |
| OVO | OVO Premier | Rp 10.000.000 |
| DANA | DANA Verified | Rp 2.000.000 |
| DANA | DANA Premium | Rp 10.000.000 |
| GoPay | Unverified | Rp 2.000.000 |
| GoPay | Verified | Rp 10.000.000 |
What are the minimum Amount for disbursements?
e-wallet: Since each e-wallet provide limits to the amount each user can hold at a time, disbursements made to e-wallet accounts have their respective limits.
| Wallet | Minimum Amount |
|---|---|
| OVO | Rp 10.000 |
| DANA | Rp 10.000 |
| GoPay | Rp 10.000 |
| Linkaja | Rp 10.000 |
Is there a cut-off time?
No, we are available 24/7 including holidays.
Is there a maximum transaction volume and transaction amount in a day?
There are no daily limits of how many bulk campaigns can be created and executed. There is also no limit to the number of total transactions per disbursement campaign.
How many recipient emails can I send the transaction notification to?
You can send up to 5 emails per transactions with a limit of 255 characters total. For each transaction, simply list out the email recipients.
What are the supported banks for the disbursement products?
We support transactions to 100+ banks in Indonesia. Please refer to the bank codes here when using our disbursement products. (Please note that we currently do not support disbursements to Virtual Accounts.)
Can I specify the "notes" to be reflected in the beneficiary bank account statement?
Yes. However, we only support notes for these 7 banks: BCA, BNI, BRI, CIMB, DBS, Mandiri, and Permata. However, please note that should there arise unexpected difficulties with the connection to these aforementioned banks, our failover system will not be able to support these notes to be reflected in the beneficiary bank account statement.
Will the funds accepted from the API VA Aggregator and Payment Link and Invoice products be readily available for disbursement uses?
Yes. The funds accepted from the API VA Aggregator and Payment Link and Invoice products will be automatically reflected in your OY! balance in real-time, allowing you to use these funds directly for disbursement purposes.
[Bulk Disbursement Specific] What if the recipient name on the xlsx or CSV file is different from the bank account name? What is the phone number used for?
As long as the bank account number is valid and not dormant, the transaction will still be executed.
The name and phone number are visible only to the partner and is used for the partner’s own documentation. The name and phone number listed are not used by OY or sent to the recipient.
[API Disbursement Specific] Are the disbursements performed in real-time?
Yes. Disbursements executed through our API Disbursement are all performed in real-time.
API VA Aggregator
What are the supported banks?
We currently have 11 available banks for our API VA Aggregator. Please refer to the bank codes here.
Is the amount received in realtime?
Yes, all the amount received are in realtime and will be immediately available in your OY! balance.
Payment Link/Invoice
What are the possible payment methods for users? We support payments via bank transfers, credit card, debit card, and QR code from the following:
Bank Transfer via Virtual Account: BCA, BNI, BRI, CIMB Niaga, Mandiri, Permata Bank.
Bank Transfer via Unique Code: BCA
Credit Card/Debit Card: VISA, Mastercard
E-Wallet: ShopeePay, DANA, LinkAja, OVO
QR Code: QRIS
What are closed and open amounts? What happens when the amount paid by the user is different from the declared amount in the created Payment Links?
A closed amount is a configuration so that the payment link or invoice can only be paid if the actual declared amount is paid. The user will not be able to pay any amount other than the declared amount.
An opened amount is a configuration so that the payment link or invoice can be paid up to the declared amount (or any, if amount is not declared). If the user pays an amount that is different from the declared amount, the payment link will remain active. The payment link will only reflect a completed status when the full amount is paid in total.
What is the difference between Bank Transfer via Virtual Account and Bank Transfer via Unique Code? Bank Transfer via Virtual Account (VA) will generate specific account number destination for each transaction. You can create an open amount or closed amount transaction using VA. Detail explanation of VA can be seen here. You can create VA Transactions via API Payment Routing or VA Aggregator
Bank Transfer via Unique Code generates unique code for each transaction but the account number destination will always be the same. The total amount paid is subtracted by the unique code. For example, your end user wants to paid a transaction of Rp 100.000 and get Rp 100 as the unique code. The payment uses subtraction approach, so your end user will pay a total of Rp 99.900 to complete the payments. Unique Code also have limitations compared to VA, where you can only create unique code transaction during the operational hours (3 AM - 8.30 PM GMT+7).
Payment Routing
What are the possible payment methods for users? We support payments via bank transfers, e-wallet , credit card/debit card, and QR code from the following:
Bank Transfer via Virtual Account: BCA, BNI, BRI, CIMB Niaga, Mandiri, Permata Bank.
Bank Transfer via Unique Code: BCA
Credit Card/Debit Card: VISA, Mastercard
E-Wallet - One Time: ShopeePay, DANA, LinkAja, OVO
E-Wallet - Direct Payment: ShopeePay
QR Code: QRIS
What is the difference between Bank Transfer via Virtual Account and Bank Transfer via Unique Code? Bank Transfer via Virtual Account (VA) will generate specific account number destination for each transaction. You can create an open amount or closed amount transaction using VA. Detail explanation of VA can be seen here. You can create VA Transactions via API Payment Routing or VA Aggregator
Bank Transfer via Unique Code generates unique code for each transaction but the account number destination will always be the same. The total amount paid is subtracted by the unique code. For example, your end user wants to paid a transaction of Rp 100.000 and get Rp 100 as the unique code. The payment uses subtraction approach, so your end user will pay a total of Rp 99.900 to complete the payments. Unique Code also have limitations compared to VA, where you can only create unique code transaction during the operational hours (3 AM - 8.30 PM GMT+7). You can create Unique Code Transaction via API Payment Routing or Payment Link
What are the differences between E-Wallet One Time Payment and E-Wallet Direct Payment? E-Wallet One Time creates a payment URL that can be paid by any guest users. Once payment URL is opened, your end user's is redirected to the E-Wallet app and completes the payment inside the E-Wallet's app.
E-Wallet Direct creates a payment URL dedicated to a particular user. The end user needs to link their E-Wallet account first by doing Account Linking. Once the end user has linked their account to your app, you can initiate a Direct payment. OY will return an authorization URL for the end users to input the E-Wallet PIN and complete the payment. Using Direct payment, your end users will complete the transaction inside your app. Therefore, it will bring a better experinence for your end users.
| One Time | Direct | |
|---|---|---|
| Supported E-Wallets | ShopeePay, LinkAja, DANA, OVO | ShopeePay |
| Need to do Account Linking first? | No | Yes |
| Can be created via.. | API Payment Routing Payment Link API E-Wallet Aggregator |
API Payment Routing |
| Send phone number in API Create Request | Optional | Mandatory |
| Who can complete the transaction? | Any Users/Guest | Dedicated User. Only the user whose phone number listed in the API request |
| Payment Completion Journey | Inside E-Wallet App | Your app |